iSStar用户操作指南_安装操作_R6
- 格式:ppt
- 大小:2.19 MB
- 文档页数:41

Star Manufacturing International Inc.10 Sunnen DriveS t. Louis, MO 63143Phone: (314) 781-2777Fax: (314) 781-3636Installation and Operating Instructions STAR-MAXELECTRIC HOT PLATEMODELS502A AND 502FA2M-Z1436 Rev. B 6/25/02Model 502AModel 502FASAFETY SYMBOLThis symbol is intended to alert the user to the presence of Arrayimportant operating and maintenance instructions in the manualaccompanying the appliance.RETAIN THIS MANUAL FOR FUTURE REFERENCENOTICEUsing any part other than genuine Star factory suppliedparts relieves the manufacturer of all liability.NOTICEStar reserves the right to change specifications and productdesign without notice. Such revisions do not entitle thebuyer to corresponding changes, improvements, additionsor replacements for previously purchased equipment.MAINTENANCE AND REPAIRSContact your local authorized service agent for service or required maintenance. Refer to the authorizedservice center listing provided with the unit. The Star Service Help Desk (1-800-807-9054) is available duringnormal business hours to answer any questions that may arise. Please have your model number and serialnumber for faster service.CAUTION CAUTIONThis equipment is designed and sold for commercialuse only by personnel trained and experienced in itsoperation and is not sold for consumer use in andaround the home nor for use directly by the generalpublic in food service locations. For equipment tobe used by the general public, please contact thefactory.The Star-Max models 502A and 502FA Electric HotPlates are equipped for the voltage indicated on thenameplate mounted on the front panel. This unit isdesigned to operate on alternating current (A.C.),two wire single phase service only. DO NOTCONNECT TO DIRECT CURRENT (D.C.).Total Connected Load502FA - at 240 Volts, Wattage is 5200.at 208 Volts, Wattage is 3900.502A - at 240 Volts, Wattage is 4200.at 208 Volts, Wattage is 3150.INSTALLATIONFor your protection, we recommend that aqualified electrician install this appliance. Theelectrician should be familiar with electricalinstallations and your local electrical requirements.The external wiring should be in conduit or anapproved type of flexible cable and of suitable sizeto carry the load. The supply circuit should beproperly fused and equipped with a means ofdisconnecting as required by local electrical code.The body of the hot plate should be grounded (Donot ground to a gas supply pipe). The connectionsare made in this unit at the pigtail leads located inthe junction box on the back of the unit. To gainaccess to the pigtail leads remove cover on junctionbox.LEVELING UNIT Level unit by adjusting the (4) feet for accurate and perfect line up with other Star-Max series units.CAUTION GENERAL OPERATING INSTRUCTIONSUSE ONLY FLAT BOTTOM PANS AND POTS! DO NOT USE RAISED BOTTOM UTENSILS OR BUCKETS! GOOD HEAT TRANSFER DEPENDS UPON GOOD CONTACT BETWEEN THE ELEMENT AND POT.Two (2) heating elements are used. For the 502FA each element draws 2600 watts on 240 Volts and 1950 watts on 208 Volts. For the 502A each element draws 2100 watts on 240 Volts and 1575watts on 208 Volts. Each element is controlled by an infinite position switch. The right control knob controls the rear cooking element and the left control knob controls the front cooking element.On "HI" the element delivers uninterrupted full heat. Between "LO" and "5" any desired amount of heat can be obtained between 6% and 60% of full heat.Signal lights are provided above the control knobs to give a visual check if either one or both heating units are turned on.OPERATING PROCEDURE DO NOT INSTALL WITHOUT FEET.LOCATE THE UNIT Do not install the unit closer than 1 inch from a side wall and/or closer than 1 inch from a rear wall.CLEANINGThe exterior surfaces can be kept clean and attractive by regularly wiping with a clean soft cloth. Any discoloration can be removed with a non-abrasive cleaner.For model 502A, the heating elements may be raised for access to the drip pans, which may be removed for cleaning and the bottom pan may be removed by sliding pan forward. REPLACEMENT OF INFINITE CONTROLBE SURE POWER IS DISCONNECTED BEFORE ATTEMPTING TO SERVICE UNIT.1.Pull control knobs on front panel forward toremove.2.Remove 4 screws from front panel and tiltfront panel forwards.3.Remove the nut that mounts the inoperativecontrol and pull the control to the side.4.Remove one wire at a time from theinoperative control and connect at the sameterminal on the new control. Carefully checkto see that proper wires have been connected to the terminals of the control. See attachedwiring diagram.5.Assemble new control to the front panel. MAINTENANCE AND REPAIRSContact the factory or one of its representatives or a local service company for service or maintenance if required.RETAIN THIS MANUAL FOR FUTURE REFERENCE Part No. 2M-Z1436 Rev. B 6/25/02Part# 2M-4497-2 01/02The foregoing warranty is in lieu of any and all other warranties expressed or implied and constitutes the entire warranty.FOR ASSISTANCEShould you need any assistance regarding the Operation or Maintenance of any Star equipment; write, phone, fax or email our Service Department.In all correspondence mention the Model number and the Serial number of your unit, and the voltage or type of gas you are using.ALL:* Pop-Up Toasters * Butter Dispensers * Pretzel Merchandisers * Pastry Display Cabinets * Nacho Chip Merchandisers * Accessories of any kind * Sneeze Guards * Pizza Ovens * Heat Lamps * Hot Cups * Pumps Visit our Website at: Email: **********************************************:(800) 807-9814THOROUGHLY INSPECT YOUR UNIT ON ARRIVALThis unit has been tested for proper operation before leaving our plant to insure delivery of your unit in perfect condition. However, there are instances in which the unit may be damaged in transit. In the event you discover any type of damage to your product upon receipt, you must immediately contact the transportation company who delivered the item to you and initiate your claim with same. If this procedure is not followed, it may affect the warranty status of the unit.LIMITED EQUIPMENT WARRANTYAll workmanship and material in Star products have a one (1) year limited warranty on parts & labor in the United States and Canada. Such warranty is limited to the original purchaser only and shall be effective from the date the equipment is placed in service. Star's obligation under this warranty is limited to the repair of defects without charge, by the factory authorized service agency or one of its sub-agencies. Models that are considered portable (see below)should be taken to the closest Star service agency, transportation prepaid.>Star will not assume any responsibility for loss of revenue.>On all shipments outside the United States and Canada, see International Warranty.*The warranty period for the JetStar series six (6) ounce popcorn machines is two (2) years.*The warranty period for the Chrome-Max Griddles is five (5) years on the griddle surface. See detailed warranty provided with unit.* The warranty period for Teflon/Dura-Tec coatings is one year under normal use and reasonable care. This warranty does not apply if damage occurs to Teflon/Dura-Tec coatings from improper cleaning, maintenance, use of metallic utensils, or abrasive cleaners. This warranty does not apply to the “non-stick” properties of such materials.>This warranty does not apply to "Special Products" but to regular catalog items only. Star's warranty on "Special Products" is six (6) months on parts and ninety (90) days on labor.>This warranty does not apply to any item that is disassembled or tampered with for any purpose other than repair by a Star Authorized Service Center or the Service Center's sub-agency.>This warranty does not apply if damage occurs from improper installation, misuse, wrong voltage, wrong gas or operated contrary to the Installation and Operating instructions.PARTS WARRANTYParts that are sold to repair out of warranty equipment are warranted for ninety (90) days. The part only is warranted. Labor to replace the part is chargeable to the customer.SERVICES NOT COVERED BY WARRANTYPORTABLE EQUIPMENTStar will not honor service bills that include travel time and mileage charges for servicing any products considered "Portable" including items listed below.These products should be taken to the Service Agency for repair:1.Travel time and mileage rendered beyond the 50 mile radius limit 2.Mileage and travel time on portable equipment (see below) 3.Labor to replace such items that can be replaced easily during a daily cleaning routine, ie; removable kettles on fryers, knobs, grease drawers on griddles, etc. 4.Installation of equipment 5.Damages due to improper installation 6.Damages from abuse or misuse 7.Operated contrary to the Operating and Installation Instructions 8.Cleaning of equipment 9.Seasoning of griddle plates10.Voltage conversions 11.Gas conversions 12.Pilot light adjustment 13.Miscellaneous adjustments 14.Thermostat calibration and by-pass adjustment 15.Resetting of circuit breakers or safety controls 16.Replacement of bulbs 17.Replacement of fuses 18.Repair of damage created during transit, delivery, &installation OR created by acts of God * The Model 510F Fryer.* The Model CFS Series Food Steamer.* The Model 526TO Toaster Oven.* The Model 526WO Warming Oven.* The Model J4R, 4 oz. Popcorn Machine.* The Model 518CM & 526CM Cheese Melter.* The Model 12NCPW & 15NCPW Nacho Chip/Popcorn Warmer.* All Hot Dog Equipment except Roller Grills & Drawer Bun Warmers.* All Nacho Cheese Warmers except Model 11WLA Series Nacho Cheese Warmers.* All Condiment Dispensers except the Model CSD Series Chili/Cheese Dispenser.* All Specialty Food Warmers except Model 130R, 500, 11RW Series, and 11WSA Series.March 18, 2009 RB W/Ceramic Block。
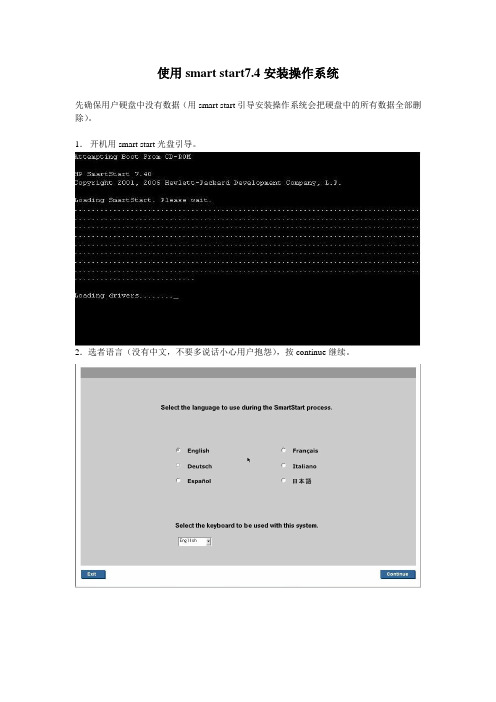
使用smart start7.4安装操作系统
先确保用户硬盘中没有数据(用smart start引导安装操作系统会把硬盘中的所有数据全部删除)。
1.开机用smart start光盘引导。
2.选者语言(没有中文,不要多说话小心用户抱怨),按continue继续。
3.加载smart start光盘。
(时间可能比较长)
4.启动ss光盘。
5.按agree接收协议。
6.安装操作系统,按deploy server(maintain server进入acu,adu,sdu,erase)(view documentation是进入光盘说明,几乎没用)
7.按continue继续安装操作系统(reboot to rbsu是重启进入rbsu,reboot to orca是重启进入字符界面配置阵列,launch acu是进入acu图形界面配置)
8.选择操作系统,按continue继续
9.划分系统分区的大小(就是c盘的大小)按continue继续。
10.填写操作系统序列号(用户名和组织名可以随便写)按continue继续。
11.选择per server(具体什么意思,不太明白,如果谁明白可以补充)按continue继续。
12.这里是设置snmp的界面,主要和insight manager 7有关,按continue继续。
13.确认安装操作系统信息。
按continue继续。
14.清除硬盘原有信息,创建临时分区,拷贝驱动和psp包。
等待就可以了。
会自动弹到下一个界面的。
15,提示插入系统光盘,以后的就和手动安装操作系统是一样的了。
Nastar相关工作操作文档一、服务器基本信息1、Nastar服务器平台构成Nastar服务器搭建条件:已安装操作系统,已安装Microsoft SQL Server另外需要安装相关的Nastar工具:1、Data collection Tool:采集数据2、TransData:将原始数据转换到数据库中3、Nastar:应用工具要实现一些定制日报内容,需要用到小工具WordReport2、用户名&密码<二楼OMC机房Server>集应用和数据库于一身,既进行数据采集、数据库建立,也可以运行应用软件,比如nastar、WordReport等。
用户名:administrator密码:nastar_123<四楼Server>四楼办公室有两台服务器,一台是application Server,用来运行nastar、WordReport 等应用软件,另外一台是Data Server,用于数据库的建立。
出于安全性考虑,app服务器与办公室内网络相连,数据服务器则与app服务器相连,只能通过app服务器登陆数据服务器。
Application ServerIP:192.168.1.38用户名:administrator密码:nastar_123用远程桌面连接的方式登陆,方法:开始\运行\mstsc点击连接,输入用户名和密码就可以远程登陆到app服务器。
在app服务器上同样使用远程登陆方法即可登录数据服务器。
Data ServerIP:172.0.0.2用户名:administrator密码:nastar_1233、软件版本情况Nastar:V200R005C01B037BSC6000:BSC6000V900R001C03B104工具备份地址:application Server\E:\Upload\交付文档\NastarGSMB0374、资源使用情况Nastar原始话统是*.mrf.zip类型的文件,粒度为1小时。
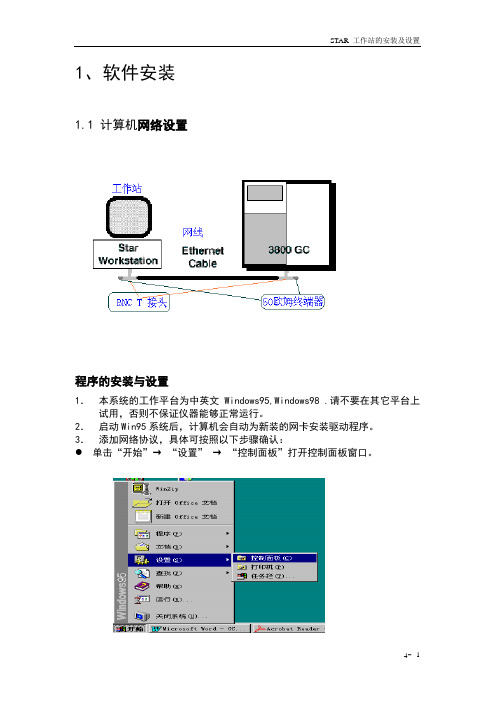
1、软件安装1.1 计算机网络设置程序的安装与设置1.本系统的工作平台为中英文Windows95,Windows98 .请不要在其它平台上试用,否则不保证仪器能够正常运行。
2.启动Win95系统后,计算机会自动为新装的网卡安装驱动程序。
3.添加网络协议,具体可按照以下步骤确认:单击“开始”→“设置”→“控制面板”打开控制面板窗口。
●在“控制面板”中双击“网络”●在网络中查看有无TCP/IP项。
若没有,请击“添加”→协议→“Microsoft”→“TCP/IP”几秒钟后就会看到新加的TCP/IP项。
双击“TCP/IP”按下图所示设置IP地址和子网掩码,其它项均不要动。
IP地址的使用范围必须在:10.2.128.1-10.255.255.254之间;子网掩码必须为:255.0.0.0。
网关不得输任何值;DNS配置和 WINS配置均应设置在“禁用”状态。
否则将导致通讯不正常。
最后按下图设定“标识窗口”。
至此,工作站的网络参数的设置全部完成。
但GC3800 IP地址的设置尚未进行。
请按“GC3800通讯软件的设置”步骤继续。
4.如果网卡驱动程序没有被正确安装,请使用以下步骤进行安装。
●进入控制面板,双击“添加新硬件”→“下一步”→选择“否”→“下一步”→选“网络适配器”→“下一步”→选择“从磁盘安装”将网络生产厂家提供的驱动程序盘插入软驱,按屏幕提示完成安装。
然后再回到上一步完成计算机网络参数的设置。
●注意:以上计算机参数设置只适用于不接入其它网的计算机。
1.2安装STAR5.X 工作站启动工作站安装程序,按照提示执行。
如果是安装Star 5.51工作站时,应特别注意:在安装工作站且自动升级(Update)后,出现“Hotfix”安装提示“是”或“否”时,应选择“否”。
否则,在重新启动时,Windows系统可能会出现严重问题。
这一选择是为英文Windows准备的。
1.3 GC3800的通讯设置1.启动工作站软件(通过双击“STAR TOOLBAR”实现),同时开启GC3800电源,不要按GC3800面板上任何键!!!2.从STAR工具栏击“系统控制/自动化”启动系统控制软件,第一次,计算机会显示“通讯设置”画面引导你进行设置,如图所示:4.单击“下一步”继续得如下画面:5.单击“设置”进入下一个画面6.点“从该工作站管理IP地址”前的方框,直至出现“√”符号。

AutoFormR6安装说明AutoForm R6安装说明只能⼀步⼀步安装,即装完⼀步重新运⾏AutoForm^plus_R6_Setup.exe步骤⼀. Install AutoForm R6 RLM License server (RLM_v11.2BL2)(卸载电脑⾥的R4和R5版本,确定要卸载⼲净,可以和R3.1并存,最好不要在⼀个⽂件夹,否则会出问题。
)1.1. Run "AutoForm^plus_R6_Setup.exe"【运⾏AutoForm^plus_R6_Setup.exe】【先选择第⼀个,点到下⼀步的时候,会出现AutoForm License Server R6,Install License File,这两个都勾选】当出现要选择许可证⽂件的时候,浏览安装包⾥crack/win64/AutoForm.lic,并先将AutoForm.lic⾥的XXXX改成你的电脑名启动Windows 任务管理器(⽤键盘的ctrl+alt+delete)》服务》服务(在右下⾓)》AutoForm R6 License Server》点击停⽌1.5. Copy files "AFHostInfo.exe" and "afrlm.exe" from crack folder "RLM_v11.2BL2" to (by default C:\Program Files\RLM_v11.2BL2\ ) and overwrite original ones将crack/win64/RLM_v11.2BL2⽂件⾥的两个⽂件"AFHostInfo.exe" 和"afrlm.exe" 复制到安装⽬录C:\ProgramFiles\RLM_v11.2BL2下直接替换然后回到步骤1.4的Windows任务管理器启动AutoForm R6 License serve以上第⼀步许可证⽂件安装结束。
![新编r6b[航空航天]0用户操作手册讲课稿](https://img.taocdn.com/s1/m/28b03e2c27284b73f24250ef.png)
博烁供排水管网运行管理系统用户手册1. 引言1.1. 编写目的编写本手册的目的是为了帮助用户在使用《博烁供排水管网运行管理系统V2.1》(以下简称:BWDS)的过程中,能快速掌握系统的所有功能和操作流程。
1.2. 读者对象本手册适用于有一定计算机基础相关岗位工作人员,同时要求具有一定的供水管网管理业务知识等。
1.3. 环境要求BWDS的运行环境分为服务器端和客户端,服务器端根据各供水公司管网覆盖面积而定,50平方公里以内建议配置如下:服务器CPU:Inter Xeon X3430及同等性能的CPU内存:4G或更高硬盘:250G或更高(建议做RAID1)网卡:100/1000M自适应网卡操作系统:Microsoft Windows Server 2003 SP2企业版;数据库系统:Microsoft SQL Server 2000 SP4以上;建议使用MicrosoftSQL Server 2005或MS SQLServer2008。
客户端CPU:Inter P4 3.0及同或更高性能CPU内存:2G或更高硬盘:100G或更高显卡:要求独显,512M或更高显存。
显示器:19”或更大网卡:10/100M自适应网卡操作系统:Microsoft Windows XP SP2专业版;网络环境局域网:100M对等网络VPN:4M以上同一电信运营商ADSL组件的VPN2. 软件综述2.1 系统简介BWDS属于处理地下管网专题数据的一种信息系统,是以地下管网空间信息和属性信息为核心,利用计算机地理信息系统技术、计算机图形学技术、数据库管理技术和信息可视化技术对城市地下供水管网进行综合管理,为施工部门和管理部门提供地下管网准确的口径、走向、埋深、实时压力等有关信息,通过进行各种分析,为领导部门进行管网规划、管网改造等提供辅助决策功能。
地下管线虚拟现实系统一是可以实现传统手工处理方式向现代化信息管理转型,以保证数据的实时更新、有效管理,避免重复收集数据信息;二是可为市政建设提供规划、设计、决策服务;三是可为应对突发事件提供支撑。
LinkStar™RCST安装维护手册目录1.小站安装使用快速参考 (3)2. 小站系统简介 (5)3. 系统框图 (6)4. LinkStar远端站组件 (6)5. 安装工具及测试设备 (8)6. IFL电缆要求 (9)7. 安装步骤 (10)8. IFL 安装 (10)9. 天线对星 (11)10. RCST安装 (13)11.检验RCST运行状态 (16)11.1. TDM 误码率 (16)11.2. TDMA误码率 (16)11.3. IP Ping (17)12.交叉极化 (18)13.故障排除 (19)13.1. 排除故障所需设备 (19)13.2. 确定问题 (19)13.3. RCST无法加电 (20)13.4. 无卫星信标信号 (20)13.5.接收同步 (21)13.5.1. 接收TDM信号 (21)13.5.2. LNB (23)13.5.3. 接收电缆 (24)13.5.4. 天线 (24)13.5.5 TDM频率和符号率 (25)13.6. 接收TDM误码率 (25)13.7.发射同步 (26)13.7.1. RCST 发射 (28)13.7.2. RCST 启动参数 (29)13.7.3. PCR分配 (30)13.7.4. TDMA发射电平 (30)13.8. RCST发射误码率 (33)13.9. IP 测试 (33)13.9.1. 带宽分配 (33)13.9.2. 分配CIR (34)13.9.3. IP 状态 (35)附录A: RCST设备规格指标 (36)附录B: RCST LED 显示 (37)附录C: Telnetting到RCST (38)附录D: RCST 有关安装的启动参数 (39)1.小站安装使用快速参考本节作为小站安装使用的快速参考,如果需要查找更详细的信息或者排除故障,请参考详细的操作手册。
1.1正确安装BUC、LNB设备到天线上。
天线精确对星。
GISSTAR操作步骤:
长按PWR电源键开机(如出现假死,按黄色小按钮重启)
1.双击GIS数据采集(增强版)进入主界面
2.开始-设置-网络和拨号连接-GPRS-连接-隐藏
3.管理-GPS-外部源连接-开始(如信号不好,选择接入点下拉列表-更新接入点,优先选择
RTCM3.1(网络基站),信号不好选择地方-RTCM3.0)-连接上-退出
4.管理-工程-新建工程-输入工程名称-下一步-(坐标系北京54默认)下一步-设置采集限
制参数(默认,需修改时详细看采集设置)-下一步-勾选手动命名-完成。
5.原工程打开步骤:管理-工程-打开工程-选择-打开。
6.数据采集-ENT(回车键)-等待水平残差-垂直残差降低至控制范围-采集成功后确认-命
名后确认,命名规则详细查看表1:
如:直线桩序号:1,编码:Z1 转角桩序号:2,编码J2
表1
采集设置:
ENT采集状态中-停止-采集设置进入参数设置。
参数设置:
状态限制:浮点解(当前状态低于浮点解则不自动采集)
限制PDOP:卫星数量(当前卫星数量低于限制数量则不自动采集)
限制HRMS:水平残差(同上)
限制VRMS:垂直残差(同上)
以上数值可自由更改。
I*STAR 用户手册2008 年 7 月Copyright © 2008 LOMA (Life Office Management Association, Inc.) All rights reserved.LOMANET® and I*STAR® are registered service marks of LOMA and use for purposes not authorized by LOMA is prohibited.目录I*STAR 用户手册 2008 年 7 月1: 教育代表/监考官 ............................................................................................................ 4 什么是 I*STAR? .......................................................................................................................................................... 4 开始 I*STAR 之前 ....................................................................................................................................................... 4 I*STAR 服务台 ............................................................................................................................................................ 4 启动 I*STAR ................................................................................................................................................................ 5 登录 I*STAR 时您会见到的页面 ............................................................................................................................... 5 教育代表 /监考官登录页面 ................................................................................................................................... 5 现有考试科目页面................................................................................................................................................... 6 I*STAR 模拟考试..................................................................................................................................................... 6 考生登录页面........................................................................................................................................................... 7 I*STAR 考试的监考................................................................................................................................................. 7 教育代表/监考官使用 I*STAR 的步骤 ..................................................................................................................... 8 2: 考生 ................................................................................................................................. 9 考生必须首先具有使用 LOMANET 的用户名和密码 ............................................................................................ 9 登录 I*STAR 时考生会见到的页面 ......................................................................................................................... 10 考生登录页面......................................................................................................................................................... 10 I*STAR 模拟考试................................................................................................................................................... 11 考试声明书页面..................................................................................................................................................... 11 考试页面................................................................................................................................................................. 12 考试结果页面......................................................................................................................................................... 13 考生使用 I*STAR 的步骤 ......................................................................................................................................... 14 3: 补充说明........................................................................................................................15 如何处理故障 ............................................................................................................................................................ 15 提示故障的页面..................................................................................................................................................... 15 启动 I*STAR 时无法与 LOMANET 联结 ........................................................................................................... 15 登录时的联结故障................................................................................................................................................. 15 如何重新启动考试................................................................................................................................................. 16 如何上载考生已完成的答案................................................................................................................................. 17 监考规则 .................................................................................................................................................................... 19 I*STAR 监考官须知 .................................................................................................................................................. 20 4I*STAR 用户手册1: 教育代表/监考官什么是 I*STAR?I*STAR 是 LOMA 向全世界 LOMA 考场 提供的、基于因特网的电子考试系统。
LTE NASTAR使用指南目前LTE优化大部分工作主要集中在前台测试验证方面,后台关注的内容较少,随着网络的进一步的建设和放开,以及后续运营商网络放号,后台数据支撑变得非常重要。
目前后台支撑主要在单站测试方面(关注基站状态、告警、RSSI、驻波等),由于用户较少,对用户使用的情况不做过多的关注。
随着用户的不断增加,用户使用的情况就需要进一步的进行了解(用户的感知速率、感知性能),通过用户使用的情况,可以获知网络中存在不足的地方(覆盖不足、导频污染、若覆盖、参数设置不合理),这些对于后续优化方向及优化目标的制定非常重要。
这里简单介绍后台NASTAR使用工具使用,希望后续优化工作中得到更好的帮助。
一、NASTAR网元的组成及介绍二、NASTAR后台数据获取途径及使用方向三、NASTAR任务制定及目标四、NASTAR任务制定及目标网元建立、优化策略、优化内容制定均有华为工程师完成,这里不做介绍。
(这方面暂不开放权限。
)五、NASTAR数据准备六、NASTAR已订阅人物查看及分析以下内容以投诉辅助分析为例进行介绍:目前还不支持将用户详细的接入释放、切换等测量项在一行中呈现,只能点击汇总表中单项后,在相应的表中体现。
后续版本将支持。
这种布局有利于在分析异常事件时将前的所有信息统一呈现出来。
从接入到释放。
有详细的测量报告。
有详细的信令流程可以知道释放时用户全流程处在哪个阶段。
VIP分析是对VIP用户使用的情况进行指标汇总呈现。
可以点击深度分析进行详细的辅助分析界面。
投诉辅助分析是对VIP用户或者其他单用户详细的业务流程的记录。
包含信令,测量、事件等等。
在承载分析时,单项右键可以看到详细承载信息。
承载分析---异常释放分析E-RAB,移动性管理信息-切换失败分析,可以通过加载确认内外部干扰,E-RAB异常释放次数/(E-RAB异常释放次数+E-RAB正常释放次数)=掉线率,投诉受理注意收集用户终端类型,用户保障分析下的VIP分析和投诉辅助分析,两者的区别是前者是指标类统计汇总,后者是细化分析异常原因结果。