拉深模设计中拉深壁起皱的分析 外文翻译本科学位论文
- 格式:doc
- 大小:295.50 KB
- 文档页数:13

本科毕业设计(论文)外文翻译(附外文原文)学院:机械与控制工程学院课题名称:复杂阶梯形圆筒件拉深有限元分析专业(方向):机械设计制造及其自动化(模具设计与制造)班级:学生:指导教师:日期:拉伸模设计中拉伸壁起皱的分析摘要本文研究带有斜度的方形盒和带有阶梯的方形盒的拉深中发生的起皱现象。
这两种类型的起皱现象有一个共同的特征:全都发生在相对无支撑、无压边的拉深壁处。
在带有斜度的方形盒的拉深中,常受到工序参数的影响,例如:模具的间隙值和压边力等,所以常用有限元模拟的方法来研究分析起皱的发生。
模拟的结果表明模具的间隙值越大,起皱现象就越严重,而且增加压边力也不能抑制和消除起皱现象的发生。
在带有阶梯的方形盒拉深的起皱现象分析中,常通过实际生产中一种近似的几何结构来研究、试验。
当凸模与阶梯边缘之间的金属板料在拉深时分布并不均衡,就会在侧壁发生起皱现象。
为了消除起皱现象的发生,一个最优的模具设计常采用有限元的方法进行分析。
模拟的结果和起皱试验论证了有限元分析的准确性,并且表明了在拉深模具设计中使用有限元方法分析的优越性。
关键词:侧壁起皱;拉深模;带有阶梯的方形盒;带有斜度的方形盒1 引言起皱是金属板料成形中常见的失效形式之一。
由于功能和视觉效果的原因,起皱通常是不能为零件制品所能接受的。
在金属板料成形加工中通常存在三种类型的起皱现象:法兰起皱;侧壁起皱和由于残余压应力在未变形区产生的弹性变形。
在冲压复杂形状的时候,拉深壁起皱就是在模具型腔中形成的褶皱。
由于金属板料在拉深壁区域内相对无支撑,因此,消除拉深壁起皱比抑制法兰起皱要难得多。
我们知道在不被支撑的拉深壁区域中材料的外力拉深可以防止起皱,这可以在实践中通过增加压边力而实现,但是运用过大的拉深力会引起破裂失效。
因此,压边力必须控制在一定的范围内,一方面可以抑制起皱,另一方面也可以防止破裂失效。
合适的压边力范围是很难确定的,因为起皱在拉深零件的中心区域以一个复杂的形状形成,甚至根本不存在一个合适的压边力范围。
更多资料请访问.(.....)拉深模设计中拉深壁起皱的分析——F.—K.Chen and Y.—C.Liao台湾大学机械设计研究所在带有斜度的方形盒和带有阶梯的方形盒的拉深中发生的起皱现象一直在被研究。
这两中类型的起皱现象有一个共同的特征:全都发生在相对无支撑、无压边的拉深壁处。
在带有斜度的方形盒的拉深中,常受到工序参数的影响,例如:模具的间隙值和压边力等,所以常用有限元模拟的方法来研究分析起皱的发生。
模拟的结果表明模具的间隙值越大,起皱现象就越严重,而且增加压边力也不能抑制和消除起皱现象的发生。
在带有阶梯的方形盒拉深的起皱现象分析中,常通过实际生产中一种近似的几何结构来研究、试验。
当凸模与阶梯边缘之间的金属板料在拉深时分布并不均衡,就会在侧壁发生起皱现象。
为了消除起皱现象的发生,一个最优的模具设计常采用有限元的方法进行分析。
模拟的结果和起皱试验论证了有限元分析的准确性,并且表明了在拉深模具设计中使用有限元方法分析的优越性。
关键词:侧壁起皱;拉深模;带有阶梯的方形盒;带有斜度的方形盒一、介绍起皱是金属板料成形中常见的失效形式之一。
由于功能和视觉效果的原因,起皱通常是不能为零件制品所能接受的。
在金属板料成形加工中通常存在三种类型的起皱现象:法兰起皱;侧壁起皱和由于残余压应力在未变形区产生的弹性变形。
在冲压复杂形状的时候,拉深壁起皱就是在模具型腔中形成的褶皱。
由于金属板料在拉深壁区域内相对无支撑,因此,消除拉深壁起皱比抑制法兰起皱要难得多。
我们知道在不被支撑的拉深壁区域中材料的外力拉深可以防止起皱,这可以在实践中通过增加压边力而实现,但是运用过大的拉深力会引起破裂失效。
因此,压边力必须控制在一定的范围内,一方面可以抑制起皱,另一方面也可以防止破裂失效。
合适的压边力范围是很难确定的,因为起皱在拉深零件的中心区域以一个复杂的形状形成,甚至根本不存在一个合适的压边力范围。
为了研究起皱的原因,Yoshida et al.发明了一个试验,即:一张薄板延着对角的一个方向进行不均匀拉深。

拉深件之凸缘起皱的原因分析陈洪艳;王正东【摘要】圆筒形拉深件,在常规的拉深过程中容易产生起皱和拉破的现象.针对圆筒形拉深的起皱的原因进行分析,通过对圆筒形件的起皱的原因进行分析,针对起皱的现象提出解决方案,从增加压边圈、采用合理的拉深系数和间隙等方面来进行解决.通过合理的拉深工艺,来提高拉深件的质量.【期刊名称】《装备制造技术》【年(卷),期】2016(000)007【总页数】3页(P144-146)【关键词】拉深;起皱;拉深系数;压边圈;间隙【作者】陈洪艳;王正东【作者单位】广东省工业贸易职业技术学校,广东佛山528000;广东省工业贸易职业技术学校,广东佛山528000【正文语种】中文【中图分类】TG302圆筒形拉深件在日常生活常有,比如做饭用的锅、盆,喝水用的杯子、饭盒等,绝大多数是用模具对钢板拉深而成。
板料在压力的作用下,随凸模引导凹模内成形,由于模具几何结构尺寸、接触摩擦和压边力等因素的影响,在金属的成形过程中常发生起皱现象,为了得到高质量的钣金产品,必须克服和抑制成形过程中起皱的发生。
拉深是在压力机的压力作用下,利用拉深模具将平板坯料或空心工序件制成开口空心零件的加工方法。
在拉深过程中使用的拉深模具、拉深方式、材料等不同,对拉深坯料时所产生的缺陷的形式也不同。
拉深过程中对零件造成主要的缺陷形式有两种:起皱和破裂。
在此只针对坯料凸缘起皱的原因进行分析,并提出防止起皱的措施。
利用模具装平板料压制成开口空心件的冲压过程称为拉深,如图1所示。
圆筒形拉深件的形成是利用模具,将平板料置于凹模上,在压力机的作用下,置于凹模上的板料会顺着凹模口被压入凹模内,从而形成一个圆筒形的拉深件。
拉深件的形成过程可通过拉深时金属的流动变化情况来观察,从而了解在拉深过程中材料的受力情况。
如图2所示[1]。
从拉深坐标网格试验和拉深过程中坯料的应力与应变状态图中可以总结出:圆筒形拉深件在拉深的过程中,由于压力机是对部分板料施加压力,所以造成与压力块接触的板料中心部分底部基本不变形,称为不变形区;而与压力块不接触的凸缘部分(即为D-d环形部分),在拉力的作用下,发生变形,该部位称为主要变形区。
拉伸件成形时的起皱原因及措施1、拉伸件起皱原因的分析在研究具有复杂的曲面形状的拉深件之前,首先讨论最简单的材料平板形状。
在平面应力作用下,平板的板厚方向由于外力的压缩成分(σ、τ中的负应力)的存在而可能引起不稳定。
引起这种应力状态的外力是有很大区别的,大致可分为压缩力、剪切力、不均匀的拉伸力、板内弯曲力等。
当这些外应力中的压应力成分在平板的板厚方向达到或超过其材料的稳定极限时,工件便产生起皱现象。
工件在拉深时,其凸缘部分在切向压应力作用下,使凸缘材料失去稳定而形成起皱。
一般来说切向压应力在凸缘的外边缘为最大,故起皱也首先在最外边缘出现。
同时,材料的相对厚度t/d0越小(即材料越薄),越容易发生起皱。
起皱的走向与压应力的方向垂直。
除了压应力以外,还有其它应力成分引起的起皱,其形状也不相同。
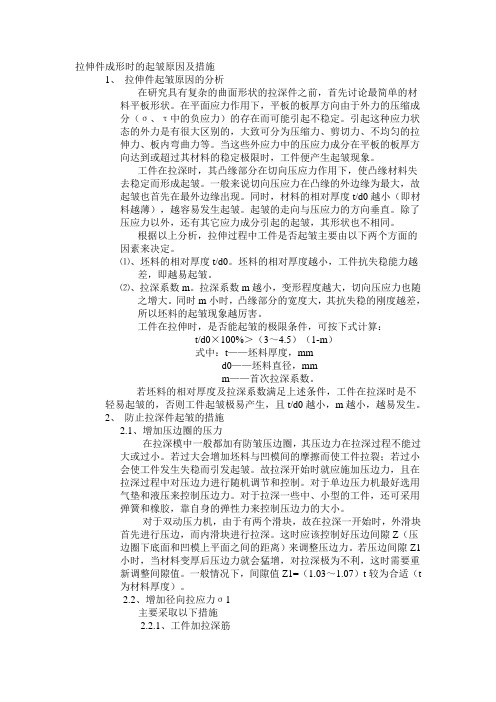
根据以上分析,拉伸过程中工件是否起皱主要由以下两个方面的因素来决定。
⑴、坯料的相对厚度t/d0。
坯料的相对厚度越小,工件抗失稳能力越差,即越易起皱。
⑵、拉深系数m。
拉深系数m越小,变形程度越大,切向压应力也随之增大。
同时m小时,凸缘部分的宽度大,其抗失稳的刚度越差,所以坯料的起皱现象越厉害。
工件在拉伸时,是否能起皱的极限条件,可按下式计算:t/d0×100%>(3~4.5)(1-m)式中:t——坯料厚度,mmd0——坯料直径,mmm——首次拉深系数。
若坯料的相对厚度及拉深系数满足上述条件,工件在拉深时是不轻易起皱的,否则工件起皱极易产生,且t/d0越小,m越小,越易发生。
2、防止拉深件起皱的措施2.1、增加压边圈的压力在拉深模中一般都加有防皱压边圈,其压边力在拉深过程不能过大或过小。
若过大会增加坯料与凹模间的摩擦而使工件拉裂;若过小会使工件发生失稳而引发起皱。
故拉深开始时就应施加压边力,且在拉深过程中对压边力进行随机调节和控制。
对于单边压力机最好选用气垫和液压来控制压边力。
对于拉深一些中、小型的工件,还可采用弹簧和橡胶,靠自身的弹性力来控制压边力的大小。


《轴对称拉深成形应变分布规律及圆锥形件起皱破裂研究》篇一一、引言轴对称拉深成形是金属塑性加工中常用的工艺之一,其过程涉及到复杂的物理变化和力学行为。
本文将重点研究轴对称拉深成形过程中的应变分布规律,以及在圆锥形件加工中起皱和破裂等问题的研究。
这些研究对于优化金属成形工艺、提高产品质量和降低生产成本具有重要意义。
二、轴对称拉深成形的基本原理及应变分布规律轴对称拉深成形是指通过对金属板料施加外力,使其在模具的作用下发生塑性变形,从而得到所需形状的零件。
在这个过程中,应变分布规律是影响零件质量和性能的关键因素。
2.1 轴对称拉深成形的原理轴对称拉深成形主要依靠模具的形状和压力机的压力,使金属板料在拉伸、压缩、弯曲等多种力的作用下发生塑性变形。
这种变形过程必须满足金属的塑性变形条件和力学平衡条件。
2.2 应变分布规律在轴对称拉深成形过程中,应变分布受到多种因素的影响,包括模具形状、材料性能、工艺参数等。
一般来说,拉深成形过程中,板料表面的应变较大,而中心区域的应变较小。
这种应变分布不均匀会导致零件的力学性能不均匀,进而影响零件的使用寿命和安全性。
三、圆锥形件起皱和破裂的研究在轴对称拉深成形过程中,圆锥形件常常会出现起皱和破裂等问题。
这些问题不仅影响零件的外观质量,还会降低零件的力学性能。
因此,研究起皱和破裂的机理及影响因素对于优化金属成形工艺具有重要意义。
3.1 起皱的研究起皱是由于金属板料在拉深过程中受到不均匀的应力作用而产生的局部变形。
起皱的位置和程度受到模具形状、材料性能、工艺参数等多种因素的影响。
为了防止起皱,需要合理设计模具形状和工艺参数,并选择合适的材料。
3.2 破裂的研究破裂是轴对称拉深成形过程中另一种常见的问题,它通常是由于金属板料在拉深过程中承受过大的应力而导致的。
破裂的位置和程度也受到模具形状、材料性能、工艺参数等多种因素的影响。
为了防止破裂,需要合理控制工艺参数,选择合适的材料,并优化模具设计。
冲压模具设计中的拉深起皱分析F.-K. Chen and Y.-C. LiaoDepartment of Mechanical Engineering, National Taiwan University, Taipei, Taiwan摘要:我们对在锥形方杯和矩形阶梯杯的冲压中发生的起皱现象进行了研究。
这两种起皱类型的共同特征是,其皱褶在拉伸壁是相对没有支撑的。
在锥形方杯的冲压中,过程参数的作用,比如冲模间隙和变压边力,起皱现象的出现是用有限元来模拟试验的。
模拟试验的结果显示冲模间隙越大,起皱现象就越严重,而且这个起皱不会被增大的变压动力所抑制。
对矩形阶梯杯的冲压中发生的起皱进行分析,其实际生产部分被检查出与几何体有相似的结构。
皱褶被发现在拉伸壁上归因于冲头和阶跃边缘之间金属板不平衡的拉伸。
一个最佳的模具设计是采用有限元分析来确定消除皱褶的。
这些观察到的不皱的生产部分与模拟结果吻合很好验证了有限元分析的准确性,还演示了使用有限元分析对冲压模具设计的优势。
关键词:拉伸壁起皱;冲压模具;矩形阶梯杯;锥形方杯1.引言:起皱是其中之一严重影响金属板料成型过程的发生。
由于功能和视觉效果的原因,起皱通常不能被零件制品所接受。
这里有三种在金属板料成型过程中时常出现的起皱类型:法兰起皱,侧壁起皱和由于残余弹性压缩应力在未变形区产生的弹性屈曲。
在冲压复杂形状形成时,拉伸壁起皱就是在模具型腔中形成的起皱。
由于金属板料在拉伸壁区域内相对无支撑,因此消除拉伸壁起皱比抑制法兰起皱要难得多。
众所周知,额外的拉伸的材料不受拉伸壁的支持可能可以预防起皱,这通过增加变压动力的实践中实现;但是过度拉伸压力导致失败的应用程序被撕裂。
因此,变压动力必须控制在一定的范围内,一方面抑制起皱,另一方面防止破裂。
这个合适的变压动力范围是很难决定的。
因为起皱在冲压零件的中心位置以一个复杂的形状形成,甚至不存在一个合适的变压动力范围。
为了检查起皱形成的结构,Yoshida等人对薄片沿着对角线做了非均匀拉伸的试验。
An Analysis of Draw-Wall Wrinkling in a Stamping DieDesignF.-K. Chen and Y.-C. LiaoDepartment of Mechanical Engineering, National Taiwan University, Taipei, Taiwan Wrinkling that occurs in the stamping of tapered square cups and stepped rectangular cups is investigated. A common characteristic of these two types of wrinkling is that the wrinkles are found at the draw wall that is relatively unsupported.In the stamping of a tapered square cup, the effect of process parameters, such as the die gap and blank-holder force, on the occurrence of wrinkling is examined using finiteelement simulations. The simulation results show that the larger the die gap, the more severe is the wrinkling, and such wrinkling cannot be suppressed by increasing the blank-holder force. In the analysis of wrinkling that occurred in the stamping of a stepped rectangular cup, an actual production part that has a similar type of geometry was examined. The wrinkles found at the draw wall are attributed to the unbalanced stretching of the sheet metal between the punch head and the step edge. An optimum die design for the purpose of eliminating the wrinkles is determined using finite-element analysis. The good agreement between the simulation results and those observed in the wrinkle-free production part validates the accuracy of the finite-element analysis, and demonstrates the advantage of using finite-element analysis for stamping die design.Keywords:Draw-wall wrinkle; Stamping die; Stepped rectangular cup; Tapered square cups1. IntroductionWrinkling is one of the major defects that occur in the sheet metal forming process. For both functional and visual reasons,wrinkles are usually not acceptable in a finished part. There are three types of wrinkle which frequently occur in the sheet metal forming process: flange wrinkling, wall wrinkling, and elastic buckling of the undeformed area owing to residual elastic compressive stresses. In the forming operation of stamping a complex shape, draw-wall wrinkling means the occurrence of wrinkles in the die cavity. Since the sheet metal in the wall area is relatively unsupported by the tool, the elimination of wall wrinkles is more difficult than the suppression of flange wrinkles. It is well known that additional stretching of the material in the unsupported wall area may prevent wrinkling,and this can be achievedin practice by increasing the blankholder force; but the application of excessive tensile stresses leads to failure by tearing. Hence, the blank-holder force must lie within a narrow range, above that necessary to suppress wrinkles on the one hand, and below that which produces fracture on the other. This narrow range of blank-holder force is difficult to determine. For wrinkles occurring in the central area of a stamped part with a complex shape, a workable range of blank-holder force does not even exist.In order to examine the mechanics of the formation of wrinkles, Yoshida et al. [1] developed a test in which a thin plate was non-uniformly stretched along one of its diagonals.They also proposed an approximate theoretical model in which the onset of wrinkling is due to elastic buckling resulting from the compressive lateral stresses developed in the non-uniform stress field. Yu et al. [2,3] investigated the wrinkling problem both experimentally and analytically. They found that wrinkling could occur having two circumferential waves according to their theoretical analysis, whereas the experimental results indicated four to six wrinkles. Narayanasamy and Sowerby [4] examined the wrinkling of sheet metal when drawing it through a conical die using flat-bottomed and hemispherical-ended punches. They also attempted to rank the properties that appeared to suppress wrinkling.These efforts are focused on the wrinkling problems associated with the forming operations of simple shapes only, such as a circular cup. In the early 1990s, the successful application of the 3D dynamic/explicit finite-element method to the sheetmetal forming process made it possible to analyse the wrinkling problem involved in stamping complex shapes. In the present study, the 3D finite-element method was employed to analyse the effects of the process parameters on the metal flow causing wrinkles at the draw wall in the stamping of a tapered square cup, and of a stepped rectangular part.A tapered square cup, as shown in Fig. 1(a), has an inclined draw wall on each side of the cup, similar to that existing in a conical cup. During the stamping process, the sheet metal on the draw wall is relatively unsupported, and is therefore prone to wrinkling. In the present study, the effect of various process parameters on the wrinkling was investigated. In the case of a stepped rectangular part, as shown in Fig. 1(b),another type of wrinkling is observed. In order to estimate the effectiveness of the analysis, an actual production part with stepped geometry was examined in the present study. The cause of the wrinkling was determined using finite-element analysis, and an optimum die design was proposed to eliminate the wrinkles. The diedesign obtained from finite-element analysis was validated by observations on an actual production part.Sketches of (a) a tapered square cup.Sketches of(b) a stepped rectangular cup.Fig. 1.2. Finite-Element ModelThe tooling geometry, including the punch, die and blankholder,were designed using the CAD program PRO/ENGINEER. Both the 3-node and 4-node shell elements were adopted to generate the mesh systems for the above tooling using the same CAD program. For the finite-element simulation,the tooling is considered to be rigid, and the corresponding meshes are used only to define the tooling geometry and are not for stress analysis. The same CAD program using 4-node shell elements was employed to construct the mesh system for the sheet blank. Figure 2 shows the mesh system for the complete set of tooling and the sheet-blank used in the stamping of a tapered square cup. Owing to the symmetric conditions, only a quarter of the square cup is analysed. In the simulation, the sheet blank is put on the blank-holder and the die is moved down to clamp the sheet blank against the blank-holder. The punch is then moved up to draw the sheet metal into the die cavity.In order to perform an accurate finite-element analysis, the actual stress–strain relationship of the sheet metal is required as part of the input data.In the present study, sheet metal with deep-drawing quality is used in the simulations.A tensile test has been conducted for the specimens cut along planes coinciding with the rolling direction (0°) and at angles of 45°and 90°to the rolling direction.The average flow stress σ,calculated from the equationσ=(σ0+2σ45+σ90)/4, for each measuredtrue strain,as shown in Fig.3, is used for the simulations for the stampings of the tapered square cup and also for the stepped rectangular cup.All the simulations performed in the present study were run on an SGI Indigo 2 workstation using the finite-element program PAMFSTAMP. To complete the set of input data required for the simulations, the punch speed is set to 10 m s_1 and a coefficient of Coulomb friction equal to 0.1 is assumed.Fig. 2. Finite-element mesh.Fig. 3. The stress–strain relationship for the sheet metal.3. Wrinkling in a Tapered Square CupA sketch indicating some relevant dimensions of the tapered square cup is shown in Fig. 1(a). As seen in Fig. 1(a), the length of each side of the square punch head (2Wp), the die cavity opening (2Wd), and the drawing height (H) are considered as the crucial dimensions that affect the wrinkling.Half of the difference between the dimensions of the die cavity opening and the punch head is termed the die gap (G) in the present study, i.e. G = Wd-Wp. The extent of the relatively unsupported sheetmetal at the draw wall is presumably due to the die gap, and the wrinkles are supposed to be suppressed by increasing the blank-holder force. The effects of both the die gap and the blank-holder force in relation to the occurrence of wrinkling in the stamping of a tapered square cup are investigated in the following sections.3.1 Effect of Die GapIn order to examine the effect of die gap on the wrinkling, the stamping of a tapered square cup with three different die gaps of 20 mm, 30 mm, and 50 mm was simulated. In each simulation, the die cavity opening is fixed at 200 mm, and the cup is drawn to the same height of 100 mm. The sheet metal used in all three simulations is a 380 mm × 380 mm square sheet with thickness of 0.7 mm, the stress–strain curve for the material is shown in Fig. 3.Fig. 4. Wrinkling in a tapered square cup (G =50 mm).The simulation results show that wrinkling occurred in all three tapered square cups, and the simulated shape of the drawn cup for a die gap of 50 mm is shown in Fig. 4. It is seen in Fig. 4 that the wrinkling is distributed on the draw wall and is particularly obvious at the corner between adjacent walls. It is suggested that the wrinkling is due to the large unsupported area at the draw wall during the stamping process,also,the side length of the punch head and the die cavity openingare different owing to the die gap. The sheet metal stretched between the punch head and the die cavity shoulder becomes unstable owing to the presence of compressive transverse stresses. The unconstrained stretching of the sheet metal under compression seems to be the main cause for the wrinkling at the draw wall. In order to compare the results for the three dif ferent die gaps, the ratio β of the two principal strains is introduced, βbeing εmin/εmax, where εmax and εmin are the major and the minor principal strains, respectively. Hosford and Caddell [5] have shown that if the absolute value of β is greater than a critical value, wrinkling is supposed to occur, and the larger the absolute value of β, the greater is the possibility of wrinkling.The β values along the cross-section M–N at the same drawing height for the three simulated shapes with different die gaps, as marked in Fig. 4, are plotted in Fig.5. It is noted from Fig. 5 that severe wrinkles are located close to the corner and fewer wrinkles occur in the middle of the draw wall for all three different die gaps. It is also noted that the bigger the die g ap, the larger is the absolute value of β. Consequently,increasing the die gap will increase the possibility of wrinkling occurring at the draw wall of the tapered square cup.3.2 Effect of the Blank-Holder ForceIt is well known that increasing the blank-holder force can help to eliminate wrinkling in the stamping process. In order to study the effectiveness of increased blank-holder force, the stamping of a tapered square cup with die gap of 50 mm,which is associated with severe wrinkling as stated above, was simulated with different values of blank-holder force. The blank-holder force was increased from 100 kN to 600 kN,which yielded a blank-holder pressure of 0.33 MPa and 1.98 MPa, respectively. The remaining simulation conditions are maintained the same as those specified in the previous section.(An intermediate blank-holder force of 300 kN was also used in the simulation.)The simulation results show that an increase in the blankholder force does not help to eliminate the wrinkling that occurs at the draw wall.The βvalues along the cross-section compared with one another for the stamping processes with blank-holder force of 100 kN and 600 kN. The simulation results indicate that the _ values along the cross-section M–N are almost identical in both cases. In order to examine the difference of the wrinkle shape for the two different blank-holder forces, five cross-sections of the draw wall at different heights from the bottom to the line M–N, as marked in Fig. 4, are plotted in Fig. 6 for both cases.It is noted from Fig. 6 that the waviness of the cross-sections for both cases is similar. This indicates that the blank-holder force does not affect the occurrence of wrinkling in the stamping of a tapered square cup, because the formation of wrinkles is mainly due to the large unsupported area at the draw wall where large compressive transverse stresses exist. The blankholder force has no influence on the instability mode of the materialbetween the punch head and the die cavity shoulder.Distance(mm)Fig. 5. β-value along the cross-section M–N for different die gaps.Fig. 6. Cross-section lines at different heights of the draw wall fordifferent blank-holder forces. (a) 100 kN. (b) 600 kN.4. Stepped Rectangular CupIn the stamping of a stepped rectangular cup, wrinkling occurs at the draw wall even though the die gaps are not so significant.Figure 1(b) shows a sketch of a punch shape used for stamping a stepped rectangular cup in which the draw wall C is followed by a step D–E. An actual production part that has this type of geometry was examined in the present study. The material used for this production part was 0.7 mm thick, and the stress–strain relation obtained from tensile tests is shown in Fig. 3.The procedure in the press shop for the production of this stamping part consists of deep drawing followed by trimming.In the deep drawing process, no draw bead is employed on the die surface to facilitate the metal flow. However, owing to the small punch corner radius and complex geometry, a split occurred at the top edge of the punch and wrinkles were found to occur at the draw wall of the actual production part,as shown in Fig. 7. It is seen from Fig. 7 that wrinkles are distributed on the drawwall, but are more severe at the corner edges of the step, as marked by A–D and B–E in Fig. 1(b).The metal is torn apart along the whole top edge of the punch,as shown in Fig. 7, to form a split.Fig. 7. Split and wrinkles in the production part.Fig. 8. Simulated shape for the production part with split and wrinkles.In order to provide a further understanding of the deformation of the sheet-blank during the stamping process, a finiteelement analysis was conducted. The finite-element simulation was first performed for the original design. The simulated shape of the part is shown from Fig. 8. It is noted from Fig.8 that the mesh at the top edge of the part is stretched significantly, and that wrinkles are distributed at the draw wall,similar to those observed in the actual part.The small punch radius, such as the radius along the edge A–B, and the radius of the punch corner A, as marked in Fig.1(b), are considered to be the major reasons for the wall breakage. However,according to the results of the finiteelement analysis, splitting can be avoided by increasing the above-mentioned radii. This concept was validated by the actual production part manufactured with larger corner radii.Several attempts were also made to eliminate the wrinkling.First, the blank-holder force was increased to twice the original value. However, just as for the results obtained in the previous section for the drawing of tapered square cup, the effect of blank-holder force on the elimination of wrinkling was not found to be significant. The same results are also obtained by increasing the friction or increasing the blank size. We conclude that this kind of wrinkling cannot be suppressed by increasing the stretching force.Since wrinkles are formed because of excessive metal flow in certain regions, where the sheet is subjected to large compressive stresses, a straightforward method of eliminating the wrinkles is to add drawbars in the wrinkled area to absorb the redundant material. The drawbars should be added parallel to the direction of the wrinkles so that the redundant metal can be absorbed effectively. Based on this concept, two drawbars are added to the adjacent walls, as shown in Fig. 9, to absorb the excessive material. The simulation results show that the wrinkles at the corner of the step are absorbed by the drawbars as expected, however some wrinkles still appear at the remaining wall. This indicates the need to put more drawbars at the draw wall to absorb all the excess material. This is, however,not permissible from considerations of the part design.Fig. 9. Drawbars added to the draw walls.One of the advantages of using finite-element analysis for the stamping process is that the deformed shape of the sheet blank can be monitored throughout the stamping process, which is not possible in the actual production process. A close look at the metal flow during the stamping process reveals that the sheet blank is first drawn into the die cavity by the punch head and the wrinkles are not formed until the sheet blank touches the step edge D–E marked in Fig. 1(b). The wrinkled shape is shown in Fig. 10. This provides valuable information for a possible modification of die design.Fig. 10. Wrinkle formed when the sheet blank touches the steppededge.Fig. 11. Cut-off of the stepped corner.Fig. 12. Simulated shape for the modified die design.An initial surmise for the cause of the occurrence of wrinkling is the uneven stretch of the sheet metal between the punch corner radius A and the step corner radius D, as indicated in Fig. 1(b). Therefore a modification of die design was carried out in which the step corner was cut off, as shown in Fig.11, so that the stretch condition is changed favourably, which allows more stretch to be applied by increasing the step edges.However, wrinkles were still found at the draw wall of the cup. This result implies that wrinkles are introduced because of the uneven stretch between the whole punch head edge and the whole step edge, not merely between the punch corner and the step corner. In order to verify this idea, two modifications of the die design were suggested: one is to cut the whole step off, and the other is to add one more drawing operation, that is, to draw the desired shape using two drawing operations.Thesimulated shape for the former method is shown in Fig.12. Since the lower step is cut off, the drawing process is quite similar to that of a rectangular cup drawing, as shown in Fig. 12. It is seen in Fig. 12 that the wrinkles were eliminated.In the two-operation drawing process, the sheet blank was first drawn to the deeper step, as shown in Fig. 13(a). Subsequently,the lower step was formed in the second drawing operation, and the desired shape was then obtained, as shown in Fig. 13(b). It is seen clearly in Fig. 13(b) that the stepped rectangular cup can be manufactured without wrinkling, by a two-operation drawing process. It should also be noted that in the two-operation drawing process, if an opposite sequence is applied, that is, the lower step is formed first and is followed by the drawing of the deeper step, the edge of the deeper step,as shown by A–B in Fig. 1(b), is prone to tearing because themetal cannot easily flow over the lower step into the die cavity.The finite-element simulations have indicated that the die design for stamping the desired stepped rectangular cup using one single draw operation is barely achieved. However, the manufacturing cost is expected to be much higher for the twooperation drawing process owing to the additional die cost and operation cost. In order to maintain a lower manufacturing cost, the part design engineer made suitable shape changes, and modified the die design according to the finite-elementSimulation result to cut off the lower step, as shown in Fig.12. With the modified die design, the actual stamping die for production was manufactured and the production part was found to be free from wrinkles, as shown in Fig.14.The part shape also agreed well with that obtained from the finiteelement simulation.Fig. 13. (a) First operation and (b) second operation in the two-operation drawing process.Fig. 14. The defect-free production part.In order to further validate the finite-element simulation results, the thickness distribution along the cross-section G–H obtained from the simulation result as indicated in Fig. 14,was compared with those measured from the production part.The comparison is shown in Fig. 15. It can be seen in Fig.15 that the predicted thickness distribution by finite-element simulation agrees well with that measured directly in the production part. This agreement confirms the effectiveness of the finite-elementanalysis.Fig. 15. The simulated and measured thickness distribution along G–H.5. Summary and Concluding RemarksTwo types of wrinkling occurring in stamping processes were investigated using finite-element analysis, and the causes for wrinkling were examined and the methods to eliminate such wrinkles were developed.The first type of wrinkling appears at the draw wall in the stamping of a tapered square cup. The occurrence of wrinkling is attributed to the large die gap, which is the difference between the side length of the die cavity opening and the side length of the punch head. The large die gap results in a large unsupported area of sheet metal when the metal is drawn into the die cavity and an unfavourable stretch between the punch head and die cavity shoulder. The large unsupported area of sheet metal is therefore prone to wrinkling. The finite-element simulations show that this type of wrinkling cannot be suppressed by increasing the blank-holder force.Another type of wrinkling investigated occurs in an actual stamping part that has a stepped rectangular geometry. It is found that wrinkling occurs at the draw wall above the step even though the die gap is not sufficiently large. The wrinkling is due to the uneven stretch between the punch head and the step edge, according to the finite-element analysis. Several attempts were made in the die design to eliminate the wrinkling,using finite-element simulations, and an optimum design in which the step was cut off is finally established. The modified die design for eliminating wrinkles was validated by the production of a defect-free production part. The good agreement between the simulation results and those observed in the drawn production part demonstrates the accuracy of the finite-element analysis, and the effectiveness ofusing finite-element simulations as a substitute for the expensive method of actual die try-outs is thereby confirmed.AcknowledgementsThe authors wish to thank the National Science Council of the Republic of China for the grant NSC-86–2212-E002–028 that made this project possible. They also wish to thank KYM for providing the production part.References1. K. Yoshida, H. Hayashi, K. Miyauchi, Y. Yamato, K. Abe, uda, R. Ishida and Y. Oike, “The effects of mechanical properties of sheet metals on the growth and removing of buckles dueto non-uniform stretching”, Scientific Pap ers, Institute of Physics and Chemistry Research, 68, pp. 85–93, 1974.2. T. X. Yu, W. Johnson and W. J. Stronge, “Stamping and springback of circular plates deformed in hemispherical dies”, International Journal of Mechanical Sciences, 26, pp. 131–148, 1984.3. W. J. Stronge, M. P. F. Sutcliffe and T. X. Yu, “Wrinkling of elasto-plastic circular plates during stamping”, Experimental Mechanics, pp. 345–353, 1986.4. R. Narayanasamy and R. Sowerby, “Wrinkling of sheet metals when drawing through a conical di e”, Journal of Material Processing Technology, 41, pp. 275–290, 1994.5. W. F. Hosford and R. M. Caddell, Metal Forming: Mechanics and Metallurgy, 2nd edn, 1993.Process simulation in stamping – recent applications forproduct and process designW. Thomas*, T. Oenoki and T. AltanAbstractProcess simulation for product and process design is currently being practiced in industry. However, a number of input variables have a significant effect on the accuracy and reliability of computer predictions. A study was conducted to evaluate the capability of FE-simulations for predicting part characteristics and process conditions in forming complex-shaped, industrial parts.In industrial applications, there are two objectives for conducting FE-simulations of the stamping process; (1) to optimize the product design by analyzing formability at the product design stage and (2) to reduce the tryout time and cost in process design by predicting the deformation process in advance during the die design stage. For each of these objectives, two kinds of FE-simulations are applied. Pam-Stamp, an incremental dynamic-explicit FEM code released by Engineering Systems Int'l, matches the second objective well because it can deal with most of the practical stamping parameters. FAST_FORM3D, a one-step FEM code released by Forming Technologies, matches the first objective because it only requires the part geometry and not the complex process information.In a previous study, these two FE codes were applied to complex-shaped parts used in manufacturing automobiles and construction machinery. Their capabilities in predicting formability issues in stamping were evaluated. This paper reviews the results of this study and summarizes the recommended procedures for obtaining accurate and reliable results from FE simulations.In another study, the effect of controlling the blank holder force (BHF) during the deep drawing of hemispherical, dome-bottomed cups was investigated. The standard automotive aluminum-killed, drawing-quality (AKDQ) steel was used as well as high performance materials such as high strength steel, bake hard steel, and aluminum 6111. It was determined that varying the BHF as a function of stroke improved the strain distributions in the domed cups.Author Keywords: Stamping; Process stimulation; Process designArticle Outline1. Introduction2. Product simulation – applications3. Die and process simulation – applications4. Blank holder force control – applications5. Conclusions and future work1. IntroductionThe design process of complex shaped sheet metal stampings such as automotive panels, consists of many stages of decision making and is a very expensive and time consuming process. Currently in industry, many engineering decisions are made based on the knowledge of experienced personnel and these decisions are typically validated during the soft tooling and prototyping stage and during hard die tryouts. Very often the soft and hard tools must be reworked or even redesigned and remanufactured to provide parts with acceptable levels of quality.The best case scenario would consist of the process outlined in Fig. 1. In this design process, the experienced product designer would have immediate feedback using a specially design software called one-step FEM to estimate the formability of their design. This would allow the product designer to make necessary changes up front as opposed to down the line after expensive tooling has been manufactured. One-step FEM is particularly suited for product analysis since it does not require binder, addendum, or even most process conditions. Typically this information is not available during the product design phase. One-step FEM is also easy to use and computationally fast, which allows the designer to play “what if” without much time investment.Once the product has been designed and validated, the development project would enter the “time zero” phase and be passed onto the die designer. The die designer would validate his/her design with an incremental FEM code and make necessary design changes and perhaps even optimize the process parameters to ensure not just minimum acceptability of part quality, but maximum achievable quality. This increases product quality but also increase process robustness. Incremental FEM is particularly suited for die design analysis since it does require binder, addendum, and process conditions which are either known during die design or desired to be known.。
拉深模设计毕业论文拉深模设计毕业论文一、引言在当今工业发展的背景下,拉深模设计作为一种重要的制造工艺,被广泛应用于各个领域。
本文旨在探讨拉深模设计的原理、方法和应用,并对其在工程实践中的重要性进行分析和评价。
二、拉深模设计的原理拉深模设计是一种通过应用力和压力,使金属板材在模具中发生塑性变形,从而得到所需形状的制造工艺。
其原理基于材料力学和塑性变形理论,通过控制模具的形状和应力分布,实现对金属板材的塑性变形。
三、拉深模设计的方法1. 材料选择:不同材料具有不同的拉深性能,因此在拉深模设计中,需要根据所需产品的要求选择合适的材料。
常用的材料有冷轧钢板、不锈钢板等。
2. 模具设计:模具的设计是拉深模设计中的关键环节。
模具的形状和结构直接影响到拉深过程中的应力分布和变形情况。
因此,在模具设计中需要考虑产品的几何形状、材料的性能以及制造成本等因素。
3. 模具材料选择:模具材料的选择也是拉深模设计中的重要环节。
模具材料需要具备足够的强度和硬度,以保证模具在拉深过程中不发生变形或损坏。
四、拉深模设计的应用拉深模设计广泛应用于汽车制造、家电制造、航空航天等领域。
以下是拉深模设计在这些领域中的具体应用:1. 汽车制造:在汽车制造中,拉深模设计用于制造车身外壳、车门、引擎盖等部件。
通过拉深模设计,可以使金属板材具备所需的强度和刚度,同时实现轻量化设计。
2. 家电制造:在家电制造中,拉深模设计用于制造冰箱门、洗衣机筒体等部件。
拉深模设计可以使得家电产品具备更加美观、坚固的外观,提高产品的市场竞争力。
3. 航空航天:在航空航天领域,拉深模设计用于制造飞机机身、发动机外壳等部件。
通过拉深模设计,可以使得航空航天产品具备更高的强度和耐腐蚀性,提高产品的安全性和可靠性。
五、拉深模设计的重要性拉深模设计在工程实践中具有重要的意义和应用价值。
首先,拉深模设计可以实现对金属板材的塑性变形,从而满足产品的几何形状和性能要求。
其次,拉深模设计可以提高产品的生产效率和质量,降低生产成本。
毕业设计(论文)外文资料翻译系部:机械工程系专业:机械制造及自动化姓名:学号:外文出处:Journal of Materials ProcessingTechnology,159(2005),418–425.附件: 1.外文资料翻译译文;2.外文原文。
附件1:外文资料翻译译文新型四分区锥形压边力摩擦辅助拉深的工艺摘要:本文提出了一种摩擦辅助拉深的新技术。
金属压边圈设计可分为两层:一层为不动层,或称基层,由四个5°锥角的平面组成;另一层为移动层,分为四个锥形部分。
在适当的压边力下,这四个部分能通过一种专门设计的压紧工具匀速径向移动到模腔,这种压边装置的主要功能是利用板料和压边圈之间的在有效拉深方向上的摩擦力,就如在Maslennikov过程中利用的橡胶圈的功能。
使用一个辅助的金属冲压器在拉深过程中在液压缸的帮助下提供一个恒定的拉深力来实现有效的拉深变形。
所提出工艺的优缺特点主要研究拉深的机构和拉深条件的影响。
虽然成功制造拉深比率为3.76的深杯状体已验证了当前技术的可行性,然而,提高拉深效率还需要进一步研究。
关键词金属板料成型摩擦辅助拉深拉深分块压边圈1. 介绍在传统的拉深法中,第一阶段的拉深很难超过单位杯高度与直径比率为2.2的拉深比率极限。
提出的提高变形极限的解决方案一般分为三类:改变需成型金属板的材料特性;改变应力状态;改变摩擦状态。
基于这些基本解决方案,已提出了很多特殊工艺来提高拉深比率极限[1-10]。
使用这些工艺,在材料流动应力可控制在材料极限强度以下时来获得巨大的塑性张力。
在这些拉深工艺中,所谓的Maslennikov工艺[11]是一种特殊的方式,其巧妙的利用置于杯形件中的橡胶圈作为压力介质产生毛坯拉深变形。
该过程属于上述的第三类方案,即改变摩擦的状态。
不同于传统方法,该工艺利用毛坯板材和橡胶圈之间的摩擦力实现深拉深。
由于该拉深方式是通过径向的压力实现的,就能避免凸模圆角部分的破裂。
毕业设计(论文)外文资料翻译学院(系):专业:姓名:学号:外文出处:Analysis of Draw-Wall Wrinklingin a Stamping Die Design 附件: 1.外文资料翻译译文;2.外文原文。
指导教师评语:签名:年月日注:请将该封面与附件装订成册。
附件1:外文资料翻译译文拉深模设计中拉深壁起皱的分析起皱是金属板料成形中常见的失效形式之一。
由于功能和视觉效果的原因,起皱通常是不能为零件制品所能接受的。
在金属板料成形加工中通常存在三种类型的起皱现象:法兰起皱;侧壁起皱和由于残余压应力在未变形区产生的弹性变形。
在冲压复杂形状的时候,拉深壁起皱就是在模具型腔中形成的褶皱。
由于金属板料在拉深壁区域内相对无支撑,因此,消除拉深壁起皱比抑制法兰起皱要难得多。
我们知道在不被支撑的拉深壁区域中材料的外力拉深可以防止起皱,这可以在实践中通过增加压边力而实现,但是运用过大的拉深力会引起破裂失效。
因此,压边力必须控制在一定的范围内,一方面可以抑制起皱,另一方面也可以防止破裂失效。
合适的压边力范围是很难确定的,因为起皱在拉深零件的中心区域以一个复杂的形状形成,甚至根本不存在一个合适的压边力范围。
为了研究起皱的原因,Yoshida et al.发明了一个试验,即:一张薄板延着对角的一个方向进行不均匀拉深。
他们还提出了一个近似的理论模型,起皱的初始是由于弹性变形导致横向压力发展成为不均匀的压力场。
Yu et al.用试验和理论分析的方法来研究起皱问题。
他们发现根据他们的理论分析,起皱发生在两个环形的起伏处,而且试验结果指出了4—6处起皱。
Narayanasamy和Sowerby通过圆锥形凸模和半球形凸模的拉深来研究金属板料的起皱。
同时,他们也试图整理防止发生起皱的特性参数。
一个有斜度的方形盒,如图1所示,盒形件的每一个倾斜的拉深壁都与圆(a)锥盒形件相似。
拉深成形过程中,在拉深壁处的金属板料是相对无支撑的,因此,褶皱是倾斜的。
在目前的研究中,各种关于起皱的成型过程参数都被研究。
在带所示,观察到了另一种类型的起皱。
在当有阶梯的方形盒件的研究中,如图1(b)前的研究中,为了得出分析的效果,实际生产用阶梯形结构的零件来研究。
使用有限元方法可以分析出起皱的原因,并且可以使一个最优的模具设计消除起皱现象。
有限元分析使得模具设计在实际生产中更为合理化。
(a)带有斜度的方形盒件(b)带有阶梯的方形盒件图11 有限元模型模具的几何结构(包括凸模、凹模、压边装置等等),通过使用CAD和PRO/ENGINEER来设计。
使用CAD将3个节点或4个节点形成壳形的单体,进而在模型上形成网格体系。
使用有限元模拟,模型被视为是刚性的,并且相对应的网格仅仅可以定义模型的几何形状,不能对压力进行分析。
使用CAD所建立的4个节点的壳形单体可以为板料创建网格体系。
图2给出了模型完全建立时的网格体系和用以成形带有斜度的方形盒件的金属板料。
由于对称的原因,仅仅分析了零件的1/4。
在模拟过程中,金属板料放在压边装置上,凹模向下移动,夹紧板料。
凸模向上移动,拉深板料至模具型腔。
为了精确的完成有限元分析,金属板料的实际压力——拉力的关系需要输入相关的数据。
从目前的研究来看,金属板料的深拉深的特性参数已经用于模拟。
一个拉深的实验已经用于样品的生产,并且沿着压延方向和与压延方向成45°和90°的方向切断。
平均的流动压力σ可以通过公式σ=(σ0+2σ45+σ90)/4,计算出来,进而准确测量出实际拉力,如图2所示,以用于带有斜度的方形盒件和带有阶梯的方形盒件的拉深。
图2目前研究中的所有模拟都在SGI Indigo2工作站使用有限元可调拉深程序完成。
完成了用于模拟所需数据的输入(假定凹模速度为10m /s,并且平均摩擦系数为0.1)。
2 带有斜度的方形盒件的起皱2.1 凸模间隙的影响为了研究凸模间隙对起皱的影响,现在分别用凸模间隙为20mm,30mm和50mm的带有斜度的方形盒进行拉深模拟。
在每次模拟拉深中,凹模口部尺寸为200mm固定不变,并且拉深高度均为100mm。
在3次模拟中,均使用尺寸为380mm×380mm的方形板料,且板料厚度均为0.7mm,凹模对板料的压力——拉力关系,如图3所示。
图.3模拟结果表明:三个有斜度的方形盒均发生了起皱现象,图3给出了凸模间隙为50mm的方形盒的形状。
从图3可以看出,起皱分布在拉深壁处,并且拉深壁邻近的拐角处起皱现象尤为严重。
经分析,在拉深过程中,起皱是由于拉深壁处存在过大的无支撑区域,而且凸模顶部和凹模口部长度的不同是由于凸模间隙的存在。
在凸模顶部与凹模之间的金属板料的延伸变得不稳定,是由于断面压力的存在。
在压力作用下,金属板料的无约束拉深是在拉深壁处形成褶皱的主要原因。
为了比较三个不同凸模间隙的试验结果,需要引入两个主应力的比值β,β为εmin/εmax, εmin/ε max是主应力相对的最小值和最大值。
Hosford和Cadde 指出,β值比临界值更重要,如果起皱发生,那么β值越大,起皱现象就可能越严重。
如图4和图4的曲线所示,三次不同凸模间隙的拉深模拟,沿M——N 截面的相同拉深高度处的β值。
从图4可以看出,在3次模拟中位于拉深壁的拐角处起皱比较严重,在拉深壁的中间起皱比较弱。
还可以看出,凸模间隙越大,比值β就越大。
因此,增加凸模间隙将可能增加带有斜度的方形盒件在拉深壁处起皱的可能性。
2.2 压边力的影响众所周知,增加压边力可以帮助削弱拉深过程中发生的褶皱。
为了研究增加压边力的影响,采用凸模间隙为50mm,不同的压边力数值来对有斜度的方形盒进行拉深起皱的模拟。
压边力从100KN增加到600KN,以提供压边力0.33Mpa 到1.98Mpa。
其他模拟条件和先前的规定保持一致(在模拟当中采用了300KN 的压边力)。
模拟结果表明:增加压边力并不能消除拉深壁处起皱现象的发生。
如图4所示,在M-N截面处的β值,和压边力分别为100KN、600KN的拉深相比较,模拟结果指出,在M-N截面处的β值都是相同的。
为了分析两次不同压边力时出现起皱的不同,从拉深壁顶部到直线M-N处,对5处不同高度截面进行了分析,如图4所示,图5给出了所有情况的曲线。
从图5可以看出,几种情况截面处的波度是相似的。
这就证明压边力与有斜度的方形盒件拉深中的起皱现象无关,因为褶皱的形成主要是由于拉深壁处大面积无支撑区域存在较大的横断面压力,所以压边力并不影响凸模顶部与凹模肩部之间的制件形状的不稳定状况。
图4 图5(a )100KN.(b)600KN.3 带有阶梯的方形盒件在带有阶梯的方形盒件的拉深中,即使凸模间隙不是这样重要,而在拉深壁处仍然会发生起皱。
图1(b)所示为带有阶梯的方形盒件拉深用的凸模,图1(b)给出了拉深壁C和阶梯处D、E。
目前,实际生产中一直在研究这种类型的几何结构。
生产中,板料的厚度为0.7mm,压力-拉力关系从应力试验中获得。
这种拉深件的生产是通过深拉深和整形两个工序组成的。
由于凸模拐角处的小圆角半径和复杂的几何结构,导致在盒形件的顶部边缘发生破裂,在盒形件的拉深壁处发生褶皱,如图6所示。
从图6中可以看出,褶皱分布在拉深壁处,尤其在阶梯边缘的拐角处更为严重,如图1(b)所示的A-D和B-E处。
金属板料在凸模顶部的边缘开裂,进而形成破裂,如图6所示。
图6图7为了对拉深过程中金属板料出现的变形现象有更进一步的了解,生产中仍然采用了有限元分析方法。
最初的设计已经用有限元模拟完成。
模拟的盒形件外形如图7所示。
从图7可以看出,盒形件顶部边缘的网络拉深比较严重,褶皱分布在拉深壁处,这与实际生产中的状况是一致的。
小的凸模圆角,例如A-B边缘的圆角和凸模拐角A处的圆角,如图1(b)所示,是拉深壁处破裂的主要原因。
然而,根据有限元分析的结果,通过加大上述两处圆角可以避免破裂的产生。
较大的拐角圆角这种想法通过实际生产加工被验证是可行的。
在拉深工序中采用有限元分析的优点之一就是可以通过拉深模拟来监视、控制金属板料的形状变形,而这些在实际生产中是不可能做到的。
在拉深过程中,仔细地看金属板料的流动,可以看出金属板料首先由凸模拉深进凹模腔内,直到金属板料到阶梯边缘D——E处时,褶皱才开始形成。
褶皱的形状如图8所示。
有限元分析还可以为模具设计的改进提供相关的数据信息。
、图84 简要论点及结束语在拉深过程中发生的两种类型的褶皱通过有限元分析研究以及对起皱原因做的试验,最终发现了抑制起皱的方法。
第一种类型的起皱出现在带有斜度的方形盒件的拉深壁处。
在凹模口部的高度尺寸和凸模顶部的高度尺寸等因素中,起皱的发生归因于较大的凸模间隙。
较大的凸模间隙会导致拉深到凸模顶部与凹模肩部的金属板料处产生较大的无支撑区域,而金属板料较大的无支撑区域是形成起皱的最终原因。
有限元模拟表明这种类型的起皱是不能通过增加压边力而抑制的。
另一种类型的起皱发生在实际生产中带有阶梯的几何结构的方形盒件中。
研究发现即使凸模间隙影响不是很重要,起皱还是会发生在阶梯上面的拉深壁处。
根据有限元分析,起皱的原因主要是由于凸模顶部和台阶边缘之间的不均匀拉深造成的。
为了避免起皱,在模具设计中使用有限元模拟做了一些试验,试验最终确定的最优设计就是将阶梯去除。
修改后的模具设计生产出了无缺陷的盒形零件。
模具分析的结果和实际生产所获得的结论证明了有限元分析的准确性和使用有限元模拟的有效性。
因此,可以说:有限元方法可以取代传统的实际生产试验的昂贵的方法。
附件2:外文原文An Analysis of Draw-Wall Wrinkling in a Stamping Die Design Wrinkling is one of the major defects that occur in the sheet metal forming process. For both functional and visual reasons, wrinkles are usually not acceptable in a finished part. There arethree types of wrinkle which frequently occur in the sheet metal forming process: flange wrinkling, wall wrinkling, and elastic buckling of the undeformed area owing to residual elastic compressive stresses. In the forming operation of stamping a complex shape, draw-wall wrinkling means the occurrence of wrinkles in the die cavity. Since the sheet metal in the wall area is relatively unsupported by the tool, the elimination of wall wrinkles is more difficult than the suppression of flange wrinkles. It is well known that additional stretching of the material in the unsupported wall area may prevent wrinkling, and this can be achieved in practice by increasing the blank-holder force; but the application of excessive tensile stresses leads to failure by tearing. Hence, the blank-holder force must lie within a narrow range, above that necessary to suppress wrinkles on the one hand, and below that which produces fracture on the other. This narrow range of blank-holder force is difficult to determine. For wrinkles occurring in the central area of a stamped part with a complex shape, a workable range of blank-holder force does not even exist.In order to examine the mechanics of the formation of wrinkles, Yoshida et al. [1] developed a test in which a thin plate was non-uniformly stretched along one of its diagonals. They also proposed an approximate theoretical model in which the onset of wrinkling is due to elastic buckling resulting from the compressive lateral stresses developed in the non-uniform stress field. Yu et al. [2, 3] investigated the wrinkling problem both experimentally and analytically. They found that wrinkling could occur having two circumferential waves according to their theoretical analysis, whereas the experimental results indicated four to six wrinkles. Narayanasamy and Sowerby [4] examined the wrinkling of sheet metal when drawing it through a conical die using flat-bottomed and hemispherical-ended punches. They also attempted to rank the properties that appeared to suppress wrinkling.A tapered square cup, as shown in Fig. 1(a), has an inclined draw wall on each side of the cup, similar to that existing in a conical cup. During the stamping process, the sheet metal on the draw wall is relatively unsupported, and is therefore prone to wrinkling. In the present study, the effect of various process parameters on the wrinkling was investigated. In the case of a stepped rectangular part, as shown in Fig. 1(b), another type of wrinkling is observed. In order to estimate the effectiveness of the analysis, an actual production part with stepped geometry was examined in the present study. The cause of the wrinkling was determined using finite-element analysis, and an optimum die design was proposed to eliminate the wrinkles. The die design obtained fromfinite-element analysis was validated by observations on an actual production part.Fig.11. Finite-Element ModelThe tooling geometry, including the punch, die and blank-holder, were designed using the CAD program PRO/ENGINEER. Both the 3-node and 4-node shell elements were adopted to generate the mesh systems for the above tooling using the same CAD program. For the finite-element simulation, the tooling is considered to be rigid, and the corresponding meshes are used only to define the tooling geometry and are not for stress analysis. The same CAD program using 4-node shell elements was employed to construct the mesh system for the sheet blank. Figure 2 shows the mesh system for the complete set of tooling and the sheet-blank used in the stamping of a tapered square cup. Owing to the symmetric conditions, only a quarter of the square cup is analysed. In the simulation, the sheet blank is put on the blank-holder and the die is moved down to clamp the sheet blank against the blank-holder. The punch is then moved up to draw the sheet-metal into the die cavity.In order to perform an accurate finite-element analysis, the actual stress–strain relationship of the sheet metal is required as part of the input data. In the present study, sheet metal with deep-drawing quality is used in the simulations. A tensile test has been conducted for the specimens cut along planes coinciding with the rolling direction (0°) and at angles of 45°and 90°to the rolling direction. The average flow stress , calculated from the equation σ=(σ0+2σ45+σ90)/4, for each measured true strain, as shown in Fig. 2, is used for the simulations for the stampings of the tapered square cup and also for the stepped rectangular cup.Fig.2All the simulations performed in the present study were run on an SGI Indigo 2 workstationusing the finite-element program PAMFSTAMP. To complete the set of input data required for the simulations, the punch speed is set to 10m /s and a coefficient of Coulomb friction equal to 0.1 is assumed.2. Wrinkling in a Tapered Square Cup2.1 Effect of Die GapIn order to examine the effect of die gap on the wrinkling, the stamping of a tapered square cup with three different die gaps of 20 mm, 30 mm, and 50 mm was simulated. In each simulation, the die cavity opening is fixed at 200 mm, and the cup is drawn to the same height of 100 mm. The sheet metal used in all three simulations is a 380 mm _ 380 mm square sheet with thickness of 0.7 mm, the stress–strain curve for the material is shown in Fig. 3.Fig 3The simulation results show that wrinkling occurred in all three tapered square cups, and the simulated shape of the drawn cup for a die gap of 50 mm is shown in Fig. 4. It is seen in Fig. 4 that the wrinkling is distributed on the draw wall and is particularly obvious at the corner between adjacent walls. It is suggested that the wrinkling is due to the large unsupported area at the draw wall during the stamping process, also, the side length of the punch head and the die cavity opening are different owing to the die gap. The sheet metal stretched between the punch head and the die cavity shoulder becomes unstable owing to the presence of compressive transverse stresses. The unconstrained stretching of the sheet metal under compression seems to be the main cause for the wrinkling at the draw wall. In order to compare the results for the three different die gaps, the ratio _ of the two principal strains is introduced, _ being _min/_max, where _max and _min are the major and the minor principal strains, respectively. Hosford and Caddell [5] have shown that if the absolute value of _ is greater than a critical value, wrinkling is supposed to occur, and the larger the absolute value of _, the greater is the possibility of wrinkling.The _ values along the cross-section M–N at the same drawing height for the three simulated shapes with different die gaps, as marked in Fig. 4, are plotted in Fig. 5. It is notedfrom Fig. 5 that severe wrinkles are located close to the corner and fewer wrinkles occur in the middle of the draw wall for all three different die gaps. It is also noted that the bigger the die gap, the larger is the absolute value of _. Consequently,increasing the die gap will increase the possibility of wrinkling occurring at the draw wall of the tapered square cup.2.2 Effect of the Blank-Holder ForceIt is well known that increasing the blank-holder force can help to eliminate wrinkling in the stamping process. In order to study the effectiveness of increased blank-holder force, the stamping of a tapered square cup with die gap of 50 mm,which is associated with severe wrinkling as stated above, was simulated with different values of blank-holder force. The blank-holder force was increased from 100 kN to 600 kN,which yielded a blank-holder pressure of 0.33 MPa and 1.98MPa, respectively. The remaining simulation conditions are maintained the same as those specified in the previous section.An intermediate blank-holder force of 300 kN was also used in the simulation.The simulation results show that an increase in the blankholder force does not help to eliminate the wrinkling that occurs at the draw wall. The _ values along the cross-section M–N, as marked in Fig. 4, are compared with one another for the stamping processes with blank-holder force of 100 kN and600 kN. The simulation results indicate that the _ values along the cross-section M–N are almost identical in both cases. In order to examine the difference of the wrinkle shape for the two different blank-holder forces, five cross-sections of the draw wall at different heights from the bottom to the line M–N, as marked in Fig. 4, are plotted in Fig. 5 for both cases.It is noted from Fig. 5 that the waviness of the cross-sections for both cases is similar. This indicates that the blank-holder force does not affect the occurrence of wrinkling in the stamping of a tapered square cup, because the formation of wrinkles is mainly due to the large unsupported area at the draw wall where large compressive transverse stresses exist. The blank-holder force has no influence on the instability mode of the material between the punch head and the die cavity shoulder.Fig 4 Fig 53. Stepped Rectangular CupIn the stamping of a stepped rectangular cup, wrinkling occurs at the draw wall even though the die gaps are not so significant. Figure 1(b) shows a sketch of a punch shape used for stamping a stepped rectangular cup in which the draw wall C is followed by a step D–E. An actual production part that has this type of geometry was examined in the present study. The material used for this production part was 0.7 mm thick, and the stress–strain relation obtained from tensile tests .The procedure in the press shop for the production of this stamping part consists of deep drawing followed by trimming. In the deep drawing process, no draw bead is employed on the die surface to facilitate the metal flow. However, owing to the small punch corner radius and complex geometry, a split occurred at the top edge of the punch and wrinkles were found to occur at the draw wall of the actual production part, as shown in Fig. 6. It is seen from Fig. 6 that wrinkles are distributed on the draw wall, but are more severe at the corner edges of the step, as marked by A–D and B–E in Fig. 1(b). The metal is torn apart along the whole top edge of the punch, as shown in Fig. 6, to form a split.Fig 6 Fig 7In order to provide a further understanding of the deformation of the sheet-blank during the stamping process, a finite-element analysis was conducted. The finite-element simulation was first performed for the original design. The simulated shape of the part is shown from Fig. 7. It is noted from Fig. 7 that the mesh at the top edge of the part is stretched significantly, and that wrinkles are distributed at the draw wall, similar to those observed in the actual part.The small punch radius, such as the radius along the edge A–B, and the radius of the punch corner A, as marked in Fig.1(b), are considered to be the major reasons for the wall breakage. However, according to the results of the finite-element analysis, splitting can be avoided by increasing the above-mentioned radii. This concept was validated by the actual production partmanufactured with larger corner radii.One of the advantages of using finite-element analysis for the stamping process is that the deformed shape of the sheet blank can be monitored throughout the stamping process, which is not possible in the actual production process. A close look at the metal flow during the stamping process reveals that the sheet blank is first drawn into the die cavity by the punch head and the wrinkles are not formed until the sheet blank touches the step edge D–E marked in Fig. 1(b). The wrinkled shape is shown in Fig. 8. This provides valuable information for a possible modification of die design.Fig 84. Summary and Concluding RemarksTwo types of wrinkling occurring in stamping processes were investigated using finite-element analysis, and the causes for wrinkling were examined and the methods to eliminate such wrinkles were developed.The first type of wrinkling appears at the draw wall in the stamping of a tapered square cup. The occurrence of wrinkling is attributed to the large die gap, which is the difference between the side length of the die cavity opening and the side length of the punch head. The large die gap results in a large unsupported area of sheet metal when the metal is drawn into the die cavity and an unfavourable stretch between the punch head and die cavity shoulder. The large unsupported area of sheet metal is therefore prone to wrinkling. The finite-element simulations show that this type of wrinkling cannot be suppressed by increasing the blank-holder force.Another type of wrinkling investigated occurs in an actual stamping part that has a stepped rectangular geometry. It is found that wrinkling occurs at the draw wall above the step even though the die gap is not sufficiently large. The wrinkling is due to the uneven stretch between the punch head and the step edge, according to the finite-element analysis. Several attempts were made in the die design to eliminate the wrinkling, using finite-element simulations, and an optimum design in which the step was cut off is finally established. The modified die design foreliminating wrinkles was validated by the production of a defect-free production part. The good agreement between the simulation results and those observed in the drawn production part demonstrates the accuracy of the finite-element analysis, and the effectiveness of using finite-element simulations as a substitute for the expensive method of actual die try-outs is thereby confirmed.。