pH、ORP电极使用说明书
- 格式:doc
- 大小:227.50 KB
- 文档页数:25


pH/ORP电极使用说明保证书感谢您购买本公司的系列仪表、传感器及配套产品。
本公司系列产品所配套的pH/ORP传感器有限保证如下:保证期限:电极――自购买之日起未经使用为半年。
本公司向你承诺传感器从购买之日起在上述指定期限内,公司产品所提供的配套传感器均为合格正品,如果在保证期内本公司收到有关此类配套产品缺陷的通知,经查实,本公司将负责免费维修或更换有质量缺陷的配套产品。
在使用过程中对下列原因导致的缺陷不予保修或更换。
A、安装、使用不当造成的线缆断裂、损毁;B、私自拆线或接线造成传感器测量不准;C、不谨慎拆卸造成的玻璃部分破碎或接头松脱;D、未按产品规定的条件使用在超出规范的环境造成的损坏;E、没有按照规定的仓储或运输条件储运造成失效的;F、配套传感器存放时间过长自身会失效,建议即买即用,不要存储。
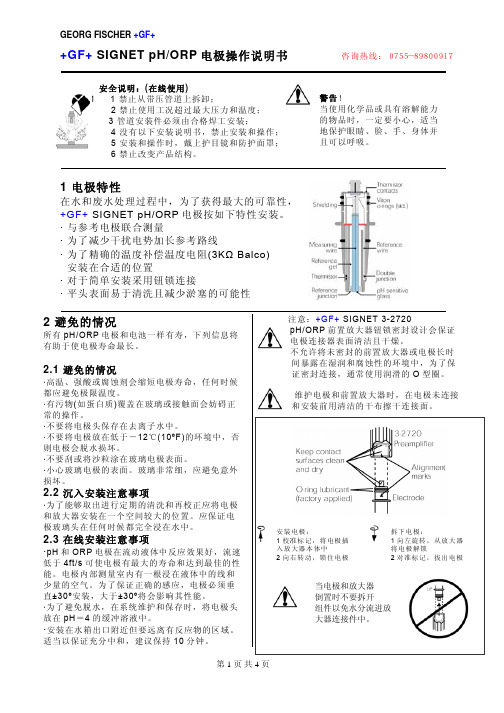
G、PH传感器敏感部分不宜干燥保存,不使用时不要将养护帽除去;一、pH/ORP电极简述1.了解pH/ORP传感器pH/ORP传感器是工业在线(过程)仪表的一次元件,是电化学仪器的一种消耗性传感器。
由于该传感器的制造工艺、电化学特性、应用方式决定其使用有效时间一般不超过一年,由于其使用环境影响和接触介质危害,选型、使用不当有的可能几周就会失效。
即使不安装使用,随着存储期限延长,电极斜率(灵敏度)也会不断下降;多数电极存储期限超过一年,如果电极头干燥放置也会自然失效。
1、电极的灵敏度随着使用时间的延长,电极斜率会发生衰变,导致测量不够准确,需要经常性的利用pH缓冲溶液进行斜率校正。
校正的周期取决于传感器的选型,对精度的要求,测量溶液对电极特性的影响。
2、早期的pH电极是由两个相互独立的参比和指示电极构成,安装使用不太方便。
随着技术的进步后来合并改进为一支电极使用,称为二复合电极。
又因为介质温度变化对电极pH测量存在影响,出现了带有温度补偿电极的三复合电极。
针对介质对pH电极的影响还派生出许多结构和材料各异的pH测量电极来满足pH仪表的配套应用。

PH/ORP电极使用说明书1 概述欢迎使用pH/ORP-660/1/2系列pH/ORP控制器。
它是工业在线分析监测仪表,适用于检测溶液的pH值或ORP值。
其采用微处理器控制智能运行,软件功能丰富,具有安装使用方便,抗干扰性强,维护量小等特点,并设有高精度温度补偿和pH值运行补偿功能。
(PH-3500)本仪表有许多用户友好和安全的功能:●菜单选择pH或ORP功能。
●背光LCD数字显示。
●采用微芯片作数据处理,读数直接,控制精确。
●自动、手动三点校准任意选择。
●具有pH(ORP)上限、下限报警继电器控制输出功能,报警回差可从键盘设置,组成自动闭环控制系统更为灵活,方便。
●4~20mA电流环输出实现信号远传。
●具有菜单输入运行误差补偿功能。
●可选择显示pH、mV值。
●抗干扰能力强,自动掉电复位。
2 主要技术指标●pH测量范围:0~14pH●ORP测量范围:0~±1000mV●分辨率:0.01pH,±1mV●准确度:±0.05pH,±5mV●电极耐压力:0~0.6MPa●供电电源:AC 220V±10% 50Hz●测量距离:不大于40m (电极电缆标准配置5m),距离太长,请选用pH变送仪●触点容量:3A(240V AC)●输出信号:非隔离4~20mA电流环输出(负载≤500Ω)●被测溶液温度:0~80℃●环境条件:温度:0--50℃湿度:≤85%/RH;除地磁场外,无其他强电磁场干扰●手动温度补偿:0~99℃●外形尺寸:48×96×80mm(高×宽×深)●表盘开孔:44×92mm●安装方式:盘装式3 型号、功能说明4 前面板说明4.1液晶屏:用来显示pH 值、mV 值、量程上、下限值、错误标记等。
4.2指示灯: ● H i:上限报警指示灯,当测量值高于上限时或处于上限设定状态时,此灯点亮。
● Lo:下限报警指示灯,当测量值低于下限时或处于下限设定状态时,此灯点亮。
pH(ORP)变送器使用说明书(适用于PB-201型及PB-301型)一. 概述PB-201型pH变送器及PB-301型ORP变送器是一种适合工业流程使用的酸度或氧化还原仪表,本仪器采用双高阻输入与HT2513pH(ORP)复合电极配合使用,将pH或ORP测量值直接转换成4~20mA标准信号,具有可靠.长寿.维护方便的特点。
HT2513pH(ORP)复合电极是由pH玻璃电极(ORP铂金环或黄金针测量电极),参比电极和接地电极组合成一体的三电极测量系统。
该电极系统与本型号变送器组合,具有很强的抗干扰能力,特别适合工业现场测量。
特别注意事项:1.本型号pH变送器与控制器相连接,既可以使用变送器内部的“定位”.“斜率”调节器进行电极标定,也可以使用控制器上的调整键进行标定,一般使用控制器上的调整键更方便。
2.若采用二线制的pH(ORP)复合电极(无接地电极),则应将变送器内部的“地”端与“参比”端相连接,否则将无法测试。
若测试中不稳定,建议再增加“接地电极”接于“地”端,此时应将“地”端与“参比”端的连线割断。
二. 主要技术指标1.测量范围:0~14.00pH 0~1400mV(ORP)2. 输出信号:4~20mA,DC3. 电源:220V±40V4. 信号输出距离:≤100m5.校正功能:2点校正(手动)6. 外形尺寸:120×80×55mm7.信号输入:测量电极和参比电极双高阻输入,具有很强的抗干扰性能。
8.工作环境:防水防潮耐温,能在露天和潮湿的环境条件下使用。
三. 电器连接四. 使用注意事项1.由于pH传感器是玻璃制品,在安装和拆卸变送器时应小心轻放,避免碰撞以免损坏。
电极不宜接触油性物质,如有污物沾染电极敏感部位,可以用0.1%的盐酸清洗,油性污染物可以用脱脂棉蘸肥皂水轻轻搽洗电极敏感部位。
2. pH电极一般使用半年后应定期及时更换新电极,以保持自动控制系统的灵敏,精确和可靠。
ORP复合电极使用说明书一.概述:ORP(又称氧化还原电位)复合电极是由金或铂电极与参比电极组合在一起的复合电极,用以测量溶液的氧化还原电位。
ORP电极有不同的型号,分别适用于不同的场合。
详见下表:型号及名称301Pt-C塑壳ORP复合电极3501Pt-C玻璃ORP复合电极301-S塑壳ORP复合电极2513Pt-C玻璃ORP复合电极特点 PC外壳耐碰撞,凝胶电解液无需补充。
玻璃外壳,可补充外电解液PC外壳耐碰撞,凝胶电解液无需补充。
玻璃外壳,凝胶电解液无需补充。
参比电极Ag/Agcl Ag/Agcl Ag/Agcl毛细管Ag/Agcl 液接界陶瓷芯陶瓷芯陶瓷芯玻璃磨口敏感元件Φ6×2.5铂圈Φ6×2.5铂圈Φ6×2.5铂圈Φ6×2.5铂圈外参比溶液 3.3 mol/L Kcl(凝胶)3.3mol /L Kcl(用Agcl饱和)3.3mol/L Kcl(用Agcl饱和)3.3mol/LKcl(凝胶)外形尺寸Φ12×160mm Φ12×155mm Φ12×160mm Φ12×155mm 电线长度及插头 1m.BNC插头 1m.BNC插头 1m.八芯插头 1m.BNC插头应用范围实验室和现场常规使用,用以测定溶液的氧化还原电位。
实验室常规使用,尤其适合对PC塑壳有溶解性的溶液,以及温度较高的场合。
实验室和现场常规使用,用以测定溶液的氧化还原电位。
适用于连续测试或温度较高的场合,与HT型护套配合,在工业流程中使用。
二.主要技术参数:在ORP标准溶液mV值:222±15mV(25℃)三.ORP标准溶液中的测试:1.将ORP电极接至pH/mV计上,电子单元设定在mV测量档。
2.将ORP复合电极浸入标准液中,搅动后静止放置,待显示值稳定后读数,应符合上述技术标准。
四.使用及维护:1.ORP复合电极使用时无需标定,可直接入仪器使用。
Parts covered by this product data sheet include:SD7000CD, SD7000CD-ORP, SD7500CD, SD7500CD-ORP, SD7420CD, SD7420CD-ORPMechanical InstallationSubmersion InstallationMake a submersible conduit assembly using 1.5" F x 1" F reducer and 1" pipe. On top of the pipe, mount a junction box. with a 2-sided terminal strip. Thread the electrode onto the reducer. Be sure to use sealing tape or paste. Attach the wires to one side of the terminal strip and an extension cable to the other. Match colors if using the same wires colors. See FIG 3.In-Line InstallationUse pipe sealing tape or paste on the 1.5" threads near the pH glass and salt bridge. Thread into user-supplied SCH80 1.5" threaded tee. See FIG 4.6. Readings stabilize faster in some solutions than in others; allow time for the readings to stabilize. In general, new pH electrodes stable readings display in 10-15 seconds. ORP stability in samples can take much longer.7. All pH electrodes age with time. Aging is characterized by shortened span and slower speed of response. Aging is best detected by the two-point calibration method. If the pH meter has manual or microprocessor slope (span) controls, the controls can be adjusted to compensate for electrode span errors (but will not affect the speed of response).8. Salt bridge should be replaced when the electrode readings cannot be corrected by the meter's controls and/or when their speed of response is too slow for the application for which they are being used. The frequency of electrode replacement is a function of the application; electrodes operating in hot liquids at very high or very low pH values will have shorter lives than those operating at neutral pH and ambient temperature.9. Coatings on an electrode's surface prevent new liquids from contacting an electrode's measuring surface and can mimic the effects of electrode aging. Before concluding that a salt bridge needs replacing, check the pH glass surface for coatings by removing the pH electrode cartridge and looking at the pH glass.10. Temperature affects electrode readings in two ways. First, the output of an electrode varies with temperature. For pH elec- trodes this effect can be corrected by automatictemperature compensation (ORP/Redox readings are notcorrected for temperature effects). Secondly, the real pH or ORP value, independent of the electrode measuring the value or use of the temperature compensation, is temperature dependent.Electrode Calibration Guidlines:As a rule, follow the procedures shown in the pH Meter's Instruction Manual. These procedures will vary depending on whether the meter is a simple type with manual adjustments, a micro-processor type or a pH transmitter.The frequency of calibration is a function of many factors. These factors include:1) The accuracy required by the application.2) The value of the off-specification product versus the costof calibration.3) The coating or abrasive nature of the application.4) The stability of the pH Electrode and pH Meter as a system.The frequency of calibration is really determined by experience. At a new installation, calibration might initially be checked every few hours or shift with the calibration changesnoted in a log. As a pattern of longer stability is found, the time between calibration checks can be increased to once a day or once a week.System Calibration ConceptsThe pH Electrode and the pH controller should always be cali-brated as a system. Electronic calibration of a pH controller with a pH signal simulator checks the controller only and does not cor-rect for imperfections of the pH electrode. Even if perfect when new, the performance of pH electrodes varies with time, usually in an unpredictable way. When changing electrodes or connect-ing an electrode to a different pH controller, re-calibration must be performed. ORP is usually not calibrated but quinhydrone based solution or other standardscan be used to verify ORP sensor performance. See FIG. 9.Two-Point CalibrationsTwo-point calibrations correct for both the pH electrode's offset and span errors. Since both the offset and span vary with time the two-point method is the onr preferred. Choose buffer pH 7 for zero-point and a second buffer close to your normal operat-ing range (usually pH4.01 or pH 10.00). See FIG. 8 A-C.Grab Sample CalibrationsThe Grab Sample Calibration method is used when it is difficult or undesirable to remove an electrode from a system. This meth-od involves obtaining a sample of the liquid being measured and noting the meter's reading at that time. The sample's reading is obtained by use of a calibrated lab or portable meter and that reading is compared to that of the on-line meter. The on-line meter is adjusted by the difference between the readings. It is important to use the difference between the readings because the system's reading may have changed in the intervening time. It is important that the sample being measured by the lab meter be at the process temperature or erroneous results may occur.Intermittent OperationSome facilities are only operated part of the time. When out of operation, electrodes must not be allowed to be exposed to air and become dry. Electrodes should be removed from such systems and stored in their bottles or caps or in a beaker filled, preferably, with pH 4.0 Buffer. In some instances, power to the meter is shut off; this condition can be harmful to elec-trodes. Electrodes should be disconnected from un-powered meters.Electrode WiringSee the figures 10 through 17 to find wiring for your particu-lar pH or ORP controller or transmitter. Figures 10-17 apply to SD7000CD and SD7000CD-ORP sensors only. If you don't see a wiring diagram for your make and model number of controller, please contact Sensorex Technical support at tech-**************************************.Figure 18 is wiring for the SD7420CD & SD7420CD-ORP sen-sors. These sensors are loop powered 4-20mA.Figure 19 is wiring for SD7500CD & SD7500CD-ORP sensors. These sensors DO NOT REQUIRE POWER. Do not connect to power. These are self-powered.AquametrixSharkControllerAquametrixSharkTX/PTransmitter FIG. 10FIG. 11Troubleshooting Your SD7000 Series ElectrodeGeneral TroubleshootingAlways check all electrical connections. Make sure all parts are assembled correctly and o-rings are well greased. Electrode Troubleshooting1. Put the sensor in a pH 7 buffer solution and wait for the tempera-ture of the sensor and buffer to reach room temperature.2. Disconnect the red, green, yellow and black sensor wires from the module ( applies to SD7000CD, SD7000CD-ORP , SD7500CD, SD7500CD-ORP).3. Measure the resistance between the yellow and black wires to ver-ify the operation of the temperature element. The resistance should be between 250 and 350 ohms at approximately 25 ºC (SD7000CD only). For SD7500CD the resistance should measure about 1100 ohms at 25 ºC. If the temperature element is good, reconnect the yellow and black wires to the module.4. Measure the DC mV with the multimeter (+) lead connected to the red wire and the (–) lead connected to the green wire. The reading should be between –50 and + 50 mV. If the reading is outside of these limits, clean the sensor and change the salt bridge and stan-dard cell solution.5. With the multimeter still connected the same way, rinse the sensor with water and put it in a pH 4 or pH 10 buffer solution. Wait for the temperature of the sensor and buffer to reach room temperature.6. Compare the mV reading in the pH 4 or 10 buffer to the reading in the pH 7 buffer. The reading should differ by approximately 160 mV. If the difference is less than 160 mV, call technical support.7. The SD7420CD & SD7420CD-ORP sensors are loop-powered 4-20mA. In pH7 buffer the SD7420CD output should measure ap-proximately 12mA. For SD7420CD-ORP , use B225 solutions. The reading should be approxiamately 8.9mA.Buffer reading Possible Cause Corrective Action 6.2-6.8 in all buffers a) Cracked pH glass a) Replace electrode b) Stress crack b) Contact Sensorex for Return Authorization 7.00 in all buffers a) Bad connection a) Check/fix connection b) Internal short circuit b) Contact Sensorex forReturn Authorization Buffers read close to a) Dirty electrode pH glass a) Clean electrode expected value but and/or reference junction speed of response* is slow (>30 seconds) Short span*** a) Dirty pH glass or reference a) Clean pH glass or replace(Less than 70%) junction salt bridgeb) Aged electrode b) Replace electrode (too old)Unstable ordrifting reading Reference dirty or plugged Clean pH glass or replace salt bridgepH ELECTRODE TROUBLESHOOTINGSEE CONTROLLER MANUALFIG. 13GLI P63GLI P53 FIG. 16Ordering InformationPart Number DescriptionSD7000CD Differential pH sensor with replaceable saltbridge, 20ft cable, tinned leads, 1.5” NPT mounting.Replacement salt bridges sold separately.SD7000CD-ORP Differential ORP sensor with replaceable saltbridge, 20ft cable, tinned leads, 1.5” NPT mounting.Replacement salt bridges sold separately.SD7420CD Differential pH sensor with replaceable saltbridge, 20ft cable, tinned leads, 1.5” NPT mounting, 4-20mA loop-powered. Replacement salt bridges sold separately.SD7420CD-ORP Differential ORP sensor with replaceable salt bridge, 20ft cable, tinned leads, 1.5” NPT mounting. 4-20mA loop-powered. Replacement salt bridges sold separately.SD 7500CD Differential pH sensor with replaceable salt bridge, 20ft cable, tinned leads, 1.5” NPT mounting, self- powered. Replacement salt bridges sold separately.SD 7500CD -ORP Differential ORP sensor with replaceable salt bridge, 20ft cable, tinned leads, 1.5” NPT mounting, self- powered. Replacement salt bridges sold separately.SDA-7001 Replacement salt bridge quantity 1 each for pH and ORP differential sensorsSDA-7003 Replacement salt bridge quantity 3 each for pH andORP differential sensorsSDA-7010 Replacement salt bridge quantity 10 each forpH and ORP differential sensorsSDS-7015 Standard Refill solution for PH and ORP differential sensors, 150mLSDS-7025 Standard Refill solution for PH and ORP differential sensors, 250mLSDS-7050 Standard Refill solution for SD7000 Series sensors,500mLProduct SpecificationsElectrode Specifications:SD7000CD , SD7000CD-ORPpH Range: 0-14Temp/Pressure: Min 32° F(0°C)/ Max 140° F/(60° C)Speed of Response: 95% in 5 secondsWetted Materials: PPS (Body), PVDF(Salt bridge junction),pH glass (pH), Platinum (ORP), Titanium (ground pin), Viton (o-rings) Cable Length: 20ft Max flow Rate: 10ft./sec Max transmission distance: 3000ft (914m)GLI P53 - "B" prefix Serial Nos.1 21 2 3 4 5 6 7 8J4J5RED GRN CLR WHT YEL BLKSENSOREX CORPORATION LIMITED WARRANTYSENSOREX warrants the SD7000, SD7500 and SD7420 sensors all to be free of defects in materials and workmanship for 2 years from date marked on the product. Sensorex will replace any sensor that is deemed to have a workmanship defectwithin 1 year of the manufacture date stamped on the product (WWYY code) free of charge. Products beyond 1 year date code will have a prorated warranty cost for replacement. Con-tact Sensorex for details. SENSOREX offers no warranty, either expressed or implied, as to the useful life of these products. There are no implied warranties of merchantability or fitness for a particular purpose given in connection with the sale of any goods. In no event shall SENSOREX be liable for conse- Cable 20ft, Red = +Black = -+-Power SupplySD7420CD & SD7420D-ORP。
指导手册pH / ORP 传感器(电极)●请将手册置于操作人员方便取拿之处。
●使用前请详阅手册中的正确操作方法。
安全警告(1)开始接线操作前请确保电源已切断。
(2)电极的主要成分是玻璃,而HC-72和HC-81的内管也是由玻璃制造。
请小心轻放以免损坏电极或被玻璃碎片所伤。
目录1、概述 (2)2、系统配置 (2)3、安装 (3)4、运行 (7)5、校准 (9)6、维护 (12)7、故障检修 (16)8、传感器装拆 (17)pH变送器和ORP 变送器是分别用来测量液体的pH值和氧化还原电位的。
这本指导手册对测量系统的表述是建立在pH检测计和ORP 检测计的传感器之上的。
至于变送器的调整,请根据不同型号查阅另外提供的指导手册。
另外,传感器上配备一清洗系统,关于清洗系统细目请参照另外单独准备的指导手册。
pH/ORP测量系统的基本组成是一个传感器和一台变送器。
在某些情况下还加入记录仪。
当变送器位于离测量点较远的位置时,在测量点附近安置一个接线盒并用延长电缆把接线盒和变送器连接起来,如下图所示。
3页图:pH/ORP测量系统图例(1)电极通常,复合式电极是由一个玻璃电极,一个叁考电极和一温度补偿元件组成的一个单一体。
而传统的非复合式电极,3个电极被分别安装在传统的电极夹具中并各自独立工作。
电极导线直接连接变送器或接线盒。
(2)电极支架电极支架要能够把电极安全地固定在样品中以便于电极的测量。
至于电极支架的类型,目前广泛运用的是浸入式和流通式两种。
前者是安装在暴露在空气中的水槽的液面上;而后者是被装在流动样品的的管道中。
电极支架跟电极合起来称为感应器。
(3)接线盒连接延长电缆和电极导线需要有一个具有高绝缘端子板的接线盒。
(4)延长电缆连接接线盒和变送器需要具有高绝缘性的延长电缆。
3.1 传感器的安装(1) 安装位置的选择安装位置的选择应考虑以下条件:(a) 必须便于操作和维护, 尤其要保证维修所需的充足空间。
(b) 应避免机器振动, 远离会产生电磁波感应干扰的电子设备及快速转动的设备。
(c) 样品液面变化时应保证电极能始终浸入样品。
(d) 如果样品含有气泡、浆料或固体等有可能损害电极的固体颗粒,在测量之前应消去。
(e) 搅拌操作时要保证样品的温度不超过允许的范围。
(f) 当流通式传感器被安装在管道时,请加装带有截止阀的旁路管,使电极支架可以在不影响操作过程的情况下从管道中移开进行维修。
请在电极支架上方保留充足空间以便电极支架因突发事件需要卸下维修。
(2) 浸入式传感器的安装浸入式传感器的安装请遵照下面图例。
[重要]•电极要小心轻放,过大的压握可能损害电极。
使用安装附件A的使用安装附件B的使用安装附件D的使用敞开法兰安装带清洗系统的带接头的传感器安装图例接头的带清洗系统传感器安装图例传感器安装图例的传感器安装图例4页图:传感器安装图例[注意]•DKK-TOA公司提供安装附件,可选择。
(3) 流通式传感器的安装[注意]•NHC-87型传感器可按下述相同方式安装。
5页上图:流通式传感器的安装(a) 如上图所示装备一条有旁路阀和截止阀的旁路管。
(b)为了便于测量管中样品的更换,将电极支架垂直安装在测量管上,以保证样品能从电极支架的底部进入并从上部溢出。
(c) 在电极位置完全固定之前请关闭2个截止阀。
(d) 在校准期间,由于加压式传感器需要在测量管内上下移动,因此在仪表加压空气通往传感器时,不要把空气管过紧地固定连接到传感器上。
3.2接线盒的安装5页下图:接线盒的安装(a) 因为电极导线的标准长度是 3m 或 5m,安装位置应靠近电极支架。
[重要]•注意接线盒的位置和高度,以便维修时盒盖和导线能容易地移动或安装。
(b) 用安装附件将接线盒安装在25~50A的管上、墙上或板上,如上图所示。
3.3 布线(1)电缆的安装6页上图:电缆的安装如上图所示, 安装各个缆线时请遵照有关规定和限制。
关于变送器的接线细目,请叁照变送器指导手册。
[重要]•由于传感器在维护时必须从测量点提升出来,因此装置电极导线应使用挠性套管而不是用硬套管。
(a) 测量线 (延长电缆)确保连接测量线的延长电缆有足够的长度,用于连接接线盒和变送器。
延长电缆的两端标有记号,“传感器”端和“变送器”端。
依照指导手册将“变送器”端连接到变送器的端子板,并将“传感器”端通过接线盒的水- 密封电缆接口连接到接线盒上。
延长电缆是一根带屏蔽的高绝缘缆线,其绝缘电阻大于105MΩ/lOOm.[重要]•确保使用的是一根单独的延长电缆,因为它不能被其他电缆延长。
(ⅰ)用于pH变送器的延长电缆6页下图:延长电缆[重要]•如果延长电缆的端子沾水变潮,或被手指、油性材料弄脏,指示将变得不稳定。
•应始终保持延长电缆的端子干燥洁净。
如果弄湿或弄脏时,请用酒精清洗然后使其干燥。
[注意]•请确保延长电缆安装在挠性套管中,以保护其免受物理损害及避免由于延长电缆的振动产生的静电。
7页上图:延长电缆到接线盒的连接(ii) 用于ORP 变送器的延长电缆ORP 变送器的延长电缆没有“3”号导线端(绿色)和“4”号导线端(蓝色),但其余导线与(i)中图示相同。
(b) 延长电缆的端子处理(i) 出厂前延长电缆的两端都被DKK-TOA 处理过。
如果一根延长电缆的端子没被处理过或延长电缆不得不被割断而且重复使用, 依下列各项处理。
(ii)请注意端子的处理,在传感器端和在变送器端不同。
(iii)如果测量中不使用测温元件, 请用小乙烯袋将端子“3”和“4”包扎起来,以避免与其他端子接触。
传感器端的端子处理①剥开电缆护套,拉出每根导线……剥开外护套并放松外屏蔽层,逐一拉出每根导线。
7页下图:剥开外护套并逐一拉出每根导线②取掉黑色护套和缓冲垫……整理好外屏蔽层, 然后从PE绝缘导体上取掉缓冲垫和黑色护套,保留黑色护套距外护套端口约5mm 。
8页上图:取掉黑色护套和缓冲垫③取掉半导体护套……放松PE 绝缘导体上的内屏蔽层,然后取掉PE绝缘导体上的半导体护套。
[重要]•确定取掉PE绝缘导体上的半导体护套。
•当取下半导体护套时,注意不要损害PE上的绝缘层。
8页中图:取掉半导体护套④在外屏蔽层和内屏蔽层上套上黑色乙烯套管……放松外屏蔽层并且切断约超过它的 50%。
然后, 分别把一段黑色的乙烯套管(Ф3)套在剩余的外屏蔽层上,把另一段黑色的乙烯套管(Ф2)套在PE绝缘导体的内屏蔽层上。
[重要]•注意内屏蔽层和外屏蔽层决不能相碰。
8页下图:在外屏蔽层和内屏蔽层上套上黑色乙烯套管⑤安装压接端子结束端子处理……如上所示将绝缘体从每个导体的终端取掉6mm,然后把压接端子(M3,圆形) 和导线标号分别压接在每根导线上,最后用黑色乙烯带包住外护套的终端以加固电缆的终端。
9页上图:使用压接端子并结束端子处理变送器端的端子处理①取掉半导体护套……遵照上述的传感器端端子处理的步骤①~③。
②将乙烯套管套在PE绝缘导体上……取掉全部外屏蔽层, 然后将黑色乙烯套管(Ф2)套在PE绝缘导体的屏蔽层上。
9页中图:将乙烯套管套在PE绝缘导体上③安装压接端子结束端子处理……如上所示将绝缘体从每个导体的终端取掉6mm,然后把压接端子(M4,圆形) 和导线标号分别压接在每根导线上,最后用黑色乙烯带包住外护套的终端以加固电缆的终端,如下图所示。
9页下图:使用压接端子并结束端子处理(2)布线图10页上图:带导线3、4的电极布线图10页中图:不带导线3、4的电极布线图(a) 在下列情况中, 依照10页上图“带导线3、4的电极布线图”布线。
• pH电极与温度补偿元件是合成一体的。
• pH电极没有与温度补偿元件合成一体,而是独立提供一个温度感应元件,组合应用。
• ORP电极和温度感应元件是合成一体的。
(b) 在下列情况中, 依照10页中图“不带导线3、4的电极布线图”布线• ORP 电极是用于一般用途,(没有温度感应元件)。
• pH电极没有与温度补偿元件合成一体。
(c) 没有使用接线盒,电极导线直接连接到变送器的端子板。
(d) 变送器的端子排列因型号不同而不同,关于各自的接线细目请参阅相关的指导手册。
(3)接线盒的布线11页上图:接线盒的电缆入口(a) 电极导线的连接11页中图:电极导线的引入①卸下盒盖……打开两个防水密封电缆入口中的一个,接线盒的气密性被打破,打开盒盖就容易的多。
然后,卸下盒盖。
②将电极导线引入接线盒……从接线盒的电极导线入口处取下防水密封压盖。
然后,按顺序将电极引线穿过防水密封压盖、垫圈和锥形密封圈。
注意,锥形密封圈有3个直径不同的孔(φ4,φ5,φ6)以适用于不同尺寸的电缆,每个孔都用一片橡胶薄膜覆盖。
选择一个与电缆尺寸相适应的孔,将电缆穿过橡胶薄膜。
然后将电极导线引入接线盒。
[重要]•注意,如果导线穿过一个与电缆尺寸不合的孔,将破坏接线盒的气密性。
③布线……确认每根导线上的标号,将电极导线连接到接线盒对应标号的端子上,如下图所示。
12页上图:电极导线到接线盒的连接(b) 延长电缆的连接12页中图:延长电缆的引入①引入延长电缆到接线盒……从接线盒的延长电缆入口处取下防水密封压盖。
然后,按顺序将延长电缆穿过防水密封压盖、垫圈和锥形密封圈。
[重要] •为了接线盒气密的可靠,要将延长电缆护套12页下图穿过锥形密封垫足够的深,如右图所示。
插入电缆护套向上到这里②布线……将延长电缆的导线连接到接线盒标号对应的端子上,如下图所示。
③上紧防水密封压盖……上紧防水密封压盖时,将接线盒里的导线留长一些,然后盖上接线盒盖。
13页图:延长电缆到接线盒的连接(c) 接线盒地线的布线遵照D级接地标准(接地电阻≦100Ω),从接线盒底部的接地端子连接地线到大地。
不要用地线连接其他电气设备。
4.1 运行准备(1) 浸入式传感器的准备14页图:浸入式传感器①从测量点拆下传感器……从测量点拆下传感器并用纯净水彻底清洗电极支架。
②打开填充内部液的孔……旋转支架的上帽直到旋不动,使填充内部液的孔完全打开。
[重要]•注意,如果在填充内部液的孔打开之后将传感器水平放置,传感器的内部液会由电极支架溢出。
③移开电极尖端上的橡皮帽……如果橡皮帽仍然附在电极的尖端上,请取下它。
④把电极尖端浸于自来水中……在开始校准之前请把电极尖端浸入自来水中超过30分钟。
[重要]•注意如果电极尖端在它的橡皮帽被移开之後暴露在空气中,电极尖端将被风干,而且电极恢复其正常特性将需要一段比较长的时间。
(2)流通式传感器(型号;HC-81□,HC-862)的准备15页图:流通式传感器①装配电极……将电极装配到电极支架上。
然后,填充内部液并给电极支架加压。
→“8.3 传感器,型号: HC-81□, HC-862, NHC-813”②把电极尖端浸入到自来水中……在开始校准之前把电极尖端浸入自来水中超过30分钟。