E路航导航系统产品使用说明书(精品资料).doc
- 格式:doc
- 大小:30.00 KB
- 文档页数:5


E路航X20各套餐安装连接说明2012-5-21 20:52阅读(3114)导航自带的电子狗DSA数据需要更新,解压后的Alarm文件夹覆盖原文件夹。
可以与地图自带的测速同时使用。
外置电子狗不需更新,上面的按键操作时连接导航有提示声音,模式为城市、高速及静音三种模式。
正常设置为静音,导航会有提示开什么屏。
2013-2-24铭天汽车用品专营店:3号(2013-02-24 16:37:45):导航不需要设置的吖xiayi0425(2013-02-24 16:39:38):导航自带电子狗与软件带的固定测速能同时使用吗铭天汽车用品专营店:3号(2013-02-24 16:39:48):可以啊xiayi0425(2013-02-24 16:40:53):正常两个需要同时升级吗铭天汽车用品专营店:3号(2013-02-24 16:41:04):导航自带的不能升级升级DSA数据就可以了xiayi0425(2013-02-24 16:43:26):将解压后的Alarm文件夹直接覆盖原文件夹,对吗铭天汽车用品专营店:3号(2013-02-24 16:43:32):是的xiayi0425(2013-02-24 16:44:08):外置的电子狗需要升价吗升级铭天汽车用品专营店:3号(2013-02-24 16:44:23):不需要xiayi0425(2013-02-24 16:44:45):上面按键是干嘛用的铭天汽车用品专营店:3号(2013-02-24 16:44:59):测留动不是语音播报的,而是以K、KA、X频等等播报,那说明前方有流动测速电子眼,或者受到干扰信号(超市、发射塔、银行门对雷达都会有干扰也会播报)您的硬件接吸盘的那一面有一个长方形的按钮这个按钮就是调模式的一共有3个模式城市模式高速模式语音解除您跟导航链接起来就把硬件调到语音解除就可以了,硬件测到的信号会通过导航报出来。
插上电源按那个按钮会报给您当前模式的。

e路航LH900N使用说明书简介e路航LH900Ne路航LH900N支持无线倒车后视功能,支持A V IN输入接口,支持电子相册功能, 支持JPG、GIF、BMP、PNG等格式文件浏览;e路航LH900N采用全触摸屏无按键设计,内置多款游戏编辑本段功能1. 拥有蓝牙功能,是可以打电话的GPS。
与蓝牙手机相接,可以当车载免提电话使用。
2:带A V IN输入接口,支持无线倒车后视,可选配高清晰无线摄像头。
3.支持卫星导航、定位;FLASH动画播放、视频播放、音频播放(MP3/MP4)、; 4. 日程安排,唐诗宋词,词典翻译,Windows操作界面,记事本,计算器,5、FM无线发射,游戏等功能;6、支持多国语言设置,时间设置,声音设置,背光设置,电源设置,文件管理,坐标调整,系统升级,系统资源;特点:编辑本段基本参数产品类型PND便携机屏幕尺寸4.3英寸屏幕类型4.3"高分辨率TFT液晶触摸显示屏屏幕分辨率480x272像素产品尺寸125*78*15mm 机身特点全触摸屏无按键设计系统参数GPS芯片SiRFstar III 操作系统Windows CE 6.0 存储扩展存储介质SD/MMC/TF 扩展卡最大容量SD:16GB 数据接口MiniUSB接口产品内存64MB 处理器中央处理器Atlas-III AT642D 372/396MHz A V接口2.5mm 导航参数导航地图导航地图:内置E路航正版地图papago趴趴走地图功能:3D画面/路口放大/路径规划/语音提示/自动/设施咨询/快速查找/显示设定模块灵敏度模块灵敏度:-159dBm 卫星通道24通道定位精度<10米启动时间平均冷启动42S/温启动28S/热启动1S 语音导航全程语音导航其他导航功能接受频率 1.5754GHZ 差分模式DGPS 数据输入A V输入接口IN输入接口娱乐参数数字电视可外接CMMB移动数字电视,同步接收海量电视节目视频播放电影:支持WMV/ASF/A VI等播放;可调节播放进度/暂停/全屏播放视频文件游戏:内置益智游戏音乐:支持WMA9/MP3/W A V 格式的音频播放,支持顺序播放/随机播放/循环播放电子书:支持TXT格式文本工具:日历/计算器/单位换算三种实用工具图片:支持JPG/GIF/BMP/PNG格式图片FLASH: 支持SWF/FLV格式播放FM发射支持蓝牙免提蓝牙(选配):蓝牙免提功能,带回声消除效果其它参数菜单语言简/繁体中文/编辑本段系统参数GPS芯片:SiRFstar III纠错操作系统:Windows CE 6.0纠错存储扩展:存储介质SD/MMC 扩展卡最大容量SD:16GB纠错数据接口:MiniUSB接口英/法/德/ 意大利/西班牙/葡萄牙/荷兰/丹麦/瑞典/挪威/希腊等多国语言内置:电池类型内置900mAH聚合物锂电池电源性能电源充电器:120/230V适配器,5伏/1.5安培,USB 插头车用充电器:12~36.7伏转5伏/1.5安培,USB插头产品天线内置其他性能电子狗:内置固定电子眼数据,实时升级更新;可外接雷达实现流动测速预警功能A V-IN(选配): 支持无线倒车后视TMC(选配): 可外接实现实时交通信息共享功能其他特点输出功率喇叭2W / 8R 工作温度0℃-60℃存放温度-20℃-60℃随机附件车载支架、车载充电器、旅行充电器、GPS说明书E路航LH900N 汽车车载导航仪图册(2张)。
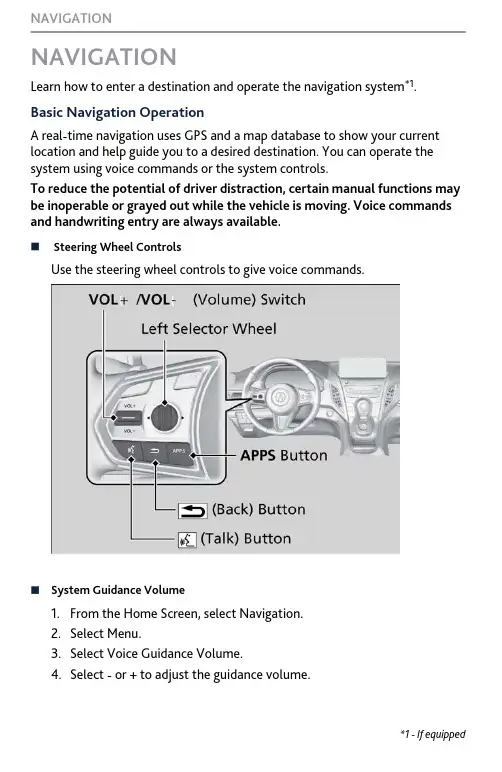
NAVIGATIONLearn how to enter a destination and operate the navigation system *1.Basic Navigation OperationA real-time navigation uses GPS and a map database to show your current location and help guide you to a desired destination. You can operate the system using voice commands or the system controls.To reduce the potential of driver distraction, certain manual functions may be inoperable or grayed out while the vehicle is moving. Voice commands and handwriting entry are always available.n Steering Wheel ControlsUse the steering wheel controls to give voice commands.n System Guidance Volume1.From the Home Screen, select Navigation.2.Select Menu.3.Select Voice Guidance Volume.4.Select - or + to adjust the guidance volume.*1 - If equipped NAVIGATIONn Navigation Display and ControlsTouch icons on the screen to enter information and make selections.Entering Your DestinationThere are several methods to enter a destination.n Home AddressStore your home address in the system so you can easily route to it.1.Select Set Home Address.2.Enter your home address, and thenclick touchpad A.Select ENTER and then click thetouchpad A if using the on-screenkeyboard.3.Select your home address from the search results.n Street Address1.Select a search method to enter anew destination.2.Select GO on the right side of yourdestination.If you select the destination fromrecent destinations or favoritelocations, select the location name.3.Select Start New Route.You can add the location to the current route.NAVIGATIONRoutingAfter a destination is set, you can alter or cancel your route.nMap Legend Using the navigation system while driving can take your attention away from the road, causing a crash in which you could be seriously injured or NAVIGATION。
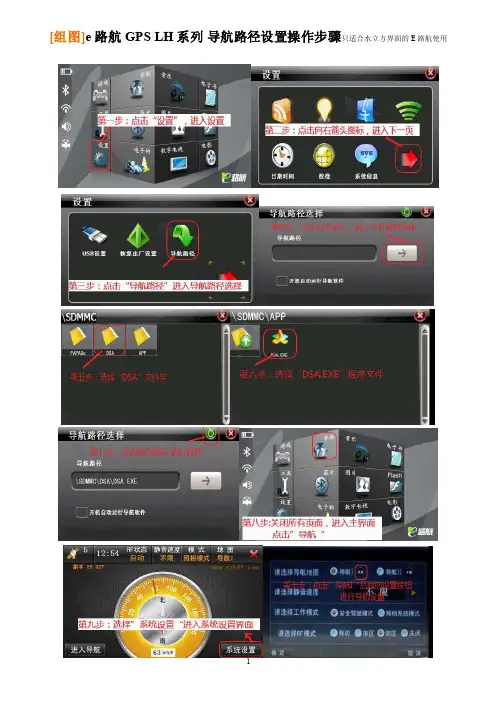
[组图]e路航GPS LH系列导航路径设置操作步骤只适合水立方界面的E路航使用800*480一机多图程序,GPS高清一机多图800x480分辨率一机多图!5寸高清屏幕,7寸高清屏幕,DVD导航高清屏分辨率1、将解压后的“一机多图”文件夹复制到SDMMC根目录下2、设置--导航路径--修改路径:/SDMMC/一机多图/OTHERS.EXE3、点“导航”键就进入多图页面了经过努力,制作完成一机多图程序,可以根据自己需要修改导航软件的路径和图标。
教你如何用WORD文档(2012-06-27 192246)转载▼标签:杂谈1. 问:WORD 里边怎样设置每页不同的页眉?如何使不同的章节显示的页眉不同?答:分节,每节可以设置不同的页眉。
文件――页面设置――版式――页眉和页脚――首页不同。
2. 问:请问word 中怎样让每一章用不同的页眉?怎么我现在只能用一个页眉,一改就全部改了?答:在插入分隔符里,选插入分节符,可以选连续的那个,然后下一页改页眉前,按一下“同前”钮,再做的改动就不影响前面的了。
简言之,分节符使得它们独立了。
这个工具栏上的“同前”按钮就显示在工具栏上,不过是图标的形式,把光标移到上面就显示出”同前“两个字来。
3. 问:如何合并两个WORD 文档,不同的页眉需要先写两个文件,然后合并,如何做?答:页眉设置中,选择奇偶页不同与前不同等选项。
4. 问:WORD 编辑页眉设置,如何实现奇偶页不同比如:单页浙江大学学位论文,这一个容易设;双页:(每章标题),这一个有什么技巧啊?答:插入节分隔符,与前节设置相同去掉,再设置奇偶页不同。
5. 问:怎样使WORD 文档只有第一页没有页眉,页脚?答:页面设置-页眉和页脚,选首页不同,然后选中首页页眉中的小箭头,格式-边框和底纹,选择无,这个只要在“视图”――“页眉页脚”,其中的页面设置里,不要整个文档,就可以看到一个“同前”的标志,不选,前后的设置情况就不同了。
1Introduction ................................ 3Manual Overview ...........................3System Overview............................3Accessories Precautions .................3Important Safety Information.........4Map Overview .. (4)User Agreement (6)Getting Started............................ 8System Controls .............................8V oice Control Basics .. (10)Using the Voice Control System (11)Improving Voice Recognition..........12Selecting an Item (Button) on the Screen ........................................13Selecting an Item in a List............13Using the On-screen Keyboard.....14System Start-up ............................15Map Screen...................................16Map Screen Description ...............17Displaying Current Location........17System Function Diagram (18)Entering a Destination .............19By Address .. (20)Selecting the State (20)Selecting the City (20)Selecting the Street .........................21Entering the Street Number ............21By Intersection .............................22Changing the State .........................22Changing the City...........................22Selecting the Street .........................23By Places ......................................24Find Place by Category ..................24Place Name by Keyword.............26Sort by Distance to Travel...........26A City Vicinity ............................27Place Name..................................27Find Place by Name........................27Find Place by Phone Number.........27By Map Input................................28Show Area of Current Position .......28Show Area of a City ........................28Show Area of a State.......................29Show Area of Continental USA.......29By Previous Destination...............30By Today’s Destinations...............30Editing Today’s Destinations List...30Adding Destinations to the List ......31By Personal Address.....................32By Go Home.................................32Driving to Your Destination.....33Add to Today’s Destinations.........33Destination Map ...........................33Change Method ............................33Show Routes.................................34Map Screen...................................34Guidance Screen...........................36Direction List................................37Splitscreen Guidance....................38Unverified Routing .......................39Going Off the Route .....................42View/Save Current Location ........42Changing Your Destination...........43Landmark Icons............................43Continue Trip................................45Information Features................46Trip Computer ..............................46Voice Command Help...................47Calendar........................................47Storing Your Schedule.....................48Calculator .....................................49System Set-up............................50Set-up Mode (50)Distance and Time to Destination 37Map Scale 38...................................Map Orientation ...........................38Track Offroad Position ............45....Destination Icon...........................45Refer to 2005 Accord 4d r Owner's Manual for more e these links (and links throughout this manual) to navigate through this reference.For a printed owner's manual, click on authorized manuals or go to .Table of ContentsShow Icon on Map (52)Guidance Mode (52)Set-up Screen 2 (53)Edit Personal Information: PersonalAddress (53)Accessing the Personal AddressesList (53)Entering Personal Addresses (53)Edit Personal Information: HomeAddress (56)Edit Personal Information: PINNumber (56)Personal Address PIN (56)Go Home PIN (57)Delete Previous Destination (57)Reroute (58)Track Offroad Position (58)Set-up Screen 3 (59)Voice Feedback (59)Guidance Voice (59)Keyboard Layout (59)Units (Mile or Km) (59)Background Color (59)Set-up Screen 4 (59)Time Zone/Clock (59)Auto Daylight Saving Time (60)Auto Time Zone by GPS (60)Time Adjustment (60)Adjust: Vehicle Position (60)Unverified Routing (61)System Information (62)System Initialization (63)Entering the Security Code (63)GPS Initialization (64)Map Matching (64)System Limitations (65)Database Limitations (66)Customer Assistance (67)Reporting Errors (67)Honda Automobile CustomerService (67)Obtaining a Navigation Update DVD (67)Changing the DVD (68)PC Card (68)Coverage Areas (69)Map Coverage (69)U.S. Detailed Coverage Areas (69)Canada Detailed Coverage Areas..73Frequently Asked Questions (78)Troubleshooting (81)Glossary (82)Voice Command Index (85)Global Commands (85)Navigation General Commands (85)Navigation Display Commands (86)Find Place Commands (86)Climate Control Commands (87)Temperature V oice Commands (87)CD V oice Commands (88)Radio V oice Commands (88)Information ScreenV oice Commands (89)Set-up Screen 1 Commands (89)On Screen Commands (89)Index (90)Set-up Screen 1 (50)Brightness (50)Volume (50)Display (51)2。
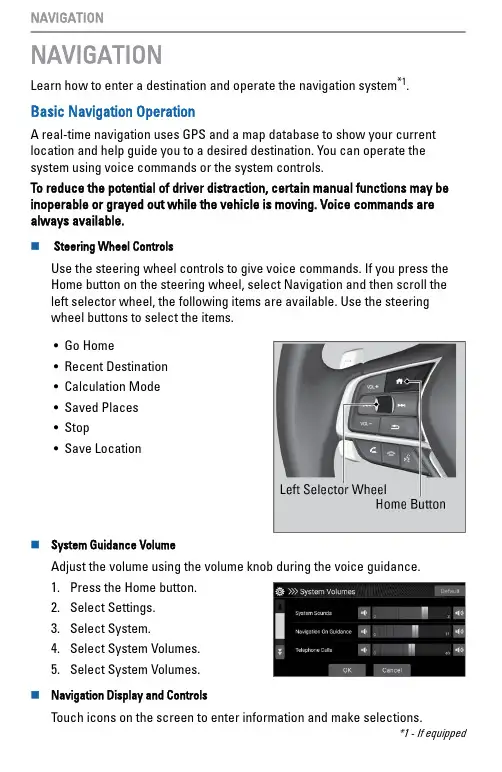
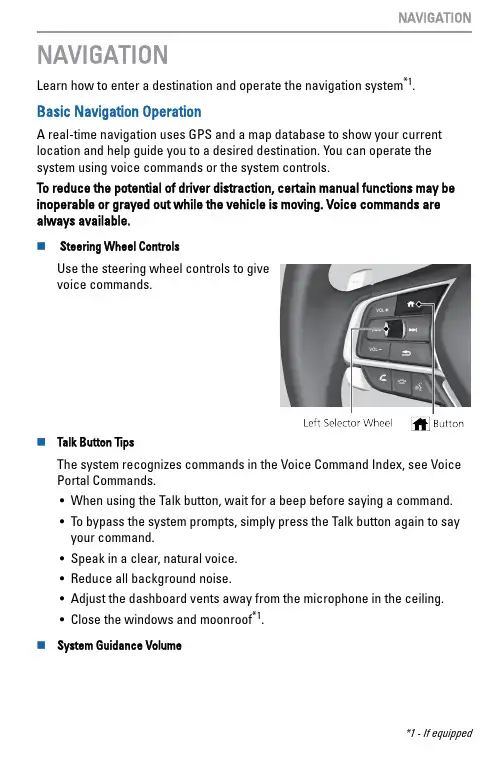
NAVIGATIONLearn how to enter a destination and operate the navigation system *1.Basic Navigation OperationA real-time navigation uses GPS and a map database to show your current location and help guide you to a desired destination. You can operate the system using voice commands or the system controls.To reduce the potential of driver distraction, certain manual functions may be inoperable or grayed out while the vehicle is moving. Voice commands are always available.n Steering Wheel ControlsUse the steering wheel controls to give voice commands. If you press the Home button on the steering wheel, select Navigation and then scroll the left selector wheel, the following items are available. Use the steering wheel buttons to select the items.•Go Home •Recent Destination •Calculation Mode •Saved Places •Stop •Save Locationn System Guidance VolumeAdjust the volume using the volume knob during the voice guidance.1.Press the Home button.2.Select Settings.3.Select System.4.Select System Volumes.5.Select System Volumes.n Navigation Display and ControlsTouch icons on the screen to enter information and make selections.*1 - If equipped NAVIGATIONEntering Your DestinationThere are several methods to enter a destination.n Home AddressStore your home address in the system so you can easily route to it.1.Press the Home button and thenselect Navigation.2.Select the Where to button.3.Select the list icon and then selectSet Home Location.4.Select Enter My Address.5.Enter a house number and streetname.6.Select Done or a suggestion.7.Select an address from the list.8.Select Select.n Street AddressEnter a street address.NAVIGATION1.Press the Home button and then select Navigation.2.Select the search icon.3.Select the search bar.4.Enter the house number and street name.5.Select Done or a suggestion.RoutingAfter a destination is set, you can alter or cancel your route.nMap LegendUsing the navigation system while driving can take your attention away from the road, causing a crash in which you could be seriously injured orNAVIGATION。
IntroductionManual OverviewThe manual is divided into the following sections:• Getting started - A basic introduction that discusses the controls and how to communicate with the system.• Entering a Destination - How to enter an address or locate a point of interest (POI).• Driving to your Destination - An explanation of the map features, guidance, and cautions.• Information Features - Message, Voice Command Help, Trip Computer, Map Legend, Calendar, Key to Zagat Ratings, Calculator, and Roadside Assistance.• System Set-up - How to set up and tailor the system for your personal use and use the Address Book.The back of this manual contains:• Map Coverage (page116)•Cities with Traffic Coverage(page 125)•Frequently Asked Questions (FAQs)(page 126)•Troubleshooting Guide (page134)• Glossary of Terms (page 135)• Voice Command List (page 138)System OverviewYour navigation system is a highlysophisticated location system with voicecontrol that uses satellites and a mapdatabase to show you where you are andto help guide you to a desireddestination.The navigation system receives signalsfrom the global positioning system(GPS), a network of 24 satellites in orbitaround the earth. By receiving signalsfrom several of these satellites, thenavigation system can determine thelatitude, longitude, and elevation ofyour vehicle. In addition, a gyroscopicyaw sensor and a vehicle speed sensorin your vehicle keep track of thedirection and speed of travel at all times.The navigation system applies thislocation, direction, and speedinformation to the maps and calculates aroute to the destination you enter. Asyou drive to that destination, the systemprovides map and voice guidance.IntroductionThe navigation system is easy to use. The locations of many places of business and entertainment are already entered in the system. You can select any of them as a destination by using the Interface Dial or voice control.There are several ways to enter a destination, such as by point of interest (POI), by address, by phone number, and by selecting it from the map. The last 50 destinations are saved for reuse at a later date. The system also allows you to store a home address to simplify returning home from your destination.Accessories PrecautionsIf you have rear window tintinginstalled, be aware that if the tint hasmetallic properties, it can seriouslydegrade or prevent GPS reception. Thisis because the GPS antenna is locatedunder the dash board.If you plan to install electroniccomponents such as radar detectors,vehicle location devices, remotestarters, additional amplifiers, or otheraudio components, ensure that they arenot located near the navigation controlunit behind a small door located belowthe transmission shift lever on thepassenger’s side, near the navigationdisplay in the dash, or near the GPSantenna under the dash board. Signalnoise emanating from these devices cancause intermittent disruption of thenavigation system.Important Safety InformationThe navigation system can distract yourattention from the road if you focus onthe screen or operate the system’scontrols while driving.Enter as much information as possibleinto the system before you begindriving, or when the vehicle is stopped.Then, as you drive, listen to the audioinstructions and use voice commandswhen possible.While driving, do not look at the screen or operate the system controls for more than a second or so at a time, and only after deciding you can do so safely. Pull to the side of the road if you need more time to look at the screen or operate the controls.The navigation system is designed to provide route information to help you reach your destination. However, this route guidance may sometimes conflict with current road conditions such as street closures, road construction, detours, and out-of-date map data.Additionally, the system itself has certain limitations (see page 110). Therefore, you must verify the audio and visual route information provided by the system by carefully observing the roadway, signs and signals, etc. If you are unsure, proceed with caution. Always use your own good judgment, and obey traffic laws while driving.Map OverviewCurrent StreetThe current street on which your vehicle is appears at the bottom of the map screen (see page 19). A message saying “Not on a digitized road” may appear instead when you drive half a mile away from a mapped road. For more details, see Off-road Tracking on page 67Verified/Unverified StreetYour navigation system has two kinds of streets: verified (dark colored) and unverified (light colored). Thedifferences between the two types of streets are contrasted in the following chart.“Unverified” Road“Verified” RoadIntroductionIntroduction Verified streets (dark colored) Unverified streets (light colored)When displayed These roads are found within metropolitan areas, andinclude interstate freeways and major roads connecting cities.These roads are found in rural areas, and typically include residential streets away from the center of a town.Street colorShown on daytime map screen as black or red, such asinterstate freeways.Shown on the daytime map screen as light brown.Map Quality The database vendor has verified these streets.Information like turn restrictions, average speed, andwhether it is a one way street have been gathered andused when creating your route to a destination.These streets have not been verified by the database vendor.The system does not contain information about one-way streets,turn restrictions, or the road’s average speed. They are shownon the map for reference and can have errors in map location,naming, and address range.Routing differences While driving to your destination, the displayed routeline is solid blue. The system provides voice and mapguidance to your destination.Your route line is either a blue dotted “vector line,” or a dashedpink/blue line. For information on selecting this option, and therouting differences, see Unverified Area Routing on page 92.Cautions There are no pop up boxes urging extra caution during aroute. However, because roads constantly change, youare urged to use common sense, and always obeyposted traffic restrictions.Regardless of whether the user chooses route guidance, thereare cautionary screens before and during the route urging theuser to be extra cautious, and obey all traffic restrictions. seeUnverified Area Routing on page 92.Guidance voice Voice guidance issues maneuvers such as “In a halfmile make a right turn.”The suffix “if possible” is added to each guidance maneuver.For example: “In a half mile make a right turn, if possible.”Time and distance “to go”The time and distance “to go,” displayed while on routeto a destination, is based on the average speed anddistance for the roads used for your route.Because the average speed of these roads is not known, the timeand distance “to go” is based on a fixed average speed of25mph for these roads.User AgreementIn using this DVD “Satellite Linked Navigation System” (the “DVD”), which includes HONDA MOTOR CO., LTD. software, ALPINE ELECTRONICS, INC. software, NAVTEQ database contents, INFO USA CORPORATION database, ZAGAT SURVEY database contents, and ZENRIN CO. database contents (hereinafter referred to as “Licensors”), you are bound by the terms and conditions set forth below.By using your copy of the DVD, you have expressed your Agreement to the terms and conditions of this Agreement. You should, therefore, make sure that you read and understand the following provisions. If for any reason you do not wish to be bound by the terms of this Agreement, please return the DVD to your dealer.•The DVD may not be copied,duplicated, or otherwise modified, inwhole or in part, without the expresswritten permission of the Licensors.•The DVD may not be transferred orsublicensed to any third party forprofit, rent or loan, or licensed forreuse in any manner.•The DVD may not be decompiled,reverse engineered or otherwisedisassembled, in whole or in part.•The DVD may not be used in anetwork or by any other manner ofsimultaneous use in multiple systems.•The DVD is intended solely forpersonal use (or internal use wherethe end-user is a business) by theconsumer. The DVD is not to be usedfor commercial purposes.•The Licensors do not guarantee to thecustomer that the functions includedin the DVD meet the specificobjectives of the user.•Licensor shall not be responsible forany damages caused by the use of theDVD to the actual user or to any thirdparty.•The warranty on the DVD shall notextend to an exchange or refund dueto misspelling, omission of letters, orany other cosmetic discrepancy in thecontents of the DVD.•The right to use the DVD shall expireeither when the user destroys theDVD or software, or when any of theterms of this Agreement are violatedand the Licensors exercise the optionto revoke the license to use the DVDor software.User Agreement•The terms and conditions hereof apply to all subsequent users and owners as well as to the original purchaser.•The use of oil company logos in the display are for your information and convenience, and in no way implies any sponsorship, approval or endorsement of these companies, or their products. The logos are trademarks of their respective owners.The user shall indemnify and saveharmless the Licensors, and theirofficers, employees and agents, fromand against any claim, demand oraction, irrespective of the nature of thecause of the claim, demand or action,alleging loss, costs, expense, damagesor injuries (including injuries resultingin death) arising out of the use orpossession of the DVD or software.Use, duplication, or disclosure of thisDVD by or on behalf of the UnitedStates government is subject to“Restricted Rights” as set forth at FAR52.227-14, -19 or DFARS 252.227-7013, as applicable. Manufacturers arethe Licensors, including HONDAMOTOR CO., LTD., 2-1-1 MinamiAoyama Minato-Ku Tokyo 107-8556JAPAN., Alpine Electronics, Inc., 20-1Yoshima Kogyodanchi, Iwaki,Fukushima 970-1192 JAPAN.,NAVTEQ Corporation, 222Merchandise Mart, Suite 900, Chicago,IL, 60654, INFO USACORPORATION, 5711 South 86thCircle, Omaha, NE 68127.,Zagat Survey, LLC, 4 Columbus Circle,New York, NY, 10019., and ZENRINCO., LTD., 1-1-1 Muromachi,Kokurakita-ku, Kitakyushu, Fukuoka803-8630, JAPAN.。
NAVIGATIONLearn how to enter a destination and operate the navigation system*1.Basic Navigation OperationA real-time navigation uses GPS and a map database to show your current location and help guide you to a desired destination. You can operate the system using voice commands or the system controls.To reduce the potential of driver distraction, certain manual functions may be inoperable or grayed out while the vehicle is moving. Voice commands are always available.n Steering Wheel ControlsUse the steering wheel controls to givevoice commands.n Talk Button TipsThe system recognizes commands in the Voice Command Index, see Voice Portal Commands.•When using the Talk button, wait for a beep before saying a command.•To bypass the system prompts, simply press the Talk button again to sayyour command.•Speak in a clear, natural voice.•Reduce all background noise.•Adjust the dashboard vents away from the microphone in the ceiling.•Close the windows and moonroof*1.n System Guidance Volume*1 - If equipped1.Press the Home button.2.Select Settings.3.Select System.4.Select System Volumes.5.Select System Volumes.n Navigation Display and ControlsTouch icons on the screen to enter information and make selections.1.Select Set Home Location.2.Select an option.Select Use Current Location to sethome location.If selecting Enter My Address,Recently Found or Saved Place,proceed to steps 3 and 4.3.Select the home location.4.Select Select.n Street Address1.Select the Map icon.2.Select the Search icon.3.Select Search Tools.4.Select Address.5.Enter the house number and streetname. Select Done or a suggestion.6.Select your destination from the list.Select Go!.RoutingAfter a destination is set, you can alter or cancel your route. n Map Legendfrom the road, causing a crash in which you could be seriously injured or。
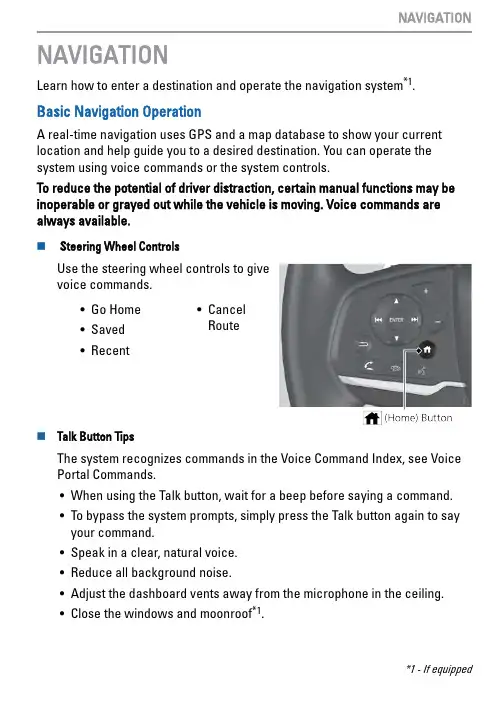
NAVIGATIONLearn how to enter a destination and operate the navigation system *1.Basic Navigation OperationA real-time navigation uses GPS and a map database to show your current location and help guide you to a desired destination. You can operate the system using voice commands or the system controls.To reduce the potential of driver distraction, certain manual functions may be inoperable or grayed out while the vehicle is moving. Voice commands are always available.n Steering Wheel ControlsUse the steering wheel controls to give voice commands.•Go Home•Saved•Recent •Cancel Routen Talk Button TipsThe system recognizes commands in the Voice Command Index, see Voice Portal Commands.•When using the Talk button, wait for a beep before saying a command.•To bypass the system prompts, simply press the Talk button again to say your command.•Speak in a clear, natural voice.•Reduce all background noise.•Adjust the dashboard vents away from the microphone in the ceiling.•Close the windows and moonroof *1.*1 - If equippedn System Guidance Volume1.Select Home.2.Select Navigation.3.Select (Map Tools icon).4.Select Guidance Volume.5.Select - or + to adjust the volume.n Navigation Display and ControlsTouch icons on the screen to enter information and make selections.Entering Your DestinationThere are several methods to enter a destination.n Home AddressStore your home address in the system so you can easily route to it.1.Press the MAP button.2.Select the Where to button.3.Select Menu and then select Set Home Location.Select Use Current Location to set home location.If selecting Enter My Address, Recently Found or Saved Place, proceed to steps 4 and 5.4.Select the home location.5.Select Select.n Street AddressEnter an address to use as the destination.1.From the Home screen, selectNavigation.2.Select the search bar, then searchtools.3.Select Address.4.Enter the house number and streetname.5.Select Done or a suggestion.6.Select your destination from the list.7.Select Go! to set the route to yourdestination.RoutingAfter a destination is set, you can alter or cancel your route.n Map LegendUsing the navigation system while driving can take your attention away from the road, causing a crash in which you could be seriously injured or。
IntroductionManual OverviewThe manual is divided into the following sections:• Getting started - A basic introduction that discusses the controls and how to communicate with the system.• Entering a Destination - How to enter an address or locate a point of interest (POI).• Driving to your Destination - An explanation of the map features, guidance, and cautions.• Information Features - Message, Voice Command Help, Trip Computer, Map Legend, Calendar, Key to Zagat Ratings, Calculator, and Roadside Assistance.• System Set-up - How to set up and tailor the system for your personal use and use the Address Book.The back of this manual contains:• Map Coverage (page 119)• Cities with Traffic Coverage(page 128)• Frequently Asked Questions (FAQs)(page 131)• Troubleshooting Guide (page 139)• Glossary of Terms (page 140)• Voice Command List (page 143)•Operation specific to Alaska andHawaii (page 128)System OverviewYour navigation system is a highlysophisticated location system with voicecontrol that uses satellites and a mapdatabase to show you where you are andto help guide you to a desireddestination.The navigation system receives signalsfrom the global positioning system(GPS), a network of 24 satellites in orbitaround the earth. By receiving signalsfrom several of these satellites, thenavigation system can determine thelatitude, longitude, and elevation ofyour vehicle. In addition, a gyroscopicyaw sensor and a vehicle speed sensorin your vehicle keep track of thedirection and speed of travel at all times.The navigation system applies thislocation, direction, and speedinformation to the maps and calculates aroute to the destination you enter. Asyou drive to that destination, the systemprovides map and voice guidance.IntroductionThe navigation system is easy to use. The locations of many places of business and entertainment are already entered in the system. You can select any of them as a destination by using the Interface Dial or voice control.There are several ways to enter a destination, such as by point of interest (POI), by address, by phone number, and by selecting it from the map. The last 50 destinations are saved for reuse at a later date. The system also allows you to store a home address to simplify returning home from your destination.Accessories PrecautionsIf you have rear window tintinginstalled, be aware that if the tint hasmetallic properties, it can seriouslydegrade or prevent GPS reception. Thisis because the GPS antenna is locatedunder the rear window beneath the rearshelf.If you plan to install electroniccomponents such as radar detectors,vehicle location devices, remotestarters, additional amplifiers, or otheraudio components, ensure that they arenot located near the navigation controlunit in the trunk, near the navigationdisplay in the dash, or near the GPSantenna under the rear window. Signalnoise emanating from these devices cancause intermittent disruption of thenavigation system.Important Safety InformationThe navigation system can distract yourattention from the road if you focus onthe screen or operate the system’scontrols while driving.Enter as much information as possibleinto the system before you begindriving, or when the vehicle is stopped.Then, as you drive, listen to the audioinstructions and use voice commandswhen possible.While driving, do not look at the screen or operate the system controls for more than a second or so at a time, and only after deciding you can do so safely. Pull to the side of the road if you need more time to look at the screen or operate the controls.The navigation system is designed to provide route information to help you reach your destination. However, this route guidance may sometimes conflict with current road conditions such as street closures, road construction, detours, and out-of-date map data.Additionally, the system itself has certain limitations (see page 112). Therefore, you must verify the audio and visual route information provided by the system by carefully observing the roadway, signs and signals, etc. If you are unsure, proceed with caution. Always use your own good judgment, and obey traffic laws while driving.Map OverviewCurrent StreetThe current street on which your vehicle is, appears at the bottom of the map screen (see page 20). A message saying “Not on a digitized road” may appear instead when you drive half a mile away from a mapped road. For more details, see Off-road Tracking on page 67Verified/Unverified StreetYour navigation system has two kinds of streets: verified (dark colored) and unverified (light colored). Thedifferences between the two types of streets are contrasted in the chart on page 7.IntroductionIntroductionVerified streets (dark colored) Unverified streets (light colored)Whendisplayed These roads are found within metropolitan areas, and include interstate freeways and major roads connecting cities.These roads are found in rural areas, and typically include residential streets away from the center of a town.Street colorShown on daytime map screen as black or red, such as interstate freeways.Shown on the daytime map screen as light brown.Map QualityThe database vendor has verified these streets.Information like turn restrictions, average speed, and whether it is a one way street have been gathered and used when creating your route to a destination.These streets have not been verified by the database vendor. The system does not contain information on one-way streets, turn restrictions, or the road’s average speed. They are shown on the map for reference and can have errors in map location, naming, and address range.Routing differencesWhile driving to your destination, the displayed route line is solid blue. The system provides voice and map guidance to your destination.Your route line is either a blue dotted “vector line,” or a dashed pink/blue line. For information on selecting this option, and the routing differences, see Unverified Area Routing on page 93.Cautions There are no pop up boxes urging extra caution during a route. However, because roads constantly change, you are urged to use common sense, and always obey posted traffic restrictions.Regardless of whether the user chooses route guidance, there are cautionary screens before and during the route urging the user to be extra cautious, and obey all traffic restrictions. see Unverified Area Routing on page 93.Guidance voice Voice guidance issues maneuvers such as “In a half mile make a right turn.”The suffix “if possible” is added to each guidance maneuver. For example: “In a half mile make a right turn, if possible.”Time and distance “to go”The time and distance “to go,” displayed while on route to a destination, is based on the average speed and distance for the roads used for your route.Because the average speed of these roads is not known, the time and distance “to go” is based on a fixed average speed of 25mph for these roads.User AgreementIn using this DVD “Satellite Linked Navigation System” (the “DVD”), which includes HONDA MOTOR CO., LTD. software, ALPINE ELECTRONICS, INC. software, NAVTEQ database contents, INFO USA CORPORATION database, ZAGAT SURVEY database contents, and ZENRIN CO. database contents (hereinafter referred to as “Licensors”), you are bound by the terms and conditions set forth below.By using your copy of the DVD, you have expressed your Agreement to the terms and conditions of this Agreement. You should, therefore, make sure that you read and understand the following provisions. If for any reason you do not wish to be bound by the terms of this Agreement, please return the DVD to your dealer.•The DVD may not be copied,duplicated, or otherwise modified, inwhole or in part, without the expresswritten permission of the Licensors.•The DVD may not be transferred orsublicensed to any third party forprofit, rent or loan, or licensed forreuse in any manner.•The DVD may not be decompiled,reverse engineered or otherwisedisassembled, in whole or in part.•The DVD may not be used in anetwork or by any other manner ofsimultaneous use in multiple systems.•The DVD is intended solely forpersonal use (or internal use wherethe end-user is a business) by theconsumer. The DVD is not to be usedfor commercial purposes.•The Licensors do not guarantee to thecustomer that the functions includedin the DVD meet the specificobjectives of the user.•Licensor shall not be responsible forany damages caused by the use of theDVD to the actual user or to any thirdparty.•The warranty on the DVD shall notextend to an exchange or refund dueto misspelling, omission of letters, orany other cosmetic discrepancy in thecontents of the DVD.•The right to use the DVD shall expireeither when the user destroys theDVD or software, or when any of theterms of this Agreement are violatedand the Licensors exercise the optionto revoke the license to use the DVDor software.User Agreement•The terms and conditions hereof apply to all subsequent users and owners as well as to the original purchaser.•The use of oil company logos in the display are for your information and convenience, and in no way implies any sponsorship, approval or endorsement of these companies, or their products. The logos are trademarks of their respective owners.The user shall indemnify and saveharmless the Licensors, and theirofficers, employees and agents, fromand against any claim, demand oraction, irrespective of the nature of thecause of the claim, demand or action,alleging loss, costs, expense, damagesor injuries (including injuries resultingin death) arising out of the use orpossession of the DVD or software.Use, duplication, or disclosure of thisDVD by or on behalf of the UnitedStates government is subject to“Restricted Rights” as set forth at FAR52.227-14, -19 or DFARS 252.227-7013, as applicable. Manufacturers arethe Licensors, including HONDAMOTOR CO., LTD., 2-1-1 MinamiAoyama Minato-Ku Tokyo 107-8556JAPAN., Alpine Electronics, Inc., 20-1Yoshima Kogyodanchi, Iwaki,Fukushima 970-1192 JAPAN.,NAVTEQ Corporation, 222Merchandise Mart, Suite 900, Chicago,IL, 60654, INFO USACORPORATION, 5711 South 86thCircle, Omaha, NE 68127.,Zagat Survey, LLC, 4 Columbus Circle,New York, NY, 10019., and ZENRINCO., LTD., 1-1-1 Muromachi,Kokurakita-ku, Kitakyushu, Fukuoka803-8630, JAPAN.。
IntroductionManual OverviewThe manual is divided into the following sections:• Getting started - A basic introduction that discusses the controls and how to communicate with the system.• Entering a Destination - How to enter an address or locate a point of interest (POI).• Driving to your Destination - An explanation of the map features, guidance, and cautions.• Information Features - Message, Voice Command Help, Cellular Phonebook, Map Legend, Calendar, Key to Zagat Ratings, Calculator, and Roadside Assistance.• System Set-up - How to set up and tailor the system for your personal use and use the Address Book.The back of this manual contains:• Map Coverage (page 118)• Cities with Traffic Coverage (page 126)•Frequently Asked Questions (FAQs) (page 128)•Troubleshooting Guide (page 136)• Glossary of Terms (page 137)• Voice Command List (page 140)System OverviewYour navigation system is a highlysophisticated location system with voice control that uses satellites and a map database to show you where you are and to help guide you to a desired destination.The navigation system receives signals from the global positioning system (GPS), a network of 24 satellites in orbit around the earth. By receiving signals from several of these satellites, the navigation system can determine the latitude, longitude, and elevation of your vehicle. In addition, a gyroscopic yaw sensor and a vehicle speed sensor in your vehicle keep track of thedirection and speed of travel at all times.The navigation system applies this location, direction, and speedinformation to the maps and calculates a route to the destination you enter. As you drive to that destination, the systemprovides map and voice guidance.IntroductionThe navigation system is easy to use. The locations of many places of business and entertainment are already entered in the system. You can select any of them as a destination by using the Interface Dial or voice control.There are several ways to enter a destination, such as by point of interest (POI), by address, by phone number, and by selecting it from the map. The last 50 destinations are saved for reuse at a later date. The system also allows you to store a home address to simplify returning home from your destination.Accessories PrecautionsIf you have front window tintinginstalled, be aware that if the tint hasmetallic properties, it can seriouslydegrade or prevent GPS reception. Thisis because the GPS antenna is locatedunder the dashboard.If you plan to install electroniccomponents such as radar detectors,vehicle location devices, remotestarters, additional amplifiers, or otheraudio components, ensure that they arenot located near the navigation controlunit under the driver’s seat, near thenavigation display in the dash, or nearthe GPS antenna under the dashboard.Signal noise emanating from thesedevices can cause intermittentdisruption of the navigation system.Important Safety InformationThe navigation system can distract yourattention from the road if you focus onthe screen or operate the system’scontrols while driving.Enter as much information as possibleinto the system before you begindriving, or when the vehicle is stopped.Then, as you drive, listen to the audioinstructions and use voice commandswhen possible.While driving, do not look at the screen or operate the system controls for more than a second or so at a time, and only after deciding you can do so safely. Pull to the side of the road if you need more time to look at the screen or operate the controls.The navigation system is designed to provide route information to help you reach your destination. However, this route guidance may sometimes conflict with current road conditions such as street closures, road construction, detours, and out-of-date map data.Additionally, the system itself has certain limitations (see page 111). Therefore, you must verify the audio and visual route information provided by the system by carefully observing the roadway, signs and signals, etc. If you are unsure, proceed with caution. Always use your own good judgment, and obey traffic laws while driving.Map OverviewCurrent StreetThe current street on which your vehicle is, appears at the bottom of the map screen (see page 20). A message saying “Not on a digitized road” may appear instead when you drive half a mile away from a mapped road. For more details, see Off-road Tracking on page 67.Verified/Unverified StreetYour navigation system has two kinds of streets: verified (dark colored) and unverified (light colored). Thedifferences between the two types of streets are contrasted in the chart on page 7.“Unverified” Road“Verified” RoadIntroductionIntroductionVerified streets (dark colored) Unverified streets (light colored)Whendisplayed These roads are found within metropolitan areas, and include interstate freeways and major roads connecting cities.These roads are found in rural areas, and typically includeresidential streets away from the center of a town.Street colorShown on daytime map screen as black or red, such as interstate freeways.Shown on the daytime map screen as light brown.Map QualityThe database vendor has verified these streets.Information like turn restrictions, average speed, and whether it is a one way street have been gathered and used when creating your route to a destination.These streets have not been verified by the database vendor. The system does not contain information on one-way streets, turn restrictions, or the road’s average speed. They are shown on the map for reference and can have errors in map location, naming, and address range.Routing differencesWhile driving to your destination, the displayed route line is solid blue. The system provides voice and map guidance to your destination.Your route line is either a blue dotted “vector line,” or a dashed pink/blue line. For information on selecting this option, and the routing differences, see Unverified Area Routing on page 92.Cautions There are no pop up boxes urging extra caution during a route. However, because roads constantly change, you are urged to use common sense, and always obey posted traffic restrictions.Regardless of whether the user chooses route guidance, there are cautionary screens before and during the route urging the user to be extra cautious, and obey all traffic restrictions. see Unverified Area Routing on page 92.Guidance voice Voice guidance issues maneuvers such as “In a half mile make a right turn.”The suffix “if possible” is added to each guidance maneuver. For example: “In a half mile make a right turn, if possible.”Time and distance “to go”The time and distance “to go,” displayed while on route to a destination, is based on the average speed and distance for the roads used for your route.Because the average speed of these roads is not known, the time and distance “to go” is based on a fixed average speed of 25mph for these roads.User AgreementIn using this DVD “Satellite Linked Navigation System” (the “DVD”), which includes HONDA MOTOR CO., LTD. software, ALPINE ELECTRONICS, INC. software, NAVTEQ database contents, INFO USA CORPORATION database, ZAGAT SURVEY database contents, and ZENRIN CO. database contents (hereinafter referred to as “Licensors”), you are bound by the terms and conditions set forth below.By using your copy of the DVD, you have expressed your Agreement to the terms and conditions of this Agreement. You should, therefore, make sure that you read and understand the following provisions. If for any reason you do not wish to be bound by the terms of this Agreement, please return the DVD to your dealer.•The DVD may not be copied,whole or in part, without the expresswritten permission of the Licensors.•The DVD may not be transferred orsublicensed to any third party forprofit, rent or loan, or licensed forreuse in any manner.•The DVD may not be decompiled,reverse engineered or otherwisedisassembled, in whole or in part.•The DVD may not be used in anetwork or by any other manner ofsimultaneous use in multiple systems.•The DVD is intended solely forpersonal use (or internal use wherethe end-user is a business) by theconsumer. The DVD is not to be usedfor commercial purposes.•The Licensors do not guarantee to the•Licensor shall not be responsible forany damages caused by the use of theparty.•The warranty on the DVD shall notextend to an exchange or refund dueto misspelling, omission of letters, orany other cosmetic discrepancy in thecontents of the DVD.•The right to use the DVD shall expireeither when the user destroys theDVD or software, or when any of theterms of this Agreement are violatedand the Licensors exercise the optionto revoke the license to use the DVDor software.client that the functions included in duplicated, or otherwise modified, inthe DVD meet the specific objectivesDVD to the actual user or to any thirdof the user.User Agreement•The terms and conditions hereof apply to all subsequent users and owners as well as to the original purchaser.•The use of oil company logos in the display are for your information and convenience, and in no way implies any sponsorship, approval or endorsement of these companies, or their products. The logos are trademarks of their respective owners.The user shall indemnify and saveharmless the Licensors, and theirofficers, employees and agents, fromand against any claim, demand oraction, irrespective of the nature of thecause of the claim, demand or action,alleging loss, costs, expense, damagesor injuries (including injuries resultingin death) arising out of the use orpossession of the DVD or software.Use, duplication, or disclosure of thisDVD by or on behalf of the UnitedStates government is subject to“Restricted Rights” as set forth at FAR52.227-14, -19 or DFARS 252.227-7013, as applicable. Manufacturers arethe Licensors, including HONDAMOTOR CO., LTD., 2-1-1 MinamiAoyama Minato-Ku Tokyo 107-8556JAPAN., Alpine Electronics, Inc., 20-1Yoshima Kogyodanchi, Iwaki,Fukushima 970-1192 JAPAN.,NAVTEQ Corporation, 222Merchandise Mart, Suite 900, Chicago,IL, 60654, INFO USACORPORATION, 5711 South 86thCircle, Omaha, NE 68127.,Zagat Survey, LLC, 4 Columbus Circle,New York, NY, 10019., and ZENRINCO., LTD., 1-1-1 Muromachi,Kokurakita-ku, Kitakyushu, Fukuoka803-8630, JAPAN.Getting StartedSystem ControlsMAP/GUIDE buttonDisplays the map. When on a route, switches between the map andguidance screens. See page 20 or 54.CANCEL buttonCancels the current screen and returns to the previous screen display.NOTE:The NAVI BACK button performs the same basic function.MENU buttonDisplays the Enter destination by screen. When on a route, displays the Change route by screen. See page buttonDisplays the screen for selecting Message , Voice Command Help , Cellular Phonebook , Map Legend , Calendar , Key to Zagat Ratings , Calculator , and Roadside Assistance . See page 76.SETUP buttonDisplays the Setup screens to change and update information in the system. See page 82.。
目录第一章产品概述 (1)1.产品简介 (1)2.产品功能 (1)2.1 系统主界面 (1)2.2功能介绍 (2)第二章基本功能 (3)1.GPS导航 (3)2.音乐 (6)3.电子书 (9)4.图片浏览 (10)5.电影播放 (12)6.倒车后视 (13)第三章蓝牙功能 (14)1.蓝牙设置 (14)2.蓝牙通行码 (15)3.蓝牙连接 (16)4.拨号界面 (17)5.通话界面 (18)6.蓝牙音乐控制器 (19)第四章系统设置 (21)1.GPS设置 (21)2.音量控制 (21)3.GPS监视 (22)4.触摸校准 (23)5.通用设置 (24)6.系统信息 (25)7.LOGO设置 (25)8.屏幕调整 (26)9.亮度控制 (26)10.蓝牙设置 (27)附录:导航板技术规格 (1)1.接口引脚定义 (1)2.引脚功能描述 (3)3.技术规格 (5)第一章产品概述1.产品简介本产品是集导航、娱乐于一体的车载多媒体导航系统。
除导航功能外还支持音频/视频播放、电子书、图片浏览、蓝牙电话、倒车后视等功能。
2.产品功能2.1 系统主界面主界面为左右移动界面,包含两个界面,如图:2.2功能介绍导航支持实时GPS导航蓝牙支持与蓝牙手机连接进行免提通话音乐支持WMA、MP3等格式的音频文件电子书支持TXT格式文本阅读图片支持JPG、GIF、BMP、PNG等格式图片的浏览电影支持WMV、AVI、MP4等文件格式的视频文件设置包含导航设置、音量控制、背景光、系统信息、触摸屏校准、LOGO设置、屏幕调整、蓝牙设置等功能。
此外,本导航系统还可选配倒车后视功能。
第二章基本功能1. GPS导航设备开启后,首次进入导航软件,必须先对导航软件的路径进行相关设置。
径设置界面,如下图:b.点选,可以在启动时自动运行所选的导航软件。
然后点击,进入到导航设置的路径选择界面,如下图:c.在这个界面下,显示了所有的文件夹和可执行文件(EXE文件),您可以将不同版本的地图拷入SD卡中,在该界面下选择相应地图的“EXE”文件。
汽车导航系统使用说明一、导航系统简介汽车导航系统是一种现代化的智能设备,旨在帮助驾驶员准确定位、规划路线、提供导航指示等功能。
本使用说明将详细介绍导航系统的操作方法,以便用户能够顺利使用。
二、导航系统操作步骤1. 打开导航系统在汽车启动后,通过触摸屏或旋钮等控制器激活导航系统。
待系统启动完毕后,将会出现主界面。
2. 设置目的地在主界面中,选择“目的地”选项。
之后,您可以手动输入地址、POI(兴趣点)名称或选择之前保存的目的地。
通过输入字母或汉字等方式,系统将提供自动匹配选项,以便更加方便地找到目的地。
3. 路线规划导航系统将根据您输入的目的地信息,自动规划最佳路线。
在规划过程中,系统会根据道路交通状况、限速信息和预估时间等因素进行考虑,提供最优化的导航路线。
4. 导航指引导航系统将在行驶过程中提供必要的导航指引。
在主界面中,您将看到地图显示、转向箭头、语音提示等信息。
请遵循语音提示,并在视线允许范围内观察导航指示,以确保驾驶安全。
5. 实时交通信息导航系统通常可提供实时交通信息。
通过导航系统,您可以了解当前道路的交通情况,并根据实时信息选择最佳路线。
系统还能够提供交通堵塞警示和可选绕行建议,以确保您能够尽快到达目的地。
6. 附近服务导航系统还提供一系列的附近服务功能,如加油站、停车场、餐馆等。
您可以在主界面中找到这些选项,并根据需要进行选择。
7. 其他功能导航系统通常还会提供一些其他实用功能,如语音识别、地图显示设置、车辆信息等。
这些功能将使您的导航体验更为便捷和个性化。
三、使用注意事项1. 请在行驶前设置导航目的地,以确保行驶过程中不会过多操作导航系统,影响驾驶安全。
2. 导航系统可以提供指引,但并不代表您可以完全依赖它。
请始终保持对道路和交通的注意力,并遵守交通规则。
3. 如遇到系统故障或操作困难,请参考附带的用户手册或与生产厂家联系,获取更多帮助和支持。
四、总结汽车导航系统是一项实用的车载设备,为驾驶提供了精准的路线指引和实时交通信息。
Guidance ScreenThe guidance screen offers an alternative way to view your route information. Many of the icons and screen features are similar to those on the map screen. While driving to your destination, press the MAP/GUIDE button to switch to the guidance screen. The guidance screen shows you:Milestone to Destination – the position of the small circular icon shows your trip progress. As you get closer to your destination, the indicator will approach “DEST.”Vehicle Heading – the black portion of the compass symbol indicates north. NOTE:• The map and voice guidance in unverified areas differ from those in verified areas.• Current maneuvers and those within 1000 feet will show on the Countdown bar, indicating the distance until the next maneuver.Guidance Screen Legend51)50)51)51)CURRENT STREET/AUDIO INFOCurrent Street (see page6)(When audio information is displayed, touchAUDIO INFO. to display the current street name.)Driving to Your Destination50Navigation SystemDriving to Your DestinationDistance and Time to DestinationWhen you select a destination, the distance to the destination is the actual road distance of the calculated route, and “not as the crow flies.” When viewing a list of destinations (points of interest), such as restaurants, the distance is “as the crow flies” (see Sort by Distance to Travel on page 35).The displayed time to destination may differ from the actual travel time because the time is calculated based on the posted road speed data and your current speed. If part of your route includes unverified roads, the “distance” and “time to go” for that portion is estimated using 25 mph as an average speed.Direction ListWhen you press the MAP/GUIDEbutton on the guidance screen, thedisplay changes to:NOTE:• The map and voice guidance inunverified areas differ from those inverified areas. See Unverified AreaRouting on page 81.•Only maneuvers that occur atfreeway exits or contain freeway exitinformation will show the exit infoicon (“i” icon) on the right end of theitems in the direction list. If no exitinfo icon is shown on the list, the ExitInfo. is grayed out.You can see the directions list and thedistance to each maneuver. Press theMAP/GUIDE button to return to themap screen.You can scroll through the direction listscreen by screen using the scroll bar, orone instruction at a time using thejoystick.Navigation System 51。
To select the ‘‘Address’’ option in the Main Menu, do either of the following.•Push the joystick up or down to move the highlighting to the Address box.Then push on the joystick.•Touch the Address box on the screen with your finger.After you select the option, the displaychanges to:The last state selected is displayed at the top of the screen. If your desired destination is in another state, select the ‘‘Change State’’ option to enter the desired state. If the proper state is displayed, select either the ‘‘City’’ or ‘‘Street’’ option.If you select the ‘‘City’’ option first,you can enter the name of the city that is your destination. If you select the ‘‘Street’’ option first, the system will list all cities that contain the street name that you enter. This may behelpful if the street runs through several cities, and you are not sure of the exact one your destination is in.Select the ‘‘Change State,’’ ‘‘City’’ or ‘‘Street’’ option by touching the box on the screen, or by using the joystick to move the highlighting to the desired option, then pushing in on the joystick.Change StateWhen you select the ‘‘Change State’’option, the display changes to:Use the displayed letters to enter the name of the destination state. Enter each letter by doing one of the following.•Move the highlighting to each letter with the joystick, then push on the joystick to enter that letter.•Touch each desired letter on the screen.Each entered letter will appear on the top of the display. Use the ‘‘Space’’ box to enter a space between words. Use the ‘‘Delete’’ box to erase a letter entered incorrectly.As you enter the state name, the system searches its database for a name that matches the letters you are entering. When it finds only one state that matches, it completes the entry of the name for you.If the system does not find an exact match, continue entering the name of the state. Select ‘‘List’’ when you are finished.The system then displays a list ofstates, with the name that most closelymatches what you entered at the top.Use the joystick, the ZOOM IN/OUTbuttons, or the triangles in the upperright corner of the screen to scrollthrough the list. When you find thedesired state, do either of the following.•Highlight it with the joystick, andthen push the joystick.•Touch the name on the screen.You may also select a state by enteringonly the first character or first fewcharacters of the name. The system willdisplay a list of state names beginningwith that character or characters. Scrollthrough the list, find the desired state,and select it as described.Once you have selected the state, thesystem will return to the ‘‘Find addressby:’’ screen.Tip:When entering an address, it is usuallyeasier to enter the street first and thenlet the system display the city or citiesthat the street appears in. This avoidshaving to enter both the city and thestreet.NOTE:If you find that your city is not listed, itmay be part of a larger metropolitanarea. Try entering the street first.Selecting the CityWhen you select the City option, thedisplay changes to:The name of your current location is displayed. If your desired destination is in the same location, select ‘‘List’’.If not, use the displayed letters to enter the name of the destination city. Enter each letter by doing one of the following.•Move the highlighting to each desired letter with the joystick, then push on the joystick to enter that letter.•Touch each desired letter on the screen.Each entered letter will appear on the top of the display. Use the ‘‘Space’’ box to enter a space between words. Use the ‘‘Delete’’ box to erase a letter entered incorrectly.As you enter the city name, the system searches its database for a name that matches the letters you are entering.When it finds only one city thatmatches, it completes the entry of the name for you.If the system does not find an exact match, continue entering the name ofthe city. Select ‘‘List’’when you are finished.All cities and towns in the database are listed. Cities and towns in the non-detailed coverage area will have an ‘‘*’’next to their names. If you select one of these cities or towns, the system will not give you the option to enter a street address. It will guide you to the center of that city or town. See ‘‘Non-detailed coverage’’on page 75.The display changes to:The city selected by the system, or thecity you entered, is at the top of the list.To scroll through this list city by city,push the joystick up or down. To scrollup or down a screen at a time, use theZOOM IN or ZOOM OUT buttons, ortouch one of the triangles in the upperright corner of the screen. When youfind the desired city, do either of thefollowing.•Highlight it with the joystick, thenpush the joystick.•Touch the name on the screen.You can also select a city by enteringonly the first one or two letters in itsname. Then select ‘‘List’’.For example, if you enter only ‘‘L’’, thesystem will display a list of all citieswith names that start with the letter‘‘L’’.Use the joystick, the ZOOM IN/OUTbuttons or the triangles on the screen toscroll through the list.When you find the desired city, select itas explained above.If you do not find the city, or havemade a mistake, you can return to theprevious display by pressing theCANCEL button. Pressing the Menubutton will return you to the MainMenu.Selecting the Street Address After you have selected the city, ordirectly if you select the ‘‘Street’’option in the beginning screen, thedisplay changes to:Enter the street name in the same way that you entered the name of the city. If the street name includes numbers (228th Place, for example) select the Number box on the screen.The display will change to:Enter the numbers, then select theLetter box on the screen to return to thealphabet display. Complete the streetname, then select ‘‘List’’.To enter the name of a major highway,you must use the full name, including ahyphen. For interstates, use an ‘‘I’’ (I-80). For U.S. highways, use ‘‘US’’ (US-18). For state highways, use the two-character state designation (CA-101).For county roads, use the appropriatedesignation (G-2, for example).The system will display a list of streetnames, with the name you entered, orthe closest match to that name, at thetop of the list.Use the joystick, the ZOOM IN/OUT buttons, or the triangles in the upper right corner of the screen to scrollthrough the list.When you find the desired street, do either of the following.•Highlight it with the joystick, then push the joystick.•Touch the name on the screen.As with the city name, you do not have to enter the full street name.You can enter just one or two of the beginning characters, then select‘‘List’’.The system will display a list of street names beginning with that character or group of characters.Use the joystick, the ZOOM IN/OUT buttons, or the triangles on the screen to scroll through the list.When you find the desired street, select it with the joystick, or by touching the screen.After you have completed the streetname, the display changes to:Enter the address number of yourdestination.When you have finished,select‘‘Done’’.The system displays the acceptableaddress range. If you try to enter anumber outside that range, you will beshown an error message.Tip:If the particular address you wantcannot be found, select “Map Input”and use the joystick to select theappropriate location on the map (seeBy Map Input on page 34).If you did not select a city in thebeginning, and the street name youselected appears in more than one city,you will see:Select the desired destination city fromthe list.After you have entered the city andstreet address, the system will ask forthe type of route that you desire,calculate the route, and give you yourfirst route instruction. See ‘‘TravelingTo Your Destination’’on page 43.。
1.前言欢迎您使用E 路航GPS导航仪。
该导航仪以GPS导航功能为主,支持语音识别,同时具有视频播放、音频播放、Flash播放、图片浏览、E-Book阅读、游戏、数字电视等多种可选功能,可外接倒车后视监控摄像头、移动电子狗实现道路预警功能。
z采用SiRF Atlas-Ⅳ 双核处理器:高性能、低功耗;z友好的用户界面:简单、易操作;z电源管理:确保产品更稳定、持久地工作;z数据传输:通过Mini USB与计算机通讯;z优质的收讯:精确定位,为您提供称心如意的导航服务;z娱乐休闲好伴侣:音频/视频/娱乐功能,减轻您的疲劳。
您可以随时随地使用它,在驾车、步行、骑车的时候,或是等候会议的时候,其完善的“GPS+娱乐”功能让生活和工作变得丰富多彩!为了可以使您的GPS导航仪发挥最大的用途,并且了解所有的操作细节,请先仔细阅读本帮助说明的操作与指示,并只使用原厂提供的配件,以免造成无法预期的损坏。
如果您未依照正确的程序使用本系统或连接不兼容的配件,此行为将导致保修自动失效,甚至可能危害您及他人的安全。
对此,本公司不承担任何责任。
z我公司保留对此帮助说明的最终解释权。
z本产品有任何变动,恕不另行通知。
不便之处,敬请原谅!z请用户将重要资料进行备份,因资料遗失造成的损失,本公司不承担任何责任。
z本手册己经仔细核对,但不排除有少量文字错误的可能性。
如发现,请联系本公司客户服务中心。
全国统一服务电话:400-676-1277。
z由于交通建设的发展,可能出现导航电子地图数据与实际交通指示不完全一致的情况,请您务必遵照道路现状、现地标志等交通规则行驶。
在汽车驾驶过程中查看或操作导航仪,可能会导致严重的交通事故。
由于使用导致的交通意外及造成的各种损失,本公司不承担任何责任。
z软件的更新和升级信息均会在本公司网站公布,客户可自行决定是否要更新或升级。
z本手册中的图片仅供参考,请以实物为准。
阅读过程中,您还会看到以下一些补充信息:【提示】:有关主题的解释或说明;【相关信息】:有关主题的相关扩展信息;【注意事项】:有关主题的注意或警告事项。
【最新整理,下载后即可编辑】
E路航导航系统产品使用说明书
一、地图应用范围:
“凯立德”适用南方及珠三角地区,“城际通”适用北方城市,“道道通”适用长途司机。
出货时所配的导航仪地图:通常都是最新的!!!请不要盲目下载更新,另外我们建议广大用户,请在使用导航仪之前请把导航内部的全部资料在您的电脑中备份,以便不时之需!二、导航如何连接到电脑:
首先打开GPS导航仪,用数据线连接到电脑,若电脑读不到导航仪存储的空间,方式一:重新插数据线再试;若还是不行,拔掉数据线,打开GPS导航仪里的USB端口,重新设置,在U 盘处选择“打勾”,再连接电脑;若还是不行,重新启动电脑再试,重复前两次的方式,直到读到为止。
四、e路航导航仪路径的设置:
打开系统设置,点击e路航导航仪路径,选择NandFlash(内置地图)/SDMMC(外置T卡里的地图),再点击你所需要的地图文件,它就出现后缀.EXE执行文件后,再点击这个文件——点击右下角出现“GPS路径”,再选择“打勾”就保存,退出到桌面,双击导航仪就可以了。
五、AV参数设置:
视频格式支持:WMV, ASF, AVI ,RMVB
音频格式支持:WMA,MP3 and WAV
视频/音频的限制:分辨率控制在720×480以内,最佳效果
600×480,声音比特率降低到32,图像比特率降低到256。
参数仅供参考,从网上下载“模式加工厂”,在电脑里安装,降低“分
辨率”、“声音和图像的比特率”即可。
图像卡就降低图像比特率,图像拖影就增加图像比特率;声音不正常就调声音比特率(快就降低、拖音就增加)
六、导航仪声音大小的调节:
首先看喇叭位的保护膜揭开没有,若还是声音小,请在音量设置中选择更大。
若在导航过程中,还是比较小,请在语言设置里,把音量调大;若还觉得不够大,那就通过FM发射到汽车音箱里,任你自由调节,具体操作,如下“FM发射的设置与应用”。
七、电子狗预警常识:
电子狗预警是对固定点检测和预报,是e路航航仪系统内置的一个探测系统。
LDT是雷达头的简称,是流动测速的外接便携式装置,对“移动交警”的“移动基站”监测超速的“提前”提示(最远可提前1.5公里),提醒你前方有移动交警测速,请不要“超速的警示
LDT插上自带的车充就可工作,与导航没有关系,独立工作,互不影响。
若跟导航连接使用,必须通过数据线连接,可节省空间,共用雷达头的车充来实现供电。
C/H用途:长按3秒市区/郊区的模式语音切换,单独触发是音量调节;扬声器/PND用途:拨到扬声器就雷达头放音(最好),拨到PND可通过数据线连接到导航放音(效果不理想)。
(温馨提示:导航内置电子狗只能测固定点)
八、倒车后视安装方式:
摄像头固定在车牌顶部;发射器的电源线接在任一个倒车
灯(即挂倒档就亮的灯)上;接收器上的AV和USB线插在GPS 上,其盲端必须插车充。
请固定好“发射器”和“接收器”,不要晃动,否则就影响倒车后视效果。
挂倒档自动后视,挂前进档自动关闭,无需在GPS导航仪里设置。
若倒车图像方向不对,请点击屏幕“任一个角落”,即可自动调整
九、FM发射的设置与应用:
首先打开汽车收音并调到空频段(即没有收音和杂音的频道),再打开GPS导航仪的FM发射调到对应的车上“空频段”的“频率”,然后“必须”插上车充(可充当收音天线,同时降低杂音),即可把导航的声音或收音传到汽车音箱里,实现扩音。
(温馨提示:不在车上用时,请关闭FM发射,否则GPS就没有声音。
)
十、蓝牙的使用和设置:
首先将手机和导航仪的蓝牙都打开,再用导航仪的蓝牙进行搜索,搜索到了就可以连接,连接上就再对码(即把手机和导航的数字设定一样,通常是四位数字),对上了即可使用导航的免提打/接电话。
后续就不需要在连接了。
(若一次不成功请多试几次,导航的蓝牙功能对手机蓝牙的配置要求比较高,需要大家的耐心)
十一、电视功能的操作与说明:
首先要在有无线数字电视信号的地方,若在家里最好靠近窗台,必须拔出“左上角”的天线,点击电视,系统将自动搜索,直到出现电视画面。
若收不到电视,请重新开始,同样要在无线数字电视信号比较强的地方,拔出天线——打开电视——点击“设置”——选择“扫描”——将自动进行,完成后——点击“应用”——又将自动搜索——直到电视画面出现;若不行——
再点击右边“三角形或+ -”标志进行选择其他台,都需要一定时间。
还是不行,请点击“频道”——点击“扫描”——选择“应用”——直到电视画面出来就OK
(温馨提示:自动搜索没台,是系统默认的频道,就再用手点击选择下一个台,每点击一次系统将自动搜索一下,自动出现电视画面。
)
十二、导航仪的使用方法:
首先在户外把车停下来,在家就放在阳台/窗台能搜到卫星的地方,把地图打开,自动搜星,第一次搜星时间较长,2到10分钟,搜到3颗卫星时将自动语音提示,并显示你当前所在位置,这时只设置“目的地”,即可导航。
在家里只能实现模拟导航,但必须设置“出发地”和“目的地”;户外导航在“立交、隧道、交通复杂的路段”,系统将自动出现3D画面,供司机更方便的选择路线;在家里模拟导航,无3D效果。
温馨提醒:
1、请不要非法操作,不正常退出,严重会导致导航仪系统瘫痪
2、车启动前不能插车充,否则因车启动电流过大而烧掉车上点烟器的保险丝或车充,严重则损坏导航
3、TF卡请不要经常拔出,否则会缩短T卡的使用寿命,拔出时,请先关机
4、请不要从网上“直接”下载给GPS,系统容易受病毒侵袭,导致无法运行
5、请不要频繁的点击,系统本身有一个反应时间,否则就会不停的使系统内部重复启动,严重就导致死机,尤其是关闭GPS 导航仪系统,要从地图“功能”里,选择“关闭系统”,这才是
“正确”的真正的退出导航系统,否则容易导致地图程序破坏,不能导航
6、请关机充电充满,前几次充5小时左右,在车上使用时“必须”插车充,否则等到系统提示充电时再插上车充,将会影响GPS正常工作。