KEYENCE fs-v31放大器中文说明书
- 格式:doc
- 大小:1.99 MB
- 文档页数:6


06/27/2019 Page 1 / 7Signal conditioner - MACX MCR-UI-UI-NC - 2811446Please be informed that the data shown in this PDF Document is generated from our Online Catalog. Please find the complete data in the user's documentation. Our General Terms of Use for Downloads are valid (/download)Configurable 3-way isolating amplifier with safe electrical isolation, 24 V, power bridging. DIP switches on the front, over 1600 signal conversions can be set. Standard configuration (IN 0 ... 10 V/OUT 0 ... 20 mA), screwconnection, SIL.Your advantagesPower supply possible via DIN rail connectorOver 1600 signal conversions can be set via DIP switches on the frontInstallation in zone 2 permitted Up to SIL 2 according to EN 61508 3-way electrical isolationAnalog signal conditioner for isolating, filtering, amplifying, and converting standard analog signals Configurable input and output signals, including bipolar current and voltage signals 10 kHz limit frequency for time-critical applications Status indicator for supply voltage Active or passive outputPlug-in screw or spring-cage connection technology (Push-in technology)Key Commercial DataTechnical dataNoteDimensionsSignal conditioner - MACX MCR-UI-UI-NC - 2811446 Technical dataDimensionsAmbient conditionsInput dataSignal conditioner - MACX MCR-UI-UI-NC - 2811446Technical dataInput data06/27/2019 Page 3 / 7Signal conditioner - MACX MCR-UI-UI-NC - 2811446Technical dataInput dataOutput dataPower supplyConnection dataGeneral06/27/2019 Page 4 / 7Signal conditioner - MACX MCR-UI-UI-NC - 2811446Technical dataGeneralStandards and RegulationsEnvironmental Product Compliance06/27/2019 Page 5 / 706/27/2019 Page 6 / 7Signal conditioner - MACX MCR-UI-UI-NC - 2811446DrawingsDimensional drawing116 (SP)Block diagramZone 2Div. 2PictogramOUTApprovalsApprovalsApprovalsUL Listed / cUL Listed / Functional Safety / DNV GL / cULus ListedEx ApprovalsIECEx / ATEX / UL Listed / cUL Listed / EAC Ex / cULus ListedApproval detailsUL Listed/cgi-bin/XYV/template/LISEXT/1FRAME/index.htm FILE E 330267Signal conditioner - MACX MCR-UI-UI-NC - 2811446ApprovalscUL Listed /cgi-bin/XYV/template/LISEXT/1FRAME/index.htm FILE E 330267 Functional Safety BVS Pb 01/10DNV GL https:/// TAA000020C cULus ListedPhoenix Contact 2019 © - all rights reservedPHOENIX CONTACT GmbH & Co. KGFlachsmarktstr. 832825 BlombergGermanyTel. +49 5235 300Fax +49 5235 3 4120006/27/2019 Page 7 / 7。


放大器操作说明一、放大器的设置1.打开Nexus 元件的电源并使Nexus 元件初始化。
2.如果Nexus 元件没有显示主菜单,则应按底下的“Home ”键,直到出现主菜单。
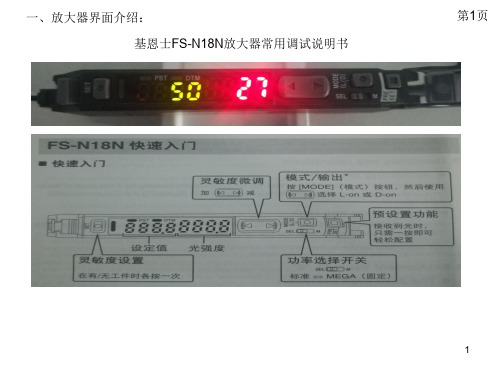
在主菜单上应有诸如“Amplifier Set -up (放大器设置)”,“Transducer Set -up (传感器设置)”等选项。
如照片1所示:3.滚动到“Amplifier Set -up (放大器设置)”并按底下的“↙”一次。
如照片2所示:照片 1照片 24.在“Amplifier Set -up (放大器设置)”菜单下,应通过在底下箭头键来滚动到“Hz ”,以确保“Hz ”显示加亮。
一旦“Hz ”显示加亮,则按 “Ch ↓”键。
随后应用“+”和“-”按键来设置Hz (频率)为A 。
一旦通道1设置为A ,则应按 “Ch ↓”键,并对通道2,3和4作同样的工作。
如果是2通道Nexus 元件,那么只需要编程两个通道。
当所有通道设置为A 时,按“Home ”键返回。
如照片3所示:然后,用“→”键移动到“Out (输出)”。
一旦“Out (输出)”被显示加亮,使用“Ch ↓”键和“+”与“-”键把每个通道都设置为316mV/Pa 。
当所有通道都设置为316mV/Pa 后,按“Home ”键返回。
最后回顾一下菜单,确保所有的通道都被分别设置在A 下,“Out ”输出为316 mV/Pa 。
当所有设置项都设置正确后,按“Home ”键返回。
如照片4所示:照片 3滚动到“Transducer Set -up (传感器设置)”下并按底下的“↙”一次。
如照片5所示:(此步可以省略,因为麦克风的灵敏度是自动识别的不用设置)编辑此菜单需要声学传感器的校准数值。
当得到校准数值后,滚动到“Sensitivity (灵敏度)”并按“Ch ↓”键。
如照片6所示:照片 4照片 5随后将处在显示加亮的十进制数值的通道#1。
用“+”与“-”键把此数值设置为对应于此通道/声学传感器的校准/灵敏度数值。
DIGITAL FIBER SENSORFS-V30/31(P)/31C(P)/31M/32(P)/32C(P)Instruction ManualI FS-V31/32/31MI FS-V31P/32P*1 FS-V31/31M only *2 FS-31M only *3 FS-V31P onlyI FS-V31C/32COutput Circuit DiagramInput Circuit DiagramI FS-V31CP/32CPOutput Circuit DiagramInput Circuit DiagramI Socket Cable (Sold Separately)For FS-V31C(P)/32C(P)Pin and wire color table2To dismount the sensor, raise the main body in the direction of the arrow 3 while pushing the both ends of the connected amplifiers in the same way as in step (2).5Sandwich the amplifiers between the end units. Tighten the screws at the top (twoscrews x two units) with a Phillips screwdriver to fix the end units.Move down the fiber lock lever in the direction shown by arrow 4.NoteIf a thin fiber unit is used, an adapter provided with the thin fiber unit will be required.Unless the right adapter is connected, the thin fiber unit will not detect targets correctly. (The adapter is supplied with the fiber unit.)•To connect the coaxial reflective type fiber unit to the amplifier, connect the single-core fiber to the transmitter side, and connect the multiple-core fiber to the receiver side.Pin assignmentPin assignmentOP-73864 (cable length:2 m)OP-73865 (cable length:10 m)with and without a workpiece.12after the calibration is complete. The set value is stored in memory even in that case.I Maximum Sensitivity SettingSet the sensitivity without a workpiece in the case of the reflective type, and with a workpiece in the case of the through-beam or retro-reflective type.Press the SET button for three seconds in the state as shown in the above figure.(Release the button when SET flashes.)When setting the sensitivity, set the value slightly higher than the received light intensity.I Full Auto CalibrationIn this mode, the PV will be set to the mean value of the maximum and minimum incident val-ues obtained within a certain period. Use this mode to detect moving workpieces.1Press the set button for a minimum of three seconds while the target workpiece is passing the sensing area of the fiber unit.•While the SET button is pressed, the sensitivity of the sensor will be set•After the setting is completed, the setting value is displayed on the digital monitor.I Positioning CalibrationFor example, if the target value is set to –10P , the setting value is determined 10% lower than the received light intensity when the SET button is pressed.1When selecting the sensitivity setting method (page 4, No. 2), select the % calibration, and set the target value of calibration.2Taking the desired light intensity as a reference (normally without a workpiece), press the SET button.*While the % calibration is in use, other calibrations (sensitivity setting) cannot be used.*With FS-V31C(P)/32C(P), by periodically performing external calibration from PLC or other devices, stable detection can be performed even with a small sensitivity difference.This function is effective when the light intensity difference is small when judging whether or not there is a workpiece.At Detection mode selection (page 4, No.4), select “Dynamic sensitivity correction mode” beforehand.*How to set the sensitivity is the same as in the normal mode.The DSC indicator illuminates when the DSC function is set.*When Light ON is selected, the upper limit of the correctable range is twice as much as the initial setting value.*The value is stored in memory even after the power is turned off.*The DSC indicator flashes when the light intensity during output OFF greatly fluctuates or the L/D ON selection is inappropriate. In such a case, check the setting again.•When using FS-V31C(P)/32C(P), external inputs can be used.•No inputs are accepted while setting each mode.When external calibration is selected, the operation is the same as with the SET button.I Special FunctionBy performing the following operation, both sensitivity setting and scaling can be performed using external input. Select external calibration (page 4, No. 4-C) and display scaling. The following is the example when using the % calibration.set by pressing the button for 2 seconds or longer.The same steps can be taken to deactivate key lock.For more information on the key lock levels and the PIN number key lock function, refer to page 6.Select “rSt “with the3Select “init” with theDefault settingPower mode:FINEDetection mode: NormalSetting value:50Output selection:L ONI Saving the settings1While pressing, press for 5 seconds or longer.2Select “SAvE” with the3Select “YES” with theI Loading the setting1While pressing , press for 5 seconds or longer.2Select “rSt” with the3Select “[vSt” with thebutton for 3 seconds or longer.Reference。
10104C SJ-M前言本手册说明的是“高性能微型静电消除器SJ-M 100/200”的运用、操作方法以及注意事项。
为了充分、安全地使用“高性能微型静电消除器SJ-M 100/200”的功能,请在使用前一定阅读本手册。
同时,请妥善保管,以备不时之需。
■标志本手册采用以下标志提醒用户注意重要信息。
请务必阅读。
如果忽视遵守这些指示,有可能导致死亡或受重伤。
如果忽视遵守这些指示,可能导致人身伤害。
如果忽视遵守这些指示,可能损坏产品(产品故障等)。
在操作上必须遵守的注意事项和限制事项。
提醒用户注意容易产生错误的操作。
有用的信息或有助于理解本文的信息。
应该参照的本手册中的相关页数或其他使用手册中的相关页数。
䰽䄺 ⊼110104C 为了安全使用一般注意事项•在将SJ-M 系列与其他机器混合使用时,由于使用条件以及使用环境等原因,其功能和性能可能无法充分发挥。
所以请在调查研究后再使用SJ-M 。
•请不要将本产品用于人身保护。
使用SJ-M 系列时的注意事项SJ-M 系列是不具有防爆构造的高电压产品。
所以在使用时请注意以下几点。
•在静电消除头尖端部分的周围,请用硅树脂、氟树脂等耐臭氧性高的树脂加以保护。
否则产生的臭氧还可能对人体有不良影响,所以请不要在密闭的空间使用 SJ-M系列。
请一定在通风好的场所使用 SJ-M 系列。
也请不要将脸部靠近静电消除头。
产生的臭氧可能使您的鼻部或喉部感到疼痛或不适。
•请不要在温度变化急剧或结露水的场所使用,否则可能导致事故或故障。
•请不要用湿手操作,否则可能导致触电。
•在维护和检修的时候,请一定在电源关闭的状态下操作。
如果在电源开启的状态下操作,可能导致触电或事故。
•在维护期间,请不要触碰电极针。
否则可能导致受伤。
•请按照符合规格的温度降级供应空气。
如果不进行温度降级,可能导致触电或故障。
•万一本公司的产品有异常时,请立刻切断电源,与最近的营业所联系。
请用户不要自行修理。
否则可能导致触电或故障。
LineupFeaturesD ual digital display/Bar LED/Two-colour display S tandard single output/Dual output/Analogue outputE xpansion connection reduces wiringExpert Engineering SitesAn on-line guide of automation knowledge and techniques1-Line System FibreSensor Amplifi ers FS-V21/V11/V1Refer to P.837 for a list of productscomplying with EU Directives.Refer to P.853 for UL Certifi ed Products.Dedicated parallel operation chip (FALCON)Since 1996, the FS-V Series has utilised a parallel processing chip rather than a general-purpose CPU. This chip is designed especially for fi breoptic sensors in order to offer accelerated data processing and specialisation. This chip is what gives KEYENCE fi breoptic sensors their stunning performance.Dual digital display indicates current value (received light intensity) + setting valueFS-V20 SeriesCurrent value (received light intensity) + sensitivity margin displayFS-V10 SeriesDual output as standard.Monitor intensity of received light for PS Series unitsFS-V1SeriesBar LED monitorOperation indicatorDigital monitorManual button Output selection switchMode buttonSet buttonOperation indicator*Dual digital monitorMode buttonOutput selection buttonSet buttonManual button* The operation indicator on the FS-V21X (infrared type) does not light up.Sensitivity margin can be checked on the bar LED in 5% increments.It is possible to check the received light intensity of a PS-T2 unit or aPS Series expansion unit by simply connecting to the FS-V1.Operation indicatorOutput timer selection switchLCD display monitorUp/down keysSet buttonMode buttonOutput selection switchTuning display indicatorFS-V20 SeriesFS-V10 Series,FS-V1All series listed above require less wiring when using main and expansion units. for details on wiring.Main units include mounting brackets and expansion units include end units.Mounting bracketOP-25431End UnitsOP-26751(x2)* FS-V1(P) is supplied with a different mounting bracket.Amplifier (FS-V20 Series)1. Use the FS-V21RM in the FINE or TURBO mode when outputting signals with a monitor.2. I f more than one unit is used together, the ambient temperature varies with the conditions below. Mount the units on the DIN rail with mounting brackets and check that the output current is 20 mA or less.1 or2 Units: -10 to 55°C,3 to 10 Units: -10 to 50°C, 11 to 16 Units: -10 to 45°C3. The operation indication light of the infrared types does not illuminate.4. 20 mA at maximum for the expansion unit.Amplifier (FS-V10 Series)1. I f more than one unit is used together, the ambient temperature varies with the conditions below. Mount the units on the DIN rail with mounting brackets and check that the output current is 20 mA or less.3 to 10 Units: -10 to 50°C, 11 to 16 Units: -10 to 45°C2. The response speed varies depending on the number of expansion units connected.3. The FS-V1 is equipped with two outputs. The FS-V10 has no control output.4. Neither the FS-V12 nor the FS-V10 can be used as a standalone unit.DimensionsUnit: mmAmplifierFS-V21(R) Series (Main unit)FS-V22(R)/V20R Series (Expansion unit)FS-V10/V12/V12PWhen the mounting bracket (Optional)FS-V21(R)(Main unit) is attached:FS-V21R/21G/21X (Main unit)FS-V21RP (Main unit)FS-V11/V12FS-V11P/V12PFS-V21RMFS-V22R/22G/22X (Expansion unit)FS-V22RP(Expansion unit)5 to 40 VDC12 to 24 VDC0 V0 V*FS-V21RM only.Ω or higherø3.9, 3-core x Brown/Blue/Black: 0.34 mm* FS-V21RM : ø3.9, 4-core xBrown/Blue: 0.34 mm Black/Orange: 0.18 mm922 ** The FS-V20Rdoes not have connecting cables.2 *Accessory: End unit Caution label x 2x 1* T he FS-V10 does not have connecting cables.*F S-V11 only0 V*FS-V11P onlyFS-V1FS-V1P(External calibration input circuit)FS-V11/V11PFS-V1/V1Pø3.9, 3-core x Brown/Blue/Black: 0.34 mm 2Accessory: Mounting bracket x 1When the mounting bracket (Optional)FS-V11 is attached:When the mounting bracket (Optional)FS-V1(P)is attached:ø3.9, 5-core x Brown/Blue: 0.34 mm 22Accessory: Mounting bracket x 1Rear of mounting bracketEnd unit (Optional)OP-26751DIN-rail mounting*When several units are connected* The above is for the FS-T2 and M2.。