hl7接口开发商中文使用手册
- 格式:doc
- 大小:270.50 KB
- 文档页数:23
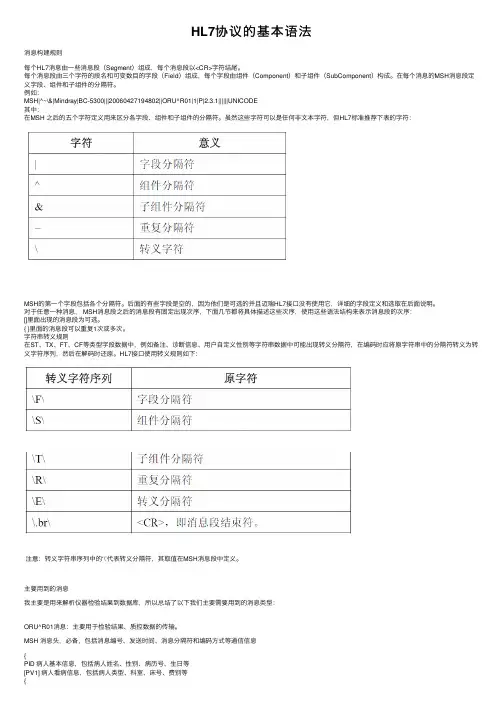
HL7协议的基本语法消息构建规则每个HL7消息由⼀些消息段(Segment)组成,每个消息段以<CR>字符结尾。
每个消息段由三个字符的段名和可变数⽬的字段(Field)组成,每个字段由组件(Component)和⼦组件(SubComponent)构成。
在每个消息的MSH消息段定义字段、组件和⼦组件的分隔符。
例如:MSH|^~\&|Mindray|BC-5300|||20060427194802||ORU^R01|1|P|2.3.1||||||UNICODE其中:在MSH 之后的五个字符定义⽤来区分各字段、组件和⼦组件的分隔符。
虽然这些字符可以是任何⾮⽂本字符,但HL7标准推荐下表的字符:MSH的第⼀个字段包括各个分隔符。
后⾯的有些字段是空的,因为他们是可选的并且迈瑞HL7接⼝没有使⽤它,详细的字段定义和选取在后⾯说明。
对于任意⼀种消息, MSH消息段之后的消息段有固定出现次序,下⾯⼏节都将具体描述这些次序,使⽤这些语法结构来表⽰消息段的次序:[]⾥⾯出现的消息段为可选。
{ }⾥⾯的消息段可以重复1次或多次。
字符串转义规则在ST、TX、FT、CF等类型字段数据中,例如备注、诊断信息、⽤户⾃定义性别等字符串数据中可能出现转义分隔符,在编码时应将原字符串中的分隔符转义为转义字符序列,然后在解码时还原。
HL7接⼝使⽤转义规则如下:注意:转义字符串序列中的‘\’代表转义分隔符,其取值在MSH消息段中定义。
主要⽤到的消息我主要是⽤来解析仪器检验结果到数据库,所以总结了以下我们主要需要⽤到的消息类型:ORU^R01消息:主要⽤于检验结果、质控数据的传输。
MSH 消息头,必备,包括消息编号、发送时间、消息分隔符和编码⽅式等通信信息{PID 病⼈基本信息,包括病⼈姓名、性别、病历号、⽣⽇等[PV1] 病⼈看病信息,包括病⼈类型、科室、床号、费别等{OBR 样本信息,包括样本编号、检验者、检验时间等{[OBX]} 检验数据项,包括检验参数结果以及⼯作模式等检验相关数据等}}PID(Patient Identification)消息段包含病⼈的基本信息。
Red Hat Enterprise Linux (RHEL) 7.4-ALT Driver User ManualTable of ContentsDocument Revision History (5)1Firmware Burning (6)2Port Type Management (7)3Modules Loading and Unloading (8)4Important Packages and Their Installation (9)5SR-IOV Configuration (10)5.1Setting up SR-IOV in ConnectX-3/ConnectX-3 Pro (10)6Default RoCE Mode Setting (12)7PXE over InfiniBand Installation (13)Table 1: Document Revision History (5)Table 1: Document Revision History1 Firmware Burning1.Check the device’s PCI address.lspci | grep MellanoxExample:00:06.0 Infiniband controller: Mellanox Technologies MT27520 Family[ConnectX-3 Pro]2.Identify the adapter card's PSID.# mstflint -d 81:00.0 qImage type: FS2FW Version: 2.36.5000FW Release Date: 26.1.2016Rom Info: type=PXE version=3.4.718 devid=4103Device ID: 4103Description: Node Port1 Port2Sys imageGUIDs: e41d2d0300b3f590 e41d2d0300b3f591 e41d2d0300b3f592e41d2d0300b3f593MACs: e41d2db3f591 e41d2db3f592VSD:PSID: MT_10901110193.Download the firmware BIN file from the Mellanox website that matches your card'sPSID: → Support/Education→Support Downloader4.Burn the firmware.# mstflint -d <lspci-device-id> -i <image-file> b5.Reboot your machine after the firmware burning is completed.2 Port Type ManagementConnectX®-3/ConnectX®-3 Pro/ConnectX®-4/ConnectX®-4 Lx/ConnectX®-5/ConnectX®-5 Ex ports can be individually configured to work as InfiniBand or Ethernetports. By default both ConnectX®-4 VPI ports are initialized as InfiniBand ports. If youwish to change the port type use the mstconfig after the driver is loaded.1.Install mstflint tools.yum install mstflint2.Check the device’s PCI address.lspci | grep MellanoxExample:00:06.0 Infiniband controller: Mellanox Technologies MT27520 Family[ConnectX-3 Pro]e mstconfig to change the link type as desired IB – for InfiniBand, ETH – for Ethernet.mstconfig –d <device pci> s LINK_TYPE_P1/2=<ETH|IB|VPI>Example:# mstconfig -d 00:06.0 s LINK_TYPE_P1=ETHDevice #1:----------Device type: ConnectX3ProPCI device: 00:06.0Configurations: Current NewLINK_TYPE_P1 IB(1) ETH(2)Apply new Configuration? ? (y/n) [n] : yApplying... Done!-I- Please reboot machine to load new configurations.4.Reboot your machine.3 Modules Loading and UnloadingMellanox modules for ConnectX®-2/ConnectX®-3/ConnectX®-3 Pro are:∙mlx4_en, mlx4_core, mlx4_ibMellanox modules for ConnectX®-4/ConnectX®-4 Lx/ ConnectX®-5/ ConnectX®-5 Exare:∙mlx5_core, mlx5_ibIn order to unload the driver, you need to first unload mlx*_en/ mlx*_ib and then themlx*_core module.To load and unload the modules, use the commands below:∙Loading the driver: modprobe <module name># modprobe mlx5_ib∙Unloading the driver: modprobe –r <module name># modprobe –r mlx5_ib4 Important Packages and Their Installationrdma-corerdma-core RDMA core userspace libraries and daemonslibibmad: Low layer InfiniBand diagnostic and management programslibibmad OpenFabrics Alliance InfiniBand MAD libraryopensm: InfiniBand Subnet Manageropensm-libs Libraries used by OpenSM and included utilitiesopensm OpenIB InfiniBand Subnet Manager and management utilitiesIbutils: OpenIB Mellanox InfiniBand Diagnostic Toolsibutils-libs Shared libraries used by ibutils binariesibutils OpenIB Mellanox InfiniBand Diagnostic Toolsinfiniband-diags: OpenFabrics Alliance InfiniBand Diagnostic Toolsinfiniband-diags OpenFabrics Alliance InfiniBand Diagnostic Toolsperftest: IB Performance testsperftest IB Performance Testsmstflint: Mellanox Firmware Burning and Diagnostics Toolsmstflint Mellanox firmware burning toolTo install the packages above run:# yum install libibverbs librdmacm libibcm libibmad libibumad libmlx4libmlx5 opensm ibutils infiniband-diags srptools perftest mstflint rdmacm-utils ibverbs-utils librdmacm-utils -y5 SR-IOV Configuration5.1 Setting up SR-IOV in ConnectX-3/ConnectX-3 Pro1.Install the mstflint tools.# yum install mstflint2.Check the device’s PCI.# lspci | grep MellanoxExample:00:06.0 Infiniband controller: Mellanox Technologies MT27520 Family[ConnectX-3 Pro]3.Check if SR-IOV is enabled in the firmware.mstconfig -d <device pci> qExample:# mstconfig -d 00:06.0 qDevice #1:----------Device type: ConnectX3ProPCI device: 00:06.0Configurations: CurrentSRIOV_EN True(1)NUM_OF_VFS 8LINK_TYPE_P1 ETH(2)LINK_TYPE_P2 IB(1)LOG_BAR_SIZE 3BOOT_PKEY_P1 0BOOT_PKEY_P2 0BOOT_OPTION_ROM_EN_P1 True(1)BOOT_VLAN_EN_P1 False(0)BOOT_RETRY_CNT_P1 0LEGACY_BOOT_PROTOCOL_P1 PXE(1)BOOT_VLAN_P1 1BOOT_OPTION_ROM_EN_P2 True(1)BOOT_VLAN_EN_P2 False(0)BOOT_RETRY_CNT_P2 0LEGACY_BOOT_PROTOCOL_P2 PXE(1)BOOT_VLAN_P2 1IP_VER_P1 IPv4(0)IP_VER_P2 IPv4(04.Enable SR-IOV:mstconfig –d <device pci> s SRIOV_EN=<False|True>5.Configure the needed number of VFsmstconfig –d <device pci> s NUM_OF_VFS=<NUM>NOTE:This file will be generated only if IOMMU is set in the grub.conf file (byadding “intel_iommu=on” to /boot/grub/grub.conf file).6.[mlx4 devices only] Create/Edit the file /etc/modprobe.d/mlx4.conf:options mlx4_core num_vfs=[needed num of VFs] port_type_array=[1/2 for IB/ETH],[ 1/2 for IB/ETH]Example:options mlx4_core num_vfs=8 port_type_array=1,17.[mlx5 devices only] Write to the sysfs file the number of needed VFs.echo [num_vfs] > sys/class/net/ib2/device/sriov_numvfsExample:# echo 8 > /sys/class/net/ib2/device/sriov_numvfs8.Reboot the driver.9.Load the driver and verify that the VFs were created.# lspci | grep mellanoxExample:00:06.0 Network controller: Mellanox Technologies MT27520 Family[ConnectX-3 Pro]00:06.1 Network controller: Mellanox Technologies MT27500/MT27520 Family [ConnectX-3/ConnectX-3 Pro Virtual Function]00:06.2 Network controller: Mellanox Technologies MT27500/MT27520 Family [ConnectX-3/ConnectX-3 Pro Virtual Function]00:06.3 Network controller: Mellanox Technologies MT27500/MT27520 Family [ConnectX-3/ConnectX-3 Pro Virtual Function]00:06.4 Network controller: Mellanox Technologies MT27500/MT27520 Family [ConnectX-3/ConnectX-3 Pro Virtual Function]00:06.5 Network controller: Mellanox Technologies MT27500/MT27520 Family [ConnectX-3/ConnectX-3 Pro Virtual Function]00:06.6 Network controller: Mellanox Technologies MT27500/MT27520 Family [ConnectX-3/ConnectX-3 Pro Virtual Function]00:06.7 Network controller: Mellanox Technologies MT27500/MT27520 Family [ConnectX-3/ConnectX-3 Pro Virtual Function]00:06.0 Network controller: Mellanox Technologies MT27500/MT27520 Family [ConnectX-3/ConnectX-3 Pro Virtual Function]For further information, refer to section Setting Up SR-IOV MLNX_OFED User Manual.6 Default RoCE Mode Setting1.Mount the configfs file.# mount -t configfs none /sys/kernel/config2.Create a directory for the mlx4/mlx5 device.# mkdir -p /sys/kernel/config/rdma_cm/mlx4_0/3.Validate what is the used RoCE mode in the default_roce_mode configfs file.# cat /sys/kernel/config/rdma_cm/mlx4_0/ports/1/default_roce_modeIB/RoCE v14.Change the default RoCE mode,∙For RoCE v1: IB/RoCE v1∙For RoCE v2: RoCE v2# echo "RoCE v2" >/sys/kernel/config/rdma_cm/mlx4_0/ports/1/default_roce_mode# cat /sys/kernel/config/rdma_cm/mlx4_0/ports/1/default_roce_modeRoCE v2# echo "IB/RoCE v1" >/sys/kernel/config/rdma_cm/mlx4_0/ports/1/default_roce_mode# cat /sys/kernel/config/rdma_cm/mlx4_0/ports/1/default_roce_modeIB/RoCE v17 PXE over InfiniBand InstallationPXE over InfiniBand infrastructure has additional parameter in the Boot Loader file forloading the necessary modules and interfaces and for allowing sufficient time to get the link.To install RHEL from PXE using the IPoIB interfaces, add the following parameters to theBoot Loader file, located in the var/lib/tftpboot/pxelinux.cfg directory, at thePXE server:bootdev=ib0 ksdevice=ib0 net.ifnames=0 biosdevname=0 rd.neednet=1rd.bootif=0 rd.driver.pre=mlx5_ib,mlx4_ib,ib_ipoib ip=ib0:dhcp.dhcp.retry=10 .timeout.iflink=60 .timeout.ifup=80.timeout.carrier=80Example:default RH7.4-ALTprompt 1timeout 600label RH7.4-ALTkernelappend bootdev=ib0 ksdevice=ib0 net.ifnames=0 biosdevname=0 rd.neednet=1rd.bootif=0 rd.driver.pre=mlx5_ib,mlx4_ib,ib_ipoib ip=ib0:dhcp.dhcp.retry=10 .timeout.iflink=60 .timeout.ifup=80.timeout.carrier=80。

【課程名稱】HLC(V er7.1) 中文簡易操作手冊【課程編號】SMT – E – 01Date: Feb.05 Ver.:A01 Editor : Duan Le目錄第一章MSL SETUP設置-----------------------------------------------------3第二章Edit Program設置---------------------------------------------------------------42.2PWB設置-----------------------------------------------------------------42.21定位方法------------------------------------------------------------42.22基板結構------------------------------------------------------------42.23 Mark點類型--------------------------------------------------------42.24壞板標示-------------------------------------------------------------42.25 Mark點識別類型---------------------------------------------------42.26 PWB DA TA設置----------------------------------------------------42.27 矩陣電路層原點設置----------------------------------------------52.3 Planement設置--------------------------------------------------------52.4 Component設置------------------------------------------------------6元件數據的設置及數據庫的導入----------------------------------62.5 Pick設置---------------------------------------------------------------7第三章優化-----------------------------------------------------------------------83.2 Optimization設置--------------------------------------------------------83.21 Assignments 分配的設置-----------------------------------------8 3.22 Feed back 的設置--------------------------------------------------8 3.23 Balance 的設置-----------------------------------------------------8 3.24 Machine Option----------------------------------------------------9一、MSL SETUP1.1打開HLC文件後雙擊進行MSL 的設置。

HL7工具使用指南HL7 (Health Level Seven)是一种用于医疗信息系统间相互交换数据的国际标准。
它定义了一套通用的数据传输协议和数据格式,使得医疗信息能够在不同系统之间进行交换和共享。
为了帮助开发人员更好地理解和应用HL7标准,本文将提供一份HL7工具使用指南。
2. 消息路由器:消息路由器是用于根据HL7消息的内容和规则将消息路由到指定的接收者的工具。
它能够根据消息头中的信息,如发送者、接收者、消息类型等,将消息发送到相应的目标系统。
一些常用的消息路由器包括Mirth Connect、Rhapsody和Cloverleaf。
3. 数据转换器:数据转换器是用于将HL7消息转换为其他格式或数据协议的工具。
它能够将HL7消息转换为XML、JSON、CSV等格式,或者将消息转换为其他协议,如SOAP、REST等。
一些常用的数据转换器包括Mirth Connect、HL7 to XML Converter和HL7 to JSON Converter。
4. 接口引擎:接口引擎是用于在不同系统间建立和管理HL7接口的工具。
它能够处理HL7消息的收发、转换和路由等操作,并提供了监控和管理接口的功能。
一些常用的接口引擎包括Mirth Connect、Rhapsody和Cloverleaf。
5. 测试工具:测试工具是用于对HL7消息进行测试和验证的工具。
它可以模拟HL7消息的发送和接收,并提供了一些常用的测试用例和验证规则。
测试工具能够帮助开发人员在开发和部署阶段对HL7接口进行测试和调试。
一些常用的测试工具包括HL7 Soup、HL7 Spy和HL7 Inspector。
6. 应用程序接口(API):HL7的标准定义了一系列的应用程序接口(API),用于在应用程序中集成和处理HL7消息。
开发人员可以使用这些API来解析、生成、转换和路由HL7消息。
一些常用的HL7 API包括HAPI、NHapi和HL7apy。
CS-1600/CS-6400全自动生化分析仪LIS网络接口使用说明书V1.002011/07/04前言使用本系统前,请仔细阅读并理解本接口手册的内容,以便正确使用该系统。
本使用说明书的读者对象为进行LIS(实验室信息系统)开发的人员以及需要了解HL7 接口的其他相关人员。
本接口手册用于指导LIS系统开发商开发LIS接口,目的是使LIS系统能够同生化分析仪系统进行通信。
开发者需要具备一定的LIS、HL7标准相关知识以及网络编程的能力。
网络层通讯协议为TCP/IP,应用层协议为HL7,版本2.3.1。
建议在Windows 平台下使用Visual C++、Delphi等开发工具进行接口开发。
本使用说明书为CS-1600/CS-6400全自动生化分析仪HL7接口使用说明书。
目录1. 接口概述............................................................................................................ - 1 -1.1 HL7消息结构 ............................................................................................. - 1 -1.2 HL7底层协议 ............................................................................................. - 1 -2. 通讯格式............................................................................................................ - 3 -2.1 支持的HL7消息 ........................................................................................ - 3 -2.2 消息段....................................................................................................... - 6 -3. 通迅示例.......................................................................................................... - 23 -3.1发送检测数据过程..................................................................................... - 23 -3.2发送查询请求过程..................................................................................... - 27 -1. 接口概述HL7是标准化的卫生信息传输协议,是医疗领域不同应用之间电子传输的协议。
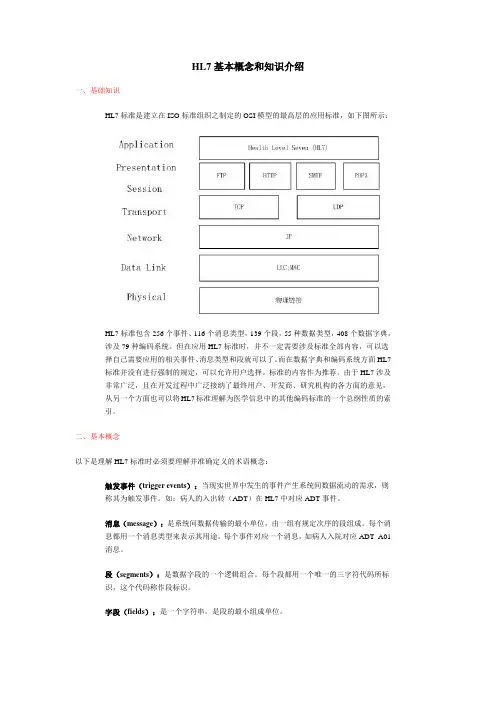
HL7基本概念和知识介绍一、基础知识HL7标准是建立在ISO标准组织之制定的OSI模型的最高层的应用标准,如下图所示:HL7标准包含256个事件、116个消息类型,139个段,55种数据类型,408个数据字典,涉及79种编码系统。
但在应用HL7标准时,并不一定需要涉及标准全部内容,可以选择自己需要应用的相关事件、消息类型和段就可以了。
而在数据字典和编码系统方面HL7标准并没有进行强制的规定,可以允许用户选择。
标准的内容作为推荐。
由于HL7涉及非常广泛,且在开发过程中广泛接纳了最终用户、开发商、研究机构的各方面的意见,从另一个方面也可以将HL7标准理解为医学信息中的其他编码标准的一个总纲性质的索引。
二、基本概念以下是理解HL7标准时必须要理解并准确定义的术语概念:触发事件(trigger events):当现实世界中发生的事件产生系统间数据流动的需求,则称其为触发事件。
如:病人的入出转(ADT)在HL7中对应ADT事件。
消息(message):是系统间数据传输的最小单位,由一组有规定次序的段组成。
每个消息都用一个消息类型来表示其用途。
每个事件对应一个消息,如病人入院对应ADT_A01消息。
段(segments):是数据字段的一个逻辑组合。
每个段都用一个唯一的三字符代码所标识,这个代码称作段标识。
字段(fields):是一个字符串。
是段的最小组成单位。
二、HL7消息示例最快的学习方法就是看应用示例,我们可以看选自:HL7 标准 2.4版本,第三章节3.5.1小节的一个示例说明,蓝色字体表示一条消息,下面为消息的说明:3.5.1 Admit/visit notification - event A01 (admitted patient)MSH|^~\&|ADT1|MCM|LABADT|MCM|198808181126|SECURITY|ADT^A01|MSG00001|P|2.4|<cr>EVN|A01|198808181123||<cr>PID|1||PATID1234^5^M11^ADT1^MR^MCM~123456789^^^USSSA^SS||JONES^WILLIAM^A^III||19610615|M||C|1200 N ELMSTREET^^GREENSBORO^NC^27401?1020|GL|(919)379?1212|(919)271?3434||S||PATID12345001^2^M10^ADT1^AN^A|123456789|987654^NC|<cr>NK1|1|JONES^BARBARA^K|WI^WIFE||||NK^NEXT OF KIN<cr>PV1|1|I|2000^2012^01||||004777^LEBAUER^SIDNEY^J.|||SUR||||ADM|A0|<cr>Patient William A. Jones, III was admitted on July 18, 1988 at 11:23 a.m. by doctor Sidney J.Lebauer (#004777) for surgery (SUR). He has been assigned to room 2012, bed 01 on nursingunit 2000.The message was sent from system ADT1 at the MCM site to system LABADT, also at theMCM site, on the same date as the admission took place, but three minutes after the admit.消息解读:该消息为ADT消息类型中的A01消息,MSH表示为消息头段,EVN为消息事件段,PID为病人标识段,NK1为相关,PV1为病人就诊段;这些三个字母一组称作段ID,<cr>代表回车符,表示该段的结束消息的内容就不进行翻译了。

竭诚为您提供优质文档/双击可除hl7,协议篇一:lishl7(网口通讯协议)cs-1600/cs-6400全自动生化分析仪lis网络接口使用说明书V1.0020xx/07/04前言使用本系统前,请仔细阅读并理解本接口手册的内容,以便正确使用该系统。
本使用说明书的读者对象为进行lis (实验室信息系统)开发的人员以及需要了解hl7接口的其他相关人员。
本接口手册用于指导lis系统开发商开发lis 接口,目的是使lis系统能够同生化分析仪系统进行通信。
开发者需要具备一定的lis、hl7标准相关知识以及网络编程的能力。
网络层通讯协议为tcp/ip,应用层协议为hl7,版本2.3.1。
建议在windows平台下使用Visualc++、delphi 等开发工具进行接口开发。
本使用说明书为cs-1600/cs-6400全自动生化分析仪hl7接口使用说明书。
目录1.接口概述................................................. ................................................... .. (1)1.1hl7消息结构................................................. ................................................... ..........-1-1.2hl7底层协议................................................. ................................................... ..........-1-2.通讯格式................................................. ................................................... .. (3)2.1支持的hl7消息................................................. ................................................... ....-3-2.2消息段................................................. ................................................... .....................-6-3.通迅示例................................................. ................................................... (22)3.1发送检测数据过程................................................. ................................................... -22-3.2发送查询请求过程................................................. (25)1.接口概述hl7是标准化的卫生信息传输协议,是医疗领域不同应用之间电子传输的协议。

hl7解析方法
HL7(Health Level Seven)是一个标准化的卫生信息传输协议,它汇
集了不同厂商用来设计应用软件之间接口的标准格式。
通过这个协议,医疗数据可以在各个医疗硬件、软件之间进行传输。
对于HL7消息的解析,通常需要使用特定的工具或库。
以下是解析HL7消息的一般步骤:
1. 获取HL7消息:首先,你需要从医疗设备或系统获取HL7消息。
这
可以通过接口、文件传输或网络通信等方式实现。
2. 识别消息版本:了解HL7消息的版本是解析的关键。
不同版本的
HL7消息具有不同的结构和格式。
你可以查看消息中的版本标识符来确定其版本。
3. 选择合适的解析库:根据你的编程语言和需求,选择一个适合的
HL7解析库。
这些库通常提供了用于解析HL7消息的函数或类,使你可以轻松地提取数据。
4. 解析消息:使用所选的解析库,将HL7消息转换为可读的格式(如XML、JSON等)。
根据消息的版本,使用相应的解析规则和结构化格式来提取消息中的数据字段。
5. 处理数据:一旦你成功地解析了消息,就可以处理其中的数据。
这
可能涉及到提取特定的信息(如病人信息、医嘱、检查结果等),并
将其用于医疗信息系统中的相应操作或分析。
请注意,具体的解析方法可能因使用的编程语言和库而有所不同。
因此,建议查阅相关文档或库的官方资料以获取详细的解析指导。
此外,为了确保解析的准确性和兼容性,建议遵循HL7组织的最佳实践和标准,并关注HL7版本的更新和变化。

HL7 3.0版本RIM(Reference Information Model)入门说明:本入门资料是在gabrielyang基于RIM1.12版本翻译整理的中文版本的基础上,依照RIM的编排格式有选择的制作而成,提供论坛的朋友们学习研究使用,如果需要用于其它方面,请在论坛管理员联系。
RIM版本目前已经发展到1.18版本,其它版本相关的链接,在本文的最后可以找到。
由于时间的关系,所以没有做页内的链接,所以不能像英文版本那样可以做页内跳跃,在此向各位表示歉意。
1.2 概述What the Reference Information Model IsHL7中RIM的目的是越过局部上下文的关系来共享联合的含义。
The HL7 Version 3 Reference Information Model (RIM)包含了全面的用于HL7规范中的信息主题的所需要的内容。
由于HL7规范允许松散的信息系统联合,HL7的RIM的范围就是我们要理解的信息系统中的信息,而不是任何一个特定的系统中的都必须包括所有信息。
由于HL7规范用于连接不同环境下运作的信息系统,通过不同类型的医疗护理交付系统(healthcare delivery organizations)和通过行政上的管理来运作。
当构建一个联合的框架的时候,HL7RIM需要足够灵活,以表达内容广泛的信息内容。
The Version 3 RIM清晰的定义了在HL7通讯中引用的一些重要内容,包括结构化的文件或一些未来的HL7信息包的规范说明,RIM也包含了这些有影响的东西的特性和他们之间关系的描述。
RIM用一个改良的对象符号表示,和UML中使用的差不多。
RIM用图像表现为网络状的类,包含了他们的属性和他们的联合联接。
图表后面是所有定义联接和约束的细节。
RIM 的所有的信息被放在一个知识库中,这个知识库包含了详细资料,详细资料的联接和发生的修订。
What the Reference Information Model Is NotHL7RIM不是一个数据库模块,也不是任何的信息系统,不是任何医疗组织的计划或者一套特定的通讯系统。

HL7工具使用指南版本: 1.001.生成RMIM模型visio图以西医处方为例,根据业务场景从HL7 Domain中找到与业务场景相似的RMIM模型,西医处方使用PORX_RM010120模型,从/v3ballot2011may/source/domains/中下载对应的RMIM模型的visio文件(如hmporx_sourcegraphics.zip中的PORX_RM010120UV.vsd).双击用visio打开如下图:根据西医处方数据集,对以上RMIM模型进行裁剪,去除没有用到活动,角色,实体等,结果如下:裁剪后先使用菜单HL7→validation→validate against RIM对模型进行校验,如下:校验通过后,使用菜单HL7 save to Repository…,进行保存。
2.生成HMD文件使用RoseTree打开Repository库,选择刚保存RMIM模型选择edit auto-generate HMD from selected one,点击右侧Add按钮:选择File save as XML format,保存为HMD文件:3.用pubDB生成动态文件在pubDB的安装目录下,打开PubDb_v209c,并在Domain区输入相应的内容(在HL7中找到业务场景对应的Domain):点击Edit Domain按钮:输入相应内容:进入Domain StoryBoard Tab页,输入相应内容:点击Edit StoryBoard按钮,输入相应内容:点击interactions Tab页:返回到Domain StoryBoard页面,点击application RolseTab页,输入相应内容(在HL7中找到业务场景对应的Domain下的interaction,查找其对应的application Rolse):点击Edit App Role按钮,输入相应内容(interactions sent by Application Role中下拉列表框中的内容是interactions Tab页中内容,完成interactions Tab页中的内容再重新进入此界面进行选择):返回Application Role页面,点击Trigger Event Tab页(在HL7中找到业务场景对应的Domain 下的Trigger Event):点击Edit Trigger Event按钮,输入相应内容:返回到Trigger Event页面,进入RMIM’s 页面,输入相应的内容:点击Edit RMIM按钮,输入相应内容:点击Edit HMD按钮,输入相应内容:返回RMIM’s页面,点击interaction Tab页,输入相应内容(在HL7中找到业务场景对应的Domain下的interaction):点击Edit Interaction按钮,输入相应内容:返回Interaction页面,点击State Tab页,输入相应内容:点击Glossary Tab页,输入相应内容:点击Authors Tab页,输入相应内容:退出PubDB,在pubDB的安装目录下找到HL7PublishingWidget(这是RoseTree的组件,需安装RoseTree 4.30版本,高版本的RoseTree不能正常export文件),如下:点击export to XML:点击to HTML $ beyond:4.生成schema文件将rostTree生成的HMD文件拷贝到V3 generate的C:\HL7Programs\HL7\v3Generator-3.4.4_20101211\InputFiles\PayloadModels目录下将裁剪后的visio XML文件拷贝到C:\HL7Programs\HL7\v3Generator-3.4.4_20101211\InputFiles\VisioModelXmlFiles目录下将HL7PublishingWidget生成的文件拷贝到C:\HL7Programs\HL7\v3Generator-3.4.4_20101211\InputFiles\DynamicModelFiles目录下运行C:\HL7Programs\HL7\v3Generator-3.4.4_20101211\run.bat,运行成功后在C:\HL7Programs\HL7\v3Generator-3.4.4_20101211\OutputFiles\Schemas目录下生成了PORX_MT010120UV.xsd文件。
Red Hat Enterprise Linux (RHEL) 7.7 DriverUser ManualRHEL 7.7NOTE:THIS HARDWARE, SOFTWARE OR TEST SUITE PRODUCT (“PRODUCT(S)”) AND ITS RELATED DOCUMENTATION ARE PROVIDED BY MELLANOX TECHNOLOGIES “AS-IS” WITH ALL FAULTS OF ANY KIND AND SOLELY FOR THE PURPOSE OF AIDING THE CUSTOMER IN TESTING APPLICATIONS THAT USE THE PRODUCTS IN DESIGNATED SOLUTIONS. THE CUSTOMER'S MANUFACTURING TEST ENVIRONMENT HAS NOT MET THE STANDARDS SET BY MELLANOX TECHNOLOGIES TO FULLY QUALIFY THE PRODUCT(S) AND/OR THE SYSTEM USING IT. THEREFORE, MELLANOX TECHNOLOGIES CANNOT AND DOES NOT GUARANTEE OR WARRANT THAT THE PRODUCTS WILL OPERATE WITH THE HIGHEST QUALITY. ANY EXPRESS OR IMPLIED WARRANTIES, INCLUDING, BUT NOT LIMITED TO, THE IMPLIED WARRANTIES OF MERCHANTABILITY, FITNESS FOR A PARTICULAR PURPOSE AND NONINFRINGEMENT ARE DISCLAIMED. IN NO EVENT SHALL MELLANOX BE LIABLE TO CUSTOMER OR ANY THIRD PARTIES FOR ANY DIRECT, INDIRECT, SPECIAL, EXEMPLARY, OR CONSEQUENTIAL DAMAGES OF ANY KIND (INCLUDING, BUT NOT LIMITED TO, PAYMENT FOR PROCUREMENT OF SUBSTITUTE GOODS OR SERVICES; LOSS OF USE, DATA, OR PROFITS; OR BUSINESS INTERRUPTION) HOWEVER CAUSED AND ON ANY THEORY OF LIABILITY, WHETHER IN CONTRACT, STRICT LIABILITY, OR TORT (INCLUDING NEGLIGENCE OR OTHERWISE) ARISING IN ANY WAY FROM THE USE OF THE PRODUCT(S) AND RELATED DOCUMENTATION EVEN IF ADVISED OF THE POSSIBILITY OF SUCH DAMAGE.Mellanox Technologies350 Oakmead Parkway Suite 100Sunnyvale, CA 94085U.S.A.Tel: (408) 970-3400Fax: (408) 970-3403© Copyright 2019. Mellanox Technologies Ltd. All Rights Reserved.Mellanox®, Mellanox logo, Mellanox Open Ethernet®, LinkX®, Mellanox Spectrum®, Mellanox Virtual Modular Switch®, MetroDX®, MetroX®, MLNX-OS®, ONE SWITCH. A WORLD OF OPTIONS®, Open Ethernet logo, Spectrum logo, Switch-IB®, SwitchX®, UFM®, and Virtual Protocol Interconnect® are registered trademarks of Mellanox Technologies, Ltd.For the complete and most updated list of Mellanox trademarks, visit /page/trademarks.All other trademarks are property of their respective owners.Table of ContentsDocument Revision History (5)1Firmware Burning (6)2Port Type Management (7)3Modules Loading and Unloading (8)4Important Packages and Their Installation (9)5SR-IOV Configuration (10)5.1Setting up SR-IOV (10)6Default RoCE Mode Setting (12)7PXE over InfiniBand Installation (13)List of TablesTable 1: Document Revision History (5)Document Revision HistoryTable 1: Document Revision HistoryRevision Date DescriptionRHEL 7.7 October 22, 2019 Initial version of this document.1 Firmware Burning1.Check the device’s PCI address.lspci | grep MellanoxExample:00:06.0 Infiniband controller: Mellanox Technologies MT27520 Family[ConnectX-3 Pro]2.Identify the adapter card's PSID.# mstflint -d 81:00.0 qImage type: FS2FW Version: 2.42.5000FW Release Date: 26.7.2017Rom Info: type=PXE version=3.4.752 devid=4103Device ID: 4103Description: Node Port1 Port2Sys imageGUIDs: e41d2d0300b3f590 e41d2d0300b3f591 e41d2d0300b3f592e41d2d0300b3f593MACs: e41d2db3f591 e41d2db3f592VSD:PSID: MT_10901110193.Download the firmware BIN file from the Mellanox website that matches your card'sPSID.4.Burn the firmware.# mstflint -d <lspci-device-id> -i <image-file> b5.Reboot your machine after the firmware burning is completed.2 Port Type ManagementConnectX®-3 onwards adapter cards’ ports can be individually configured to work asInfiniBand or Ethernet ports. By default, ConnectX® family adapter cards VPI ports areinitialized as InfiniBand ports. If you wish to change the port type use the mstconfig afterthe driver is loaded.1.Install mstflint tools.yum install mstflint2.Check the device’s PCI address.lspci | grep MellanoxExample:00:06.0 Infiniband controller: Mellanox Technologies MT27520 Family[ConnectX-3 Pro]e mstconfig to change the link type as desired IB – for InfiniBand, ETH – for Ethernet.mstconfig –d <device pci> s LINK_TYPE_P1/2=<ETH|IB|VPI>Example:# mstconfig -d 00:06.0 s LINK_TYPE_P1=ETHDevice #1:----------Device type: ConnectX3ProPCI device: 00:06.0Configurations: Current NewLINK_TYPE_P1 IB(1) ETH(2)Apply new Configuration? ? (y/n) [n] : yApplying... Done!-I- Please reboot machine to load new configurations.4.Reboot your machine.3 Modules Loading and UnloadingMellanox modules for ConnectX®-2/ConnectX®-3/ConnectX®-3 Pro are:•mlx4_en, mlx4_core, mlx4_ibMellanox modules for ConnectX®-4/ConnectX®-4 Lx/ ConnectX®-5/ ConnectX®-5Ex/ConnectX-6 are:•mlx5_core, mlx5_ibIn order to unload the driver, you need to first unload mlx*_en/ mlx*_ib and then themlx*_core module.To load and unload the modules, use the commands below:•Loading the driver: modprobe <module name># modprobe mlx5_ib•Unloading the driver: modprobe –r <module name># modprobe –r mlx5_ib4 Important Packages and Their Installationrdma-corerdma-core RDMA core userspace libraries and daemonslibibmad: Low layer InfiniBand diagnostic and management programslibibmad OpenFabrics Alliance InfiniBand MAD libraryopensm: InfiniBand Subnet Manageropensm-libs Libraries used by OpenSM and included utilitiesopensm OpenIB InfiniBand Subnet Manager and management utilitiesIbutils: OpenIB Mellanox InfiniBand Diagnostic Toolsibutils-libs Shared libraries used by ibutils binariesibutils OpenIB Mellanox InfiniBand Diagnostic Toolsinfiniband-diags: OpenFabrics Alliance InfiniBand Diagnostic Toolsinfiniband-diags OpenFabrics Alliance InfiniBand Diagnostic Toolsperftest: IB Performance testsperftest IB Performance Testsmstflint: Mellanox Firmware Burning and Diagnostics Toolsmstflint Mellanox firmware burning toolTo install the packages above run:# yum install libibverbs librdmacm libibcm libibmad libibumad libmlx4libmlx5 opensm ibutils infiniband-diags srptools perftest mstflint rdmacm-utils ibverbs-utils librdmacm-utils -y5 SR-IOV Configuration5.1 Setting up SR-IOV1.Install the mstflint tools.# yum install mstflint2.Check the device’s PCI.# lspci | grep MellanoxExample:00:06.0 Infiniband controller: Mellanox Technologies MT27520 Family[ConnectX-3 Pro]3.Check if SR-IOV is enabled in the firmware.mstconfig -d <device pci> qExample:# mstconfig -d 00:06.0 qDevice #1:----------Device type: ConnectX3ProPCI device: 00:06.0Configurations: CurrentSRIOV_EN True(1)NUM_OF_VFS 8LINK_TYPE_P1 ETH(2)LINK_TYPE_P2 IB(1)LOG_BAR_SIZE 3BOOT_PKEY_P1 0BOOT_PKEY_P2 0BOOT_OPTION_ROM_EN_P1 True(1)BOOT_VLAN_EN_P1 False(0)BOOT_RETRY_CNT_P1 0LEGACY_BOOT_PROTOCOL_P1 PXE(1)BOOT_VLAN_P1 1BOOT_OPTION_ROM_EN_P2 True(1)BOOT_VLAN_EN_P2 False(0)BOOT_RETRY_CNT_P2 0LEGACY_BOOT_PROTOCOL_P2 PXE(1)BOOT_VLAN_P2 1IP_VER_P1 IPv4(0)IP_VER_P2 IPv4(04.Enable SR-IOV:mstconfig –d <device pci> s SRIOV_EN=<False|True>5.Configure the needed number of VFsmstconfig –d <device pci> s NUM_OF_VFS=<NUM>NOTE: This file will be generated only if IOMMU is set in the grub.conf file (byadding “intel_iommu=on” to /boot/grub/grub.conf file).6.[mlx4 devices only] Create/Edit the file /etc/modprobe.d/mlx4.conf:options mlx4_core num_vfs=[needed num of VFs] port_type_array=[1/2 for IB/ETH],[ 1/2 for IB/ETH]Example:options mlx4_core num_vfs=8 port_type_array=1,17.[mlx5 devices only] Write to the sysfs file the number of needed VFs.echo [num_vfs] > sys/class/net/ib2/device/sriov_numvfsExample:# echo 8 > /sys/class/net/ib2/device/sriov_numvfs8.Reboot the driver.9.Load the driver and verify that the VFs were created.# lspci | grep mellanoxExample:00:06.0 Network controller: Mellanox Technologies MT27520 Family[ConnectX-3 Pro]00:06.1 Network controller: Mellanox Technologies MT27500/MT27520 Family [ConnectX-3/ConnectX-3 Pro Virtual Function]00:06.2 Network controller: Mellanox Technologies MT27500/MT27520 Family [ConnectX-3/ConnectX-3 Pro Virtual Function]00:06.3 Network controller: Mellanox Technologies MT27500/MT27520 Family [ConnectX-3/ConnectX-3 Pro Virtual Function]00:06.4 Network controller: Mellanox Technologies MT27500/MT27520 Family [ConnectX-3/ConnectX-3 Pro Virtual Function]00:06.5 Network controller: Mellanox Technologies MT27500/MT27520 Family [ConnectX-3/ConnectX-3 Pro Virtual Function]00:06.6 Network controller: Mellanox Technologies MT27500/MT27520 Family [ConnectX-3/ConnectX-3 Pro Virtual Function]00:06.7 Network controller: Mellanox Technologies MT27500/MT27520 Family [ConnectX-3/ConnectX-3 Pro Virtual Function]00:06.0 Network controller: Mellanox Technologies MT27500/MT27520 Family [ConnectX-3/ConnectX-3 Pro Virtual Function]For further information, refer to section Setting Up SR-IOV MLNX_OFED User Manual.6 Default RoCE Mode Setting1.Mount the configfs file.# mount -t configfs none /sys/kernel/config2.Create a directory for the mlx4/mlx5 device.# mkdir -p /sys/kernel/config/rdma_cm/mlx4_0/3.Validate what is the used RoCE mode in the default_roce_mode configfs file.# cat /sys/kernel/config/rdma_cm/mlx4_0/ports/1/default_roce_modeIB/RoCE v14.Change the default RoCE mode,•For RoCE v1: IB/RoCE v1•For RoCE v2: RoCE v2# echo "RoCE v2" >/sys/kernel/config/rdma_cm/mlx4_0/ports/1/default_roce_mode# cat /sys/kernel/config/rdma_cm/mlx4_0/ports/1/default_roce_modeRoCE v2# echo "IB/RoCE v1" >/sys/kernel/config/rdma_cm/mlx4_0/ports/1/default_roce_mode# cat /sys/kernel/config/rdma_cm/mlx4_0/ports/1/default_roce_modeIB/RoCE v17 PXE over InfiniBand InstallationPXE over InfiniBand infrastructure has additional parameter in the Boot Loader file forloading the necessary modules and interfaces and for allowing sufficient time to get the link.To install RHEL from PXE using the IPoIB interfaces, add the following parameters to theBoot Loader file, located in the var/lib/tftpboot/pxelinux.cfg directory, at thePXE server:bootdev=ib0 ksdevice=ib0 net.ifnames=0 biosdevname=0 rd.neednet=1rd.bootif=0 rd.driver.pre=mlx5_ib,mlx4_ib,ib_ipoib ip=ib0:dhcp.dhcp.retry=10 .timeout.iflink=60 .timeout.ifup=80.timeout.carrier=80Example:default RH7.5prompt 1timeout 600label RH7.5kernelappend bootdev=ib0 ksdevice=ib0 net.ifnames=0 biosdevname=0 rd.neednet=1rd.bootif=0 rd.driver.pre=mlx5_ib,mlx4_ib,ib_ipoib ip=ib0:dhcp.dhcp.retry=10 .timeout.iflink=60 .timeout.ifup=80.timeout.carrier=80。
医疗接口标准 hl7在医疗信息化高速发展的今天,医疗接口标准化的重要性日益凸显。
HL7(Health Level Seven)作为卫生信息交换标准,为医疗行业的信息交互和数据共享提供了统一的规范。
本文将深入探讨HL7的定义、作用、应用场景以及面临的挑战,并提出发展策略与建议。
一、HL7的定义与作用HL7是一种标准化的卫生信息数据交换协议,用于不同医疗信息系统间的信息交互。
它定义了医疗领域中电子数据交换的语法、语义和消息格式,使得不同厂商的医疗设备、软件系统能够实现互操作。
HL7在医疗行业中的重要性主要体现在以下几个方面:1.信息共享:通过HL7标准,医疗机构内部及不同医疗机构之间可以实现患者信息、诊疗数据等的共享,提高医疗服务的协同性和效率。
2.数据整合:HL7规范有助于将来自不同系统的医疗数据整合到一个统一的平台,便于数据分析和挖掘,支持临床决策和科研。
3.降低成本:通过标准化减少信息交互的障碍,降低医疗信息系统集成和数据转换的成本。
4.提高安全性:HL7标准强调数据的安全性和隐私保护,确保患者信息在传输和存储过程中的安全。
二、HL7标准及应用HL7包含一系列的标准、规范和数据交换准则,用于指导医疗信息系统间的信息交互。
以下对HL7的主要标准进行详细阐述:1.HL7版本与规范:目前应用最广泛的版本是HL7 v3,它定义了消息的结构、数据类型和交互方式。
此外,还包括临床文档结构(CDA)规范,用于描述医疗文档的结构和内容。
2.数据交换标准:通过XML(可扩展标记语言)作为消息的传输格式,确保消息内容的可读性和结构化。
在实际应用中,HL7的优势主要体现在以下几个方面:1.互操作性:遵循HL7标准的医疗设备或软件系统能够实现跨平台的信息交互,打破信息孤岛。
2.标准化:统一的数据交换标准降低了医疗信息化过程中的技术难度和成本,方便系统的集成与升级。
3.灵活性:HL7允许根据实际需求定制数据结构和交互方式,适应不同医疗机构的具体情况。
BEA WebLogicAdapter forHL7®Release NotesRelease 8.1.2Document Date: January 2004CopyrightCopyright © 2004 BEA Systems, Inc. All Rights Reserved.Portions Copyright © 2004 iWay Software. All Rights Reserved.Restricted Rights LegendThis software and documentation is subject to and made available only pursuant to the terms of the BEA Systems License Agreement and may be used or copied only in accordance with the terms of that agreement.It is against the law to copy the software except as specifically allowed in the agreement. This document may not, in whole or in part, be copied photocopied, reproduced, translated, or reduced to any electronic medium or machine readable form without prior consent, in writing, from BEA Systems, Inc.Use, duplication or disclosure by the U.S. Government is subject to restrictions set forth in the BEA Systems License Agreement and in subparagraph (c)(1) of the Commercial Computer Software-Restricted Rights Clause at FAR 52.227-19; subparagraph (c)(1)(ii) of the Rights in Technical Data and Computer Software clause at DFARS 252.227-7013, subparagraph (d) of the Commercial Computer Software--Licensing clause at NASA FAR supplement 16-52.227-86; or their equivalent.Information in this document is subject to change without notice and does not represent a commitment on the part of BEA Systems. THE SOFTWARE AND DOCUMENTATION ARE PROVIDED “AS IS”WITHOUT WARRANTY OF ANY KIND INCLUDING WITHOUT LIMITATION, ANY WARRANTY OF MERCHANTABILITY OR FITNESS FOR A PARTICULAR PURPOSE. FURTHER, BEA Systems DOES NOT WARRANT, GUARANTEE, OR MAKE ANY REPRESENTATIONS REGARDING THE USE, OR THE RESULTS OF THE USE, OF THE SOFTWARE OR WRITTEN MATERIAL IN TERMS OF CORRECTNESS, ACCURACY, RELIABILITY, OR OTHERWISE.Trademarks or Service MarksBEA, Jolt, Tuxedo, and WebLogic are registered trademarks of BEA Systems, Inc. BEA Builder, BEA Campaign Manager for WebLogic, BEA eLink, BEA Manager, BEA WebLogic Commerce Server, BEA WebLogic Enterprise, BEA WebLogic Enterprise Platform, BEA WebLogic Express, BEA WebLogic Integration, BEA WebLogic Personalization Server, BEA WebLogic Platform, BEA WebLogic Portal, BEA WebLogic Server, BEA WebLogic Workshop and How Business Becomes E-Business are trademarks of BEA Systems, Inc.All other trademarks are the property of their respective companies.ContentsAbout This Release of the BEA WebLogic Adapter for HL7. . . . . . . . . . . . . . . . . . . . . .1-1Supported Platforms. . . . . . . . . . . . . . . . . . . . . . . . . . . . . . . . . . . . . . . . . . . . . . . . . . . . . .1-1Software Requirements . . . . . . . . . . . . . . . . . . . . . . . . . . . . . . . . . . . . . . . . . . . . . . . . . . .1-2Determining the Adapter Version . . . . . . . . . . . . . . . . . . . . . . . . . . . . . . . . . . . . . . . . . . .1-2Contacting BEA Customer Support. . . . . . . . . . . . . . . . . . . . . . . . . . . . . . . . . . . . . . . . . .1-3BEA WebLogic Adapter for HL7 Release Notes iiiiv BEA WebLogic Adapter for HL7 Release NotesC H A P T E R1 BEA WebLogic Adapter for HL7 User GuideBEA WebLogic Adapter for HL7 Release 8.1.2Release Date: January 2004 This document includes the following topics:z About This Release of the BEA WebLogic Adapter for HL7z Supported Platformsz Software Requirementsz Determining the Adapter Versionz Contacting BEA Customer SupportAbout This Release of the BEA WebLogic Adapter for HL7 The BEA WebLogic Adapter for HL7 8.1.2 is designed to provide simple, standard access to HL7 documents to support existing business processes. These documents are available to the adapter as requests of HL7 and when your HL7 system invokes its remote requests.The adapter and WebLogic Integration provide all the functionality you need to integrate your mission-critical HL7 system with other enterprise applications.Supported PlatformsThe BEA WebLogic Adapter for HL7 release is supported on the following platforms:BEA WebLogic Adapter for HL7 User Guide1-1z Sun Solaris 8 (with Sun recommended patches)z Sun Solaris 9 (with Sun recommended patches)z Microsoft Windows 2000 Professional with Service Pack 2 and higherz Microsoft Windows 2000 Server with Service Pack 2 and higherz Microsoft Windows 2000 Advanced Server with Service Pack 2 and higherz Hewlett-Packard HP-UX 11.0z Hewlett-Packard HP-UX 11iWe are working to certify this adapter on additional platforms. Up-to-date information onsupported platforms is available at the following URL:/wladapters/docs81/support/index.htmlSoftware RequirementsBefore you install the BEA WebLogic Adapter for HL7, ensure that you have the following software installed:z BEA WebLogic Platform 8.1 with WebLogic Integration 8.1 or WebLogic Integration 8.1SP2The software can be downloaded from the BEA Web site at/downloads/products.jspThe information required to install WebLogic Platform 8.1 can be found at/platform/docs81/install/index.htmlNote:The WebLogic Server and WebLogic Integration components must be installed.z Java Runtime Environment (JRE) 1.4.2 or higherz Internet Explorer 6.0 or higherDetermining the Adapter VersionTo allow you to easily determine the version of the BEA WebLogic Adapter for HL7, identifying information has been added to the Manifest.mf file. This file is included in the ear file.For example, the Manifest.mf file for BEA WebLogic Adapter for HL7 8.1.2 contains the following:Manifest-Version: 1.01-2BEA WebLogic Adapter for HL7 User GuideContacting BEA Customer SupportAnt-Version: Apache Ant 1.5.3Created-By: 1.4.1_02-b06 (Sun Microsystems Inc.)Label: BEAVIENNA.0047Implementation-Vendor: BEA SystemsImplementation-Version: 8.1.2.0047Implementation-Title: WebLogic Adapter for HL7 8.1.2 December 17,2003 The Implementation-Version is provided in the following format: W.X.Y.ZZZZ:z W.X represents the major and minor release number (in this case, 8.1)z Y represents the service pack number (in this case, 2)z ZZZZ represents the build number of the release (in this case, 0047)If you obtain a patch subsequent to a release, identifying information specific to the patch is included in the Manifest.mf file.Contacting BEA Customer SupportIf you have any questions about this release of the BEA WebLogic Adapter for HL7, or if you have problems installing and running the adapter, contact BEA Customer Support through BEA eSupport at . You can also contact Customer Support by using the contact information provided on the Customer Support Card, which is included in the product package.When contacting Customer Support, be prepared to provide the following information:z Your name, e-mail address, phone number, and fax numberz Your company name and company addressz Your machine typez The name and version of the adapter you are usingz The version of WebLogic Integration you are usingz A description of the problem and the content of pertinent error messagesBEA WebLogic Adapter for HL7 User Guide1-31-4BEA WebLogic Adapter for HL7 User Guide。
Package‘RonFHIR’October12,2022Type PackageTitle Read and Search Interface to the'HL7FHIR'REST APIVersion0.4.0DescriptionR on FHIR is an easy to use wrapper around the'HL7FHIR'REST API(STU3and R4).It pro-vides tools to easily read and search resources on a FHIR server and brings the re-sults into the R environment.R on FHIR is based on the FhirClient of the offi-cial' API',also made by Firely.License BSD3-clause License+file LICENSEImports R6,httr,jsonlite,utils,stringrSuggests testthatEncoding UTF-8LazyData trueDepends R(>=3.1.0)NeedsCompilation noRoxygenNote6.0.1Author Sander Laverman[aut,cre],Firely B.V.[aut,cph]Maintainer Sander Laverman<**************>Repository CRANDate/Publication2020-01-1012:30:05UTCR topics documented:fhirBulkClient (2)fhirClient (4)searchParams (6)Index91fhirBulkClient fhirBulkClientDescriptionBulk data client in R for FHIR STU3.Usagebulkclient<-fhirBulkClient$new(endpoint,tokenURL=NULL,token=NULL)bulkclient$patientExport(criteria=NULL)bulkclient$groupExport(groupId,criteria=NULL)bulkclient$wholeSystemExport(criteria=NULL)bulkclient$getBulkStatus()bulkclient$downloadBulk(requestNumber,returnType="parsed",deleteFromQueue=TRUE) bulkclient$deleteBulkRequest(requestNumber)bulkclient$retrieveToken(jwt,scopes,tokenURL=NULL)bulkclient$setToken(token)print(bulkclient)Argumentsbulkclient A fhirBulkClient object.endpoint The URL of the server to connect to.tokenURL Authorization server’s endpoint.token Acces token.criteria The search parameters tofilter the Resources on.Each given string is a combined key/value pair(separated by’=’).groupId Id of the Group resource.requestNumber Number of the request in the queue.returnType Specify the return type.This can be"parsed"or"ndjson".deleteFromQueue If the request needs to be deleted from the queue after it’s been downloaded.jwt JSON Web Token signed with the app’s private key(RSA SHA-256).scopes Desired scope(s).Details$new()Creates a new fhirBulkClient using a given endpoint.If the endpoint does not end with a slash(/),it will be added.$patientExport()Request all data on all patients.Possible tofilter the results with the_output-Format,_since and_type parameters.The request will be added to the queue.$groupExport()Request all data of a patientgroup.Possible tofilter the results with the_output-Format,_since and_type parameters.The request will be added to the queue.$wholeSystemExport()Request all data.Possible tofilter the results with the_outputFormat, _since and_type parameters.The request will be added to the queue.$getBulkStatus()Update and return the queue to see the progress of your requests.$downloadBulk()Download a request from the queue.$deleteBulkRequest()Cancel a request from the queue.$retrieveToken()Retrieve a token from the authentication server.$setToken Set a token.print(p)or p$print()Shows which endpoint is configured.Examples##Not run:#Read your private keyprivatekey<-openssl::read_key("PrivateKey.pem")#Create your claimclaim<-jose::jwt_claim(iss="ServiceURL",sub="ClientID",aud="TokenURL",#expiration date as epoch(5minutes)exp=as.integer(as.POSIXct(Sys.time()+300)),# random numberjti=charToRaw(as.character(runif(1,0.5,100000000000))))#Sign your claim with your private keyjwt<-jose::jwt_encode_sig(claim,privatekey)#Define your scope(s)scopes<-c("system/*.read","system/CommunicationRequest.write")#Create a new fhirBulkClientbulkclient<-fhirBulkClient$new("FHIRBulkServerURL",tokenURL="TokenURL")#Retrieve your tokentoken<-bulkclient$retrieveToken(jwt,scopes)#Set your tokenbulkclient$setToken(token$access_token)#Request a download for Patient Cohort3bulkclient$groupExport(3)#Request the progress of the requestsbulkclient$getBulkStatus()#When the downloads a available,download the bulkdatapatient_cohort_3<-bulkclient$downloadBulk(1)View(patient_cohort_3)##End(Not run)fhirClient fhirClientDescriptionRead and search only client in R for FHIR STU3and R4.Based on the official API.Usageclient<-fhirClient$new(endpoint,token=NULL)client$read(location,summaryType=NULL,returnType="parsed")client$search(resourceType,criteria=NULL,includes=NULL,pageSize=NULL,summaryType=NULL,retur client$searchById(resourceType,id,includes=NULL,summaryType=NULL,returnType="parsed")client$wholeSystemSearch(criteria=NULL,includes=NULL,pageSize=NULL,summaryType=NULL,returnTy client$searchParams(params,resourceType=NULL,returnType="parsed")client$continue(bundle)client$setToken(token)client$endpointclient$authUrlclient$tokenUrlclient$registerUrlclient$tokenprint(client)Argumentsclient A fhirClient object.endpoint The URL of the server to connect to.token An ouath2.0Token(httr Token2.0)resourceType The type of resource to search for.id The id of the Resource to search for.summaryType Whether to include only return a summary of the Resource(s).location The url of the Resource to fetch.This can be a Resource id url or a version-specific.criteria The search parameters tofilter the Resources on.Each given string is a combined key/value pair(separated by’=’).includes Paths to include in the search.pageSize Asks server to limit the number of entries per page returned.query A searchParams object containing the search parameters.bundle The bundle as received from the last response.returnType Specify the return type.This can be"parsed","json"or"xml".Details$new()Creates a new fhirClient using a given endpoint.If the endpoint does not end with a slash (/),it will be added.$read()Fetches a typed Resource from a FHIR resource endpoint.$search()Search for Resources of a certain type that match the given criteria.$searchById()Search for Resources based on a Resource’s id.$wholeSystemSearch()Search for Resources across the whole server that match the given criteria.$searchByQuery()Search for Resources based on a searchParams object.$continue()Uses the FHIR paging mechanism to go navigate around a series of paged result Bundles.$setToken()Saves an Oauth2.0token in a variable.$endpoint Returns the endpoint.$authUrl Returns the authorization server’s OAuth authorization endpoint.$tokenUrl Returns the authorization server’s OAuth token endpoint.$registerUrl Returns the endpoint where the client can register.$token Returns the initialized token.print(p)or p$print()Shows which endpoint is configured.Examples##Not run:#Setting up a fhirClientclient<-fhirClient$new("https://vonk.fire.ly")#Readclient$read("Patient/example")#Searchbundle<-client$search("Patient",c("name=Peter","address-postalcode=3999"))while(!is.null(bundle)){#Do something usefulbundle<-client$continue(bundle)}##End(Not run)##Not run:#Using Oauth2.0client<-fhirClient$new("https://vonk.fire.ly")#Retrieving a tokenclient_id<-"id"client_secret<-"secret"app_name<-"TestApp"scopes<-c("patient/*.read")app<-httr::oauth_app(appname=app_name,client_id,client_secret)oauth_endpoint<-httr::oauth_endpoint(authorize=paste(client$authUrl,"?aud=",client$endpoint,sep=""),access=client$tokenUrl)token<-httr::oauth2.0_token(endpoint=oauth_endpoint,app=app,scope=scopes) #Set a token and read a patient resourceclient$setToken(token$credentials$access_token)client$read("Patient/example")#Token refreshtoken<-token$refresh()client$setToken(token$credentials$access_token)##End(Not run)searchParams searchParamsDescriptionAn alternative way to specify a query is by creating a searchParams object and pass this to the fhirClient s searchByQuery.The searchParams class has a set offluent calls to allow you to easily construct more complex queries.Based on the official API.Usagequery<-searchParams$new()query$select(elements)query$where(criteria)query$include(path)query$orderBy(paramName,sortOrder="asc")query$limitTo(count)query$countOnly()query$summaryOnly()query$textOnly()query$dataOnly()Argumentsquery A searchParams object that contains all specified search criteria.elements Elements defined at the root level in the Resource.criteria The search parameters tofilter the Resources on.Each given string is a combined key/value pair(separated by’=’).path Paths to include in the search.paramName Name of the parameter to order by.sortOrder Direction of the order.Can be asc or desc(ascending and descending).count The number of returned Resources per page.Details$new()Creates a new searchParams object.$select()Specify the elements to be returned as part of a Resource.$where()Specify on which parameters tofilter.$include()Specify the paths to include.$orderBy()Specify the order to return the results.$limitTo()Specify how many Resources should be returned in a single page of a Bundle.$countOnly()Specifiy to just return a count of the matching Resources,without returning the actual matches.$summaryOnly()Specify to return only those elements marked as"summary"in the base definition of the Resource(s).$textOnly()Specify to return only the"text"element,the’id’element,the’meta’element,and only top-level mandatory elements.$dataOnly()Specify to remove the text element.Examples##Not run:#Setting up a fhirClientclient<-fhirClient$new("")#Creating a new searchParams objectquery<-searchParams$new()query$select(c("name","birthDate"))$where("given:exact=Peter")$orderBy("family")peters<-client$searchByQuery(query,"Patient")#equivalent:#client$search("Patient",c("_elements=name,birthDate","given:exact=Peter","_sort=family")) while(!is.null(bundle)){#Do something usefulpeters<-client$continue(peters)}##End(Not run)IndexfhirBulkClient,2fhirClient,4fhirClient s,6searchParams,69。