uclinux移植项目及说明
- 格式:docx
- 大小:24.40 KB
- 文档页数:11

uClinux 的编译和运行说明:这个编译过程是基于uClinux-dist-51EDA.tar.bz2这个文件可以在51EDA论坛的客服中心找到。
1.创建开发环境首先需要编译的环境。
我们最好使用Linux作为开发平台,因为Linux以及uClinux的开发者们基本都是在Linux下完成的开发。
为了能够编译uClinux,我们需要下载uClinux的编译器。
这个文件可以在uClinux的官方网站得到,也可以在论坛的客服中心下载。
官方的下载地址是:/pub/uClinux/arm-elf-tools/arm-elf-tools-20030314.sh但是这个网站的速度比较慢,因此您也可以在论坛的客服中心下载。
是一样的文件。
在这里需要注意的是,虽然同为gcc和binutils工具,但是必须使用uClinux发布的版本,因为这个gcc和binutils都是为了能够编译FLAT格式的文件而订制的,另外也加入了ARM对PIC(Position Independent Code,位置无关代码)的支持。
PIC的支持是用来编译动态库或者XIP模式的可执行文件。
关于XIP的介绍有一篇文章:/article.pl?sid=02/08/28/0434210大家可以了解一下XIP。
但是由于XIP并不是很稳定,所以在我们发布的uClinux版本中并没有使用这个技术。
然后,将下载得到的文件,是一个sh文件。
这是一个自解压的文件(就好比Windows 下面的自解压zip或者rar一样)。
为了能够运行,我们需要:./arm-elf-tools-20030314.sh这样如果不能运行的话,那应该使用下面的命令:chmod 755 arm-elf-tools-20030314.sh得到了编译环境,就可以编译源代码了。
当然,首先要把代码解压缩到你的目录下面:tar xjvf uClinux-dist-51EDA.tar.bz2它会把全部的文件解压缩到uClinux-dist的目录下。
AN3012Application noteGetting started with uClinux™for STM32F10x high-density devicesIntroductionuClinux, pronounced “you-see-Linux”, literally means “microcontroller (µC) Linux®”.uClinux is a Linux kernel fork for microcontrollers (MCUs, embedded systems). It does nothave a memory management unit (MMU). Originally derived from version 2.0 (1996) of theLinux kernel, it now has ports based on Linux 2.6. Since version 2.6, the major parts ofuC linux have been integrated with the mainline kernel for a number of processorarchitectures. The project continues to develop patches and supporting tools to use Linuxon microcontrollers. uClinux supports many architectures, and this new version supports theSTM3210E-EVAL evaluation board.The purpose of this application note is to explain you how to:1.Install the uClinux operating system, the toolchain, and configure the kernel for theSTM3210E-EVAL board2. Build a uClinux image and download it to the STM3210E-EVAL board3. Add applications to the kernelSeptember 2009Doc ID 16051 Rev 11/36Contents AN3012Contents1Package description . . . . . . . . . . . . . . . . . . . . . . . . . . . . . . . . . . . . . . . . . 6 2Hardware description . . . . . . . . . . . . . . . . . . . . . . . . . . . . . . . . . . . . . . . . 73Getting the tools . . . . . . . . . . . . . . . . . . . . . . . . . . . . . . . . . . . . . . . . . . . . 93.1uClinux package . . . . . . . . . . . . . . . . . . . . . . . . . . . . . . . . . . . . . . . . . . . . . 93.1.1Standard distribution . . . . . . . . . . . . . . . . . . . . . . . . . . . . . . . . . . . . . . . . 93.1.2STM3210E-EVAL uClinux software kit . . . . . . . . . . . . . . . . . . . . . . . . . . . 93.2GNU toolchain . . . . . . . . . . . . . . . . . . . . . . . . . . . . . . . . . . . . . . . . . . . . . . 93.3DFuSe & Flash loader demonstrator . . . . . . . . . . . . . . . . . . . . . . . . . . . . . 93.3.1DFuSe applet . . . . . . . . . . . . . . . . . . . . . . . . . . . . . . . . . . . . . . . . . . . . . 103.3.2Flash loader demonstrator . . . . . . . . . . . . . . . . . . . . . . . . . . . . . . . . . . . 104Building the uClinux image . . . . . . . . . . . . . . . . . . . . . . . . . . . . . . . . . . 114.1Installing the toolchain . . . . . . . . . . . . . . . . . . . . . . . . . . . . . . . . . . . . . . . 114.2Preparing the source code tree . . . . . . . . . . . . . . . . . . . . . . . . . . . . . . . . 124.3Configure uClinux for STM3210E-EVAL . . . . . . . . . . . . . . . . . . . . . . . . . . 134.3.1Configuring the kernel . . . . . . . . . . . . . . . . . . . . . . . . . . . . . . . . . . . . . . 154.3.2Application/library settings . . . . . . . . . . . . . . . . . . . . . . . . . . . . . . . . . . . 174.4Running the build process . . . . . . . . . . . . . . . . . . . . . . . . . . . . . . . . . . . . 185Loading the images to the board . . . . . . . . . . . . . . . . . . . . . . . . . . . . . . 195.1Loading the “kernel loader / software updater” . . . . . . . . . . . . . . . . . . . . . 195.1.1Software installation . . . . . . . . . . . . . . . . . . . . . . . . . . . . . . . . . . . . . . . . 195.1.2Hardware installation . . . . . . . . . . . . . . . . . . . . . . . . . . . . . . . . . . . . . . . 195.1.3Load the hex file to the Flash memory . . . . . . . . . . . . . . . . . . . . . . . . . . 205.2Loading the kernel/root file system images . . . . . . . . . . . . . . . . . . . . . . . 215.2.1DfuSe demonstration installation . . . . . . . . . . . . . . . . . . . . . . . . . . . . . . 215.2.2Generating the .dfu image and upgrading the board . . . . . . . . . . . . . . . 22 6First run . . . . . . . . . . . . . . . . . . . . . . . . . . . . . . . . . . . . . . . . . . . . . . . . . . 25 7Command examples/tutorials . . . . . . . . . . . . . . . . . . . . . . . . . . . . . . . . 272/36Doc ID 16051 Rev 1AN3012Contents8How to add new features . . . . . . . . . . . . . . . . . . . . . . . . . . . . . . . . . . . . 298.1How to add a new hardware driver . . . . . . . . . . . . . . . . . . . . . . . . . . . . . . 298.1.1References . . . . . . . . . . . . . . . . . . . . . . . . . . . . . . . . . . . . . . . . . . . . . . . 298.1.2Example of a kernel driver . . . . . . . . . . . . . . . . . . . . . . . . . . . . . . . . . . . 298.2How to add a new application . . . . . . . . . . . . . . . . . . . . . . . . . . . . . . . . . 34 9Revision history . . . . . . . . . . . . . . . . . . . . . . . . . . . . . . . . . . . . . . . . . . . 35Doc ID 16051 Rev 13/36List of tables AN3012 List of tablesTable 1.Document revision history . . . . . . . . . . . . . . . . . . . . . . . . . . . . . . . . . . . . . . . . . . . . . . . . . 35 4/36Doc ID 16051 Rev 1AN3012List of figures List of figuresFigure 1.STM3210E-EVAL board. . . . . . . . . . . . . . . . . . . . . . . . . . . . . . . . . . . . . . . . . . . . . . . . . . . . 8 Figure 2.Configuring the installation parameters . . . . . . . . . . . . . . . . . . . . . . . . . . . . . . . . . . . . . . . 11 Figure 3.uClinux-dist directory.. . . . . . . . . . . . . . . . . . . . . . . . . . . . . . . . . . . . . . . . . . . . . . . . . . . . . 12 Figure 4.uClinux kernel directory.. . . . . . . . . . . . . . . . . . . . . . . . . . . . . . . . . . . . . . . . . . . . . . . . . . . 13 Figure 5.uClinux configuration main menu. . . . . . . . . . . . . . . . . . . . . . . . . . . . . . . . . . . . . . . . . . . . 14 Figure 6.Vendor & Product selection . . . . . . . . . . . . . . . . . . . . . . . . . . . . . . . . . . . . . . . . . . . . . . . . 14 Figure 7.Kernel / Library / Defaults selection . . . . . . . . . . . . . . . . . . . . . . . . . . . . . . . . . . . . . . . . . . 15 Figure 8.System Type configuration. . . . . . . . . . . . . . . . . . . . . . . . . . . . . . . . . . . . . . . . . . . . . . . . . 16 Figure 9.STM3210-EVAL demonstration menu . . . . . . . . . . . . . . . . . . . . . . . . . . . . . . . . . . . . . . . . 17 Figure 10.Device Manager window. . . . . . . . . . . . . . . . . . . . . . . . . . . . . . . . . . . . . . . . . . . . . . . . . . . 19 Figure 11.Flash loader demonstrator download configuration . . . . . . . . . . . . . . . . . . . . . . . . . . . . . . 21 Figure 12.Multi Bin injection window (STM3210E-EVAL-jffs configuration) . . . . . . . . . . . . . . . . . . . . 22 Figure 13.Multi Bin injection window (STM3210E-EVAL-MCU_Flash configuration). . . . . . . . . . . . . 23 Figure 14.DfuSe demonstration window. . . . . . . . . . . . . . . . . . . . . . . . . . . . . . . . . . . . . . . . . . . . . . . 24 Figure 15.Example of MS HyperTherminal. . . . . . . . . . . . . . . . . . . . . . . . . . . . . . . . . . . . . . . . . . . . . 25 Figure 16.uClinux boot log . . . . . . . . . . . . . . . . . . . . . . . . . . . . . . . . . . . . . . . . . . . . . . . . . . . . . . . . . 26 Figure 17.Linux device driver architecture . . . . . . . . . . . . . . . . . . . . . . . . . . . . . . . . . . . . . . . . . . . . . 29 Figure 18.STM3210E-EVAL uart_driver struct. . . . . . . . . . . . . . . . . . . . . . . . . . . . . . . . . . . . . . . . . . 30 Figure 19.STM3210E-EVAL uart_port struct . . . . . . . . . . . . . . . . . . . . . . . . . . . . . . . . . . . . . . . . . . . 30 Figure 20.STM3210E-EVAL uart_ops struct. . . . . . . . . . . . . . . . . . . . . . . . . . . . . . . . . . . . . . . . . . . . 30 Figure 21.STM3210E-EVAL console struct . . . . . . . . . . . . . . . . . . . . . . . . . . . . . . . . . . . . . . . . . . . . 31 Figure 22.STM3210E-EVAL console Init function. . . . . . . . . . . . . . . . . . . . . . . . . . . . . . . . . . . . . . . . 31 Figure 23.Simple GPIO file_operations struct. . . . . . . . . . . . . . . . . . . . . . . . . . . . . . . . . . . . . . . . . . . 32 Figure 24.Simple GPIO write operation . . . . . . . . . . . . . . . . . . . . . . . . . . . . . . . . . . . . . . . . . . . . . . . 33Doc ID 16051 Rev 15/36Package description AN30126/36Doc ID 16051 Rev 11 Package descriptionThis section presents all the files in the package, that are needed to get started with uClinuxon STM32F101xC/D/E and STM32F103xC/D/E devices.●uClinux_on_stm32.patch.gz : the uClinux patch, using which the ARM Cortex-M3 CPU and STM3210E-EVAL board are supported.●AN3012.pdf : the purpose of this guide is to show all the steps necessary to successfully configure, build and run uClinux on the board. It also presents theprocedure to add new hardware driver and applications to the kernel.●Tiny_kernel_boot_loader.hex / kernel_boot_loader.hex : these are the boot loaders required to boot up the board and load uClinux (kernel loader / firmware updater).●uClinux_on_stm32-jffs.dfu / uClinux_on_stm32-MCU_Flash.dfu : these are the binary image files that can immediately be downloaded to the board to get uClinux running.AN3012Hardware description Doc ID 16051 Rev 17/362 Hardware descriptionThe STM3210E-EVAL evaluation board is designed as a complete development platform forSTMicroelectronics's ARM™ Cortex ®-M3 core-based STM32F103xx microcontrollersdelivered in 144-pin packages. This device features: full speed USB2.0, CAN2.0A/Bcompliant interface, two I 2S channels, two I 2C channels, five USART channels withSmartcard support, three SPI channels, two DAC channels, FSMC interface, SDIO, 64Kbyte of internal SRAM and 512 Kbyte of Flash memory, JTAG and SWD debug support.The STM3210E-EVAL has the following onboard hardware features:●Three 5 V power supply options: power jack, USB connector or daughterboard ●Boot from user Flash memory, system memory or SRAM ●I2S audio DAC, stereo audio jack ●128 Mbyte MicroSD card ●A- and B-type Smartcard support ●64 or 128 Mbit serial Flash memory, 512 Kbit × 16 SRAM, 512 Mbit or 1 Gbit NAND Flash and 128 Mbit NOR Flash memory ●I2C/SMBus compatible serial interface temperature sensor ●Two RS-232 channels with RTS/CTS handshake support on one channel ●IrDA transceiver ●USB2.0 full speed connection ●CAN2.0A/B compliant connection ●Inductor motor control connector ●JTAG and trace debug support ●240 × 320 TFT color LCD ●Joystick with 4-direction control and selector ●Reset, wakeup, tamper and user buttons ●4 color LEDs ● RTC with backup batteryHardware description AN3012 Figure 1.STM3210E-EVAL board8/36Doc ID 16051 Rev 1AN3012Getting the tools Doc ID 16051 Rev 19/363 Getting the toolsThis section explains how to get the software tools that are required to build and run uClinuxon the STM3210E-EVAL evaluation board.3.1 uClinux package3.1.1 Standard distributionY ou should first download the original uClinux source files from the uClinux project page(/), or simply follow the following direct link:/pub/uClinux/dist/uClinux-dist-20080808.tar.bz2To get the uClinux-dist-20080808.tar.bz2 file (281Mbytes), which is compatible with theSTM3210E-EVAL uClinux kit.Porting is based on the latest stable version of uClinux which implements the Linux kernel2.6.26-uc0.Y ou also need the uClinux distribution update patch file: uClinux-dist-20080808-20090112.patch.gz (47.1Mbytes) available from:/pub/uClinux/dist/patches/uClinux-dist-20080808-20090112.patch.gz3.1.2 STM3210E-EVAL uClinux software kitThis package contains the kernel patch (update of 399 files) and the kernel boot loader (seeSection 1: Package description ). The package is available from /stm32.3.2 GNU toolchainA toolchain known to successfully build the kernel for ARM Cortex-M3 targets can bedownloaded from the CodeSourcery web site /, or using thefollowing link: /sgpp/lite/arm/portal/release827The G++ Lite 2009q1 toolchain is a free version of the CodeSourcery G++ toolchain, whichis an improvement of the GNU toolchain for ARM processors. It supports ARM, thumb andthumb-2 compilation for all architectures, including Version 7 of the ARM Architecture.Note:1This application note only shows how to Install the “easy-to-install recommended packages”.2Y ou need a PC running on the Linux operating system to be able to install and compileuClinux. The Linux distribution (Fedora, Mandriva, Ubuntu, etc.) should have the kerneldevelopment kit.3.3 DFuSe & Flash loader demonstratorThese two tools are needed to load the final binary images to the board.Getting the tools AN301210/36Doc ID 16051 Rev 13.3.1 DFuSe appletDFuSe stands for Device firmware upgrade application. This applet, coupled to the kernelboot loader firmware, allows the upgrade of the final .dfu file to the external NOR Flashmemory.It can be downloaded from the STMicroelectronics website or directly, using the followinglink: /stonline/products/support/micro/files/um0412.zip .3.3.2 Flash loader demonstratorThis applet, together with the System memory boot loader capabilities, is used to upgradekernel_boot_loader.hex to the STM32F101/103xC/D/E’s 512-Kbyte internal Flash memory.The Flash loader demonstrator is available from at:/stonline/products/support/micro/files/um0462.zipNote:Y ou need a PC running on the Microsoft ® Windows ® operating system to be able to run anduse these two applets.4 Building the uClinux imageThis section shows the kernel building process from scratch; to successfully build theuClinux image, you have to Install GNU toolchain, extract the uClinux source files, apply thepath to the source, configure uClinux for the STM3210E-EVAL board and finally run thebuild process.4.1 InstallingtoolchaintheOn a host PC running with the Linux OS:1.Move to the directory containing the previously downloaded arm-2009q1-163-arm-uclinuxeabi.bin file.2. Execute the installer by double clicking on the bin file or from the command line bytyping:#./arm-2009q1-163-arm-uclinuxeabi.bin3. Follow the installer Wizard to install the typical toolchain settings.Figure 2.Configuring the installation parametersNote:When no windowing server is running you can use the console installation mode, which is enabled with the “-i console” parameter:# ./arm-2009q1-163-arm-uclinuxeabi.bin -i consoleDoc ID 16051 Rev 111/364.2 Preparing the source code treeLet us assume that all the downloaded files are present under the ~/sources directory.Make a new workspace directory, where the build process will take place.# mkdir ~/workspace1.Extract the original uClinux distribution files: make sure you have enough free space(more than 2 Gbytes).# cd ~/workspace# tar -xjvf ~/sources/uClinux-dist-20080808.tar.bz2Figure3 shows what is under the uClinux-dist directory.Figure 3.uClinux-dist directory.2. Update the uClinux distribution with the uClinux-dist-20080808-20090112.patch.gzpatch:# cd ~/workspace/uClinux-dist/# zcat ~/sources/uClinux-dist-20080808-20090112.patch.gz | patch -p13. To enable support of STM32 MCUs, patch the uClinux distribution withuClinux_on_stm32.patch.gz from the STM3210E-EVAL uClinux kit:# zcat ~/sources/uClinux_on_stm32.patch.gz | patch -p112/36Doc ID 16051 Rev 1Figure 4.uClinux kernel directory.4.3 Configure uClinux for STM3210E-EVALNow that you have enabled support of the STM3210E-EVAL evaluation board by uClinux,you need to set up the configuration for the kernel and the final application. Many types ofkernel binary images can be built depending on how you configure uClinux.In this section you will see how to configure the uClinux kernel to run from the STM32’sinternal Flash memory or the external NOR Flash memory.# make menuconfigFrom the main menu, select the vendor / product as shown in Figure5.Doc ID 16051 Rev 113/36Figure 5.uClinux configuration main menuSelect “STMicroelectronics” for “Vendor” and, depending on the type of kernel image youwant to build, select “STM3210E-EVAL-jffs” or “STM3210E-EVAL-MCU_Flash” for“Product”.By selecting “STM3210E-EVAL-jffs” you apply the default configuration that enables supportof an external Flash memory, and boot from it.If you choose the “STM3210E-EVAL-MCU_Flash” configuration, the compilation script willbuild a mini image that runs from the microcontroller’s internal Flash memory.Figure 6.Vendor & Product selectionReturn to the main menu (with the “Exit” button or the “ESC“ key).14/36Doc ID 16051 Rev 1Under the Kernel / Library / Defaults Selection menu, choose Linux-2.6.x for the “kernelversion” and “none” for the “libc version” and toggle the next three menus as shown inFigure7:●“Default all settings” will apply the default vendor/product configuration to the kerneland application.●“Customize Kernel Settings” is used to edit the kernel configuration.●“Customize Application/Library Settings” is used to choose the application that willbe add to the root file system.●Finally “Update Default Vendor Settings” is used to save the new configuration as thevendor default configuration for future use.Figure 7.Kernel / Library / Defaults selectionY ou can now exit the configuration menu. When prompted to save, choose “yes”.kernel4.3.1 ConfiguringtheThe Linux kernel has many configuration items. If you have followed the above describedsteps, the kernel should be configured to meet the STM3210E-EVAL evaluation boardspecifications. Let us now look into some of the main configuration menus.●The System Type menu (see Figure8) shows the MMU setting, ARM System type,processor type, Flash and SRAM settings. All these options should coincide with theboard specifications.Doc ID 16051 Rev 115/36Figure 8.System Type configuration●The boot options menu is used to enable the XIP (execute in place) mode and set thephysical location of the kernel xipImage. Y ou can also specify the default kernelcommand line. The “XIP Kernel Physical Location” parameter points to the Flashmemory address where the kernel image is located.For example, if “STM3210E-EVAL-jffs” was selected, the kernel binary will be written tothe external Flash memory address 0x64000000 set in the configuration menu (asdescribed in Section5.2.2: Generating the .dfu image and upgrading the board).If “STM3210E-EVAL-MCU_Flash” was chosen, the XIP setting will point to0x08003000.[ * ] Kernel Execute-In-Place from ROM(0x64000000) XIP Kernel Physical Locationor(0x08003000) XIP Kernel Physical Location●For console input/output, enter “Device Drivers” ->“Character Device”-> “SerialDrivers”. Set the two following options:[ * ] STM3210E-EVAL USART Port[ * ] Support for console on STM3210E-EVAL USART Port●Many file systems are supported by the uClinux kernel and can be enabled from the“File systems” menu. Y ou can determine which file system will be supported accordingto your product memory size. For example if you need the jffs2 file system you have toenable it.In the case of the STM3210E-EVAL-jffs configuration, this file system is mandatorybecause it is used as the root file system.Under the “File systems” -> “Miscellaneous File system” submenu, toggle JFFS2 fs(with fs standing for file system).[ * ] Journalling Flash File System v2 (JFFS2) support16/36Doc ID 16051 Rev 14.3.2 Application/library settingsIn this menu, leave the vendor default settings. In “Miscellaneous Applications” ->“STM3210E-EVAL Demo(s)”, you will find a few applications examples exploiting theSTM32 hardware and the uClinux features and drivers.Applications under development will also appear there.Figure 9.STM3210-EVAL demonstration menu1.If you use the STM3210E-EVAL-MCU_Flash configuration, the Show Logo application will not be selectedbecause the LCD is not initialized during the boot process hardware initialization.When exiting the configuration menu, save the settings.Doc ID 16051 Rev 117/364.4 Running the build processY ou are now ready to start building the uClinux system. Depending on the previouslyselected configuration (“STM3210E-EVAL-jffs” or “STM3210E-EVAL-MCU_Flash”), you willuse one of the two following processes to build the kernel image:●If you chose the STM3210E-EVAL-jffs configuration:Simply type the “make” command and wait the end of the build process. At this step,the kernel and the selected application are built.After this operation, the xipImage.bin, rootfs.img.bin and logo.bin files are generatedand copied to the “uClinux-dist/images/” folder.●If you chose the STM3210E-EVAL-MCU_Flash configuration:To build the minimal image, proceed as follows:a) Run the “make ucfront” command to prepare tools to build user applications.b) Run the “make user_only” command to prepare user applications.c) Run the “make romfs” command to build the initramfs folder tree.d) Run the “make image” command to copy the kernel image to the “uClinux-dist/images/” folder.At the end of this step a single xipImage.bin file is generated.Whatever the configuration you used (“STM3210E-EVAL-jffs” or “STM3210E-EVAL-MCU_Flash”), now all you need to do is copy the generated image(s) and jump to the nextstep: Loading the images to the board.18/36Doc ID 16051 Rev 15 Loading the images to the board5.1 Loading the “kernel loader / software updater”On a host PC running with a recent version of Microsoft Windows, you need to verify thatyou have an available COM port to communicate with the board.To check that you have an available communication port, right-click on the “My Computer”icon on the desktop and select “Properties” from the pop-up menu. The “System Properties”dialog box appears. Click on the “Hardware” tab, and then on the “Device manager” buttonto display the system hardware configuration. Available COM ports are grouped under the“Ports (COM & LPT)” node in the hardware tree as shown in Figure10.Figure 10.Device Manager window5.1.1 SoftwareinstallationRun the Flash_Loader_Demonstrator_VX.Y_Setup.exe file: the InstallShield Wizard willguide you through the installation of the Flash loader demonstrator application on yourcomputer. Once the software has been successfully installed, click on the “Finish” button. 5.1.2 HardwareinstallationConnect the device to a spare COM port on your PC.Doc ID 16051 Rev 119/365.1.3 Load the hex file to the Flash memoryBefore loading the file, move the boot jumpers to “System Memory Mode” then power up theboard. Run the Flash loader demonstrator application from the “Programs” menu.1.The first step consists in selecting the connection settings: UART port, baud rate andtimeout.2. In the second step, the connection is established and communication has started. Thisstep consists in displaying the Flash memory status. If this status is read-protected, the“Next” button is disabled until the read protection is removed by clicking on the“Remove protection” button. Removing the read protection causes all the Flashmemory pages to be erased.3. At this step the Wizard displays the available device information such as the target ID,the firmware version, the supported device, the memory map and the memoryprotection status. Select the target from the target combobox and click on “Next”.4. At this step, select the Download operation and set the related parameters as shown inFigure11. “Download from file” should point to the Kernel boot loader file from theSTM3210E-EVAL uClinux kit.Depending on the board configuration selected in Section4.3: Configure uClinux forSTM3210E-EVAL when booting from the STM32’s internal Flash memory, you requirea tiny boot loader to preserve some Flash pages for the kernel. In the case when thekernel is placed in an external Flash memory you can use a standard boot loader.–Use Tiny_kernel_boot_loader.hex (< 12 Kbytes) when booting from the STM32’s Flash memory (with the “STM3210E-EVAL-MCU_Flash” configuration).–Use Kernel_boot_loader.hex when booting from the NOR Flash memory (with the STM3210E-EVAL-jffs configuration).20/36Doc ID 16051 Rev 1Figure 11.Flash loader demonstrator download configuration5. The last Wizard page shows the operation page. It gives the size of the data to bedownloaded, the percent completed and the duration of the operation.Note:If an error message appears, you can consult the Flash Loader demonstrator user manual available from the “Programs” menu.5.2 Loading the kernel/root file system imagesMove the boot jumpers to select the “User Flash” boot mode, set the JP14 board jumper toconnected mode and reset the board.5.2.1 DfuSedemonstration installationSoftware InstallationRun the DfuSe_Demo_VX.Y.Z_Setup.exe file: the InstallShield Wizard will guide you toinstall DfuSe applications and source code on your computer. When the software issuccessfully installed, click on the “Finish” button. Y ou can then explore the driver directory.The driver files are in the “Driver” folder located at your install path (C:\Programfiles\STMicroelectronics\DfuSe).Doc ID 16051 Rev 121/36Hardware installation●Connect the device to a spare USB port on your PC.●The “Found New Hardware Wizard” then starts. Follow the wizard to install the newhardware driver available in the “Driver” folder at your install path.5.2.2 Generating the .dfu image and upgrading the boardLet us assume that the files generated from Running the build process have been copied toa local folder on the MS Windows host (e.g. C:\Workspace\Images).DFU file managerStart the DFU file manager application (Start -> All Programs -> STMicroelectronics ->DfuSe-> DFU File Manager), select “i want to GENERATE a DFU file from S19, HEX orBIN files” then click on “OK”.1.Set an unused Target ID number.2. Fill the VID, PID, Version and target name fields3. Click on the “Multi Bin” button to show the “Multi Bin Injection” dialog box.If you chose the “STM3210E-EVAL-jffs” configuration in Section4.3: Configure uClinuxfor STM3210E-EVAL you have to:–Set the start address in the Address field to “6400 0000”.–Click the Browse button to select the xipImage.bin file atC:\Workspace\Images\xipImage.bin.–Click on the Add to list button to add the selected binary file at the given address.–Redo the same sequence to add C:\Workspace\Images\rootfs.img.bin at address “64100 0000”, and C:\Workspace\Images\logo.bin at address “64160 0000”.–Click on “OK” to validate.Figure 12.Multi Bin injection window (STM3210E-EVAL-jffs configuration)22/36Doc ID 16051 Rev 1Doc ID 16051 Rev 123/36If you chose the “STM3210E-EVAL-MCU_Flash” configuration in Section 4.3:Configure uClinux for STM3210E-EVAL you have to:–Set the start address in the Address field to “08003000”.–Click the Browse button to select the xipImage.bin file at C:\Workspace\Images\xipImage.bin .–Click on the Add to list button to add the selected binary file at the given address.–Click on “OK ” to validate.Figure 13.Multi Bin injection window (STM3210E-EVAL-MCU_Flash configuration)4. To create the DFU file, click on “Generate ”.How to download a DFU fileRun the “DfuSe demonstration” application (Start -> All Programs ->STMicroelectronics ->DfuSe -> DfuSe Demonstration).1.Click on the “Choose ” button to select the previously generated DFU file. The displayed Information such as VID, PID, Version and target number is read from the DFU file.2.Choose “NOR Flash” or “internal Flash” in the “Select target(s)” area.3. Check the “Verify after download ” checkbox if you want to launch the verificationprocess after downloading data (this step is optional ).4. Click on the “Upgrade ” button to start upgrading the file content to the memory.5.Wait until the end of the upgrade process.。
uCLinux开发介绍严永红Linux是当前一种非常受欢迎的操作系统,它与UNIX系统兼容,并开放源代码。
它包含所有现代操作系统所具有的一切特性,包括多任务,虚拟内存,代码共享,按需载入,内存管理,以及TCP/IP网络。
并且,它遵循POSIX标准,只要是遵循POSIX API的应用程序很容易被移植。
目前,随着嵌入式系统的蓬勃发展。
Linux也已对嵌入式系统的开发产生具大影响。
大多数流行的CPU都被移植上去,ARM, PowerPC , MIPS, 68K, SPARC, Alpha, SH 等等. 这些CPU都含有一种叫做内存管理单元(MMU)的硬件,来支持标准Linux所需要的虚拟内存。
但在嵌入式世界里,还有很多CPU是没有MMU的,象ARM7、68328等等。
uClinux 正是为了解决这种没有MMU的CPU而产生的。
在uCLinux这个英文单词中,u表示Micro,小的意思,C表示Control,控制的意思,连起来就是Micro-Control-Linux, ―运行在微控制器上的Linux.‖针对这种没有MMU的CPU架构,uCLinux采用了一种平板式(Flat)的内存模型来去除对MMU的依赖, 并且改变了用户程序的加载方式,开发了运用于uCLinux的C函数库--uCLibc. 由于这些变化,一般的Linux开发工具(例如GDB)在开发uCLinux时会碰到一些困难,包括内核的移植,驱动程序及应用程序的调试。
针对这样状况。
Hitool System公司开发了Hitool for uClinux开发套件,来帮助用户开发基于uClinux的系统。
Hitool for uClinux与其它的Linux开发工具相比,有几个优点:A.整个开发过程只在Windows环境下完成,包括内核的配臵、编译,应用程序的编译,文件系统的生成,内核的调试,用户程序的调试。
B.可以采用多种调试方式,既可以采用JTAG方式来调试,也可通过网口用Hitool自己的监控程序(MDB)来调试。
软件架构能用到的linux基本的操作有:VirtualBox 共享设置一、VirtualBox在winxp下虚拟ubuntu在winxp下虚拟ubuntu,在ubuntu下访问win的共享文件夹时出现如下错误:/sbin/mount.vboxsf: mounting failed with the error: No such device1,若要使用共享文件夹功能,必须安装linux guest additions,安装增强功能,这一步得注意不然没戏2,lsmod | grep vboxvfs,确保加载了vboxvfs模块,若没有,使用sudo modprobe vboxvfs 加载3,新建一个文件夹,sudo mkdir /home/js/dxn4,sudo mount -t vboxsf xuni /home/js/dxn 即:sudo mount -t vboxsf “共享文件夹名” “虚拟机共享文件夹目录”5,cd /home/js/dxn中途可能出现错误yacc -d grammar.ymake: yacc:命令未找到make: *** [grammar.c] 错误 127需要安装yaccinux下是用flex和bison来分别代替lex和yacc的,安装直接使用命令:sudo apt-get install bisonLinux切换root用户问题命令模式下直接用su,然后输入密码就可以了,像ubuntu如果还没有为root设置密码的话,可以用第一个用户(它默认有权使用sudo命令)来设置密码,sudo passwd root。
添加路径: export PATH=$PATH:路径名检查路径: echo $PATH桌面有光驱图标,这是加载linux系统增强工具的软件,打开:里面有个autorun.sh然后打开,在终端中运行在终端中运行,输入密码,稍等片刻。
之后出现以下界面,回车退出,工具安装完成。

niosII 硬件架构在开始之前,我总是想多说点,因为看了很多的教程,中间也很辛酸,要达到无师自通的境界,在这种领域有些困难,每每遇到问题,总是喜欢百度一下,当找不到符合自己的情况的时候才是最头疼的时候,我们有点懒,有点想走捷径~~~做做笔记,同时也做做教程,在摩尔定律走不下去的时候,我们就会想起FPGA,我们乐此不疲,因为前途无量,当我们轻车熟路,请不要忘了给我们经验的前辈,同时有好的经验的时候,写写教程,小则帮助一二像我们一样的人,大则为中国的科技兴国做做贡献,无所求,只为心里踏实。
这个教程分两部分,一个是硬件架构,另一个是软件架构,不免会有错误,希望指正,所需硬件要求:cpu包含硬件乘法器,timer,串口,至少8M SDRAMusb blaster , pc一台所需软件要求:此番硬件架构大体分为以下内容:1.建立quartusII 工程。
2.利用sopc 工具搭建niosII软核处理器。
3.建立锁相环。
4.编译工程,分配引脚,重新编译。
5.提取所需的ptf文件。
1.建立工程:选择File -> New Project Wizard...会点英文的,或者是用过别的软件的都会知道,wizard是向导的意思,我们就喜欢向导,因为它会给我们剩下很多工作。
这个不用管它,点next,向下。
这个对话框就有用啦,看第一行,翻译过来就是你要把工程放到哪个文件夹下,然后点"..."选吧,选择你要放的位置,但是我要提醒一点就是,因为这是个外国人用的软件,它的路径里不能有中文,否则当你用niosII IDE软件的时候会有莫名奇妙的错误,这个就是我的经验,免费告诉大家啦。
我设置的路径是D:\quartus_pro\uclinux_nios2,然后点击:打开。
看第二个框。
工程名字,这次的有点特殊了,我们要同时看看第三个框了,第三个是顶层实体的名字,如果知道硬件描述语言,那么肯定会明白我说的意思,这里的工程名字必须和顶层实体的名字相同,我在工程名字填上uclinux_nios2。
ucosii在stm32上的移植详解虽然目前网上已经有不少关于ucosii在stm32上的移植版本,包括micrium也有官方移植版本。
但这些版本具体是怎么移植出来的,又该怎么基于移植好的ucosii 开发应用软件,网上介绍的并不多。
这里介绍一下我的移植经历,希望对大家有所帮助。
我的移植基本上是从零开始的。
首先想要做好移植,有两方面的内容是必须要了解。
1.目标芯片;2.ucosii内核原理。
虽然我们移植的目标芯片是stm32,但操作系统的移植基本是针对Cortex-M3内核(以下简称CM3)而言的,所以我们只需了解CM3内核就好了。
stm32芯片就是CM3内核加上各种各样的外设。
怎么才能了解CM3呢?看一本书<<ARM Cortex-M3权威指南>>(宋岩译,网上多的很)就好了,很多同学可能想,看完这本书移植的新鲜劲都没了,因此我把该书和移植有关的章节都列了出来,并对其中的重点内容进行介绍,我数了数相关章节还不到100页,就这点内容,总要看了吧。
相关章节如下:chapter2 Cortex-M3概览2.1 - 2.9主要了解Cortex-M3的概貌。
刚开始看时不用追求全部理解,后面会有详细介绍,很多内容多看几遍就明白。
其中2.8 指令集,只要了解,CM3只使用thumb2就ok了。
chapter3 Cortex-M3基础3.1 寄存器组R0-R12: 通用寄存器R13: 堆栈寄存器有两个,MSP和PSP,同时只能看见一个引用R13时,引用的是正在使用的那个MSP:可用于异常服务和应用程序PSP:只能用于应用程序系统复位后,用的堆栈指针是MSP。
R14: 连接寄存器,又名LR,存储返回地址R15: 程序计数寄存器,又名PC3.2 特殊功能寄存器程序状态字寄存器组(PSRs)中断屏蔽寄存器组(PRIMASK, FAULTMASK, BASEPRI)控制寄存器(CONTROL)程序状态字寄存器组(PSRs)分为应用程序 PSR(APSR)中断号 PSR(IPSR)执行 PSR(EPSR)每个都是32位,由于这3个寄存器有效位是错开的,因此可以组合访问。
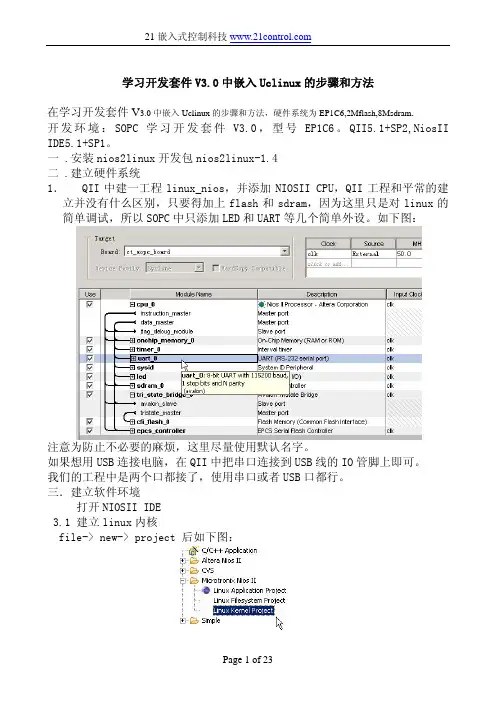
学习开发套件V3.0中嵌入Uclinux的步骤和方法在学习开发套件V3.0中嵌入Uclinux的步骤和方法,硬件系统为EP1C6,2Mflash,8Msdram.开发环境:SOPC学习开发套件V3.0,型号EP1C6。
QII5.1+SP2,NiosII IDE5.1+SP1。
一 .安装nios2linux开发包nios2linux-1.4二 .建立硬件系统1. QII中建一工程linux_nios,并添加NIOSII CPU,QII工程和平常的建立并没有什么区别,只要得加上flash和sdram,因为这里只是对linux的简单调试,所以SOPC中只添加LED和UART等几个简单外设。
如下图:注意为防止不必要的麻烦,这里尽量使用默认名字。
如果想用USB连接电脑,在QII中把串口连接到USB线的IO管脚上即可。
我们的工程中是两个口都接了,使用串口或者USB口都行。
三.建立软件环境打开NIOSII IDE3.1 建立linux内核file-> new-> project 后如下图:注意:在安装Microtronix_uclinux_nios2开发包后在IDE中分增加出如上图的Microtronix NiosII选项如果没有可以按下面方法解决:1)、打开cmd,在 开始->运行 那里输入cmd2)、cd到你的NiosII的工作目录下面,我的NiosII安装在D盘,如下:3)、在这里输入命令nios2-ide.exe –clean,进入NiosII IDE的clean模式,选择workspace:这是在New->Other那里你就可以看到那个linux的目录项了。
关了IDE窗口和cmd窗口,这样就可以正常看到Microtronix_linux了。
3.2 输入内核名字按next:finish完成四. 构建内核:4.1 右键内核名,在弹出菜单中选择Configure Kernel如下:后进入如下界面:因为flash只有2M因此构造的内核应尽可能的小,其大小不能超过1M。
Minigui在uClinux 上的移植心得1、下载minigui源码1.3.31.3.3这两个包的下载需要你在上注册过才可以下载,免费注册的,自己去下吧1.3.0 图形界面程序1.3.0 一些小例子把源码文件复制到/home/liu/minigui目录下,解开源码[root@localhost minigui]#tar zxvf 1.3.3 minigui]#tar zxvf 1.3.3 minigui]#tar zxvf 1.3.0 minigui]#tar zxvf 1.3.0环境的搭建首先你需要一个Linux 环境,我安装的是RedHat 安装时记着选everything,这样可以避免到时候编译少了东西。
这里搭建的环境是让MiniGUI 在你的PC 上可以跑起来,这样以后你开发程序就可以只在PC 上开发,调试好,最后交叉编译一下放到板子上就行了。
把 1.3.3 解开[user]# tar zxf[user]# tar zxf编译libminigui ,这个是minigui 运行所必需的库文件,必须编译成功[user]# cd libminigui-1.3.3[user]# ./configure . yeschecking for pthread library... yeschecking for TT_FreeType_Version in -lttf... yeschecking for T1_InitLib in -lt1... nochecking for jpeg_std_error in -ljpeg... yeschecking for png_check_sig in -lpng... yes其中–lttf –lpng 必须是yes ,不然后面你的程序肯定会有问题,如果这里不是yes 的话,肯定是你的Redhat 9 安装不对,告诉过你安装时选everything ,你选了吗其中ttf 库是对TrueType 字体的支持,png 库是对png 图形的支持,MiniGui 里都需要这两个,在后面为板子交叉编译的时候也需要这两个,不然你的程序跑不起来,切记切记。
Linux/uClinux移植教程移植环境:PC主机一台:windows XP+SP3,虚拟机平台Vmware6.5,Linux平台:CentOS5.3操作系统,并且linux虚拟机可以访问互联网。
对于其它Linux操作系统,可能需要安装其它一些库文件,移植方法也大致相同。
步骤如下:1).安装EPEL开发包使用管理员帐号登陆CentOS5.3,下载安装EPEL开发包[root@localhost ~]#-Uvh /pub/epel/5/i386/epel-release-5-3.noarch.rpm[root@localhost ~]#yum install git-all git-gui make gcc ncurses-devel bison byacc flex \gawk gettext ccache zlib-devel gtk2-devel lzo-devel pax-utilslibglade2-devel完成后,会在linux机上装上gcc编译器(4.1版本),以及git server等其它工具。
2).检测cc编译器是否链接到gcc上[root@localhost ~]# which gcc[root@localhost ~]# gcc –v以及[root@localhost ~]# which cc[root@localhost ~]# cc -v如果两者内容相同,则已链接好。
如果不是:[root@localhost ~]# cd /usr/bin[root@localhost bin]# ln -s gcc cc3). 安装nios2-linux-20090730.tar开发包下载地址: /pub/uclinux/nios2-linux-20090730.tar可以在windows下下载,下载完后复制到linux的root根目录下。
校验压缩包是否完整:[root@localhost ~]# sha1sum nios2-linux-20090730.tar校验结果1d99a54d36759cc6ce5f054ff0460b1bd370b0b6 nios2-linux-20090730.tar解压到当前目录下,即root目录下:[root@localhost ~]# tar xf nios2-linux-20090730.tar进入nios2-linux目录:[root@localhost ~]# cd nios2-linuxCheckout源代码:[root@localhost nios2-linux]# ./checkout等checkout完成后,nios2-linux-20090730.tar安装完成4).生成nios的交叉编译工具toolschain如果您对linux比较熟悉,可以自己生成toolschain,这是一个漫长的过程,首先需要安装gcc4.3.3,安装完gcc后,[root@localhost nios2-linux]# cd toolchain-build # CD 到toolchain-build 目录[root@localhost toolchain-build]# gcc --version #查看gcc 版本[root@localhost toolchain-build]# git clean -f -x -d #清除编译缓存[root@localhost toolchain-build]# make gcc elf2flt gdb-host幸运地话,会在1到2个小时后完成,不过,这步出错率极高。
首先去下一个berkeley db,下面这个是官方网站:/database/berkeley-db/index.html我所下到的最新版本是4.5.20首先解压缩:tar zxvf db-4.5.20.tar.tarcd db-4.5.20可以看到有个README文件,它让我们进docs/index.html查看具体的文档。
查看文档完毕,开始编译,由于berkeley db是用autoconf和libtool编译工程的,所以编译相当方便。
对于一般的Linux/Unix而言,只要进入build_unix目录,命令如下:cd bulid_unix../dist/configure #configre的参数可以使用-h命令查看makemake install生成的目标文件和库都将在目录bulid_unix下。
如果要重新编译:make cleanmake而我要用在的ARM9上(ARM7也一样,都是flat的文件格式,库文件也是),我所用的交叉编译工具是arm-linux-gcc, 版本3.3.2.我首先在db-4.5.20下新建了一个build_arm_linux目录,然后编译,命令如下:mkdir build_arm_linuxcd build_arm_linux../dist/configure CC=arm-linux-gcc --host=armmake哈,是不是很简单。
且慢,ARM上没法直接install的。
以后怎么使用呢?你看看build_arm_linux下面是不是有db.h和libdb-4.5.a(静态库),这就是我们所要的文件,你可以把db.h拷贝到目标系统中的/usr/include下面,或者自己添加环境变量,同理,libdb-4.5.a也可以放到/usr/lib下面,这样你就可以想系统库一样调用它。
因为我只用一个工程要使用它,所以我是直接跟我的工程一起编译的,假使跟工程文件放在一起。
uclinux移植项目及说明4.4.移植项目及说明4.1压缩内核代码起始地址修改修改文件:uClinux-dist/linux-2.4.x/arch/armnommu/boot/Makefile 修改内容:ifeq ($(CONFIG_BOARD_MBA44),y)ZTEXTADDR = 0x0c100000ZRELADDR = 0x0c008000endif说明:ZTEXTADDR:自解压代码的起始地址。
ZRELADDR:内核解压后代码输出起始地址。
4.2处理器配置选项的修改修改文件:uClinux-dist/linux-2.4.x/arch/armnommu/config.in修改内容:define_bool CONFIG_NO_PGT_CACHE ydefine_bool CONFIG_CPU_WITH_CACHE ydefine_bool CONFIG_CPU_WITH_MCR_INSTRUCTION n- define_int CONFIG_ARM_CLK 60000000- define_bool CONFIG_SERIAL_S3C44B0X y- define_int CONFIG_FORCE_MAX_ZONEORDER 5+ define_int CONFIG_ARM_CLK 64000000 #72000000+# define_bool CONFIG_SERIAL_S3C44B0X y+# define_int CONFIG_FORCE_MAX_ZONEORDER 5if [ "$CONFIG_SET_MEM_PARAM" = "n" ]; then- define_hex DRAM_BASE 0x00000000+ define_hex DRAM_BASE 0x0C000000define_hex DRAM_SIZE 0x00800000- define_hex FLASH_MEM_BASE 0x01000000+ define_hex FLASH_MEM_BASE 0x00000000define_hex FLASH_SIZE 0x00200000fifi……说明:修改了对ARM处理器主频的定义:define_int CONFIG_ARM_CLK 64000000修改了存储器大小和起始地址的定义:define_hex DRAM_BASE 0x0C000000;SDRAM的起始地址define_hex DRAM_SIZE 0x00800000;SDRAM的大小define_hex FLASH_MEM_BASE 0x00000000;flash的起始地址define_hex FLASH_SIZE 0x00200000;flash的大小4.3内核起始地址的修改修改文件:uClinux-dist/linux-2.4.x/arch/armnommu/Makefile修改内容:ifeq ($(CONFIG_BOARD_MBA44),y)-TEXTADDR = 0x0c000000+TEXTADDR = 0x0c008000MACHINE = S3C44B0XINCDIR = $(MACHINE)-CORE_FILES := $(CORE_FILES) romfs.o+CORE_FILES := $(CORE_FILES) #romfs.oendif说明:TEXTADDR:内核的起始地址,通常取值:DRAM_BASE+0x8000。
4.4ROM文件系统的定位修改修改文件:uClinux-dist/linux-2.4.x/drivers/block/blkmem.c修改内容:+#ifdef CONFIG_BOARD_MBA44+ {0, 0xc700000, -1},/*{0, 0x100000, -1},*/#endif说明:将ROM file system在SDRAM中的地址定位在0xc700000。
4.5修改存储空间配置修改文件:uClinux-dist/linux-2.4.x/include/asm-armnommu/arch-S3C44B0X/memory.h 修改内容:-#define PHYS_OFFSET (DRAM_BASE + 2*1024*1024)+#define PHYS_OFFSET (DRAM_BASE)//(DRAM_BASE + 2*1024*1024)#define PAGE_OFFSET (PHYS_OFFSET)-#define END_MEM (DRAM_BASE + DRAM_SIZE - 2*1024*1024)+#define END_MEM (DRAM_BASE+DRAM_SIZE)//(DRAM_BASE +DRAM_SIZE - 2*1024*1024)说明:PHYS_OFFSET:RAM第一个bank的起始地址。
4.6初始化节拍定时器修改文件:uClinux-dist/linux-2.4.x/include/asm-armnommu/arch-S3C44B0X/time.h修改内容:-extern void s3c44b0x_timer_interrupt(int irq, void *dev_id, struct pt_regs*regs);+//extern void s3c44b0x_timer_interrupt(int irq, void *dev_id, struct pt_regs *regs);+static inline void s3c44b0x_timer_interrupt(int irq, void *dev_id, structpt_regs *regs)+{+ do_leds();+ do_timer(regs);+}//modified by hzh/* TODO: THE, 2003-08-13, do timer setup like in eCos */-#define S3C44B0X_TIMER5_PRESCALER 16+#define S3C44B0X_TIMER5_PRESCALER 32extern __inline__ void setup_timer (void){u_int32_t tmod;u_int32_t period;+ __u32 rw_tmp;period = (CONFIG_ARM_CLK/S3C44B0X_TIMER5_PRESCALER)/HZ;outl(period, S3C44B0X_TCNTB5);@@ -36,8 +42,14 @@outl(tmod, S3C44B0X_TCON);/* initialize the timer period and prescaler */- outl((5-1) << 16, S3C44B0X_TCFG0);- outl( (0x3 <<20), S3C44B0X_TCFG1); /* prescaler */+ rw_tmp = inl(S3C44B0X_TCFG0);+ rw_tmp &= ~(0xff<<16);+ rw_tmp |= (16-1)<<16;+ outl(rw_tmp, S3C44B0X_TCFG0); // prescaler = 1/16+ rw_tmp = inl(S3C44B0X_TCFG1);+ rw_tmp &= ~(0xf<<20);+ rw_tmp |= 0<<20;+ outl(rw_tmp, S3C44B0X_TCFG1); // mux = 1/2说明:这里,uClinux使用了S3C44B0X的内部定时器5,并利用定时器5的中断来产生节拍。
4.7定义二级异常中断矢量表的起始地址修改文件:uClinux-dist/linux-2.4.x/include/asm-armnommu/proc/system.h 修改内容:+#ifdef CONFIG_BOARD_MBA44+#undef vectors_base()+#define vectors_base() (DRAM_BASE)+#endif说明:vectors_base()定义了二级异常中断矢量表的起始地址,这个地址与Bootloader 中的_IRQ_BASEADDRESS相对应。
4.8定义CPU体系结构和交叉编译器修改文件:uClinux-dist/linux-2.4.x/Makefile修改内容:-# ARCH := armnommu+ARCH := armnommu# ARCH := m68knommu# ARCH := h8300# ARCH := niosnommu……HOSTCFLAGS = -Wall -Wstrict-prototypes -O2 -fomit-frame-pointer# CROSS_COMPILE = m68k-elf--# CROSS_COMPILE = arm-elf-+CROSS_COMPILE = arm-elf-# CROSS_COMPILE = h8300-elf-# CROSS_COMPILE = nios-elf-# CROSS_COMPILE = e1-coff-说明:这里定义了CPU体系结构:ARCH := armnommu和对应的交叉编译器名称:CROSS_COMPILE = arm-elf-。
4.9以太网卡寄存器地址的偏移量修改这里针对ARMSYS的硬件结构,要做两处特殊的修改:修改文件:uClinux-dist/linux-2.4.x/driver/net/8390.h修改内容:#define ETH_ADDR_SFT 8说明:访问RTL8019内部寄存器地址的偏移量。
4.10以太网设备基地址修改修改文件:uClinux-dist/linux-2.4.x/driver/net/ne.c修改内容:dev->base_addr = base_addr = 0x08000000;说明:修改了以太网设备的基地址。
5.移植的步骤5.1解压uClinux-dist发行包到以下地址下载uClinux-dist-20040408.tar.gz源代码包:/pub/uClinux/dist/uClinux-dist-20040408.tar.gz该版本在很多方面比早先的20030522版本要完善很多,这也使我们的移植工作变得方便很多。
其中使用的内核版本是Linux 2.4.24。
以下工作在装有Linux操作系统(例如RedHat9.0)的PC机上进行。