cc3便携式打印机说明书
- 格式:docx
- 大小:11.21 KB
- 文档页数:1

热敏打印机MODEL CT-S300使用说明书CITIZEN is a registered trade mark of CITIZEN WATCH CO., LTD., Japan.EPSON是日本精工爱普生公司的商标。
在使用CT-S300打印机之前,请您务必仔细阅读(安全注意事项),以便正确使用本产品。
若电器产品使用不当,会引起(火灾、触电、人身伤亡等)意外的事故。
●阅读完毕,请将本说明书保管于便于查找之处,以便日后需要查阅时随手可得。
●本章节中有一部分内容与本产品无关。
为避免使操作人员或任何其他人员遭受危险、避免财产受到损失,本使用说明书中采用专用的警告标记来表示须严格遵守的重要事项。
如果CT-S300打印机的使用未遵循附有如下所述的警告标记的说明,相应错误操作所可能造成的危险与破坏程度如下述标记的说明所述。
请务必仔细阅读本说明书。
本标记提醒您对于重要事项的注意。
用(敬请注意)标识表示。
本标记提醒您注意多加注意防止触电与静电。
用(敬请注意)标识表示。
本标记表示拔下电源插头。
用(信息)标识表示。
本标记表示请您注意使用方法。
用(信息)标识表示。
本标记表示禁止。
用(禁止)标识表示。
目录1. 前言 (9)1.1 特点 (9)1.2 附件 (10)1.3 机种的分类 (10)1.4 规格一览表 (11)2. 打印机各部分说明 (12)2.1 打印机外观 (12)2.2 供纸盒内部 (14)2.3 其他内置功能 (14)3. 准备 (15)3.1 AC变压器与AC线的连接 (15)3.2 连接接口线 (16)3.3 连接收银机 (17)3.4 打印机的设置方法 (18)3.5 宽度为58 mm打印卷筒纸专用的分纸器 (18)3.6 设定DIP开关 (19)3.7 设定打印纸传感器 (20)4. 维护和故障 (21)4.1 更换打印卷纸 (21)4.2 消除卡纸 (21)4.3 清洁打印头 (22)4.4 无法打开供纸盒时 (22)4.5 自检打印 (23)4.6 16进机码打印 (23)4.7 出错显示 (24)5. 其他 (26)5.1 外形及尺寸 (26)5.2 打印纸 (27)5.3 存储选择开关设定指南 (28)1. 前言CT-S300打印机是为了适应多种应用的需求而开发的热敏打印机。

Zebra’s ZXP Series 3 direct-to-card printer provides an array of features, outstanding print quality, and a low cost of ownership. The ZXP Series 3 offers a wide range of high capacity ribbon options, along with the capability to select the card thickness that is right for the application. And, when paired with Zebra’s eco-friendly media, the ZXP Series 3 is the most cost-effective printing solution in its class.The ZXP Series 3 offers vivid, high-quality full color and monochrome printing on single- or dual-sided cards. Operating the ZXP Series3 is simplified with an intuitive design, color touch points, and quick-replace higher capacity Load-N-Go™ smart ribbons, which are now eco-friendly using less plasticand more biodegradable material.Zebra’s ZRaster™ host-basedimage processing technologyenables high speed printing—without sacrificing image quality.The printer’s compact designmakes it the right choice for tightwork spaces. Smart card andmagnetic stripe encoding optionsallow the ZXP Series 3 to meetthe needs of a variety of marketsand applications, including ID andaccess control cards as well aspersonalized gift, membershipand loyalty cards. StandardKensington™ lock feature andoptional enclosure lock make theZXP Series 3 ideal for secure cardprinting solutions.Print T ouchThe ZXP Series 3 includes ZebraPrint T ouch TM, an embedded NearField Communication (NFC) chipand software. Justhold your NFC enabledsmartphone up to theZebra Print T ouch logoon the printer to read key printerinformation and launch web-basedhelp pages.Ideal for These ApplicationsSecurity: employee and studentID cards, access control cardsRetail/Hospitality: loyalty, gift andmembership cardsFinancial Services: instantissuance financial cardsZebra ZXP Series 3 Card Printer Data Sheet*Specifications subject to change without notice. **Field upgradeable options©2014 ZIH Corp. All product names and numbers are Zebra trademarks, and Zebra, the Zebra head graphic and True Colours are registered trademarks of ZIH Corp. All rights reserved. Microsoft,Windows, Windows Vista and Windows Server are either registered trademarks or trademarks of Microsoft Corporation in the United States and/or other countries. MIFARE is a registered trademark of Philips Semiconductors Gratkorn GMBH Ltd. Kensington is a registered trademark of ACCO Brands Corporation. All other trademarks are the property of their respective owners.Corporate Headquarters +1 800 423 0442******************Asia-Pacific Headquarters +65 6858 0722******************************EMEA Headquarters +44 (0)1628 556000******************Latin America Headquarters +1 847 955 2283******************(9/14)Other Locations / USA: California, Georgia, Illinois, Rhode Island, T exas, Wisconsin Europe: France, Germany, Italy, the Netherlands, Poland, Spain, Sweden, Turkey, United Kingdom Asia Pacific: Australia, China, Hong Kong, India, Indonesia, Japan, Malaysia, Philippines, Singapore, South Korea, Taiwan, Thailand, Vietnam Latin America: Argentina, Brazil, Colombia, Florida (LA Headquarters in USA), Mexico Africa/Middle East: Dubai, South AfricaSPECIFICATIONS AT A GLANCE*Printer NameZXP Series 3 Card Printer Printing Specifications• Dye-sublimation thermal transfer direct to card • F ull color or monochrome printing • S ingle- or dual-sided printing • 700 cph monochrome single-sided • 195 cph single-sided YMCKO • 140 cph dual-sided YMCKOK • E dge-to-edge printing on standard CR-80 media Standard Features• True Colours ® ix Series™ ZXP 3 high-performance ribbons with intelligent media technology• High capacity, eco-friendly Load-N-Go™ drop-in ribbon cartridges• ZRaster™ host-based image processing • A uto calibration of ribbon • U SB connectivity• M icrosoft ® Certified Windows ® drivers • P rint T ouch NFC tag for online printer documentation and tools • 100 card covered feeder (30 mil)• 45 card capacity output hopper (30 mil)• 16-character LCD operator control display • 300 dpi (11.8 dots/mm) print resolution • T wo-year warranty on printer • T wo-year (unlimited passes) original printhead • O ne-year hot swap (U.S. only)• K ensington ® secure lock slot Optional Features• Built-in 10/100 Ethernet connectivity**• Manual card feeder bezel• ZebraCare™ extended product warranty programs • Lockable enclosure with opaque output bin** Encoding Options and Specifications• Magnetic stripe encoder—ISO 7811 (new and pre-encoded); tracks 1, 2 and 3; high and low coercivity; stripe down; 30 mil cards only • ISO 7816 smart card contact station for third-party external contact encoders**• Combined MIFARE ® ISO 14443 (13.56 MHz) contactless and ISO 7816 Contact Encoder with EMV level 1 certification and PC/SC compliance (includes 50 card capacity [30 mil] output hopper)**• Encoding over USB and EthernetDrivers SupportedWindows ®XP (32 bit), Windows Vista ®(32 and 64 bit), Windows Server ® 2003 (32 bit), Windows 7® (32 and 64 bit), Windows Server 2008 (32 and 64 bit), Windows 8® and Win 8 Pro (32 and 64 bit), Windows Server 2012 (64 bit)Please see for up to-date listing of supported systems.Media SpecificationsNOTE : The ZXP Series 3 printer is designed to work only with Zebra True Colours ix Series high-performance ribbons • Z ebra intelligent technology automatically detects and authenticates ribbon • I ntegrated cleaning roller included with each ribbon • M edia Starter Kit (single-sided): 1 YMCKO ribbon, 200 30-mil PVC cards• Specially designed cleaning supplies simplify preventive maintenance True Colours ix Series ZXP 3 Ribbon • Y MCKO: 280 images/roll • ½ YMCKO: 400 images/roll • Y MCKOK: 230 images/roll • K dO: 700 images/roll • K rO: 700 images/roll • B lack Monochrome: 2000 images/roll • R ed Monochrome: 1700 images/roll • B lue Monochrome: 1700 images/roll • G old Monochrome: 1600 images/roll • S ilver Monochrome: 1600 images/roll • W hite Monochrome: 1400 images/roll Card CompatibilityNOTE: For optimum print quality and printerperformance, use of Genuine Zebra™ supplies is recommended. • C ard Thickness: 10-40 mil • C ard Size: CR-80, ISO 7810 format, T ype ID-1• C ard Material: PVC and PVC composite • S mart Card Contact – ISO 7816-1,2,3,4• S mart Card Contactless MIFARE ® ISO 14443A/B • S pot color or monochrome print only on < 20 mil card thickness Communications Interfaces • U SB V2.0 (cable included) - standard • B uilt-in 10/100 Ethernet - optional**Electrical Specifications• A uto-switching single-phase AC power • O perating range: 90-132VAC and 190-264VAC RMS • F requency range: 47-63 Hz • F CC Class A Physical Specifications (standard model) • H eight: 9.3” (236 mm)• W idth: 7.9” (200 mm)• D epth: 14.5” (368 mm)• W eight: 11.6 lbs (5.3 kg)Environmental Specifications• O perating T emperature: 60º F to 86º F (15º C to 30º C)• Storage T emperature: 23º F to 131º F (-5º C to 55º C)• Operating Humidity: 20% to 65% non-condensing• Storage Humidity: 20% to 70% non-condensing • Media Storage:- T emperature: 41º F to 77º F (5º C to 25º C) - Humidity: 35% to 65% non-condensing - Do not store in direct sunlightGenuine Zebra SuppliesGenuine Zebra supplies meet stringent quality standards and are recommended for optimal printing quality and proper printer performance.CardStudio ™ SoftwareZebra’s CardStudio™ is an easy-to-learn, easy-to-operate complete card design and card issuance software suite. It makes designing and printing high quality photo ID cards and other cards easy, with basic to advanced features, and support for all Zebra card printers. For more information, visit /cardstudio .。


使用說明書PRC-CM03為充分發揮本機功能,在您使用前請詳細閱讀本說明書,並妥善保存,作為日後參考手提MP3/CD音響目錄(一)本機特點及緊急處理方法&警告 (2)(二)安全注意事項 (3)(三)免責聲明 (3)(四)外型及各部位名稱 (4)(五)安裝方法 (5)(六)規格 (5)(七)功能操作 (6)功能選擇 (6)音量調整 (6)調諧電台 (6)CD/MP3唱片的使用 (7)CD/MP3唱片的播放 (7)搜尋特定樂曲 (7)搜尋特定歌曲片段 (8)重複播放 (8)低音加強功能 (8)程序播放記憶 (9)外部音源功能 (9)耳機使用 (9)(八)保養 (10)(九)故障排除 (10)1˙HI/FI立體聲˙具播放CD/MP3/收音機功能˙AM(MONO)/FM立體聲收音˙具有耳機插孔˙CD 20首及MP3 99首曲目編輯播放功能。
˙具重複播放、資料夾重複播放、單曲重複播放及隨機播放功能˙具外部音源輸入擴音功能˙具低音加強功能2在使用本機之前,應仔細閱讀下列事項及使用說明,閱後並請妥為收存,以備將來參考:1.本機請勿置於雨中、濕氣中或避免陽光直射及遠離其他會產生熱能的裝置。
2.本機放置位置請勿太靠近電視、電腦、錄影機及手機,以免遭受干擾,產生誤 動作。
003.使用本機的工作溫度為5~35C。
4.長期不使用本機時,應將其電源線插頭從插座內拔出。
5.請勿將雜物或液體從機身開口處進入機身內部。
6.當本機出現下列情況時,應請合格的維修人員進行維修:A:故障或液體落入本機內。
B:雜物或液體落入本機內。
C:受到雨淋。
D:無法正常操作或性能出現明顯變化。
E:不慎跌落或外殼受損。
7.請勿擅自拆下任何蓋子、內部裝置或調校內部裝置,請交由本公司專業人員進 行維修。
8.使用耳機時,請勿將音量調太大聲,以免聽力受損。
9.當耳朵產生耳鳴時,應將音量調小或取消耳機使用。
10.當使用開放式耳機時,請勿將音量調太大聲,以避免聽不到周遭的聲音。
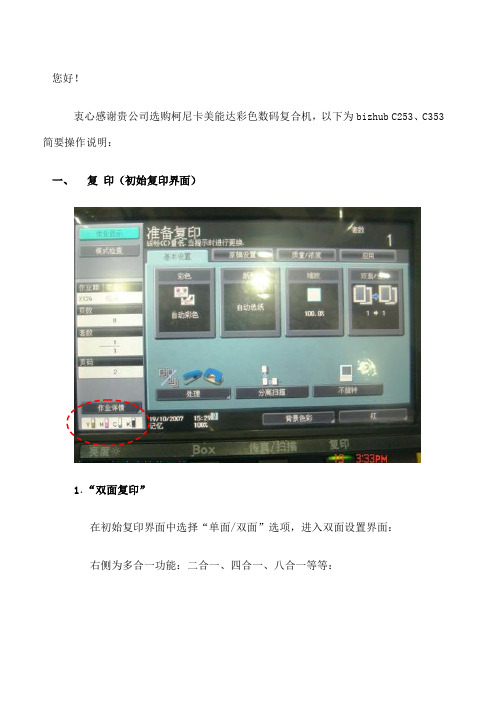
您好!衷心感谢贵公司选购柯尼卡美能达彩色数码复合机,以下为bizhub C253、C353简要操作说明:一、复印(初始复印界面)此处可查看碳粉使用情1.“双面复印”在初始复印界面中选择“单面/双面”选项,进入双面设置界面:右侧为多合一功能:二合一、四合一、八合一等等:2.“混合原稿”功能:如果您有不同正规尺寸的原稿需要通过自动送稿器进行复印,在此界面中选择“混合原稿”按钮,按“start ”按钮开始复印,则复印机可以自动检测原稿尺寸,复印出相应尺寸的副本,如下图所示: 3.装订:角订、边订。
如果复印多份、需要分页,选择“分页”及偏移功能。
多合一功能:2 in角订4. 制作“小册子”:Step 1:在“应用”中选择“小册子”功能:Step 2:返回初始界面,选择“处理”装订:一般性角Step 3:选择“中心装订”和“中心折纸”的YES,再按start 键即可 : 5.1.复印:黑白/彩色/双色复印5.2.“书本复印”:原稿超过黑色+另选择面板上“应用”中的“书本复印/重复”功能:5.3.“重复复印”功能:(适用于名片、身份证证等证件复印)Step1:在玻璃稿台上刻度量好证件的长宽尺寸(厘米): Step2:选择“设置范围”-----“自定义尺寸”。
二、 扫 描1. 选择控制面板上“扫描/传真”按钮Step 1:从注册目的地中选择您的扫描帐户(使用之前需注册好帐户),将原稿放置自动输稿器(100张以内),按开始即可。
将稿台上原稿将稿台上原稿与以上“书本分Step 2:若需要设置扫描,请点击“扫描设置”:“扫描设置”明细:扫描帐户注册好后,会一一扫描生成的格式:PDF、改变扫描文不规则原稿每页:有几张原稿即扫成几个电子给扫描的文件加密后,只。
柯达 EasyShare多功能底座打印机 3 系列用户指南要获得互动式教程,请访问/go/howtoEastman Kodak CompanyRochester, New York 14650© Eastman Kodak Company, 2004所有屏幕影像均为模拟影像。
柯达 (Kodak)、EasyShare、ImageLink 和 XtraLife 是伊士曼柯达 (Eastman Kodak) 公司的商标。
P/N 4J1893_zh-cn/go/support i1充电放电按钮7 8纸盘门照片尺寸按钮 23 4彩色墨盒指示灯 传输按钮/指示灯 左/右控制按钮910照片尺寸指示灯、、、USB 设备接口(适用于可选购的柯达存储卡阅读器或 PictBridge 兼容设备) 56纸盘打印按钮/指示灯 1112相纸指示灯 相机接口ii /go/support1电源接口(直流输入) 4过纸道纸槽 2USB 接口(至计算机) 5彩色墨盒(如图示安装) 3通风口6墨盒盖/go/support iii目录1 使用入门 .............................................................................1寻找多功能底座打印机的摆放位置. (1)安装专用相机接插件.......................................................................2连接电源..........................................................................................3处理与存放彩色墨盒.......................................................................3安装和取出彩色墨盒.......................................................................4处理与存放相纸...............................................................................5装入相纸..........................................................................................6安装和卸下纸盘...............................................................................72 设置您的数码相机 ...............................................................8为您 EasyShare 相机选择适当的电池...............................................8将您的数码相机插接到底座上并对其进行充电............................10设置照片质量.................................................................................12标记照片以进行打印.....................................................................123 不使用计算机进行打印 ......................................................13从数码相机打印.............................................................................13从柯达存储卡阅读器打印..............................................................14打印标记的照片.............................................................................15从 PictBridge 兼容设备打印............................................................15更改打印照片的尺寸.....................................................................16取消打印........................................................................................19从相纸撕下有孔边.........................................................................194 安装软件 ...........................................................................20最低系统要求.................................................................................20安装软件. (20)目录iv/go/support5 通过计算机使用多功能底座打印机 (23)连接到计算机 (23)从数码相机传输照片 (24)从柯达存储卡阅读器传输照片 (25)从计算机打印 (26)取消打印 (29)6 保养与维护 (30)一般维护 (30)清洁进纸辊 (31)携带多功能底座打印机 (32)7 故障排除 (33)打印故障 (33)传输/通讯问题 (40)多功能底座打印机状态指示灯 (41)8 获得帮助 (47)有用链接 (47)电话客户支持 (48)9 附录 (49)多功能底座打印机技术规格 (49)重要安全事项 (50)升级软件和固件 (51)其它维护和保养 (52)保修 (52)监管信息 (54)/go/support11使用入门寻找多功能底座打印机的摆放位置■将多功能底座打印机放在平稳、干净、无尘、干燥且避光的表面上。
微型打印机说明书1. 引言1.1 目的1.2 范围2. 打印机概述2.1 功能特点- 高精度打印功能,可实现细节丰富的图像和文字输出。
- 小巧便携设计,方便随身携带并使用。
- 多种连接方式(如蓝牙、USB等),与各类设备兼容性强。
3. 硬件规格及配置要求3 .l 主要硬件参数:a) 分辨率:XXX dpi;b) 打印速度:XX mm/s;c) 连接方式:支持蓝牙4.O, USB;l.l 最低系统需求:a)操作系统: Windows XP/Vista/7/8/10; Mac OS Xv10以上版本;Android/iOS.b)CPU : Intel Core i5或更高级别处理器 ;c ) 内存:至少4GB RAM ;4.软件安装指南此章节详细介绍了如何在不同操作系统上正确地安装驱动程序以使得微型打开能够正常工作。
包括以下内容:- 安装步骤及注意事项5.基本操作指引在此章节中将描述一些最基本但重要的用户界面和操作说明,以帮助用户快速上手使用微型打印机。
包括以下内容:- 打开/关闭设备- 连接到其他设备的步骤(如蓝牙连接)- 软件界面介绍及功能解释6.高级功能指南本章节将详细描述一些更复杂但实用的高级功能,并提供相应的操作指引。
这些特性可能需要较长时间来掌握并正确地运行。
- 图像编辑与调整- 文字样式设置- 纸张尺寸选择7. 常见问题解答在此章节中了常见问题及其解决方案,旨在帮助用户自己排除故障或遇到困惑时找到相关信息。
8. 法律名词及注释a) 版权:版权是对作品、表演等所享有专属利益支配权力;9. 附件10 . 结束语感谢您阅读我们为您准备的微型打印机说明书!如果还有任何疑问,请联系客服人员获取进一步咨询和技术支持。
高效办公便携式打印机产品说明书感谢您选择我们的高效办公便携式打印机。
本产品说明书旨在提供详细的产品信息和操作指南,帮助您充分了解并正确使用我们的打印机。
一、产品概述我们的高效办公便携式打印机是一款轻便、易用的便携式打印设备。
它可以满足您在办公、商务、旅行等各种场景下的打印需求。
该打印机采用先进的喷墨技术,具有高速打印、高清晰度和低耗材成本的特点。
二、产品特性1. 轻便便携:该打印机重量轻,体积小巧,方便携带。
无论您是在办公室内还是外出办公,都可以轻松携带并使用该打印机。
2. 高速打印:我们的打印机采用先进的喷墨技术,能够以每分钟XX页的速度打印文档,有效提高工作效率。
3. 高清晰度:打印机具有高分辨率和出色的打印质量,可以准确还原文档和照片的细节,确保打印效果更加清晰逼真。
4. 强大兼容性:打印机支持多种文件格式,包括PDF、DOC、JPEG等,以及多种操作系统,如Windows、Mac和Linux等。
5. 省电环保:打印机采用智能省电设计,具有低能耗特点。
同时,我们也提供环保的墨盒和耗材,助力减少对环境的影响。
三、产品规格1. 外观尺寸:XXX(长)mm × XXX(宽)mm × XXX(高)mm2. 重量:XXX 克3. 打印速度:每分钟XX页4. 打印分辨率:XXX dpi5. 接口类型:USB、无线网络等6. 适用文件格式:PDF、DOC、JPEG等7. 适用操作系统:Windows、Mac、Linux等8. 适用纸张规格:A4、A5、信封等四、使用方法1. 准备工作a. 确认打印机已连接电源,并处于待机状态。
b. 安装墨盒和纸张,确保它们的摆放正确。
c. 连接打印机与电脑或移动设备的接口线,确保连接稳定。
2. 打印文档a. 启动您的电脑或移动设备,确保系统正常运行。
b. 打开需要打印的文档,并选择打印选项。
c. 在打印选项中,选择本机打印机为默认打印设备。
d. 确认打印机设置,如打印纸张规格、打印质量等。
Stampante laser Guida rapidaCaricamento della carta e dei supporti specialiCaricamento del vassoio da 250 o 550 fogli in corso1Estrarre completamenteNota: non rimuovere i vassoi durante la stampa o quando sul display viene visualizzato il messaggio Occupata. Questa operazione potrebbe provocare inceppamenti.2Premere contemporaneamente la linguetta della guida della larghezza come mostrato e spostare la guida della larghezzanella posizione adeguata alle dimensioni della carta caricata.3Sbloccare la guida della lunghezza, premerecontemporaneamente la linguetta della guida della lunghezzaverso l'interno come mostrato in figura e spostare la guida nellaposizione adeguata alle dimensioni delle carta caricata.Note:•Utilizzare gli indicatori del formato carta sul fondo delvassoio per posizionare le guide.•Per dimensioni della carta standard, bloccare la guida dellalunghezza.4Flettere i fogli avanti e indietro in modo da separarli, quindiaprirli a ventaglio. Non piegare o sgualcire la carta. Allineare ibordi su una superficie piana.5Caricare la carta.•Per la stampa su un solo lato, caricare la carta con il lato dastampare rivolto verso il basso e il bordo più lungo delfoglio nella prima parte del vassoio.Nota: Per i lavori di stampa che utilizzano un fascicolatoreopzionale StapleSmart TM II, posizionare il bordo più lungodel foglio in fondo al vassoio.•Per la stampa su due lati o fronte/retro, caricare la carta conil bordo più lungo rivolto verso l'alto in fondo al vassoio.Nota: Per i lavori di stampa che utilizzano un fascicolatoreopzionale StapleSmart II, posizionare il bordo più lungodel foglio all'inizio del vassoio.Nota: tenere presente il limite massimo di caricamentopresente sul lato del vassoio che indica l'altezza massima peril caricamento della carta. Non caricare eccessivamente ilvassoio.6Se necessario, regolare le guide della carta finché non toccanoleggermente i lati della risma, quindi bloccare la guida dellalunghezza per le dimensioni della carta indicate sul vassoio.7Inserire il vassoio.8Se è stato caricato un tipo di carta diverso da quello caricatoin precedenza nel vassoio, modificare l'impostazione Tipo dicarta per il vassoio dal pannello di controllo della stampante.Rimozione degli inceppamenti200 e 201 Inceppamenti carta 1Premere il pulsante di rilascio e abbassare lo sportellodell'alimentatore multiuso.2Premere il gancio di rilascio e aprire il coperchio anteriore.3Sollevare ed estrarre la cartuccia di stampa della stampante.Avvertenza — Danno potenziale: non toccare il tamburo del fotoconduttore sul fondo della cartuccia. Tenere lacartuccia sempre dall'apposita maniglia.4Collocare la cartuccia di stampa su una superficie piana epulita.Avvertenza — Danno potenziale: non esporre la cartucciaalla luce diretta per periodi di tempo prolungati.Avvertenza — Danno potenziale: è possibile che sianopresenti dei residui di toner sulla carta inceppata, chepotrebbero macchiare gli indumenti e la pelle.5Rimuovere la carta inceppata.ATTENZIONE — SUPERFICIE MOLTO CALDA: la parteinterna della stampante potrebbe essere surriscaldata.Per evitare infortuni, lasciare raffreddare la superficieprima di toccarla.Nota: se non è facile rimuovere la carta, aprire lo sportelloposteriore e rimuovere la carta.6Allineare e reinstallare la cartuccia di stampa.7Chiudere il coperchio anteriore.8Chiudere lo sportello dell'alimentatore multiuso.9Premere .202 e 203 Inceppamenti cartaSe la carta esce dalla stampante, estrarre la carta, quindipremere .Se la carta non esce dalla stampante:1Abbassare lo sportello posteriore superiore.2Rimuovere lentamente la carta inceppata per evitare distrapparla.3Chiudere lo sportello posteriore superiore.4Premere .241–245 Inceppamenti carta1Estrarre il vassoio visualizzato sul display.2Rimuovere l'eventuale carta inceppata, quindi reinserire ilvassoio.3Premere .4Se il messaggio relativo alla carta inceppata continua ad esserevisualizzato per un vassoio da 250 o 550 fogli, rimuovere ilvassoio dalla stampante.5Rimuovere la carta inceppata, quindi inserire il vassoio.6Premere .。
cc3便携式打印机说明书
供电方式:2600mAh 7.4V可充电锂聚合物电池。
充电方式:可带机充电。
放电输出:有5V 2A的USB接口输出,可作为充电宝使用。
黑标定位:双黑标定位,适应各种纸宽。
标签定位:穿透式。
异常检测:缺纸检测、电量不足检测、开盖检测,充电提醒,充电结束提醒。
装纸方式:蛤壳式装纸。
开盖方式:一键开盖。
切纸方式:手动撕纸。
状态指示:OLED。
显示:通讯模式、打印、缺纸、开盖、缺电、休眠。
异常检测:缺纸检测、电量不足检测、开盖检测。
省电模式:自动休眠、自动唤醒。
外形尺寸:110mm×108mm×60mm。
重量:350g。