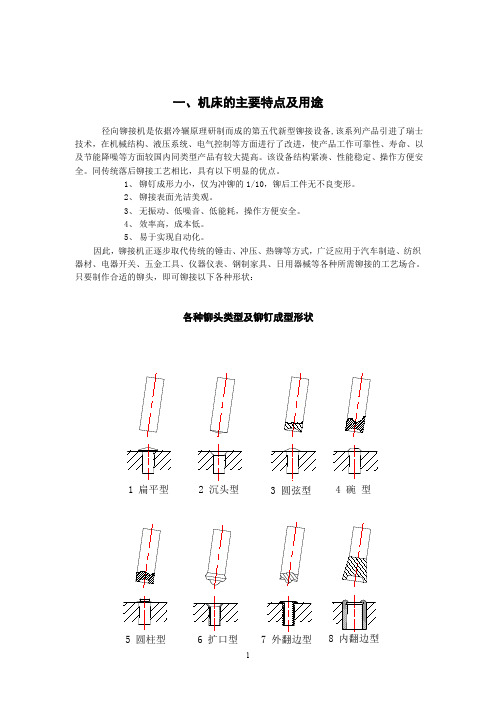
JM9径向铆接机说明书(2015版)
- 格式:pdf
- 大小:1.17 MB
- 文档页数:25


铆接机作业指导书篇一:铆接机保养作业指导书铆接机保养作业指导书一(维护类别和职责:1.日常维护,每班工作中或工作后,由操作人员进行。
2.一级技术保养,根据使用情况6个月到1年一次,由操作者维修人员进行。
3.二级技术保养,根据使用情况1年到2年一次,由维修人员进行。
二(一级保养内容:,.外保养a.擦拭机床身,应无黄斑、无油污。
b.配齐螺钉、螺母、标牌。
c.擦拭附件、清扫机床周围。
2.主轴a.清洗主轴表面。
b.检查调整主轴间隙。
3.工作台a.检查修光工作台毛刺、锈斑。
1b.清洗油污。
4.润滑a.润滑系统完整,油路畅通、油标明亮、无泄漏。
b.检查油质、油量。
;.清洗油滤网。
,.各部位加注润滑油。
5.电路,(清扫电动机、电气箱。
,(检查整理电器元件、开关按钮有无松动。
三(二级保养(除执行一级保养外)还应做好下列工作:1.主轴a.拆装检查主轴、升降花键轴、主轴内各轴承。
b.检查主轴修复调整或更换严重磨损零件。
2.油压,.拆装检查油压阀、换向阀。
,.检查更换或修复零件。
3.润滑,.检查油泵轴承、主轴。
,.检查清洗更换或修复磨损零件。
;.根据油质更换或加注润滑油。
4.电路电器,(拆装检查电动机轴承,更换或清洗加注油脂。
,(检2查修复或更换损坏电器元件。
c.电器符合设备完好要求。
篇二:通用铆接作业指导书篇三:关键工序(铆接)作业指导书附录A 铆接缺陷产生原因分析及缺陷检查表编制批准 2014年3月15日审核篇四:铆接机的操作规程铆接机的操作规程1、操作者必须熟悉铆接设备的一般结构及性能,具备使用铆接设备的基本技能,拥有使用该铆接机的资格。
2、开机前应检查设备的润滑系统是否有润滑油,润滑油滴出是否正常。
机械系统及安全防护装置是否齐全、完好,各运转部件及滑动面有无障碍物。
3、工作前先作空行程试运转,检查各按钮、开关等是否灵活可靠。
4、调整铆头与工件的高度时,调整后应锁紧工作台,并锁紧螺母。
每批产品铆接完工后,人员离开应挂行程牌。

JMDM-20DIOV2接线说明一、输入信号(低电平有效):1~6、11~16引脚1、7引脚为 1~6输入引脚的电源公共端。
当要用到1~6引脚的输入时,7引脚必须接+24V (可使用控制器的9引脚输出的+24V ;也可用外部电源的+24V );2、10引脚为11~16输入引脚的电源公共端。
当用到11~16引脚的输入时,10引脚必须接+24V (可以使用控制器的9引脚输出的+24V ;也可以用外部电源的+24V );3、控制器输入信号为低电平有效。
输入引脚(1~6引脚和11~16引脚)做开关输入时,开关的一端接控制器的输入端,一端接24V 供电地。
如下图:上图所示:当开关闭合时,控制器输入端口获得24V 公共地信号,得到低电平,有信号输入。
二、 输出信号(低电平有效):21~23引脚、24~27引脚JMDM-20DIOV2:输出类型有3种:4MT4MR 、8MT 、8MR ,对应的产品型号分别为:JMDM-20DIOV2混合型、JMDM-20DIOV2MT 、JMDM-20DIOV2MR 。
晶体管输出的外接电源为12~24V 均可,这里以DC24V 为例说明,晶体管输出的外接电源可以由控制器的8、9引脚给定,也可由外部24V 电源给定(当17、18使用AC18V 时,8、9脚自动整流出DC24V 电源)。
继电器输出的外接电源为0~220V 均可,这里以AC220V 为例说明。
1、4MT4MR (混合型输出):20-23引脚为继电器输出端口,电源公共地接19脚;24-27引脚为晶体管输出端口,电源公共地接28脚、公共正接29脚。
详细接法如下:19脚为20~23脚的电源公共地,需接电源负极,供负载使用,电源正极接负载的一端,负载的另一端接输出端口(20~23脚);电源根据负载要求选用。
28脚接24V 公共地(0V ),29脚接24V 公共正(+24V )。
24—27引脚的输出负载的一端接24V+,一端接输出端口(24-27引脚)。

铆接机的工作原理铆接机的的工作原理铆接机工作原理一般分两种,即径向式(JM型)和摆辗式(BM型),它们在结构实现上和运动轨迹上都有较大的区分,现简洁简洁介绍如下:径向铆接机(JM):电机通过联轴器将运动传递给主轴,主轴通过少齿差行星机构将运动传递给球面运动副,同时液压系统驱动活塞连同球面副向下施压,当铆头接触到铆钉时,铆头围绕铆钉中心线(即主轴中心线)按11瓣梅花运动轨迹对铆钉进行无滑动辗压,而完成铆接工作。
摆辗铆接机(BM):电机通过联轴器将运动传递主轴,同时液压系统驱动活塞连同主轴向下施压,当铆头接触到铆钉时,铆头围绕铆钉中心线(即主轴中心线)公转,同时铆头在切向力的作用下自转,从而形成无滑动辗压。
项目径向铆接(JM型铆接机)摆辗型铆接(BM型铆接机)铆接质量总体评价:最优。
该型设备采纳目前公认的最先进的11瓣梅花型摆辗技术,铆钉材料沿直径方向变形,并形成与工作载荷相切的纤维质流,大大提高抗载荷力量。
该技术静铆接性极好,可加工带电镀层的铆钉,铆后镀层完好无损。
当调整合适的进给量和压力,该设备还可铆接塑料和陶瓷材料。
另外其铆接稳定性很好,一般铆钉不对中和不夹持也能也能顺当铆接完成。
由于同比状况下铆接力最小,因此铆件铆后无不良变形(铆杆弯曲、墩粗),内应力微小,不会产生任何内裂纹。
铆接面光滑美观。
废品率几乎为零。
总体评价:较优。
该型设备采纳冷摆碾成型技术,铆接质量略低于径向铆接。
铆接材料是沿圆周方向变形,并产生回旋纤维质流,抗载荷力量较径向纤维稍差。
铆接时要求有肯定程度的对中,并需要夹持。
铆后伴有少量内应力。
铆接范围总体评价:最广泛。
径向铆接适用领域相当广泛,除摆辗型铆接机能加工的领域外,还可铆接半封闭型的铆件,例如锁壳内的铆钉;静压止动型铆件;例如万向节接头;长径比较大的铆件,例如汽车刮水器。
特殊是要求内、外翻边型铆接件,加工性极好。
还可铆接塑料和陶瓷材料。
总体评价:较广泛。
适合一般要求的铆件加工,对于长径比较大的铆钉易铆弯。

德国 SOYER(索亚)中国总代理珠海市福尼斯焊接技术有限公司操作说明书螺柱焊机BMS-9BMS-9V螺柱焊枪PS-9PS-9KPS-1K德国 SOYER(索亚)中国总代理珠海市福尼斯焊接技术有限公司机身序号请填写机身序号,让我们能在您需要时提供即时的支持。
设备型号机身序号螺柱焊机BMS-9BMS-9V螺柱焊枪PS-9PS-9KPS-1K操作说明书文档货号: P00161, 02-2017, 原文说明书翻译(英文: P00261)文档中所有资讯为Heinz Soyer Bolzenschweißtechnik GmbH财产。
版本信息文档创建/修改编者日期初版预备DD17.02.20172 德国 SOYER(索亚)中国总代理——珠海市福尼斯焊接技术有限公司目录1. 一般资讯. . . . . . . . . . . . . . . . . . . . . ............ . . . . . . . . . . . . . . . . . . . . . . . . . 5 1.1. 操作说明书的有效性 5 1.2. 符合性声明 5 1.3. 制造商7 1.4. 指引,培训7 1.5. 标准及指令72. 重要安全指引 . . . . . . . . . . . . . . . . .. . . . . . . . . . . . . . . . . . . . . . . . . . . . . . . . . . . . 8 2.1. 使用的安全警告8 2.2. 一般安全指引9 2.3. 个人防护装备12 2.4. 螺柱焊机的预期用途132.4.1 不当使用13 2.5. 螺柱焊枪的预期用途132.5.1 不当使用13 2.6. 公司的操作前提132.6.1 人员的操作前提143. 运输 . . . . . . . . . . . . . . . . . . . . . . . . . . . . . . . . . . . . . . . . . . . . . . . . . . . . . . . . . . . . 154. 储存,关机. . . . . . . . . . . . . . . . . . . . . . . . . . . . . . . . . . . . . . . . . . . . . . . . . . . . . . . 155. 废物处置 . . . . . . . . . . . . . . . . . . . . . . . . . . . . . . . . . . . . . . . . . . . . . . . . . . . . . . . . 156. BMS-9(V)螺柱焊机说明. . . . . . . . . . . . . . . . . . . . . . . . . . . . . . . . . . . . . . . . . . . . . 16 6.1. 类型区别166.2. 工作方法166.2.1 产品特点166.2.2 电容储能式螺柱焊接17 6.3. 控制概览186.3.1 操作状态显示19 6.4. BMS-9(V)螺柱焊机的技术数据20 6.5. 认可的螺柱焊枪21 6.6. 清洁螺柱焊机227. PS-9(K)螺柱焊枪说明. . . . . . . . . . . . . . . . . . . . . . . . . . . . . . . . . . . . . . . . . . . . . . . 23 7.1. 类型区别24 3德国 SOYER(索亚)中国总代理——珠海市福尼斯焊接技术有限公司目录7.2. L ED光环显示含义24 7.3. P S-9(K)螺柱焊枪技术数据257.4. 清洁螺柱焊枪268. PS-1K螺柱焊枪说明. . . . . . . . . . . . . . . . . . . . . . . . . . . . . . . . . . . . . . . . . . . . . . . 27 8.1. PS-1K螺柱焊枪技术数据28 8.2. 清洁螺柱焊枪299. 螺柱夹套说明. . . . . . . . . . . . . . . . . . . .. . . . . . . . . . . . . . . . . . . . . . . . . . . . . . . . . 30 9.1. 不可调式螺柱夹套30 9.2. 调节及安装可调式螺柱夹套3210. 安装及连接. . . . . . . . . . . . . . . . . . . . . . . . . . . . . . . . . . . . . . . . . . . . . . . . . . . . . 35 10.1. 安装位置条件3510.2. 螺柱焊机及螺柱焊枪的连接3610.2.1 电源连接3610.2.2 连接地线3610.2.3 连接螺柱焊枪3811. 设置. . . . . . . . . . . . . . . . . . . . . . . . . . . . . . . . . . . . . . . . . . . . . . . . . . . . . . . . . . . 3911.1. 调节螺柱焊机的充电电压及提升时间3911.1.1 焊机调节表3911.1.2 调节充电电压4111.1.3 “设置”模式中设置提升时间(提升高度)4212. 焊接操作. . . . . . . . . . . . . . . . . . . . . . . . . . . . . . . . . . . . . . . . . . . . . . . . . . . . . . . 45 12.1. 进行焊接4512.2. 检查焊接质量的注意事项4612.2.1 目测检视46 12.3. 关闭焊机48 12.4. 焊接缺陷及其原因4912.5. 故障时出现的报警信息5013. 维护及维修. . . . . . . . . . . . . . . . . . . . . . . . . . . . . . . . .. . . . . . . . . . . . . . . . . . . . 5214. 服务. . . . . . . . . . . . . . . . . . . . . . . . . . . . . . . . . . . . . . . .. . . . . . . . . . . . . . . . . . . 5215. 保修条款. . . . . . . . . . . . . . . . . . . . . . . . . . . . . . .. . . . . . . . . . . . . . . . . . . . . . . . 52 4 一般资讯德国 SOYER(索亚)中国总代理——珠海市福尼斯焊接技术有限公司1. 一般资讯本操作说明书包含重要信息和操作设备的要求。
OUTBOARD MOTORDF9.9B/BE/BR/BT DF15A/AE/AR/AT DF20A/AE/AR/ATApplicable model and effective serial number:00995F-410001 and later01504F-410001 and later02002F-410001 and later99505-89L10-01EFOREWORDThis outboard motor has been designed and produced utilizingSuzuki’s most modern technology. The finest product, however,cannot perform properly unless it is correctly assembled andserviced. This set-up manual has been produced to aid you inproperly assembling and servicing this outboard motor.NOTE:This Set-up manual has been prepared exclusively for followingmodels.Applicable model and effective serial number:00995F-410001 and later01504F-410001 and later02002F-410001 and later*This manual has been prepared on the basis of the latestspecifications at the time of publication. If modificationshave been made since then, differences may existbetween the content of this manual and the actual out-board motor.*Illustrations in this manual are used to show the basicprinciples of operation and work procedures and may notrepresent the actual outboard motor exactly in detail.*This manual is intended for those who have enoughknowledge and skills to service SUZUKI outboardmotors. Without such knowledge and skills, you shouldnot attempt servicing by relying on this manual only.Instead, please contact your nearby authorized SUZUKIoutboard motor dealer.Apprentice mechanics or do-it-yourself mechanicsthat don’t have the proper tools and equipment maynot be able to properly perform the services describedin this manual. Improper assembly and/or servicingmay result in injury to the mechanic and may renderthe engine unsafe for the boat operator and passen-gers.© COPYRIGHT SUZUKI MOTOR CORPORATION 2013Outboard Motor Engineering DepartmentCONTENTSIMPORTANT (3)SYMBOL (4)MATERIALS REQUIRED (4)GENERAL INFORMATION (5)HANG TAGS (5)EMISSION-RELATEDINSTALLATION INSTRUCTIONS .. 6 OUTBOARD MOTOR INSTALLATION .. 7 HORSEPOWER SELECTION (7)MOTOR DIMENSIONS (7)TRANSOM DIMENSIONS (11)ESTABLISHINGTHE CENTER-LINE (12)LIFTING THE MOTOR (12)MOUNTING TO THE TRANSOM ....13CONTROL CABLES AND WIRE HARNESS INSTALLATION .. (15)REMOTE CONTROL BOX SIDE (15)ENGINE SIDE (15)STEERING SYSTEM (21)DRAG LINK INSTALLATION (21)BATTERY (23)BATTERY REQUIREMENT (23)INSTALLATION OF BATTERY (23)CONNECTION OF BATTERYCABLE (24)WIRING DIAGRAM (25)Side Mount Remote Control (25)R-model (26)T-model (27)IMPORTANTWARNING/ CAUTION/NOTICE/NOTEPlease read this manual and follow its instructions carefully. To emphasize special information, the symbol and the words WARNING, CAUTION, NOTICE and NOTE have special meanings. Pay special attention to the messages highlighted by these signal words.Indicates a potential hazard that could result in death or serious injury.Indicates a potential hazard that could result in minor or moderate injury.NOTICEIndicates a potential hazard that could result in damage to the motor or boat.NOTE:Indicates special information to make maintenance easier or instructions clearer.Please note, however, that the warnings and cautions contained in this manual cannot possibly cover all potential hazards relating to the servicing, or lack of servicing, of the outboard motor. In addition to the WARNINGS, CAUTIONS and NOTICE stated, you must use good judgement and basic mechanical safety principles.SYMBOLListed in the table below are symbols indicating special instructions and other important information neces-sary for proper servicing. Please note the definition for each symbol. You will find these symbols used throughout this manual. Refer back to this table if you are not sure of any symbol(s) meanings.MATERIALS REQUIREDSYMBOLDEFINITIONSYMBOLDEFINITIONTorque control required.Data beside it indicates specified torque.Apply THREAD LOCK “1342”.Apply SUZUKI WATER RESISTANT GREASE.Use special tool.Apply SUZUKI SILICONE SEAL.GENERAL INFORMATIONHANG TAGSIt is mandatory that every new Suzuki outboard motor be assembled and serviced in accordance with the instructions in the set-up manual.A critical step in the set-up and pre-delivery process of every outboard motor is to attach the hang tags to the outboard motor. Hang tags are required to remain on the motor until it is deliv-ered to the customer.Be sure the hang tags are attached to the outboard motor as shown.EMISSION-RELATED INSTALLATION INSTRUCTIONSFuel lines and fuel tanks used for a vessel must meet the requirements of federal law (40 CFR 1045.112 and 40 CFR 1060).If you install the engine in a way that makes the engine’s emission control information label hard to read dur-ing normal engine maintenance, you must place a duplicate label on the vessel, as described in 40 CFR 1068.105Failing to follow these instructions when installing a certified engine in a vessel violates federal law (40 CFR 1068.105(b)), subject to fines or other penalties as described in the Clean Air Act.OUTBOARD MOTOR INSTALLATIONHORSEPOWER SELECTIONOverpowering your boat may cause operating/handling difficulties which could result in a crash.The boat may also sustain hull damage or other damage due to stress.•Do not overpower your boat.•Never install an outboard motor with horsepower exceeding the boat manufacturer’s recom-mended maximum horsepower.NOTE:•State the maximum horsepower outboard motor that can be safely used on that boat. There is severe product liability potential connected with rigging and selling a boat with an outboard motor exceeding the horsepower capacity limitation.•The rig should not be underpowered, as this will not allow the performance balance you are trying to achieve. Determine the customer’s needs, application and use of the perspective rig to make the best overall horsepower recommendation.MOTOR DIMENSIONSTRANSOM DIMENSIONSESTABLISHING THE CENTER-LINETo establish the center of the transom you may use the following procedure:(1)Measure across the transom from chine to chine and makea mark on the transom face at 1/2 of this measurement.(2)Measure across the transom from strake to strake andmake a second mark on the transom face at 1/2 of this measurement.(3)Align a straightedge with the marks on the transom faceand draw a line. This is the vertical center-line of the tran-som for a single engine installation.LIFTING THE MOTOR(1)Install the lifting eye on cylinder block, then securely tightenit with bolt. 11291-91B50: Engine hook (Lifting eye)01550-08207: Bolt(2)Attach lift to lifting eye on cylinder block, then lift the engine.Lifting the outboard motor using a hoist with insuffi-cient capacity can result in serious injury and/or dam-age to the outboard motor.Use a hoist which has a minimum lift capacity of at least 450 kg (1000 lbs.) when lifting the motor.Failure to use the proper attachment point for lifting the outboard motor can result in severe injury and/or damage to the outboard motor.Use the lifting eye only. Do not lift the motor using a flywheel lifting attachment.Chine1/21/21/21/2StrakeMOUNTING TO THE TRANSOMContained parts(1)Center the motor on the transom and secure it by alter-nately tightening the clamp screws by hand.Make sure that anti-cavitation plate is located 0 – 25 mm (0– 1 in.) below the boat bottom.(2)Install motor mounting bolts with large diameter flat washerfrom inside of transom and through clamp brackets.(3)Install flat washers, lock washers and nuts on clampbracket side.(4)Tighten all mounting bolts securely.Mounting bolt/nut: 13 N·m (1.3 kgf-m, 9.5 lb-ft)Item Part namePart number Q’ty A Bolt (M 8 × 90 mm)09100-083112B Washer No.1 (Large) φ23 × φ8.541154-91J002C Washer No.2 (φ16 × φ8.5)09160-081702D Lock washer (φ15 × φ8)29162-93J102ENut09140-080162If the motor is not properly secured to the transom, itcan come off.Be sure to bolt the motor to the transom. The motor may come off if it is held only by the clamp screws.Occasionally check the clamp screws for tightness.NOTE:•Drill the mounting holes vertically to the transom board.•To insure water-tightness, sealant (SUZUKI SILICONE SEAL or equivalent) should be applied to all bolt holes. Apply the sealant to the shanks of the bolts, but not the threads.•Do not use an impact tool to tighten or loosen the transom nuts.•If the specified tightening torque can not be reached due to weak transom material, it may be necessary to install a rein-forcement plate between the transom board and washer B. If a reinforcement plate is required, contact the boat manufac-turer for recommendations.NOTE:Make sure that there is no clearance on matting surfaces between the transom board and motor clamp brackets. Otherwise, the motor clamp brackets may be damaged.CONTROL CABLES AND WIRE HARNESS INSTALLATIONContained parts (Remote control model)R modelT modelRequired parts (Remote control model)Choose one item which is matched to the boat in length.REMOTE CONTROL BOX SIDEFor the procedure to connect the throttle control cable and shift control cable to the remote control box, refer to the “REMOTE CONTROL BOX SET-UP INSTRUCTION” that comes supplied with each unit of remote control box.ENGINE SIDEContained parts (Remote control model)NOTE:Before performing the following procedures, be sure that the throttle/shift control cables are installed in the remote control box according to the “REM TE C NTR L B X SET-UP INSTRUCTION”.Item Part name Part number Q’ty A Remote control box67200-94J151B Remote control harness 36620-94J011Item Part name Part number Q’ty A Remote control box67200-93J061B Remote control harness36620-93J021Part namePart number Q’ty Part namePart number Q’ty Control cable 8ft (2.4 m)67320-93J002Control cable 18ft (5.4 m)67320-93J502Control cable 10ft (3.1 m)67320-93J102Control cable 20ft (6.0 m)67320-93J602Control cable 12ft (3.7 m)67320-93J202Control cable 22ft (6.7 m)67320-93J702Control cable 14ft (4.2 m)67320-93J302Control cable 24ft (7.3 m)67320-93J802Control cable 16ft (4.8 m)67320-93J402Item Part name Part number Q’ty A Cable connector67467-89J012Procedure(1)Remove the STBD engine side cover.(2)Position the remote control handle into “NEUTRAL”.— Shift control cable —(3)Remove the lock pin 1 and washer 2 from clutch controllever.(4)Route the shift cable 3, then secure the cable in the cableholder 4 by fitting groove on the cable into a slot on the holder.(5)Make sure that clutch control lever 5 is in the neutral posi-tion.(6)While pushing cable end as shown by arrow X , thread theconnector A onto the shift control cable 3 until the con-nector hole aligns with the pivot pin 6 on the clutch control lever 5.(7)Set the connector A onto the pivot pin 6 with the flat sideof connector towards the lever.If the cable connector is not threaded far enough onto the cable, the cable connector could break causing a loss of control and a crash.Thread the cable connector at least 8 mm (0.3 in.) ontocable.(8)Install the washer 2 and lock pin 1, then tighten the locknut 7.(9)Make sure that both forward and reverse gear can beengaged with the same angle of remote control handle travel from “NEUTRAL” position.(15)Thread the throttle cable connector A onto the cable end.(16)While pushing cable end as shown by arrow X , adjust theconnector A until the center of connector hole aligns with the pivot pin A on the throttle control lever 0.(17)Set the connector A onto the pivot pin A with the flat sideof connector towards the throttle control lever.(18)Install the washer 2 and lock pin 1, then tighten the locknut B .(19)Make sure the throttle stopper C contacts the stopper Dwith throttle control fully opened. If not, adjust the connector A again.(20)Return the remote control handle to the neutral position.Check that the throttle drum 9 is in fully closed position.Also make sure the clearance “a” exists between the inter-link lever E and the link lever F with throttle control fully closed position.NOTE:Do not attempt to adjust the throttle valve opening such as by turning the throttle stop screw G.Clearance “a”1 –2 mm(21)Install grommet H.(22)Reinstall the engine side covers.NOTE:Before installing side cover, confirm that the remote control har-ness and PTT motor cable are properly routed and they must not contact with the remote control cable holder.If the harness touches with the cable holder, pull the harness outward at its grommet.a:Remote control harnessb:Remote control cable holderc:Grommetd:PTT motor cable— Remote control wire harness —(23)Connect the coupler of the remote control wire harness tothe coupler in the engine side.After assembly, make sure that the cables are not stretched or otherwise stressed when the outboard motor is turned all the way to the right and left.NOTICEOn the T model;Do not connect the sub-battery cable to the remotecontrol harness.For this model, it is not necessary to connect the sub-battery cable to provide power for operation of the engine control system.If you connect the sub-battery cable, the sub-battery fuse will blow.2021STEERING SYSTEMDRAG LINK INSTALLATIONNOTE:These instructions are for connecting a mechanical push-pull steering system with the following specifications:•Single cable•Starboard cable entry into the motor tilt tube.•Steering cable meeting the current American Boat and Yacht Council’s Safety standard (P-17).Contained parts (Remote control model)NOTICESelection of an improper steering system or improp-erly installing a steering system on the outboard motor can cause steering/handling difficulties, result-ing in loss of control and a crash.Be sure to follow the steering system manufacturer’s instructions for proper selection and installation.Item Part name Part number Q’ty Drag link assembly 67701-99J01A •Drag link •Not available separately 1B •Spacer •67721-89J001C •Bolt•67725-99J001D •Safety nut •67726-99E002E •Washer•67728-99E003FSteering cable seal41161-944001Never reuse the lock nut D after it has been threaded into position and torqued.Once you have tightened the lock nut D , it will no longer have the necessary fastening performance ifyou reuse it.Procedure(1)Thread the steering cable seal F onto the port side end ofthe motor tilt tube 1.(2)Apply SUZUKI WATER RESISTANT GREASE to the steer-ing cable 2.(3)Insert the cable 2 into the tube 1 from the starboard side,then tighten the cable retaining nut 3 to the torque speci-fied by the cable manufacturer.NOTE:O n most outboard motor installations, it will be necessary to install the steering cable prior to the outboard motor installation.(4)Connect the drag link A to the steering cable end 2 withwashers E and safety nut D as shown. Tighten the nut D to the specified torque, then BACK THE NUT OFF 1/8 TURN.Safety nut D: 10 N·m (1.0 kgf-m, 7.0 lb-ft)(5)Move the steering cable until the hole of drag link A alignswith the thread hole on the attachment 4.(6)Connect the drag link to the attachment 4 by tightening thebolt C with the spacer B and washer E as shown.Bolt C: 34 N·m (3.4 kgf-m, 24.5 lb-ft)(7)Tighten the safety nut D.Safety nut D: 34 N·m (3.4 kgf-m, 24.5 lb-ft)NOTE:After assembly, check for smooth and free steering operation byturning the steering wheel all the way to the right and left.22BATTERYBATTERY REQUIREMENTSuzuki recommends a 12-volt cranking-type lead acid battery for the DF9.9B/15A/20A.Minimum battery requirement for starting the engine is provided below.The battery must satisfy one of the specifications described below.450 Marine Cranking Amps (MCA)/ABYC,or 330 Cold Cranking Amps (CCA)/SAEor 70 Reserve Capacity (RC) Minutes/SAEor 12 V 35 AHNOTE:•The specifications listed above are the minimum battery ratingrequirements for starting the engine.•Additional electrical loads from the boat will require largercapacity batteries.•Dual-purpose (Cranking/Deep Cycle) batteries can be used ifthey meet the minimum specifications listed above (MCA,CCA, or RC).•Do not use a Deep Cycle battery for the main cranking battery.•The use of Maintenance-Free, sealed, or Gel-Cell batteries isnot recommended because they may not be compatible withSuzuki’s charging system.•When connecting batteries in parallel, they must be of thesame type, capacity, manufacturer, and of similar age. Whenreplacement is necessary, they should be replaced as a set.INSTALLATION OF BATTERYFailure to take proper precautions when handling thebattery may cause severe injury.Be sure to take the following precautions when han-dling the battery:•Never expose the battery to open flames or electricsparks as batteries generate gas which is flammableand explosive.•Do not place the battery near the fuel tank.•Battery acid is poisonous and corrosive. Avoid con-tact with eyes, skin, clothing and painted surfaces.If you come in contact with battery acid, flush imme-diately with large amounts of water and seekimmediate medical attention.•Batteries should always be kept out of reach of chil-dren.•When checking or servicing battery, disconnect thenegative (black) cable. Be careful not to cause ashort circuit by allowing metal objects to contact thebattery posts and motor at the same time.•Wear approved eye protection.23Store the battery free from splash of water, etc. and fix it securely to the hull with a battery band or the like to prevent it from falling down during boating.NOTE:It is recommended that the battery be installed in an enclosed battery case.NOTE:When extending the battery cable, use a cable of diameter larger than equivalence of AV8 (AWG8).CONNECTION OF BATTERY CABLE•First connect positive battery cable to positive battery termi-nal, then connect negative battery cable to negative battery terminal.NOTE:When connecting batteries, hexagon-nuts must be used to secure battery leads (cables) to battery terminals.24WIRING DIAGRAMSide Mount Remote Control25R-model26T-model271TK。
铆接机操作说明一、简介铆接机是一种用于连接金属工件的设备,通过压缩、挤压等方式将铆钉固定在工件上,使工件之间形成牢固的连接。
本操作说明将详细介绍铆接机的使用方法和注意事项,以确保您能正确、安全地操作铆接机。
二、设备准备1. 确保工作区域清洁整齐,没有杂物和障碍物;2. 检查铆接机的外观是否完好,零部件是否齐全;3. 检查电源是否接通,并确保电源电压符合铆接机的要求;4. 连接并固定铆钉进给装置;5. 根据需要选择合适的铆钉规格,并将其装入铆接机。
三、操作步骤1. 打开铆接机电源开关,待铆接机预热完成(通常需要数分钟);2. 将待铆接的工件放置在适当位置,调整工件固定装置(如夹具、工作台等),确保工件稳固;3. 调整铆接机的压力和冲击力,根据工件和铆钉的规格进行相应设置;4. 将铆头对准工件上的铆钉孔,使用铆接机加压,直至铆钉完全插入工件。
注意,加压时应保持均匀、稳定的力度;5. 松开铆接机的压力,取下铆接机,检查铆钉是否完全牢固;6. 如需继续铆接其他位置,重复步骤4和步骤5;7. 铆接完成后,关闭铆接机电源开关,清理工作区域。
四、注意事项1. 操作时,请佩戴个人防护装备,如手套、护目镜等,以防止意外伤害;2. 严禁将手指或其他物体伸入铆接机的工作区域;3. 在铆接过程中,避免使用过大或过小的铆钉,以免造成工件损坏或连接不牢固;4. 铆接机应放置在平稳的工作台或地面,保持稳定性;5. 在操作过程中如发现任何异常情况,应立即停止使用铆接机,并寻求专业人员的帮助维修。
结束语:通过以上操作说明,您应该已经掌握了铆接机的正确使用方法。
请务必在操作铆接机时遵守以上注意事项,确保自身安全和铆接效果。
祝您工作顺利!。
北汽福田汽车股份有限公司北京欧曼重型汽车厂车架铆接通用作业指导书共5页第1页1.适用范围:本通用作业指导书适用于中重型车架.2.内容:(1)铆钉插入前待铆孔应无毛刺等缺陷。
(2)铆接后铆钉头不得有歪斜、翘起等缺陷,全部铆接件应仔细检查。
铆接不合格时应铲除铆钉重新铆接,不允许用焊接方法补充连接强度。
(3)铆钉的铆接力应符合以下规定,可在标准值基础上进行15%内的调整,但不允许超出极限值(铆接力每班前进行确认,专检每周进行检查一次,并作记录)。
铆钉直径(㎜)铆接机型号铆钳缸径(㎜) 档位及铆接力标准值(Mpa)极限值(Mpa)备注10AX-30CS 110 压力Ⅰ2431.512 压力Ⅱ3012AX-40CS 125 压力Ⅰ2432。
6铸件铆钉14 压力Ⅱ30 其他位置铆钉12AX-63B(卧铆)140 压力Ⅰ2041铸件铆钉14 压力Ⅱ31。
5 其他位置铆钉14AX-63B(悬铆)140 压力Ⅰ31。
54116 压力Ⅱ36(4)铆接缺陷的允差和检查如下表所示:铆接缺陷的允差和检查序号缺陷类型示意图允差检查方法1 铆钉头有裂纹不允许目测2 铆钉松动不允许用手锤击打3 铆钉周缘残缺或外形不完整铆钉直径(㎜)a+b≤1.010a+b≤1。
212a+b≤1.414外观查看描校档案号日期签字编制(日期)校对(日期)审核(日期)标准化(日期)会签(日期)批准(日期)北汽福田汽车股份有限公司北京欧曼重型汽车厂车架铆接通用作业指导书共5页 第2页(5) 热铆铆钉镦头成型为球冠状,冷铆铆钉镦头成型为圆锥形,具体尺寸要求见下表.表中d k 为铆成头直径,k 为铆成头高度。
铆钉直径(d)dd kk基本尺寸极限偏差 基本尺寸极限偏差 10 17 ±0。
35 6 ±0。
24 12 21 ±0。
428 ±0.291424 9 162910(6) 车架打号位置要求:车架编号应打印在车架左纵梁下翼面距后端面10mm ~200mm 处.车架编号的起止两端均应打印起止符“﹡”;字高应为10。