日立S4800扫描电子显微镜
- 格式:ppt
- 大小:26.59 MB
- 文档页数:15

HITACHI H-7650 透射电镜操作规程编号: QW148 HITACHI S4800扫描电子显微镜操作规程样品准备及要求:1.含水样品测试前必须干燥,样品要尽量的小,多孔样品做之前一般要烘两到三天;2.粉末样品测试时尽量用最少量的样品,否则容易使电镜污染;3.严禁观察磁性样品;4.样品须处于样品台中央位置,样品表面平坦,样品厚度不可太大。
操作步骤:一、开机顺序1. 开墙上主机电源的开关,开启冷却循环水;2. 将仪器后面板处的主电源开关(Main Power) 打开,之后按下Reset键;3.启动Evac Power,等待TMP指示正常后顺序打开IP1、IP2 和IP3的电源开关:4.达到真空度要求后,开启操作台电源,PC机自动启动进入Windows操作系统,并自动运行S-4800操作程序,此时点击OK (没有密码)后自动进入S 4800操作软件。
二、样品安装1.在实验台上事先粘好样品,并用高度规检测其高度;2.装样品前确认工轴、WD,x,y以及Rotation是否复位(Z轴=8,WD=8,x=25,y=25,Rotation=0),如未复位,将其复位;3.点击样品交换室的Air键,当听到笛的一声后轻轻的拉开样品交换室;4.将样品杆手柄处于Unlock位置,把样品机座装于样杆的香蕉头处并转动手柄到Lock位置;5.轻轻推住样品交换室,点击Evac键,抽好真空后点市Open键,样品交换室与样品室间的闸门自动打开;5. 轻轻的推动样品杆的手柄将样品送至于样品台上,旋转手柄至Unlock, 拉出样品杆,最后点击Close关闭阀门,安装样品结束。
三、图像观察1.加高压后即可进行调试观察;2.首先在TV1模式下找到所要观察的区域;3.在高倍下用coarse键粗聚焦,然后用fine键细调聚焦,直到图像清楚;4.放回到观察倍数,用ABC或手动调到适合的对比度:5. 在SLOW模式下观察调试后的图像,不合适重新执行步骤2,3,若合适即可拍照。
一、介绍Hitachi S-4800场发射扫描电镜采用了新型ExB式探测器和电子束减速功能,提高了图象质量(15 kV下分辨率1 nm),尤其是将低加速电压下的图象质量提高到了新的水平(1 kV下1.4 nm);新型的透镜系统,提高了高分辨模式、高速流模式、大工作距离模式、磁性样品模式等多种工作模式,使其能够精确和清楚地捕捉最短暂的瞬间。
二、操作说明1.开机(1)日常开机:打开Display的开关,PC自动开机进入用户界面并自动运行PC_SEM程序,以空口令登入。
(2)完全关闭电源后开机:接通配电盘电源→拔上MAIN Swith 开关→按一下Reset按钮,→将MAIN控制面板上EVAC POWER按至ON,SC EVAC指示灯处于常绿状态后,等半小时→按下Display开关至ON, PC 自动开机进入用户界面并自动运行PC_SEM程序,以空口令登入。
2.图像观察(1)装入样品制样→把样品托装入样品座,并用标尺确定高度、旋紧→按AIR按钮→将样品座插在样品交换杆上,并锁紧→将交换杆拉至尽头卡紧,关闭交换室→按下EVAC按钮→按下OPEN 按钮打开MV-1后,推进交换杆,旋转样品杆UNLOCK位置后拉出交换杆→按下CLOSE 按钮。
(2)图像观察及保存SC真空恢复正常后(显示为L E-3)→选择适当的加速电压(Vacc)→加高压→在低倍、TV模式下将图像调节清楚→聚焦、消象散→Slow3确认图像质量→点击Capture按钮拍照→点击右下方Save按钮→选择保存位置、使用者及样品信息,保存。
(3)结束观察点击OFF按钮关闭加速高压→将放大倍率还原设至×1.00K→按操作界面上home使样品台回到初始位置→依照装入样品的方式反序取出样品。
3.关机(1)日常关机退出PC_SEM程序→退出Windows XP系统→关闭DISPLAY(2)完全关机短时间关机:退出PC_SEM程序→退出Windows XP系统→关闭DISPLAY→关闭EVAC→等待约35分钟后Multi Indicator区域显示“POFF”→关闭MAIN SWITCH→关闭电源总开关。

扫描电镜S-4800操作规程一、日常开机打开Display开关,电脑自动开机进入s-4800用户界面,PC_SEM程序自运行,点击确认进入软件界面。
二、装样品1.将样品台装在样品座上,根据标尺调整高度及确认样品位置后旋紧。
2.按下AIR键,当AIR灯变绿时拉开样品交换室,水平向前推出交换杆,把样品座插在交换杆上,逆时针旋转交换杆(即按照杆上的标示转至LOCK)锁定样品座后,将交换杆水平向后拉回原处。
3.关闭交换室,按下EV AC键,当EV AC绿灯亮时,按OPEN键至绿灯亮样品室阀门自动打开。
4.水平插入交换杆,直至样品座被卡紧为止,顺时针旋转交换杆(即按照杆上的标示转至UNLOCK)后水平向后拉回原处,点CLOSE键至绿灯亮样品室阀门自动关闭。
三、图像观察1.加高压点击屏幕左上方的高压控制窗口,弹出HV Control对话窗。
选择合适的观察电压和电流,点击ON,弹出提示样品高度的对话框,点击确定出现HV ON 提示条,待图像出现后,关闭HV Control对话窗。
2.在低倍、TV模式下,找到所要观察的样品,点击H/L按钮切换到高倍模式,通过调节样品位置,找到所要观察的视场。
3.聚焦、消像散选好视场后,放大到合适的倍数聚焦消像散。
先调节聚焦粗调和细调旋钮,使图像达到最佳状态,若图像有拉长现象,则需进行消像散。
调节STIGMATOR/ALIGNMENT X使图像在水平方向的拉长消失,再调节STIGMATOR/ALIGNMENT Y使图像在垂直方向的拉长消失。
4.图像采集及保存用A.B.C.键或BRIGHTNISS/CONTRAST旋钮自动或手动调节图像的对比度和亮度,扫描速度变为慢扫,点击抓拍按钮进行采集。
采集后暂时存放在窗口下侧,选中要保存的图像,点击Save,弹出Image Save对话框,输入文件名,选好存储位置保存即可。
5.对中调整改变加速电压和电流时,或图像在高倍聚焦发生漂移时,需要进行对中调整,方法如下:(1)选取样品上一个具有明显特征的位置放在视场中心。
S-4800日立扫描电子显微镜(SEM)简易操作指南一、开机前准备1.1制备样品(带口罩与手套进行)SEM样品制备相对简单,原则上只要能放入样品室的样品,都可进行观察。
但需注意以下事项:a)样品在物理上和化学上必须要保持稳定,在真空中和电子束轰击下不挥发或变形,没有腐蚀性和放射性。
(通常是干燥固体。
)b)由于光源是电子,样品必须导电,非导电样品可喷镀金膜。
金膜在一定程度上会影响样品原有形貌。
(若样品本身导电,衬底不导电,如蓝宝石上的ZnO,只需用导电胶把样品表面连到样品台。
)c)由于物镜有强磁性,带有磁性的样品制样必须非常小心,防止在强磁场中样品被吸入物镜或分散在样品室中。
通常磁性样品必须退磁,且工作距离(WD)须大于8mm。
具体操作过程:(1) 按待测样品数量选择样品台,(支持直径d=5mm,15mm,1 inch,2 inch等规格,若要观测截面可选择带角度的样品台)。
(2) 剪一小段导电胶,粘到样品台上。
若样品为粉末,则把粉末撒到导电胶上,用吸耳球或高压氮气吹扫掉导电胶上未粘紧的粉末;若是块状样品,则把样品牢牢粘到导电胶上,用手轻轻推,样品不会左右晃动。
(为观测时方便定位,将样品排列成行(或列),并在行下方(或列左侧)标上数字编号。
)(3) 样品粘贴完成后,用吸耳球或高压氮气吹扫掉样品台上的粉末、灰尘、水珠、唾沫等(会影响照片质量,甚至使真空度下降而无法加高压,推荐认真执行。
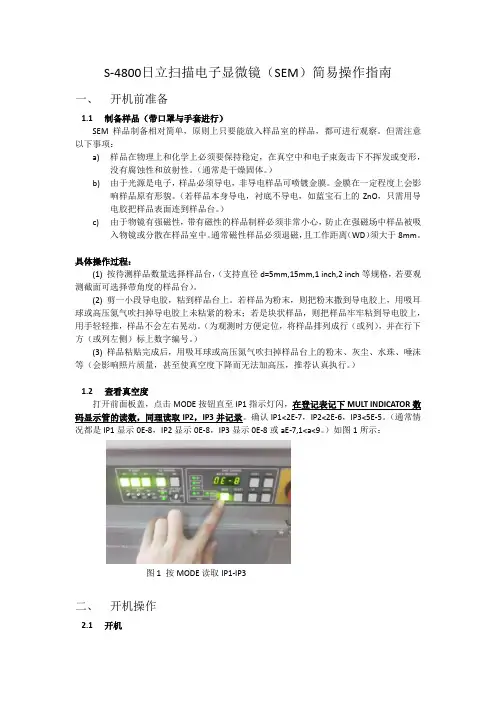
)1.2查看真空度打开前面板盖,点击MODE按钮直至IP1指示灯闪,在登记表记下MULT INDICATOR数码显示管的读数,同理读取IP2,IP3并记录。
确认IP1<2E-7,IP2<2E-6,IP3<5E-5。
(通常情况都是IP1显示0E-8,IP2显示0E-8,IP3显示0E-8或aE-7,1<a<9。
)如图1所示:图1 按MODE读取IP1-IP3二、开机操作2.1开机a)开启冷却循环水电源,循环水温度显示应在15-20℃,水位应浸没金属线圈。
S4800扫描电镜简介S4800扫描电镜(Scanning Electron Microscope,SEM)是一种常用的电子显微镜,用于观察材料的形貌和表面特征。
相比传统光学显微镜,扫描电镜具有更高的分辨率和放大倍数,能够在纳米级别观察样品表面。
S4800扫描电镜是日本公司HITACHI生产的一款高性能扫描电镜,具有出色的图像质量和操作简便性。
技术特点1.高分辨率:S4800扫描电镜配备了专业的电子光学系统,能够实现超高分辨率的样品观察。
其分辨率可达到1纳米,使得使用者能够更加清晰地观察样品的微观细节。
2.宽范围放大倍数:S4800扫描电镜具有大范围的放大倍数,可根据需要进行调整。
通常情况下,它能够提供从几十倍到几十万倍的放大倍数,满足不同应用场景的需求。
3.快速成像:S4800扫描电镜采用了先进的图像采集技术,能够快速获取高质量的图像。
其高速扫描和快速成像功能使得样品的观察过程更加高效和便捷。
4.强大的样品适应性:S4800扫描电镜可以适应多种不同类型的样品。
无论是固态材料、有机材料还是生物样品,都能够通过调整样品表面处理和操作参数,获得清晰而详细的图像。
5.前沿功能:S4800扫描电镜具备多种前沿功能,如悬臂梁技术(Cantilever technology)、能谱分析(Energy Dispersive X-ray Spectroscopy,EDS)等。
这些功能可以提供更多的信息,丰富样品表征的内容。
应用领域S4800扫描电镜广泛应用于各个领域,包括但不限于以下几个方面:1.材料科学领域:S4800扫描电镜可以用于材料的表面形貌观察、颗粒分析和晶体结构分析等方面。
它能够帮助科学家们深入了解材料的微观特性,为材料研发和性能改进提供有效的依据。
2.生命科学领域:S4800扫描电镜在生命科学研究中有着广泛的应用。
它可以用于细胞形态学观察、细胞器的结构研究以及生物材料的表面特性分析等方面。
通过扫描电镜的观察,科学家们可以更好地了解生物体的微观结构,推动生命科学的发展。
日立扫描电子显微镜(SEM)维护手册S-48001、每一个月检查冷却循环水,及时记录水面是否下降并补充。
换水以及清洗过滤网(频率:1年1次以上)2、空气压缩机的维护(频率:半个月一次,1个月1次以上)压缩机内部排水3、机械泵、干泵的维护(频率:半年1次以上(机械泵),1年1次(油泵))机械泵:半年1次以上,当油雾收集器附着油液或有油烟时立即更换。
当油的颜色变为茶色时或换油过了6个月时:停机→交换油→开机油泵:1年1次,委托服务人员维护保养。
4、烘烤与机械对中(频率:1年1次以上)烘烤1.关闭电脑,前面板Display,和循环水。
2.拧开X轴向的两个小螺丝,取下最上端的电磁罩3.松开电子枪的螺纹盖,取下电子枪套入左侧两个圆环处。
注意手不要碰到电子枪内壳4.松开Y轴向两个螺丝,注意用手掩护防止螺丝往里掉。
取下镜筒罩。
5.拿烘烤装置围在镜筒上,并用专用帽子盖上,拧紧螺丝。
6.把两根内加热线插入电子枪桶的两个X轴向的小凸起上,并整理好内外电线,使其不接触到加热部位,防止烧坏,并引到右侧后台的接线盖处。
7.松开右侧后台的接线盖,分别插入内外线插槽,用螺丝拧紧接线盖。
8.设置前面板,通常烘烤必须保证冷却6 Hour,加热时间可变,常用8小时,且外烘烤先启动,两个小时后内烘烤才启动。
故可设Mode/Bake 闪动时按下select 0u 8( =out 8hour) In 6。
此时转到后面板调整开关为Bake 开,Display 关,其他勿动。
再回到前面板按下start。
若无意外,烘烤设置成功,倒计时几秒后即开始。
判断烘烤是否成功开始标志:a)按下start 后无报警现象b)烘烤镜筒部位发热c)IP1-3真空度下降,由E-7到E-6简单版烘烤流程拆下最上端电磁罩→拆下电子枪→取下镜筒罩→装上Outer加热器→装上Inner导线→把两队导线连接到后面板→放置高温牌提醒→前面板定时→开后面板总开关→开始烘机械对中1. 软件设置1KV,flash 记下电流值2. 电子束光阑由1逆时针调到0,物镜可动光阑由3调到03. 软件菜单栏setup/column 下聚光镜cond len1、cond len2前面的勾去掉。

扫描电镜运用培训手册〔试行〕一、场放射扫描电镜操作人员培训〔一〕学员选拔及考核1、培训时间:各课题组自行提交申请,统一支配培训。
2、考核时间:依据培训状况,治理员统一支配理论和上机考核。
3、学员举荐:导师举荐人员〔建议举荐研一、研二的同学2-4 名〕填写学员培训申请表,分别由导师、治理员、学院签字或盖章后正式统一支配培训。
4、学员要求:各导师举荐的学员确定要看法端正、大公无私、负责心强、动手实力强,能切实担当起试验室样品的测试任务。
5、培训内容支配:每年的探讨生开学始终到第一学期完毕,第一学期完毕时进展理论考核和操作考核;其次学期为试操作,由阅历丰富的操作人员〔各个课题组的高年级探讨生等〕指导下进展操作;试操作未消灭任何问题,再独立进展上机操作,合格后发放门禁卡。
具体的培训时间依据一年级探讨生的课程支配,从而确定时间分批培训。
培训时间要在网上预约时注明〔当天半天的时间段其他课题组不能预约〕且为每周一次,每次半天。
6、培训人员:仪器工程师、仪器治理人员和有操作阅历的高年级探讨生〔高年级探讨生要主动帮带和培训自己试验室的低年级探讨生〕负责全程培训。
参与培训的人员为经导师举荐和学院同意后确定的硕士或博士探讨生。
7、培训考核:每个参与培训的学生尽量不要缺席任何一次支配的培训课程,假设缺席三分之一以上视为不合格。
参与培训的学生具体记录培训人员的讲解内容,课程完毕后参与考核,不参与考核视为不合格。
培训不合格和未参与培训人员不得上机操作。
8、门禁卡发放:经理论考核和上机考核双重考核后,具备独立上机资格,取得治理员不在场的上机资格,发放门禁卡。
9、门禁卡运用留意事项:大仪中心全程配有视频监控,留意行为举止;门禁卡是各个课题组进入大仪中心的凭证〔建议各课题组导师统一保管〕,不能外借,丧失刚好挂失,不刚好挂失导致大仪中心东西丧失或仪器损坏的,由持卡课题组照价赔偿。
〔二〕培训流程图各课题组报送学员名单及递交申请表治理员审核及报学院备案理论学习课题组内见习不合格理论考核合格进入上机操作培训不合格上机考核合格考核合格、报学院审批发上机证或门禁卡;运用说明介绍〔三〕预约方法学院购置网上预约系统,各课题组每周一登陆网上预约系统进展实名预约下周的上机时间,预约系统开放时间为工作时间。
Hitachi S-4800冷场发射扫描电子显微镜一、设备名称、型号及主要技术参数:Hitachi S-4800冷场发射扫描电子显微镜二、主要功能简介:1. S-4800所采用的探测器为高位/低位二次电子探测器,半导体式背散射电子探测器,在高加速电压(15kV )下,S-4800的二次电子图像分辨率为1 nm ,这是目前半浸没式冷场发射扫描电镜所能达到的最高水平。
该电镜在低加速电压(1kV )下的二次电子图像分辨率为2nm ,这有利于观察绝缘或导电性差的样品。
放大倍率为20~2000×(低倍模式),100~800000×(高倍模式)。
2.S-4800的主要附件为X 射线能谱仪,型号为EDAX GENESIS XM2 SYSTEM 60x 。
利用S-4800和X 射线能谱仪可以在观察样品表面微观形貌的同时进行微区成分定性和定量以及元素分布分析。
3.由于S-4800不能在低真空条件下工作,因此不适合直接观察含水和含油样品。
主要技术参数电子发射源: 冷场发射源物镜类型: 半浸没式物镜探测器类型:高位/低位二次电子探测器、半导体式背散射电子探测器低加速电压下的二次电子图像分辨率:2nm高加速电压下的二次电子图像分辨率: 1nm放大倍率:20~2000×(低倍模式),100~800000×(高倍模式)三、收费标准:说明:※未满一个小时以一个小时计算,使用时间以使用者登入与注销系统的时间记录为依据;※自行测试者,必须参加过本实验室开设的培训课,培训费用为400元/人;※未经过实验室培训不能够私自操作仪器设备,否则将停止该课题组使用电镜三个月;※若不按规定操作导致仪器损坏的,按照规定赔偿维修费用。
四、联系方式:联系人:苏欣若,联系电话:158****0893,Email:*****************.cn。
Operating Procedure for Hitachi S-4800 Scanning Electron MicroscopeCFN Laboratory1L-32C.Black/G.WrightOperation of the Hitachi S-4800 Scanning Electron Microscope (SEM) requires specific user training and authorization. This operating procedure is meant as a general overview of tool operation and is NOT A SUBSTITUTE for obtaining proper training and authorization.Users should have reserved tool access via the FOM calendar.NIRTRILE GLOVES ARE TO BE WORN AT ALL TIMES when handling sample specimens, sample stages, and any parts to be introduced into the tool vacuum chamber. Suitable gloves are located on the workbench to the left of the Hitachi SEM.Sample PreparationSuitable samples for imaging will be mounted on solid flat substrates such as silicon or glass.Sample specimens must be mounted on a sample holder for insertion into the tool. Several different sample holder sizes are available. Sample holders are located on the workbench.Mount sample on sample holder. Specimens should be mounted using either double-sided sticky tape or clips. Silver paint is to be used only if absolutely necessary.Samples may be blown free of dust and debris using the can of compressed air located onthe laboratory workbench.Clean and organize sample preparation area when finished.Microscope PreparationObserve that microscope is energized and ready for operation. If any warning lights indicate a problem then STOP and contact a staff member.Log into the FOM and activate your reserved session to turn on the Hitachi computer.Loading a sampleAfter mounting sample on a sample holder, adjust the specimen height using the specimen height gauge located on the workbench. To adjust the height, loosen the lock screw and adjust the specimen height so that the height of the highest point of the specimen is the same as the bottom of the height gauge. Then tighten the lock screw by holding the fixed upper part of the holder..Move to the SEM console. Verify that there is no sample stage already loaded in the chamber by looking at the small camera monitor showing a view inside the chamber.Click the EXC button on the control panel. The stage inside the SEM will move to the specimen exchange position. Once this occurs the indicator beside the button will turn green. (Normally the stage will be left in the exchange position.)Press the AIR button on the specimen exchange chamber. After 15 sec. a buzzer will sound indicating that the chamber has been vented.Open the exchange chamber door. Be SURE to use the handle to open the chamber door and DO NOT USE THE SAMPLE LOAD ARM. Pulling on the arm in this way can damage the sample lock vacuum. The exchange chamber door is interlocked and will not open unless all vacuum conditions are satisfied.Confirm that the specimen exchange rod is in the UNLOCKED position by turning clockwise until the UNLOCK mark faces upwardsInsert the two spring pins at the end of the rod into holes of the specimen holder.While holding the specimen holder, turn the knob of the specimen exchange rod counterclockwise until the LOCK mark comes upwards. The sample holder is now lockedonto the load arm.Pull out the sample exchange rod completely and close the exchange chamber door.Press the EVAC button on the specimen exchange chamber. This will pump out the loadlock. Press the OPEN button to open the gate valve to the chamber, which will happen when a suitable low pressure has been achieved.After the gate valve opens, slide the specimen exchange rod all the way into the chamber WHILE LOOKING INTO THE CHAMBER on the small microscope screen toensure that the specimen holder inserts into the guide rails.Turn the specimen rod knob to the UNLOCKED position.Pull out the specimen exchange rod completely while VISUALLY WATCHING that the rod disengages from the sample holder.Press the CLOSE button on the specimen exchange chamber to close the gate valve. The sample is now loaded into the chamber.Applying the SEM high voltageClick the ON button on the control panel at the left of the HV DISPLAY area. You will be asked to verify the size (diameter and height) of the sample holder you are using. If the one displayed is in fact the one you are using, click OK. If not, clickCANCEL. Set the size of the sample holder you are using in the STAGE menu. If you are using the cross- section stage then you should select a stage size of 4 inches.High voltage can be applied only if the HV DISPLAY area on the control panel is blinking in yellow and blue. If the indicator is solid blue then the SEM conditions are not appropriate for high voltage application. Once the high voltage has been applied the indicator will display (nonblinking) yellow.Use the HV CONTROL dialog window to set SEM accelerating voltage and emission current.To set the accelerating voltage, select a voltage from the Vacc list box.To set an emission current, set a current in the SET Ie to list box. Hitachi recommends 10uA emission current for normal SEM operation.Click the ON button on the control panel at the left of the HV DISPLAY area. The SEM will automatically turn on the accelerating voltage, the extracting voltage, and the emission current. These values are displayed in the HV DISPLAY area. The electron gun airlock valve will automatically open upon completion of gun turn-on.Once the high voltage is applied the ON button will change to SET, allowing the user to set the emission current during high voltage operation. The OFF button turns off the high voltage. Note that during SEM operation the current will drop gradually over time. You can reset to the specified emission current (typically 10uA) by pressing SET.After high voltage turn-on a message will appear saying: “Stage is at specimen exchange position. Move to Home position?” Selecting YES will move the stage to the Home position such that the center of the sample holder will be directly underneath the electron beam.Obtaining a sample imageThere are many possible imaging variations for using the Hitachi S-4800 tool and these depend on the type of sample being imaged. We include here a summarized list of many commonly- used possibilities but do not provide detailed descriptions or an exhaustive list. The user is directed to the tool operating manual (located on the workbench to the left of the Hitachi SEM) for a complete discussion.Imaging mode:Selecting a Magnification Mode: The SEM has two magnification modes, HIGH MAG and LOW MAG. Most common applications will utilize the HIGH MAG mode.Within HIGH MAG magnification mode, user specifies:Probe current mode: NORMAL of HIGH. Most applications will utilizeNORMALFocus mode: UHR or HR. UHR mode allows full range of working distances.Working distance (WD). Shorter WD means higher resolution. Longer WDallows greater depth of focus and more sample tilting.Focus depth: Best resolution attainable with this value set to 1.0Specimen bias voltage: Specimen can be voltage-biased during imaging tominimize sample charging effects.Magnetic sample: Use this mode for observation of ferromagnetic samplesDegauss operation:Setting ABCC link: Automatically adjusts brightness and contrast during sample imaging.Column Alignment Operation: Obtaining the highest resolution image will involve aligning the electron optical column. This operation is done entirely through an electromagnetic alignment (i.e., using the computer interface) without need for touching any knobs on the SEM column. Alignment conditions are saved for each accelerating voltage and probe current setting such that only minimal alignment adjustment should be necessary.Press TV1 to obtain an image on the screen.Typically the beam can be tuned up using only an APERTURE ALIGNMENT. The procedure is as follows:Set the magnification to about 5,000 and position a point of interest in the center of the display.Focus the image and correct astigmatism.Click APERTURE ALIGN in the ALIGNMENT dialog box and make adjustments such that the wobbling motion of the image is minimized.Turn off the APERTURE ALIGN mode by clicking the OFF button.Sample imagingDetector selection: The SEM has two secondary electron detectors, the UPPER and the LOWER detectors. User can select either detector or alternatively image using a mixture of the two signals. Select a detector on the SIGNAL SELECT block of the OPERATION panel.Image Magnification: Select image magnification by dragging the mouse in the MAGNIFICATION INDICATION area on the CONTROL PANEL. The magnification can also be set by rotating the MAGNIFICATION knob on the control box.Focus and astigmatism correction: Iteratively adjust focus and astigmatism using the knobs on the SEM control box.Brightness and Contrast: Adjust brightness and contrast either manually by using BRIGHTNESS and CONTRAST knobs on SEM control panel or by pressing ABCC button for automatic control.The recorded images are stored in a memory buffer and displayed across the screen bottom. At the end of the session you will need to save them in the appropriate folder.Unloading sampleRemember to wear gloves when unloading samples.When finished imaging, turn off the high voltage by clicking OFF on the HV DISPLAY area. Move the sample stage to the exchange position by clicking the EXC button on the control panel. Once this occurs the indicator beside the button will turn green.Press the OPEN button on the specimen exchange chamber to open the gate valveTurn the knob on the specimen exchange rod clockwise so that the UNLOCK mark is facing upwards.Insert the specimen exchange rod straight into the chamber and fit the two spring pins into the holes at the end of the specimen holderTurn the knob counterclockwise so the LOCK mark comes upwards to hook on the sample holder.VISUALLY INSPECT that the sample holder comes out with the rod as you pull the rod all the way out of the chamber.Press the CLOSE button on the specimen exchange chamber to close the gate valve. Press AIR to vent the loadlock.Open the exchange door (by its handle) and turn knob clockwise to UNLOCK position. The sample holder can now be disengaged from the sample rod.Close specimen exchange chamber door and press EVAC to pump the loadlock back down.CleanupLog into the FOM computer and end your session. This will turn off the Hitachi computer.Unmount your samples from the sample holder.Return sample stage to appropriate stage storage box located near the workbench at the rear of the laboratory.Clean workbench area and properly dispose of any materials used during sample preparation.TURN OFF laboratory lights when leaving the room。