路虎发现3使用说明书
- 格式:docx
- 大小:830.85 KB
- 文档页数:13
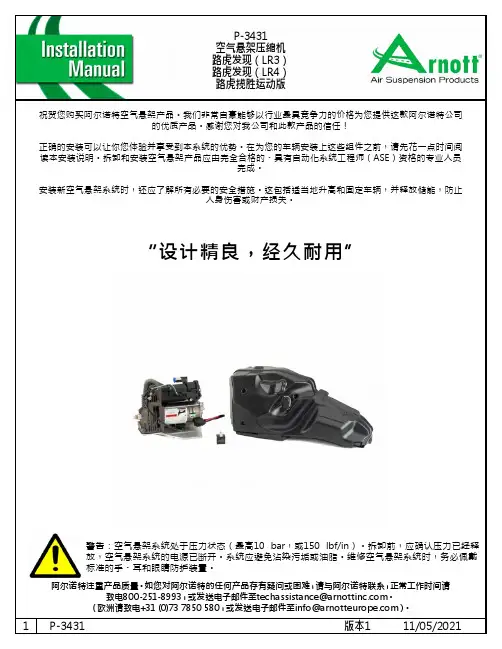
路虎发现(LR4)路虎揽胜运动版祝贺您购买阿尔诺特空气悬架产品。
我们非常自豪能够以行业最具竞争力的价格为您提供这款阿尔诺特公司的优质产品。
感谢您对我公司和此款产品的信任!正确的安装可以让你您体验并享受到本系统的优势。
在为您的车辆安装上这些组件之前,请先花一点时间阅读本安装说明。
拆卸和安装空气悬架产品应由完全合格的、具有自动化系统工程师(ASE)资格的专业人员完成。
安装新空气悬架系统时,还应了解所有必要的安全措施。
这包括适当地升高和固定车辆,并释放储能,防止人身伤害或财产损失。
警告:空气悬架系统处于压力状态(最高10 bar,或150 lbf/in)。
拆卸前,应确认压力已经释放,空气悬架系统的电源已断开。
系统应避免沾染污垢或油脂。
维修空气悬架系统时,务必佩戴标准的手、耳和眼睛防护装置。
“设计精良,经久耐用”阿尔诺特注重产品质量。
如您对阿尔诺特的任何产品存有疑问或困难,请与阿尔诺特联系,正常工作时间请致电800-251-8993,或发送电子邮件至****************************。
路虎发现(LR4)路虎揽胜运动版空气悬架压缩机拆卸1. 打开引擎盖,找到保险盒/电池盖。
(图1)基本信息:阅读本手册即表示您同意相关通用条款、免责和无损害协议约定的条款,全文详见。
• 储存温度不得低于5°F(-15°C)或高于122°F(50°C)。
• 避免损坏空气管路和电线。
• 必须由完全合格的专业人员拆卸和安装。
• 使用汽车制造商的诊断软件。
警告:不按说明书规定的方法或顺序操作,可能会损坏车辆和空气悬架系统。
为了避免操作电子元件时发生短路,请参阅您的用户手册,了解如何断开蓄电池。
关于车辆正确的千斤顶支点及其它保养、安全和维护说明,请参阅您的用户手册、维修手册,或咨询汽车经销商。
在任何情况下,如未获得充分的支撑,不得在车辆下方作业,因为这有可能引发严重的伤亡事故。
路虎全系中文版使用说明书,维修手册发现三,发现四,路虎揽胜,运动,极光,神二,中文原版说明书发现三,发现四,路虎揽胜,运动,极光,神二,中文维修手册,电路图欢迎咨询淘宝店铺,百友林溪同时出售各种汽车维修资料节气门基本设定手工操作方法:奔驰车系采用电子节气门系统的车型当拆电瓶线超过两小时以上,或更换新电脑或更换怠速马达后,必需进行电脑学习设定程序:1. 将自动变速箱挡位放在P档或N档,发动引擎使怠速运转到正常工作温度80度以上,这段时间中不可以加速踩油门.2. 然后将引擎熄火后将点火开关KEY—ON,不发动引擎等待60秒以上,再将点火开关KEY—OFF等待10秒以上.3. 进行路试,自动变速箱挡位放在4 档或3 档,加速必须超过3500 转以上,然后保持引擎转速到1200转以上巡航.4. 重复步骤(3),三次即可设定完成机油油位查看方法:机油油位的检查方法:由于2003 款以后奔驰W211 车辆没有机油油尺,因此需要借助仪表多功能显示屏读取机油的油位。
操作方法如下:车辆处于水平路面,发动机处于正常工作温度,且熄火2 分钟以上。
(1)将点火开关置于“ON位置。
(2)重复压下方向盘上的“[][] ”按键,直到多功能显示器上显示公里数。
(3)重复压下方向盘上的前进/后退”按键,直到显示“ engine oil level measureme nt running"出现在显示器上。
(4)现在多功能显示器上显示发动机机油油位。
1、点火开关转到“1档”位置2、按压系统选择确认键S110s3 “[[]] 按键”直到仪表显示A1p13 出现里程或温度显示3、快速按压里程复位按键A1s3 3次,在显示屏A1p13会出现蓄电池信息4、按压前进/后退键S110s1,直到出现“SERVICE MENU5、按压“ +和-'”键S111s1,选择“ CONFIRMATION6、按压选择确认按键S110s3,选择“ COMPLETE SERVIC E7、按压选择确认按键S110s3,选择“SERVICE CONFIRMED&按压选择确认按键S110s3,选择“SERVICE MENU9、按压“ +和 -'”键S111s1,选择“SPECIAL WORK10、按压选择确认按键S110s111、按压“ +和键S111s1,选择“SERVICE 3”12、按压选择确认按键S110s313、按压“ +和键S111s1,选择“OIL QUALITY ”14、按压选择确认按键 S110s3, A1p13显示 “POSITION CONFIRMED15、 按压选择确认按键 S110s3, A1p13显示 里程或温度16、 关闭点火开关,保养归零结束。

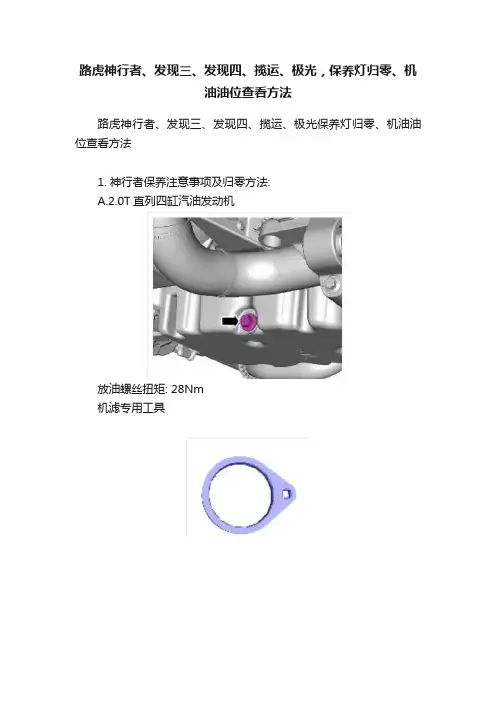
路虎神行者、发现三、发现四、揽运、极光,保养灯归零、机油油位查看方法路虎神行者、发现三、发现四、揽运、极光保养灯归零、机油油位查看方法1. 神行者保养注意事项及归零方法:A.2.0T直列四缸汽油发动机放油螺丝扭矩: 28Nm机滤专用工具机油型号:SAE 5W-30.API SM/CF;标准加注量:常规保养时5.4L;大修时6.2L B.3.2L直列六缸汽油发动机:放油螺丝拧紧力矩:38Nm机油格拧紧力矩:25Nm机油型号:SAE 5W-30.API SM/CF;标准加注量:常规保养时7.5L;大修时9.0LC.2.2L直列四缸柴油发动机:放油螺丝拧紧力矩:20Nm机油格拧紧力矩:25Nm机油型号:SAE 5W-30.API SM/CF;标准加注量:常规保养时5.9L;大修时6.5LD.油位的检查通过机油尺;保养灯的手动归零方法:执行某项保养操作时,需要重置SII。
可以使用Land Rover认可的诊断系统或按照手动重置步骤实现此操作。
执行下列例行操作可以进入手动重置模式:车辆静止时按住行程重置按钮并且进入动力模式6以下的模式。
按住行程重置按钮时,车辆进入动力模式6。
进入动力模式6后的10秒内释放行程重置按钮。
如果成功进入手动重置模式,则会在里程表中示“dISt”或“DATE”,具体取决于激活的警报。
要清除“dISt”警报,请在进入手动重置模式后的10秒内按住行程重置按钮5秒以上。
如果成功,则会在里程表中显示“RESET”(重置)5秒钟。
如果尚未激活日期警报,则会在里程表中显示“END”(结束)。
注意:如果车辆行驶的距离少于下次保养间隔值的20%,则不会重置距离警报。
如果已经激活日期警报,则会在里程表中显示“DATE”(日期)。
要清除警报,请在显示“DATE”(日期)后的10秒内按住行程重置按钮5秒以上。
如果成功,则会在里程表中显示“END” (结束)后显示“RESET”(重置)5秒钟。
现在里程表将退出重置模式。
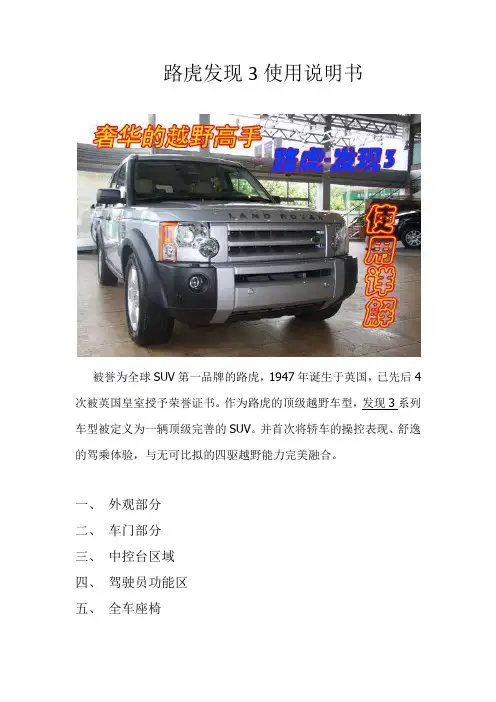
路虎发现3使用说明书被誉为全球SUV第一品牌的路虎,1947年诞生于英国,已先后4次被英国皇室授予荣誉证书。
作为路虎的顶级越野车型,发现3系列车型被定义为一辆顶级完善的SUV。
并首次将轿车的操控表现、舒逸的驾乘体验,与无可比拟的四驱越野能力完美融合。
一、外观部分二、车门部分三、中控台区域四、驾驶员功能区五、全车座椅一、外观部分路虎-发现3整车尺寸被精心规划,在SUV车型中也占有优势的2885mm长轴距,令驾驶稳定性得以提升。
1887mm的车身高度也为车内的宽裕空间打好了基础。
2009mm的宽度将为驾者提供更加舒适的横向空间,而较一般SUV更长的车身,则令乘员腿部的伸展更为惬意。
作为SUV车型,因行驶特点需要提供了前后多点式高档次的驻车雷达等配置,一体式前大灯与高亮反射式的雾灯配合,也将令夜间的行驶变得更加清晰、安全。
车辆后部细心的提供了最全面的保护,两边尾灯虽然分别整合雾灯与倒车灯,但四点式倒车雷达将令停车入位变得更加省心。
同时高位制动灯也令后车更易观察前车动向。
开启后盖轻松顺滑,两端的液压支撑杆提供了有力的支持。
较宽大的后备箱开口方便放置大件物品,而内部的置物隔板可提供更多的储物空间。
后备箱宽达1180mm的宽度也为放置大件物品提供了便捷。
二、车门部分路虎-发现3的车门开启角度很大,上下车方便舒适,车门下部的照明灯提升了整车品质的同时,还保证了乘员上下车时的安全。
车门内部可见车窗电控按键,全车一键式升降玻璃省时省力。
同前门几近相同的开启角度,保证了后排乘客的舒适,特别设计的童锁显而易见,避免了失手误触等可能性。
后门车窗还可完全放下,令后座的整体感觉更加完美。
中控按键位于中控台中央,行驶中根据路况调整非常不便。
为安全驾驶提供多一层的保护同样位于驾驶席车门内的全车玻璃及外后视镜调节按键可单手操作,令专心驾驶不再是难事。
三、中控台区域数字化的中控台,多功能显示屏由GPS及DVD影像均可清楚显现。
闲暇时的影音娱乐也全部由此而来。

项目123456项目12345已发布:17-十月-2014信息和娱乐系统 - 语音控制说明和操作部件位置 - INCONTROL 触摸式音响系统说明触摸屏 (TS)方向盘左侧开关组仪表盘 (IC)麦克风便携式音响接口面板音频主机单元 (AHU)部件位置 - INCONTROL 触摸式加强型音响系统说明触摸屏 (TS)方向盘左侧开关组仪表盘 (IC)麦克风便携式音响接口面板零件号------零件号-----6项目1234567集成音频模块 (IAM)部件位置 - INCONTROL 触摸式加强型音响系统 - 日本说明触摸屏 (TS)方向盘左侧开关组仪表盘 (IC)麦克风导航控制模块 (NCM)便携式音响接口面板集成音频模块 (IAM)概述 - INCONTROL 触摸式音响系统注意: 通过语音控制系统进行导航在亚洲市场不可用。
语音控制系统为驾驶员提供用于一系列支持功能的语音控制选项。
除了支持导航系统、电话系统和笔记本电脑功能外,系统还支持收音机、卫星广播、通用串行总线 (USB) 以及附件连接功能。
语音控制系统采用被称为“说您所见”的概念。
语音系统能使车辆用户全心专注于车辆的驾驶,无需为查看触摸屏 (TS) 信息显示而将视线从前方道路移开。
语音控制系统也向车辆用户反馈音频信息。
语音控制是一种主要基于软件的系统。
软件安装在音频主机单元 (AHU)、SD 存储卡和触摸屏 (TS) 中。
控制语音控制系统的主要控制软件保存在 SD 存储卡上,SD 存储卡位于便携式音频接口面板中。
SD 存储卡还包含用于导航系统和电话系统的软件。
语音控制麦克风位于前头顶控制台中,通过硬接线连接至 AHU 。
概述 - INCONTROL 触摸式加强型音响系统注意: 仅为日本规格车辆提供基本的语音控制。
亚洲其它市场尚不提供语音控制。
语音控制系统为驾驶员提供用于一系列支持功能的语音控制选项。
除了支持导航系统、电话系统和笔记本电脑功能,系统还支持收音机、卫星广播、数字广播、单张 CD (光碟)、虚拟 CD 换片机、通用串行总线 (USB) 以及附件连接功能。

10-12年路虎揽胜发现四各车系使用说明书-CAL-FENGHAI.-(YICAI)-Company One1路虎全系中文版使用说明书,维修手册发现三,发现四,路虎揽胜,运动,极光,神二,中文原版说明书发现三,发现四,路虎揽胜,运动,极光,神二,中文维修手册,电路图欢迎咨询淘宝店铺,百友林溪同时出售各种汽车维修资料节气门基本设定手工操作方法:奔驰车系采用电子节气门系统的车型当拆电瓶线超过两小时以上,或更换新电脑或更换怠速马达后,必需进行电脑学习设定程序:1. 将自动变速箱挡位放在P档或N档,发动引擎使怠速运转到正常工作温度80度以上,这段时间中不可以加速踩油门.2. 然后将引擎熄火后将点火开关KEY—ON,不发动引擎等待60秒以上,再将点火开关KEY—OFF等待10秒以上.3. 进行路试,自动变速箱挡位放在4档或3档,加速必须超过3500转以上,然后保持引擎转速到1200转以上巡航.4. 重复步骤(3),三次即可设定完成机油油位查看方法:机油油位的检查方法:由于2003款以后奔驰W211车辆没有机油油尺,因此需要借助仪表多功能显示屏读取机油的油位。
操作方法如下:车辆处于水平路面,发动机处于正常工作温度,且熄火2分钟以上。
(1)将点火开关置于“ON”位置。
(2)重复压下方向盘上的“[] []”按键,直到多功能显示器上显示公里数。
(3)重复压下方向盘上的“前进/后退”按键,直到显示“engine oil level measurement running"出现在显示器上。
(4)现在多功能显示器上显示发动机机油油位。
保养归零手工操作方法:1、点火开关转到“1”档位置2、按压系统选择确认键S110s3“[] []按键”直到仪表显示A1p13出现里程或温度显示3、快速按压里程复位按键A1s3 3次,在显示屏A1p13会出现蓄电池信息4、按压前进 / 后退键 S110s1 ,直到出现“SERVICE MENU”5、按压“+”和“-”键S111s1,选择“CONFIRMATION”6、按压选择确认按键S110s3,选择“COMPLETE SERVICE”7、按压选择确认按键S110s3,选择“SERVICE CONFIRMED”8、按压选择确认按键S110s3,选择“SERVICE MENU”9、按压“+”和“-”键S111s1,选择“SPECIAL WORK”10、按压选择确认按键S110s111、按压“+”和“-”键S111s1,选择“SERVICE 3”12、按压选择确认按键S110s313、按压“+”和“-”键S111s1,选择“OIL QUALITY ”14、按压选择确认按键S110s3,A1p13显示“POSITION CONFIRMED”15、按压选择确认按键S110s3,A1p13显示“里程或温度”16、关闭点火开关,保养归零结束。

路虎全系中文版使用说明书,维修手册发现三,发现四,路虎揽胜,运动,极光,神二,中文原版说明书发现三,发现四,路虎揽胜,运动,极光,神二,中文维修手册,电路图欢迎咨询淘宝店铺,百友林溪同时出售各种汽车维修资料节气门基本设定手工操作方法:奔驰车系采用电子节气门系统的车型当拆电瓶线超过两小时以上,或更换新电脑或更换怠速马达后,必需进行电脑学习设定程序:1. 将自动变速箱挡位放在P档或N档,发动引擎使怠速运转到正常工作温度80度以上,这段时间中不可以加速踩油门.2. 然后将引擎熄火后将点火开关KEY—ON,不发动引擎等待60秒以上,再将点火开关KEY—OFF等待10秒以上.3. 进行路试,自动变速箱挡位放在4档或3档,加速必须超过3500转以上,然后保持引擎转速到1200转以上巡航.4. 重复步骤(3),三次即可设定完成机油油位查看方法:机油油位的检查方法:由于2003款以后奔驰W211车辆没有机油油尺,因此需要借助仪表多功能显示屏读取机油的油位。
操作方法如下:车辆处于水平路面,发动机处于正常工作温度,且熄火2分钟以上。
(1)将点火开关置于“ON”位置。
(2)重复压下方向盘上的“[] []”按键,直到多功能显示器上显示公里数。
(3)重复压下方向盘上的“前进/后退”按键,直到显示“engine oil level measurement running"出现在显示器上。
(4)现在多功能显示器上显示发动机机油油位。
保养归零手工操作方法:1、点火开关转到“1”档位置2、按压系统选择确认键S110s3“[] []按键”直到仪表显示A1p13出现里程或温度显示3、快速按压里程复位按键A1s3 3次,在显示屏A1p13会出现蓄电池信息4、按压前进/ 后退键S110s1 ,直到出现“SERVICE MENU”5、按压“+”和“-”键S111s1,选择“CONFIRMATION”6、按压选择确认按键S110s3,选择“COMPLETE SERVICE”7、按压选择确认按键S110s3,选择“SERVICE CONFIRMED”8、按压选择确认按键S110s3,选择“SERVICE MENU”9、按压“+”和“-”键S111s1,选择“SPECIAL WORK”10、按压选择确认按键S110s111、按压“+”和“-”键S111s1,选择“SERVICE 3”12、按压选择确认按键S110s313、按压“+”和“-”键S111s1,选择“OIL QUALITY ”14、按压选择确认按键S110s3,A1p13显示“POSITION CONFIRMED”15、按压选择确认按键S110s3,A1p13显示“里程或温度”16、关闭点火开关,保养归零结束。
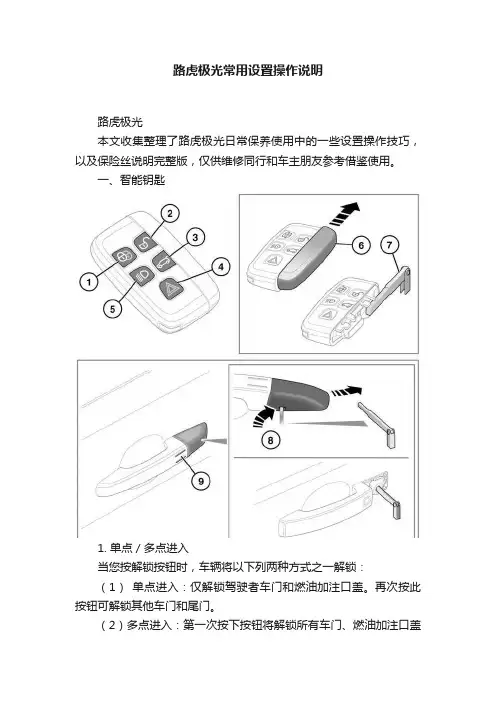
路虎极光常用设置操作说明路虎极光本文收集整理了路虎极光日常保养使用中的一些设置操作技巧,以及保险丝说明完整版,仅供维修同行和车主朋友参考借鉴使用。
一、智能钥匙1.单点/多点进入当您按解锁按钮时,车辆将以下列两种方式之一解锁:(1)单点进入:仅解锁驾驶者车门和燃油加注口盖。
再次按此按钮可解锁其他车门和尾门。
(2)多点进入:第一次按下按钮将解锁所有车门、燃油加注口盖和尾门。
如要从单点进入切换到多点进入(或从多点进入切换到单点进入),请同时按住锁闭和解锁按钮 3 秒钟。
危险报警灯将闪烁两次以确认变更。
2、车窗全开按住智能钥匙解锁按钮3 秒钟可解锁车辆并打开所有车窗。
按下智能钥匙上任何按钮即可取消操作。
3、智能钥匙和免匙进入功能失效时解除警报车辆依然可以解锁,警报可以禁用。
解锁车辆:(1)使用钥匙片打开左前车门。
将会触发警报。
(2)将智能钥匙紧靠转向柱盖板的下侧放置,让有按钮的一面朝上。
(3)此时按下 START/STOP(启动/停止)按钮。
(4)关闭已触发的警报如果触发了警报,则可以通过以下任一方法解除:· 按下智能钥匙上的解锁按钮。
· 通过免匙进入功能打开车门。
· 将有效的智能钥匙置于转向柱下方并按下 START/STOP 按钮。
请参阅上图。
4、电动尾门开启高度设置可以根据需要设定最大开启高度。
这在屋顶高度较低的停车区很有用,或者只是方便使用。
(1)将尾门打开至希望设置为最大高度的位置。
按下任何尾门控制器,在要求的位置停止移动。
如需要,可以通过手动达到最终位置。
(2)确保尾门静置至少三秒钟。
(3)按住尾门关闭开关 10 秒钟,以设置最大开启高度。
(4)关闭尾门,然后再次打开,检查其是否打开至编程的高度。
注意:如果执行了程序第3 步后尾门自动关闭,则没有设置好所要求的高度。
重复该程序,并确保所有步骤都正确执行。
要重设最大开启高度,可重复该程序,但是当尾门达到其当前编程高度时,请手动移动尾门至全开位置,而后按住按钮。
路虎全系中文版使用说明书,维修手册发现三,发现四,路虎揽胜,运动,极光,神二,中文原版说明书发现三,发现四,路虎揽胜,运动,极光,神二,中文维修手册,电路图欢迎咨询QQ1310448496淘宝店铺,百友林溪同时出售各种汽车维修资料节气门基本设定手工操作方法:奔驰车系采用电子节气门系统的车型当拆电瓶线超过两小时以上,或更换新电脑或更换怠速马达后,必需进行电脑学习设定程序:1. 将自动变速箱挡位放在P档或N档,发动引擎使怠速运转到正常工作温度80度以上,这段时间中不可以加速踩油门.2. 然后将引擎熄火后将点火开关KEY—ON,不发动引擎等待60秒以上,再将点火开关KEY—OFF等待10秒以上.3. 进行路试,自动变速箱挡位放在4档或3档,加速必须超过3500转以上,然后保持引擎转速到1200转以上巡航.4. 重复步骤(3),三次即可设定完成机油油位查看方法:机油油位的检查方法:由于2003款以后奔驰W211车辆没有机油油尺,因此需要借助仪表多功能显示屏读取机油的油位。
操作方法如下:车辆处于水平路面,发动机处于正常工作温度,且熄火2分钟以上。
(1)将点火开关置于“ON”位置。
(2)重复压下方向盘上的“[] []”按键,直到多功能显示器上显示公里数。
(3)重复压下方向盘上的“前进/后退”按键,直到显示“engine oil level measurement running"出现在显示器上。
(4)现在多功能显示器上显示发动机机油油位。
保养归零手工操作方法:1、点火开关转到“1”档位置2、按压系统选择确认键S110s3“[] []按键”直到仪表显示A1p13出现里程或温度显示3、快速按压里程复位按键A1s3 3次,在显示屏A1p13会出现蓄电池信息4、按压前进/ 后退键S110s1 ,直到出现“SERVICE MENU”5、按压“+”和“-”键S111s1,选择“CONFIRMATION”6、按压选择确认按键S110s3,选择“COMPLETE SERVICE”7、按压选择确认按键S110s3,选择“SERVICE CONFIRMED”8、按压选择确认按键S110s3,选择“SERVICE MENU”9、按压“+”和“-”键S111s1,选择“SPECIAL WORK”10、按压选择确认按键S110s111、按压“+”和“-”键S111s1,选择“SERVICE 3”12、按压选择确认按键S110s313、按压“+”和“-”键S111s1,选择“OIL QUALITY 229.5”14、按压选择确认按键S110s3,A1p13显示“POSITION CONFIRMED”15、按压选择确认按键S110s3,A1p13显示“里程或温度”16、关闭点火开关,保养归零结束。
前言忠 告《瑞虎3xe使用说明书》明确了奇瑞新能源汽车技术有限公司与用户之间就有关产品质量、售后服务方面权利义务设立和终止及违约责任的相关内容。
请务必在使用本公司产品前认真阅读《瑞虎3xe使用说明书》。
奇瑞新能源瑞虎3xe使用说明书致诚祝贺您拥有一辆奇瑞瑞虎3xe车辆!同时衷心感谢您对本公司及本公司产品的厚爱!奇瑞新能源汽车特约销售服务站的全体员工将竭诚为您提供最优质的服务。
请仔细阅读本说明书,因为其中的信息可让您了解如何正确操控及保养车辆,并从中获得最大程度的驾驶享受。
本说明书适用于奇瑞瑞虎3xe车辆。
奇瑞新能源汽车技术有限公司目录前言本手册是根据中国路况及奇瑞新能源汽车技术有限公司(下称“奇瑞新能源”)生产的瑞虎3xe车辆具体情况编写的,它只适用于在中国境内(不含港澳台地区)行驶的由奇瑞新能源生产的瑞虎3xe车辆。
本手册包括至印刷时为止的最新信息。
奇瑞新能源全权负责该手册的修订及说明,并保留该手册印刷后产品更新而不另行通知的权利,有关产品更新的信息您可以向奇瑞新能源汽车特约销售商咨询。
本手册中部分图片是示意图,仅供参考,若图片与实物不符,以实物为准。
本手册是您获得车辆质量担保和首次免费保养的主要凭证。
享受三包的车辆在办理三包业务时,必须出示三包凭证、购车发票等相关文件(详见三包凭证)。
请将本手册和三包凭证(如有)妥善保管,以便您需要时使用。
如果您要转卖车辆,请将本说明书及全套随车文件随车交给新车主,以便新车主需要时使用。
特别声明请您务必在使用本产品前认真阅读本说明书,尤请仔细认真阅读本手册“质量担保”一章,以免因违反规定而失去享受本公司所提供的质量担保服务的权利。
奇瑞新能源为产品设定了新车磨合及不同阶段的技术保养规定,其中包括首次免费保养,上述设定的维护保养对您的车辆的安全使用和保持良好运行状态至关重要,请您必须遵守。
若您的车辆因为滥用、疏忽、不正确使用、不按规定的里程/时间间隔进行保养或未按要求在保养证明上签字盖章,或未经批准进行改装/加装,您将丧失提出保修的权利。
DISCOVERY 快速入门指南2 驾驶员控制装置3 进入车辆4 舒适度调节6 驾驶11 触摸屏12 音频/视频15 电话16 加油站信息某些功能可能不适用于您的车辆。
1. 前照灯、方向指示灯和行车计算机。
2. 手动换档拨杆 (-) 下。
3. 音频和电话控制。
4. 仪表板、警告灯和信息中心。
5. 信息中心菜单控制。
6. 手动换档拨杆 (+) 上。
7. 刮水器和洗涤器。
21. 分动箱控制。
22. 智能停止/启动。
23. 空气悬挂控制。
24. 陡坡缓降控制。
25. 全地形反馈适应系统。
26. 加热型方向盘开关。
27. 电话和语音识别控制按钮。
DISCOVERY DISCOVERY DISCOVERY1. 按下即可解锁所有车门和尾门。
2. 按下即可锁闭所有车门和尾门。
这不会启用报警功能。
3智能钥匙进入车辆中央门锁操作注意事项如果车辆通过智能钥匙或免匙锁闭功能单次锁闭, 则主解锁开关不会解锁。
车门控制杆仍可释放车门锁,并打开车门。
起步锁定若此功能启用,当车速超过 8 公里/小时,所有的出入口将自动锁闭。
通过行车计算机上的 Settings (设置)选项可打开或关闭此功能。
请参阅第 2 页第 35 条。
操作注意事项如果智能钥匙无法工作,请将其保持在所示的位置的转向柱下面。
正常启动发动机。
现在可拔出智能钥匙。
按一次可开启前照灯。
再次按下可关闭。
按下可解锁并释放尾门。
如果启用警报,将在尾门打开时禁用。
按住 3 秒可启用求救警报。
5 秒后,再次按下 3 秒钟以取消。
解锁模式备选操作单点进入。
按下一次仅可解锁驾驶员车门和燃油加注口盖。
按下两次可解锁所有车门和尾门。
多点进入。
按下一次可解锁所有车门、燃油加注口盖和尾门。
切换模式 - 在车辆解锁的情况下,同时按住锁闭和解锁按钮 3 秒钟。
危险警告灯将闪烁以确认更改。
免匙进入/退出使用车门把手时,智能钥匙只需在驾驶员身上。
不需将其暴露在外,也不需要对其进行任何处理。
要锁定车辆并启用报警,请先确保智能钥匙由驾驶员携带。
路虎卫士用户手册出版编号LRL***-*****1本手册是随您的新车提供的用户资料的一部分。
在图片和针对某一特定国家/地区的信息中可能会出现左侧驾驶和右侧驾驶情况,文中将对这些情况予以明确说明。
单独的快速入门指南旨在使驾驶者能迅速熟悉初始设置,并对一些独特的功能予以阐释。
请尽快花时间研究随车提供的所有操作手册。
重要说明本随车资料包内包含的信息涵盖了所有车辆附属产品和可选设备。
因此资料包内包含的信息可能不适用于您的车辆。
您车辆中的可选件、硬件和软件均来自针对该车辆目标销售市场而提供的规格。
如果您的车辆在另一个地理区域使用,您可能需要更改车辆的规格,使之与当地的条件相符。
Land Rover 不负担由任何更改而产生的费用。
本出版物内所包含的信息在付印时正确无误。
在本手册付印之后,车辆规格可能已经发生变化。
如果是这样,在出售前资料包内可能会增加一份手册补遗。
您可以在Land Rover 的官方网站上看到后续更新内容,网址是/doc/4e0f44e1b8f67c1cfad6b8eb.html。
Land Rover 汽车公司保留未经事先通知且不承担任何责任的情况下随时更改规范、设计或设备的权利。
本出版物或其部分内容未经事先批准不得以任何形式或方式进行复制、翻译或传输。
错误和疏漏之处除外。
? Land Rover 2007保留所有权利。
由Land Rover Technical Communications 出版发行。
2目录简介符号词汇. . . . . . . . . . . . . . . . . . . . . . . . 7标签位置 . . . . . . . . . . . . . . . . . . . . . . . . 7健康与安全 . . . . . . . . . . . . . . . . . . . . . . 8数据记录. . . . . . . . . . . . . . . . . . . . . . . . 8零件和附件 . . . . . . . . . . . . . . . . . . . . . . 8钥匙与遥控器使用钥匙 . . . . . . . . . . . . . . . . . . . . . . . 10射频一般信息 . . . . . . . . . . . . . . . . . . . 10使用遥控器 . . . . . . . . . . . . . . . . . . . . . 10车锁锁闭与解锁 . . . . . . . . . . . . . . . . . . . . . 12报警布设报警. . . . . . . . . . . . . . . . . . . . . . . 14解除报警 . . . . . . . . . . . . . . . . . . . . . . . 14座椅坐在正确位置. . . . . . . . . . . . . . . . . . . 16手动座椅 . . . . . . . . . . . . . . . . . . . . . . . 17头枕. . . . . . . . . . . . . . . . . . . . . . . . . . . 19后座椅. . . . . . . . . . . . . . . . . . . . . . . . . 19加热型座椅 . . . . . . . . . . . . . . . . . . . . . 23安全带操作原则. . . . . . . . . . . . . . . . . . . . . . . 24系紧安全带 . . . . . . . . . . . . . . . . . . . . . 25怀孕期间使用安全带 . . . . . . . . . . . . . . 26儿童安全儿童座椅. . . . . . . . . . . . . . . . . . . . . . . 27辅助座垫 . . . . . . . . . . . . . . . . . . . . . . . 28儿童安全锁 . . . . . . . . . . . . . . . . . . . . .28照明灯光控制. . . . . . . . . . . . . . . . . . . . . . . 29后雾灯. . . . . . . . . . . . . . . . . . . . . . . . . 29前照灯水平调整 . . . . . . . . . . . . . . . . . 30危险报警闪光灯. . . . . . . . . . . . . . . . . 30方向指示灯. . . . . . . . . . . . . . . . . . . . . 30内部照明灯. . . . . . . . . . . . . . . . . . . . . 31更换灯泡. . . . . . . . . . . . . . . . . . . . . . . 31灯泡规格表. . . . . . . . . . . . . . . . . . . . . 37刮水器和清洗器挡风玻璃刮水器 . . . . . . . . . . . . . . . . . 38挡风玻璃清洗器 . . . . . . . . . . . . . . . . . 38后车窗刮水器和清洗器. . . . . . . . . . . . 38调整挡风玻璃清洗器喷嘴. . . . . . . . . . 39检查刮水器刮片 . . . . . . . . . . . . . . . . . 39更换刮水器刮片 . . . . . . . . . . . . . . . . . 40车窗与后视镜电动车窗. . . . . . . . . . . . . . . . . . . . . . . 41推拉窗. . . . . . . . . . . . . . . . . . . . . . . . . 41车外后视镜. . . . . . . . . . . . . . . . . . . . . 42车内后视镜. . . . . . . . . . . . . . . . . . . . . 42仪表仪表板概览. . . . . . . . . . . . . . . . . . . . . 43警告灯和指示灯 . . . . . . . . . . . . . . . . . 45气候控制出风口. . . . . . . . . . . . . . . . . . . . . . . . . 48手动气候控制 . . . . . . . . . . . . . . . . . . . 49天窗 . . . . . . . . . . . . . . . . . . . . . . . . . . 51便利功能遮阳板. . . . . . . . . . . . . . . . . . . . . . . . . 52时钟 . . . . . . . . . . . . . . . . . . . . . . . . . . 52点烟器. . . . . . . . . . . . . . . . . . . . . . . . . 52烟灰缸. . . . . . . . . . . . . . . . . . . . . . . . . 53杯托 . . . . . . . . . . . . . . . . . . . . . . . . . . 53储物箱室. . . . . . . . . . . . . . . . . . . . . . . 54踏板 . . . . . . . . . . . . . . . . . . . . . . . . . . 543目录4可拆式顶蓬安装顶蓬. . . . . . . . . . . . . . . . . . . . . . . 55启动发动机启动柴油发动机 . . . . . . . . . . . . . . . . . 58变速器手动变速器. . . . . . . . . . . . . . . . . . . . . 59分动箱 . . . . . . . . . . . . . . . . . . . . . . . . 59技术规格. . . . . . . . . . . . . . . . . . . . . . . 62制动器操作原则. . . . . . . . . . . . . . . . . . . . . . . 63与配备ABS 的车辆有关的驾驶提示. . . . . . . . . . . . . . . . . . . . . 63驻车制动器. . . . . . . . . . . . . . . . . . . . .64驾车提示磨合 . . . . . . . . . . . . . . . . . . . . . . . . . . 66经济行驶. . . . . . . . . . . . . . . . . . . . . . . 66燃油与加油安全预防措施 . . . . . . . . . . . . . . . . . . . 67燃油质量. . . . . . . . . . . . . . . . . . . . . . . 67燃油耗尽. . . . . . . . . . . . . . . . . . . . . . . 67加油 . . . . . . . . . . . . . . . . . . . . . . . . . . 68技术规格. . . . . . . . . . . . . . . . . . . . . . . 69装载负荷一般信息. . . . . . . . . . . . . . . . . . . . . . . 70行李定位固定点 . . . . . . . . . . . . . . . . . 70车顶货架和载货工具. . . . . . . . . . . . . . 70拖车牵引拖车. . . . . . . . . . . . . . . . . . . . . . . 71水平高度调整 . . . . . . . . . . . . . . . . . . . 71建议的牵引重量 . . . . . . . . . . . . . . . . . 72牵引基本检查 . . . . . . . . . . . . . . . . . . . 72拖车杆 . . . . . . . . . . . . . . . . . . . . . . . . 73车辆保养外部清洁 . . . . . . . . . . . . . . . . . . . . . . 75内部清洁 . . . . . . . . . . . . . . . . . . . . . . 76修复细小油漆损伤 . . . . . . . . . . . . . . . 77维护保养一般信息 . . . . . . . . . . . . . . . . . . . . . . 78打开和关闭发动机罩 . . . . . . . . . . . . . 80发动机舱概况. . . . . . . . . . . . . . . . . . . 81发动机机油检查. . . . . . . . . . . . . . . . . 82发动机冷却液检查 . . . . . . . . . . . . . . . 83助力转向液检查. . . . . . . . . . . . . . . . . 85制动液检查 . . . . . . . . . . . . . . . . . . . . 86离合液检查 . . . . . . . . . . . . . . . . . . . . 87清洗液检查 . . . . . . . . . . . . . . . . . . . . 88技术规格 . . . . . . . . . . . . . . . . . . . . . . 89车辆蓄电池蓄电池警告符号. . . . . . . . . . . . . . . . . 90蓄电池保养 . . . . . . . . . . . . . . . . . . . . 90使用增压器电缆. . . . . . . . . . . . . . . . . 92车辆蓄电池充电. . . . . . . . . . . . . . . . . 93车辆蓄电池更换. . . . . . . . . . . . . . . . . 93车轮和轮胎一般信息 . . . . . . . . . . . . . . . . . . . . . . 96轮胎保养 . . . . . . . . . . . . . . . . . . . . . . 98使用冬季轮胎. . . . . . . . . . . . . . . . . . 102置换车轮 . . . . . . . . . . . . . . . . . . . . . 102使用雪链 . . . . . . . . . . . . . . . . . . . . . 109轮胎词汇表 . . . . . . . . . . . . . . . . . . . 109技术规格 . . . . . . . . . . . . . . . . . . . . . 110保险丝保险丝更换 . . . . . . . . . . . . . . . . . . . 111保险丝盒位置. . . . . . . . . . . . . . . . . . 111保险丝规格表. . . . . . . . . . . . . . . . . . 112应急设备危险报警闪光灯. . . . . . . . . . . . . . . . 115目录碰撞之后碰撞之后的行驶. . . . . . . . . . . . . . . . . 116检查安全系统部件. . . . . . . . . . . . . . . 116车辆施救牵引点. . . . . . . . . . . . . . . . . . . . . . . . 117系绑点. . . . . . . . . . . . . . . . . . . . . . . . 117运输车辆 . . . . . . . . . . . . . . . . . . . . . . 117四轮牵引车辆 . . . . . . . . . . . . . . . . . . 117车辆标识车辆标识牌 . . . . . . . . . . . . . . . . . . . . 119车辆标识代码(VIN). . . . . . . . . . . . 119技术规格发动机规格. . . . . . . . . . . . . . . . . . . . 120重量. . . . . . . . . . . . . . . . . . . . . . . . . . 120尺寸. . . . . . . . . . . . . . . . . . . . . . . . . . 122类型许可类型许可 . . . . . . . . . . . . . . . . . . . . . . 125音频介绍无线电接收 . . . . . . . . . . . . . . . . . . . . 127音频单元概述音频单元概述 . . . . . . . . . . . . . . . . . . 128音频系统安全安全代码. . . . . . . . . . . . . . . . . . . . . . 129音频单元操作开启/关闭按钮. . . . . . . . . . . . . . . . 130音量控制. . . . . . . . . . . . . . . . . . . . . . 130音频控制. . . . . . . . . . . . . . . . . . . . . . 130波段按钮. . . . . . . . . . . . . . . . . . . . . . 132自动存储控制 . . . . . . . . . . . . . . . . . . 132电台预设按钮 . . . . . . . . . . . . . . . . . . 132交通信息控制 . . . . . . . . . . . . . . . . . . 133光碟播放器载入光碟. . . . . . . . . . . . . . . . . . . . . . 134光碟弹出. . . . . . . . . . . . . . . . . . . . . . 135光碟播放. . . . . . . . . . . . . . . . . . . . . . 135曲目选择. . . . . . . . . . . . . . . . . . . . . . 136光碟暂停. . . . . . . . . . . . . . . . . . . . . . 136快进/快退. . . . . . . . . . . . . . . . . . . . 136随机曲目选择 . . . . . . . . . . . . . . . . . . 136光碟曲目重复 . . . . . . . . . . . . . . . . . . 137光碟曲目扫描 . . . . . . . . . . . . . . . . . . 137 MP3 文件播放. . . . . . . . . . . . . . . . . . 138辅助输入(AUX IN)插座辅助输入插座 . . . . . . . . . . . . . . . . . . 139本手册末列有综合索引。
THE LAND ROVER GUIDETO OFF ROAD DRIVINGThink rugged descents and deep wading are for experts? Think again.With good preparation and a bit of practice, anyone can off road.A Land Rover is capable of more than you could ever imagine. It can carry you through almost any environment: thick forest, fiery desert, rugged mountain or frozen river.This guide is designed to help you make the most of your Land Rover’s legendary capability. To tame the most vigoroustopography, and get to places other vehicles simply can’t.THROUGH, UNDER, OVERABOVE AND BEYOND5 Know your vehicle6 Off road checklist7 Off road driving: golden rules 9 Off road technique10 Land Rover off road technology 11 Terrain Response 12 Terrains13 Driving in mud 14 Driving on sand 15 Driving on rocks 16 Driving on gravel 17 Driving on hills18 Driving through water 19 Driving in snow and ice 20 Returning to the road 21 Find out moreCONTENTSThe key to safe driving on any terrain is a robust knowledge of your vehicle and what it can do.Before you venture off road, equip yourself with a clear mental picture of the underside of your 4x4.Learn the location of the fuel tank, engine sump, differentials and gearbox. You’ll be less likely to snag them on rocks and other obstacles if you can see them in your mind’s eye. Memorising some basic stats will help you deal confidently with off-road obstacles. Get to know your vehicle’s height and width, its lowest point, its wading depth and angles.Get to grips with your vehicle’s on-board technology features; you’ll find everything you need to know in the manual. Click here to download your manual .KNOW YOUR VEHICLEWHEN VENTURINGOFF ROAD, ALWAYS CARRY:– Suitable clothing and footwear – Water – Torch– Mobile phone (and charger) – Shovel– Hot drinks/food, in snowy weatherOFF ROAD CHECKLISTIf possible, plan your journey beforehand by checking the terrain and topography of the area you’ll be visiting. You can do this with Ordnance Survey maps or Google Maps Earth mode.Consider the current and recent weather, and how it might affect the land.Before you set off, make sure your tyres are properly inflated. Secure anything in your 4x4 that could move or fall during a bumpy ride, and don’t overload the roof rack.OFF ROAD DRIVING: GOLDEN RULES1Be aware of the Countryside Code and never damage the environment. Stay within the bounds of existing tracks andgive way to wildlife.2If you don’t have permission, don’t drive there.3Know your limits and always plan ahead. Going off road can be perilous: think about what could go wrong, and howyou’d deal with it.5Make sure you have more than enough fuel for your journey. You definitely don’t want to be stranded off roadwith an empty tank.4Tell someone where you’re going and when you’re due to arrive. That way, people will know where to look for you if something goes wrong.6Always carry a mobile phone with fully charged battery. It’s a good idea to have an in-car charger.7If in doubt, don’t do it. It’s only a drive after all, and you should always keep risk to a minimum.OFF ROAD TECHNIQUEDrive as slowly as possible, and as fastas necessary.Always keep both hands on the wheel, even when reversing.Don’t hook your thumbs inside the steering wheel. Kickback from rough terrain could sprain them.Use progressive throttle, gentle steering and progressive braking.Never make harsh movements unlessit’s vital to do so. Keep steering precise and braking to a minimum.Use the driver display to check your wheels are straight, and assess any potential risks ahead. Where necessary, get out of your vehicle and check the terrain.Avoid gear changes while negotiatingtricky terrain.LAND ROVER OFF ROADTECHNOLOGYTerrain ResponseLand Rover’s pioneeringtechnology optimises settings togive a combination of traction,agility and control which bestsuits the terrain.Terrain Reponse 2Adds an automatic modewhich uses sophisticatedsystems to analyse live drivingconditions and select themost suitable program.All-Terrain Progress Control(ATPC)Land Rover’s innovative 4x4technology enables steady,composed progress across anyterrain at the push of a button.Hill Descent Control(HDC)Allows smooth, controlleddescent in rough terrainwithout the driver needingto touch the brakes.There are five programs in the Terrain Response system:Choose the one that best suits the terrain you’re tackling. If you have Terrain Response 2, this will happen automatically. In the pages ahead, you’ll find detailed advice on using Terrain Response with different surfaces.TERRAINRESPONSEGear selectionTo climb, always use the highest practical gear. To descend use the lowest, and/or engage Hill Descent Control if available. If you have an automatic gearbox and Terrain Response, select [D] and the vehicle will cope with whatever conditions you throw at it.If you want to be a bit more hands-on, try CommandShift.©When driving on icy, slippery or muddy surfaces in an automatic 4x4, move off in second gear as it reduces the risk of wheel spin. If you’re in a manual vehicle without low range, use first gear.The key is to find the right balance between traction and momentum . If you have decent traction, use less momentum.NORMAL DRIVINGGRASS/GRAVEL/SNOWMUD AND RUTSSANDROCK CRAWLTERRAINSDRIVING IN MUDIn deep mud, you need steady momentum to carry you through. Engage Mud and Ruts on Terrain Response, and use a low-range gear like 2nd or 3rd.Your tyres will cut through mud tofind traction on firmer ground below.All Land Rovers have built-in Traction Control, which drives power to the wheels with the most traction.If your wheels do start to spin, ease off the throttle and slow the tyres to regain grip.RutsA rut is a long, deep track created by the repeated passage of vehicles. Try to straddle deep ruts, as this keeps your environmental impact to a minimum.If muddy conditions force you to drive in ruts, make sure you know where your front wheels are pointing. Check the Wheel Direction Indicator, if available.Try to keep your lowest point clear ofthe ground at all times. Terrain Response will automatically raise the vehicle to an optimum height.Muddy hillsWhen climbing muddy hills, remember that you’ll need more momentum to balance the decrease in traction.Always try to avoid wheel spin, as it results in loss of momentum and can cause environmental damage.DRIVING ON SANDThe basicsTo travel across sand*, you need a low gear and steady momentum. Consider lowering your tyre pressure (15psi minimum) to create a greater surface area.Engage Sand on Terrain Response. If your wheels spin, ease off the throttle and slow the tyres to regain traction.When driving on damp sand, your wheels may sink into the surface, so use the Mud and Ruts setting. Keep off wet sand. It can contain dangerous areas of ‘floating’ sand or quicksand.If you need to park in sand, do so on a downward slope. This will help you when you pull away.* When driving off-road on sand please respect local laws and road signs at all times.Beach drivingBetween the high-tide mark and four metresfrom the sea, sand is usually firm enoughto take a 4x4. Always be aware of incomingtides when you’re driving on the beach.Desert drivingOn stretches of firm sand in the desert,you can travel in relatively high-range gears.Remember that the sand’s surface crustwill be stronger, and appear dryer, in thecool of the morning.Driving in damp desert sand, after rainfall,can be easier. Flowers blooming overnightwill also help bind the sand together.If you encounter dunes, go around themnot over them.Should you get caught in a sandstorm: turnthe rear of your vehicle to face the wind, turnthe engine off and wait for the storm to pass.DRIVING ON ROCKSBefore crossing rocks and scree in your 4x4, get out of the vehicle and assess the risks. If you feel it’s safe to continue, select Rock Crawl on Terrain Response and proceed carefully. Low-range first gear is best for rocky ground.If possible, ask someone outside the vehicle to guide you through the area, or use surround cameras if fitted.TraversingBefore navigating uneven ground, secure anything inside the vehicle that could fall.If possible, remove any roof-rack items.Use the lowest gear possible and approach at a crawl. Avoid the temptation to steer up the slope.If you slide, steer downhill and gently apply the throttle. If you lose traction on your uphill wheels, stop immediately, reverse away and choose a more suitable route.Keep an eye out for anything that could unbalance the vehicle, like rocks or potholes. Approach logs, rocky steps or ditches diagonally: you want three wheels on the ground at all times.DRIVING ON GRAVELSelect Grass/Gravel/Snow on Terrain Response, and use the highest gear possible for the conditions.Gravel is a constantly changing, low-grip surface, so drive at a slow speed. This reduces the risk of losing traction when you stop, accelerate or take a corner.Always leave a generous gap between you and other vehicles, to minimise the risk of damage from flying gravel.Avoid dust clouds as they reduce visibility.DRIVING ON HILLSDriving uphillWherever possible, investigate the areaon foot. You should always know what’s on the other side of the hill. Remember your approach angle: is the wheel or nose going to hit the ground first?Approach the hill straight on, rather than diagonally, to avoid a roll. Use the highest gear in which the vehicle will ‘pull’ comfortably.Never attempt to turn your 4x4 on asteep slope.Be prepared for a failed climb, it happens to the best drivers. Work out an escape route and take note of where the obstacles are.Driving downhillStop one vehicle-length before the descent, so you have time to make any corrections. Remember your departure angle. Is the back of your vehicle going to hit the ground?Choose the lowest gear possible and select Hill Descent Control (HDC), if available.If using HDC, try to keep your foot away from the pedal and avoid the temptation to brake. If you do need to brake, apply progressive rather than strong pressure. If you don’t have HDC, just use your lowest gear.Follow the natural fall line—the route water would take down the slope—and keep your wheels straight. If the vehicle starts to slide, increase throttle to match the ground speed and regain steering control.If driving a manual, never roll or reverse downhill in neutral or with the clutch depressed. And never turn your 4x4 on a steep slope, as it could lead to sideways sliding.DRIVING THROUGH WATERTry to work out how deep the water is.In static shallower water, explore on foot and use a stick to gauge the depth—or watch another vehicle go through. It’s a good idea to keep a pair of wellies or waders in the boot.If there are other vehicles ahead, wait until they’ve left the water. Unsettled water can make a safe passage more challenging. Drive through the water very slowly at first, then build up momentum. Do not slip/ride the clutch as this reduces control of the vehicle. Ease off the accelerator as you reach the other side.A Land Rover 4x4 can manage submersion of between 50 and 90cm. Refer to your manual to find your maximum wading depth. Never attempt to cross deep, fast-flowing streams and always prioritise safe driving. As a general rule, don’t drive into water unless you really have to.DRIVING IN SNOW AND ICEWhen off-road driving on icy surfaces, select the Grass/Gravel/Snow setting and use the highest gear possible for the conditions.Use steady momentum to carry you through: it’s important to keep the wheels rolling.All Land Rover 4x4s have built-in Traction Control, which drives power to the wheelswith the most traction. If your wheels do start to spin or slide, ease off the accelerator until you feel the tyres regain grip.Harsh braking may cause you to skid; so start gently, then progressively increase pedal pressure. Hill Descent Control (HDC) willtake the guesswork out of steep, slippery slopes by automatically braking to maintaina steady speed.On corners, brake before you approach,steer through the corner at a safe speed,then accelerate once you’ve straightened up. Don’t steer while braking or accelerating,and vice versa.RETURNING TO THE ROADStop and check for damage. Look for debris and cuts in the tyres, including inside the walls, and debris lodged in the underside of the vehicle.Clear any excess grass, mud or snow from your 4x4, paying particular attention to your lights and number plates. Make sure that any equipment is secure.If you’ve lowered your tyre pressureto tackle a surface, remember to revert to the correct pressure as recommended by the manufacturer.Set off slowly, as mud on the wheels could affect handling and braking. Always check for a firm brake pedal and ensure there isno resistance in the steering.FIND OUT MOREKeep up to date with Land Rover by following us on Twitter @LandRover, Instagram /LandRover and Facebook /LandRover.For more driving tips, visit our Official Youtube Channel at /landrover Keen to master your off-road driving skills? Book Land Rover Half Day, Full Day or Advence Experience days on your nearest Land Rover Experience Centre. Find your nearest centre: /experiences/ find-a-centreSome features shown are optional. Please consult , your owner’s manual or your local authorised Land Rover retailer for more details.21。
Instruction manual for car navigation system of Landrover Discovery3Dear Users£ºThank you so much for using our navigation system. our navigation system can help you enjoy your driving. This system really incarnates the characters of "safety, high quality & human design". To make sure you can operate this navigation system smoothly, we strongly suggest that you can read this manual before you begin to use it.IntroductionThis manual uses icons to show you how to operate this system correctly and what are the potential dangers for the incorrect operation. Please understand the meanings of each icon. This can help you operate this system correctly and effectively.This icon is to warn the importance of this instruction.Your disregard for the details may cause hurt or damage.This icon is to warn the importance of this instruction. Y our disregard for the details may cause hurt or damage.Please note this. With the quick development of traffic facility & structure, it may appear that the data of navigation map is not completely the same as the actual road traffic guide. Under this condition, please drive according to the actual road traffic guide. At the same time, please contact with the distributer of this system as soon as possible to update the data of map.This system is only used to supply some assistant tips during driving. Our company will not bear any responsibility for the damages or accidents, which is caused for your uses of our system, while driving. The technical specification, design and icons of this navigation system may be changed and be different from the description in the manual. W e will reserve the right for update without notice.We strongly suggest reading this instruction manual as well as other manuals of audio systems of the car, before using this system. Please operate this system according to the instructions of the manual.Otherwise, your incorrect operation may cause troubles or even dangers. Our company will not be responsible for these, which are caused for your incorrect operation..............................................................................2. (5)1.1 .............................................................5.. (6)2.1 (6)2.2 (6)2.3 ........................................................................7.. (8)3.1 (8)3.2 Bluetooth (9)3.3 (10)3.4 TV (11)3.5 (11)3.6 (11)3.7 (12)3.7.1 (12)3.7.2 (13)3.7.3 Photo (14)3.8 (15)3.8.1 (15)3.8.2 (16)3.8.3 (16)3.8.4 (16)3.8.5 Bluetooth.......................................................................... 17..................................................18.. (20)Safety attentions Chapter One Product Instruction Product Characteristics Chapter Two Introduction of buttons & basic operation Diagram of buttons Function introduction of each button Basic operation Chapter Three Function application Function application DVD player Navigation .................................... Rear view Camera B Audio player Video player Setup Date/time Calibrate Volume System ......................................Chapter Four T rouble shooting Chapter Five Maintenance and repairs ContentDrivers are not allowed to operate this system, while driving.If driver operates this car while driving, it may lead to traffic accident, as the driver has to pay attention to operate the system & fail to watch the road situation carefully. Therefore, it is a must to stop the car in a safe place and pull up the handbrake, before operating the unit.Please keep the batteries off from children.Children may swallow the batteries. This will cause danger to children. Therefore, please keep the batteries in the place child can not reach it. In case child swallows the battery, please go to the hospital as soon as possible.Do not take apart or revise or repair this system by yourself. Please contact the nearest authorized repair station for repairs. Do not use the system , which can not work normally.If the system works abnormally, please contact the nearest authorized repair station as soon as possible to handle it. In case the system explores in the water or gives out smoke, please never power on the system. Otherwise, the system will be destroyed and cause dangers.Attentionsremote may slip under the brake footbrake, which will affect the driving & then cause traffic accident.To make sure the safe driving, please keep low volume so that the driver can hear the voice outside of car & pay attention to the road situation.Pleas keep this system away from water or damp or dust. Water or dust can cause fire or lead to other damages to thissystem. Therefore, please keep this unit away from the damp or dust environment.case the screen is broken, please bear in mind not to touch the broken glasses or liquid. Please make sure to flush the broken glass or liquid and handle it completely, in case you have touched glasses or liquid. Otherwise, it may cause hurts to body. It is possible that there are some tiny black or white pixels to appear on the LCD panel. This is normal. The characteristics of panel lead to pixels.Attentions: Please obey the following instruction strictly.AttentionsAttentionsUnder the condition of low temperature, the display seems alittle dark or responds a little slowly. Once the temperature goesup, the display will restore. This is normal for the system.A fter the system turns on, the antenna of navigation needsome time to receive satellite signal & update the internalmessage. Therefore, the system need cost a little time to runnavigation function.tunnels or high buildings. These buildings may affect thereceiving of GPS signal.setup the system.TFT LCD screen Transparent touch panel Resolution: 800*4802 Brightness: 300cd/m Contrast: 350:1 CPU: 400mhz, Built-in Media Accelerator Engine 128DDR RAM 128MB NAND Flash, SD card(compatible with 2G & 4G) Navigation: 3D map display, human voice guide, routine plan & automatic routine search MP3/MP4 player(The following formats are only for reference. It is possible some files can not be played smoothly.) The file which is bigger than 720*576 may not be played smoothly. And the system will show relevant tips for the playing condition so that users can check whether to continue playing or not. We strongly suggest to setup the file to be smaller than 720*576.Audio playing Format MP3/WMA/ASP/OGG/WA V Labels 1D3VI labeled with ED3 V22. 0, V23.0Video playing FormatReal time/date displayTouch panel controlWorking temperature: -10 -60 ¡æWorking V oltage: DC9-18VPower consumption: ¡Ü15WC C Chapter One Product Introduction1.1 Characteristics of the systemA VI(MPEG-4 simple profile, Divx3, 11, 4.0, 5.1, Xvid)WMV, ASF, MPEG1/MPEG2/DA T Car navigation SystemImage Browser Format Resolution Bit rate JPG, BMP, GIF, PNG BMP: 2048*1536, GIF:1024*768 Max. 1.5Mbps JPG, PNG, 1926*1444Car navigation SystemOn/offMenu1.2.Chapter Two Introduction of buttons and basic operation2.1 Diagram of the buttons 2.2 Introduction of buttons21A button to turn on/off the system:The system is set to power on automatically with theignition. Press this key for a very short time to return the main OSD interference. And press this key for a little long time to power off the system. When the system is off, press this button to power on it.Menu:A button to return back to main OSD interference.Car navigation System2.3 Basic operationTurn on/off the systemThe system will turn on automatically with ignition. Then the system will enter the interference of main menu within 15 seconds. Function shiftsThe system will forbid doing any function shifts, unless the car stops & its hand brake is pulled up. But please notice the following items.The system can not play movie and music at the same time.The system can run movie or music with "setup" function at the same time.The system can run movie or music with "navigation" function at the same time.The system can run TV playing or navigation at the same time. (Please note: TV is optional function).Car navigation SystemChapter Three Function ApplicationOperation while driving3.1 Function applicationa . While the hand brake is pressed down, the system will turn to the GPS navigation interference automatically. At this time, the "OSD" key will be locked and can not work.b . The system can not do any function shift until car stops running and the hand brake is pulled up. And the display of dashboard shows "P".interference as the follows:The current date/timeThere are six icons under the interference of OSD: Bluetooth/ DVD/TV/NAVI/USB/SD/SETUP. Touch the relevant icon to activate the relevant function.1)Start Bluetooth of mobile phone.2)Search Bluetooth hardware.3)Select ONTOPPAT 4)Mobile phone will begin to connect the Bluetooth.5)Input code: 88886)Car navigation SystemClick "Bluetooth" icon to activate Bluetooth Function. One: Pair the mobile phone and our system.Two: Bluetooth enjoys priority with prompt of incoming call.No matter which function is working, including SD/USBreading/AUX IN/Navigation/DVD playing, the system willshift to Bluetooth interference automatically. While driving,driver can choose to answer or reject the incoming calling. Ifthere is no answer within 10 seconds, the system will go backto the navigation interference. Please note: the voice guidefrom navigation may be missed, while listen to a call or callout.Answer Hang up Redial Exit3.2BluetoothCar navigation System3.3 DVD playerOur system can work with DVD changer or DVD player, which can be controlled by touch panel. (But please note, the system cannot control the DVD or DVD changer, until our system has done suitable software to match the remote code of DVD changer or DVD player).Car navigation System3.5 Navigation3.6 Rear view cameraAttention:3.4 TV Click "Navigation" icon or press "navi" on the remote to activate GPS navigation function. Please refer to the manual of GPS navigation for details.1. GPS Navigation: The files in "Navione" file folder are navigation programs. Never delete any file in it. Otherwise, it will lead to program exception.2. Update of map: Please store the updating file in the USB flash memory.The rear view function is only an assistant function for parking. It can not be the basis for a judgment.Once the car is reversing (the shift lever is located on R place), the display of the system will shift to display the images from the rear view camera, no matter what current image it is. Once the car finishes backing up, the image displayed by the system will go back to the former image. Please note that the playing of MP4 will be stopped, if the system shifts to the rear view image while MP4 is playing.While the system is standing by, the reversing of car can let the TFT display open automatically & the rear view image will be visible. A fter car stops reversing, the system will go back the interference of main menu. And then the system will go back to the standby condition after 5 seconds.Click "TV" icon of OSD to activate the function of TV and then the system will enter TV interference. As different TVmodule may have different TV operation interference, we will not describe it specifically. Please operate according to theactual TV module.Insert "USB" flash disk into USB slot & click the "USB" icon to enter USB interference. There we can find three applications for "CINEMA", "PHOTO" and "MUSIC" for select. Please choose the application you prefer. And then click the program name forplaying. To exit USB interference, please click " "on the left upper corner. Please make sure format of files can be compatible with our system.The format of USB memory: FA T32Car navigation System3.7.1Audio player3.7 USBClick "USB" icon to enter "USB" interference. (Please note: Some USB files can not be compatible).Click "CINEMA", "PHOTO" or "MUSIC" icon to boundout relevant file folder or program list. If programs are stored in file folder, please click file folder to open the program list.Return ExitCar navigation System3.7.2 Video playerClick "MUSIC" icon to start audio player; Or click audio file from "file list" & then click for playing;Click "CINEMA" icon and the "file list" will appear. There click your prefer movie or click a file folder to find & click your prefer movie. Finally, click to start playing.Play/Pause Stop Prev/Next Loop ReturnCar navigation System3.7.3PhotoThe interference of video playing is as the follows.Please note: the playing axis will not work here. Therefore,we can not push it to play forwards or backwards.In the interference of video playing, the messages of playingcan be shown, including the current playing improvement ¤t playing time. And we can operate the playing as we like,for example, Play/pause/stop the video file or display the imagefull of screen. Click for full screen display. While the imageis displaying full of screen, touch the display area of image toget back the normal display area.Click "Photo" icon and the system will show the followingmenu. There we can read, delete or even revise the files in thesystem or USB flash memory. The compatible file formats include BMP/JPEG/GIF/PNG.Play/Pause Stop Prev/Next Full Screen ExitCar navigation System3.8 Setup3.8.1 Date/TimeFull screen 16:9/4:3 Auto Prev/Next ExitClick "Setup" icon to enter into the interference of "setup". There we can setup date/time, parameter of volume, system message & calibration of touch panel & Bluetooth etc.Click "Date/time" to make setup for DATE/TIME by clicking the "¡ø" or "¨‹" icons.¡¡Car navigation System3.8.3 V olume3.8.4 System3.8.2 CalibrateClick "setup" icon in the interference of main menu to get into the submenu. There, please click "calibrate" and then "Start" to calibrate touch panel control. A fter the system begin to calibrate touch panel, a symbol of "+" will be found in the centre of the panel. Just click it & then "+" will appear on each corner of the panel. Click the "+" till it disappears. Finally, the system will exit automatically.1) Click "V olume" to enter the interference of volume setup.There click "+" to increase volume and "-" to decrease volume.During the setup of volume, the volume scale bar will display. Click "system" to check the capacity of USB message.3.8.5 Bluetooth LG Kg800 LG KE970Motorola L6 Motorola V3i Motorola K1Nokia 6103 Nokia 6233 Nokia 6120CNokia N70 Nokia N73 Nokia N80 Nokia 8800 Samsung D900 Samsung E760Samsung P310 Samsung E890 Samsung P300Palm Treo 750DOPOD D802HTC MTeoR :Click "Bluetooth" to setup the connection way of Bluetooth.Select "Auto", the system will search mobile phone and pair with it automatically.Select "Manually", the system will not search for phone facilit y until we operate it manually to do this.Car navigation SystemPlease note: The system can match with followingmodel s.(As mobile phones are updated or replaced continually, the following phone modes are only for reference. Please forgive without further notice).Guides of trouble shootingChapter Four Guide of Trouble ShootingGuides of trouble shootingAttentions:The follows are guides of trouble shooting, which can help you solve some familiar troubles. Once it can not be solved, please contact the authorized repair station for repairs. Please never take part the system by yourself, otherwise, it may cause serious bad results.Description of troublesReasons How to solve No power Not ignited yet.Battery of car hasbeen run out of.Ignite the car at first.Recharge the battery.No voiceSet too low volume to be heard.Set a bigger volume.Please refer to "3.8.3" for details.Panel contro l Not calibrated touch panel yet.Calibrate the touch panel.Please refer to "3.8.2" for details.No work of touch panel The system is still running some program (route search, etc). Please wait for a moment. If it can not work for long time,please contact repair stations.No Signal o fG P SThe system did notrecognize its GPS navigation signal.Turn off the system and then restart it.Failure to position It is possible the system is located in the area GPS signal is not covered.Please try to move the car toanother area to see whetherthe GPS signal can restore.If still failed, please contact repair station for repair.Bad touchGuides of trouble shootingDescriptionof troublesReasons How to solveBlack display The system turnsoff the backlight.Touch the LCD screen to turn on the backlight.Failure to get navigation Please contact repair station to update map.Failure to find destination.Firstly, check & confirm the correct place name., try to input another n ame of t he destination.If failed again, it means the place does not include in the data of navigation.Get bad guide from navigation. For example, the system select a longer routine to destination.The system may takemany factors intoconditions, not onlylimited to the distance.For example, the rateof road, traffic rules,main road and so on.Generally, it will workout a shortest road forusers.the routine refresh.No map shown It is possible the displayscale of map is toosmall or too big to beseen.Please try to adjust thedisplay scale to see whetherthe map can be restored. Iffailed, it is possible thesystem loses the position ofnavigation. Please selectanother mark refresh.The system is locatedin a blind area ofnavigation.The place name isnot in the data ofnavigation.Please selectSecondlyMaintenance&RepairsChapter Five Maintenance & repairsThe system is a precise electronic unit with fine design and exquisite craftworks. Please use it carefully. Please obey the following suggestions to prolong the work life of the system.Please keep the system and relevant accessories away from children.Please keep a dry working environment for the system. Rain, dampness or other liquids may hurt the electronic circuit or even destroy the system.Please keep a clean working environment for the system.Dust can damage the visible part of the system.Please try to avoid locating the system in too hot place. High temperature can shorten the electronic working life or cause deformation of structure.Please try to avoid locating the system in too cold place.While the temperature goes up, it may lead to damp. This damp can hurt the electronic circuit.Please never take the system into parts by yourself. Non professional staff may damage the system.Please never wash or clean the system with chemical things or detergent.Please use soft & clean clothes to wipe this system.Please keep the system away from magnetic or radioactive equipment.Please never use any sharp object to click the touch panel. It may cause permanent hurt to the panel. The touch pen has been attached. Please use the pen for operation.。
路虎发现3使用说明书
被誉为全球SUV第一品牌的路虎,1947年诞生于英国,已先后4次被英国皇室授予荣誉证书。
作为路虎的顶级越野车型,发现3系列车型被定义为一辆顶级完善的SUV。
并首次将轿车的操控表现、舒逸的驾乘体验,与无可比拟的四驱越野能力完美融合。
一、外观部分
二、车门部分
三、中控台区域
四、驾驶员功能区
五、全车座椅
一、外观部分
路虎-发现3整车尺寸被精心规划,在SUV车型中也占有优势的2885mm长轴距,令驾驶稳定性得以提升。
1887mm的车身高度也为车内的宽裕空间打好了基础。
2009mm的宽度将为驾者提供更加舒适的横向空间,而较一般SUV更长的车身,则令乘员腿部的伸展更为惬意。
作为SUV车型,因行驶特点需要提供了前后多点式高档次的驻车雷达等配置,一体式前大灯与高亮反射式的雾灯配合,也将令夜间的行驶变得更加清晰、安全。
车辆后部细心的提供了最全面的保护,两边尾灯虽然分别整合雾灯与倒车灯,但四点式倒车雷达将令停车入位变得更加省心。
同时高位制动灯也令后车更易观察前车动向。
开启后盖轻松顺滑,两端的液压支撑杆提供了有力的支持。
较宽大的后备箱开口方便放置大件物品,而内部的置物隔板可提供更多的储物空间。
后备箱宽达1180mm的宽度也为放置大件物品提供了便捷。
二、车门部分
路虎-发现3的车门开启角度很大,上下车方便舒适,车门下部的照明灯提升了整车品质的同时,还保证了乘员上下车时的安全。
车门内部可见车窗电控按键,全车一键式升降玻璃省时省力。
同前门几近相同的开启角度,保证了后排乘客的舒适,特别设计的童锁显而易见,避免了失手误触等可能性。
后门车窗还可完全放下,令后座的整体感觉更加完美。
中控按键位于中控台中央,行驶中根据路况调整非常不便。
为安全驾驶提供多一层的保护
同样位于驾驶席车门内的全车玻璃及外后视镜调节按键可单手操作,令专心驾驶不再是难事。
三、中控台区域
数字化的中控台,多功能显示屏由GPS及DVD影像均可清楚显现。
闲暇时的影音娱乐也全部由此而来。
高于同级车性的双温区自动空调也整合其中,令驾驶与享受可以兼得。
双温区自动空调工作状态可由液晶显示器中读取,全车乘员均可根据需要调整属于自己的舒适温度。
前排座椅也可分别选择温度,令不同季节的车内温度都适中宜人。
作为多功能SUV车型,更多的便利设计必不可少,整合车内电子系统的车载通讯系统使用相当方便。
发现3的内部阅读灯并未简单化处理,而是精心的为每位乘员考虑,前后乘客可均可根据需要照亮自己的一片区域。
四、驾驶员功能区
本车方向盘功能最为丰富,由真皮包裹后的手感也明显提升。
方向盘上整合了多种的控制与调节按键、旋钮等,手握时可感受到路虎车系中人性化与高科技的完美结合。
方向盘两侧的控制拨杆分别控制车辆灯光及前后雨刷,提示清晰,易于上手,并且手感也相当不错。
外观金属与真皮结合的的挡把头,设计位置合理,实现便捷的换档操作不是难事,各个档位入位清晰。
作为豪华型SUV,发现3的启动方式则显得极为传统,采用钥匙旋转式启动。
插拔钥匙及旋转手感极佳,反应清晰。
同挡把设计不同的科技化手刹部分,以扳手式形象出现。
抬起时则显得轻松顺手,并且行程很短反应灵敏。
五、全车座椅
前文提到的路虎-发现3车身尺寸优势,最终在车内的空间上得以展示,较为充裕的前后排空间可满足任何身材的驾乘者找到舒适的乘姿。
后排的腿部空间一直是运动型SUV的弱点,但在满足了前排舒适感后,发现3的后排座椅依旧可提供很大的空间,证明了4913mm车长设计是物有所值的。
前排的双座椅均为电控多向调整,而驾驶席独有电动的腰部支撑调节旋钮,对于缓解驾驶时的腰部疲劳有明显的效果。
(但长时间驾驶后还停车休息)
要
后排座椅可选择放倒,在需要延长后备箱空间时,简单的操作即可提升整车的实用性,极为方便。
总的来说,路虎-发现3不仅在外型设计方面有自己的特点,在动力部分也可完全征服广大消费者。
作为世界知名的品牌-路虎精心打造的车型,相信还有更加富有特点的细节未被发现。
这里也只是为大家提供简单的上手操作及使用介绍。