siemens pro 中文说明书 西门子贴片机如何编程 必看
- 格式:pdf
- 大小:4.13 MB
- 文档页数:53
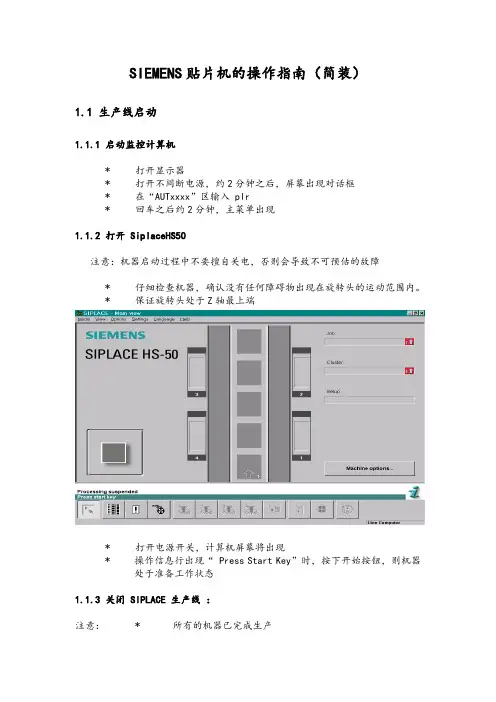
SIEMENS贴片机的操作指南(简装)1.1 生产线启动1.1.1 启动监控计算机* 打开显示器* 打开不间断电源,约2分钟之后,屏幕出现对话框* 在“AUTxxxx”区输入 plr* 回车之后约2分钟,主菜单出现1.1.2 打开 SiplaceHS50注意:机器启动过程中不要擅自关电,否则会导致不可预估的故障* 仔细检查机器,确认没有任何障碍物出现在旋转头的运动范围内。
* 保证旋转头处于Z轴最上端* 打开电源开关,计算机屏幕将出现* 操作信息行出现“ Press Start Key”时,按下开始按钮,则机器处于准备工作状态1.1.3 关闭 SIPLACE 生产线:注意:* 所有的机器已完成生产* 旋转头处于Z轴最上端* 吸嘴上没有任何元件* 旋转头处于等待位置1.1.3.1 关闭监控计算机注意:必须按下列步骤关闭监控计算机,不能简单地关掉UPS电源否则系统有可能出现故障.* 将光标移到屏幕的右边, 光标将变成十字线* 按下鼠标左键, 屏幕出现下拉式菜单* 继续按下鼠标左键,将光标移到“shut down”处, 屏幕将出现Really shut down?Yes No* 点中“yes” , 监控计算机将关闭所有程序. 然后屏幕出现Safe to power ofPress any key to reboot* 关闭 UPS 及显示屏1.1.3.2 关闭SIPLACE* 必须在监控计算机完全关闭之后才能关闭贴片机* 不要在机器执行命令时关闭贴片机* 不要在机器打板子时关闭贴片机* 不要在计算机启动过程中关闭贴片机* 应在机器处于等待状态时关闭贴片机1.2 操作指南1.2.1 SIPLACE HS50 屏幕组成 (用户级别: operator)(1) 为机器控制按钮包含以下功能状态:1. 执行2.停止执行3. 继续执行4.终止执行(2) 程序名及 PCB P/N(3) 机器选项,可在这里选择贴装头子,以及设置首功阻挡等功能(4) 错误信息及机器状态栏。
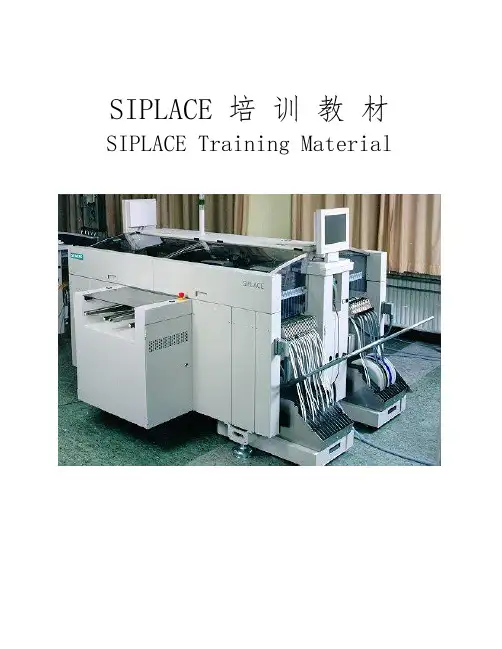
SIPLACE 培训教材SIPLACE Training Material目录一、课程目标 (2)1.1 总体目标 (2)1.2 具体目标 (2)二、特殊说明 (3)2.1 西门子贴片机使用注意事项 (3)三、SIEMENS 贴片机的结构 (4)3.1 SIEMENS 贴片机结构 (4)3.2 Siplaces 80S - 20 机器结构介绍 (5)3.3 Siplaces 80S - 20 贴片头介绍 (6)3.4 旋转贴片头的12个站 (7)四、SIEMENS贴片机的用户界面 (8)4.1 贴片机用户界面的组成 (8)4.2 贴片机用户界面菜单 (8)4.3 错误及信息对话框 (9)4.4 机器控制对话框 (10)4.5 选择操作等级 (10)五、SIEMENS贴片机的操作指南 (12)5.1 生产线启动 (12)5.2 操作指南 (13)5.3 SIEMENS贴片机操作明细 (17)六、SIEMENS 单项操作功能 (23)七、送料器续料及操作步骤 (24)7.1 送料器 (24)八、故障描述/掉件率查询 (29)8.1 故障描述 (29)8.2 SIEMNES 常见错误分析及解决 (31)8.3 掉件率查询 (32)九、清洁步骤及PCP参数指导 (32)一、课程目标1.1 总体目标西门子贴片机的特点是结构精巧,紧凑,易于调整。
但是非正常规程操作,极有可能造成机器的损坏。
通过对本教材的系统学习,使学员能够正确利用工具及材料并掌握SIEMENS贴片机的操作方法和日常维护,实现正确操作。
1.2 具体目标1.能正确识别生产工具,设备及所用材料2.了解产品生产的整体工艺流程3.了解机器的安全特征4.可以根据操作指导对机器进行正确操作5.进行自觉性维护和日常清理并保持5S二、特殊说明2.1 西门子贴片机使用注意事项1.放置供料器应保证桌面的磁条上没有任何元件和异物,检查供料器是否摆放牢固。
2.打件过程中如意外打开防护罩或按下急停,应对打过的板作100% 检查。
SIEMENS数控系统编程指令详解第一章编程语言1.1 准备功能(G指令)一般用NC语言对单个操作步骤进行实际编程,只能代表一个NC程序中工作的一部分。
实际指令编程之前,应先对操作步骤进行计划和准备,对NC程序的结构和组织考虑的越周详,所产生的复杂程序就会越清晰、准确,而且生成的速度就会越快,越简便。
通常按如下编程步骤进行:根据图纸要求、指定加工方案;测量每一把刀具的长度及半径;确定工件零点坐标系的位置;计算出每把刀具的切削用量;编制加工零件程序;根据程序图形模拟,查看刀具运行轨迹;空运行,查看刀具运行轨迹;试切削、检验、优化加工程序。
每一个程序都有一个不同的名称叫程序名,编程时可以任意选择名称。
在编辑程序时首先要建立一个新程序名,然后才能编制加工程序。
建立新程序名时要注意以下几点:前一个符号必须是字母;其余符号可以是字母、数字几及下划线;程序名最多有24个字符;字符间不允许有分隔符。
SIEMENS 802D数控系统常用G代码:1.2.1 G00快速定位指令格式:G00 Xxx Yxx ZxxXxx Yxx Zxx ——直角坐标系中的终点坐标;编程示例(图1—1)Y)0 X图1—1N10 G00 G90 X0 Y0N20 G00 X200 Y200G00 指令的运动速度为机床的快速定位速度(机床允许的最大运动速度)G00的速度由机床参数设定。
G00快速移动功能不能用于工件切削加工,只能用于空行程进给,一般用于接近起始位置或换刀点、退刀等。
1.2.2 G01 直线插补指令格式:G01 Xxx Yxx Zxx FxxXxx Yxx Zxx ——直角坐标系中的终点坐标;Fxx ——进给率单位mm/min。
编程示例(图1—2)YX图1—2N10 G00 G90 X0 Y0N20 G01 X150 Y200 F300G01指令规定的进给速度可以由面板上的进给倍率开关进行修调,此功能一般用于工件切削,切削的进给速度由F值指定。
备注:刀补=(刀具半径+圆角半径)*sin(角度)—圆角半径Z=(刀具半径+圆角半径)*cos(角度)—圆角半径—刀具半径$TC_DP6[GETT(“MILLX” ,1(DP值)),1(刀沿值)]=_备注:此椭圆原点在坐标系原点如果不在坐标系原点只要将偏离坐标原点的值加在公式后面如G1X=20*COS(R1)+X1、铣矩形槽、POCKET1POCKET1(RTP,RFP,SDIS,DP,DPR,LENG,WID,CRAD,CPA,CPO,STA1,FFD,FFP1,MID,CDIR,FAL,VARI,MIDF,FFP2,SSF)时序用这个循环,能够加工加工平面上任何位置上的矩形槽。
此循环是粗加工/最终加工的组合。
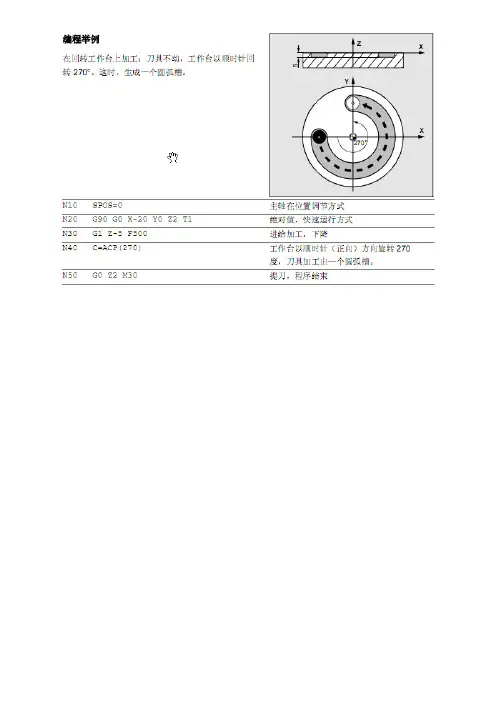
2、圆周上的槽、SLOT1写法SLOT1(RTP,RFP,SDIS,DP,DPR,NUM,LENG,WID,CPA,CPO,RAD,STA1,INDA,FFD,FFP1MID,CDIR,FAL,VARI,MIDF,FFP2,SSF)时序用这个循环,能够加工排列在圆周上的槽,与长孔相比,槽宽大小要说明。
SOLT1循环是粗加工/最终加工的组合。
参数说明写法:SLOT2(RTP,RFP,SDIS,DP,DPR,NUM,AFSL,WID,CPA,CPO,RAD,STA1,INDA,FFD,FFP1,MID,CDIR,FAL,VARI,MIDF,FFP2,SSF) 时序用这个循环,能够加工排列在圆周上的弧形孔腔。
1、钻削,顺时针镗孔:CYCLE82这个循环加工一个简单的孔,当达到最后的钻深时,会暂停进刀,旋转一段时间。
2、深孔钻削:CYCLE83CYCLE83(RTP,RFP,SDIS,DP,DPR ,FDEP,FDPR,DAM,DTB,DTS,FRF,VARI)提出钻头到其参考平面,达到排屑目的,每次可以上提1mm以使断屑。
3、攻螺纹、CYCLE84(刚性攻丝循环)写法CYCLE84(RTP,RFP,SDIS,DP,DPR,DTB,SDAC,MPIT,PIT,POSS,SST,SST1)4、不带起锥器攻螺纹写法:CYCLE840(RTP,RFP,SDIS,DP,DPR,SDR,SDAC,ENC,MPIT,PIT)时序用本循环,可以用起锥器加工螺纹孔。
SIPLACE 培训教材SIPLACE Training Material目录一、课程目标 (2)1.1 总体目标 (2)1.2 具体目标 (2)二、特殊说明 (3)2.1 西门子贴片机使用注意事项 (3)三、SIEMENS 贴片机的结构 (4)3.1 SIEMENS 贴片机结构 (4)3.2 Siplaces 80S - 20 机器结构介绍 (6)3.3 Siplaces 80S - 20 贴片头介绍 (7)3.4 旋转贴片头的12个站 (8)四、SIEMENS贴片机的用户界面 (9)4.1 贴片机用户界面的组成 (9)4.2 贴片机用户界面菜单 (9)4.3 错误及信息对话框 (10)4.4 机器控制对话框 (11)4.5 选择操作等级 (11)五、SIEMENS贴片机的操作指南 (13)5.1 生产线启动 (13)5.2 操作指南 (14)5.3 SIEMENS贴片机操作明细 (19)六、SIEMENS 单项操作功能 (25)七、送料器续料及操作步骤 (26)7.1 送料器 (26)八、故障描述/掉件率查询 (32)8.1 故障描述 (32)8.2 SIEMNES 常见错误分析及解决 (34)8.3 掉件率查询 (35)九、清洁步骤及PCP参数指导 (36)一、课程目标1.1 总体目标西门子贴片机的特点是结构精巧,紧凑,易于调整。
但是非正常规程操作,极有可能造成机器的损坏。
通过对本教材的系统学习,使学员能够正确利用工具及材料并掌握SIEMENS贴片机的操作方法和日常维护,实现正确操作。
1.2 具体目标1.能正确识别生产工具,设备及所用材料2.了解产品生产的整体工艺流程3.了解机器的安全特征4.可以根据操作指导对机器进行正确操作5.进行自觉性维护和日常清理并保持5S二、特殊说明2.1 西门子贴片机使用注意事项1.放置供料器应保证桌面的磁条上没有任何元件和异物,检查供料器是否摆放牢固。
2.打件过程中如意外打开防护罩或按下急停,应对打过的板作100% 检查。
题 目: SIEMENS 设备贴片工艺参数与调制规范 第 A 版 第 0 次修改一. 目的为能使操作者都能清楚地了解贴片设备的性能及其参数设定,以及保证设备的稳定运行,故制定此套标准作业规范。
二. 范围本规范适用于杭州信华精机有限公司SMT 车间SIEMENS 贴片设备的贴片工艺参数与调制。
三. 职责生技部负责对设备调试及参数设定。
生管部对设备操作。
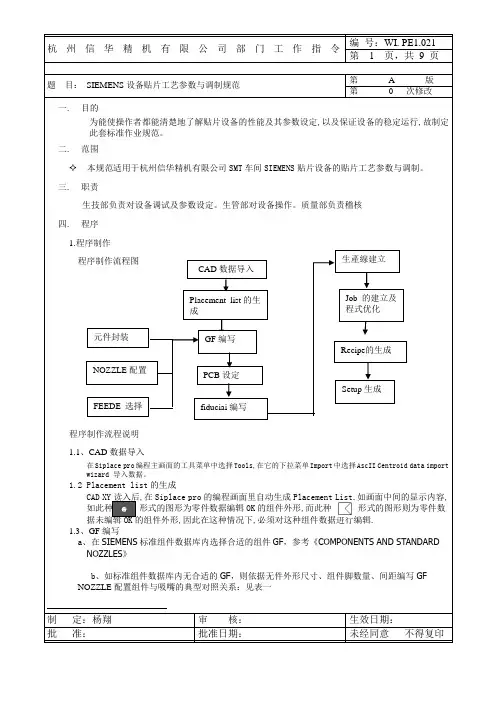
质量部负责稽核 四. 程序 1.程序制作 程序制作流程图程序制作流程说明 1.1、CAD 数据导入在Siplace pro 编程主画面的工具菜单中选择Tools,在它的下拉菜单Import 中选择AscII Centroid data import wizard 导入数据。
1.2 Placement list 的生成CAD XY 读入后,在Siplace pro 的编程画面里自动生成Placement List,如画面中间的显示内容,如此种 形式的图形为零件数据编辑OK 的组件外形,而此种 形式的图形则为零件数据未编辑OK 的组件外形,因此在这种情况下,必须对这种组件数据进行编辑. 1.3、GF 编写a 、在SIEMENS 标准组件数据库内选择合适的组件GF ,参考《COMPONENTS AND STANDARD NOZZLES 》b 、如标准组件数据库内无合适的GF ,则依据无件外形尺寸、组件脚数量、间距编写GF NOZZLE 配置组件与吸嘴的典型对照关系:见表一制 定:杨翔 审 核: 生效日期:批 准:批准日期: 未经同意 不得复印元件封装CAD 数据导入PCB 设定Recipe 的生成生產線建立GF 编写Placement list 的生成fiduciai 编写Job 的建立及程式优化 Setup 生成NOZZLE 配置 FEEDE 选择定。


1.2 一般功能
1.2.1 创建一个新对象
有三个方式创建新对象1)菜单栏上的“新建”功能
2) 工具栏上的“新建”功能
3)树状显示区域鼠标右键
1.2.2 通过相应编辑器打开已存在的对象
可直接在相应的树状显示区域中通过鼠标右键或双击打开已存在的对象
1.2.3 Siemens GF库与初试测试数据
当Pro 完全安装后Line computer master data也自动安装。
通过使用Line computer Import Wizard 导入这些数据到Pro数据库。
The master data 包括:
西门子标准GF库
测试板极其相关元件和定位点
编程的CAD数据
你可以Pro server中找到。
其路径如图示:
1.2.4 打印报告
Pro给对象提供图象和文本形式的报告,可以导出.pdf 格式. Xml格式
有三种方式发布报告:
1)在图形窗口单击鼠标右键
2)在树状显示区域用鼠标右键
3)在菜单栏”Item”中选择发布
下面的图示显示机台上料表情况
1.2 Pro 编程流程图。
2.4.7Tapping with compensating chuck - CYCLE840ProgrammingCYCLE840 (RTP, RFP, SDIS, DP, DPR, DTB, SDR, SDAC, ENC, MPIT, PIT, AXN) ParametersParameter Data type DescriptionRTP REAL Retraction plane (absolute)RFP REAL Reference plane (absolute)SDIS REAL Safety clearance (enter without sign)DP REAL Final drilling depth (absolute)DPR REAL Final drilling depth relative to the reference plane (enter withoutsign)DTB REAL Dwell time at thread depth (chip breakage)SDR INT Direction of rotation for retractionValues: 0 (automatic direction reversal), 3 or 4 (for M3 or M4) SDAC INT Direction of rotation after end of cycleValues: 3, 4 or 5 (for M3, M4 or M5)ENC INT Tapping with/without encoderValues: 0 = with encoder, 1 = without encoderMPIT REAL Thread lead as a thread size (signed):Range of values 3 (for M3) to 48 (for M48)PST REAL Thread lead as a value (signed)Range of values: 0.001 ... 2000.000 mmTool axisAXN INTValues1):1: 1st axis of the current plane2: 2nd axis of the current plane3: 3rd axis of the current plane1)The definition of the 1st, 2nd, and 3rd axes depends upon the current plane selected. FunctionThe tool drills at the programmed spindle speed and feedrate to the entered final threaddepth.This cycle is used to program tapping with the compensating chuck:●Without encoder●With encoder.SequenceTapping with compensating chuck without encoderPosition reached prior to cycle start:The drilling position is the position in the two axes of the selected plane.The cycle creates the following sequence of motions:●Approach of the reference plane brought forward by the safety clearance by using G0●Tapping to the final drilling depth●Dwell time at tapping depth (parameter DTB)●Retraction to the reference plane brought forward by the safety clearance●Retraction to the retraction plane with G0Sequence of operationsTapping with compensating chuck with encoderPosition reached prior to cycle start:The drilling position is the position in the two axes of the selected plane.The cycle creates the following sequence of motions:●Approach of the reference plane brought forward by the safety clearance by using G0●Tapping to the final drilling depth●Dwell time at thread depth (parameter DTB)●Retraction to the reference plane brought forward by the safety clearance●Retraction to the retraction plane with G0Explanation of the parametersFor the parameters RTP, RFP, SDIS, DP, DPR, refer to Section "Drilling, centering -CYCLE81 (Page 122)".DTB (dwell time)The dwell time must be programmed in seconds.SDR (direction of rotation for retraction)SDR=0 must be set if the spindle direction is to reverse automatically.If the machine data is defined such that no encoder is set (in this case, machine dataMD30200 $MA_NUM_ENCS is 0), the parameter must be assigned the value 3 or 4 for thedirection of rotation; otherwise, alarm 61202 "No spindle direction programmed" is outputand the cycle is aborted.SDAC (direction of rotation)Because the cycle can also be called modally (see Section "Graphical cycle support in theprogram editor (Page 118)"), it requires a direction of rotation for tapping further threadedholes. This is programmed in parameter SDAC and corresponds to the direction of rotationprogrammed before the first call in the higher-level program. If SDR=0, the value assigned toSDAC has no meaning in the cycle and can be omitted in the parameterization.ENC (tapping)If tapping is to be performed without encoder although an encoder exists, parameter ENCmust be assigned value 1.If, however, no encoder is installed and the parameter is assigned the value 0, it is ignored inthe cycle.MPIT and PIT (thread lead as a thread size and as a value)The parameter for the lead is only relevant if tapping is performed with encoder. The cycle calculates the feedrate from the spindle speed and the lead.The value for the thread lead can be defined either as the thread size (for metric threads between M3 and M48 only) or as a value (distance from one thread turn to the next as a numerical value). Any parameters not required are omitted in the call or assigned the value zero.If the two lead parameters have conflicting values, alarm 61001 "Thread lead wrong" is generated by the cycle and cycle execution is aborted.NoteDepending on the settings in machine data MD30200 $MA_NUM_ENCS, the cycle selects whether tapping is to be performed with or without encoder.The direction of rotation for the spindle must be programmed with M3 or M4.In thread blocks with G63, the values of the feedrate override switch and spindle speed override switch are frozen to 100%.A longer compensating chuck is usually required for tapping without encoder.AXN (tool axis)The following figure presents the options for the drilling axes to be selected.With G17:●AXN=1; Corresponds to X●AXN=2; Corresponds to Y●AXN=3; Corresponds to ZUsing AXN (number of the drilling axis) to program the drilling axis enables the drilling axis tobe directly programmed.AXN=1 1st axis of the current planeAXN=2 2nd axis of the current planeAXN=3 3rd axis of the current planeFor example, to machine a hole in the G17 plane with Z axis, you program:G17AXN=3Programming example: Tapping without encoderIn this program, a thread is tapped without encoder at position X35 Y35 in the XY plane; thetapping axis is the Z axis. The parameters SDR and SDAC for the direction of rotation mustbe assigned; parameter ENC is assigned the value 1, the value for the depth is the absolutevalue. Lead parameter PIT can be omitted. A compensating chuck is used in machining.N10 G90 G0 T11 D1 S500 M3 ; Specification of technologyvaluesN20 G17 X35 Y35 Z60 ; Approach drilling positionN30 G1 F200 ; Setting the path feedrateN40 CYCLE840(20,0,3,-15,,1,3,4,1,6,,3) Cycle call, dwell time 1 s,direction of rotation forretraction M4, direction ofrotation after cycle M3, nosafety clearance, parameters MPITand PIT have been omittedN50 M02 ; End of programProgramming example: Tapping with encoderIn this program, a thread is tapped with encoder at position X35 Y35 in the XY plane. Thedrilling axis is the Z axis. The lead parameter must be defined, automatic reversal of thedirection of rotation is programmed. A compensating chuck is used in machining.N10 G90 G0 T11 D1 S500 M4 ; Specification of technologyvaluesN20 G17 X35 Y35 Z60 ; Approach drilling positionN30 CYCLE840(20,0,3,-15,,1,3,4,1,6,,3) ; Cycle call, without safetyclearance, with absolute depthspecificationN40 M02 ; End of program。
SIPLACE 培训教材SIPLACE Training Material目录一、课程目标 (2)1.1 总体目标 (2)1.2 具体目标 (2)二、特殊说明 (3)2.1 西门子贴片机使用注意事项 (3)三、SIEMENS 贴片机的结构 (4)3.1 SIEMENS 贴片机结构 (4)3.2 Siplaces 80S - 20 机器结构介绍 (6)3.3 Siplaces 80S - 20 贴片头介绍 (7)3.4 旋转贴片头的12个站 (8)四、SIEMENS贴片机的用户界面 (9)4.1 贴片机用户界面的组成 (9)4.2 贴片机用户界面菜单 (10)4.3 错误及信息对话框 (10)4.4 机器控制对话框 (11)4.5 选择操作等级 (11)五、SIEMENS贴片机的操作指南 (13)5.1 生产线启动 (13)5.2 操作指南 (14)5.3 SIEMENS贴片机操作明细 (19)六、SIEMENS 单项操作功能 (26)七、送料器续料及操作步骤 (27)7.1 送料器 (27)八、故障描述/掉件率查询 (33)8.1 故障描述 (33)8.2 SIEMNES 常见错误分析及解决 (35)8.3 掉件率查询 (37)九、清洁步骤及PCP参数指导 (38)一、课程目标1.1 总体目标西门子贴片机的特点是结构精巧,紧凑,易于调整。
但是非正常规程操作,极有可能造成机器的损坏。
通过对本教材的系统学习,使学员能够正确利用工具及材料并掌握SIEMENS贴片机的操作方法和日常维护,实现正确操作。
1.2 具体目标1.能正确识别生产工具,设备及所用材料2.了解产品生产的整体工艺流程3.了解机器的安全特征4.可以根据操作指导对机器进行正确操作5.进行自觉性维护和日常清理并保持5S二、特殊说明2.1 西门子贴片机使用注意事项1.放置供料器应保证桌面的磁条上没有任何元件和异物,检查供料器是否摆放牢固。
2.打件过程中如意外打开防护罩或按下急停,应对打过的板作100% 检查。