Fuji_inverter
- 格式:ppt
- 大小:5.29 MB
- 文档页数:34
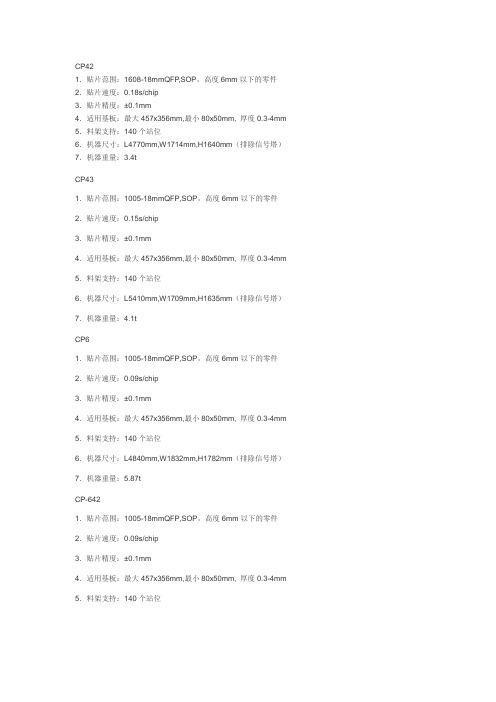
CP421.贴片范围:1608-18mmQFP,SOP,高度6mm以下的零件2.贴片速度:0.18s/chip3.贴片精度:±0.1mm4.适用基板:最大457x356mm,最小80x50mm, 厚度0.3-4mm 5.料架支持:140个站位6.机器尺寸:L4770mm,W1714mm,H1640mm(排除信号塔)7.机器重量:3.4tCP431.贴片范围:1005-18mmQFP,SOP,高度6mm以下的零件2.贴片速度:0.15s/chip3.贴片精度:±0.1mm4.适用基板:最大457x356mm,最小80x50mm, 厚度0.3-4mm 5.料架支持:140个站位6.机器尺寸:L5410mm,W1709mm,H1635mm(排除信号塔)7.机器重量:4.1tCP61.贴片范围:1005-18mmQFP,SOP,高度6mm以下的零件2.贴片速度:0.09s/chip3.贴片精度:±0.1mm4.适用基板:最大457x356mm,最小80x50mm, 厚度0.3-4mm 5.料架支持:140个站位6.机器尺寸:L4840mm,W1832mm,H1782mm(排除信号塔)7.机器重量:5.87tCP-6421.贴片范围:1005-18mmQFP,SOP,高度6mm以下的零件2.贴片速度:0.09s/chip3.贴片精度:±0.1mm4.适用基板:最大457x356mm,最小80x50mm, 厚度0.3-4mm 5.料架支持:140个站位6.机器尺寸:L4840mm,W1690mm,H1780mm(排除信号塔)7.机器重量:6tCP6431.贴片范围:1005-20mmQFP,SOP,高度6mm以下的零件2.贴片速度:0.09s/chip3.贴片精度:±0.1mm4.适用基板:最大457x356mm,最小80x50mm, 厚度0.3-4mm5.料架支持:140个站位6.机器尺寸:L4843mm,W1734mm,H1851mm(排除信号塔)7.机器重量:6.5tIP21.贴片范围:1005-54mmx54mm, 高度10mm以下的零件2.贴片速度:0.7s/chip(使用4 种不同吸咀),盘装IC4s/chip3.贴片精度:±0.05mm4.适用基板:最大457x356mm,最小80x50mm, 厚度0.3-4mm5.料架支持:tape, stick feeder最多74 slots,tray最多10 trays/MTU6.机器尺寸:L2940mm,W1644mm,H1725mm(排除信号塔)7.机器重量::3.5t(包括MTU4.25t)IP31.贴片范围:1005-74mmx74mm, 高度10mm以下的零件,可贴BGA零件2.贴片速度:小IC0.55s/chip,大IC1.25s/chip,盘装IC2.5s/chip3.贴片精度:±0.025mm4.适用基板:最大508x457mm,最小80x50mm, 厚度0.3-4mm5.料架支持:tape feeder最多74slots,stick feeder最多36slots,tray最多20 trays/MTU 6.机器尺寸:L3185mm,W2530mm,H1850mm(排除信号塔)7.机器重量:4t(包括MTU5.1t)XP141E1.贴片范围:0603-5x4mm(8pin IC),高度3mm以下的零件2.贴片速度:0.165s/chip,21800chips/h3.贴片精度:±0.1mm4.适用基板:最大457x356mm,最小80x50mm,厚度0.5-4mm5.料架支持:前后方供料,计100个站位,台车换料方式6.机器尺寸:L1500mm,W1300mm,H1408mm(排除信号塔)7.机器重量:1.8t8.程序编辑:同时支持在线编程与脱机编程XP142E1.贴片范围:0603-20x20mm(28pin IC),高度6mm以下的零件,可贴BGA2.贴片速度:0.165s/chip,21800chips/h3.贴片精度:±0.05mm4.适用基板:最大457x356mm,最小80x50mm,厚度0.3-4mm5.料架支持:前后方供料,计100个站位,台车换料方式6.机器尺寸:L1500mm,W1300mm,H1408mm(排除信号塔)7.机器重量:1.8t8.语言支持:中,英,日9.程序编辑:同时支持在线编程与脱机编程XP143E1.贴片范围:0402(in 01005)-25x20mm,高度6mm以下的零件,可贴BGA(选配)2.贴片速度:0.165s/chip,21800chips/h,吸嘴自动更换功能(选配)3.贴片精度:±0.05mm4.适用基板:最大457x356mm,最小50x50mm,厚度0.3-4mm5.料架支持:前后方供料,计100个站位,台车换料方式,单座tray盘供应器(选配)6.机器尺寸:L1500mm,W1300mm,H1408mm(排除信号塔)7.机器重量:1.8t8.语言支持:中,英,日9.程序编辑:同时支持在线编程与脱机编程XP241E:1.贴片范围:1005-45x45mm,高度25.4mm以下的零件2.贴片速度:0.4-0.6s/Chip(矩型),0.7~1.5s/IC3.贴片精度:±0.05mm4.适用基板:最大457x356mm,最小80x50mm, 厚度0.5-4mm5.料架支持:前后方供料,前侧40个站位,后侧有两个选择:10种10层和20种10层6.机器尺寸:L1500mm,W1300mm,H1408mm(排除信号塔)7.机器重量:2t8.程序编辑:同时支持在线编程与脱机编程XP242E1.贴片范围:1005-45x150mm,高度25.4mm以下的零件2.贴片速度:0.43s/chipIC,0.56s/QFP IC3.贴片精度:±0.025mm4.适用基板:最大457x356mm,最小80x50mm, 厚度0.3-4mm5.料架支持:前后方供料,前侧40个站位,后侧有两个选择:10种10层和20种10层6.机器尺寸:L1500mm,W1500mm,H1537mm(排除信号塔)7.机器重量:2t8.语言支持:中,英,日9.程序编辑:同时支持在线编程与脱机编程XP243E1.贴片范围:0603-45x150mm,高度25.4mm以下的零件2.贴片速度:0.43s/chipIC,0.56s/QFP IC3.贴片精度:±0.025mm4.适用基板:最大457x356mm,最小50x50mm, 厚度0.3-4mm5.料架支持:前后方供料,前侧40个站位,后侧有两个选择:10种10层和20种10层6.机器尺寸:L1500mm,W1500mm,H1537mm(排除信号塔)7.机器重量:2t8.语言支持:中,英,日9.程序编辑:同时支持在线编程与脱机编程GL21.点胶速度:0.2s/ dot,2个点胶头2.点胶精度:±0.15mm3.适用基板:最大508x457mm,最小80x50mm, 厚度0.3-4mm4.机器尺寸:L1770mm,W900mm,H1700mm(排除信号塔)5.机器重量:0.9t(包括cooler0.93t)GL41.点胶速度:0.13s/ dot,3个点胶头2.点胶精度:±0.15mm3.适用基板:最大508x457mm,最小80x50mm, 厚度0.3-4mm 4.机器尺寸:L850mm,W1207mm,H1725mm(排除信号塔)5.机器重量:1.58t(包括cooler 1.6t)GL5411.点胶速度:0.13s/ dot,3个点胶头2.点胶精度:±0.09mm3.适用基板:最大457x356mm,最小80x50mm, 厚度0.8-4mm 4.机器尺寸:L795mm,W996mm,H1755mm(排除信号塔)5.机器重量:1.758t。

INSTRUCTION MANUALBraking ResistorDB□□□-□C Seriesg When an inverter is installed with the braking resistor in a device or control board and shipped, make sure that the actual end user of the inverter receives this manual.g The contents of this manual are subject to changes for improvement without notice.Fuji Electric Co., Ltd. INR-SI47-0591a-EThank you for purchasing our Inverter Option. Before using the option, read this manual carefully to understand how to use the option correctly. Improper use may result in abnormal operation, reduce product life, and possible failure. This manual does not describe how to use the inverter main unit. Refer to inverter main unit Instruction Manual for details about the inverter main unit.Keep this manual on hand for reference when using the option.Note the following items when using the option. Improper use may result in unexpected failure, electric shock, or possible injury.WARNING• Wait at least five minutes after turning off the power before installing or wiring the inverter option. Use a multimeter or similar instrument to check the voltage before performing installation or wiring. (Check whether the charge lamp goes off.), as electric shock may occur • Discharge statistic electricity from your body before handling the inverter option. Never touch the Inverter option with wet hands, as accident or electric shock may occur• No foreign matter such as screws, metal patches, lint, chips, and dust in the inverter option. There is risk of fire or accident.• Do not damage or stress the wiring, as accident or electric shock may occur. • Wait at least five minutes after turning off the power before inspecting the inverter option. (Check whether the charge lamp goes off.) There is a risk of electric shock. • Never modify the inverter option, as electric shock or injury may occur.CAUTION• Do not install or operate a damaged option or one that is lacking parts, as injury may occur.Check the items described below when you receive this product. Also check whether this product has been damaged during transport. If anything is amiss, contact your distributor or our nearest branch office.Please confirm the form with the ratings signature board.Fig.1Fig.2Fig.3Fig.4Table 1-2-1 Outlines.Table 1-3-1Item SpecificationStorage temperature -20~+70℃ Place where be dewy and freezing by rapid temperaturechange are not caused.Relativehumidity5~95%Note 1Atmosphere There must be dust, direct sunshine, corroded gas, oil mist, steam or neither drop of water nor a vibration. Salinity must not be included so much.Note 1:Even if humidity meets the specification, the be dewy and freezing are caused in the place where the temperature change is hard much. Please avoid such a place.①Please do not put on ground.②Please cover with the vinyl seat when atmosphere is bad.③Please put a dry medicine internally, and, besides, wrap ②item procedure when the influence of moisture is large.This product is guaranteed against defects in workmanship for 18 months from the manufacturing date indicated on the nameplate. However, the troubles caused by the following reasons are not covered by this warranty even in warranty period.(1) Problems caused by incorrect operation or by unauthorized repairs or modifications.(2) Problems resulting from using the inverter in the range outside the standard specification.(3) Damage to the inverter after purchase or during delivery.(4) Damage caused by earthquakes, fire, floods, lightning, abnormal voltage fluctuations or other natural disasters.The installation environment for the inverter in which this product is being installed is listed Table 3-1-1Table 3-1-1 Installation Environment.Item Specifications RemarksLocation Indoors - Ambienttemperature-10 to 50°C -Ambient relative humidity 5 to 95%-Environment The place should be away from direct sunlight and free from dust, corrosive gases,inflammable gases, oil mists, steam, dripping water or vibration. Salty environmentsshould preferably be avoided. Avoid places where sudden changes in temperature occurwhich could cause condensation or freezing.- Altitude Up to 1000m -①Please set up so that power terminal may become the lower side.Please set up vertically on a strong building with the bolt.Please do not turn upside down and do not set up in a horizontal plane.②This option generates heat, and install space more than each of 100 ㎜the top and bottom and the right and left to secure the passage of the cooling style, please.The generated heat is radiated up. Please do not install under a weak equipment to heat.Moreover, installation respect must use the one of the material that the temperature rise can be endured enough.③Please consider enough to ventilation so that the ambient temperature of the inverter and the braking resistor should not exceed the specification value when storing in the control board etc.Please do not store in a small sealing up box where heat radiation is bad.WARNING•The surface temperature of resistance becomes 400℃or less by the use state.There is risk of fire or burn.•Please install in a nonflammable thing such as the metals.There is risk of fire.•Please do not arrange the combustible in surroundings.There is risk of fire.CAUTION•Check the wiring again before operating the inverter. Improper wiring may cause unexpected inverter operation or device operation. There is a risk of accident or injury.• Since noise is generated by the inverter, motor, and wiring, carefully monitor surrounding sensors and devices for abnormal operation. There is a risk of accident.Applicable Table 3-3-1Model Use electric wire sizeDB0.75-2C 2mm2DB2.2-2C/DB3.7-2C 2mm2DB5.5-2C/DB7.5-2C 3.5mm2DB11-2C~DB22-2C 5.5mm2DB0.75-4C 2mm2DB2.2-4C~DB22-4C 2mm2Note 1:The size of the use electric wire is based on 600V vinyl electric wire.(Please use heatproof 75℃ or more.)Note 2:The wiring length is assumed to be 5m or less.Recommended connection methodTerminal for braking resistor connection Table 3-3-2Type Terminal form Connection methodDB0.75-2C DB0.75-4C 0.75mm2Electric wire(CFGE)The wiring for 500mm is attached.Please connect the terminal with wiring.DB2.2-2C/DB3.7-2C DB2.2-4C/DB3.7-4C Connected barBoard thickness2mmΦ4.3mm Installation holePlease connect wiring in connected bar with the boltand the nut.DB5.5-2C/DB7.5-2C DB5.5-4C/DB7.5-4CDB11-2C~DB22-2C DB11-4C~DB22-4C Connected barBoard thickness2mm Φ6mm Installation holeEarthterminal Table 3-3-3Type Terminal form Connection methodAll models M4Terminal(With screw)Please connect wiring with the earth terminal.Connection diagramDB0.75-2C/4C ~DB7.5-2C/4C Inver (Note2)(Note1)Please detach connected line of a built-in resistor. Please insulate the detached line.terBraking ResistorP (+)DBDB11-2C/4C ~DB22-2C/4C(Note1)A green screw terminal is an earth.(Note2)The wiring for the braking resistor, there is no polarity.(Note3)Please connect with either of inverter side control terminal X1-X9 for the G11 series. At this time, please set theconnected terminal function data in 9 among function codes E01-E09.InverterBraking Resisto rDB(Note3)(Note2)(Note1)P (+)Braking unit(Note4)P (+)N (-)THRCMG12P (+)N (-)(Note4)Please use the shield line for the wiring for the braking unit. Please connect the shield of the shield line with theearth terminal of the inverter. (Another shield edge side is opened.)7Buy:|Phone844-385-3099|Email:*************************Note 1:The use rate will decrease because of the undermentioned model when Electric thermal O/L relay setting (for braking resistor).1.5~7.5G11S-2/4 7%ED5.5~11P11S-2/4 5%EDBrakingpower100%Time*Duty cycle(%ED)Frequency which can be repeatedly used. *Continuous braking timeTime which can be continuously braked.(Use of limit from state of normal temperature once.) *Surface temperature of resistance by use rate.The surface temperature is 230℃ or less (50℃ in surroundings temperature time). I will describe the surface temperature rise value by the use rate of DB22-2C as a reference value.Tem p eratu re rise valu e [K]100120140160180200567891Du ty cycle [%ED]NOTE10Buy:|Phone844-385-3099|Email:*************************。

购入后如要转卖给第三方,请务必事先与我公司联系。
模组型高速多功能贴片机NXT编程手册本机器手册包含下列内容。
NXT安装手册NXT系统手册NXT机械手册FUJI智能供料器使用手册NXT编程手册为了您能安全高效地使用本机器,请仔细阅读以上手册,并遵守上面记载的步骤及注意事项。
请将手册放置在机器附近,以便使用时能立即浏览。
QD025-00著作权本手册的著作权属于富士机械制造株式会社所有。
未经本公司同意,严禁任意复制和转载本手册中的部分或全部内容。
商标保证和责任本公司对在使用富士产品的时候,由于没有使用纯正的富士公司所生产的零部件制品,或者由于使用者的不恰当的设定以及不合适的使用环境而所产生的结果及其所造成的影响不负任何责任。
注意事项· 本手册中的内容在没有预告的情况下,有进行变更的可能性。
· 本手册中的内容在编写时虽力求精益求精,万一有错误之处敬请和本公司联系。
· 除了因本公司制品所引起的故障以外,本公司对于使用本手册的结果及其所造成的影响不负任何责任。
QD025-00目录目录1. Fuji Flexa与NXT机 (1)1.1 序言 (1)2. Job编制器 (3)2.1 序言 (3)2.2 创建Job的基本操作方法 (3)2.2.1 从修改已有Job开始 (3)2.2.2 从手动输入顺序数据开始 (3)2.2.3 从导入Centroid CAD数据开始 (4)2.2.4 从导入CCIMF数据开始 (4)2.2.5 从导入MCSIMF文件开始 (5)2.2.6 从导入Allegro CAD数据开始 (5)2.2.7 从导入Mentor CAD数据开始 (6)2.2.8 从导入CR5000(PWS/Board Designer) CAD数据开始 (6)2.2.9 从导入OrCAD CAD数据开始 (7)2.2.10 从导入SFX-J1 CAD数据开始 (7)2.2.11 从导入Specctra CAD数据开始 (8)2.2.12 从导入PowerPCB CAD数据开始 (8)2.2.13 从导入PanaCAD数据开始 (9)2.3 NXT的设定方法 (10)2.3.1 将当前Job的生产线设定更改为NXT机的生产线设定 (10)2.3.2 将NXT机添加至Job (10)2.3.3 编辑NXT机的Configuration数据 (11)2.4 生产线平衡 (17)2.5 优化 (18)2.5.1 在Job编制器中进行优化 (18)2.5.2 Dual Job Optimize (18)2.6 生成报告 (20)2.6.1 手动生成报告 (20)2.6.2 在保存Job时自动创建生产程序 (20)3. 元件数据 (21)3.1 序言 (21)目录QD025-003.2 元件数据 (22)3.2.1 元件数据详情 (22)3.3 Shape Data (24)3.3.1 Shape information详情 (26)3.3.2 形状过外形程详情 (29)3.4 Package Data (33)3.4.1 Package information详情 (33)3.4.2 Package process详情 (34)3.5 关于P_pattern (36)3.5.1 NXT机可使用的P_patern (36)3.5.2 NXT机无法使用的P_pattern (37)3.5.3 P_pattern详情 (38)3.5.4 P_Pattern选择表 (43)3.6 Vision Type详情 (45)3.6.1 关于元件基准点 (45)3.6.2 NXT机Vision Type 输入说明 (46)3.7 同已有PD之间的兼容性 (60)3.7.1 原因 (60)3.7.2 已有机种的Vision Type和NXT机的Vision Type对照一览表 (61)3.7.3 设置元件数据的“Override” (66)4. Job传输 (67)4.1 序言 (67)4.2 传输 (68)4.2.1 从Job创建器传输Job (68)4.2.2 拖放Job以进行传输 (68)4.2.3 使用[传输]指令进行传输 (69)4.3 基本操作方法 (70)4.3.1 更改当前Job (70)4.3.2 从机器中删除Job (70)5. Fujitrax与NXT (71)5.1 序言 (71)6. Fujitrax Verifier (73)6.1 序言 (73)6.2 必需条件 (73)QD025-00目录6.2.1 安装和运行Central Server (73)6.2.2 在Fujitrax的生产线结构中添加NXT机 (73)6.2.3 NXT机的Fujitrax configuration设置 (74)6.2.4 Kit Handy access的用户注册 (75)6.3 将供料器和料卷进行关联 (76)6.3.1 ID创建方法 (76)6.3.2 快速检验的执行方法 (76)6.4 进行供料装置检查 (78)6.4.1 使用Kit Handy (78)6.5 供料装置状态检查 (79)6.5.1 使用Kit Manager时 (79)6.5.2 使用Kit Handy时 (79)6.6 在生产中补给元件 (80)6.6.1 更换供料器 (80)6.6.2 料带拼接 (80)7. 用语表 (83)7.1 英文、数字 (83)7.2 拼音:B (83)7.3 拼音:C (83)7.4 拼音:D (84)7.5 拼音:F (84)7.6 拼音:G (84)7.7 拼音:H (85)7.8 拼音:J (85)7.9 拼音:L (86)7.10 拼音:M (86)7.11 拼音:Q (86)7.12 拼音:R (86)7.13 拼音:S (86)7.14 拼音:T (87)7.15 拼音:W (87)7.16 拼音:X (87)7.17 拼音:Y (88)7.18 拼音:Z (88)目录QD025-00 MEMO:QD025-00关于本手册关于本手册本手册介绍Fuji Flexa和Fujitrax的操作方法,以及有关NXT机的元件数据的详细情况。

电梯报价(富士精工)————————————————————————————————作者:————————————————————————————————日期:电梯项目报价书南通永日商贸有限公司苏州富士精工电梯有限公司SUZHOU FUSIJG ELEVATOR CO.LTD目录……………………………………富士精工企业简介1 ……………………………………报价书2 ……………………………………电梯技术规格书3 ……………………………………轿厢装饰4 ……………………………………主要配置清单5 ……………………………………主要功能6 ……………………………………售后服务承诺7 ……………………………………电梯技术特点、性能指标质量水平详细说明8 ……………………………………注意事项9 ……………………………………部分业绩表富士精工电梯企业简介苏州富士精工电梯有限公司是一家引进世界先进电梯自动化控制技术,集电梯研发、制造、销售、安装、维修服务于一体的专业制造企业。
公司遵循“精益求精、追求卓越”的企业精神,确立了以客户为关注焦点,以客户满意为产品和服务工作的评价标准,立志为全球提供可信赖的多样化的产品。
产品涵盖了高速乘客电梯、住宅电梯、医用电梯、载货电梯、观光电梯、自动扶梯、自动人行道、别墅电梯、无机房货梯、液压电梯等产品在内的电梯系列产品及服务。
目前,富士精工电梯已先后开发了20多个系列50多种规格的电梯,致力于用先进的技术为城市开发服务。
先进的生产设备在富士精工电梯公司,品牌与品质同步。
具有先进的设备是产品品质高标准的前提和利器。
富士精工电梯公司装备了强大的设计制造体系包括数控激光切割机、多工位数控冲床、数控折板机、加工中心、喷涂流水线及完备的配件生产线等全套世界一流水平的各类现代化制造工艺,为公司生产出高品质、高技术附加值的电梯产品有了坚实的屏障。
精准、专业、高效对于富士精工电梯公司来说。
设备体系的完整和高要求只是做好品质的一部分。

INSTALLATION MANUALModule for controlling of FUJITSU GENERAL inverter outdoor unitsAOYG and WOYx type (refrigerant R410a or R32)USEThe UTI-INV-DX module (hereinafter …module“) is used for control of FUJITSU GENERAL LTD. outdoor inverter units connected to heat exchangers of different producer or of different construction.PACKAGE CONTENTSUTI-INV-DX module Temperature sensor This manualINSTALLATION∙The module with IP20 protection is designed to be attached to the DIN rail situated inside the electrical switchboard or the installation box. In the outdoor environment, it must be used only in facilities with adequate protection. It is also possible to install the module inside the outdoor unit (only if there is enough space for installation).∙By installing the module properly, ensure that the air is perfectly circulating so that the maximum allowed working temperature of the module is not exceeded in the case of continuous operation and higher ambient temperatures.WARNING∙If you find any signs of damage, deformation or malfunction, do not install this module and return it to your dealer.∙Pay extra attention to the wire connection between the module and the outdoor unit! There’s a risk of possible destruction of the module and electronics of the outdoor unit, if incorrectly connected!∙The power and communication terminal of the module must not be used as a power supply of the outdoor unit!∙The module may be powered only from the outdoor unit to which it is connected. Power supply from another source is unacceptable.∙Use of the module in any other way than described in this manual may reduce the level of protection.LED indicator no. 1 (capacity/mode)RS232 connector Ground terminalAnalogue input (capacity request)Output OPERATIONOutput DEFROST Output ERROR Temperature sensor terminal Output +10 V DC Input heating/coolingLED indicator no. 2 (error code)Name Serial numberNegative wire terminal Phase wire terminalCommunication wire terminalELECTRICAL CONNECTION∙ General wiring of the supplied module can be found in the enclosed scheme.∙ Before starting installation, make sure that the module is not energized and the main switch is in the "OFF" position. ∙ The module is designed for connection to single-phase alternating voltage supply network (AC) 230 V and must be installed in accordance with regulations and norms applicable in the particular country. ∙ Installation, connection, adjustment and operation may only be carried out by a person with adequate electrical engineering skills allowing them to work with equipment up to 1000V, who is fully familiar with this manual and functionality of this device. ∙ The module is a permanently connectable device and does not have its own power disconnection device. A switch or circuit breaker must be included as a part of the installation. It must be easily accessible by the operator and must be marked as the disconnect device. The device is protected as a set with the air conditioning unit. The circuit breaker values are determined by the unit type and are listed in the installation manual for the air conditioning unit. The switches or circuit breakers used as the disconnect device must comply with the relevant requirements of IEC 60947-1 and IEC 60947-3. ∙ WARNING: The installation manual for the air conditioning unit also requires an installation of residual-current device (RCD), in addition to the circuit breaker. ∙ The device includes protection against overvoltage peaks and disturbing impulses in the power supply. However, for the proper functioning of these protections, appropriate higher level of protection (A, B, C) must be provided in the installation and the interference of the switching devices (contactors, motors, inductive loads, etc.) must be ensured according to the standard. ∙ Do not install the module near the sources of excessive electromagnetic interference.CONNECTIONDESCRIPTION OF THE TERMINALSDescription of the top bus terminals:L phase wire terminal (connection to the outdoor unit)N negative wire terminal (connection to the outdoor unit)C communication wire terminal (connection to the outdoor unit)ERR output (max. load 5A) – the relay is activated in case of malfunction of the outdoor unit or controlling module (NC/NO can be set using the UTI-TOOL software)DEF output (max. load 5A) – the relay is activated during the defrost operation of the outdoor unit.Using the UTI-TOOL software, this period can be extended by 5 minutes or until the exchangerreaches 28°CON output (max. load 5A) – the relay is activated when the outdoor unit compressor is in operation (NC/NO can be set using the UTI-TOOL software). Using the UTI-TOOL software, the relay canbe made inactive during defrost operation and 5 minutes afterwards or until the exchangerreaches 28°CDescription of the bottom bus terminals:TH temperature sensor terminal+10output +10 V DCH/C input Cooling/HeatingCooling: the H/C terminal is inactive or at a voltage of 0 V to 1.5 V against ground terminalHeating: connecting to +10 V terminal or applying voltage of 10 V to 24 V against groundterminalON outdoor unit capacity request - In the range from 0 to 10V it serves as an analogue input of the capacity request in the range of 0 - 100% of the nominal power of the unit. If the ON terminal isconnected to the + 10V terminal using a dry contact (e.g. a thermostat), the system can operatein the ON-OFF mode (with continuous compressor start). The + 10 V voltage can be lowered byan external voltage divider to limit compressor performance.⊥the ground terminal is used to connect the minus analogue signal from the higher-level controller.DO NOT connect to the PE protective wire!RS232 connectorThe 4-pin connector used to connect the module to a PC using the UTI-USB cableThe module can be set and updated using the UTI-TOOL softwareDO NOT USE any other cable to connect the module.DO NOT CONNECT any other device to the connector.INSTALLATION OF THE CABLE BETWEEN MODULEAND AIR CONDITIONING UNIT∙Use a cable as specified in the installation manual for air conditioning unit.∙Do not use a damaged cable∙When placing a cable in an environment with electromagnetic interference, we recommend using the Anti-EMI ferrite elements with minimum impedance of min. 200 Ohm/100Mhz (eg. type FLF-65B).INSTALLATION OF TEMPERATURE SENSORThe use of a temperature sensor is essential for the module to function properly. Please follow these installation instructions:∙The location and method of sensor installation must ensure its perfect thermal contact with the measured surface.∙Secure the sensor on the piping with the securing tape attached to it. If necessary, use additional insulation.∙When installing into a tank, carefully cut the plastic protection and remove the sensor.∙The sensor must always be electrically connected to the module. The module does not work without the connected sensor.∙The maximum cable length of the sensor is 3m. If you need to extend the length of the original cable, please follow the current grounding principles to avoid current loops.∙If sensor is located in an environment with electromagnetic interference, we recommend using the Anti-EMI ferrite elements with minimum impedance of min. 200 Ohm/100Mhz (e.g. type FLF-65B). Sensor location:∙Sensors in systems that are used only for cooling should be placed on the coldest part of the evaporator or on the refrigerant return pipe (gas pipe) – position A.∙For air exchangers with cooling and heating functions, the best sensor location is approximately in the middle of the length of the exchanger tube (position B).Example: AHU heat exchanger – refrigerant/air(B) temperature sensor(cooling and heating)(A) temperature sensor(cooling only)to the moduleThe sensor location in air-to-water heat pumps depends on the structural design:∙ When using the plate heat exchanger, it is suitable to place the sensor to its lower part, in the middle between the water inlet and the liquid refrigerant outlet. ∙ When using the coil heat exchanger, which is integrated into a storage tank, place the sensor inside the tank in the bottom of the spiral of the heat exchanger.Example: Plate heat exchanger – refrigerant/waterExample: Coil heat exchanger – refrigerant/waterto the moduleWater outletRefrigerant pipinginlet (gas)Water inletTemperature sensorRefrigerant pipingoutlet (liquid)to the module Refrigerant pipinginlet (gas)Refrigerant pipingoutlet (liquid)Temperature sensor in the tankto the module Coil exchangerHEAT EXCHANGER SELECTIONThe correct dimension of the heat exchanger connected to the outdoor unit is extremely important. Exchanger with unsuitable volume will not be able to ensure a proper energy transfer, the whole technology might not work properly, and in extreme cases, there is a risk of damage to the outdoor unit. It is necessary to observe the parameters mentioned below.LED INDICATORSThe module is equipped with a pair of LED indicators that visually show the status of the device.LED No. 1 (Capacity / Mode)∙the LED indicator is located in the middle of the module at the front∙the indicator uses red and green lights∙explanation of the signalization:LED No. 2 (error code)∙the LED indicator is located at the bottom on the right side∙if the module is built into a rack, this indicator may be covered∙the outdoor unit error code is signalled by RGB LED (1x - 9x flashes = 1 - 9, 10x flashes = A code).∙explanation of the signalization:∙refer to the documentation of the outdoor unit for the meaning of the error code∙the description of errors can also be found in the Mobile Technician application (iOS, Android)∙the module also signals errors evaluated by its own program∙explanation of the signalization:SETTINGThe module’s default communication setting is for the AOYG model with R32 refrigerant. To change the settings, use the UTI-TOOL software. Use version 1.6 and higher to set up the UTI-INV-DX module.UTI-TOOL program - setting the type of outdoor unit (default setting - R32 models)UTI-TOOL program - setting the outputs (factory default)You can change the values of the following outputs and customize the module behaviour to your installation. The overall setting is evaluated by the MODE checksum. The factory setting is 2, where all modes are set to OFF, except for “L imit regulation on”, which is set to ON.Limit regulation on (exchanger)✓= respects the set limits of temperature and capacity, time constant determines the speed of regulation (default 2 = regulatory intervention every 5 sec)✗= respects only capacity limits, reacts immediatelySlave mode on✓= 3 - 10 V = 0% - 100%✗= 0 - 10 V = 0% - 100%The slave mode is used to control two modules with the same analogue signal. The outdoor master unit operates in the basic mode, where the 0 - 10 V analogue input signal linearly generates a power demand of 0% - 100%. The slave starts to operate when the input signal reaches a voltage of + 3V and at + 10V a 100% request is generated.In addition to parallel connection of inputs, the circuits of all systems must be separated from each other (i.e. each system has its own power and communication cable and its own heat exchanger temperature sensor).Time defrost delay✓= the defrost relay is still activated 5 minutes after the end of defrost operation✗= the defrost relay is only activated during the defrost operationTemperature defrost delay✓= the defrost relay is activated till the exchanger reaches 28°C✗= the defrost relay is only activated during the defrost operationIn case both options are on, the defrost relay is activated till whichever happens first (28°C or 5 minutes)Output ON - fan control mode✓= the ON relay is inactive during the defrost operation, and also afterwards, till the exchanger reaches 28°C✗ = the ON relay is activated while the unit is runningNegative defrost output, Negative error output, Negative ON output✓= the output relay function is negated (active = disconnected)✗= standard function of the output relay (active = connected)TEST RUNBefore first turning the power on, please check if the module and the outdoor unit are correctly connected. If the outdoor unit is equipped with an error indication with LED lamps or alphanumeric display, check if the error status is not indicated. To decode the errors, use the Fujitsu-General service documentation (Installation manual, Service manual, Service Instructions).Starting the outdoor unit:Determine the outdoor unit mode using the H/C input by the master control system. Then send an outdoor unit operation command using the analogue signal on the ON terminal. We recommend changing the outdoor unit mode only when there is no requirement for outdoor unit power.CAUTION!If the heat offtake from the indoor unit is not provided (for example, if the indoor heat exchanger is not connected, the indoor fan or circulation pump is not running), the compressor may only operate for maximum of 1 minute!SAFETY PRECAUTIONS, MAINTENANCE AND CLEANINGFor security reasons, do not interfere with the module. For any possible repairs, please return to the manufacturer. Do not expose this device to excessive humidity, do not immerse it in the water and do not expose it to the vibrations, shocks or direct sunlight. The device requires no maintenance. Use only soft, slightly moistened cloth to clean the case of the module. Do not use any scouring or chemical solvents.RECYCLINGElectronic and electrical products must not be disposed as a household waste.Dispose the waste at the end of its lifetime in accordance with the applicable legal provisions.TECHNICAL SPECIFICATIONSMANUFACTURERIMPROMAT KLIMA spol. s r. o.Tř. T. Bati 5267, 760 01 Zlin, Czech Republictel.: + 420 577 004 141 (148)e-mail: **********************www.impromat-klima.czThis device is in conformity with the following EC directives:∙EC Council Directive 2014/35/EU (Government Regulation No. 118/2016 Coll.) Safety requirements for electrical equipment∙EC Council Directive 2014/30/EU (Government regulation No. 117/2016 Coll.) Electromagnetic compatibility (EMC)。
富士变频器frn说明书富士变频器(Fuji Frequency Inverter)是一种用于控制交流电机的设备。
富士变频器采用先进的变频技术,能够通过改变电机的转速来调整输出功率,实现对电机的精准控制。
本说明书将详细介绍富士变频器的性能特点、安装使用方法、参数设置以及故障排除方法。
一、富士变频器的性能特点1.1宽电压输入范围:富士变频器能够适应多种电网电压,输入电压范围宽广。
1.2高效率节能:富士变频器采用高效率电路设计,能够显著降低能耗,提高系统的效率。
1.3多功能控制:富士变频器具有多种控制模式,可实现定速、变速、定时等功能。
1.4高可靠性:富士变频器采用先进的硬件设计和稳定的软件算法,具有高可靠性和稳定性。
1.5易于安装和调试:富士变频器提供详细的安装和调试指南,使用户能够轻松地完成安装和调试工作。
二、富士变频器的安装使用方法2.1安装前的准备:在安装富士变频器之前,首先需要检查设备是否完好,并了解设备所需的电源电压、电流等参数。
2.2安装变频器:根据安装图纸和说明书的指示,将富士变频器安装在合适的位置上,并固定好。
2.3接线连接:按照电路图纸和说明书中的接线图,将电源线、电机线、控制信号线等正确连接到变频器的对应接口上。
2.4参数设置:根据实际需求,通过触摸面板或电脑软件进行参数设置,包括电压、电流、频率等参数的设置。
2.5调试运行:确认变频器的参数设置正确后,可以进行调试运行。
通过观察电机的运行状态,调整变频器的参数,以达到理想的控制效果。
三、富士变频器的参数设置3.1输入电压:设置富士变频器的输入电压,以适应实际的电网电压。
3.2输出电压:设置富士变频器的输出电压,以控制电机的转速和输出功率。
3.3输出频率:调整富士变频器的输出频率,以控制电机的转速和运行状态。
3.4过载保护:设置富士变频器的过载保护参数,以避免电机因过载而损坏。
3.5故障报警:设置富士变频器的故障报警参数,以便及时发现和修复设备故障。
AC Drive for ElevatorElevator AC DriveGreat Performance through Dedicated DesignsWelcome to The New Generation of ELEVATOR AC Drive*1) Except for 200 V / 22 kW and 400 V / 30 kW F U J I I N V E R T E R SThe Series of exclusive AC Drives for operation of elevators are specially designed to have a number of improved features over previous elevator AC Drives, such as vastly lower torque ripple. We have incorporated the functions that customers find most necessary in elevator controls to provide an AC Drive that delivers performance that fits your elevator system.A braking circuit is built in the AC Drives of all the capacities.Built-in PG feedback circuit is standard equipment. An optional keypad is available.Optimum Exclusive Design for Passenger ElevatorsOverload capacity: 200% for 10s*1) Current response (ACR) : 500Hz Reduction of torque ripple realizes low vibration. Reduced roll-back during starting up.Higher PerformanceMotor capacity(kW)Three-phase400VThree-phase200V Single-phase200V2.24.05.57.5111518.52230 37 45*2) Except for 200 V / 22 kW and 400 V / 30 kWCurrent response (ACR): 500Hz Speed control accuracy: ±0.01%High performance vector control200% of rated current for 10s*(Overload begins from 80% continuous operation with a carrier frequency of 10kHz.)High overload capacityA single AC Drive can control an inductionmotor (open/closed loop control) and a synchronous motor (the optional PG interface card is required).IM/PMSM common driveFRENIC-Lift AC Drives are available ina series with capacities ranging from 5.5 to 22kW for three-phase 200V model.4.0 to 45kW for three-phase 400V model.2.2kW for single-phase 200V model.Model variationsApplicable to the inputs by opencollector/complementary output as a standard specification (Encoder power supply is switchable between +12V and +15V.)Applicable to the inputs from the 5V line driver as an option Applicable to Sin/Cos,Serial interface (EnDat2.1)and Parallel interface(4-bit gray code, UVM 3-bit code)Applicable to the feedbacks from various pulse generatorsDC bus capacitor life: 7 yearsElectrolytic capacitor life on the printedcircuit boards: 7 years Cooling fan life: 5 years Life warning signalRecording and display of cumulative operating timeRecording and display of cumulative operationsMaintenance functions/Long life designSafety standardsEN61800-5-1:2003, EN954-1 Category3 Sink/source switchableRS-485 communications (Modbus RTU) is adopted as standard equipment.CAN Bus is adopted as standard equipment.GlobalizationAC Drive support loader software isprovided.A multi-function keypad (with backlit LCD) makes it possible to copy or edit the function code data.Peripheral support tools (Option)Specifications●Standard specifications■Three-phase 200V series*2) R ated capacity is calculated by regarding the output rated voltage as 220V for three-phase 200V series.*3) O utput voltage cannot exceed the power supply voltage.*4) I t is a value in the condition of the career frequency 10kHz and the ambient temperature 45°C. Select the inverter capacity such that the square average current in cycle operationis 80% or less of the rated current of an inverter.*5) V oltage unbalance [%] = (Max. voltage [V] - Min. voltage [V])/ Three-phase average voltage [V] x 67 (IEC61800-3)*6) T he power supply capacity is 500kVA (ten times the inverter capacity when the inverter capacity exceeds 50kVA), and the calculation value when connecting with the power supply of %X=5%.*7) O btained when a DC Reactor is used.*8) A n acceptable variation of the main power supply and the control power supply assistance input.*9)T he admissible error of minimum resistance is ±5%.*10)*11) T he same AC power as the main power supply input is connected for the backup of the control circuit power source.45°C. Use the inverter such that the square average current in battery operation is 80% or less of the rated current of an inverter.*13) B raking time and duty cycle (%ED) are defined by cycle operation at the rated regenerative power as shown in the figure below.*14) T he inverter that last 2 digits of a software version are from 50 to 99 corresponds to this standard.*15) W hen output exceeds this overload capacity at carrier frequency 16kHz, carrier frequency is reduced automatically. The reduced carrier frequency is maintained until an inverter stops.Type of inverter Description FRN_LM1S-2□CAN versuion FRN_LM1S-2□A DCP versuion■Three-phase 400V series*2) R ated capacity is calculated by regarding the output rated voltage as 440V for three-phase 400V series.*3) O utput voltage cannot exceed the power supply voltage.*4) I t is a value in the condition of the career frequency 10kHz and the ambient temperature 45°C. Select the inverter capacity such that the square average current in cycle operation is 80% or less of the rated current of an inverter.*5) V oltage unbalance [%] = (Max. voltage [V] - Min. voltage [V])/ Three-phase average voltage [V] x 67 (IEC61800-3)*6) T he power supply capacity is 500kVA (ten times the inverter capacity when the invertercapacity exceeds 50kVA), and the calculation value when connecting with the power supply of %X=5%.*7) O btained when a DC Reactor is used.*8) A n acceptable variation of the main power supply and the control power supply assistance input.*9)T he admissible error of minimum resistance is ±5%.*10)*11) I t is necessary to change the power-supply voltage change connector on the power supply printed wiring board depend on the power-supply voltage.*12) 30kW or lessThe same AC power as the main power supply input is connected for the backup of the control circuit power source.37kW or morethe fan, and the contactor.T he inverter doesn’t operate if the power supply is not input to the auxiliary control power input. Please supply power.*13) I t is a value in the condition of the career frequency 10kHz and the ambient temperature 45°C. Use the inverter such that the square average current in battery operation is 80% or less of the rated current of an inverter.*14) B raking time and duty cycle (%ED) are defined by cycle operation at the rated regenerative power as shown in the figure below.*15) T he inverter that last 2 digits of a software version are from 50 to 99 corresponds to this standard.*16) W hen output exceeds this overload capacity at carrier frequency 16kHz, carrier frequency is reduced automatically. The reduced carrier frequency is maintained until an inverter stops.Type of inverter Description FRN_LM1S-4□CAN versuion FRN_LM1S-4□A DCP versuionSpecifications■Single-phase 200V series*2) R ated capacity is calculated by regarding the output rated voltage as 220V.*3) O utput voltage cannot exceed the power supply voltage.*4) I t is a value in the condition of the career frequency 10kHz and the ambient temperature 45°C. Select the inverter capacity such that the square average current in cycle operation is 80% or less of the rated current of an inverter.*5) T he power supply capacity is 500kVA (ten times the inverter capacity when the inverter capacity exceeds 50kVA), and the calculation value when connecting with the power supply of %X=5%.*6) O btained when a DC Reactor is used.*7) A n acceptable variation of the main power supply and the control power supply assistance input.*8) T he admissible error of minimum resistance is ±5%.*9)*10) T he same AC power as the main power supply input is connected for the backup of the control circuit power source.*11) I t is a value in the condition of the career frequency 10kHz and the ambient temperature 45°C. Use the inverter such that the square average current in battery operation is 80% or less of the rated current of an inverter.power as shown in the figure below.*13) T he inverter that last 2 digits of a software version are from 50 to 99 corresponds to this standard.*14) W hen output exceeds this overload capacity at carrier frequency 16kHz, carrier frequency is reduced automatically. The reduced carrier frequency is maintained until an inverter stops.Type of inverter Description FRN_LM1S-7□CAN versuion FRN_LM1S-7□A DCP versuion●Common specifications●Protective Functions●Terminal functions■FRN30LM1S-4□ to FRN45LM1S-4-□■FRN5.5LM1S-4□ to FRN22LM1S-4□, FRN5.5LM1S-2□ to FRN22LM1S-2□[ Unit: mm ][ Unit: mm ]■FRN4.0LM1S-4□/FRN2.2LM1S-7□●Keypad (TP-G1-ELS)●DC ReactorOptions●AC Drive Support Loader●Option Card ListFunctionality: Operation monitoring, test operation, tracing (real-time and historical), function code editing, etc.Supported operating systems: Windows 2000, Windows XPNote:An RS232C/RS485 adapter or USB/RS485 adapter is required to connect the AC Drive to your computer.●Option Card List■Extension cable for remote operation (CB-□S)■External cooling attachment (PB-F1-□□□)■Zero-phase reactor for radio noise reduction (ACL-40B, ACL-74B, F200160)This is a cable used for connection between the inverter main body and the remote touch panel or RS 485USB converter.This is an attachment for taking the cooling fin of the inverter out of the board. The Models of 37 kW or higher can accommodate even without an attachmentby replacing the mounting leg.81■Applicable power supply size list ACL-40BACL-74BF200160(Without mounting foot)F200160PB(With mounting foot)−MEMO−−MEMO−Gate City Ohsaki, East Tower, 11-2,Osaki 1-chome, Shinagawa-ku,Tokyo 141-0032, JapanPhone: +81-3-5435-7057 Fax: +81-3-5435-7420 URL: /NOTES• Driving a 400V general-purpose motor When driving a 400V general-purpose motor with an inverter using extremely long cables, damage to the insulation of the motor may occur. Use an output circuit filter (OFL) if necessary after checking with the motor manufacturer. Fuji's motors do not require the use of output circuit filters because of their reinforced insulation.•Torque characteristics and temperature rise When the inverter is used to run a general-purpose motor, the temperature of the motor becomes higher than when it is operated using a commercial power supply. In the low-speed range, the cooling effect will be weakened, so decrease the output torque of the motor. If constant torque is required in the low-speed range, use a Fuji inverter motor or a motor equipped with an externally powered ventilating fan.• VibrationWhen the motor is mounted to a machine, resonance may be caused by the natural frequencies, including that of the machine. Operation of a 2-pole motor at 60Hz or more may cause abnormal vibration.* Study use of tier coupling or dampening rubber.* It is also recommended to use the inverter jump frequencies control to avoid resonance points.• NoiseWhen an inverter is used with a general-purpose motor, the motor noise level is higher than that with a commercial power supply. To reduce noise, raise carrier frequency of the inverter. High-speed operation at 60Hz or more can also result in more noise.• Explosion-proof motorsWhen driving an explosion-proof motor with an inverter, use a combination of a motor and an inverter that has been approved in advance.• Brake motorsFor motors equipped with parallel-connected brakes, their braking power must be supplied from the primary circuit (commercial power supply). If the brake power is connected to the inverter power output circuit (secondary circuit) by mistake, problems may occur.Do not use inverters for driving motors equipped with series-connected brakes.• Geared motorsIf the power transmission mechanism uses an oil-lubricated gearbox or speed changer/reducer, then continuous motor operation at low speed may cause poor lubrication. Avoid such operation.• Single-phase motorsSingle-phase motors are not suitable for inverter-driven variable speed operation. Use three-phase motors.• Installation locationUse the inverter in a location with an ambienttemperature range of -10 to 50˚C.The inverter and braking resistor surfaces becomehot under certain operating conditions. Install theinverter on nonflammable material such as metal.Ensure that the installation location meets theenvironmental conditions specified in "Environment"in inverter specifications.•Installing a molded case circuitbreaker (MCCB)Install a recommended molded case circuit breaker(MCCB) or an earth leakage circuit breaker (ELCB)in the primary circuit of each inverter to protect thewiring. Ensure that the circuit breaker capacity isequivalent to or lower than the recommendedcapacity.• Installing a magnetic contactor (MC)in the output (secondary) circuitIf a magnetic contactor (MC) is mounted in theinverter's secondary circuit for switching the motorto commercial power or for any other purpose,ensure that both the inverter and the motor are fullystopped before you turn the MC on or off. Removethe surge killer integrated with the MC.• Installing a magnetic contactor (MC)in the input (primary) circuitDo not turn the magnetic contactor (MC) in theprimary circuit on or off more than once an hour asan inverter fault may result. If frequent starts orstops are required during motor operation, useFWD/REV signals.• Protecting the motorThe electronic thermal facility of the inverter canprotect the general-purpose motor. The operationlevel and the motor type (general-purpose motor,inverter motor) should be set. For high-speedmotors or water-cooled motors, set a small value forthe thermal time constant to protect the motor.If you connect the motor thermal relay to the motorwith a long cable, a high-frequency current may flowinto the wiring stray capacitance. This may causethe relay to trip at a current lower than the set valuefor the thermal relay. If this happens, lower thecarrier frequency or use the output circuit filter(OFL).•Discontinuance of power-factor correcting capacitorDo not mount power factor correcting capacitors inthe inverter (primary) circuit. Use a DC reactor toimprove the inverter power factor. Do not use powerfactor correcting capacitors in the inverter outputcircuit (secondary). An overcurrent trip will occur,disabling motor operation.• Discontinuance of surge killerDo not mount surge killers in the inverter output(secondary) circuit.• Reducing noiseUse of a filter and shielded wires are typicalmeasures against noise to ensure that EMCDirectives are met.• Measures against surge currentsIf an overvoltage trip occurs while the inverter isstopped or operated under a light load, it isassumed that the surge current is generated byopen/close of the phase-advancing capacitor in thepower system.We recommend connecting a DC REACTOR to theinverter.• Megger testWhen checking the insulation resistance of theinverter, use a 500V megger and follow theinstructions contained in the Instruction Manual.• Wiring distance of control circuitWhen performing remote operation, use twistedshielded wire and limit the distance between theinverter and the control box to 20m.• Wiring length between inverter and motorIf long wiring is used between the inverter and the motor, theinverter will overheat or trip as a result of overcurrent (high-frequency current flowing into the stray capacitance) in thewires connected to the phases. Ensure that the wiring isshorter than 50m. If this length must be exceeded, lower thecarrier frequency or mount an output circuit filter (OFL).When wiring is longer than 50m, and sensorless vectorcontrol or vector control with speed sensor is selected,execute off-line tuning.• Wiring sizeSelect cables with a sufficient capacity by referringto the current value or recommended wire size.• Wiring typeDo not use multicore cables that are normally usedfor connecting several inverters and motors.• GroundingSecurely ground the inverter using the groundingterminal.• Driving general-purpose motorSelect an inverter according to the applicable motorratings listed in the standard specifications table forthe inverter. When high starting torque is required orquick acceleration or deceleration is required, selectan inverter with a capacity one size greater than thestandard.• Driving special motorsSelect an inverter that meets the following condition:Inverter rated current > Motor rated current.When transporting or storing inverters, follow theprocedures and select locations that meet theenvironmental conditions that agree with theinverter specifications.。