支持Android的USB-串口转换器
- 格式:doc
- 大小:231.50 KB
- 文档页数:2

USB转串口的虚拟串口驱动简介USB2COM是USB转串口转换器的虚拟串口驱动程序(Windows2000/XP),适用于Cypess的USB-HID->COM转换器(未测试), 以及与之兼容的设备。
USB-HID->COM转换器是兼容USB HID类设备的设备,因此可以不用此驱动,直接以USB_HID类设备访问。
特性:∙支持设置波特率、奇偶校验、停止位。
∙事件检测。
仅支持SERIAL_EV_RXCHAR | SERIAL_EV_RXFLAG | SERIAL_EV_TXEMPTY。
∙数据流控。
todo∙超时设置。
todo安装方法-:1.把HID->COM转换器插入USB端口。
2.HID->COM转换器被识别为:USB人体学输入设备。
3.选择设备管理器->人体学输入设备->USB人体学输入设备,单击右键。
4.选择更新驱动程序。
5.选择从列表或指定位置安装,单击下一步。
6.选择不要搜索,我要自己选择要安装的驱动程序,单击下一步。
7.选择从磁盘安装,浏览驱动程序所在路径,单击确定。
8.提示没有通过Windows徽标测试,选择仍然继续。
9.安装完成,端口(COM和LPT) 项下面显示USB-HID ->Comm Port(COM?)。
方法二:使用安装程序。
还没写-;)访问设备∙使用Windows APIo阻塞式读写comtst.co检测事件comevent.co适当的超时设置,可以实现有数据时ReadFile返回,无数据时阻塞。
o CommTimeOuts.ReadIntervalTimeout = 3;o CommTimeOuts.ReadTotalTimeoutMultiplier = 0;o CommTimeOuts.ReadTotalTimeoutConstant = 0;o CommTimeOuts.WriteTotalTimeoutMultiplier = 0;o CommTimeOuts.WriteTotalTimeoutConstant = 0;o bRc = SetCommTimeouts(hCommPort, &CommTimeOuts);∙MFC中使用MSComm控件1.VC6.0 Project菜单--->Add toProject--->Components and Controls--->RegisteredActiveX Controls,选择Components: MicrosoftCommunications Control 插入到当前的Workspace中。

Android中查看USB连接的外接设备信息的代码实例1,USB存储设备(如:U盘,移动硬盘)://USB存储设备插拔监听与 SD卡插拔监听⼀致。
复制代码代码如下:private USBBroadCastReceiver mBroadcastReceiver;IntentFilter iFilter = new IntentFilter();iFilter.addAction(Intent.ACTION_MEDIA_EJECT);iFilter.addAction(Intent.ACTION_MEDIA_MOUNTED);iFilter.addAction(Intent.ACTION_MEDIA_REMOVED);iFilter.addAction(Intent.ACTION_MEDIA_UNMOUNTED);iFilter.addDataScheme("file");mBroadcastReceiver = new USBBroadCastReceiver();registerReceiver(mBroadcastReceiver, iFilter);private class USBBroadCastReceiver extends BroadcastReceiver {@Overridepublic void onReceive(Context context, Intent intent) {String action = intent.getAction();if (action.equals(Intent.ACTION_MEDIA_EJECT)) {//USB设备移除,更新UI} else if (action.equals(Intent.ACTION_MEDIA_MOUNTED)) {//USB设备挂载,更新UI}}}//获得挂载的USB设备的存储空间使⽤情况public static String getUSBStorage(Context context){// USB Storage//storage/udisk为USB设备在Android设备上的挂载路径.不同⼚商的Android设备路径不同。

常用USB转串pl2303原理应用PL2303符合USB1.1标准,价格3RMB.2 CP2102/CP2103简介Silicon Laboratories公司推出的USB接口与RS232接口转换器CP2102/CP2103是一款高度集成的USB-UART桥接器,提供一个使用最小化元件和PCB空间来实现RS232转换USB的简便解决方案。
如图1所示,CP2102/CP2103包含了一个USB功能控制器、USB收发器、振荡器和带有全部调制解调器控制信号的异步串行数据总线(UART),采用5 mm×5 mm MLP-28的封装。
CP2102/CP2103作为USB/RS232双向转换器,一方面可以从丰机接收USB数据并将其转换为RS232信息流格式发送给外设;另一方面可从RS232外设接收数据转换为USB数据格式传送至主机,其中包括控制和握手信号。
2.1 USB功能控制器和收发器2.2 异步串行数据总线(UART)接口CP2102/CP2103 UART接口包括TX (发送)和RX(接收)数据信号以及RTS、CTS、DSR、DTR、DCD和RI控制信号。
UART支持RTS/CTS、DSR/DTR和X-On/X-Off握手。
通过编程设置UART,支持各种数据格式和波特率。
在PC机的COM端口编程设置UART的数据格式和波特率。
表1为其数据格式和波特率。
2.3 内部EEPROMCP2102/CP2103内部集成有1个EEPROM,用于存储由设备制造商定义的USB供应商ID、产品ID、产品说明、电源参数、器件版本号和器件序列号等信息。
USB配置数据的定义是可选的。
如果EEPROM没有被OEM的数据占用,则采用表1所示的默认配置数据。
注意,对于可能使用多个基于CP2102/CP2103连接到同一PC机的OEM应用来说,则需要专用的序列号。
内部EEPROM是通过USB编程设置的,允许OEM的USB配置数据和序列号可以在出厂和测试时直接写入系统板上的CP2102/CP2103。

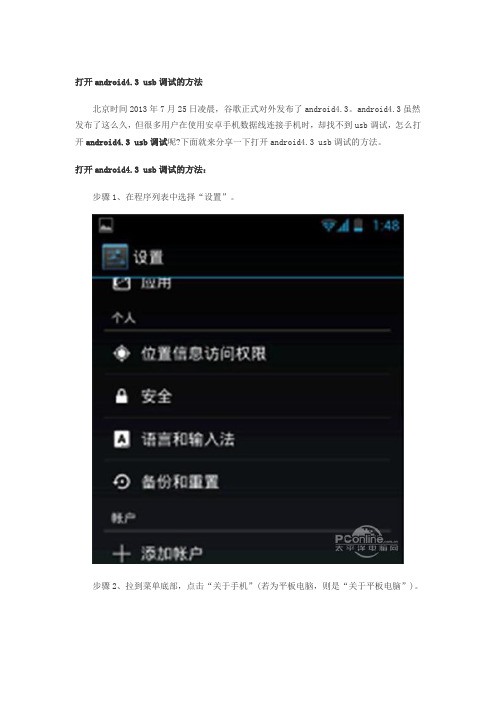
打开android4.3 usb调试的方法
北京时间2013年7月25日凌晨,谷歌正式对外发布了android4.3。
android4.3虽然发布了这么久,但很多用户在使用安卓手机数据线连接手机时,却找不到usb调试,怎么打开android4.3 usb调试呢?下面就来分享一下打开android4.3 usb调试的方法。
打开android4.3 usb调试的方法:
步骤1、在程序列表中选择“设置”。
步骤2、拉到菜单底部,点击“关于手机”(若为平板电脑,则是“关于平板电脑”)。
步骤3、拉到底部,疯狂点击“版本号”七次,界面会提示“您现在处于开发者模式”。
步骤4、点击返回,这时候可以看到熟悉“开发者选项”出现在菜单列表中了。
步骤5、在右上角点击一下开关,看到那个隐藏这么深的“usb调试”了,点击选择右边的框,勾上就可以打开usb调试了。
以上就是打开android4.3 usb调试的方法,希望对大家有帮助。
本资料整理:追机网。
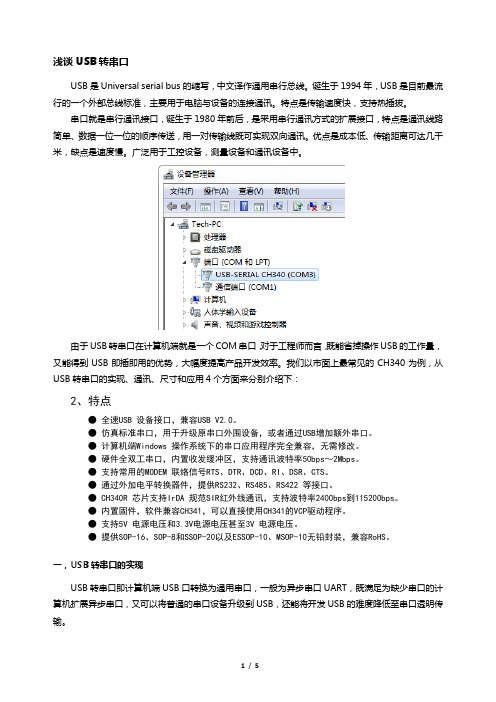
浅谈USB转串口USB是Universal serial bus的缩写,中文译作通用串行总线。
诞生于1994年,USB是目前最流行的一个外部总线标准,主要用于电脑与设备的连接通讯。
特点是传输速度快,支持热插拔。
串口就是串行通讯接口,诞生于1980年前后,是采用串行通讯方式的扩展接口,特点是通讯线路简单、数据一位一位的顺序传送,用一对传输线既可实现双向通讯。
优点是成本低、传输距离可达几千米,缺点是速度慢。
广泛用于工控设备,测量设备和通讯设备中。
由于USB转串口在计算机端就是一个COM串口,对于工程师而言,既能省掉操作USB的工作量,又能得到USB即插即用的优势,大幅度提高产品开发效率。
我们以市面上最常见的CH340为例,从USB转串口的实现、通讯、尺寸和应用4个方面来分别介绍下:2、特点●全速USB 设备接口,兼容USB V2.0。
●仿真标准串口,用于升级原串口外围设备,或者通过USB增加额外串口。
●计算机端Windows 操作系统下的串口应用程序完全兼容,无需修改。
●硬件全双工串口,内置收发缓冲区,支持通讯波特率50bps~2Mbps。
●支持常用的MODEM 联络信号RTS、DTR、DCD、RI、DSR、CTS。
●通过外加电平转换器件,提供RS232、RS485、RS422 等接口。
● CH340R 芯片支持IrDA 规范SIR红外线通讯,支持波特率2400bps到115200bps。
●内置固件,软件兼容CH341,可以直接使用CH341的VCP驱动程序。
●支持5V 电源电压和3.3V电源电压甚至3V 电源电压。
●提供SOP-16、SOP-8和SSOP-20以及ESSOP-10、MSOP-10无铅封装,兼容RoHS。
一,USB转串口的实现USB转串口即计算机端USB口转换为通用串口,一般为异步串口UART,既满足为缺少串口的计算机扩展异步串口,又可以将普通的串口设备升级到USB,还能将开发USB的难度降低至串口透明传输。
USB Serial Converter (Micro USB B type)2014.02Rev. 1.01Contents1.Introduction (2)1-1. Overview (2)1-2. Package Contents (2)1-3. System Requirements and Restrictions (2)1-4. RS-232C connector Pin Assignment (3)2.Installation and Operation on Android OS (4)2-1. Installation of USB60Term application (4)2-2. How to operate USB60Term (5)3. Specifications (8)*All trademarks and logos are the properties of their respective holders. *The specifications and pictures are subject to change without notice.11.Introduction1-1. Overview● REX-USB60MB is a USB to serialconverter. Compatible with UniversalSerial Bus specifications Rev. 1.1.● Up to 230.4Kbps data transfer rate.●Micro USB (B type Male)Easy to connect Android tablet or smartphone.●Power/Transmit/Receive LED indicatorsfor monitoring communication status.1-2. Package ContentsThis product is shipped with the following items:● REX-USB60MB USB Serial Converter● Warranty Card in JapaneseNote: Not include the printed document of User’s manual and Software CD. 1-3. System Requirements and RestrictionsHost machine●Android tablet/smart phone with free Micro USB B type portOperating System● Android OS 3.2、Android OS 4.0 or laterNote:The Android driver software for this product is not provided from RATOC Systems, Inc.The FTDI Java D2xx for Android Library which is provided by FTDI Ltd, “D2xx.jar” works with this product.And we made the terminal application “USB60Term” using “D2xx.jar”, published at Google Play.21-4. RS-232C connector Pin AssignmentThe pin assignment of the connector is below:This DB9pin connector is compatible with ANSI/EIA/TIA-574 specifications.1 2 3 4 5Signal NameDirectionDTE – DCE. Meaning1 DCD <--- Data Carrier Detected2 RXD <--- ReceivedData3 TXD ---> TransmittedData4 DTR ---> Data Terminal Ready5 GND - SignalGround6 DSR <--- DataSetReady7 RTS ---> Request to Send8 CTS <--- Clear to Send9 RI <--- RingIndicator6 7 8 932. Installation and Operation on Android OS Please make sure that the Android tablet meets the following specifications: •USB port is Micro-USB B or AB•Android OS version is 3.2, 4.0 or later•USB Host mode is available2-1. Installation of USB60Term applicationDownload the terminal application “USB60Term” from Google Play.1) Start Google Play. Type “USB60” to the search box on Google Play.2) Select “USB60Term” from the search result, and install it.3) After USB60Term application is installed, connect USB Serial Converter. Then, the below window will show:Set the check to the checkbox “[ ] Useby default for this USB device”.If you set the uncheck to the abovecheckbox, the above popup windowshows up at each time attaching USBserial converter.4) Select “OK”, and then start USB60Term. The below window will show:After the USB Serial Converter is recognized, the “Connected” message shows up on the left of “USB Serial”. And then, it will be ready for use.42-2. How to operate USB60TermWhen the USB60Term starts, the below window will show:1Status of detecting USBSerial Converter Display the status of detecting USB SerialConverter, this status shows “Connected” or “Not connected”.2 “To setting” buttonThe button for changing serial parameter.After changing the parameter values, tap the“Configure” button to enable new values.3 Send data fieldAfter tapping this field, enter the send data.4 Receive data fieldDisplay the received data.The displayed data is holding till the “Clear ”buttonis tapped.5 Option menuOption menu shows up6 “Send” buttonTransmit the data of the “send data field “ 7 “Send with CR+LF” buttonTransmit the send data with CR code(0x0D) and LF code(0x0A) 8“new line [CR+LF]” checkbox Before transmitting the send data, an LF(0x0A)code in the send data will be replaced with the CR+LF(0x0D+0x0A) code.9 “Clear” buttonErase the data of the “Receive data field ” Option menuRTS_clear checkboxWhen checked the “RTS_clear” checkbox, then the RTS signal will be stable to clear (off). If unchecked this checkbox, the RTS signal will be unstable after opening serial port.5How to send dataWhen tapping the send data field, the software keyboard shows up. Then, enter the send data.You can set multiple lines with a new-line.After entering the send data, tap the “Send” button or the “Send with CR+LF” button at the upper-right of screen. Then, the send data will be transmitted.How to receive dataThe data from USB Serial Converter will be always received.And the received data will show at the “receive data field”.When tapping the “Clear” button, the data of the “Receive data field” will be erased.6How to change serial parameterAfter tapping the “To setting” button, you can change serial parameter values. When edit is ready, the “To setting” button will be changed to the “Configure” button. And the back-ground color of serial parameter values will be changed in light blue.Baud Rate Stop Bit Data Bit Parity Flow ControlAfter finishing editing the parameter values, tap the “Configure ” button for changing values.73. SpecificationsProduct Name REX-USB60MBSerial Input/Output level RS-232C levelUSB Specification USB(Universal Serial Bus) Specifications Rev. 1.1 Connector USB :Micro-USB B maleRS-232C:D-Sub9 male (with anchor [#4-40]) Number of I/O ports 1 portUnit Dimensions 3.35[L] x 1.1[W] x 0.43[H] in (85[L] x 28[W] x 11[H] mm) Cable Length Approx. 2.83 ft (85 cm)Weight 0.194 oz (55 g)Data transfer mode Asynchronous (Start stop synchronization)Data transfer Rate (Baud) 300/600/1,200/2,400/4,800/9,600/19,200/38,40057,600/115,200/230,400 bpsTransmit Distance Within 50ft (15m)Power Voltage DC+5V (Powered for USB Bus)Power Consumption Average: 36mA(5V) Max.: 60mA(5V)Serial Parameter Data bit: 7/8 Start bit:1 Stop bit: 1/2Parity bit: even/odd/noneRS-232C connector D-SUB9PIN RS-232C connector MaleANSI/EIA/TIA-574LED Indicators PWR:Power LEDIf 5V power from USB bus is properlysupplied from USB bus, this indicator LEDwill be on.TXD:Transmit data indicator (Host to Device)RXD:Receive data indicator (Device to Host) Operating Environment Temperature: 32ºF to 122ºF (0ºC to 50ºC)Humidity: 10 to 90% (non condensing)Storage Environment Temperature: -4ºF to 149ºF (-20ºC to 65ºC)Humidity: 10 to 90% (non condensing)Note:1.Do not remove while the application is communicating. System will beunstable.2.Do not operate to suspend while the application is communicating.System will be unable to resume properly.3.This product does not support the serial mouse for connecting to RS-232Cport.89。
Android 通过两种模式来支持各种 USB 外设和 Android USB 配件(指那些符合 Android 附件协议的 硬件) :USB 配件和 USB 主机。
在 USB 配件的模式之下,外部的 USB 配件就像 USB 主机那样。
这 种配件可以包括机器人控制器,基站连接器,医疗和音乐设备,电话亭以及读卡器这样很多的设备。
这样就使得那些搭载 Android 系统的设备不需要具备主机的特性就可以和 USB 硬件进行交互。
Android USB 配件是指那些专门用来为搭载 Android 系统的设备工作以及符合 Android 附件通信协议 的设备。
在 USB 主机的模式之下, 搭载 Android 的设备就像主机那样工作。
这些设备包括数码相机, 键盘,鼠标以及游戏控制器。
Android USB 设备被设计成具有广泛的应用领域,可以很好的完成人机 互动应用的通信设备。
图 1 就显示了这两种模式的区别。
当搭载 Android 系统的设备处于主机的模式下,它就充当 USB 主机 并且为总线提供能源。
而当搭载 Android 系统的设备处于 USB 配件的模式下时,连接的 USB 硬件(这 种情况下,指的是一个 Android USB 配件)作为主机一样并且为总线提供能源。
在 Android3.1(API12 级)或较新的平台直接支持 USB 配件和主机模式。
USB 配件模式以一个附加 的类库的方式支持范围更广的设备 被移植到 Android 2.3.4(API10 级)。
设备生产商可以决定是否在 系统镜像上附加这个类库。
注意:支持 USB 主机和配件模式主要取决于设备的硬件,而不是平台的等级。
你可以通过一个 [[<uses-feature>]]元素来为设备进行过滤以支持 USB 主机和配件。
看这个 USB 配件和主机文档来 了解更多的详情。
调试注意事项当用 USB 主机或者配件调试应用程序时,你最好有连接到搭载 Android 程序的设备的 USB 硬件。
Model:UT-8823FUSB/RS-232 1Port接口转换器使用说明书【目录】一、概述 (3)二、主要功能 (3)三、硬件安装及应用 (3)四、性能参数 (3)五、连接器和信号 (4)六、产品外形和通信连接示意图 (4)七、故障及排除 (5)八、产品外观图 (6)九、安装驱动程序步骤…………………………………………………………6-12一、概述随着PC产业的不断发展,USB接口正在逐渐替代老式PC的各种低速外围接口,然而目前工业环境中许多重要的设备仍然使用RS-232接口界面设计,因此许多用户使用USB到RS-232转换器来实现PC机与RS-232设备之间的数据传输。
UT-8823F是一款通用的USB/RS-232转换器,无需外加电源、兼容USB、RS-232标准,能够将单端的USB信号转换为RS-232信号,转换器内部带有零延时自动收发转换,独有的I/O 电路自动控制数据流方向,即插即用。
确保适合一切现有的通信软件和接口硬件。
UT-8823F可以为点到点通信提供可靠的连接。
数据通讯速300-460800bps,支持USB到RS-232的信号转换。
二、主要功能接口转换器支持以下通信方式:1、点到点通信方式三、硬件安装及应用安装UT-8823F前请先仔细阅读产品说明书,将产品USB端通信电缆接入电脑USB接口端,本产品采用USB/DB9F、通用连接器为输入/输出接口,无需设置自动实现RS-232通信方式,可使用双绞线或屏蔽线,连接、拆卸非常方便。
转换器为9线制,DCD、RXD、TXD、DTR、GND、DSR、RTS、CTS、RI 全信号连接。
四、性能参数1、标准:符合USBV1.1、1.0、2.0标准EIA RS-232标准2、USB信号:VCC、DATA-、DATA+、GND、FG3、RS-232信号:DCD RXD TXD DTR GND DSR RTS CTS RI4、工作方式:异步工作、点对点工作5、方向控制:采用数据流向自动控制技术,自动判别和控制数据传输方向6、波特率:300-460800bps,自动侦测串口信号速率7、负载能力:支持点到点通信方式8、传输距离:RS-232端5米、USB口不超过5米9、接口保护:±15KV静电保护10、接口形式:USB端A类接口公头,DB9公头的连接器连接11、传输介质:双绞线或屏蔽线 12、外形尺寸:1530mm ×34mm ×16mm13、使用环境:-40℃ 到 85℃,相对湿度为5%到95%14、支持Windows95/98/2000/2008/xp/Vista/win7/8/8.1/10/11、MAC 、Linux 等五、连接器和信号2、USB-A 类:USB 信号输入及引脚分配图六、产品外形和通信连接示意图① 标准USB A 类接口公头 ② 滤波磁环③ 黑色带屏蔽USB2.0通信线④ 标准DB9公头⑤ 主芯片采用英国FTDI 公司的产品1、DCD2、TXD3、RXD4、DSR5、GND6、DTR 7、CTS 8、RTS 9、RI七、故障及排除1、 数据通信失败A 、检查USB 接口接线是否正确 B 、检查RS-232输出接口接线是否正确C 、检查供电是否正常D 、检查接线端子是否连接良好2、数据丢失或错误A 、检查数据通信设备两端数据速率、格式是否一致B 、检查数据通信设备两端数据收发数据量是否一致八、产品外观图九、安装驱动程序步骤当插上UT-8823F 产品的时候系统会自动弹出如下的窗口(如不是XP 系统可选择设备管理器或者一键安装程序进行安装),选择[从列表或指定位置安装(高级)]这一项,点击下一步系统弹出程序选择路径安装选项窗口如下图,选择[在这些位置上搜索最佳驱动程序] [在搜索中包括这个位置前面打钩]点击[浏览]系统弹出[浏览文件夹]窗口,拉动滚动条选择(选择光盘驱动器或驱动文件software )单击打开选择电脑适用的系统如windows xp ,选择[USB2.0 Driver 下的win2000 xp64 server2003 2008x64 Vista x64 win7 x64]点击确定(其它的系统对应驱动不同)点击下一步如下窗口正在安装驱动程序完成找到新硬件向导,点击完成系统会再次弹出新硬件向导,找到USB Serial Port 新硬件向导,点击下一步,以下的向导和USB Serial Converter 是一样的,选择[从列表或指定位置安装(高级)点击下一步。
支持Android的USB/串口转换器
USB/串口转换器是实现USB与RS-232/RS-485/RS-422串口设备相互通讯的一种协议转换装置(USB协议-串行通信协议)。
USB/串口转换器是实现USB与RS-232/RS-485/RS-422串口设备相互通讯的一种协议转换装置(USB协议-串行通信协议)。
在通信主机(USB)和RS-232/RS-485/RS-422串口设备之间,无论是通信主机发送信息至指定的RS-232/RS-485/RS-422串口设备或是RS-232/RS-485/RS-422串口设备发送信息至指定通信主机,都可以经其轻易且正确地传输。
USB232GH3产品提供一个USB口,一个隔离的RS232/RS485/RS422串口。
USB232GH3不仅支持WINDOWS、WINCE、MAC-OS、LINUX,而且还支持Andriod,也是世界上最小的高速光隔USB/RS-232/485/422转换器!
现在的平板电脑和智能手机都有USB口,本文以波仕USB232GH3产品为例介绍在Android系统下的USB扩展串口的方法。
将USB232GH3型USB/串口转换器的USB口外插到平板电脑的USB口即可,有些可能要通过接USB-OTG线。
USB232GH3产品的
RS-232/485/422串口端是一个DB-9针座,具有RS-232、RS-485、RS-422全部引脚。
当作为RS-232口时与PC机的DB-9针RS-232口的2、3、5脚分配完全相同。
作为RS-422时,T+、T—是指从USB232GH3向外发送。
注意RS-485和RS-422通信时建议要接地线(5脚)。
RS-485/422无须跳线选择。
RS-485/422信号的参考地线与RS-232的GND是一样的。
USB232GH3实现了USB与串口(RS-232/485/422)之间的2500V光电隔离。
USB232GH3的串口最高通信速率为115。
2Kbps,内置有600W抗雷击浪涌保护器。
USB串口驱动程序分为虚拟串口驱动和直接端口驱动。
目前USB232GH3的Android 驱动程序为直接端口驱动,并且只支持ARM芯片。
我们已经在Android2。
3和Android2。
6测试通过。
Android实际上可以理解为一个比较完善界面和功能的LINUX、其内核仍然是LINUX。
Android的USB-串口驱动安装仍然要在LINUX开发系统下完成,运行UBUNTU10。
04。
分步运行以下指令:
makeconfigomap3_beagle_defconfig
makemenuconfigARCH=armCROSS_COMPILE=arm-eabi-
makeARCH=armCROSS_COMPILE=arm-eabi-uImage
进入下面的界面:
通过以下指令配置内核:
adbpull/proc/config。
gzconfig。
gz
catconfig。
gz>~/android-kernel-source/tegra-android-tegra-2。
6。
36-9001adc/。
config
然后设置串口访问权限:
/dev/ttyUSB*0666rootroot
echo“Helloserialport”>/dev/ttyUSB0
cat/dev/ttyUSB0
这样就可以外接USB232GH3扩展出串口了。
Android下对串口的访问目前只能通过JAVAAPI。
随产品配套的光盘中已经提供了例程。