
Comfort Panel (精智系列面板)下载参考手册 - ID_ 75215964
- 格式:pdf
- 大小:4.47 MB
- 文档页数:29

使用 TIA 博途软件进行工程组态SIMATIC HMI机器可视化的最佳选择效率达到新高度/fom生产效率新基准,打造可持续性竞争优势高效工程,成就创新瑞士 Solinaut 公司是一家工程服务与自动化解决方案提供商,凭借与西门子的密切合作以及西门子性能卓越的 TIA 博途系统,致力于显著提高客户的经济效益。
由于 TIA 博途工程组态系统中,只需一步操作即可创建多个参数,而且所有块都保存在系统的各个库中,极大缩短了程序员的开发时间。
因此,Solinaut 只需重点关注自动化解决方案中的数据直观清晰显示问题即可。
正是基于以上优势,该公司才能为客户量身定制不同的解决方案。
Altendorf 奶酪制品厂作为他们的主要客户,从中获益匪浅。
视觉的盛宴—奶酪的美味需要亲自品尝,方能感受其魅力随着全球市场竞争的日益激烈,许多与 Altendorf 奶酪制品厂相似的企业开始使用自动化系统。
一方面,自动化系统可充分发掘设备或工厂在整个生命周期内的潜能,显著降低生产能耗。
另一方面,这种系统操作直观易用,产品质量一目了然。
正是基于以下优势,系统集成商 Solinaut 为 Altendorf 奶酪制品厂定制的专业可视化解决方案才能获得巨大成功:•在流程图中集成各种特定的画面模板,极大简化了操作员的操作过程•使用滑入窗口和弹出窗口,实现各种功能快速访问•集成更多控件,支持远程维护。
如今,乳制品厂对自动化系统的投资回报已初见成效。
生产时间也仅为过去的一半,能源与生产用水量同时也获得了显著降低。
公司负责人 Erich Keller 对工厂的未来发展充满信心。
更多资讯,敬请访问:/hmi-video-altendorf2SIMATIC HMI — 智能界面 (sm@rt interface)作为人机对话的唯一接口,HMI 解决方案可实现完美的交互且优势彰显:• 高生产力 — 竞争力大幅提升• 高效率 — 成本显著降低• 高利用率 — 时间大幅缩短色彩绚丽的人机界面操作设备根据应用,选择最佳 HMI 设备!故障安全和信息安全保护投资和知识产权以及安全的操作!轻松便捷的设备调试测试与维护更为轻松快捷!3从设备可视化到高性能的 SCADA 系统,TIA 博途中集成有SIMATIC WinCC 和其它高效工具,可涵盖工程组态与可视化软件的所有功能,实现与所有性能等级应用的无缝衔接!SIMATIC WinCC Basic 软件:对精简面板的控制功能进行了优化,适用于简单解决方案。

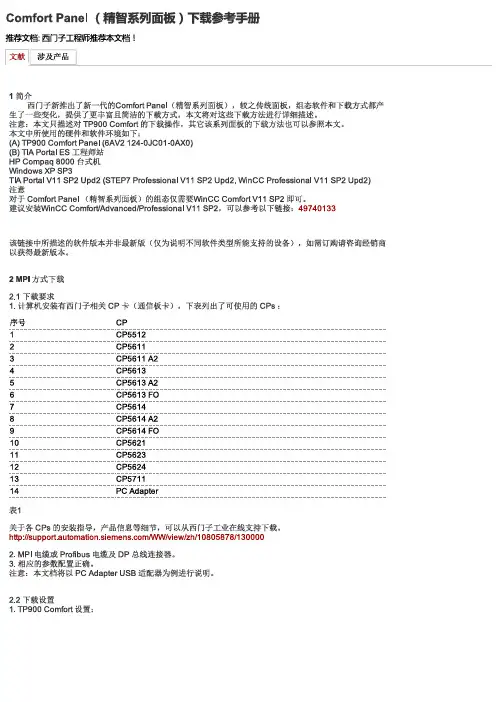
Kickasspanel FULL COLORSAFETY PRECAUTIONS:Do not operate the equipment before studying the instruction manual and the accompanying safety precautions. Make sure that Lupo Safety Instruction is always included with the equipment! Lupo products are intended for professional use. Do not place or use the equipment where it can be exposed to moisture, extreme electromagnetic fields or in areas with flammable gases or dust! Do not expose the equipment to hasty temperature changes in humid condition as could lead to condensation water in the unit. Equipment must only be serviced, modified or repaired by authorized. Dealers or the factory.CAUTION - BURN HAZARD - HOT PARTS Do not touch hot parts with bare fingers! LED bulbs and certain metal parts emit strong heat when used!Do not point lamps too close to persons. Always use the fixtures with the front part closed.NOTICE - EQUIPMENT OVERHEATING RISK Do not obstruct ventilation by placing filters, diffusing materials, etc. over inlets and outlets of the equipment ventilation or directly over glass cover or LED bulbs.FINAL DISPOSALEquipment contains electrical and electronic components that could be harmful to the environment.Equipment may be returned to Lupo distributors free of charge for recyclingaccording to WEEE. Follow local legalrequirements for separate disposal of waste, for instance WEEE directive for electrical and electronic equipment on the European market, when product life has ended.MAINTENANCE AND CAREPlease do not forget that the safe operation of lampheads also includes their maintenance and care.A visual inspection should be conducted before every use and an inspection ofelectrical safety should be conducted at least once every 12 months.WARRANTYThe warranty period for Lupo products and those marketed by Lupo is twelve months from the date of delivery. Lupo guarantees that the goods it supplies are well manufactured and of good quality. The warranty guarantees the repair of any parts that show acknowledged defects in materials, construction orworkmanship during the warranty period. The guarantee excludes any liability for direct or indirect damage of any kind and for any reason, for which Lupo will therefore not be required to pay compensation. The customers shall see to delivering the parts that need repair or replacement to Lupo’s works at their own expense and risk. The repaired or replacement parts shall be delivered by Lupo ex-works. The customers will be charged for materials and labor or replacement of the product after the expiration of the warranty period.Thanks for having purchased Lupo products. All the products are made in Italy and all the efforts have been put to keep the quality standards high. We hope this product can help you in your job and make your life easier as a professional. We also hope you will enjoy its use and we would be happy to receive your feedback about it.PLEASE NOTE:This manual is valid from 3.6 firmware version.•Device for indoor use only.•Maximum ambient temperature: 35 °C.•Make sure power supply plug is suitable for power required.•To switch on the light push the on/off button.•Kickasspanel model are equipped with new generation high quality powerleds. ATTENTION: when the C type cable is connected, and the unity is powered by Type C cable, the power is 50%.Kickasspanel Diffuser Stand and camera adapterUSB cableFor battery use:insert the battery (not included) and switch ON the unit.1For use with USBcable: insert che USB cable in the USB port andswitch ON the unit.* Charger SV min. 2A2For use with ACAdapter Connection: insert the Adapter Connection in the AC port and switch ON the unit.3Intensity knobUSB Port* Charger SV min. 2A Temperature knob DisplayUSB PortAC Adapter ConnectionLIGHT MODESA. CCT MODE: Warm and cold white control mode. It allows you to adjust colour temperature (CCT), green/magenta compensation (GN) and light intensity. This is the default settingB. HSI MODE: Colour composition mode. It allows you to adjust hue of colour (HUE), colour saturation (SAT) and light intensity.C. RGBW MODE: RGBW colour control mode allows to individually set the R, G, B, W, Color Temperature (CT), green/magenta compensation (GN) values and to adjust light intensityD. P RESET MODE: Mode with 53 PRESET colors, 48 factory preset and 5 user-defined preset. 1. In MANUAL OPTIONS menu select PRESET MODE .2. Select the PRESET to be activated with the « » 1 o « » 3 buttons, confirm the selection by pressing the « OK » 2 button.3. In current mode, use the « » 1 o « » 3 button to change the PRESET in ascending or descending order. THE PRESET ON THE DISPLAY IS THE SELECTED PRESET .4. Use the « INTENSITY » 4 knob to adjust the light intensity from 0 to 100%.SAVING THE SET VALUES AS A PRESET You can store up to 5 PRESETS .1. In CCT / HSI / RGBW mode, press the « » 1 and « » 3 at the same time.CONTROL PANELMANUAL OPERATION-In current mode press the « OK » 2 button to enter the main MENU. -In the sub-menus press the « OK » 2 button to confirm a selection.-Use the « » 1 or « » 3 buttons to navigate in the main MENU and sub-menus. -Use the « INTENSITY » 4 knob to adjust the light intensity from 0 to 100%. -Use the knobs 5 and 6 to adjust the light mode parameters. -Display 7.1. Press the « OK » 2 button to enter the main MENU.2. Select MANUAL by pressing the « OK » 2 button.3. Select the light mode between CCT / HSI / RGBW / PRESET / EFFECT with the « » 1 or « » 3 button, press « OK » 2 to confirm selection.4. See LIGHT MODES.2. Save the set values in one of the available presets between USER PRESET 1 / 2 / 3 / 4 /5 press the « » 1or « » 3 button to select the PRESET number and press « OK » 2to confirm the selection. THE SET COLOR IS SAVED AS PRESET."BUSY" indicates that in the user preset there are parameters memorized if you select it, the parameters will be replaced by the new ones. "EMPTY" indicates that the user preset is free.E. SPECIAL EFFECT MODE: Mode with 10 SPECIAL EFFECTS. STROBE / PARTY / COPCAR /DISCO / TELEVISION / PAPARAZZI / LIGHTNING / EXPLOSION / FIREWORKS / FIRE.1. In MANUAL OPTIONS or DMX MODE menu select EFFECT MODE.2. Select the EFFECT to be activated with the « » 1o « » 3 buttons, confirm theselection by pressing the « OK » 2 button.3. In current mode, use the « » 1o « » 3 button to change the EFFECT in ascending ordescending order. THE EFFECT ON THE DISPLAY IS THE SELECTED EFFECT.4. Use the knobs 5 and 6 to adjust the effect setting values. See table below.ATTENTION - Only to STROBE effect1. The strobe effect is AVAiLABLE ONL Y IN MANUAL OPERATION.2. The strobe effect is applied to the parameters of the last configured CCT/HSI/RGBW/PRESETmode.3. The STROBE effect is NOT WORK if PARTY, COPCAR, DISCO, TELEVISION, PAPARAZZI ,LIGHTNING, EXPLOSION, FIREWORKS or FIRE effects are in functioning.DEVICE SETTINGS1. Press the « OK » 2 button to enter the main MENU.2. Navigate through the MENU using the « » 1or « » 3 buttons, select DEVICESETTINGS, press the « OK » 2 button to confirm the selection.3. Navigate through the FAN / DISPLAY / MENU VIEW / FILTER / LINEARIZATION / CCT LIMITfunctions, use the « » 1and « » 3 buttons to select the desired function and press « OK » 2 to confirm the selection.4. Within each function select the option to be activated, use the « » 1and « » 3buttons to select one between the options, press « OK » 2 to activate it.Use USB port for firmware updates.Display: Time during which the display backlight stays on. 30sec / 1min / ALWAYS ON . Filter: It is the speed response of the system (smooth factor).FULL SPEED / NORMAL SPEED / HIGH SPEED / LOW SPEED.Linearization: Linearization is the compensation curve for the human eye’s perception of the luminous intensity emitted as a function of the required power. Required power = dimmer value on the display. LINEAR / EXPONENTIAL / LOGARITHMIC .Linear: No compensation, the intensity of the light is directly proportional to requested power.Exponential: The light intensity increases from 0 to 100 exponentially. Logarithmic: The light intensity increases from 0 to 100 T Limit: The colour temperature is limited. 3200K - 5600K / 2800K - 10000K.RESET DEVICE1. Press the « OK » 2 button to enter the main MENU.2. Select RESET DEVICE using the « » 1 or « » 3 buttons, press the « OK » 2 button to confirm the selection.3. Select YES with the « » 1 or « » 3 buttons, press « OK » 2 to confirm the selection.4. The device will ask for further confirmation, select YES by pressing the « OK » 2 button.THE DEVICE WILL RETURN TO FACTORY DEFAULT SETTINGS.Select “EXIT” to return to the current mode.Select "BACK" to return to the previous menu. After 1 minute ofinactivity in the menu, the device automatically exits and returns to the last selected mode.MANUALDEVICE SETTINGSRESET DEVICEEXITCCT LIMIT 3200K - 5600K 2800K - 10000K BACKYESBACKDISPLAY OPTIONS30 SEC 1 MINALWAYS ON BACKFILTERFULL SPEED NORMAL SPEED HIGH SPEED LINEARIZATIONEXITLINEARBACKLOGARITHMIC EXPONENTIAL RGBW MODE CCT MODE HSI MODE EFFECT MODEPRESET MODERED ...SOFT PINK BLUELOW SPEED STROBE PARTY COPCAR DISCOTELEVISION PAPARAZZI LIGHTNING EXPLOSION FIREWORKS FIRE BACKEXITGREEN USER PRE3USER PRE4USER PRE5BACK BACK2 BatteryBattery option 1: NP-F-SERIES (7.4 V)Battery option 2: V-Mount type (14.8 V)The accessories are products sold separately.23 AC Power Cord Cable and AC Adapter (cod. 752)AC input: 100 V - 240 V DC output: 24 VAttention: AC center pin must be positive.3Lupo srlVia V. Sassi 28/30Collegno (TO) - 10093 - Italy Phone: +39 011 411 9919E-mail:***************Website: www.lupo.it。


Control PanelD9412GRelease Notes for Version 7.00March 20071.0 IntroductionAlthough the D9412 (expanded version) Control Panel is no longer manufactured (replaced by the D9412G), Firmware Update Kits (P/N: D9499-0700) are available for this product. Refer to theD9412G/D7412G Program Entry Guide (P/N: 47775D or later) when programming a D9412 Control Panel.2.0 RequirementsTable 1: Handlers Supported for Version 6.90and LaterHandler Version Changes 9000MAIN 1.15∗ No changes since version 6.30 RADXUSR1 1.06∗ Updated to support GV2Series Control Panels RADXUSR2 1.05∗ Updated to support GV2 Series Control Panels RADXPNTS 1.08∗Updated to support GV2 Series Control Panels RADXSKED 1.04∗ Updated to support GV2 Series Control PanelsRADXAUX1 1.07∗ Updated to not support GV2 Series Control Panels RADXAXS1.06∗Updated to support GV2 Series Control Panels∗Newer versions are available but are not required for the D9412G Control Panel.For handlers with new prompts, refer to theD9412G/D7412G Program Entry Guide (P/N: 47775D or later). To acquire an update for your D5200 Programmer, call the Bosch Security Systems Handler Update System toll-free at (800) 657-4584. Make a separate call for each handler. 3.0 Version 7.00 Release NotesCorrection in Version 7.00Changes allow RPS workstations located on a private network behind a router or firewall to communicate with control panels outside of that network. No special router or firewall settings are required. The control panels support Port Address Translation (PAT) for networks that require it.4.0 Previous Version 6.90 ReleaseNotes4.1 Corrections in Version 6.90Enhanced Communication TroubleWhen a Route Group is configured with an IP destination in the primary path and a telephone number in the backup path, a break in the Network Link Integrity annunciates locally.When an Enhanced Communication Troublecondition occurs, it generates a system-wide trouble message (COMM TRBL SDI ##). The new troubleD9412GThe trouble condition is also sent through a backup path to the central station as Communication Trouble SDI ##, using the same virtual address numbers as the trouble messages. The communication trouble event also creates new Modem IIIa 2 messages that the central station might need to add to their automation software. Refer to Events 157 to 160 in the D6600 Computer Interface Manual (P/N: 4998122703) for the details of central station data changes. Unsupported Point TypePreviously, if the value of 11 was used with RADXPNTS version 1.06 or later when configuring the Point Index parameters, the control panel might not operate as expected. This condition is corrected so that the control panel responds to a P# Type value of 11 as a disabled point.5.0 Previous Version6.80 ReleaseNotes5.1Corrections in Version 6.805.1.1 Local Event ReportingSeveral changes in this release prevent the controlpanel from sending local alarm events intermittently tothe central stations. All local alarm events now remain local.5.1.2 Ethernet Link IntegrityFor UL 1610 Line Security (formerly Grade AA) Intrusion System installations and for UL 864 Commercial Fire installations, use the parameters shown in Table 2 when configuring the Heartbeat Poll. For additional details, refer to Programming Path Numbers and IP Addresses for Enhanced Communications in the D9412G/D7412G Program Entry GuideTable 2: Parameters for Heartbeat PollConfiguration in Version 6.801Number of IP Paths Poll Rate (sec) ACK Wait Time (sec)Number of Retries1 30 62 to 19 1 30 8 2 to 12 1 30 10 2 to 8 1 30 12 2 to 5 1 30 14 2 to3 1 60 6 2 to 14 1 60 8 2 to 8 1 60 10 2 to5 1 60 122 1 752102 32 1 90 6 2 to 9 1 90 8 2 to 4 1 90 10 2 1 120 6 2 to 4 1 145 522 752 82 323 752 62 324 75252321 The parameters in this table are for Version 6.80 only .2Recommended settings for the corresponding number of IP paths. 5.2 Enhancements in Version 6.80 Summary Fire Relay SustainWhen the Silent Alarm Relay for Area 2 isprogrammed with 24, the Summary Fire Alarm Relay remains active until all Fire Alarms are cleared from the keypad display. The default operation is consistent with the Summary Fire Relay operation in Version 6.60 and older. This feature provides a method of maintaining fire strobes after the alarm bells are silenced. 5.3 Known Issue in Version 6.80When a Route Group is configured with an IP destination in the primary path and a telephone number in the backup path, a break in the Network Link Integrity does not annunciate locally.D9412G6.0 Previous Version 6.70 ReleaseNotesEnhancement in Version 6.70Arming Scope RestrictionsWhen the Silent Alarm Relay for Area 3 isprogrammed with 59, some prompts in the Function List become non-functional. Refer to Table 3.Table 3: Arming Scope RestrictionsMenu Function Function NumberDisabled Prompt Disarm Menu 1 DISARM ALL?Master Arm Delay 2 MASTER ARM ALL? Master Arm Instant3ARM INSTANTALL?7.0Previous Version 6.60 Release Notes7.1Corrections in Version 6.607.1.1False Ground Fault Trouble ConditionsThe D9412G Control Panel has a ground fault detection circuit that, when enabled, detects andannunciates ground fault conditions on Terminals 1 to 9 and 11 to 32. The control panel also detects and annunciates ground faults on any device connected to the control panel.In environments with severe electrical noise, D9412G Control Panels with version 6.50 software or lower might indicate false ground fault trouble conditions.7.1.2 Enabling Ground Fault DetectionConfigure the D9412G Control Panel as follows to enable ground fault detection: •Set Area 5’s silent relay to any value other than 0 (use 1 to 128). Setting Area 5’s silent relay to 0 disables ground fault detection. The silent relay’s default value is 0 (disabled).•Switch S4 enables the ground fault hardware circuit: - S4 closed : ground fault enabled - S4 open : ground fault disabled 7.1.3 D9412G Ground Fault Specifications•The control panel detects a ground fault if any terminal or field wiring is shorted to earth ground through an impedance of 300 Ω or less.•The control panel does not detect a ground fault if any terminal or field wiring is shorted to ground through an impedance of 200 k Ωor greater. •The control panel might detect ground faults between 300 Ω and 200 k Ω, depending on the terminal to which the ground is applied.7.2Known Issues in Version 6.60•When a faulted local point is force armed, the central station should receive a Forced Close report for that point. The control panel does not send Forced Close reports for faulted local points. •If a local and a non-local point are faulted and force armed, the control panel does not send Forced Armed, Forced Point, or Forced CloseD9412G8.0 Previous Version 6.50 ReleaseNotesCorrections in Version 6.50Intermittent RF Low Battery eventsIn versions 6.30 and 6.40, Points 1 through 8 generate intermittent RF Low Battery events when devices connected to the on-board points change very quickly from normal to off-normal conditions. Firmware version 6.50 corrects this issue.When an RF Low Battery condition occurs on atransmitter, RF Low Battery appears on the D1255 or D1260 Keypad’s display. To determine whichtransmitter has the low battery condition, select one of the following: • View Log? function from the Service Menu (99 + ENT) on the keyboard, o r•Diagnostics function, using the D8125INV. Refer to the D8125INV Operation and Installation Guide (P/N: 49690) for details.If the event is transmitted to the central station, the point number is included in the transmission.9.0 Previous Version 6.40 ReleaseNotes9.1Enhancements in Version 6.409.1.1New Version of Remote Programming Software (RPS) – Version 3.7Although not required for programming of version 6.40, a new version of Remote Programming Software (RPS) is available. If you are an authorized RPS dealer, you can order a D5591-0370 (RPS Upgrade Kit on CD) at no charge.9.1.2Enabling the D1260 in a D9412G Control Panel1. To enable D1260 Keypads, set the commandcenter menu item to Yes for the command center addresses where the D1260s reside.• In the Command Center Assignments section, the prompt is CC#EnhanceCmdCtr . •In the COMMAND CENTER (9000MAIN) section in RPS, the prompt is Enhanced Command Center .For more information, refer to the D9412G/D7412G Program Entry Guide (P/N: 47774D or later). Figure 1: Enhanced Command Center Prompt inRPS2. When power is applied, each D1260 checks thefirmware revision number that resides in the control panel. For each D1260 to work, theDisplay Revision (Command 59) must be enabled and not passcode protected.•In the D5200, this function is located at: 9000MAIN USER INTERFACE Cmd Center Functions Display Rev •In RPS (Figure 2 on page 5), this function is located at:USER INTERFACE Command Center FunctionsD9412GFigure 2: Enable Display Revision Prompt in RPS3. Before exiting RPS, reset the control panel aftercompleting an RPS programming session:a. Click the Reset Panel checkboxb.Click OK . Refer to Figure 3.Figure 3: End Session Dialog BoxFigure 4: Keypad Display9.2 Corrections in Version 6.40Duplicate Events Do Not Report under Comm Fail ConditionsVersion 6.40 corrects the following problem:When a Comm Fail condition occurs in Route Group 1, Route Group 2, or both, D9412G does not send duplicate events to Route Groups 3 and 4 whenduplicate events are programmed for Route Groups 2, 3, 4, or all groups.Support for D1260 Not in Version 6.30 as Stated in LiteratureThe D9412G/D7412G Program Entry Guide (P/N: 47775D) and the D9412 Release Notes for v6.30 (P/N: 43821D) state incorrectly that Alpha V Command Center (keypad) support is available in version 6.30. Only version 6.40 or higher can support the D1260 Alpha V Command Center (keypad) Watchdog Reset EventsVersion 6.40 corrects Watchdog Reset eventsgenerated when a SKED is used to arm a disabled area or a Closing Window and Auto Close prompt is set to Yes (in Area Wide Open/Close ). BFSK FormatBefore version 6.40, the control panel did not send Burglary Restoral reports when using the BFSK communication format. Version 6.40 corrects this issue.Fail to Execute EventsBefore version 6.40, Fail To Execute events incorrectly identified the serial device interface (SDI) device associated with the event. Version 6.40 corrects this issue.Programming Point Indexes for Points 240 – 247In version 6.30 for the D7412G and D7212 Control Panels, if you use a D5200 to assign point indexes to Points 240 through 247, the control panel ignores these points and mistakenly shows missing conditions. Version 6.40 corrects this issue.D9412G9.3Known Issues in Version 6.40Disconnecting Battery during Walk Test Causes D1260 to Stop RespondingWhen the control panel’s battery is disconnected and then reconnected during a Walk Test, the D1260 stops responding and shows Retrieving panel info . The control panel must be restarted to clear the keypad.Areas Armed to “All on instant” Do Not Show Area Text in D1260 View Area StatusWhen arming areas to All on Instant, area text does not appear when using the View Area Status menu function on the D1260. BFSK FormatSupervisory and Fire Supervisory events cannot be29.4 Programming T ipsNetCom CommunicationsIn applications where both the primary and backup paths are programmed to send an IP address, the Path # Poll Rate value for the backup IP address should be set to 0. In the D9412G/D7412G Program Entry Guide (P/N: 47775), refer to: • Routing and Enhanced Routing for information about primary and backup paths.•Enhanced Communications in the RADXAUX1Handler section for information about Path # Poll RateD9412G Notes© 2007 Bosch Security Systems, Inc.130 Perinton Parkway, Fairport, NY 14450-9199 USACustomer Service: (800) 289-0096; Technical Support: (888) 886-6189 F01U035695-02Release Notes for Version 7.003/07D9412GPage 8 of 8。