奥拓电子LCD广告机更新播放节目说明书
- 格式:doc
- 大小:676.50 KB
- 文档页数:5
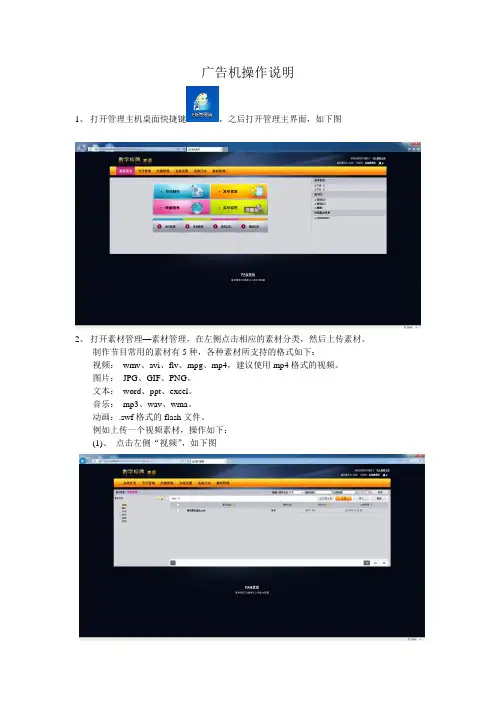
广告机操作说明1、打开管理主机桌面快捷键,之后打开管理主界面,如下图2、打开素材管理—素材管理,在左侧点击相应的素材分类,然后上传素材。
制作节目常用的素材有5种,各种素材所支持的格式如下:视频:wmv、avi、flv、mpg、mp4,建议使用mp4格式的视频。
图片:JPG、GIF、PNG。
文本:word、ppt、excel。
音乐:mp3、wav、wma。
动画:.swf格式的flash文件。
例如上传一个视频素材,操作如下:(1)、点击左侧“视频”,如下图(2)、点击“上传”,然后点击“浏览”选择需要上传的视频。
(视频支持的格式:wmv、avi、flv、mpg、mp4)视频的最大码流为1920*1080. 上传后结果如下图。
上传图片、文本、音乐等素材和视频类似,先选择左侧相应的素材分类,上传相应素材即可。
3、将制作节目的素材全部上传结束后,点击“节目管理”—“制作”,开始制作节目。
如下图。
“节目名称”处输入要定义的节目名称,分辨率选择1920*1080。
功能区各快捷键介绍如下:(1)为输入固定文字,点击后在操作区会出现,点击“请输入文字”,输入所需文字即可。
(2)为输入滚动文字,点击该键后,会出现如下图的设置界面:在“文字输入”处输入文字,然后选择字号、字体颜色、滚动速度,点击“确定”即可。
(3)为日期,点击后即可出现日期,然后双击出现的日期可以进行字体、颜色等的设置。
如下图:(4)为插入图片,点击后出现下图:将所要上传的图片前面的方框打勾,点击“添加”,然后点击“确定”,使用鼠标拖动图片,放置到合适位置即可。
(5)为插入视频素材,点击该键后出现如下图:将需要使用的视频素材名称前的方框打勾,点击“添加”“确定”,然后用鼠标拖动显示区域的大小。
(6)为插入office素材,点击该键后出现下图:将需要使用的office素材名称前的方框打勾,点击“添加”“确定”,然后用鼠标拖动显示区域的大小。
4、将节目制作好后,点击“保存”,然后会弹出如下界面:点击“发布”,然后选择所要下发节目的广告机,点击“确认”后,即可在广告机上看到制作好的界面。


高清广告机----操作说明书---❖目录1.产品概述 ---------------------------------------------32.功能介绍 ---------------------------------------------3 2.1基本设定------------------------------------------------------3 2.2字幕设定------------------------------------------------------3 2.3定制设定------------------------------------------------------42.4图像设定------------------------------------------------------43.播放日志 ---------------------------------------------54.滚动字幕文件制作 -------------------------------------55.屏参数修改方法 ---------------------------------------56.播放列表制作 -----------------------------------------67.分屏文件制作 -----------------------------------------78.插播文件制作 -----------------------------------------79.升级指南 ---------------------------------------------810.拷贝指南 --------------------------------------------8附录1:遥控器按键说明 ----------------------------------9 附录2:多媒体播放支持格式列表 -------------------------101.产品概述此款高清广告机板为解码、驱动一体板,性能优越,能直接驱动1920X1080及其以下的分辨率的LVDS 液晶屏,内含强大的音视频处理功能,支持1080P高清视频、图片播放,能输出高质量的画面和音质。
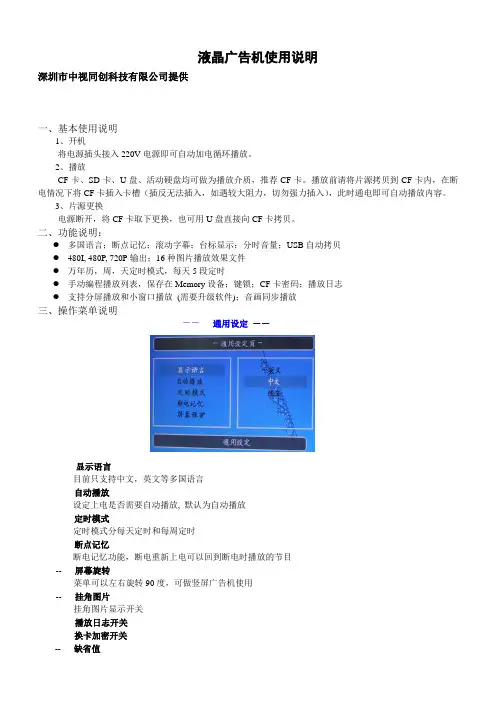
液晶广告机使用说明深圳市中视同创科技有限公司提供一、基本使用说明1、开机将电源插头接入220V电源即可自动加电循环播放。
2、播放CF卡、SD卡、U盘、活动硬盘均可做为播放介质,推荐CF卡。
播放前请将片源拷贝到CF卡内,在断电情况下将CF卡插入卡槽(插反无法插入,如遇较大阻力,切勿强力插入),此时通电即可自动播放内容。
3、片源更换电源断开,将CF卡取下更换,也可用U盘直接向CF卡拷贝。
二、功能说明:●多国语言;断点记忆;滚动字幕;台标显示;分时音量;USB自动拷贝●480I, 480P, 720P输出;16种图片播放效果文件●万年历,周,天定时模式,每天5段定时●手动编程播放列表,保存在Memory设备;键锁;CF卡密码;播放日志●支持分屏播放和小窗口播放(需要升级软件);音画同步播放三、操作菜单说明--通用设定---- 显示语言--目前只支持中文,英文等多国语言-- 自动播放--设定上电是否需要自动播放, 默认为自动播放-- 定时模式定时模式分每天定时和每周定时-- 断点记忆断电记忆功能,断电重新上电可以回到断电时播放的节目-- 屏幕旋转菜单可以左右旋转90度,可做竖屏广告机使用-- 挂角图片挂角图片显示开关-- 播放日志开关-- 换卡加密开关-- 缺省值恢复出厂设置-- 音画同步选择此项在播放图片的同时可同步播放存储卡内的mp3音乐文件,播放视频文件时请关闭此项,否则开机无法自动播放。
–-- 视频输出设定YPbPr和RGB输出(默认为YPbPr)–画面设定设定4:3,16:9 (默认为4:3)–视频制式设定NTSC,PAL,AUTO (默认为NTSC)–分辨率设定480I, 480P, 720P输出(默认为480P)–播放时间图片的播放间隔(1,3,5,8,10,15,20,25秒),默认为3秒拷贝选项此项为通过USB接口向CF卡拷贝文件时的选择,一是拷贝时添加,二是拷贝时删除--视频设定--–播放模式Normal, T->B, B->T, T/B->C, C->T/B, BLD:T->B, L->R, R->L, L/R->C, C->L/R, Implode,BLD:L->R, Fade, Random (默认为Normal)--日期设定--日期万年历功能,用上一曲,下一曲键移动光标的位置,上、下、左、右键更改时间日期设定完毕按ENTER键推出设定时间显示右上角时间显示设定,支持开,关,停止播放时显示, 三种显示模式(默认为关)分时音量(图示)分时段设定不同的音量大小,共分5个时段–定时支持每天5段定时,每段可单独开关,开机时间一定要小于关机时间上,下键调整需要设定的时间,左右键移动光标在通用设定菜单里可以设置按天定时开关机和按一周每天定时开关机--滚动字幕设定--–滚动字幕开关支持开关, 默认为开–速度分为慢,正常,快,默认为正常–前景色可改变字的颜色–背景色可改变背景的颜色-- 字体大小字体大小分为1,2,3号播放日志菜单中打开,会记录机器文件的播放情况●台标文件要求要求文件名必须为“TAIBIAO.LOG“”,注意要大写–台标尺寸为WxH(100x32),为256色,index模式BMP,色盘需要用特定的(ESS256_FULL.act)–如需修改尺寸,需要程序做相应改动–台标制作用Photoshop打开图片,把尺寸做成100X32像素,再设置“图像”-“模式”-“索引颜色”-“调板”-“自定”-“载入”-“ESS256_FULL.act”,把文件存为BMP,然后把文件名改为TAIBIAO.LOG●滚动字幕文件要求–要求文件名必须为“ROLLTXT.ROL”,注意要大写–可支持1千左右个汉字滚动字幕可设大、中、小字体文件排序说明:文件最好以数字命名,播放时的排序按数字大小排列,数字越小越先播放。
盛年不重来,一日难再晨。
及时宜自勉,岁月不待人。
深圳市中恒盛大科技发展有限公司高清广告机解码驱动一体板使用说明书1.产品概述本款广告机驱动解码一体板,能直接驱动1920*1080及其以下的分辨率的LVDS屏,内含强大的音视频处理功能,能输出高质量的画面和音质。
两路USB2.0接口,支持高清视频和图片的播放。
支持USB之间相互拷贝功能,能方便用户更新文件。
2.使用说明2.1 遥控器说明本产品使用的遥控器如下图所示:遥控器各按键功能:电源键:电源键,控制开关机静音:静音功能:快进,连续按速度加快:快退,连续按速度加快:暂停/播放功能: 向上移动光标(播放时弹出控制条菜单): 向左移动光标: 向右移动光标: 向下移动光标(播放时弹出控制条菜单)MENU :进入设定菜单,进入菜单后是确认功能VOL+:音量加VOL-:音量减:播放过程中,按该键进入下一曲:播放过程中,按该键进入上一曲EXIT :退出菜单或播放DEL:光标停留在文件上时,按该键弹出删除菜单2.2 设定菜单设定菜单主界面如下图:2.2.1 通用设定该页设定菜单图片如下:以下个项功能均按左右键来选择。
a.菜单语言:中文:设定菜单语言为中文英文:设定菜单语言为英文b.重复模式:单曲重复:循环播放同一个文件全部重复:循环播放USB根目录下的文件重复取消:播放完一遍根目录下的文件后,停止播放c.播放记录:打开带功能,会自动记录播放的文件名和开始播放的时间,还会记录开关机的时间注:该功能需要用户先在U盘中建立一个PLAY.LOG(可先建立一个同名的txt文件,然后改下后缀就可以了)。
d.断电记忆:播放时自动记录文件播放的文件和播放的时候,断电开机后接着上次断电的地方继续播放(注:不支持音乐文件的断电记忆)e.图片转场模式:设定图片播放时的转场模式。
f.图片播放时间:设定图片刷新的时间(分5s->7s->10s->15s)g.滚动字幕:设定是否打开滚动字幕h.滚动字幕颜色:设定滚动字幕字体的颜色i.字幕背景颜色:设定滚动字幕背景的颜色j.播放类型:图片:只播放存储卡根目录下的图片文件音乐:只播放存储卡根目录下的音乐文件音画同步:播放图片时带有音乐背景,并且一直重复播放图片和音乐文件播放列表:按制作好的播放列表进行播放视频:只播放存储卡根目录下的视频文件全部:播放存储卡根目录下所有能识别的图片音乐和视频文件。

高清广告机使用说明书高清广告机解码驱动一体板使用说明书1.产品概述本款广告机驱动解码一体板,能直接驱动1920*1080及其以下的分辨率的LVDS屏,内含强大的音视频处理功能,能输出高质量的画面和音质。
两路USB2.0接口,支持高清视频和图片的播放。
支持USB之间相互拷贝功能,能方便用户更新文件。
2.使用说明2.1 遥控器说明本产品使用的遥控器如下图所示:遥控器各按键功能:电源键:电源键,控制开关机静音:静音功能:快进,连续按速度加快:快退,连续按速度加快:暂停/播放功能: 向上移动光标(播放时弹出控制条菜单): 向左移动光标: 向右移动光标: 向下移动光标(播放时弹出控制条菜单)MENU :进入设定菜单,进入菜单后是确认功能VOL+:音量加VOL-:音量减:播放过程中,按该键进入下一曲:播放过程中,按该键进入上一曲EXIT :退出菜单或播放DEL:光标停留在文件上时,按该键弹出删除菜单2.2 设定菜单设定菜单主界面如下图:2.2.1 通用设定该页设定菜单图片如下:以下个项功能均按左右键来选择。
a.菜单语言:中文:设定菜单语言为中文英文:设定菜单语言为英文b.重复模式:单曲重复:循环播放同一个文件全部重复:循环播放USB根目录下的文件重复取消:播放完一遍根目录下的文件后,停止播放c.播放记录:打开带功能,会自动记录播放的文件名和开始播放的时间,还会记录开关机的时间注:该功能需要用户先在U盘中建立一个PLAY.LOG(可先建立一个同名的txt文件,然后改下后缀就可以了),目前不支持记录文件名为中文的文件d.断电记忆:播放时自动记录文件播放的文件和播放的时候,断电开机后接着上次断电的地方继续播放(注:不支持音乐文件的断电记忆)e.图片转场模式:设定图片播放时的转场模式。
f.图片播放时间:设定图片刷新的时间g.滚动字幕:设定是否打开滚动字幕h.滚动字幕颜色:设定滚动字幕字体的颜色i.播放类型:图片:只播放存储卡根目录下的图片文件音乐:只播放存储卡根目录下的音乐文件音画同步:播放图片时带有音乐背景,并且一直重复播放图片和音乐文件播放列表:按制作好的播放列表进行播放视频:只播放存储卡根目录下的视频文件全部:播放存储卡根目录下所有能识别的图片音乐和视频文件。
LCD 螢幕使用手冊I2490PXQU/I2790PQU LED 背光1安全性 (4)符號慣例 (4)電源 (5)安裝 (6)清潔 (7)其他 (8)安裝 (9)包裝盒內容 (9)安裝底座 (10)調整視角 (11)連接螢幕 (12)調整 (13)設定最佳解析度 (13)Windows 10 (13)Windows 8 (15)Windows 7 (17)快捷鍵 (19)OSD Setting(OSD 設定) (21)Luminance(亮度) (22)Image Setup(影像設定) (23)Color Setup(彩色設定) (24)Picture Boost (圖片增強) (25)OSD Setup(OSD 設定) (26)Extra(其他) (27)Exit(結束) (28)LED 指示燈號 (28)驅動程式 (29)顯示器驅動程式 (29)Windows 10 (29)Windows 8 (33)Windows 7 (37)i-Menu (40)e-Saver (41)Screen+ (42)故障排除 (43)規格 (45)一般規格I2490PXQU (45)一般規格I2790PQU (46)預設顯示模式 (47)接腳 (48)即插即用 (49)法規 (50)FCC聲明 (50)WEEE 宣告 (51)印度的WEEE 聲明 (51)EPA 能源之星 (51)EPEAT 聲明 (52)TCO DOCUMENT (53)安全性符號慣例下列子章節說明本文件中使用的符號慣例。
附註、注意及警告事項在本指南中,文字區塊可能會透過圖示與粗體或斜體印刷顯示。
這些區塊屬於附註、注意及警告事項,使用方式如下:附註:「附註」代表重要資訊,可協助您更有效利用電腦系統。
注意:「注意」代表會對硬體造成潛在的損害或遺失資料,並告知您如何避免此類問題。
警告:「警告」代表會對人體造成潛在的傷害,並告知您如何避免此類問題。
广告机使用说明指导书高清广告机解码驱动一体板使用说明书1.产品概述本款广告机驱动解码一体板,能直接驱动1920*1080及其以下的分辨率的LVDS屏,内含强大的音视频处理功能,能输出高质量的画面和音质。
,支持高清视频和图片的播放。
支持USB之间相互拷贝功能,能方便用户更新文件。
遥控器说明本产品使用的遥控器如下图所示:遥控器各按键功能:电源键:电源键,控制开关机静音:静音功能:快进,连续按速度加快:快退,连续按速度加快:暂停/播放功能: 向上移动光标(播放时弹出控制条菜单): 向左移动光标: 向右移动光标: 向下移动光标(播放时弹出控制条菜单)MENU :进入设定菜单,进入菜单后是确认功能VOL+:音量加VOL-:音量减:播放过程中,按该键进入下一曲:播放过程中,按该键进入上一曲EXIT :退出菜单或播放DEL:光标停留在文件上时,按该键弹出删除菜单设定菜单设定菜单主界面如下图:通用设定该页设定菜单图片如下:以下个项功能均按左右键来选择。
a.菜单语言:中文:设定菜单语言为中文英文:设定菜单语言为英文b.重复模式:单曲重复:循环播放同一个文件全部重复:循环播放USB根目录下的文件重复取消:播放完一遍根目录下的文件后,停止播放c.播放记录:打开带功能,会自动记录播放的文件名和开始播放的时间,还会记录开关机的时间注:该功能打开后能在U盘自动生成,可以支持中英文文件名的文件。
d.断电记忆:播放时自动记录文件播放的文件和播放的时候,断电开机后接着上次断电的地方继续播放(注:不支持音乐文件的断电记忆)e.图片转场模式:设定图片播放时的转场模式。
f.图片播放时间:设定图片刷新的时间g.滚动字幕:设定是否打开滚动字幕h.滚动字幕颜色:设定滚动字幕字体的颜色i.播放类型:图片:只播放存储卡根目录下的图片文件音乐:只播放存储卡根目录下的音乐文件音画同步:播放图片时带有音乐背景,并且一直重复播放图片和音乐文件播放列表:按制作好的播放列表进行播放(可以支持按日,周,月列表进行播放,详细见后面播放列表制作)视频:只播放存储卡根目录下的视频文件全部:播放存储卡根目录下所有能识别的图片音乐和视频文件。
ContentsImportant safety instructions 5Taking care of your remote control 6Cleaning and servicing 6First things first 7Basic features and benefits 7Packing checklist 7Your LCD TV overview 8Front panel view 8Rear panel view 9Basic connection 11Connecting the power cord 11Connecting an antenna 11Connecting DVD/VCR/AV equipment 12Connecting a camera, camcorder or video game 12Connecting headphones 13Connecting a PC or Notebook 13Remote control overview 14Getting started 18Power On 18Setup Wizard 18Changing channels 18Adjusting the volume 18OSD Navigation 19Navigating the OSD using the remote control: 19Advanced Features 20Empowering Key: Scenario Mode and Favourite Channels 20PIP/PBP/POP 22Parental Control 22Troubleshooting 23Product specifications 24English5Important safety instructionsRead these instructions carefully. Save them for fu-ture reference.1 Follow all warnings and instructions marked onthe product.2 Unplug this product from the power outlet be-fore cleaning. Use a soft, moist cloth for clean-ing. Do not use liquid or aerosol cleaners.3 Do not use this product near water. Do not spillwater or any other liquid on the product.4 Do not place this product on an unstable cart,stand, or table. The product may fall, causing serious damage to the product.5 Slots and openings are provided for ventila-tion; to ensure reliable operation of the prod-uct and to protect it from overheating. These openings must not be blocked or covered. The openings should never be blocked by placing the product on a bed, sofa, rug, or other simi-lar surface. This product should never be placed near or over a radiator or heat register, or in a built-in installation unless proper ventilation is provided.6 This product should be operated from the typeof power source indicated on the label. If you are unsure of the type of power source avail-able, consult your dealer or local power com-pany before use.7 Do not step on or place heavy objects on thepower cord. Carefully route the power cord and any cables away from foot traffic. Do not locate this product where persons will step on the cord.8 If an extension cord is used with this product,make sure that the total ampere rating of the equipment plugged into the extension cord does not exceed the extension cord ampere rating. Also, make sure that the total rating of all products plugged into the wall outlet does not exceed the fuse rating.9 Never push objects of any kind into this prod-uct through cabinet slots as they may touch dangerous voltage points or short out parts that could result in a fire or electric shock. 10 Do not attempt to service this product yourself,as opening or removing covers may expose you to dangerous voltage points or other risks. Re-fer all servicing to qualified service personnel.11 Unplug this product from the wall outlet andrefer servicing to qualified service personnel under the following conditions:a. When the power cord or plug is damaged or frayed.b. If liquid has been spilled into the product.c. If the product has been exposed to rain or water.d. If the product does not operate normally when the operating instructions are fol-lowed. Adjust only those controls that are covered by the operating instructions since improper adjustment of other controls may result in damage and will often require extensive work by a qualified technician to restore the product to normal condition.e. If the product has been dropped or the case has been damaged.f. If the product exhibits a distinct change in performance, indicating a need for service.12 Only use the correct power cord (provided inyour accessories box) for this product. Always disconnect the power cord from the wall outlet before servicing or disassembling this equip-ment.E n g l i s h6Taking care of your remote controlFollow these steps to ensure proper care of your remote control:• Handle the remote control with care. Dropping it, placing it in direct sunlight, or allowing it to getwet may cause damage.• Do not tamper with the batteries, and keep them away from children.• When you anticipate that the remote control will not be used for an extended period, remove thebatteries to prevent possible damage from battery leakage.• Dispose of batteries according to local regulations. Recycle if possible.Cleaning and servicingWhen cleaning your LCD TV, follow these steps:1 Power off the TV.2 Disconnect the power cord.3 Use a soft, moist cloth. Do not use liquid or aerosol cleaners.E n g l i s h8Your LCD TV overviewFront panel viewNo. Item DescriptionHeadphone Connects to headphones.Input Select source.When the OSD is on, press this button to confirm selection Vol Down Volume down.When the OSD is on, functions the same as the Left arrow Vol Up Volume up.When OSD is on, functions the same as the Right arrow Channel Down Channel down.When the OSD is on, functions the same as the Down arrow Channel Up Channel up.When the OSD is on, functions the same as the Up arrow Menu Turns the OSD menu ON and OFFPowerTurns the Power ON and OFFEnglishNo. Item DescriptionTuner Connects to the outdoor antenna cableAV1 / SCART 1 In Supports an external device with a SCART cable(for RGB, CVBS, S-Video,Audio left/right input)Out In TV mode, connects to your VCR In or PVR In with SCART cable to re-cord TV programsAV2 / SCART 2 In Supports external device with a SCART cable(for RGB, CVBS, S-Video,YPbPr/YCbCr, Audio left/right input)Out In TV mode, connect to your VCR In or PVR In with a SCART cable to re-cord TV programsAudio Out Connects to the audio jack input of your external device.AV3Audio-R Connects to the Audio-R output of your DVD, VCR player using the redcomposite cableAudio-L Connects to the Audio-L output of your DVD, VCR player using the whitecomposite cablePr/Cr Connects to the Component- Pr/Cr output of your DVD, VCR player usingthe red component cablePb/Cb Connects to the Component- Pb/Cb output of your DVD, VCR player us-ing the blue component cableY Connects to the Component-Y output of your DVD, VCR player using thegreen component cable9E n g l i s hDISPLAY MUTETV RECALL MENUMPXSWAP ACTIVE POSITIONSIZE/MODEINDEX SUBTITLE TELETEXT REVEALSIZE MIX SUBPAGE HOLDVOL PIP/PBP/POPCHOKENTERAV SCART PCSLEEP ZOOM WIDE SRS1234567809Teletext keysSUBPA G E H O L D Remote control overviewEnglishTeletext keysItem DescriptionINDEX Go to the index page SUBTITLE Show subtitlesTELETEXT Press to switch from TV/AV to Teletext mode. REVEAL Press to reveal hidden teletext information.SIZE Press once to zoom teletext page to 2X; press again to resume. MIX Press to overlay teletext page on the TV image, i.e. subtitles.HOLDPress to pause the current teletext page in multi-page viewing mode. Color buttons (R/G/Y/B)Operates corresponding button on the teletext page.There are five main OSD menus. These are: Picture, Audio. Use the following method to easily navigate these menus.OKUse the OSD to define your “e” Empowering Key setting: Scenario mode or Favourite channel. The default for the “e” key is the Scenario mode. Follow these steps: Menu > Empowering > e Key Setting. Choose between “Favourite channel” or “Scenario mode.” Now, when you press the “e” key, your chosen selec-Scenario ModePress the“e”Empowering key and use the Scenario mode to select pre-defined audio and video settings for optimal enjoyment of the following scenarios: Standard, Movie, Sport, Concert, Game, User; and smoothly presents moving images.Scenario Mode Design DirectionStandard mode allows you to watch your favourite channels with sharp, brilliantimagery via adaptive brightness and contrast adjustments. Clear-sounding audio isprovided by SRS performance.For comfortably enjoying movies at home, Movie mode displays dim scenes inclear detail; compensates for colour; and smoothly presents moving images. Thisis accomplished through optimal Gamma correction plus saturation, brightnessand contrast adjustments. Movie mode makes the most of high-definition movieViewing your favourite channelsOn the remote control, if you press the “e” Empowering key for less than 1 second, the favourite channel table will pop up. Your currently selected favourite channel will be highlighted. To view your other favourite channels, press the “e” Empowering key again to toggle the TV channels sequentially according to your favourite list.In TV, AV, SCART and PC mode, press PIP/PBP/POP button once to display using picture- in- picture (PIP). Press twice to display using picture- by- pic-In SCART and PC mode, press PIP/PBP/POP button three times to display picture-on-picture (POP). Then, the POP screens will display the subsequent TV channels one-by-one.PBP (Picture by Picture)PIP (Picture in Picture)EnglishTroubleshootingBefore you call the Acer service center, please check the following items:The following is a list of possible situations that may arise during the use of your LCD TV. Easy answers and solutions are provided for each one.There is no picture or sound.• Make sure the power cord is properly inserted in the power outlet.• Make sure the input mode selector is set to the correct source.• Make sure the antenna at the rear of the TV is properly connected.• Make sure the main power switch is turned on.• Make sure the volume is not set to minimum or the sound is not set to mute.• Make sure the headphones are not connected.• Reception other than those of broadcasting stations can be considered.Picture is not clear.• Make sure the antenna cable is properly connected.• Consider whether TV signals are being properly received.• Poor picture quality can occur due to a VHS camera, camcorder, or other peripheral being connectedat the same time. Switch off one of the other peripherals.• The ‘ghost’ or double image may be caused by obstruction to the antenna due to high rise buildingsor hills. Using a highly directional antenna may improve the picture quality.• The horizontal dotted lines shown on the pictures may be caused by electrical interference, e.g. hairdryer, nearby neon lights and etc. Turn off or remove these equipment.Picture is too dark, too light or tinted.• Check the color adjustment.• Check the brightness setting.• Check the sharpness function.• Fluorescent lamp may have reached the end of service life.Remote control does not work.• Check the batteries of the remote control.• Make sure the remote sensor window is not blocked or under strong fluorescent lighting.• Try to clean the remote control sensor lens on the TV with a soft cloth.• Use the buttons (hot keys) on the TV before the remote control works.If the above items do not solve your technical issue, please refer to the warranty card for service information.E n g l i s hProduct specificationsItem SpecificationPanel specifications Resolution1366 x 768 pixels Brightness (typical.) 500 nits Contrast Ratio (typical.) 800:1 Display colors16.7 M Viewing Angle (typical.) H:170 ; V:170Response Time (typical.)12 ms (gray to gray)Power supply Input100V to 240 V-AC. Max. power consumption 210 WPower Saving5 WMechanical Dimensions (W x H x D mm) 1018 x 616 x 210 mm Swivel angle 40 degrees(R20 & L20) Weight (kg) / (lbs.) 20.7kg / 45.6lbs.Wall MountingYesTerminal AV1/ SCART1 SCART(RGB,CVBS,S-Vidoe,Audio R/L )AV2/ SCART2 SCART(RGB,CVBS,S-Video,YPbPr/CbCr,Audio R/L ) AV3 RCA for YPbPr/CbCr,Audio R/L AV4 RCA for CVBS, Audio R/L AV5 S-Video, Audio R/L PC D-sub Yes DVI-D(HDCP) Yes PC audio-in Yes Audio-out YesHeadphonesYesAudio system 3D surround YesSpeakers 10 W + 10 WSRSWOW。
广告机解码驱动一体板使用说明书(二)深圳市中视同创科技有限公司提供.MP3歌词显示本产品支持MP3歌词显示功能,把MP3的歌词文件拷贝到USB 中,名字与相应的MP3文件改成一样即可。
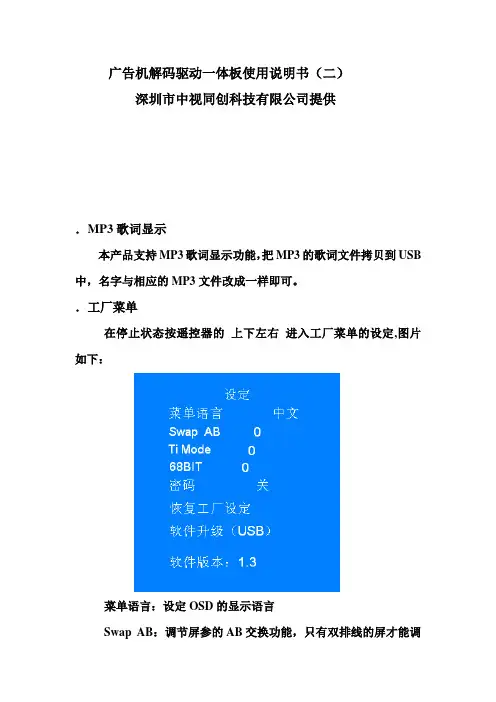
.工厂菜单在停止状态按遥控器的上下左右进入工厂菜单的设定,图片如下:菜单语言:设定OSD的显示语言Swap AB:调节屏参的AB交换功能,只有双排线的屏才能调节该项Ti Mode:调节屏的Ti Mode 参数68BIT:调节屏的6位和8位密码:进入菜单后,按确认进入各项子菜单需要输入密码,密码正确才能进入进行操作。
恢复工厂设定:按确认键恢复一些参数到默认值软件升级:把升级文件拷贝到USB根目录下,按确认键会弹出一个对话框提示是否升级,按左选择是进行升级,升级过程中请勿断电。
软件版本:用来区分不同的软件版本8. 一键升级:把升级文件拷贝到U盘根目录下,把U盘插到板上面,然后按住遥控器MUTE,3-5秒后自动进入升级,升级过程大概一分半左右,升级完后机器会自动重起。
(升级过程请勿断电)9.可拓展功能a.显示台标:用户可先提供一张200*180的BMP文件,可把该图片文件编译进软件,显示在屏幕左上角。
b.分时音量:不同的时段,可以设置不同的音量c.开机LOGO附视频格式表:常见故障及解答:1.问:接上板和屏开机会有花屏答:进入工厂菜单调节TI MODE 和6位8位,如果还是不正常请检查屏线是否正确(屏的LVDS选择脚是否选择正常的LVDS模式)。
2.问:滚动字幕字太少显示不正常答:滚动字幕文件里的字符至少不能少于40个,如果不够的话请加空格替代。
3.问:电源如果用大电源12V,5V 5VSTB都接可不可以答:可以,但要确定板上是否有焊12V转5V线圈,如果有的话请把线圈去掉,如果有该线圈只要接12V电源就好。
4.问:该板能直接点120HZ的高清屏吗答:不可以,需要加一个60转120HZ的转接板(其他公司的定义可能不一样,如不正常我公司也有该转接板,配有屏线)附播放列表工具使用说明:播放列表使用说明 (V1.2 Beta)简介:PlayListTool.exe是配合6m48广告机制作播放列表的工具。
高清液晶广告机使用说明书1.产品概述什么是液晶广告机?液晶广告机采用LCD显示器来播放视频广告,特别适合高端品牌的综合多媒体技术,向消费者传递全方位的产品信息、促销信息等。
提升产品在销售终端的显现率和陈列效果,刺激冲动性购买.它放置于卖场产品旁边,能自动开启进行宣传。
相比于其他传统媒体和促销方式,投入极低廉,性价比极高。
本款液晶广告机驱动解码一体板,能直接驱动1920*1080及其以下的分辨率的LVDS屏,内含强大的音视频处理功能,能输出高质量的画面和音质。
两路USB2。
0接口,支持高清视频和图片的播放。
支持USB之间相互拷贝功能,能方便用户更新文件。
2。
使用说明2.1 遥控器说明本产品使用的遥控器如下图所示:遥控器各按键功能:电源键:电源键,控制开关机静音:静音功能:快进,连续按速度加快:快退,连续按速度加快:暂停/播放功能:向上移动光标(播放时弹出控制条菜单):向左移动光标: 向右移动光标: 向下移动光标(播放时弹出控制条菜单)MENU :进入设定菜单,进入菜单后是确认功能VOL+:音量加VOL—:音量减:播放过程中,按该键进入下一曲:播放过程中,按该键进入上一曲EXIT :退出菜单或播放DEL:光标停留在文件上时,按该键弹出删除菜单2.2 设定菜单设定菜单主界面如下图:2.2。
1 通用设定该页设定菜单图片如下:以下个项功能均按左右键来选择。
a.菜单语言:中文:设定菜单语言为中文英文:设定菜单语言为英文b.重复模式:单曲重复:循环播放同一个文件全部重复:循环播放USB根目录下的文件重复取消:播放完一遍根目录下的文件后,停止播放c.播放记录:打开带功能,会自动记录播放的文件名和开始播放的时间,还会记录开关机的时间注:该功能打开后能在U盘自动生成PLAY.LOG文件,可以支持中英文文件名的文件.d.断电记忆:播放时自动记录文件播放的文件和播放的时候,断电开机后接着上次断电的地方继续播放(注:不支持音乐文件的断电记忆)e.图片转场模式:设定图片播放时的转场模式。
高清广告机解码驱动一体板使用说明书1.产品概述本款广告机驱动解码一体板,能直接驱动1920*1080及其以下的分辨率的LVDS屏,内含强大的音视频处理功能,能输出高质量的画面和音质。
两路USB2.0接口,支持高清视频和图片的播放。
支持USB之间相互拷贝功能,能方便用户更新文件。
2.使用说明2.1 遥控器说明本产品使用的遥控器如下图所示:遥控器各按键功能:电源键:电源键,控制开关机静音:静音功能:快进,连续按速度加快:快退,连续按速度加快:暂停/播放功能: 向上移动光标(播放时弹出控制条菜单): 向左移动光标: 向右移动光标: 向下移动光标(播放时弹出控制条菜单)MENU :进入设定菜单,进入菜单后是确认功能VOL+:音量加VOL-:音量减播放过程中,按该键进入下一曲:播放过程中,按该键进入上一曲EXIT :退出菜单或播放DEL:光标停留在文件上时,按该键弹出删除菜单2.2 设定菜单设定菜单主界面如下图:2.2.1 通用设定该页设定菜单图片如下:以下个项功能均按左右键来选择。
a.菜单语言:中文:设定菜单语言为中文英文:设定菜单语言为英文b.重复模式:单曲重复:循环播放同一个文件全部重复:循环播放USB根目录下的文件重复取消:播放完一遍根目录下的文件后,停止播放c.播放记录:打开带功能,会自动记录播放的文件名和开始播放的时间,还会记录开关机的时间注:该功能打开后能在U盘自动生成PLAY.LOG文件,可以支持中英文文件名的文件。
d.断电记忆:播放时自动记录文件播放的文件和播放的时候,断电开机后接着上次断电的地方继续播放(注:不支持音乐文件的断电记忆)e.图片转场模式:设定图片播放时的转场模式。
f.图片播放时间:设定图片刷新的时间g.滚动字幕:设定是否打开滚动字幕h.滚动字幕颜色:设定滚动字幕字体的颜色i.播放类型:图片:只播放存储卡根目录下的图片文件音乐:只播放存储卡根目录下的音乐文件音画同步:播放图片时带有音乐背景,并且一直重复播放图片和音乐文件播放列表:按制作好的播放列表进行播放(可以支持按日,周,月列表进行播放,详细见后面播放列表制作)视频:只播放存储卡根目录下的视频文件全部:播放存储卡根目录下所有能识别的图片音乐和视频文件。
高清广告机使用说明书产品概述:采用主芯片是MST6M48,该芯片内含3D COMB FILTER 和3D Deinterlace,更好解调出各种输入信号。
内含强大的音视频处理功能,能输出高质量的画面和音质。
两路USB 2.0 接口,支持图片播放、音乐播放和视频播放等,支持1080P以内的输入,支持WUXGA(宽屏超级扩展图像陈列)(1920×1080@60HZ)高清输入信号,输出效果更好并提供逐行的高清晰的视频,同时具有强大的音频功放。
1、产品功能★支持横屏/竖屏播放。
★支持全屏/分屏播放。
模块化设计分屏显示。
★最高支持1080P(分辨率为1920*1080 )逐行扫描高清显示以及隔行扫描高清显示(即1080I,分辨率为1920*1080 )。
★支持USB播放,支持热插拔,内容更新方便快捷。
★支持音视频格式:MPG、MPG-1、MPG-2、MPG-4、AVI、MP4、DIV、TS、TRP、MKV、WMV、RM、RMVB等。
★播放模式:单曲重复播放、文件夹循环播放、全盘循环播放。
★图片播放:旋转、缩放、平移、幻灯片播放、背景音乐播放。
★音频模式:左声道、右声道、立体声。
★ OSD多国语言:支持中文、英文等多国语言。
★支持支持中文、英文的流水滚动字幕。
外挂字幕。
两路USB2.0接口,支持高清视频和图片的播放。
支持USB之间相互拷贝功能,能方便用户更新文件。
2.1 遥控器说明本产品使用的遥控器如下图所示:遥控器各按键功能:电源键:电源键,控制开关机静音:静音功能数字键0-9:进入菜单后用来输入时间的设置(暂时未做):快进,连续按速度加快:快退,连续按速度加快VOL+:音量加VOL-:音量减STOP:停止播放PLAY/PAUSE:播放暂停键播放过程中,按该键进入下一曲:播放过程中,按该键进入上一曲INFO:光标停留在文件上时,按该键弹出删除菜单REPEAT:设定重复模式: 向上移动光标: 向左移动光标: 向右移动光标: 想下移动光标ENTER :确认按键MENU :进入设定菜单,再按退或上一层EXIT :退出菜单或播放2.2 设定菜单设定菜单主界面如下图:2.2.1 通用设定该页设定菜单图片如下:以下个项功能均按左右键来选择。
深圳市中恒盛大科技发展有限公司高清广告机解码驱动一体板使用说明书1.产品概述本款广告机驱动解码一体板,能直接驱动1920*1080及其以下的分辨率的LVDS屏,内含强大的音视频处理功能,能输出高质量的画面和音质。
两路USB2.0接口,支持高清视频和图片的播放。
支持USB之间相互拷贝功能,能方便用户更新文件。
2.使用说明2.1 遥控器说明本产品使用的遥控器如下图所示:遥控器各按键功能:电源键:电源键,控制开关机静音:静音功能:快进,连续按速度加快:快退,连续按速度加快:暂停/播放功能: 向上移动光标(播放时弹出控制条菜单): 向左移动光标: 向右移动光标: 向下移动光标(播放时弹出控制条菜单)MENU :进入设定菜单,进入菜单后是确认功能VOL+:音量加VOL-:音量减播放过程中,按该键进入下一曲:播放过程中,按该键进入上一曲EXIT :退出菜单或播放DEL:光标停留在文件上时,按该键弹出删除菜单2.2 设定菜单设定菜单主界面如下图:2.2.1 通用设定该页设定菜单图片如下:以下个项功能均按左右键来选择。
a.菜单语言:中文:设定菜单语言为中文英文:设定菜单语言为英文b.重复模式:单曲重复:循环播放同一个文件全部重复:循环播放USB根目录下的文件重复取消:播放完一遍根目录下的文件后,停止播放c.播放记录:打开带功能,会自动记录播放的文件名和开始播放的时间,还会记录开关机的时间注:该功能需要用户先在U盘中建立一个PLAY.LOG(可先建立一个同名的txt文件,然后改下后缀就可以了)。
d.断电记忆:播放时自动记录文件播放的文件和播放的时候,断电开机后接着上次断电的地方继续播放(注:不支持音乐文件的断电记忆)e.图片转场模式:设定图片播放时的转场模式。
f.图片播放时间:设定图片刷新的时间(分5s->7s->10s->15s)g.滚动字幕:设定是否打开滚动字幕h.滚动字幕颜色:设定滚动字幕字体的颜色i.字幕背景颜色:设定滚动字幕背景的颜色j.播放类型:图片:只播放存储卡根目录下的图片文件音乐:只播放存储卡根目录下的音乐文件音画同步:播放图片时带有音乐背景,并且一直重复播放图片和音乐文件播放列表:按制作好的播放列表进行播放视频:只播放存储卡根目录下的视频文件全部:播放存储卡根目录下所有能识别的图片音乐和视频文件。
广告机使用说明书高清广告机解码驱动一体板使用说明书1.产品概述本款广告机驱动解码一体板,能直接驱动1920*1080及其以下的分辨率的LVDS屏,内含强大的音视频处理功能,能输出高质量的画面和音质。
两路USB2.0接口,支持高清视频和图片的播放。
支持USB之间相互拷贝功能,能方便用户更新文件。
2.使用说明2.1 遥控器说明本产品使用的遥控器如下图所示:遥控器各按键功能:电源键:电源键,控制开关机静音:静音功能:快进,连续按速度加快:暂停/播放功能: 向上移动光标(播放时弹出控制条菜单)向左移动光标: 向右移动光标: 向下移动光标(播放时弹出控制条菜单)MENU :进入设定菜单,进入菜单后是确认功能VOL+:音量加VOL-:音量减:播放过程中,按该键进入上一曲EXIT :退出菜单或播放DEL:光标停留在文件上时,按该键弹出删除菜单2.2 设定菜单设定菜单主界面如下图:2.2.1 通用设定该页设定菜单图片如下:以下个项功能均按左右键来选择。
a.菜单语言:中文:设定菜单语言为中文英文:设定菜单语言为英文b.重复模式:单曲重复:循环播放同一个文件全部重复:循环播放USB根目录下的文件重复取消:播放完一遍根目录下的文件后,停止播放c.播放记录:打开带功能,会自动记录播放的文件名和开始播放的时间,还会记录开关机的时间注:该功能打开后能在U盘自动生成PLAY.LOG文件,能够支持中英文文件名的文件。
d.断电记忆:播放时自动记录文件播放的文件和播放的时候,断电开机后接着上次断电的地方继续播放(注:不支持音乐文件的断电记忆)e.图片转场模式:设定图片播放时的转场模式。
f.图片播放时间:设定图片刷新的时间g.滚动字幕:设定是否打开滚动字幕h.滚动字幕颜色:设定滚动字幕字体的颜色i.播放类型:图片:只播放存储卡根目录下的图片文件。
奥拓电子LCD广告机更新显示节目说明
首先说明该模版在LCD广告机上播放出来的样式是上边大概1/3部分播放视频,下边大概2/3部分播放图片,我将如何更换显示内容方法介绍如下:
一、工具:
1、2G或2G以上U盘1个;
2、PC机一台;
二、制作显示内容:
1、将所有的需要播放的文件拷贝到文件夹下,如模版中我需要播放两个视频文件,和五个*.jpg文件:
图一
2、如果我要添加一个新的图片文件或视频文件,我们要将新增加的视频文件和图片文件拷备到文件夹下
图片二
同时用记事本的方式将文件夹下的文件打开,如图三
图三
只需要将新添加的视频文件名称(包含扩展明)和图片文件名称(包含扩展明)如图四的格式添加完保存即可,如图四:
图四
3、如只想删除其中一个视频或图片,同样打开该文件,删除其中一行即可!
4、显示内容制作完成后将两个文件拷贝到U盘的根目录下等待更新广告机内容
二、更新广告机内容:
1、将已经存储了两个文件的U盘插到
正常开机正在播放的LCD广告机上。
2、按遥控器“菜单”键后后
LCD广告机显示如图六
图六
3、首先选择“删除节目”这里一定要注意的是删除节目选择的路径一定是/media/sda1,如
图七:
图七
4、然后“更新节目”这里一定要注意的是更新节目选择的路径一定是/media/sdb1,如图
八:
图八
5、其次是“更新配置”,这里一定要注意的是更新节目选择的路径一定是/media/sdb1,如
图九:
图九
6、最后更新完配置后选择菜单中的“重新启动”菜单,重新启动广告机即可(注意:重新
启动的同时一定要将U盘拔出)。
三:补充说明
横屏的和竖屏的操作方法一样。
深圳市奥拓电子股份有限公司
客户服务部
2011-05-09。