用C编写的RS232串口通信程序
- 格式:docx
- 大小:16.00 KB
- 文档页数:2
实验九 RS232串口通讯应用一、实验目的串口通讯对单片机而言意义重大,不但可以实现将单片机的数据传输到电脑端,而且也能实现电脑对单片机的控制,比如可以很直观地把红外遥控器键值的数据码显示在电脑上等。
本次实验目的:1、通过实际硬件连接及软件编程完成 51单片机和PC机之间的串口通讯,从而加深对异步串行通信接口的基本结构、工作原理等串行通信基本概念的理解;2、了解RS-232C电平规定与TTL电平规定的不同,及采用专用芯片MAX232实现两者之间电平转换的连接电路。
二、实验设备51单片机实验板、PC机、串口连接线、串口调试软件、Keil软件、连接导线等。
三、实验原理及内容51单片机有一个全双工的串行通讯口,所以单片机和电脑之间可以方便地进行串口通讯。
进行串行通讯时要满足一定的条件,比如电脑的串口是RS232电平的,而单片机的串口是TTL电平的,两者之间必须有一个电平转换电路,在此采用专用芯片MAX232进行转换,虽然也可以用几个三极管进行模拟转换,但是还是用专用芯片更简单可靠。
采用三线制连接串口,也就是说和电脑的9针串口只连接其中的3根线:第5脚的GND、第2脚的RXD、第3脚的TXD。
这是最简单的连接方法,但是对我们来说已经足够使用了,电路如下图所示,MAX232的第10脚和单片机的11脚连接,第9脚和单片机的10脚连接,第15脚和单片机的20脚连接。
图1 串口通讯的硬件电路连接为了能够在电脑端看到单片机发出的数据,必须借助一个WINDOWS软件进行观察,这里利用一个免费的电脑串口调试软件(这是一个绿色的软件,无需安装,可以直接在当前位置运行这个软件)。
软件界面如下图,1先要设置一下串口通讯的参数,将波特率调整为4800,勾选十六进制显示。
串口选择为COM1,当然51单片机实验板的串口也要和电脑的COM1连接,将烧写有以下程序的单片机插入单片机实验板的万能插座中,并接通51单片机实验板的电源,这时只要按下K1一次,在串口调试助手软件的接收区界面中就会增加一个“AF”字符,表示单片机向电脑发送“AF”字符成功。
C语言实现串口通信在使用系统调用函数进行串口通信之前,需要打开串口设备并设置相关参数。
打开串口设备可以使用open(函数,设置串口参数可以使用termios结构体和tcsetattr(函数。
以下是一个简单的串口通信接收数据的示例代码:```c#include <stdio.h>#include <stdlib.h>#include <fcntl.h>#include <unistd.h>#include <termios.h>int mainint fd; // 串口设备文件描述符char buff[255]; // 存储接收到的数据int len; // 接收到的数据长度//打开串口设备fd = open("/dev/ttyS0", O_RDONLY);if (fd < 0)perror("Failed to open serial port");return -1;}//设置串口参数struct termios options;tcgetattr(fd, &options);cfsetspeed(&options, B1200); // 设置波特率为1200 tcsetattr(fd, TCSANOW, &options);//接收数据while (1)len = read(fd, buff, sizeof(buff)); // 从串口读取数据if (len > 0)buff[len] = '\0'; // 将接收到的数据转为字符串printf("Received data: %s\n", buff);}}//关闭串口设备close(fd);return 0;```这段代码首先通过open(函数打开串口设备文件"/dev/ttyS0",然后使用tcgetattr(函数获取当前设置的串口参数,接着使用cfsetspeed(函数设置波特率为1200,最后使用tcsetattr(函数将设置好的串口参数写回。
计算机网络实验RS232串口通信程序的编写RS232是一种常见的串行通信接口,用于在计算机和其他外部设备之间传输数据。
它广泛应用于各种设备和应用程序,如串口调试工具、点阵打印机等。
本文将介绍如何编写一个基本的RS232串口通信程序。
我们将使用C 语言和Linux操作系统来演示。
在开始编写程序之前,我们需要了解一些RS232串口的基本概念和通信协议。
RS232串口由发送线(TX)、接收线(RX)、控制线(如RTS、CTS、DTR和DSR)等组成。
通信时,发送方将数据从TX线发送到接收方的RX线,然后接收方通过RX线接收数据。
以下是一个简单的RS232串口通信程序示例:```c#include <stdio.h>#include <stdlib.h>#include <fcntl.h>#include <termios.h>#include <unistd.h>int maiint fd = open("/dev/ttyS0", O_RDWR , O_NOCTTY); // 打开串口设备if (fd == -1)perror("打开串口失败");exit(1);}struct termios options;tcgetattr(fd, &options); // 获取当前串口设置//设置波特率为9600cfsetispeed(&options, B9600);cfsetospeed(&options, B9600);//设置数据位为8位,无奇偶校验,停止位为1位options.c_cflag &= ~PARENB;options.c_cflag &= ~CSTOPB;options.c_cflag &= ~CSIZE;options.c_cflag ,= CS8;//更新串口设置tcsetattr(fd, TCSANOW, &options);char buffer[255];while (1)ssize_t len = read(fd, buffer, sizeof(buffer)); // 从串口读取数据if (len == -1)perror("读取串口失败");exit(1);}printf("接收到数据:%.*s\n", len, buffer);ssize_t nwrite = write(fd, buffer, len); // 向串口写入数据if (nwrite == -1)perror("写入串口失败");exit(1);}}close(fd);return 0;```该程序首先打开串口设备`/dev/ttyS0`,如果打开失败则会输出错误信息并退出。
LabWindows/cvi之RS-232串口通信编程源代码/* LabWindows/CVI User Interface Resource (UIR) Include File *//* Copyright (c) National Instruments 2006. All Rights Reserved. *//* *//* W ARNING: Do not add to, delete from, or otherwise modify the contents *//* of this include file. *//**************************************************************************/#include <userint.h>#ifdef __cplusplusextern "C" {#endif/* Panels and Controls: */#define PANEL 1#define PANEL_OKBUTTON_2 2 /* callback function: receivefile */#define PANEL_OKBUTTON 3 /* callback function: receivefilename */#define PANEL_STRING_2 4#define PANEL_QUITBUTTON 5 /* callback function: QuitCallback */#define PANEL_STRING 6#define PANEL_DECORATION_2 7#define PANEL_COMMANDBUTTON 8 /* callback function: filesel */#define PANEL_DECORATION 9#define PANEL_TEXTMSG 10#define PANEL_TEXTMSG_2 11/* Menu Bars, Menus, and Menu Items: *//* (no menu bars in the resource file) *//* Callback Prototypes: */int CVICALLBACK filesel(int panel, int control, int event, void *callbackData, int eventData1, int eventData2);int CVICALLBACK QuitCallback(int panel, int control, int event, void*callbackData, int eventData1, int eventData2);int CVICALLBACK receivefile(int panel, int control, int event, void *cal lbackData, int eventData1, int eventData2);int CVICALLBACK receivefilename(int panel, int control, int event, void*callbackData, int eventData1, int eventData2);#ifdef __cplusplus}#endif#include <ansi_c.h>#include <utility.h>#include <rs232.h>#include <cvirte.h>#include <userint.h>#include "232.h"static int byteswritten;static char filename[MAX_FILENAME_LEN];static char pathname[MAX_PATHNAME_LEN];static int panelHandle;int main (int argc, char *argv[]){if (InitCVIRTE (0, argv, 0) == 0)return -1; /* out of memory */if ((panelHandle = LoadPanel (0, "232.uir", PANEL)) < 0)return -1;//打开并配置串口Com1OpenComConfig (1, "", 57600, 1, 8, 1, 32767, 32767);//设置通信超时时间SetComTime (1, 5.0);//禁止串口软件握手SetXMode (1, 0);//禁止硬件握手SetCTSMode (1, LWRS_HW HANDSHAKE_OFF); DisplayPanel (panelHandle);RunUserInterface ();DiscardPanel (panelHandle);return 0;}int CVICALLBACK sendfilename (int panel, int control, int event, void *callbackData, int eventData1, int eventData2){int comstatus;int outputqueuelen;switch (event){case EVENT_COMMIT:strcat (filename, "\r");//向Com1写入文件名字符串byteswritten = ComWrt (1, filename, strlen(filename));break;}return 0;}int CVICALLBACK QuitCallback (int panel, int control, int event, void *callbackData, int eventData1, int eventData2){switch (event){case EVENT_COMMIT://关闭串口Com1CloseCom (1);QuitUserInterface (0);break;}return 0;}int CVICALLBACK filesel (int panel, int control, int event,void *callbackData, int eventData1, int eventData2){int selstatus;switch (event){case EVENT_COMMIT:filename[0] = '\0';selstatus = FileSelectPopup ("", "*.*", "*.*", "打开文件", VAL_LOAD_BUTTON, 0, 0, 1, 1, pathname);if (selstatus >= 0){SetCtrlVal (panelHandle, PANEL_STRING, pathname);//获得文件名SplitPath (pathname, NULL, NULL, filename);}break;}return 0;}int CVICALLBACK sendfile (int panel, int control, int event,void *callbackData, int eventData1, int eventData2){int outputqueuelen;switch (event){case EVENT_COMMIT://设置串口Com1调制解调器参数XModemConfig (1, 10.0, 10, 5.0, 1024);//设置从串口Com1发送文件数据XModemSend (1, pathname);//获得串口Com1输出队列的字符串数目outputqueuelen = GetOutQLen (1);if (outputqueuelen == 0){MessagePopup ("文件传输", "文件传输完毕!");}break;}return 0;}接收程序#include "toolbox.h"#include <ansi_c.h>#include <rs232.h>#include <cvirte.h>#include <userint.h>#include "232.h"static int bytesread;static char filename[MAX_PATHNAME_LEN];static char pathname[MAX_PATHNAME_LEN];static int panelHandle;int main (int argc, char *argv[]){if (InitCVIRTE (0, argv, 0) == 0)return -1; /* out of memory */if ((panelHandle = LoadPanel (0, "232.uir", PANEL)) < 0) return -1;//打开并配置串口Com2OpenComConfig (2, "", 57600, 1, 8, 1, 32767, 32767);//设置通信超时时间SetComTime (2, 5.0);//禁止串口软件握手SetXMode (2, 0);//禁止硬件握手SetCTSMode (2, LWRS_HW HANDSHAKE_OFF);DisplayPanel (panelHandle);RunUserInterface ();DiscardPanel (panelHandle);return 0;}int CVICALLBACK receivefilename (int panel, int control, int event, void *callbackData, int eventData1, int eventData2){switch (event){case EVENT_COMMIT:filename[0] = '\0';SetCtrlVal (panelHandle, PANEL_STRING, "");//读取字符串直到回车符出现bytesread = ComRdTerm (2, filename, 260, 13);//当出现回车符后,在其后加上结束符filename[bytesread]= '\0';SetCtrlVal (panelHandle, PANEL_STRING, filename);break;}return 0;}int CVICALLBACK QuitCallback (int panel, int control, int event, void *callbackData, int eventData1, int eventData2){switch (event){case EVENT_COMMIT://关闭串口Com2CloseCom (2);QuitUserInterface (0);break;}return 0;}int CVICALLBACK filesel (int panel, int control, int event,void *callbackData, int eventData1, int eventData2){int selstatus;switch (event){case EVENT_COMMIT:selstatus = DirSelectPopup ("", "保存文件", 1, 1, pathname); if (selstatus){strcat (pathname, "\\");strcat (pathname, filename);SetCtrlVal (panelHandle, PANEL_STRING_2, pathname);}break;}return 0;}int CVICALLBACK receivefile (int panel, int control, int event, void *callbackData, int eventData1, int eventData2){int result;int filesize;int inputqueuelen;FILE *stream;switch (event){case EVENT_COMMIT:GetCtrlVal (panelHandle, PANEL_STRING_2, pathname);//判断文件是否存在result = FileExists (pathname, &filesize);if (!result){stream = fopen (pathname, "wb+");fclose (stream);}//设置串口Com2调制解调器参数XModemConfig (2, 10.0, 10, 5.0, 1024);//设置从串口Com2接收文件数据XModemReceive (2, pathname);//获得串口Com2输入队列的字符串数目inputqueuelen = GetInQLen (2);if (inputqueuelen == 0){MessagePopup ("文件保存", "文件保存完毕!"); }break;}return 0;}。
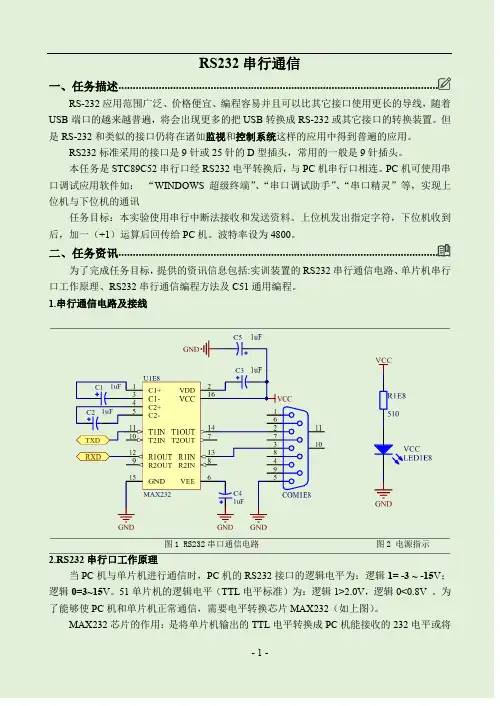
RS232串行通信一、任务描述⋅⋅⋅⋅⋅⋅⋅⋅⋅⋅⋅⋅⋅⋅⋅⋅⋅⋅⋅⋅⋅⋅⋅⋅⋅⋅⋅⋅⋅⋅⋅⋅⋅⋅⋅⋅⋅⋅⋅⋅⋅⋅⋅⋅⋅⋅⋅⋅⋅⋅⋅⋅⋅⋅⋅⋅⋅⋅⋅⋅⋅⋅⋅⋅⋅⋅⋅⋅⋅⋅⋅⋅⋅⋅⋅⋅⋅⋅⋅⋅⋅⋅⋅⋅⋅⋅⋅⋅⋅⋅⋅⋅⋅⋅⋅⋅⋅⋅⋅⋅⋅⋅⋅⋅⋅⋅⋅⋅⋅⋅⋅RS-232应用范围广泛、价格便宜、编程容易并且可以比其它接口使用更长的导线,随着USB端口的越来越普遍,将会出现更多的把USB转换成RS-232或其它接口的转换装置。
但是RS-232和类似的接口仍将在诸如监视和控制系统这样的应用中得到普遍的应用。
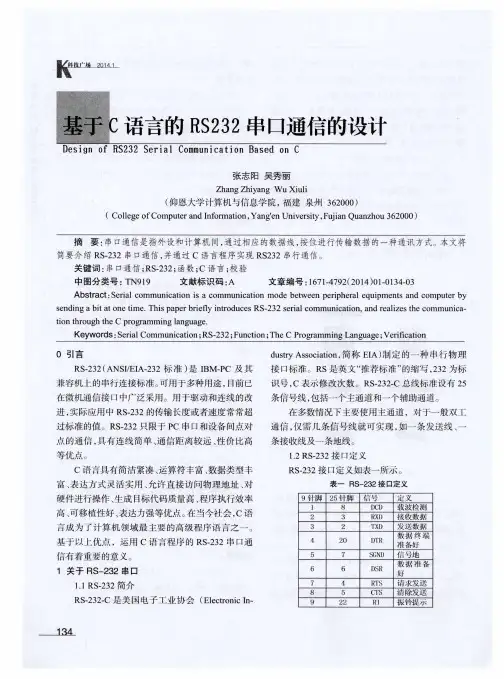
RS232标准采用的接口是9针或25针的D型插头,常用的一般是9针插头。
本任务是STC89C52串行口经RS232电平转换后,与PC机串行口相连。
PC机可使用串口调试应用软件如:“WINDOWS 超级终端”、“串口调试助手”、“串口精灵”等,实现上位机与下位机的通讯任务目标:本实验使用串行中断法接收和发送资料。
上位机发出指定字符,下位机收到后,加一(+1)运算后回传给PC机。
波特率设为4800。
二、任务资讯⋅⋅⋅⋅⋅⋅⋅⋅⋅⋅⋅⋅⋅⋅⋅⋅⋅⋅⋅⋅⋅⋅⋅⋅⋅⋅⋅⋅⋅⋅⋅⋅⋅⋅⋅⋅⋅⋅⋅⋅⋅⋅⋅⋅⋅⋅⋅⋅⋅⋅⋅⋅⋅⋅⋅⋅⋅⋅⋅⋅⋅⋅⋅⋅⋅⋅⋅⋅⋅⋅⋅⋅⋅⋅⋅⋅⋅⋅⋅⋅⋅⋅⋅⋅⋅⋅⋅⋅⋅⋅⋅⋅⋅⋅⋅⋅⋅⋅⋅⋅⋅⋅⋅⋅⋅⋅⋅⋅⋅⋅⋅为了完成任务目标,提供的资讯信息包括:实训装置的RS232串行通信电路、单片机串行口工作原理、RS232串行通信编程方法及C51通用编程。
1.串行通信电路及接线图1 RS232串口通信电路图2 电源指示2.RS232串行口工作原理当PC机与单片机进行通信时,PC机的RS232接口的逻辑电平为:逻辑1= -3 ~ -15V;逻辑0=3~15V。
51单片机的逻辑电平(TTL电平标准)为:逻辑1>2.0V,逻辑0<0.8V 。
为了能够使PC机和单片机正常通信,需要电平转换芯片MAX232(如上图)。
基于C语言的RS232串口通信的设计RS232是一种常见的串行通信接口,广泛用于计算机与外部设备之间的数据传输。
RS232串口通信涉及到多个方面的设计,包括串口参数设置、数据的发送与接收等。
本文将以C语言为基础,介绍如何设计一个基于RS232串口通信的程序。
接下来,我们需要编写数据发送和接收的函数。
数据的发送包括两个步骤:打开串口和发送数据。
首先,我们需要打开串口,并设置好相应的参数。
在C语言中,可以通过打开文件的方式来打开串口设备文件。
例如,可以使用`fopen(`函数打开串口设备文件:```FILE* serial_port = fopen("/dev/ttyS0", "w");if(serial_port == NULL)printf("Failed to open the serial port.\n");return -1;```然后,我们可以使用`fprintf(`函数将数据写入串口设备文件,实现数据的发送:```fprintf(serial_port, "Hello, RS232!\n");```数据的接收与数据的发送类似,也包括两个步骤:打开串口和接收数据。
我们仍然可以使用`fopen(`函数打开串口设备文件,并设置好相应的参数。
然后,可以使用`fgets(`函数从串口设备文件中读取数据:```char buffer[1024];fgets(buffer, sizeof(buffer), serial_port);printf("Received Data: %s", buffer);```需要注意的是,当数据到达串口时,我们需要设置好超时时间,以免数据接收阻塞程序执行。
在C语言中,可以通过设置串口设备文件的文件描述符来设置超时时间。
最后,我们需要在程序中循环调用数据发送和接收的函数,实现数据的循环传输。
C#和232串口通信方法(S e r i a l P o r t控件)-CAL-FENGHAI.-(YICAI)-Company One1本例程主要讲解使用C#,实现与232串口通信。
达到采集串口数据,监控,可视化处理等。
一.概述在Visual Studio 中编写串口通讯程序,一般都使用MicrosoftCommunicationControl(简称MSComm)的通讯控件,只要通过对此控件的属性和事件进行相应编程操作,就可以轻松地实现串口通讯。
但在技术广泛应用的今天,Visual 没有将此控件加入控件库,所以人们采用了许多方法在Visual 来编写串口通讯程序:第一种方法是通过采用Visual Studio 中原来的MSComm控件这是最简单的,最方便的方法,但需要注册;第二种方法是采用微软在.NET推出了一个串口控件,基于.NET的P/Invoke调用方法实现;第三种方法是自己用API写串口通信,虽然难度高,但可以方便实现自己想要的各种功能。
现在微软推出了最新版本的Visual Studio 2005开发工具,可以不再采用第三方控件的方法来设计串口通讯程序。
NET Framework 类库包含了SerialPort 类,方便地实现了所需要串口通讯的多种功能,为了使MSComm编程方法快速转换到以SerialPort类为核心的串口通讯的设计方法,本文着重讨论了Visual Studio 的MSComm控件和SerialPort 类设计方法的异同点。
?二.SerialPort常用属性、方法和事件1.命名空间命名空间包含了控制串口重要的SerialPort类,该类提供了同步 I/O 和事件驱动的 I/O、对管脚和中断状态的访问以及对串行驱动程序属性的访问,所以在程序代码起始位置需加入Using 。
2.串口的通讯参数串口通讯最常用的参数就是通讯端口号及通讯格式(波特率、数据位、停止位和校验位),在MSComm中相关的属性是CommPort和Settings。
RS232C标准9针串口接线方法.txt师太,你是我心中的魔,贫僧离你越近,就离佛越远……初中的体育老师说:谁敢再穿裙子上我的课,就罚她倒立。
RS232C标准串口接线方法(第二版)检验仪器与微机的通讯主要是以RS232C标准接口为主,而串口的接线方法也有一定的标准,在此谈谈几种常用的串口接法,仅作参考:一、标准接法1、9对9(包括9针对9孔,9孔对9孔,9针对9针):说明:以下的孔、针指串口线两端的串口,不过2、3有可能不交换2-------------33-------------24-------------65-------------56-------------47-------------88-------------72、9对25(包括9孔对25孔,9孔对25针)2-------------3 (备注:2、3有可能不交换)3-------------24-------------65-------------76-------------207-------------58-------------4二、特殊接法关于串口的非标准接口一般需要参考仪器说明书或者咨询仪器厂家才能获知,下面列举几种常见的特殊接法(每台仪器的具体串口具体接法可参考LIS事业部“仪器设置”文档库):1、9孔对9针(H100尿液分析仪)2--------------25--------------52、9孔对9孔(4-channel半自动血凝仪)9孔对9孔,一一对应,全接。
3、9对25(C100尿液分析仪)2--------------23--------------35--------------725串口中,4和5短接,6和20短接,25串和9串间另接一根线,均焊在两头的铁皮外壳上用做地线。
4、9孔对电话线接口(MEDICA EasyBloodGas血气分析仪端为电话线口)电话线一端:线头向下,金属片面对自己从左向右分别是1,2,3,4,5电话线口---9孔串口1--------------52--------------83--------------24--------------75--------------3三、苹果机与PC机的串口接法1、Apple(供苹果机端用的8针串口) PC机25femle(孔)串口5 ------------------23 ------------------34 ------------------71 ------------------52 ------------------42、Apple(供苹果机端用的8针串口) PC机9femle(孔)串口5-------------------33 ------------------24 ------------------51 ------------------82------------------ 7 (有可能7、8要对换)3、Apple(苹果机自身的8孔串口,类似于PS2口)苹果机的25male(针)串口5 ----------------- 33 ----------------- 24 ------------------71------------------42------------------54、苹果机的25 femle(孔)串口 PC机25 femle(孔)串口2 ----------------- 33------------------ 24------------------ 55------------------ 47------------------ 7本文来自CSDN博客,转载请标明出处:truewayleearchive298.aspx---------------------------------------------------------口连接线的制作方法 com线制作 rs年07月20日星期日 01:50在电脑的使用中往往会遇到各种各样的连接线。
c语言怎么写串口通信编程串口通信是一种广泛应用于嵌入式系统和电子设备之间的通信方式。
无论是嵌入式开发还是电子设备控制,串口通信都是常见的需求。
在C语言中,实现串口通信需要通过操作串口的硬件寄存器和使用相应的通信协议来实现数据的发送和接收。
本文将一步一步介绍如何使用C语言编写串口通信程序。
第一步:打开串口要开始串口通信,首先需要打开串口。
在C语言中,可以使用文件操作函数来打开串口设备。
通常,串口设备被命名为/dev/ttyS0,/dev/ttyS1等,具体名称取决于系统。
下面是一个打开串口设备的示例代码:cinclude <stdio.h>include <fcntl.h>include <termios.h>int open_serial_port(const char *port) {int fd = open(port, O_RDWR O_NOCTTYO_NDELAY);if (fd == -1) {perror("open_serial_port");return -1;}设置串口属性struct termios options;tcgetattr(fd, &options);cfmakeraw(&options);cfsetspeed(&options, B9600);tcsetattr(fd, TCSANOW, &options);return fd;}int main() {const char *port = "/dev/ttyS0";int fd = open_serial_port(port);if (fd == -1) {打开串口失败,处理错误return -1;}串口已打开,可以进行数据的读写操作return 0;}在上面的代码中,open_serial_port函数用于打开指定的串口设备并进行一些必要的设置。
计算机网络实验————实现RS232串口通信程序及MODBUS协议的编程一.实验目的:1.熟悉并掌握RS232串口标准及原理。
2.实现PC机通过RS232串口进行数据的收发。
3.掌握MODBUS协议。
4. 掌握MODBUS协议编程的编写二、实验设备PC机一台,RS232串口通信线(9针)一条,跳线一个(一台PC实验时,将其中的2和3短接)三、实验内容界面内容:(1)打开串口与关闭串口按钮(2)信息发送区:信息编辑区,发送信息按钮(3)信息接受区:信息显示区,接收信息按钮四、实验原理rs-232-c :RS-232C标准(协议)的全称是EIA-RS-232C标准,其中EIA(Electronic Industry Association)代表美国电子工业协会,RS(ecommeded standard)代表推荐标准,232是标识号,C代表RS232的最新一次修改(1969),在这之前,有RS232B、RS232A。
它规定连接电缆和机械、电气特性、信号功能及传送过程。
常用物理标准还有有EIA�RS-232-C、EIA�RS-422-A、EIA�RS-423A、EIA�RS-485。
这里只介绍EIA�RS-232-C(简称232,RS232)。
例如,目前在IBM PC机上的COM1、COM2接口,就是RS-232C接口。
RS232原理如图1-3。
图1 RS232接口电缆和引脚外观图2 RS232 引脚定义(DB9)RS232接口硬件握手方式1 概述在现代的各种实时监控系统和通信系统中,在Windows 9X/NT下利用VC++对RS-232串口编程是常用的手段。
Windows 9X/NT是抢先式的多任务操作系统,程序对CPU的占用时间由系统决定。
多任务指的是系统可以同时运行多个进程,每个进程又可以同时执行多个线程。
进程是应用程序的运行实例,拥有自己的地址空间。
实验5 RS232C串行口驱动程序设计实验目的掌握RS232串行口设备驱动程序的编写方法,实现串行口的初始化、中断管理、发送与接收处理的程序设计技巧。
实验环境⏹操作系统:windows 2000以上版本,要求安装.NET Framework 1.1⏹软件工具列表:⏹Microsoft ActiveSyn 4.5;⏹Platform Builder 5.0;实验学时2学时,必做实验。
实验内容理解驱动程序的原理与功能,掌握流式接口驱动程序的结构、编写、加载及调试过程预备知识驱动程序是对底层硬件的抽象。
应用程序开发者不需要真正理解底层驱动的工作原理,他们只需要通过Windows CE提供的API函数,就可以直接与硬件进行交互。
例如,如果应用程序要对串口进行操作,只需要:1.在COMx上调用CreateFile( )2.调用WriteFile( ) 往串口写数据3.调用CloseHandle( ) 关闭串口对于其他类型的API也是一样的。
如果我们需要向显示器输出,我们只需要调用PolyLine( ), 或者MoveToEx( ), LineTo( )等函数,而不需要理解显示器的真正工作原理。
在Windows CE中,驱动就是一个简单的用户态动态链接库(DLL),DLL 会导出一些公共的接口,DLL被父进程(通常是device.exe或者gwes.exe)加载,然后,父进程通过DLL导出的接口调用DLL。
流式接口的驱动程序导出一系列大家熟知的接口。
还拿串口驱动当例子。
我们希望可以往串口读写数据,因此,我们希望驱动程序可以导出Open, Close, Read, 和Write接口。
此外,流式接口的驱动程序还导出如下函数:PowerUp, PowerDown, IO Control, Init, 和DeInit.实验步骤一.、编写流式接口的驱动程序1.打开Platform Builder。
2.利用Platform Wizard创建新的平台3.在Platform Builder中选择“File”->“New Project or File”,创建一个“Windows CE Dynamic link library”项目,项目的名称填写“My Driver”。
/****************************************************************************** **** 标题: RS232串口通信试验(接收) **** 1.通过本例程了解串口的基本原理及使用,理解并掌握对串口进行初始化**** 2.请使用串口调试助手(Baud 4800、数据位8、停止位1、效验位无)做为上位机发给单片机,* 如果在字符数字发送框发0X00蜂铃器就会叫,如果发0xff蜂铃器就停叫。
** * * 请学员认真消化本例程,学会用C语言操作串口******************************************************************************** ****/#include <REG52.H>#include <stdio.h>sbit BEEP = P1^4;unsigned char b;void main (void) {SCON = 0x50; //REN=1允许串行接受状态,串口工作模式1TMOD|= 0x20; //定时器工作方式2PCON|= 0x80;//TH1 = 0xFD; //baud*2 /* reload value 19200、数据位8、停止位1。
效验位无(11.0592)TH1 = 0xF3; // //baud*2 /* 波特率4800、数据位8、停止位1。
效验位无(12M)TL1 = 0xF3;TR1 = 1;ES = 1; //开串口中断EA = 1; // 开总中断BEEP=1;// IE = 0x0;while(1){if (RI) //RI接受中断标志{ RI=0; //清除RI接受中断标志b=SBUF; //SUBF接受/发送缓冲器}BEEP=b;}}。
void main()
{
delayms(100);
init(); //初始化系统
delayms(100);
init_wdt(); //初始化看门狗
while(1)
{
while(!RI_0) //是否收到数据
{
clr_wdt();
}
RI_0=0; //清除接收中断标志
buffer=S0BUF;
if(buffer==0x5a) //检测祯头0
start0=1;
if(buffer==0x54) //检测祯头1
start1=1;
if(buffer==0x5a) //检测祯尾0
end0=1;
if(buffer==0xfe) //检测祯尾1
end1=1;
if((start0==1)&(start1==1))
{
buff[i]=buffer; //从祯头1开始存储数据
i++;
}
if((end0==1)&(end1==1)) //是否已经接收祯尾
{
count=i; //数据长度为count个
i=1;
if((buff[2]==0x03)&(count==107)) //是否422指令 {
buff[0]=0x5a; //重填祯头0
buff[count-4]=0; //校验和清零
for(k=2;k<(count-4);k++) //计算校验和
{
buff[count-4]+=buff[k];
}
for(k=0;k<count;k++) //从祯头1开始循环发送
{
S0BUF=buff[k];
while(!TI_0); //等待发送完成
TI_0=0; //清除发送中断标志
}
reset();
}
else if((buff[2]==0x05)&(count==7)) //是否AD测试指令
{
sendad();
reset();
}
else if((buff[2]==0x18)&(count==7)) //是否发送时序信号指令
{
sendpaulse();
reset();
}
else //如果接收错误,则恢复各标志位为初始状态以便下次接收 {
reset();
}
}
}
}
void reset()
{
start0=0; //祯头祯尾标志位清零
start1=0;
end0=0;
end1=0;
for(k=0;k<count;k++)
{
buff[k]=0x00; //缓冲区清零
}
count=0; //计数清零
}。