xx贝尔新风系统说明书
- 格式:docx
- 大小:23.72 KB
- 文档页数:15
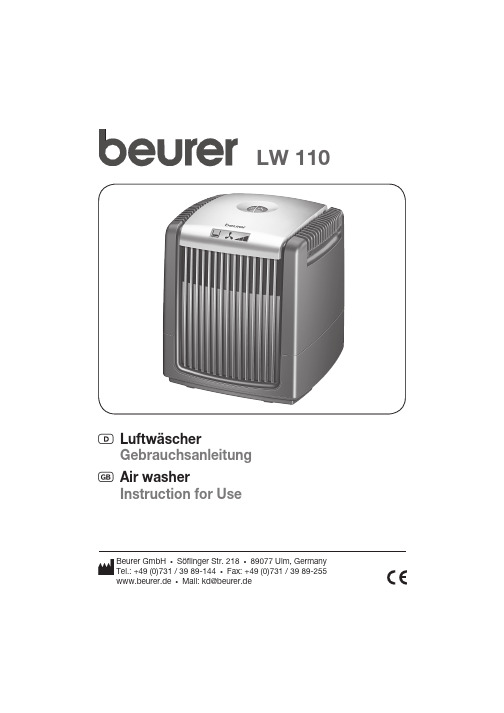
Beurer GmbH • Söfl inger Str. 218 • 89077 Ulm, GermanyTel.: +49 (0)731 / 39 89-144 • Fax: +49 (0)731 / 39 89-255www.beurer.de •Mail:************D Luftwäscher GebrauchsanleitungG Air washerInstruction for Use LW 110Das Gerät ist doppelt schutzisoliert und entspricht der Schutzklasse 2.1. Zum KennenlernenDer Mensch verbringt den größten Teil seiner Zeit in geschlossenen Räumen. Oft ist diese Luft mit Staubpar-tikeln, Pollen, Tierhaaren und Gerüchen belastet und – besonders in der Winterzeit – zu trocken. Zu trockene23Allgemein wird eine relative Luftfeuchtigkeit von 40 bis 60% empfohlen. Doch im Winter wird dieser Wert häufig unterschritten, wenn beim Lüften kalte Luft in Wohnräume strömt und dann aufgewärmt wird. Denn bei steigender Lufttemperatur kann die Luft zunehmend mehr Feuchtigkeit aufnehmen. Die Luft deckt den Feuchtigkeitsbedarf aus anderen Quellen, wie z.B. Schleimhäute, Haut, Einrichtungsgegenstände, etc. Dies kann eine Reihe negativer Auswirkungen haben:– Schleimhäute trocknen aus, Lippen werden spröde und trocknen aus, Augen brennen,– Infektionen und Erkrankungen der Atemwege werden begünstigt,– Abgespanntheit, Müdigkeit und Konzentrationsschwäche,– Haustiere und Zimmerpflanzen werden belastet,– Förderung der Staubentwicklung und elektrostatischer Aufladung von Textilien aus Kunstfasern, Teppichen und Kunststoffböden,– Beschädigung von Einrichtungsgegenständen aus Holz und besonders Parkettböden,– Verstimmung von Musikinstrumenten.Der Luftwäscher bietet der Luft nun die Möglichkeit, den Feuchtigkeitsbedarf an der grossen Oberfläche der feuchten Befeuchterscheiben zu decken. Die Luftbefeuchtung erfolgt nach dem Prinzip der selbstregulie-renden Kaltverdunstung. Es sind keine zusätzlichen Steuergeräte notwendig.Zur Keimfreihaltung und Verdunstungsförderung benötigt der Luftwäscher einen Wasserzusatz. Eine regel-mäßige Reinigung ist unerlässlich. Verwenden Sie dazu die mitgelieferte Reinigungslösung.2. Bestimmungsgemäßer GebrauchDieser Luftwäscher ist bestimmt zur Reinigung und Befeuchtung der Luft in Innenräumen.WARNUNG– Dieses Gerät ist nicht dafür bestimmt, durch Personen (einschließlich Kinder) mit eingeschränkten physischen, sensorischen oder geistigen Fähigkeiten oder mangels Erfahrung und/oder mangels Wissen benutzt zu werden, es sei denn, sie werden durch eine für ihre Sicherheit zuständige Person beaufsichtigt oder erhielten von ihr Anweisungen, wie das Gerät zu benutzen ist.– Kinder sollten beaufsichtigt werden, damit sie nicht mit dem Gerät spielen.– Wenn Sie an einer schweren Krankheit der Atemwege oder Lunge leiden, befragen Sie vor der Benutzung des Luftwäschers Ihren Arzt.– Das Gerät ist nur für den in dieser Gebrauchsanleitung beschriebenen Zweck vorgesehen. Der Hersteller kann nicht für Schäden haftbar gemacht werden, die durch unsachgemäßen oder leicht-sinnigen Gebrauch entstehen.3. SicherheitshinweiseLesen Sie diese Gebrauchsanleitung sorgfältig! Ein Nichtbeachten der nachfolgenden Hinweise kann Perso-nen- oder Sachschäden verursachen. Bewahren Sie die Gebrauchsanleitung auf und machen Sie diese auch anderen Anwendern zugänglich. Übergeben Sie diese Anleitung bei Weitergabe des Geräts.WARNUNGHalten Sie Kinder von Verpackungsmaterial fern. Es besteht Erstickungsgefahr.StromschlagWARNUNGWie jedes elektrische Gerät ist auch dieser Luftwäscher vorsichtig und umsichtig zu gebrauchen, um Gefahren durch elektrische Schläge zu vermeiden.• Betreiben Sie das Gerät deshalb– n ur mit der auf dem Gerät notierten Netzspannung (das Typenschild befindet sich innen an derVentilatoreinheit),– nie, wenn das Gerät oder Zubehör sichtbare Schäden aufweist,– nicht während eines Gewitters.• Schalten Sie das Gerät im Falle von Defekten oder Betriebsstörungen sofort aus und trennen Siedas Gerät vom Stromanschluss. Ziehen Sie nicht am Stromkabel oder am Gerät um den Stecker4678567Trennen Sie dazu die Ventilatoreinheit von der Oberschale, indem811. Garantie und ServiceSie erhalten 3 Jahre Garantie ab Kaufdatum auf Material- und Fabrikationsfehler des Produktes. Die Garantie gilt nicht:•im Falle von Schäden, die auf unsachgemäßer Bedienung beruhen,•für Verschleißteile,•für Mängel, die dem Kunden bereits bei Kauf bekannt waren,•bei Eigenverschulden des Kunden.Die gesetzlichen Gewährleistungen des Kunden bleiben durch die Garantie unberührt. Für Geltendmachung eines Garantiefalles innerhalb der Garantiezeit ist durch den Kunden der Nachweis des Kaufes zu führen. Die Garantie ist innerhalb eines Zeitraumes von 3 Jahren ab Kaufdatum gegenüber der Beurer GmbH, Söflinger Straße 218, 89077 Ulm, Germany geltend zu machen. Der Kunde hat im Garantiefall das Recht zur Reparatur der Ware bei unserem eigenen oder bei von uns autorisierten Werkstätten. Weitergehende Rechte werden dem Kunden (aufgrund der Garantie) nicht eingeräumt.91. Getting to know your deviceHumans spend a large proportion of their time indoors. The air indoors is often polluted with dust particles, pollen, animal hair and odours and is too dry, particularly in winter. Ambient air that is too dry may have a1011126781314When putting the fan unit down, ensure that it does not15753.899 – 0710 I r r t u m u n d Än d e r u n g e n v o r b e h a l t e n。

AIR HANDLING UNITWITH HEAT RECOVERY2Safety requirements (2)Purpose (4)Delivery set (4)Designation key (4)Technical data (5)Unit design and operating principle (6)Mounting and set-up (7)Connection to power mains (10)Control (11)Technical maintenance (16)Troubleshooting (17)Storage and transportation regulations (17)Manufacturer’s warranty (18)Acceptance certificate (19)Seller information (19)Installation certificate (19)Warranty card (19)This user’s manual consisting of the technical details, operating instructions and technical specification covers the installation and mounting of the Freshbox 100 heat recovery air handling unit (hereinafter referred to as «unit»).Read the user’s manual carefully prior to installing and operating the unit.Fulfil the user’s manual requirements as well as the provisions of all the applicable local and national construction, electrical and technical norms and standards.The warnings contained in the user’s manual must be considered most seriously since they contain vital personal safety information.Failure to follow the rules and safety precautions noted in this user’s manual may result in an injury or unit damage.After a careful reading of the manual, keep it for the entire service life of the unit.While transferring the unit control the user’s manual must be turned over to the receiving operator.Symbol legend:CONTENTSSAFETY REQUIREMENTS3UNIT MOUNTING AND OPERATION SAFETY PRECAUTIONS• Disconnect the unit from power mains prior toany installation operations.• Unpack the unit with care.• Do not lay the power cable of the unit in close proximity to heating equipment.• While installing the unit follow the safety regulations specific to the use of electric tools.• Do not use damaged equipment or cables when connecting the unit to power mains.• Do not operate the unit outside thetemperature range stated in the user's manual.• Do not operate the unit in aggressive or explosive environments.• Do not touch the unit controls with wet hands.• Do not carry out the installation and maintenance operations with wet hands.• Do not wash the unit with water.• Protect the electric parts of the unit against ingress of water.• Do not allow children to operate the unit.• Disconnect the unit from power mains prior to any technical maintenance.• Do not store any explosive or highly flammable substances in close proximity to the unit.• When the unit generates unusual sounds, odour or emits smoke disconnect it from power supply and contact the Seller.• Do not open the unit during operation.• Do not direct the air flow produced by the unit towards open flame or ignition sources.• Do not block the air duct when the unit is switched on.• In case of continuous operation of the unit periodically check the security of mounting.• Do not sit on the unit and avoid placing foreign objects on it.• Use the unit only for its intended purpose.4The Freshbox 100 heat recovery air handling unit is an energy saving unit based on heat recovery technology and is one of the energy saving components used in the buildings and premises.The unit is designed to ensure continuous mechanical air exchange in houses, offices, hotels, cafés, conference halls and other utility and public spaces as well as to recover the heat energy contained in the air extracted from the premises to warm up the filtered stream of supply air.The unit is rated for continuous operation.Transported air must not contain any flammable or explosive mixtures, evaporation of chemicals, sticky substances, fibrous materials, coarse dust, soot and oil particles or environments favourable for the formation of hazardous substances (toxic substances, dust, pathogenic germs).Air handling unit 1 itemUser's manual 1 itemMounting template 1 itemFastening kit 1 itemSpigot 1 itemPacking box 1 itemPURPOSEDELIVERY SET5The unit is designed for indoor application with the ambient temperature ranging from +1 °C up to +40 °C and relative humidity up to 80 %.The unit is rated as a Class I electrical appliance.Hazardous parts access and water ingress protection rating: IP 22 for the assembled unit connected to the air ducts IP 44 for the unit motorsThe unit design is constantly being improved, so some models can slightly differ from those ones described in this manual.TECHNICAL DATA6Supply fanExtract filter G4Intake filter G4LockIntake air preheater(Freshbox E-100)Automatic supplylouvre shuttersSupply airtemperature sensorPost-heater(Freshbox E1-100)PlugCounterflow heat exchangerControl unitExhaust fanAutomatic exhaustlouvre shuttersControl panelSupply filter F8Drain panOutdoor airtemperature sensor(Freshbox E-100)Warm stale extract air from the room flows to the unit, where it is filtered by the extract filter, then air flows through the heat exchanger and is exhausted outside by the extract fan.Cold fresh air from outside flows into the unit, where it is cleaned by the supply filter. Then filtered air flows through the heat exchanger and is moved to the room with the supply fan.Thermal energy of warm extract air is transferred to clean intake fresh air from outside and warms it up. The air flows are fully separated.Heat recovery minimizes heat losses, which reduces the cost of space heating in the cold season.Depending on the model the unit is equipped with a supply air preheater or post-heater with overheating protection.The preheater is located upstream of the heat exchanger and is designed for its overheating protection.The post-heater is located downstream of the heat exchanger and is designed for extra heating of supply air to more comfortable temperature. The heaters are switched on and off automatically according to temperature sensor readings.The heat exchanger overheating protection in unit models without a preheater is achieved by automatic supply fan speed reduction according to extract air sensor readings.The extract fan runs at maximum speed.Temperature differences between supply and extract air flows leads to condensate formation. Condensate is collected in the drain pan and is removed outside by the drain pipes through the exhaust air duct.The louvre shutters open automatically when the motors are switched on and close when the motors are switched off.*An additional extract spigot can be fitted to the unit to connect the exhaust air duct from additional premises, e.g. a bathroom. The spigot is included in the scope of delivery.DESIGN AND OPERATING PRINCIPLE7Before mounting make sure the casing does not contain any foreign objects (e.g. foil, paper).The unit must be mounted on a plane wall.Mounting of the unit to an uneven surface can lead to the unit casing distortion and operation disturbance.While installing the unit ensure convenient access for subsequent maintenance and repair.Minimum distances from the unit to the surfacesMounting template 3 holes (Ø 100 mm) for an air duct Fill the gaps between the wall and the air ducts with a mounting foam4 holes (Ø 8 and 90 mm deep)in the wall made using a mounting templatePower cable entryMOUNTING AND SET-UP81. Mark and drill holes in the wall using a mounting template.Fix the mounting template on the wall with a self-adhesive tape at the required level.Using a mounting template make marks to drill holes for air ducts, for unit mounting and for power cable entry.Before installation operations route necessary cables and wires to the unit mounting place.2. Remove the mounting template and drill two through holes Ø 105 mm for round air ducts.When mounting the unit with an additional extract spigot prepare a hole in the wall for a connecting bend and for laying of a rectangular air duct.A connecting bend, rectangular and round air ducts are available separately.Drill holes (Ø 8 mm, 90 mm deep) to mount the unit. Install the expansion anchors, remove the perforated fillers for the air ducts from the mounting template and install the mounting template back using a self-adhesive tape. Prepare air ducts of required length. Note that the telescopic air duct end must protrude for the distance that enables installation of the outer ventilation hood. For details, refer to the installation instruction for the ventilation hood. The outer ventilation hood is available separately.3. Fix the mounting template on the wall. Insert round air ducts in the corresponding holes of the mounting template. Install the air duct with the minimum slope of 3° for condensate removal.To install the unit with an additional spigot insert the connecting bend into the prepared hole in the wall, aligning the mounting template hole with a round end of the connecting bend. Connect a rectangular duct to the connecting bend.4. Fill the spaces between the air ducts and the wall with a mounting foam through the specially designed holes in the mounting template.Wait till a mounting foam hardens then take off the mounting template and remove the foam excess. Cut off the protruding air duct parts to be flush with the wall surface.95. To install an additional extract spigot remove the plug on the rear part of the unit.Undo the screws, remove the plug and fix a spigot on itsplace using screws.corresponding wall-mounted air ducts.Open the unit door and remove the heat exchanger.additional extract spigot is not installed.expansion anchors.length not more than 10 mm.the ventilation hood installation manual).10The unit is rated for connection to single-phase AC mains 230 V/50 Hz. The unit must be connected to power mains using durable, insulated and heat-resistant conductors (cables and wires) with minimum cross section not less than 0.75 mm2.Connect the unit to power mains through the external automatic circuit breaker QF with a magnetic trip. The position of the QF external automatic circuit breaker must ensure free access for quick power-off of the unit. The circuit breaker trip current must correspond to the unit current consumption, refer to the Technical data section. The recommended circuit breaker nominal current is 2.5 A. When selecting an automatic circuit breaker it is necessary to consider maximum permissible wire heating which depends on the wire type, its insulation, length and installation method (i.e. overhead, in cable ducts or inside the walls).Connection of additional external controls• Connection of the automatic fire fighting system contact (PK).Upon connecting the automatic fire fighting system contact remove the jumper between the terminals 5 and 6.In this case the connection is made using a normally closed dry contact that breaks the control circuit and cuts off power supply to the unit on the signal from the fire alarm panel.• Connection of the external control unit contact (H).The unit design enables connecting a normally opened contact (NO-contact) of external controls, such as an external CO2sensor, a humidity sensor,a switch etc. The contact is connected to the terminals 7 and 8. When the contact closes the unit switches to maximum speed.Additionally connected external controls are not included in the scope of delivery.Connection of additional external control contacts are shown in the wiring diagram (dashed).Power supply connection methodsThe unit is connected to power mains through the power connector located at the bottom part ofthe casing by means of a power cable. The power cable is available separately.5678PK PK H H910111213141L2N3PEThe unit is connected to power supply through the rubber gasket on the rear part of the casingusing a power cable according to the wiring diagram.To access the rubber gasket open the unit door, undo the screws fixing the shielding and remove it. Thenundo the screws fixing the control unit and pull it aside. Lead the cable into the unit and connect it to thecontrol unit after removing the jumpers 9 and 10, 11 and 12, 13 and 14 on the terminal block.L N PEQF5678PK PK H H910111213141L2N3PE CONNECTION TO POWER MAINS11The unit is controlled by means of the control panel on the unit casing and of the remote control.Control panel1. Unit On/OffUnit activation/deactivation:by mby meaR oom temperature Day of the week TimeOfT heWhen the unit is switched on the control panel display indicates: R oom temperature Day of the week TimeTim er status• • H e 2. Control of operating modes.Fan speed control:FrFrom the remote control: pressto increase speed orto reduce speed (low speed - medium speed - high speed).Fro m the remote control: pressto set low speed,to set medium speed and The control panel displays the current fan speed:– low speed– high speedCONTROL123. Timer.The timer is designed to switch the fans to maximum speed with subsequent automatic reset to a previous speed after a set time period, from 20 to 60 minutes.To turn the timer on/off:extends the timer setting for 10 minutes. The maximum timer setting is 60 minutes. Press and hold for 3 seconds to turn the timer off. Fr o m the remote control: press to turn the timer on for 20 minutes. To turn the timer off switch off the unit by pressing .4. Supply air post-heating.The unit equipped with an electric heater provides supply air post-heating during the cold season. The heater turns on/off automatically if the intake air temperature is below/above the set value.press and hold thebutton on the control panel, then presspr essto turn the heater on and to turn it off.DOWN THE. SHUTDOWN TIME OF FANS IS 0.5-2 MINUTES DEPENDING ON THE UNIT MODEL.5.6. Unit parameter settings.WARNING!CHANGING THE UNIT SETTINGS RESULTS IN LOSS OF THE FACTORY SETTINGS!FAN SPEED ADJUSTMENT IS POSSIBLE ONLY FROM THE CONTROL PANEL!Fan Speed Setting mode.Access to the Fan Capacity Adjustment mode is confirmed by thecontrol panel display.To s elTo adshow the current extract fan speed.Fan speed adjustment is not possible with the remote control.low speed — 30 %medium speed — 60 %high speed — 100 %7. Viewing the temperature sensor readings.least 3 seconds.13The indicators and light up in the Sensor Readings View mode.8. Filter replacement indication.indicating the need to replace the filters.Maintenance» section).on the control panel or on the remote control.9. Date/time setting.Turn the unit off.1. Minute2. Hour3. Day of the week4. Date5. Month6. Year10. lights up when theon the control panel to deactivate the Scheduled Operation mode. From the remote control the Scheduled Operation mode is activated/deactivated by pressing .Timer control has higher priority than scheduled operation.1411. Scheduled Operation mode setting.Each day of the week has four entries. Time of switching the unit to the set speed and turning the heater on or off can be set for each entry.on the control panel or on the remote control.— Heater OFF— Heater ONScheduled operation parameters:• Entry number – each day of the week has four entries• Day of the week – setting a day of the week•• - offTime – setting time for the current entry.To copy the set entries for the next day press and holdPress on the control panel or on the remote control to exit the Scheduled Operation Setting mode.Scheduled operation programming example1512. Alarms.In case of alarm the unit is turned off and the alarm indicators are displayed on the control panel.16Maintenance operations of the unit are required 3-4 times per year. Maintenance includes periodic dust removal from surfaces, cleaning and replacementof filters and dry cleaning of fans.Maintenance includes general cleaning of the unit and the following operations:1. Filter maintenance (3-4 times per year).Dirty filters increase air resistance in the system and reduce supply air volume. The filters require cleaning not less than 3-4 times per year.Remove the clogged filters from the unit.Clean the F8 filter with a vacuum cleaner.To remove the G4 filters for cleaning remove the flexible clamps fixing them and pull the filters until they slide off the guides.Clean the filters with water and let them dry. After complete drying reassemble the filters in the reverse order.Install the filters back to the unit.After two consecutive cleanings filters must be replaced. For new filters contact the Seller.2. Heat exchanger maintenance (once a year).Some dust may accumulate on the heat exchanger block even in case of regular maintenance of the filters. To maintain the high heat recovery efficiency, regular cleaning is required. Periodical dry cleaning is recommended. Use a vacuum cleaner with a narrow nozzle.Remove the clogged heat exchanger out of the unit, clean it with a vacuum cleaner and install the heat exchanger back to the unit.3. Fan maintenance (once a year).Even in case of regular maintenance of the filters, some dust may accumulate inside the fans and reduce the fan performance and supply air flow. Clean the fan with a cloth or a soft brush. Do not use water, aggressive solvents or sharp objects as they may damage the impeller.4. Technical maintenance of the supply grille (twice a year).The supply grille may get clogged with leaves and other objects which may reduce the unit performance. Check the supply grille twice per year and clean it as required.5. Technical maintenance of air duct system (every 5 years).Even regular fulfilling of all the maintenance operations described above may not completely prevent dirt accumulation in the air ducts which reduces the unit capacity. Duct maintenance means regular cleaning or replacement.TECHNICAL MAINTENANCE17Store the unit in the manufacturer’s original packing box in a dry closed ventilated premise with temperature range from +5 °C to + 40 °C. Storage environment must not contain aggressive vapours and chemical mixtures provoking corrosion, insulation and sealing e suitable hoist machinery for handling and storage operations to prevent possible damage to the unit.Follow the handling requirements applicable for the particular type of cargo.The unit can be carried in the original packing by any mode of transport provided proper protection against precipitation and mechanical damage.Avoid sharp blows, scratches or rough handling during loading and unloading.Do not expose the unit to sudden changes in temperature. Such changes can lead to condensation of moisture inside the unit and performance disturbance when the unit is switched on. Prior to the initial power-up after transportation at subzero temperatures allow the unit to warm up at room temperature for at least 2 hours.TROUBLESHOOTINGSTORAGE AND TRANSPORTATION REGULATIONS18The manufacturer hereby warrants normal operation of the unit for 24 months after the retail sale date provided the user’s observance of the transportation, storage, mounting and operation regulations.Should any malfunctions occur in the course of the unit operation through the Manufacturer’s fault during the guaranteed period of operation the user is entitled to elimination of faults by the manufacturer by means of warranty repair at the factory free of charge.The warranty repair shall include work specific to elimination of faults in the unit operation to ensure its intended use by the user within the guaranteed period of operation.The faults are eliminated by means of replacement or repair of the unit components or a specific part of such unit component.The warranty repair does not include:• routine technical maintenance• unit installation/dismantling• unit setupTo benefit from warranty repair the user must provide the unit, the user’s manual with the purchase date stamp and the payment document certifying the purchase.The unit model must comply with the one stated in the user’s manual.Contact the Seller for warranty service.The manufacturer’s warranty does not apply to the following cases:• User’s failure to submit the unit with the entire delivery package as stated in the user’s manual including submission with missing component parts previously dismounted by the user.• Mismatch of the unit model and the brand name with the information stated on the unit packing and in the user’s manual.• User’s failure to ensure timely technical maintenance of the unit.• External damage to the unit casing (excluding external modifications as required for installation) and internal components caused by the user.• Redesign or engineering changes to the unit.• Replacement and use of any assemblies, parts and components not approved by the manufacturer.• Unit misuse.• User’s violation of the unit installation regulations.• User’s violation of the unit control regulations.• Unit connection to the power mains with a voltage different from the one stated in the user’s manual.• Unit breakdown due to voltage surges in the power mains.• Discretionary repair of the unit by the user.• Unit repair by any persons without the manufacturer’s authorization.• Expiration of the unit warranty period.• User’s violation of the unit transportation regulations.• User’s violation of the unit storage regulations.• Wrongful actions against the unit committed by third parties.• Unit breakdown due to circumstances of insuperable force (fire, flood, earthquake, war, hostilities of any kind, blockades).• Missing seals if provided by the user’s manual.• Failure to submit the user’s manual with the unit purchase date stamp.• Missing payment document certifying the unit purchase.MANUFACTURER’S WARRANTY19The single-room reversible energy regeneration ventilation unitis recognizes as serviceable.The unit complies with the requirements according to the EU norms and directives, to the relevant EU-Low Voltage Equipment Directives, EU-Directives on Electromagnetic Compatibility. We hereby declare that the following product complies with the essential protection requirements of Electromagnetic Council Directive 2004/108/EC, 89/336/EEC and Low Voltage Directive 2006/95/EC, 73/23/EEC and CE-marking Directive 93/68/EEC on the approximation of the laws of the Member States relating to electromagnetic compatibility.This certificate is issued following test carried out on samples of the product referred to above.Approval markManufacturing date ____________________Company: Name: Date SignatureCONNECTION CERTIFICATEACCEPTANCE CERTIFICATESELLER SALES DATEREPRESENTATIVE IN EU Blauberg Ventilatoren GmbH Aidenbachstr. 52a,D-81379 München, DeutschlandWARRANTY CARDFreshbox100_v2(2)_EN。

室内新风系统使用说明书中国建筑科学研究院环境测控与优化研究中心室内新风系统使用说明一、产品构成及型号说明室内新风控制系统是专门对室内空气质量进行检测和控制的系统,包括系统主机、控制分机和检测分机(如图1所示)。
具体的产品名称和型号如下:系统型号:CABR-EMCSO-S012系统主机:CABR-EMCSO-S012A控制分机:CABR-EMCSO-S012B检测分机:CABR-EMCSO-S012C图1 系统构成实物及连接示意图系统简介室内新风系统是专门改善室内空气环境设计研发的控制系统,该系统能够全面的检测室内空气质量,并上传系统主机,由内置的微控制芯片,智能的判断环境状态,如果出现CO2浓度超标等情况,系统会根据设置控制相应区域的风机作出相应的动作,实时的改善环境状态。
具体的系统具有以下突出的特点:1、操作灵活简便:系统设计充分考虑了不同人群的使用需求,运行做到了全自动化,设置系统只需点击触屏,选择内置的运行模式,即可满足用户不同的需求;2、控制合理准确:检测系统采用高精度传感器,能快速准确的检测室内的空气质量,同时,根据设置,如果某些参数超过设置范围,就会控制风机运转,以改善室内空气质量;3、运行稳定可靠:系统采用分布式控制方式,检测准确快速,系统软件经过全面考虑,和长期老化试验,基本排除了所有的故障;4、系统安装维护方便:系统可以兼容市面上的主流风机;系统采用总线形式,只需一根控制线即可,安装既可以进行预埋管线,也可后期布线安装,方便灵活;(一)功能简介根据混合通风系统的技术思路,系统可以根据室内二氧化碳浓度、温度、湿度等的状况联动通风装置,实现室内空气环境保持清新舒适的功能。
具体的功能如下:1、检测终端:可以检测房间内的空气品质,并且上传主机;2、控制终端:接收控制数据,实现风机联动控制;3、显示主机:采集各终端的检测及状态数据,根据控制逻辑,发出控制指令及界面显示。
(二)运行模式1、舒适模式:(1)CO2浓度阈值(600~1000ppm),优先控制换气启停;(2)如果室外温度适宜(18~26℃),室内温度高于29℃或低于15℃,开启换气;(3)如果室外温度适宜(18~26℃),室外湿度适宜(30~60%),室内湿度低于20%或高于70%,开启换气。

系列新风系统用户手册1 前言 (3)1.1 机房环境要求 (3)1.2 专业节能新风系统 (3)2 产品介绍 (4)2.1 外观介绍 (4)2.2 型号说明 (4)2.3 主要特点 (5)2.4 标准组件 (5)2.4.1 风机 (5)2.4.2 滤网 (6)2.4.3 滤袋 (6)2.4.4 风阀 (6)3 技术参数 (7)3.1 机组参数 (7)3.2 使用条件 (8)4 尺寸参数 (8)4.1 机械尺寸 (8)4.2 底座安装尺寸 (9)4.3 新风管尺寸 (10)4.4 回风管尺寸 (10)4.5 维护空间 (11)4.6 安装考前须知 (11)5 应用指导 (12)5.1 显示屏 (12)5.1.1 显示屏按键说明 (12)5.1.2 系统启动界面 (12)5.1.3 待机界面内容 (13)5.1.4 菜单说明 (13)5.2 控制器 (15)5.2.1 主电路连接 (15)5.2.2 控制器原理框图 (16)5.3 新风机工作原理 (16)5.4 机房环境应用图例 (16)6 故障诊断与处理 (17)6.1 故障现象处置方法 (17)6.2 日常维护操作考前须知 (18)/ 、八—1 前言1.1机房环境要求现代计算机设备和数据交换设备均采用高热密度的CPU 芯片,单相机柜内的设备发热量也相应大幅提升,所以机房的提供的环境质量显得由为重要,主要表现在以下几个方面:a)温度控制:计算机及交换机工作时产生大量的热量,其密度是普通办公室的6〜20倍。
为了保证计算机设备能够发挥最正确效率,机房采用恒温控制,最正确控制范围为23C±2C(机房标准建议温度范围18C〜28 °C)o这就要求制冷机组一定要有足够的制冷能力和快速反响调控能力,以应对温度的急剧变化。
b)风量/洁净度控制:计算机及交换机工作时产生大量的显热,为了能迅速地排除这些热量,要求具有足够的冷却循环风量和足够的送风距离。

新风换气机说明书一、用途及特点:此适用于医药、化工、食品、冶金、矿产行业的生产性空气调节工程,也可用于宾馆、饭店、酒家等舒适性集中空调工程。
机组其主要功能是回收排风带走的冷热能量,它适用于空调工程的全新风系统和循环系统,具有系统的加热、加湿、降温、净化功能外,还具有其最大的优点,降低系统运行能量消耗,节省系统运行费用,提高用户经济效益,它是我公司最新向用户推出的节能产品。
在各类工厂空调通风换气中,冬季回收排风中的热量予热新风;夏季回收排风中的冷量予冷新风;回收工艺设备排风中的热量予热送风,达到节能的目的。
二、机组的结构特点:根据功能可分为风机段、过滤段、热交换段。
机组箱体采用模块化设计,结构为可拆装时框板式,框架为扣板式铝型材与防冷桥铝型材相结合或优质镀锌板材直接成型。
外形美观,组装方便,可根据客户要求选取防冷桥或防冷桥与普通铝型材组合使用,以达到更好的性价比。
风机段风机是空气处理机组必不可少的一个部件,该机组采用的是双吸后倾离心式风机。
风机采用Y系列电动机,电动机额定电压三相380V;风机采用后倾式机翼形叶轮,噪声低,体积小,产品结构合理寿命长,具有使用安全可靠、调整方便快捷等优点。
初中效过滤段空气过滤器是用来过滤空气中的尘埃粒子,当空气中的粒子撞到过滤网上时,粒子与过滤网粘到一起,从而起到过滤的目的。
过滤网能拦截尘埃粒子,同时也不会形成过大的阻力,过滤网上积尘越多,阻力越大,当阻力增加道设计所允许的最大值时,清洗或更换过滤器,以防被积的尘埃粒子再次进入空气,进行二次污染热交换段五层卷边技术,环保,高密封性,高强度,结构轻巧,外形美观,维护保养简便。
显热交换,特殊结构设计,传热效率高达70%以上。
采用表面特殊处理的铝箔材料,抗腐蚀性能强,并能防止凝结水在铝箔表面形成水膜。
送回风完全隔离,避免异味及湿气的传递。
模块化组合,可根据用户需要提供各种规格要求的产品。
三、机组的安装、使用及维护1、安装机组四周,尤其是检修门处应留有足够的空间用于设备的维护使用。
上海贝尔LTE基站日常维护操作手册2015年12月2日目录日常维护操作手册,便于现场维护人员快速处理相关故障。
涉及如下内容:1. 产品介绍2. 安装维护(温度、接地检查及电压范围)3. 基站侧故障维护(天馈类、光路类、脱管和GPS故障)4. 硬件更换流程(C板、B板、RRH和RUC模块)一、产品介绍1.1 9926 BBU v1(legacy BBU)产品特点:支持F/D/E 频段可以插入任何19英寸机架中,BBU 设备高度2U -48V 直流供电控制板,基带板可插拔 仅有2种模块,便于维护1 块控制板 eCCM; eCCM 控制板上有9个CPRI 光接口,通过光纤与RRU 相连。
通过Ge 接口与核心网连接。
3 块基带板,可灵活配置 (bCEM) 支持灵活工作带宽 (5-20Mhz ) 物理特性:重量 < 13kg尺寸 W482.6 x H88.9 x D275 mm 回传接口⏹ 标配:1个光口或1个电口⏹ 最大:2个光口或1个电口+1个光口 Ir 接口:9X9.8Gbps功耗:满配典型功耗:约250W(2A) /370W (8A)单板介绍eCCM-2 HR :BBU 的控制&接口板。
bCEM :基带处理板。
1.2 9926 BBU v2 (SOC BBU)产品特点:支持F/D/E频段可以插入任何19英寸机架中,BBU设备高度2U-48V直流供电4个插槽,仅有2种模块,可插拔,便于维护每块bCAM2或bCEM2控制板上有6x10G Ir 接口1 -2块控制板bCAM2; 1- 3 块基带板bCEM2,可灵活配置支持灵活工作带宽(5-20Mhz)物理特性:重量< 11kg尺寸W482.6 x H88.1 x D300 mm回传接口⏹标配:1个光口、1个电口⏹最大:2个光口、2电口Ir 接口:24x10Gbps功耗:典型功耗:250W(8A);120W(2A)单板bCAM2单板BCEM21.3 RRH 介绍B39a RRH8x10产品特点:支持F 频段 (1880-1915MHz) 支持2载波, 20+10MHz 无线接收器组成部分 发射功率:80W电源接口校准线接口直流(-48V)供电外接DC/AC转换盒支持AC供电支持灵活工作带宽(5-20Mhz)物理特性:重量:< 21kg;体积24L尺寸:400mm x 540mm x 110mmIr 接口:2 x 9.8Gbps温度:-40℃to +55℃典型功耗:203WTD-RRH2x50-2350产品特点:支持E频段;(2320-2370MHz)支持3载波:2*20MHz+10MHz发射功率:100W直流(-48V)供电交流(220V)供电支持灵活工作带宽(5-20Mhz )物理特性:重量:< 14kg;体积17L尺寸:300mm x 480mm x 120mmIr 接口:2 X 9.8Gbps温度:-40℃to +55℃典型功耗:250W9768 LR MRO 2X5W TD-LTE产品特点:基于lightRadioTM cube,集成RRH与天线频段:TDD 2575-2615MHz2Tx/2Rx, 2x2 MIMOCPRI光纤直联,支持Daisy Chain连接分布式组网架构,与BBU或BBU Pool连接 容量易扩展,用户数取决于BBU物理特性:功率2x5W,功耗满载80W两种定向波束配置:70°x70°或35°(垂直)x70° (水平)机械Tilt +/-30°尺寸:175x500x145mm <11.7L重量:< 9kg电源:AC/DC200000小时MTBF二、安装维护2.1 工作电压范围主设备BBU、RRH工作电压范围,见下表。
microairsun新风机说明书
摘要:
一、产品简介
二、产品安装
三、产品使用
四、产品维护
五、注意事项
正文:
一、产品简介
microairsun 新风机是一款室内空气净化设备,能够有效改善室内空气质量,为用户提供健康、舒适的居住环境。
该产品采用高性能过滤材料,能够过滤室内的灰尘、病毒、细菌等有害物质,并将新鲜空气引入室内,实现室内空气的循环净化。
二、产品安装
1.选择合适的安装位置,确保新风机能够顺畅地引入室外新鲜空气,并方便排风。
2.确定安装高度,一般建议安装在室内墙壁上,高度约为1.5 米。
3.根据新风机的尺寸和安装位置,确定管道的走向和长度,并进行管道的安装。
4.将新风机与管道连接,并确保连接处密封良好。
5.接通电源,启动新风机,检查设备运行是否正常。
三、产品使用
1.打开新风机,调整风速至适宜档位,以保证室内空气的流通和净化效果。
2.根据室内空气污染程度和用户需求,选择合适的工作模式,如自动模式、手动模式等。
3.定期更换过滤材料,以确保新风机的净化效果。
4.保持新风机的清洁,定期擦拭设备表面,避免灰尘和污垢影响设备运行。
四、产品维护
1.定期检查新风机的运行状态,如发现异常声音、震动等情况,应及时关闭设备并进行检修。
2.检查风机、过滤器等部件的磨损情况,如发现损坏,应及时更换。
3.保持新风机的通风管道畅通,避免堵塞导致设备运行异常。
五、注意事项
1.新风机运行时,请勿将手伸入设备内部,以免受伤。
2.请勿在新风机周围放置易燃、易爆物品,以免发生危险。
1、新风系统新风系统就是通过新风机组、新风管道和风口,将室外的空气送入室内,再通过风口、排风管道和风机将室内的空气排出室外。
简单的说,新风系统就是通过换气,实现室内外空气的循环,有双向和单向两种。
双向就是送进来排出去,单向就是只送不排,或只排不送,靠气压差把新鲜空气吸进来,污浊空气挤出去。
2、新风系统工作原理正压式新风系统:通过风机将过滤后的空气(主要是过滤PM2.5)送入室内,在室内形成正压,将室内浑浊空气排出到室外。
优点:可以保证送入室内的是经过过滤的空气,保证空气的洁净度;缺点:无法形成定向空气流,室内空气的置换性较差。
负压式新风系统:通过风机将室内的浑浊空气抽出,在室内形成负压,新鲜空气从窗户、门等缝隙,或者设置的负压进风口进入室内。
对空气的过滤性差,PM2.5的过滤基本上做不到,就像一个大排风扇,没意义,把负压式新风系统推荐给客户的销售,简直就是耍流氓。
双向式新风系统(全热交换机),从送风方式上看基本完美,有进风有出风,实现定向的空气流,同时实现了空气过滤,并且热交换技术也可以平衡室内温度,是新风系统中不错的选择。
缺点:管道铺设比较多,布放管道比较麻烦,采用110mm的PVC管路,吊顶是个较麻烦的工程;在热交换的过程中,不可避免的会出现冷凝现象,滋生霉菌,影响空气质量。
3、新风系统选购手册(1)检测报告有检验报告的不一定是好产品,但没检验报告的必然会很糟心。
所以一定要看到国家标准(GB)的检测报告。
新风系统检测报告要关注哪些点:风量:一台机器每小时能置换(排出送入)多少立方米。
计算公式如下:居住面积(厨房和卫生间有排气装置,不算在内)*层高*0.7就是需要的风量。
比如100平实用面积×3米层高,选择210~300风量。
出口全压(机外静压):决定机器的换气能力,所有回避静压而谈风量的都是耍流氓。
输出功率:决定在得到同等空气的前提下花了多少钱。
有效换气率:绝大多数情况下,业主不会听到这个词,因为它的反面是机器的漏风率,也就是有多少废气在循环的过程中,又漏回屋里。
赛菲新风机功能说明书(此说明书要适用无空调款机型)一、整机特性1、输入特性:输入端子L,N和接交流市电,为三个单插片6.3*0.8;系统工作电压为185V-240V/AC 。
2、性能指标1.控制器采用液晶显示2.控制板工作环境及储存要求:①工作温度:-20℃~85℃(室内机);②相对湿度:30~95RH?;③储存温度:-30℃~90;3.工作电压范围:185V-240V/AC;4.温度控制范围及控制精度:16℃~30℃?0.5℃,温度回差?1℃;5.温度显示范围:-30℃~90℃;6. 整机待机功率消耗:<2W;7. 电气控制部分要有良好的电磁兼容性能;8. 安全性能:符合GB4706.1-2005和GB4706.32-2005标准。
2、整机组成显示板GSC0040B电源控制板 GSC0040A变频板GSC0040CWIFI模块板GSC0040D液晶模组LCD-315A(黑底白字)粉尘传感器 PMS1003(客供)二氧化碳传感器 T6603客供温度传感器 4路(分别为新风入风口、排风入风口,新风出风口、室外排风出口)风机1 变频交流风机风机2 变频交流风机压缩机客供四通阀客供3、信号采集粉尘传感器 PMS1003(客供)(赛纳威备选数显)二氧化碳传感器T6603温度传感器 4路(分别为新风入风口、排风入风口,新风出风口、室外排风出口)二、净化机控制系统按键说明1、按键控制说明整机共有5个触摸按键,包含1个开关按键和4个功能键。
电源开关需用一个(橙蓝)双色发光二极管做出两种状态指示,其他按键由一个白色微蓝发光二极管做出状态指示。
所有正常按键操作都有提示音一声,提示操作有效(提示声音要选用美音或者由客户指定)。
2、开关键“”开关键的作用是切换控制板开机运行与待机状态。
机器通电后处于待机状态,屏幕和其他按键状态指示灯不亮,只有开关键亮橙色灯,指示整机现在处于待机状态,此时除开关键外其他按键均无效。
一旦按下开机键“”,音效提醒操作有效,开关键周围亮蓝色灯,控制板开机运行,此时所有按键指示灯和屏幕图标全亮3秒,然后按照实际运行功能键和图标亮灯,整机按默认的运行模式运行:风机风量为低风启动(默认上次风量)、PM2.5传感器、CO2传感器及各自检功能开启。
上海贝尔新风系统说明书基站新风系统产品说明书以及安装手册安全注意在仔细阅读本说明书并能正确使用前,请不要安装,操作,维护或检查主控箱,在熟悉机器的知识,安全信息以及全部有关注意事项以后使用。
1)防止触电不正确的接线,将导致重大损坏及人身安全事故。
不正确的操作造成的危险情况,将导致一般或轻微的伤害或造成物体的硬件损坏。
系统通电运行时,请勿拆接主机箱的电线,以免造成触电危险! 2)防止火灾主机箱请勿装在可燃或易燃物体上。
主机箱在发生故障时,请立即切断主机箱电源,若持续大电流会导致火灾 3)防止损坏接线板上端子的电压只能是说明书上规定的电压。
确定接线端子的正负连接正确,以防爆裂,损坏等等。
DC48V与AC220切勿接错,以防发生重大损坏。
4)其它注意当搬运产品时,注意经拿轻放安装前看主机内连接线是否有松动或脱落,若有则拔下插紧。
确认安装位置和物体能经得起主控箱和风机的重量防止螺丝、电缆碎片或其它导电物体或油类等可燃性物体进入主控箱。
目录一、产品特点 (4)二、主要性能参数 ................................................ .................................. 4 三、接口板接线 ................................................ ...................................... 4 四、系统参数设置 ................................................ .................................. 5 五、面板操作 ................................................ .......................................... 6 六.系统设备清单 ................................................ .................................. 9 七、系统安装说明 ................................................ .. (10)一、产品特点1)三遥功能遥测:基站内、外部温度、湿度。
LCD中文显示。
遥信:基站内高温、市电停电、风机、空调运行状态以及故障状态。
遥控:通过RS485智能通讯接口实现风机和空调的开关。
2)可接入六路开关量,具有报警功能。
二、主要性能参数工作温度:室内5-40℃,室外为-10~45℃。
机房内环境控制范围:温度10~30℃,湿度15%~85%。
室外运行温度设定范围: -10℃~+45℃室外运行湿度设定范围: 15%~90%三、接口板接线主控箱是该节能换气的“心脏”,大部分线已经连接好,用户只需接入工作电压,风机,空调,传感器即可。
3)两路开关量输入为开关报警量1 为开关报警量24)两路温湿感输入为室外温感接线端为室内温感接线端(HUM0蓝线,5V红线,GND黑线)为室外湿感接线端(HUM1蓝线,5V红线,GND黑线)为室内湿感接线端 5)输入电压: AC220V( N/L)为AC220V 输入端. 6)交流风机输出为进风机接线端为出风机接线端 7)空调输出为空调面板轻触开关接线端8)485输出485接到计算机本地配置整体接线图如下所图:四、系统参数设置1)系统参数表新风系统参数设置表选项说明室外温度高限室外温度低限室外温度精度修正值室外湿度高限室外湿度精度修正值室内温度高限室内温度低限室内温度精度修正值室内湿度高限室内湿度精度修正值室外尘限风机延时保护时间空调启动温度风机启动温度温度修正湿度修正系统屏蔽风机调档默认 25 8 1 85% 1 35 18 1 85% 1 单位℃℃℃℃℃℃度极限值及范围 85 -15 +-6 10%-95% +-10% 85 -15 +-6 10%-95% +-10% 0-20 0-50 0-50 -20-20 -20-20 0-5 0-5 备注相对湿度强制启动空调关闭风机相对湿度 1%步进 1分钟步进 1 1 K 3 28 25 00 00 01 01 分钟℃℃℃℃空调延时保护网络ID 系统密码 1 01 1111 位0-20 0-99 0-99 2)开启风机的条件:a.当前的实时室外温度大于室外温度低限且小于室外温度高限;b.同时,当前的实时室内温度高于室内温度低限;c.同时,当前的实时室外湿度低于室外湿度高限;d.同时,当前的实时室外灰尘度低于室外尘限;e.室外温度小于室内温度;五个条件同时满足,延时N分钟后才能开启风机,延时期间不进行新的逻辑判断,以免闭循环或连续开关风机。
否则,关闭风机。
空调开启条件:当前实时温度大于空调启动温度。
或者,当实时温度大于室内低限,但于风机开启条件不能满足时,开启空调。
空调风机同时开户条件:当实时温度大于室内高限,风机开启条件满足时。
为了校正偏差,设置了一些列精度修正值,以备对付漂移。
五、面板操作图机箱面板如上所示,右边三个指示灯,分别为:“电源”,“网络”,“运行”,下面的为四个按键。
1)系统开机后将出现图界面:图开机界面显示室内外温湿感,尘感,还有市电的有无。
①按“确定”键,提示“请输入密码”如图所示。
按“上翻”1次图如图所示。
“上翻”1次加1,“下翻”1次则减1。
图②“确定”键右移反显要修改的位。
“取消”键则为左移。
如图所示,按“确定”1次右移一位。
③当设置完4位密码1111,如图所示,此时已完成密设置,连接4次“取消”进入设置菜单,即是连按3次“取消”回到图高位反显,再按“取消”进入设置菜单。
图图图2).①进入系统设置界面,如图所示。
总共有6页的设图置项,每页4项,右下角的“1/6”为第一页,“2/6”为第二页,依此类推。
②.此时,最左边的“1”数字反显,再按“确定”,此时“30”反显,如图所示,按“上翻”为加1,“下翻”为减1。
按“取消”,“30”正常显示,此时数据区显示的值为设置值。
再次按“取消”,回到开机界面如图所示。
图③设置完数据后,数据区正常显示,按“上翻”,“下翻”选择要设置的其它项,选中项前面数字反显。
如图所示选中第四项,在此选项再接“下翻”,进入第二页,其它依此类推。
在第一项按“上翻”则是返回。
图3)开机页面,按“下翻”是查询系统状态,空调和风机运行时间等其它信息显示出来,如图所示:图4)开机页面,按“上翻”键,正确输入密码后,“恢复出厂初始化中。
”,如图所示, 2S后出现“初始化设置成功”表示操作成功。
图如图所示。
2S后回到自动回到开机画面。
如果想清除空调,风机运行时图间,则在出现“初始化设置成功”后,长按3S左右,不可松手,便进入清除状态,直到清除成功为止。
如图所示。
图5)注:①当LCD无显示或显示异常按“取消”1到3秒便回到正常状态。
②当修改各项目数据时,不需按“确定”键,LCD显示多少就是多少,“取消”键也修改变化的数据。
这点在修改用户密码时特别要注意!六.系统设备清单基站新风系统清单序设备号名称型号单位数量主要功能是系统的核心或心脏,1 主控箱采集到的信息处理,发个 1 出控制指令。
内有主控板、显示面板、开关、交流接触器等必备备注 2 进气箱排气箱室外个 1 内有1个离心风机,上面安装了滤尘装置内置1个轴流风机上面固定了1个温度传感器、1个湿度传感必备 3 个 1 必备 4 集成盒个 1 器,可选安装1个灰尘传感器,采取了防雨措施。
含连接线。
上面固定了1个温度必备室内5 集成盒膨胀6 螺丝 1 膨胀7 螺丝 2 根8 根 8 个 1 传感器、1个湿度传感器,采取了防雨措施。
含连接线。
用于固定进风箱和排气箱,直径8mm,8cm长,铁质用于固定室外集成盒、室内集成盒、主控箱(4根),材质为塑料和螺丝用于连接主控箱和进必备必备必备 8 电源线膨胀米 20 气箱、排气箱的受控制电源用于固定打孔水钻,每次4根,材质为铁质,直径为8mm,长度为10cm 必备可选,砖混房适用 9 螺丝3 根 8 七、系统安装说明安装步骤:开凿安装孔1、位置的选择:在条件允许的情况下,通常选择取进风口在机房的北侧,出风口在机房的南侧;进风口的下沿离地面高度为80-100cm;出风口上沿离机房天花板距离30-40cm。
2、开孔;钢板房基站――在机房内部按照通风系统进、出的安装尺寸划线,并复核开孔尺寸的大小及对角线误差,测量水平度,再用切割机切割,注意保护机房内环境,防止碎屑及灰尘进入设备内部,在条件允许的情况下,应尽量从机房外部向内部切割,并在内部对应的位置做好防护。
自建的水泥房、承租的房型基站――在机房内部按进出口的安装尺寸划线,并复核开孔尺寸的大小及对角线误差,测量水平度,开孔时为防止砖灰粉尘进入机房,应尽量从机房外部凿孔,并在内部采取必要的防护措施。
3、固定安装护套:先将定距支架用螺钉与外防护套固定,再将内护套与定距支架固定,依次固定护套上的螺钉,确保紧固。
进、出通风机的安装1、土建承租房――分别将进风和出风风机用螺钉固定在防护套上。
2、钢板房――可利用铆钉直接固定在机房的内壁上。
温湿度传感器的固定:将温湿度传感器盒子放置在机房内中部距离地面高度为米的墙面上,用螺钉固定;所有外露总线均用PVC线管或线槽固定。
导线的连接:1、依据接线图分别将进出风机联动线、通信接口线正确连接,并确保焊接牢固可靠,进风和出风风机的连线应在外面套PVC线管或线槽固定。
2、导线的选择:根据风机的功率,计算直流电流量,按照2A/m2来计算线径。
导线要选择铜芯、双层护套导线,或者型号是BVR电缆。
3、电源的连接;在接续DC48v电源之前,应先用完用表测量风机电源输入有无短路现象,在确保电路正常与电源开关处于关闭状态。
在电源的正负极性正确的情况下,方可接入开关电源的接线端上,必须注意:接线端的位置为一次下电的配电单元,空开额定电流为5-10A,接线时务必小心谨慎,防止出现短路。
4、基站节能换气系统的外壳必须做可靠的接地连接,接地线径不小于电源线线径。
附加说明1、排气箱(装在机房的高处,朝阳的方向)2、进气箱和排气箱寻引塑管(裁取相应尺寸放在进气和排气的墙体中.另外裁取相应尺寸,紧加固在进气箱的室内的两个风口上,以起到将冷风直接对接室内热源.)3、八个膨胀螺丝,分别用于固定进气箱和排气箱.4、主控机箱(各个参数及设制,如无特殊需要,无须更改.)5、特别注明:本箱体有三根外接线,其中一根标明电源线要连接到220V供电电源上,.此线的连接有火线和零线之分,其中棕色线连接220V的火线,另外一根蓝色线连接220V的零线.千万不可接错,否则对设备乃至人身造成伤害.再此特别提醒安装人员注意此点!主控箱的另外两根电线,是输出给进气箱和排气控制用电,无特殊要求.主控箱的固定位在箱体内部背板有孔(内用:胶塞螺丝)。