Fluke Tis 中文说明书(使用手册)
- 格式:pdf
- 大小:635.17 KB
- 文档页数:24
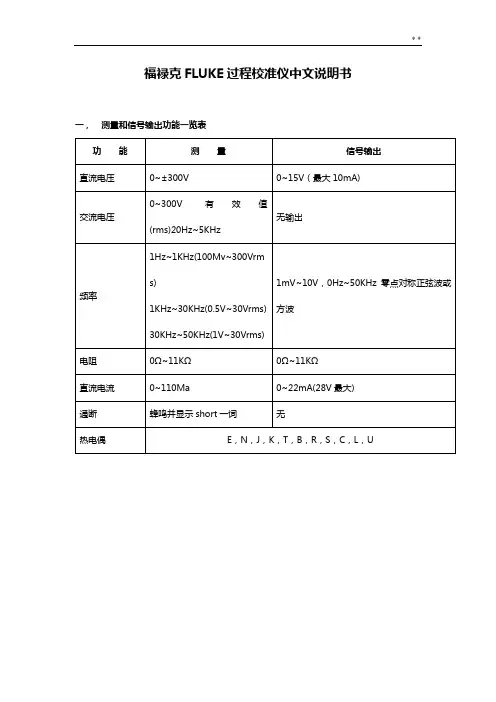
福禄克FLUKE过程校准仪中文说明书一,测量和信号输出功能一览表热电阻2,3,4线测量2线输出100ΩPlatinum(3926)100ΩPlatinum(385)120ΩNickel(672)200ΩPlatinum(385)500ΩPlatinum(385)1000ΩPlatinum(385)10ΩCopper(427)100ΩPlatinum(3916)压力27种压力模块从2.5kPa至69,000kPa *回路电压24或28V(22mA最大)*对于压力输出功能,是指由外部手动压力泵或其它压力源作为压力信号二、初识校准仪1.当你第一次取出校准仪,你需要将电池充电见图9,给电池充电2小时。
2.将电池放入校准仪中。
3.连接校准仪的电压输出端和输入端如下:连接最左端的一对插孔(V、Ω、RTD输出)和最右端的一对插孔(VMEAS)(见图3)。
图3 跨接线连接图4 输入输出的例子4.开机按⊙,按▲,▼以调整对比度。
以达到最好的显示效果。
校准仪在接通电源时是直流电压的测量功能,可以在一对VMEAS输入插孔中得到读数。
5.按看到其测量情况。
6.按V—…键,选择直流电压输出。
按数字键5和ENTER=开始输出5.0000V直流电压。
7.量直流电压。
你将在上半部屏幕看到测量读数,在下半部屏幕看到输出值,如图4所示。
三、操作功能1.输入和输出插孔图5所示,校准器输入和输出插孔,表2解释它的用途。
表2 输入/输出插孔和连接器7,8!SOURCE(输出)mA测量mAΩRTD插孔输出或测量电流、电阻和RTDS插孔,并提供回路电源9,10!SOURE(输出)V ΩRTD插孔输出电压、电阻、频率、和模拟RTDS输出插孔图5 输入/输出插孔和连接2.按键校准仪按键如图6所示,表3解释它们的功能,有4个未带标记的兰色按键,在显示屏幕下面称之为功能键。
其功能在操作过程中屏幕出现的定义所确定。
功能键和其显示内部在本手册中用黑体字标明,例如:Choices图6 按键表3 键的功能序号性能说明15 V-键测量方式中选择直流电压,输出方式中选择直流电压16 开关键电源开关3.显示屏幕图7为典型的显示屏幕。

TECHNICAL DATAFluke TiS55+ and TiS75+ Thermal ImagersBe proactive instead of reactiveTake your plan for a proactive maintenance (PM) program and turn it into reality. To get started, you need features that make it easy to set up your image organization and inspection routines. With the TiS55+ and TiS75+, you’re well on your way to implementing a successful PM program.Ditch the clipboardWith so many inspections in your day, it can be hard to remember what you saw and where you inspected. Maybe you carry around a clipboard to jot down notes. The TiS55+ and TiS75+ come with built-in personal assistants, which means you can finally ditch the clipboard and have all the information you need embedded in the images you save, including:•Voice annotation-Record up to 60 seconds per thermal image -Identify exactly what you see in real time •IR-PhotoNotes-Take photos of asset numbers and other identifiers-Use as a reference when looking at the thermal image on your computer •Asset Tagging-Sort your thermal images by asset-Scan a QR code on your asset, then start capturing thermal images-Images will automatically be sorted by asset, simply connect your camera to your computer to view them.FLUKE CONNECT™ ASSET TAGGINGEliminate hours at the computer organizing your thermal images, let Asset Tagging do all that work for you. No more dragging and dropping or renam-ing files in the office, just scan a QR code on your asset, capture your thermal images and they auto-matically are sorted by asset. Start spending your time analyzing your images and creating reports instead of sorting your files one at a time.Rugged. Reliable. Accurate.•384 x 288 (TiS75+) or 256 x 192 (TiS55+) infrared resolution •-20 °C to 550 °C temperature range •3.5" VGA Touchscreen LCD display •Water and dust resistant (IP54)•Engineered to withstand a 2-meter dropInfrared image of motor from Fluke TiS55+ thermal camera Infrared image of motor from Fluke TiS75+ thermal cameraSpecifications* Fluke Connect analysis and reporting software is available in all countries but Fluke Connect is not. Please check availability with your authorized Fluke distributor.Ordering informationFLK-TIS75+ 27HZ THERMAL IMAGER FLK-TIS75+ 9HZ THERMAL IMAGER FLK-TIS75+ 9HZ/CN THERMAL IMAGER FLK-TIS55+ 27HZ THERMAL IMAGER FLK-TIS55+ 9HZ THERMAL IMAGER FLK-TIS55+ 9HZ/CN THERMAL IMAGERIncludedInfrared camera; ac power supply (including universal ac adapters); two-bay smart bat-tery charger (TiS75+ only); rugged lithium ion smart batteries (TiS75+ includes 2 --TiS55+ includes 1); USB cable; 4 GB micro SD card; rugged, hard carrying case; soft transport bag; adjustable hand strap. Available by free down-load: desktop software and user manual.Optional accessoriesFLK-BLUETOOTH Bluetooth HeadsetFLK-TI-TRIPOD3 Tripod Mounting Accessory BOOK-ITP Introduction to Thermography Principles BookFLK-TI-SBP3 Additional Smart Battery FLK-TI-SBC3B Smart Battery Charger TI-CAR CHARGER Car ChargerVisit to get complete details on these products or ask your local Fluke sales representative.All trademarks are the property of their respective owners. WiFi or cellular service required to share data. Smartphone, wireless service and data plan not included with purchase. First 5GB of storage is free.Smartphone wireless service and data plan not included with purchase. Fluke Connect is not available in all countries.Preventive maintenance simplified. Rework eliminated.Fluke CorporationPO Box 9090, Everett, WA 98206 U.S.A.For more information call:In the U.S.A. (800) 443-5853 In Canada (800) 36-FLUKEFrom other countries +1 (425) 446-5500 ©2020 Fluke Corporation.Specifications subject to change without notice.12/2020 200541-6013214a-enModification of this document is not permittedwithout written permission from Fluke Corporation.Fluke. Keeping your world up and running.®。

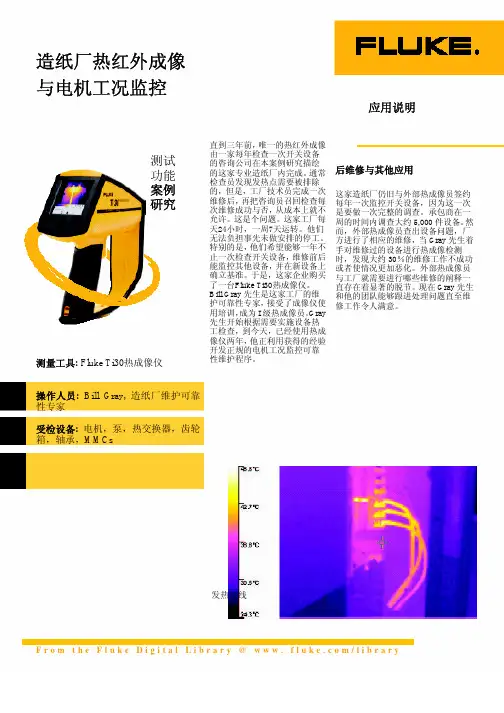
造纸厂热红外成像与电机工况监控应用说明测试功能案例研究测量工具: Fluke Ti30热成像仪操作人员: Bill Gray, 造纸厂维护可靠性专家受检设备: 电机,泵,热交换器,齿轮箱,轴承,MMCs 直到三年前,唯一的热红外成像由一家每年检查一次开关设备的咨询公司在本案例研究描绘的这家专业造纸厂内完成。
通常检查员发现发热点需要被排除的,但是,工厂技术员完成一次维修后,再把咨询员召回检查每次维修成功与否,从成本上就不允许。
这是个问题。
这家工厂每天24小时,一周7天运转。
他们无法负担事先未做安排的停工。
特别的是,他们希望能够一年不止一次检查开关设备,维修前后能监控其他设备,并在新设备上确立基准。
于是,这家企业购买了一台Fluke Ti30热成像仪。
Bill Gray先生是这家工厂的维护可靠性专家,接受了成像仪使用培训,成为I级热成像员。
Gray先生开始根据需要实施设备热工检查,到今天,已经使用热成像仪两年,他正利用获得的经验开发正规的电机工况监控可靠性维护程序。
后维修与其他应用这家造纸厂仍旧与外部热成像员签约每年一次监控开关设备,因为这一次是要做一次完整的调查。
承包商在一周的时间内调查大约5,000件设备。
然而,外部热成像员查出设备问题,厂方进行了相应的维修,当Gray先生着手对维修过的设备进行热成像检测时,发现大约30%的维修工作不成功或者使情况更加恶化。
外部热成像员与工厂就需要进行哪些维修的阐释一直存在着显著的脱节。
现在Gray先生和他的团队能够跟进处理问题直至维修工作令人满意。
发热接线F r o m t h e F l u k e D i g i t a l L i b r a r y@w w w.f l u k e.c o m/l i b r a r y这家企业拥有将近3,000台电机,范围从供给涂料与添加剂的泵组上用的很小马力的电机,到为大型作业提供动力的1000马力的设备。
即使那些小型泵电机发生故障失灵,也会让一整批纸张作废或是设备停机。
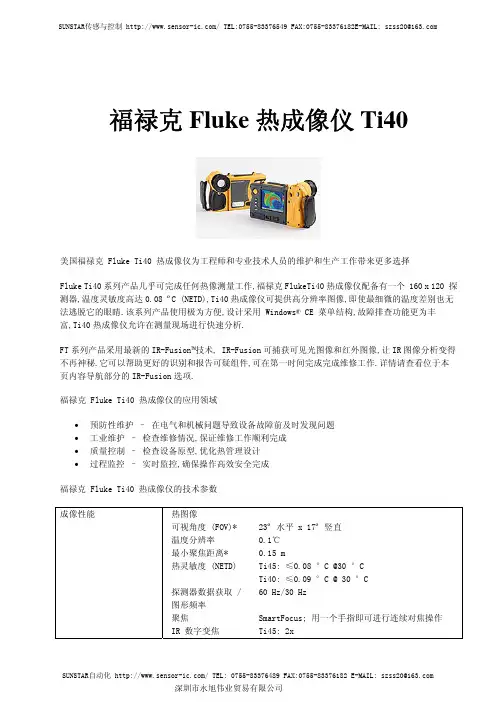
福禄克Fluke热成像仪Ti40美国福禄克 Fluke Ti40 热成像仪为工程师和专业技术人员的维护和生产工作带来更多选择Fluke Ti40系列产品几乎可完成任何热像测量工作,福禄克FlukeTi40热成像仪配备有一个 160 x 120 探测器,温度灵敏度高达0.08 ºC (NETD),Ti40热成像仪可提供高分辨率图像,即使最细微的温度差别也无法逃脱它的眼睛.该系列产品使用极为方便,设计采用 Windows® CE 菜单结构,故障排查功能更为丰富,Ti40热成像仪允许在测量现场进行快速分析.FT系列产品采用最新的IR-Fusion™技术, IR-Fusion可捕获可见光图像和红外图像,让IR图像分析变得不再神秘.它可以帮助更好的识别和报告可疑组件,可在第一时间完成完成维修工作.详情请查看位于本页内容导航部分的IR-Fusion选项.福禄克 Fluke Ti40 热成像仪的应用领域•预防性维护 – 在电气和机械问题导致设备故障前及时发现问题•工业维护 – 检查维修情况,保证维修工作顺利完成•质量控制 – 检查设备原型,优化热管理设计•过程监控 – 实时监控,确保操作高效安全完成福禄克 Fluke Ti40 热成像仪的技术参数成像性能 热图像可视角度 (FOV)* 23º 水平 x 17º 竖直温度分辨率 0.1℃最小聚焦距离* 0.15 m热灵敏度 (NETD) Ti45: ≤0.08 °C @30 °CTi40: ≤0.09 °C @ 30 °C探测器数据获取 /60 Hz/30 Hz图形频率聚焦 SmartFocus; 用一个手指即可进行连续对焦操作IR 数字变焦 Ti45: 2xTi40: -探测器类型 160 x 120焦平面阵列, 氧化钒 (VOx) 非致冷微热辐射仪光谱波段 8 µm ~ 14 µm 数字图像增强 自动全时增强 可见光 (仅限于Fusion 型号)照相机本身操作模式 Ti45: 全热/全可见光或热-可见光混合图像.画中画Ti40: 全热/全可见光.使用SmartView 软件可提供热-可见光混合图像.画中画 可见光照相机 1280 x 1024 像素, 全彩 可见光数字变焦 Ti45: 2xTi40: -温度测量校准温度范围Ti45: -20 ˚C ~ 600 ˚C (-4 ~ 1112 ºF),3档Ti40: -20 ˚C ~ 350 ˚C (-4 ~ 662 ºF),2档 量程 1 T i45: -20 ˚C ~ 100 ˚C (-4 ~ 212 ºF) Ti40: -20 ˚C ~ 100 ˚C (-4 ~ 212 ºF) 量程 2 T i45: -20 ˚C ~ 350 ˚C (-4 ~ 662 ºF) Ti40: -20 ˚C ~ 350 ˚C (-4 ~ 662 ºF) 量程 3 T i45: 250 ˚C ~ 600 ˚C (32 ~ 662 ºF) Ti40: - 可选 - 高温 Ti45: 最高 1200 ˚C (2192 ºF) Ti40: - 量程 4 T i45: 500 ˚C ~ 1200 ˚C (932 ~ 2192 ºF) Ti40: - 准确度 ±2°C 或 2 % (取较大值)测量模式Ti45: 中心点, 中心框 (面积 最小/最大, 平均), 可移动点/光盒,用户自行设定区域/文本注释,等温线, 自动热点/冷点检测, 可见颜色报警上限和下限Ti40: 中心点, 中心框 (面积 最小/最大, 平均), 更多升级选项请咨询Fluke 公司发射率校正 0.1 ~ 1.0 (0.01 增量)图像显示数字显示 5" 大屏幕高分辨率数字显示屏 LCD 背光 彩色LCD,可在阳光下读数视频输出RS170 EIA/NTSC 或 CCIR/PAL 复合视频色板 灰度, 反向灰度, 蓝红, 高对比度, 热金属色, 铁虹, 琥珀色, 反向琥珀可选镜头54 mm Telephoto 镜头高精度Germanium 镜头 可视角度 (FOV) 9º 水平 x 6º 垂直 空间分辨率(IFOV) 0.94 mrad 最小聚焦距离* 0.6 m10.5 mm 广角镜头 高分辨率 Germanium 镜头 可视角度 (FOV) 42 º 水平 x 32 º 竖直 温度分辨率 0.1℃最小焦聚距离 0.3 m图像和数据存储存储介质 小型闪卡可保存1000多幅IR图像 (512 MB 标准卡,更高容量供选择)可支持的文件格式包括14 bit 测量数据. 可导出 JPEG, BMP, PCX, PNG, PSD.接口和软件 接口包括小型闪卡读卡器在内软件SmartView; 包括全部分析和报表制作软件在内.激光 (仅限于IR-Fusion 型号) 分类 II级激光瞄准当热和可见光图像混合时,屏幕上可以看到激光点控制和调整 设置控制 日期/时间, 温度单位 C/F, 语言, 标度, LCD 亮度 (高/中/低)图像控制 Level, span, 自动调整 (连续/手动)屏幕指示器电池状态, 目标发射率, 背景温度和实时时钟电源 电池类型 智能锂电池, 可充电, 现场即可更换电池使用时间连续使用3个小时 (带有IR-Fusion的型号为2个小时 )电池充电 2 个通过常用AC插座充电的智能充电器AC 操作 AC 转换器 110/220 VAC, 50/60 Hz (仅限于Ti45)节电设计 自动关闭和睡眠模式 (用户可自己设定)环境和机械设计 工作温度 -20℃to +50℃(-4°F to 122 °F)保存温度 -40 °C ~ +70 °C (-40 °F ~ 158 °F)相对湿度 使用和贮存为10% ~ 95%, 无冷凝防水防尘 IP54重量(包括电池在内)1.95 kg (4.3 lbs)照相机尺寸 (HxWxD)162 x 262 x 101 mm (6.5" x 10.5" x 4.0")其他 保修1 年福禄克 Fluke Ti40 热成像仪的附件Fluke Ti40-20 IR FlexCam热像仪 所有型号均带有: •坚固耐用的工具包•2组可充电电池•电池充电器•AC 转换器 (仅限于Ti45型号)•视频电缆•512 MB 闪卡,提供更多选择•小型闪卡读卡器和USB电缆•PCMCIA 小型闪卡读卡器•背带•SmartView 报表制作和分析软件CD •用户手册CDFluke Ti40FT-20 IR FlexCam 热像仪和 IR-Fusion Fluke Ti45-20 IR FlexCam 热像仪Fluke Ti45FT-20 IR FlexCam 热像仪和 IR-Fusion 福禄克 Fluke Ti40 热成像仪的选件镜头 Ti4X 系列可提供10.5mm, 20mm和 54mm镜头,使用 Use the Configurator可查看如何进行组合使用IR-Fusion Ti4X系列的每一种型号均包括20mm镜头和IR-Fusion 技术.高温 Ti4X的部分型号可包括温度选件,读数最高可达1200 °C (2192 °F)。

全优方案 全力以赴从精密到简便,从主管到基层,皆有所选!福禄克红外热像仪什么是红外热像仪?红外热像仪的优势典型应用被动接收被测目标发出的红外辐射(热量),并将这种热量转化为带有温度数据的可视化图像(所有高于绝对零度(的物体都会发出红外辐射)。
可见光图红外热图安全快速无遗漏非接触式检测,适应各种工作环境。
面测量无需逐点扫描,毫秒级反应速度,提高工作效率。
可视化图像显示整体温度分布,实时发现问题点。
工业、机械、过程设备、耐节能审核、建电气设备、负修复、水渍以建筑问题、缺坚固耐用易于操作●独有的IR-Fusion®红外-可见光点对点融合技术,完美展示画面细节。
●AutoBlend™优组合模式,实现0%-100%红外融合度轻松调节。
●集成了领先的热灵敏度和空间分辨率,呈现业内最清晰的图像。
●设计可承受2米跌落●IP54防护等级全红外画中画红外/可见报警全可见.5 m1 m1.5 m 5 ft3.25 ft1.6 ft2 m 6.5 ft1. 对准2. 聚焦3. 拍摄对包装产品:8个角、6个面、 12个边跌落试验以10升/分钟、100 kN/m2压力进行防水试验3个垂直轴方向进行30分钟的振动试验湿度95% @ 40℃工作环境下测试电磁场和射频辐射试验模拟海拔12,000米工作环境下测试对未包装产品:2米跌落试验,每一面进行6次-10℃至50℃工作环境下测试12345678冠名福禄克之前,需经过8项耐损试验Ti400Ti300Ti200 1.31mRad 1.75mRad 2.09mRadTi25Ti10Ti92.5mRad 2.5mRad 2.5mRadTi29Ti27Ti125Ti110Ti105Ti100 1.43mRad 1.67mRad 3.39mRad 3.39mRad 3.39mRad 3.39mRadTi95Ti90VT02 5.6mRad 5.6mRad对焦不准确的热图传统自动对焦:聚焦于最近的物体,即画面中的铁丝网。

1560型堆栈式测温仪用户操作手册美国福禄克公司哈特是福禄克下属公司警告为了保证操作人员的安全,避免设备损坏:禁止使用未正确接地、极性不正确的电源线操作器。
禁止将该设备连接未正确接地、极性不正确的电源座。
禁止使用错误接地的断路设备。
警告为了保证人身安全,避免设备损坏:禁止在非本用户手册所述的环境中使用本仪器。
请遵守用户手册中的所有安全规定。
警告只有受过专门培训的人员才能使用校准设备。
版权所有Hart Scientific有限公司799 E. Utah Valley DriveAmerican Fork, Utah 84003-9775电话:(801)763-1600传真:(801)763-1010网址: 1 简介 (1)1.1 性能 (1)1.2 部件 (2)1.2.1 基本微处理器 (2)1.2.1.1 显示 (2)1.2.1.2 按钮 (3)1.2.1.3 串行RS-232接口 (4)1.2.1.4 电源 (4)1.2.1.5 模块总线 (4)1.2.2 添加模块 (4)1.3 数据处理 (4)1.3.1 输入 (4)1.3.2 采样控制 (4)1.3.3 输入平均 (5)1.3.4 温度转换 (5)1.3.5 单位转换 (5)1.3.6 测量显示器 (5)1.3.7 图形和滚动窗口 (5)1.3.8 存储器 (5)1.3.9 打印机输出 (5)1.3.10 统计 (5)1.3.11 输出路径 (5)1.3.12 显示数据区 (5)1.3.13 数据输出通道 (5)2 技术指标和环境条件 (6)2.1 技术指标 (6)2.2 环境条件 (6)3 安全指南 (6)4 一般操作 (7)4.1 安装新的模块 (7)4.2 交流电源 (7)4.3 上电自检 (7)4.4 调整显示屏对比度 (7)4.5 进行测量 (7)4.5.1 选择输入通道 (8)4.5.2 选择探头特性 (8)4.5.3 测量一个通道 (8)4.5.4 扫描通道 (8)4.5.5 显示测量数据 (9)5 软键功能 (10)5.1 输入菜单 (10)5.1.1 测量 (10)5.1.2 主输入通道 (10)5.1.3 扫描通道 (11)5.1.4 扫描模式 (11)5.1.5 求平均值 (11)5.2 探头菜单 (11)5.2.1 编辑探头 (11)5.2.1.1 R(Ω)转换 (12)5.2.1.2 ITS-90 转换 (12)5.2.1.3 W(T90)转换 (12)5.2.1.4 IPTS-68 转换 (13)5.2.1.5 Callendar-Van Dusen 转换 (13)5.2.1.6 RTD 多项式转换 (13)5.2.1.7 热敏电阻 T(R)转换 (13)5.2.1.8 热敏电阻R(T)转换 (14)5.2.1.9 热电偶伏特转换 (14)5.2.1.10 标准热电偶转换 (14)5.2.1.11 热电偶表格转换 (14)5.2.1.12 热电偶多项式转换 (15)5.2.2 复制探头 (15)5.2.3 测试转换 (15)5.3 输出菜单 (16)5.3.1 显示窗口菜单 (16)5.3.1.1 统计窗口 (16)5.3.1.2 设置区 (16)5.3.1.3 图形窗口 (16)5.3.1.4 删除图形 (17)5.3.1.5 滚动窗口 (17)5.3.2 输出通道 (17)5.3.3 打印输出 (17)5.3.4 打印存储器 (18)5.3.5 删除统计 (18)5.4 模块菜单 (18)5.4.1 设置显示屏 (18)5.4.2 设置设备 (18)5.4.3 校准设备 (19)5.4.4 模块信息 (20)5.5 系统菜单 (20)5.5.1 单位 (20)5.5.2 时间 (20)5.5.3 口令 (20)5.5.4 系统信息 (21)5.5.5 系统复位 (21)6 2560 / 2567 SPRT 模块 (22)6.1 说明 (22)6.2 技术规格 (22)6.3 操作 (22)目录6.3.1 连接探头 (22)6.3.2 设置系数 (22)6.3.3 电流 (23)6.3.4 设备设置命令 (23)6.4 校准 (23)6.4.1 校准参数 (23)6.4.2 前面板存取 (23)6.4.3 校准(2560) (23)6.4.4 校准过程 (2567) (24)7 2561 HTPRT 模块 (25)7.1 说明 (25)7.2 技术规格 (25)7.3 操作 (25)7.3.1 连接探头 (25)7.3.2 设置系数 (25)7.3.3 电流 (25)7.3.4 设备设置命令 (26)7.4 校准 (26)7.4.1 校准参数 (26)7.4.2 前面板存取 (26)7.4.3 校准程序 (26)8 2562/2568 PRT 扫描开关模块 (27)8.1 说明 (27)8.2 技术规格 (27)8.3 操作 (27)8.3.1 连线配置 (27)8.3.2 连接探头 (28)8.3.3 设置系数 (28)8.3.4 电流 (28)8.3.5 设备设置命令 (28)8.4 校准 / Calibration (28)8.4.1 校准参数 (28)8.4.2 前面板存取 (28)8.4.3 校准过程 (2562) (29)8.4.4 校准过程 (2568) (29)9 2563热敏电阻模块 (30)9.1 说明 (30)9.2 技术规格 (30)9.3 操作 (30)9.3.1 连接热敏电阻 (30)9.3.2 设置系数 (31)9.3.3 电流 (31)9.3.4 设备设置命令 (31)9.4 操作校准 (31)9.4.1校准参数 (31)9.4.2 前面板存取 (31)9.4.3 校准程序 / Calibration Procedure (31)10 2564 热敏电阻扫描开关模块 (33)10.1 说明 / Description (33)10.2 技术规格 / Specifications (33)10.3 操作 / Operation (33)10.3.1 连线配置 (33)10.3.2 连接探头 (34)10.3.3 设置系数 (34)10.3.4 电流 (34)10.3.5 设备设置命令 (34)10.4 校准 / Calibration (34)10.4.1 校准参数 (34)10.4.2 前面板存取 (34)10.4.3 校准程序 (35)11 2565 精密热电偶模块 (36)11.1 说明 (36)11.2 技术规格 (36)11.3 操作 (36)11.3.1 连接热电偶 (36)11.3.2 选择热电偶类型 (36)11.3.3 选择CJC类型 (37)11.3.4 使用校准热电偶 (37)11.3.5 最佳准确度建议 (37)11.3.5.1 温升时间 (37)11.3.5.2 周围环境 (37)11.3.5.3 热稳定 (37)11.3.5.4 接地电流 (37)11.3.6 设置参数 (37)11.4 校准 (38)11.4.1 校准参数 (38)11.4.2 前面板存取 (38)11.4.3 校准程序 (38)12 2566 热电偶扫描开关模块 (39)12.1 说明 (39)12.2 技术规格 (39)12.3 操作 (39)12.3.1 连接热电偶 (39)12.3.2 选择热电偶类型 (39)12.3.3 选择CJC类型 (39)12.3.4 使用校准热电偶 (40)12.3.5 最佳准确度建议 (40)12.3.5.1 温升时间 (40)12.3.5.2周围环境 (40)12.3.5.3 热稳定 (40)12.3.6 设置参数 (40)12.4 校准 (40)12.4.1 校准参数 (39)12.4.2 前面板存取 (41)12.4.3 校准程序 (41)13 维护 (42)14 故障排除 (42)14.1 不正确的温度读数或电压读数 (42)14.2 不正确的电阻或电压读数 (42)14.3 通信故障 (43)14.4 空白屏 (43)14.5 通电时出错信息 (43)插图和表格图1 安装有两个模块的 1560 型堆栈式测温仪 (1)图2 系统图 (2)图3 典型显示器 (2)图4 典型图形模式显示 (3)图5 数据流 (5)图6 安装新的模块 (7)图7 通道编号 (8)表1 软键菜单系统 (10)表2 转换类型 (12)图8 典型统计显示 (16)表3 CALCULATION 选项 (16)图9 典型滚动显示 (17)图10 典型图形窗口显示器 (17)图11 传感器布线图 (22)图12 传感器布线图 (25)图13 PRT 扫描开关模块传感器布线 (27)图14 热敏电阻模块图 (30)图15 热敏电阻扫描开关模块传感器布线 (34)图16 2565模块热电偶插座操作 (37)表27 精密热电偶模块校准参数 (38)表28 热电偶扫描开关模块校准参数 (40)1 简介 / Introduction本章将对1560型堆栈式测温仪进行概述。

Ti 系列高性能熱像儀Ti 系列高性能熱像儀Ti 系列高性能熱像儀的領域應用Fluke 紅外線熱像儀產品及應用型錄Volume June 2007目 錄為什麼使用熱像儀...........................1Ti20熱像儀 (3)Ti30熱像儀.................................5Ti 系列提高你的維護能力.. (7)Ti 系列熱像儀的易學易用....................8功能強大的InsideIR 軟體...................9Ti 系列熱像儀的應用-電力.................12Ti 系列熱像儀的應用-冶金.................13Ti 系列熱像儀的應用-石化.................14Ti 系列熱像儀的應用-預診斷維護...........15Ti 系列熱像儀的應用-電子.................16Ti 系列熱像儀的應用-建築.................17Ti 系列熱像儀的應用-汽車.................18Ti 系列熱像儀發生率表......................19通過Ti 系列熱影像儀,福祿克公司為工業維護專業人員帶來了紅外線熱影像技術功能強大的診斷和預測能力。
這些掌上型工具可顯示豐富的表面溫度圖像,用戶因此能夠輕鬆而安全地識別潛在問題。
多功能紅外線熱影像是一種非接觸式技術,它可以測量紅外波長,以便從一個安全距離測量溫度。
熱影像儀可以顯示一個以各種顏色來表示不同溫度的圖像。
透過該圖像,可以快速、簡便地檢查表面溫度並識別高溫點。
高溫點或溫度的上升通常預示著即將有故障發生。
診斷能力所有福祿克熱影像儀均為輻射式測量儀器(參見面板)。
它不僅可以圖形方式顯示溫度差,還可以測量和存儲每個點的溫度。
所有數據點都可被調用,以便對每個圖像進行詳細分析,以及對一段時間內的多個圖像進行趨勢分析。
LDR, LDGLaser DetectorsUsers ManualAugust 2016© 2016 Fluke Corporation. All rights reserved. Specifications are subject to change without notice.All product names are trademarks of their respective companies.LIMITED WARRANTY AND LIMITATION OF LIABILITYEach Fluke product is warranted to be free from defects in material and workmanship under normal use and service. The warranty period is three years and begins on the date of shipment. Parts, product repairs, and services are warranted for 90 days. This warranty extends only to the original buyer or end-user customer of a Fluke authorized reseller, and does not apply to fuses, disposable batteries, or to any product which, in Fluke's opinion, has been misused, altered, neglected, contaminated, or damaged by accident or abnormal conditions of operation or handling. Fluke warrants that software will operate substantially in accordance with its functional specifications for 90 days and that it has been properly recorded on non-defective media. Fluke does not warrant that software will be error free or operate without interruption.Fluke authorized resellers shall extend this warranty on new and unused products to end-user customers only but have no authority to extend a greater or different warranty on behalf of Fluke. Warranty support is available only if product is purchased through a Fluke authorized sales outlet or Buyer has paid theE applicable international price. Fluke reserves the right to invoice Buyer for importation costs of repair/replacement parts when product purchased in one country is submitted for repair in another country.Fluke's warranty obligation is limited, at Fluke's option, to refund of the purchase price, free of charge repair, or replacement of a defective product which is returned to a Fluke authorized service center within the warranty period.To obtain warranty service, contact your nearest Fluke authorized service center to obtain return authorization information, then send the product to that service center, with a description of the difficulty, postage and insurance prepaid (FOB Destination). Fluke assumes no risk for damage in transit. Following warranty repair, the product will be returned to Buyer, transportation prepaid (FOB Destination). If Fluke determines that failure was caused by neglect, misuse, contamination, alteration, accident, or abnormal condition of operation or handling, including overvoltage failures caused by use outside the product’s specified rating, or normal wear and tear of mechanical components, Fluke will provide an estimate of repair costs and obtain authorization before commencing the work. Following repair, the product will be returned to the Buyer transportation prepaid and the Buyer will be billed for the repair and return transportation charges (FOB Shipping Point).THIS WARRANTY IS BUYER'S SOLE AND EXCLUSIVE REMEDY AND IS IN LIEU OF ALL OTHER WARRANTIES, EXPRESS OR IMPLIED, INCLUDING BUT NOT LIMITED TO ANY IMPLIED WARRANTY OF MERCHANTABILITY OR FITNESS FOR A PARTICULAR PURPOSE. FLUKE SHALL NOT BE LIABLE FOR ANY SPECIAL, INDIRECT, INCIDENTAL OR CONSEQUENTIAL DAMAGES OR LOSSES, INCLUDING LOSS OF DATA, ARISING FROM ANY CAUSE OR THEORY.Since some countries or states do not allow limitation of the term of an implied warranty, or exclusion or limitation of incidental or consequential damages, the limitations and exclusions of this warranty may not apply to every buyer. If any provision of this Warranty is held invalid or unenforceable by a court or other decision-maker of competent jurisdiction, such holding will not affect the validity or enforceability of any other provision.Fluke CorporationP.O. Box 9090 Everett, WA 98206-9090 U.S.A.Fluke Europe B.V. P.O. Box 1186 5602 BD Eindhoven The Netherlands11/99Table of ContentsTitle Page Introduction (1)How to Contact Fluke (1)Safety Information (1)Product Familiarization (3)Use the Detector (6)Maintenance (7)Clean the Product (7)Batteries (8)Specifications (8)iLDR, LDGUsers ManualiiIntroductionThe LDR and LDG Laser Level Detectors (the Detector or Product) are battery-powered instruments that sense lasers difficult to see with the human eye. Use the Product with the 180LR or 180LG (the Laser Level) to identify new level and grade marks. The LDR senses a red laser. The LDG senses a green laser.How to Contact FlukeTo contact Fluke, call one of the following telephone numbers:•Technical Support USA: 1-800-44-FLUKE(1-800-443-5853)•Calibration/Repair USA: 1-888-99-FLUKE(1-888-993-5853)•Canada: 1-800-36-FLUKE (1-800-363-5853)•Europe: +31 402-675-200•Japan: +81-3-6714-3114•Singapore: +65-6799-5566•Anywhere in the world: +1-425-446-5500Or, visit Fluke's website at .To register your product, visit .To view, print, or download the latest manual supplement, visit /usen/support/manuals.Safety InformationA Warning identifies conditions and actions that pose hazards to the user; a Caution identifies conditions and actions that may damage the Product or the equipment under test.WarningFor safe operation and maintenance of theProduct and to prevent personal injury:•Read all safety information before you use the Product.•Carefully read all instructions.1LDR, LDG Users Manual2•Use the Product only as specified, or the protection supplied by the Product can be compromised.•Do not use the Product if it operates incorrectly.Table 1 is a list of the symbols used on the Product or in this manual.•Remove the batteries if the Product is not used for an extended period of time, or if stored in temperatures above 50 °C. If the batteries are not removed, battery leakage can damage the Product.Table 1. SymbolsLaser Detectors Product Familiarization3Product FamiliarizationFigure 1 and Table 2 show the features of the Product.Figure 1. Product FeaturesLDR, LDG Users Manual4Table 2. Product FeaturesItem DescriptionPower buttonPush to toggle on and off.Detection accuracy buttonPush to set detection accuracy level.On-Grade marksAlign with the laser on-grade reading andvertical mark notch.Beeper buttonPush to toggle the beeper on and off.Front LCDSee Table 3.Laser reception windowFace towards laser to detect beam.HolsterBeeper output signalFast - Detector is too low.Solid - Detector is on-grade.Slow - Detector is too high..Rear LCDFunctions the same as Front LCD. SeeT able 3.Rod clamp screw threadsAccepts the rod clamp screw to attach theclamp to the Product.Clamp guidesUse to align clamp.Offset notchUse to transfer reference marks 53.18 mmfrom the edge of the detector.Table 2. Product Features (cont.)Item DescriptionLaser Detectors Product Familiarization5Table 3 shows the indicators on the LCD.Table 3. LCD IndicatorsBattery doorRod clamp screwAttaches the clamp to the Detector.Alignment pointSecures and aligns the rod clamp to the detector in either a horizontal or a vertical position. Reference indicatorAlign with the on-grade marks on the Detector for grade rod readings.Clamp screw knobSecures clamp to measuring rod or staff.Table 2. Product Features (cont.)ItemDescriptionLDR, LDG Users Manual6Figure 2 shows how to attach the rod clamp to the Product.Figure 2. Rod Clamp AttachmentUse the DetectorUse the Detector and the Laser Level to identify new level and grade marks.To identify new level and grade marks:1.Put the bottom of the Laser Level on a stable surface ortripod.2.Connect the Detector to a measuring rod or staff.3.Turn on the Laser Level and the Detector and direct thelaser toward the laser reception window of the Detector. See Figure 3.4.Move the Detector up and down the rod until the laserlevel on the LCD indicates the Detector is level with the laser. If the beeper is on, the Detector also emits a solid output signal when the Detector is level with the laser.5.Secure the Detector to the rod and take measurementsas needed.NoteWhen the Laser Level is mounted on a tripod, make sure the tripod head is perfectly level. Errors in marks can result if a tripod is out of level.Laser Detectors MaintenanceFigure 3. Level and Detector MaintenanceThe Product does not require maintenance but treat Product as a calibrated instrument. Do not drop the Product. Clean the ProductClean the case with a damp cloth and a weak soap solution. Do not use abrasives, isopropyl alcohol, or solvents to clean the case or laser reception window.LDR, LDG Users ManualBatteriesReplace the batteries when the battery indicator shows a low battery.To install or replace the batteries (See Figure 4.):1.Remove the Product from the holster.2.Open the battery compartment.3.Install one 9 V batter with the correct polarity.4.Close the battery compartment.5.Put the Product back into the holster.Figure 4. Battery Replacement SpecificationsWorking Range..................≥6 m to ≤60 mAccuracyFine.................................0.75 mmMedium...........................1.75 mmPowerBatteries..........................1 x 9 V Alkaline IEC LR61Battery Life......................≥30 hrs, continuous use Dimensions(H x W x L).........................94 mm x 94 mm x 42 mm Weight................................0.20 kgTemperatureOperating........................-18 °C to +50 °CStorage...........................-40 °C to +70 °Cwith battery: -20 °C to +50 °C Relative Humidity..............0 % to 90 % (0 °C to 35 °C)0 % to 75 % (35 °C to 40 °C)0 % to 45 % (40 °C to 50 °C) AltitudeOperating........................2000 mStorage...........................12 000 m Safety.................................IEC 61010-1: Pollution Degree 2Laser DetectorsSpecificationsElectromagnetic Compatibility (EMC)International...................IEC 61326-1: Industrial ElectromagneticEnvironmentCISPR 11: Group 1, Class AGroup 1: Equipment has intentionally generated and/or usesconductively-coupled radio frequency energy that is necessary for theinternal function of the equipment itself.Class A: Equipment is suitable for use in all establishments other thandomestic and those directly connected to a low-voltage power supplynetwork that supplies buildings used for domestic purposes. Theremay be potential difficulties in ensuring electromagnetic compatibilityin other environments due to conducted and radiated disturbances.Korea (KCC)...................Class A Equipment (Industrial Broadcasting &Communication Equipment)Class A: Equipment meets requirements for industrialelectromagnetic wave equipment and the seller or user should takenotice of it. This equipment is intended for use in businessenvironments and not to be used in homes.USA (FCC).....................47 CFR 15 subpart B. This product isconsidered an exempt device per clause15.103.LDR, LDG Users Manual。
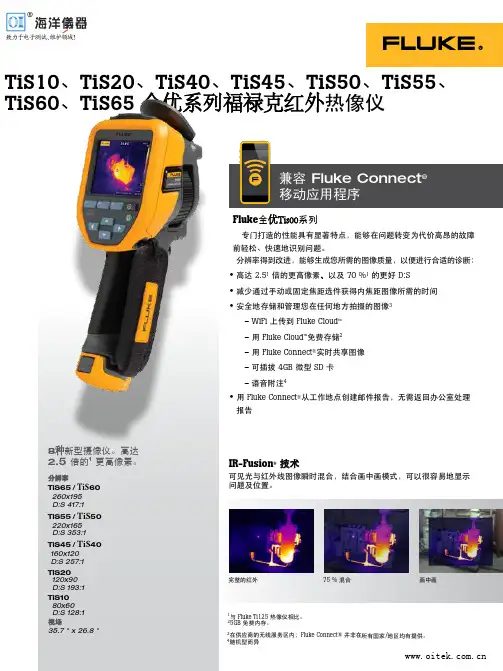
Fluke 全优Tis00系列专门打造的性能具有显著特点,能够在问题转变为代价高昂的故障前轻松、快速地识别问题。
分辨率得到改进,能够生成您所需的图像质量,以便进行合适的诊断:•高达 2.51 倍的更高像素、•减少通过手动或固定焦距选件获得内焦距图像所需的时间•安全地存储和管理您在任何地方拍摄的图像–WiFi 上传到 Fluke Cloud –用 Fluke Cloud ™免费存储–用 Fluke Connect ®实时共享图像–可插拔 4GB 微型 SD –语音附注4•用 Fluke Connect ®从工作地点创建邮件报告,无需返回办公室处理报告IR-Fusion ® 技术可见光与红外线图像瞬时混合,结合画中画模式,可以很容易地显示问题及位置。
B1与 Fluke Ti125 25GB 免费内存。
3在供应商的无线服务区内;TiS60、TiS65 全优系列福禄克红外8种新型摄像仪。
高达 2.5 倍的1 更高像素。
分辨率TiS65 / TiS 60 260x195 D:S 417:1TiS55 / TiS 50 220x165 D:S 353:1TiS45 / TiS 40 160x120 D:S 257:1TiS20 120x90 D:S 193:1TiS10 80x60 D:S 128:1视场35.7 ° x 26.8 °完整的红外详细技术指标订货信息TiS65 30HZ 工业级商业热像仪TiS65 9HZ 工业级商业热像仪TiS60 9HZ 工业级商业热像仪 TiS55 30HZ 工业级商业热像仪TiS55 9HZ 工业级商业热像仪TiS50 9HZ 工业级商业热像仪 TiS45 30HZ 工业级商业热像仪TiS45 9HZ 工业级商业热像仪TiS40 9HZ 工业级商业热像仪TiS20 9HZ 工业级商业热像仪TiS10 9HZ 工业级商业热像仪随附标准配件:含主机、交流电源适配器、锂离子智能电池(TiS65和Tis60每台包含2个,其它型号每台包含1个)、 USB电缆、微型SD卡(TiS65、Tis60、TiS55、TiS45)、硬质携带包(TiS65、Tis60、TiS55、Tis50、TiS45、Tis40)或软质运输包、可调节手带(TiS65、Tis60、TiS55、Tis50、TiS45、Tis40)和快速参考指南以及安全数据表。

坚固耐用,一目了然!超凡的图像质量重新定义对焦利用超像素实现起,利用而精准的图像。
焦图像针对指定目标即时获得对焦清晰的图像。
焦为与指定目标之间的距离节省时间nect®快作出决策。
通过两个实用的功能减少现场做笔记的需要:节,无需校准与全新、强大、易于使用的 Fluke Connect SmartView桌面软件。
现代视觉设计直观导航 - 轻松学习,轻松快速地使用简化的工作流程简化的报告流程和优化的报告模板Fluke Connect 云存储购买热像仪时随附 Fluke Connect SmartView® 桌面软件。
下载地址为:/FlukeConnectTI*Fluke Connect SmartView® 分析和报告软件在所有国家 / 地区均有提供,而 Fluke Connect 并非如此。
** 最佳情况和土耳其语100 % 精准对焦 – 每个对象。
近焦和远焦。
MultiSharp™ 多点对焦。
手动对焦MultiSharp TM多点对焦订购信息FLK-Ti480 9Hz 红外热像仪FLK-Ti480 60Hz 红外热像仪随机附件红外热像仪配有:标准红外镜头;交流电源和电池组充电器(含通用交流适配器);两个坚固耐用的锂离子智能电池组;USB 数据线;HDMI 视频数据线;4 GB 微型 SD 卡;结实耐用的硬质携带包;软质运输包以及可调节手带。
提供免费下载:Fluke Connect ® 桌面软件和用户手册。
可选附件FLK-LENS/TELE2 长焦红外镜头(2倍放大) FLK-LENS/4XTELE2 长焦红外镜头(4倍放大) FLK-LENS/WIDE2 广角红外镜头 TI-CAR-CHARGER 车载充电器 FLK-TI-VISOR3 遮阳板TI-TRIPOD3 三脚架安装选件 FLK-TI-BLUETOOTH 蓝牙耳机 FLK-TI-SBP3 智能电池FLK-TI-SBC3B 智能电池充电器射频连接时间(绑定时间)可能需要长达 1分钟。
福禄克FLUKE过程校准仪中文说明书一,测量和信号输出功能一览表热电阻2,3,4线测量2线输出100ΩPlatinum(3926)100ΩPlatinum(385)120ΩNickel(672)200ΩPlatinum(385)500ΩPlatinum(385)1000ΩPlatinum(385)10ΩCopper(427)100ΩPlatinum(3916)压力27种压力模块从2.5kPa至69,000kPa *回路电压24或28V(22mA最大)*对于压力输出功能,是指由外部手动压力泵或其它压力源作为压力信号二、初识校准仪1.当你第一次取出校准仪,你需要将电池充电见图9,给电池充电2小时。
2.将电池放入校准仪中。
3.连接校准仪的电压输出端和输入端如下:连接最左端的一对插孔(V、Ω、RTD输出)和最右端的一对插孔(VMEAS)(见图3)。
图3 跨接线连接图4 输入输出的例子4.开机按⊙,按▲,▼以调整对比度。
以达到最好的显示效果。
校准仪在接通电源时是直流电压的测量功能,可以在一对VMEAS输入插孔中得到读数。
5.按看到其测量情况。
6.按V—…键,选择直流电压输出。
按数字键5和ENTER=开始输出5.0000V直流电压。
7.量直流电压。
你将在上半部屏幕看到测量读数,在下半部屏幕看到输出值,如图4所示。
三、操作功能1.输入和输出插孔图5所示,校准器输入和输出插孔,表2解释它的用途。
表2 输入/输出插孔和连接器7,8!SOURCE(输出)mA测量mAΩRTD插孔输出或测量电流、电阻和RTDS插孔,并提供回路电源9,10!SOURE(输出)V ΩRTD插孔输出电压、电阻、频率、和模拟RTDS输出插孔图5 输入/输出插孔和连接2.按键校准仪按键如图6所示,表3解释它们的功能,有4个未带标记的兰色按键,在显示屏幕下面称之为功能键。
其功能在操作过程中屏幕出现的定义所确定。
功能键和其显示内部在本手册中用黑体字标明,例如:Choices图6 按键表3 键的功能序号性能说明15 V-键测量方式中选择直流电压,输出方式中选择直流电压16 开关键电源开关3.显示屏幕图7为典型的显示屏幕。
Fluke TiS60+操作说明
(该仪器已完成设置,只需操作即可。
)一、标准配置说明
二、主机介绍
三、电池充电及保养
3.1可使用充电座同时对两块电池进行;充电时插入后绿灯闪烁,当绿灯长亮时表示充电已满;也可以在热像仪充电端口充电;为避免电池寿命折损,使用人要尽量使用底座充电。
标配两块电池;每块电池在充满电状态下可,支持热像仪使用3-4小时。
注意:不要在过冷或过热的地方给充电,在过冷或过热的环境下充电会减弱电池的蓄电能力。
至少每六个月给热像仪的锂离子智能电池最少充电2小时,以便最大限度地延长电池寿命。
3.2、直接充电
3.3、充电器插头安装
一共配备4种型号插头,根据实际需要,选择一种进行安装。
插头和电源适配器合上后,需按插头上标识进行“顺时针”旋转,即可拧上;取下插头时,需向下拨电源适配器中间按钮,再“逆时针”旋转,即可拧下;(注意:易损坏)
四、仪器开机和关机及校准
长按2秒进行开机或关机;单击可进行快速校准。
五、操作画面
黑色按钮可发出红外线进行定位六、热成像拍照保存热图
七、查看已保存照片
点击“浏览”按钮进行访问已保存热图。
最后通过数据线连接电脑可导出图片。
坚固、精准、性能卓越。
• 节省时间 – 以无线方式,直接从热像仪将图像同步到 Fluke Connect ® 系统,并附加到资产记录或工作单。
访问各地的检查测量,更快作出决策。
团队成员可在检查点和办公室即时看到相同的数据。
• 从采用 IR-Fusion ® 技术的一幅精确融合图像或画中画图像中获得视觉背景和红外细节。
• 从接近 15 cm (6 in) 距离采用手动对焦获取精确对焦图像,或者选择固定焦距快速获取图像,无需从 45 cm (1.5 ft) 及以外距离对焦。
• 借助带 LED 电量指示的智能电池,可监视您的电池电量,从而避免意外断电。
• 可将图像保存到可移除 SD 卡上以方便随时查看。
• 使用 IR-PhotoNotes™ 或语音附注*,用红外图像数字记录重要信息,如设备或电机铭牌的位置。
B与 Fluke Connect ® 兼容*随机型而异技术参数TiS75、TiS65、TiS60、TiS55、TiS50、 TiS45、TiS40、TiS20 和 TiS10 红外热像仪Fluke 全优系列良好的图像质量 分辨率高达 320 X 240分辨率TiS75320 x 240 D:S 514:1TiS65/60 260 x 195D:S 417:1TiS55/50 220 x 165D:S 353:1TiS45/40160 x 120 D:S 257:1TiS20120 x 90D:S 193:1TiS1080 x 60视场35.7 °H x 26.8 °V在一个采用 IR-Fusion ® 技术的图像中查看问题和位置。
完全的红外50 % 混合,画中画模式50 % 混合*Fluke Connect® SmartView® 分析和报告软件在所有国家/地区均有提供,而 Fluke Connect 并非如此。
有关是否提供,请咨询您的授权 Fluke 经销商。