table自动加行
- 格式:doc
- 大小:232.00 KB
- 文档页数:19

完整的Vue+element-uitable组件实现表格内容的编辑删除和新⾏添加⼩实例copy ⽂档 l先上⼀张页⾯展⽰图,画⾯很简单(当然这个功能也很简单,不过笔者刚接触Vue,为了避免以后出现相同需求再重写,所以记录⼀下)⽼样⼦,直接贴代码,不多BB<template><el-row style="height: 100%;width:100%" type="flex" justify="center"><el-col :span="24"><el-table:data="tableData":stripe="true"height="100%"style="width: 100%":row-class-name="tableRowClassName"><el-table-columnprop="date"label="客户 ID"width="auto"align="center":resizable="false"><template slot-scope="scope"><el-input v-if=" isEdit == scope.$index " v-model="scope.row.date" placeholder="请输⼊内容" style="text-align: center;"></el-input><span v-if=" isEdit != scope.$index ">{{ scope.row.date }}</span></template></el-table-column><el-table-columnprop="name"label="地域别"width="auto"align="center":resizable="false"><template slot-scope="scope"><el-input v-if=" isEdit == scope.$index " v-model="" placeholder="请输⼊内容" style="text-align: center;"></el-input><span v-if=" isEdit != scope.$index ">{{ }}</span></template></el-table-column><el-table-columnfixed="right"label="操作"width="auto"align="center":resizable="false"><template slot-scope="scope"><el-button-group><el-buttonv-if=" isEdit == scope.$index "size="mini"@click="handleEdit(scope.$index, scope.row, 1)">保存</el-button><el-buttonv-if=" isEdit != scope.$index "size="mini"@click="handleEdit(scope.$index, scope.row, 0)">编辑</el-button><el-buttonsize="mini"type="danger"@click="handleDelete(scope.$index, scope.row)">删除</el-button></el-button-group></template></el-table-column><el-buttonslot="append"style="width: 100%;border-radius: 0;border-top: 0;border-left: 0;border-right: 0;"@click="appendNew">点击追加⼀⾏</el-button></el-table></el-col></el-row></template><script>export default {data() {return {tableData: [{date: '2016-05-02',name: '王⼩虎'}, {date: '2016-05-04',name: '王⼩虎'}, {date: '2016-05-01',name: '王⼩虎'}, {date: '2016-05-03',name: '王⼩虎'}],isEdit: -99}},methods: {handleEdit(index, row, status) {switch (status) {case 0:this.isEdit = index;break;case 1:this.isEdit = -99;break;}},handleDelete(index, row) {this.$confirm('这将会永久删除该⾏数据,是否继续?', '警告', { confirmButtonText: '确定',cancelButtonText: '取消',type: 'warning'}).then(() => {this.tableData.splice(index, 1);this.$message({type: 'success',message: '删除成功'});}).catch(() => {this.$message({type: 'info',message: '已取消删除'});});},appendNew(){this.tableData.push({date: '',name: ''});this.isEdit = this.tableData.length - 1},tableRowClassName({row, rowIndex}){row.index = rowIndex}}}</script><style>html, body {height: 100%;}</style>。

深⼊解析HTML的table表格标签与相关的换⾏问题何为table:table者Html表格也,数据之载体。
下⾯是⼀个⽐较标准的table代码写法:XML/HTML Code复制内容到剪贴板1. <table border="0" cellspacing="0" cellpadding="0" width="100%">2. <tr>3. <th>Month</th>4. <th>Date</th>5. </tr>6. <tr>7. <td>AUG</td>8. <td>18</td>9. </tr>10. </table>简单的HTML表格由table元素以及⼀个或多个tr、th或td元素组成。
tr元素定义表格⾏,th元素定义表头的单元格,td元素定义表格单元格。
border属性规定表格边框的宽度,cellpadding规定单元边沿与其内容之间的空⽩,cellspacing规定单元格之间的空⽩,这三个属性我们⼀般⼿动设置为0避免浏览器差异。
width属性规定表格的宽度,因为table宽度是随内部元素的宽度撑起多少⽽变化,⽽常⽤情况下我们希望table是同外部容器等宽,所以常常默认设置100%宽度使之撑满容器。
不得不说的table-layout:fixed属性table-layout: auto(默认)|fixed。
参数:auto:默认的⾃动算法。
布局将基于各单元格的内容。
表格在每⼀单元格读取计算之后才会显⽰出来,速度很慢。
fixed:固定布局的算法。
在这算法中,⽔平布局是仅仅基于表格的宽度,表格边框的宽度,单元格间距,列的宽度,⽽和表格内容⽆关。
解析速度快。
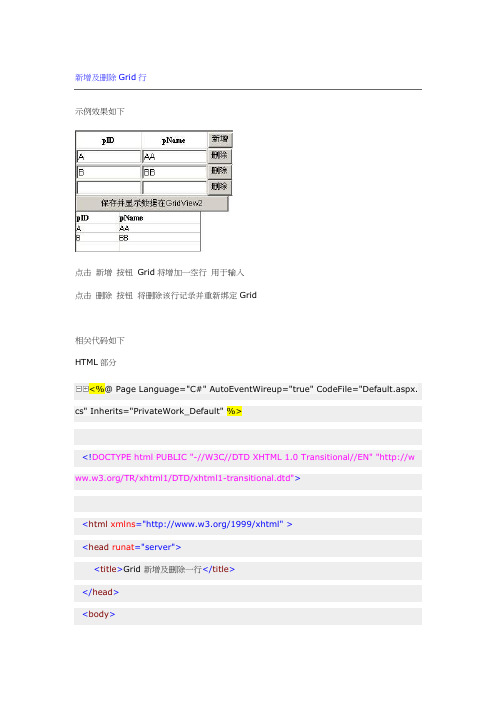
新增及删除Grid行示例效果如下点击新增按钮Grid将增加一空行用于输入点击删除按钮将删除该行记录并重新绑定Grid相关代码如下HTML部分<%@ Page Language="C#" AutoEventWireup="true" CodeFile="Default.aspx. cs" Inherits="PrivateWork_Default" %><!DOCTYPE html PUBLIC "-//W3C//DTD XHTML 1.0 Transitional//EN" "http://w /TR/xhtml1/DTD/xhtml1-transitional.dtd"><html xmlns="/1999/xhtml"><head runat="server"><title>Grid 新增及删除一行</title></head><body><form id="form1" runat="server"><asp:GridView ID="GridView1" runat="server" AutoGenerateColumns="Fa lse"><Columns><asp:TemplateField HeaderText="pID"><ItemTemplate><asp:TextBox ID="txt_pID" runat="server" Width="98"Text='<%# Bind("pID") %>'></asp:TextBox></ItemTemplate><HeaderStyle HorizontalAlign="Center"/></asp:TemplateField><asp:TemplateField HeaderText="pName"><ItemTemplate><asp:TextBox ID="txt_pName" runat="server" Width="98"Text='<%# Bind("pName") %>' ></asp:TextBox></ItemTemplate><HeaderStyle HorizontalAlign="Center"/></asp:TemplateField><asp:TemplateField><HeaderTemplate><asp:Button ID="btn_NewAdd" runat="server" Text="新增"OnClick="btn_NewAdd_Click"/></HeaderTemplate><ItemTemplate><asp:Button ID="btn_Delete" runat="server" Text="删除"CommandArgument="<%# GridView1.Rows.Count %>"OnClick="btn_Delete_Click"/></ItemTemplate></asp:TemplateField></Columns></asp:GridView><asp:Button ID="btn_SaveAndShow" runat="server" Text="保存并显示数据在GridView2"OnClick="btn_SaveAndShow_Click"/><br /><asp:GridView ID="GridView2" runat="server" Width="200"></asp:GridView></form></body></html>后台部分using System;using System.Data;using System.Configuration;using System.Collections;using System.Web;using System.Web.Security;using System.Web.UI;using System.Web.UI.WebControls;using System.Web.UI.WebControls.WebParts;using System.Web.UI.HtmlControls;public partial class PrivateWork_Default : System.Web.UI.Page {#region Page_Load 构造DataTableprotected void Page_Load(object sender, EventArgs e){if (!IsPostBack){//DataTable dt = new DataTable();dt.Columns.Add("pID", typeof(string));dt.Columns.Add("pName", typeof(string));DataRow dr = dt.NewRow();dr["pID"] = "";dr["pName"] = "";dt.Rows.Add(dr);ViewState.Add("mydt", dt);//this.GridView1.DataSource = dt;this.GridView1.DataBind();}}#endregion#region Grid 新增一行protected void btn_NewAdd_Click(object sender, EventArgs e){DataTable dt = (DataTable)ViewState["mydt"];dt.Rows.Clear();//保存页面输入for (int i = 0; i < this.GridView1.Rows.Count; i++){string str_pID = ((TextBox)this.GridView1.Rows[i].FindControl("txt_pID ")).Text.Trim();string str_pName = ((TextBox)this.GridView1.Rows[i].FindControl("txt_ pName")).Text.Trim();//DataRow dr = dt.NewRow();dr["pID"] = str_pID;dr["pName"] = str_pName;dt.Rows.Add(dr);}//新增空行DataRow drEmpty = dt.NewRow();drEmpty["pID"] = "";drEmpty["pName"] = "";dt.Rows.Add(drEmpty);//ViewState["mydt"] = dt;//this.GridView1.DataSource = dt;this.GridView1.DataBind();}#endregion#region Grid 删除一行protected void btn_Delete_Click(object sender, EventArgs e){//删除指定行int intIndex = Convert.ToInt32(((Button)sender).CommandArgument);DataTable dt = (DataTable)ViewState["mydt"];dt.Rows.RemoveAt(intIndex);//确保至少有一空行以使GridView1能显示if (dt.Rows.Count == 0){DataRow drEmpty = dt.NewRow();drEmpty["pID"] = "";drEmpty["pName"] = "";dt.Rows.Add(drEmpty);}//ViewState["mydt"] = dt;//this.GridView1.DataSource = dt;this.GridView1.DataBind();}#endregion#region保存并显示按钮protected void btn_SaveAndShow_Click(object sender, EventArgs e){DataTable dt = (DataTable)ViewState["mydt"];dt.Rows.Clear();//for (int i = 0; i < this.GridView1.Rows.Count; i++){string str_pID = ((TextBox)this.GridView1.Rows[i].FindControl("txt_pID ")).Text.Trim();string str_pName = ((TextBox)this.GridView1.Rows[i].FindControl("txt_ pName")).Text.Trim();//DataRow dr = dt.NewRow();dr["pID"] = str_pID;dr["pName"] = str_pName;dt.Rows.Add(dr);}ViewState["mydt"] = dt;//this.GridView2.DataSource = dt;this.GridView2.DataBind();}#endregion }。

layui框架中的 table中的编辑单元格自动合计行Layui框架是一款轻量级的前端UI框架,具有丰富的组件和功能,而其中的table组件可以方便地展示和操作数据。
该组件还提供了编辑单元格以及自动合计行的功能,能够满足用户对表格数据的需求。
在Layui的table组件中,编辑单元格是指用户可以直接在表格中修改数据,并且能够实时保存修改后的值。
使用编辑单元格功能可以减少用户在修改数据时的操作步骤,提高用户的效率和体验。
要实现编辑单元格功能,首先需要在表格的列设置中添加edit属性,并指定编辑单元格的类型。
例如,可以设置普通的文本编辑单元格、下拉选择框、日期选择框等,根据实际情况选择相应的类型。
当用户点击单元格时,表格将自动转换为可编辑状态,用户可以在其中输入或选择具体的值。
除了编辑单元格功能,Layui的table组件还提供了自动合计行的功能。
在某些情况下,用户需要对某一列或几列数据进行汇总计算,以便获取总和、平均值或其他统计结果。
通过设置合计行的相关属性,可以在表格底部自动显示统计结果,使用户能够快速了解数据的总体情况。
要实现自动合计行功能,首先需要在表格的列设置中添加totalRow属性,并指定需要合计的列。
Layui会自动对这些列中的数据进行求和计算,并在表格底部显示合计行。
用户也可以自定义合计行的显示内容,以适应不同的需求。
总的来说,Layui框架中的table组件的编辑单元格和自动合计行功能能够方便地实现表格数据的修改和统计。
这些功能可以减少用户的操作步骤,提高用户的效率和体验。
用户可以根据实际需求选择相应的编辑类型和合计方式,以便更好地展示和处理表格数据。
同时,值得注意的是,在使用Layui框架的table组件时,需要按照其提供的文档和示例进行正确的配置和使用。
只有正确地设置了相关属性和事件,才能正确地实现编辑单元格和自动合计行的功能。
总结起来,Layui框架中的table组件的编辑单元格和自动合计行功能是非常实用的,在使用该框架进行前端开发时,可以充分利用这些功能来处理和展示表格数据。

QTableWidget⾏选中删除添加⾏1 均分各列1 tableWidget->horizontalHeader()->setStretchLastSection(true); //就是这个地⽅2 tableWidget->horizontalHeader()->setResizeMode(QHeaderView::Stretch);2 整⾏选中:1 tableWidget->setSelectionBehavior ( QAbstractItemView::SelectRows); //设置选择⾏为,以⾏为单位2 tableWidget->setSelectionMode ( QAbstractItemView::SingleSelection); //设置选择模式,选择单⾏3 删除选中的整⾏1int rowIndex = m_pAttrbuteList->currentRow();2if (rowIndex != -1)3 tableWidget->removeRow(rowIndex);为了将数据能够在界⾯中显⽰的更清楚⼀些,在这⾥应⽤到了tableWidget控件,现将该控件中删除指定⾏的代码介绍如下:QTable⾥有⼀个removeRow(int i)函数⽤来删除当前⾏,但是如果我们没有对于table进⾏任何的选中,那么QTable是如何返回的呢?⽤Qt Creator⾥拖了⼀个tableWidget,加⼀个按钮,点击删除后执⾏1int i = ui->tableWidget->currentRow();2 QMessageBox msg;3 msg.setText(QString::number(i));4 msg.exec();5 ui->tableWidget->removeRow(i);在不选择⾏的情况下发现每次点击后删除的都是第⼀⾏,i的输出都是0.原因其实很简单,就是因为table的当前焦点在第⼀样的第⼀个单元格所导致的,解决的办法就是让table失去焦点,在构造函数⾥⾯添加ui->tableWidget->setFocusPolicy(Qt::NoFocus);然后再试,发现点击删除按钮如果不选中⾏的话是不能删除的,返回的i此时是-1。

Excel技巧如何使用PivotTable表进行数据汇总在日常工作和学习中,我们经常需要对大量的数据进行整理和汇总。
Excel是一款功能强大的电子表格软件,其中的PivotTable表功能可以帮助我们轻松地对数据进行汇总和分析。
本文将介绍如何使用Excel中的PivotTable表功能,以便更高效地处理和展示数据。
一、什么是PivotTable表PivotTable表是Excel中的一项重要功能,它可以对数据进行灵活的多维度汇总和分析。
通过拖拽字段到不同的区域,我们可以快速生成表格、柱状图、折线图等多种形式的数据报表。
PivotTable表最大的优势在于将大量的数据转换为易读且易于理解的汇总数据。
二、创建PivotTable表1. 选中需要生成PivotTable表的数据区域;2. 点击Excel菜单栏中的“插入”选项卡;3. 在“插入”选项卡中找到“表格”分组中的“PivotTable表”按钮,并点击它;4. 弹出的对话框中会自动显示待生成PivotTable表的选定区域;5. 在对话框中选择新的工作表或现有的工作表位置;6. 确认设置后,点击“确定”按钮即可生成PivotTable表。
三、设置PivotTable表1. 在PivotTable表字段列表中,将数据字段拖拽到“值”区域,这样就可以对该字段进行汇总计算;2. 将想要进行汇总或分析的字段拖拽到行标签区域或列标签区域;3. 可以通过筛选器功能选择需要显示的数据;4. 如果需要将不同字段放置在同一行或同一列,则将其拖拽到行标签区域或列标签区域时,按住Ctrl键并进行拖拽即可;5. 可以通过右键点击PivotTable表中的字段,选择“对字段进行汇总方式”,设置不同的汇总方式。
四、对PivotTable表数据进行汇总和分析通过PivotTable表,我们可以对数据进行多维度的汇总和分析,下面列举几个常用的操作:1. 添加数据字段:在“值”区域拖拽字段,可以对该字段进行求和、计数、平均值等不同的汇总计算;2. 添加行标签和列标签:将其他字段拖拽到行标签区域或列标签区域,可以将数据按照不同的维度进行分类和汇总;3. 使用筛选器:通过筛选器功能可以快速筛选想要展示的数据;4. 更改汇总方式:通过右键点击PivotTable表中的字段,选择“对字段进行汇总方式”,可以设置不同的汇总方式,如最大值、最小值等;5. 进行数据透视图设置:通过点击“分析”选项卡中的“数据透视图”按钮,可以进行更多高级的数据汇总和分析操作。
Java JTable单元格文字实现自动换行什么都不说,直接看代码,很简单的,相信大家看得懂import javax.swing.*;import javax.swing.table.*;import java.awt.*;class RowChange extends JFrame {public RowChange() {JTabletbl = new JTable(new String[][]{{"JTable里单元格内容的显示器是TableCellRenderer。
","默认的显示器(DefaultTableCellRenderer)继承JLabel所以不方便多行显示。
","要多行显示应该继承JTextArea(参看下面的TableCellTextAreaRenderer类)。
","当然,别忘了调用JTable.setDefaultRenderer() 登记你的显示器。
"}},"A B C D".split(" "));tbl.setDefaultRenderer(Object.class, new TableCellTextAreaRenderer());add(new JScrollPane(tbl));setSize(800, 200);setVisible(true);setDefaultCloseOperation(EXIT_ON_CLOSE);}public static void main(String[] args) { new RowChange(); }}class TableCellTextAreaRenderer extends JTextArea implements TableCellRenderer {public TableCellTextAreaRenderer() {setLineWrap(true);setWrapStyleWord(true);}public Component getTableCellRendererComponent(JTable table, Object value,booleanisSelected, booleanhasFocus, int row, int column) { // 计算当下行的最佳高度intmaxPreferredHeight = 0;for (inti = 0; i<table.getColumnCount(); i++) {setText("" + table.getValueAt(row, i));setSize(table.getColumnModel().getColumn(column).getWidth(), 0);maxPreferredHeight = Math.max(maxPreferredHeight, getPreferredSize().height);}if (table.getRowHeight(row) != maxPreferredHeight) // 少了这行则处理器瞎忙table.setRowHeight(row, maxPreferredHeight);setText(value == null ? "" : value.toString());return this;}}。
⾃动创建临时表,并给临时表添加⼀个⾃动增长的⾏号字段 create table #pageindex(id int identity(1,1) not null,nid int)set rowcount @PageUpperBound--读取符合记录的id放到临时表中INSERT INTO #pageindex(nid)SELECT C.ConIDFROM tbl_EmpContract as C INNER JOINtbl_Employee as E ONC.EmpID = E.EmpID INNER JOINtbl_DepartmtList as D ON E.DepID = D.DepIDwhere(C.ConState = '未审核')select IDENTITY(int, 1,1) AS ID_Num,gdsid,ordersn into #gds_day_sell_tempfrom gds_day_sellselect * from #gds_day_sell_temp还可以这样写:ID_Num = IDENTITY(int, 1, 1)也可以是其他类型:IDENTITY(smallint, 100, 1) AS job_num加上这个去掉重复FROM (Select TOP 100 Percent * FROM [BarginSaleArea] ) [BarginSaleArea]新写sql server的分页sql如下:declare @PageLowerBound intdeclare @PageUpperBound intset @PageLowerBound=(@pageindex-1)*@pagesizeset @PageUpperBound=@PageLowerBound+@pagesizeset rowcount @PageUpperBoundSELECT IDENTITY(int, 1,1) AS id,g.gdsmst_gdsid as nid into #pageindexFROM tbl_EmpContract as C INNER JOINtbl_Employee as E ONC.EmpID = E.EmpID INNER JOINtbl_DepartmtList as D ON E.DepID = D.DepIDwhere(C.ConState = '未审核')-- and (E.EmpState = '在岗')AND (D.DepSN LIKE @DepSN+'%')AND (E.EmpName LIKE )--查询AND (E.EmpIDSN LIKE )--查询AND (D.DepName LIKE )--查询--读取记录完结SELECTC.ConID,C.ConName,C.ConNumber,C.ConState,C.ConKinds,C.ConBeginDate,C.ConEndDate,C.ConSignCompany,C.ConSignDate,C.ConTemplet,C.ConTryWorkDate,C.ConExeg,E.EmpIDSN,E.EmpName,dbo.GetDepAllName(E.DepID) as DepName,E.EmpSex,E.EmpBirthday,E.EmpFunction,D.DepSN,cast(datediff(yy,E.EmpBirthday,getDate())+1 as int) EmpAge,C.ConSortFROM tbl_EmpContract as C INNER JOINtbl_Employee as E ONC.EmpID = E.EmpID INNER JOINtbl_DepartmtList as D ON E.DepID = D.DepID,#pageindex as pwhere (C.ConID = p.nid)and (p.id>@PageLowerBound)and (p.id<)order by p.idENDSET NOCOUNT OFFGOGROUP BY 的⼏种⽤法Group by 是SQL Server 中常⽤的⼀种语法,语法如下:[ GROUP BY [ ALL ] group_by_expression [ ,...n ][ WITH { CUBE | ROLLUP } ]]1、最常⽤的就是这种语法,如下:Select CategoryID, AVG(UnitPrice), COUNT(UnitPrice)FROM dbo.Products Where UnitPrice > 30GROUP BY CategoryIDORDER BY CategoryID DESC这个语句查询出,所有产品分类的产品平均单价,单价计数。
Excel中的超级表Table详细介绍(⼆)前⾯我们介绍了T a b l e的使⽤。
今天我们来介绍结构化引⽤结构化引⽤介绍使⽤了表之后,公式中引⽤单元格时就会发⽣变化,这种新的引⽤⽅式叫做“结构化引⽤”。
我们先来直观感受⼀下结构化引⽤。
在⼀个“Tabel”右侧相邻的单元格中,输⼊“=sum(”,然后点击“Table”中任意单元格,会得到如下的公式(在2007中,公式稍有不同):=SUM(表1[@销售额])公式不再是=sum(E3)这样的形式,这⾥:“表1”:代表“Tabel”的名字[销售额]: 代表列的名字@代表这⼀⾏(公式所在的同⼀⾏)所以这⼀个公式的意思⾮常直截了当:对“表1”的“销售额”列求和注:我们使⽤的表,可以参见下图结构化引⽤详解⼀个结构化引⽤是指上⾯的例⼦中sum函数的括号中的内容(本来这个地⽅是写单元格区域的)。
这个引⽤有⼏部分组成:表1[@销售额]1.表名,在这⾥叫做表12. [],界定符,指明引⽤的范围和⽅式3.列名,例⼦当中的”销售额”4. @,表⽰引⽤的项⽬,@标识当前⾏。
其中,引⽤项⽬还有其他⼀些关键字:#全部表⽰整个表,包括标题⾏,数据区域,汇总⾏#数据表⽰数据区域#标题表⽰标题⾏#汇总表⽰汇总⾏@ 表⽰本⾏下⾯通过⼀些例⼦说明这些引⽤⽅式的使⽤。
表1[客户]表⽰整个表1的客户列(只包含数据部分,不含标题⾏和汇总⾏。
你可以使⽤公式:counta(表1[客户]),结果就是客户列中的数据个数。
使⽤公式:index(表1[客户],1,0),结果就是返回表中的第⼀个客户名称表1[[#全部],[客户]]与上⾯类似,不过表⽰的是客户数据部分加上标题⾏,使⽤公式:counta(表1[[#全部],[客户]]),结果就是客户个数+1;使⽤公式index(表1[[#全部],[客户]],1,0),返回的是该列的标题。
表1[[#数据],[客户]]与表1[客户]结果相同表1[[#汇总],[销售额]]引⽤销售额的汇总。
VBA中的PivotTable操作技巧与实例讲解VBA是一种用于Excel的编程语言,它可以通过编写宏来自动化和增强Excel的功能。
在Excel中,PivotTable是一种强大的数据分析工具,可以帮助用户快速分析和汇总大量数据。
本文将介绍一些VBA中常用的PivotTable操作技巧,并提供一些实例来演示它们的用法。
第一部分:PivotTable基础知识在开始讲解VBA中的PivotTable操作技巧之前,我们首先需要了解一些关于PivotTable的基础知识。
PivotTable 是一种数据透视表,可以将大规模的数据集合进行汇总和分析。
它可以通过拖放字段到不同的区域来对数据进行维度、度量和筛选。
PivotTable还支持行、列和数据值的计算设置,用户可以根据需要自定义汇总方式。
第二部分:PivotTable操作技巧1. 创建PivotTable:使用VBA代码创建PivotTable非常简单。
首先,选择要创建PivotTable的数据范围,然后使用以下代码创建一个新的PivotTable:```vbaSub CreatePivotTable()Dim rng As RangeDim ws As WorksheetSet ws = ThisWorkbook.Sheets("Sheet1") '更改为需要创建PivotTable的工作表名称Set rng = ws.Range("A1:D10") '更改为需要创建PivotTable的数据范围Dim pt As PivotTableSet pt = ws.PivotTableWizard(rng) '创建新的PivotTable End Sub```2. 添加字段:可以使用VBA代码向PivotTable中添加字段。
以下代码演示了如何将字段添加到PivotTable的行和列:```vbaSub AddPivotFields()Dim pt As PivotTableDim ws As WorksheetSet ws = ThisWorkbook.Sheets("Sheet1") '更改为包含PivotTable的工作表名称Set pt = ws.PivotTables(1) '更改为PivotTable的索引或名称With pt.PivotFields("产品") '将“产品”字段添加到行.PivotFields("销售额") '将“销售额”字段添加到值End WithEnd Sub```3. 添加筛选器:可以使用VBA代码向PivotTable添加筛选器,以便根据需要过滤数据。
table自动增加一行出生值为2行,单焦聚到一行末时自动增加一行:代码为:<html><LINK href="../css/admin.css"type="text/css"rel="stylesheet"><head><meta http-equiv="Content-Type"content="text/html; charset=utf-8"/><style type="text/css"><!--body {margin-left: 0px;margin-top: 0px;margin-right: 0px;margin-bottom: 0px;}.STYLE1 {font-size: 12px} .STYLE4 {font-size: 12px;color: #1F4A65;font-weight: bold;}a:link {font-size: 12px;color: #06482a;text-decoration: none;}a:visited {font-size: 12px;color: #06482a;text-decoration: none;}a:hover {font-size: 12px;color: #FF0000;text-decoration: underline; }a:active {font-size: 12px;color: #FF0000;text-decoration: none;}.STYLE7 {font-size: 12}--></style><script>//声明全局对象数据teacher=newArray({},{},{},{},{},{},{},{},{},{},{},{},{},{},{} ,{},{},{},{},{},{},{},{},{},{},{},{},{},{},{},{},{ },{},{},{},{},{},{},{},{},{},{},{},{},{},{},{},{}, {},{});count=2;//统计行数function $(s){return document.getElementById(s);}function $v(s){return document.getElementById(s).value;}function addtable(object){if(object.title==1&&count<=50){object.title=0;count++;document.getElementById("table"+count).innerHTM L=" <table width='99%' border='0' align='center' cellpadding='0' cellspacing='1'bgcolor='#CECECE' >"+" <tr>"+" <td height='18' bgcolor='#FFFFFF'><div align='center' class='STYLE2 STYLE1'><inputid='tno"+count+"' size='11'type='text'></div></td>"+" <td height='18' bgcolor='#FFFFFF'class='STYLE2'><div align='center' class='STYLE2 STYLE1'><input id='tname"+count+"'type='text'></div></td>"+" <td height='18' bgcolor='#FFFFFF'><div align='center' class='STYLE2 STYLE1'><inputid='tage"+count+"' size='5'type='text'></div></td>"+" <td height='18' bgcolor='#FFFFFF'><div align='center' class='STYLE2 STYLE1'>"+" <select id='tsex"+count+"' >"+" <option value='男'> 男</option>"+" <option value='女'> 女</option>"+" </select></div></td>"+" <td height='18' bgcolor='#FFFFFF'><div align='center' class='STYLE2 STYLE1'><inputid='depart"+count+"' type='text'></div></td>"+ " <td height='18' bgcolor='#FFFFFF'><div align='center'>"+" <select id='title"+count+"'>"+" <option value='讲师'> 讲师</option>"+ " <option value='副教授'> 副教授</option>"+" <option value='教授'> 教授</option>"+ " </select>"+" </div>"+" </td>"+" <td height='18' bgcolor='#FFFFFF'><div align='center'><input id='tphone"+count+"'size='11' type='text'></div></td>"+" <td height='18' bgcolor='#FFFFFF'><div align='center'><input id='tintroduce"+count+"' type='text' title='1'onfocus='addtable(this)'></div></td>"+" </tr>"+" </table>"+"<div id='table"+(count+1)+"'></div>";document.getElementById("tintroduce"+(count-2)) .focus();}}//获取xmlhttprequestfunction getxmlhttp(){var xmlhttp=null;try{xmlhttp=new XMLHttpRequest();}catch(e){varMSXML=["MSXML2.XMLHTTP","Miscrosoft.XMLHTTP"];for(var n=0;n<MSXML.length;n++){try{xmlhttp=new ActiveXObject(MSXML[n]);break;}catch(e){}}}return xmlhttp;}//保存数据function savedata(){teacher.id="1";="2";var p=JSON.stringify(teacher);var xhr=getxmlhttp();var url="../../../admin/AddTeacher?p="+p;url=encodeURI(url);url=encodeURI(url);xhr.onreadystatechange=function(){if(xhr.readyState==4){if(xhr.status==200||xhr.status==304){var msg=xhr.responseText;alert();}}}xhr.open("post",url,true);//方式、请求url,是否异xhr.send(null);}//检查数据是否合法规定function checkdata(){alert(teacher.length);for(var i =0;i<count;i++){teacher[i].tno=$v("tno"+(i+1));teacher[i].tname=$v("tname"+(i+1));teacher[i].tage=$v("tage"+(i+1));teacher[i].tsex=$v("tsex"+(i+1));teacher[i].tphone=$v("tphone"+(i+1));teacher[i].title=$v("title"+(i+1));teacher[i].depart=$v("depart"+(i+1));teacher[i].tintroduce=$v("tintroduce"+(i+1));}for(var i =0;i<count;i++){if(teacher[i].tno==""&&(teacher[i].tintroduce!= ""||teacher[i].tname!=""||teacher[i].tage!=""||tea cher[i].tphone!=""||teacher[i].depart!="")){alert("学号不能为空");$("tno"+(i+1)).focus();return;}if(teacher[i].tno!=""&&teacher[i].tname==""){ alert("姓名不能为空");$("tname"+(i+1)).focus();return;}if(teacher[i].tno!=""&&teacher[i].tage==""){alert("年龄不能为空");$("tage"+(i+1)).focus();return;}if(teacher[i].tno!=""&&teacher[i].depart==""){ alert("所在系不能为空");$("depart"+(i+1)).focus();return;}}//alert();="2";}</script></head><body><table width="800"border="0"align="center" cellpadding="0"cellspacing="0"><tr><td height="30"><table width="100%"border="0" cellspacing="0"cellpadding="0"><tr><td width="15"height="30"><imgsrc="images/tab_03.gif"width="15"height="30"/></td><tdbackground="images/tab_05.gif"><imgsrc="images/311.gif"width="16"height="16"/><span class="STYLE4">教师信息表</span></td><td width="14"><imgsrc="images/tab_07.gif"width="14"height="30"/></td></tr></table><table width="100%"border="0"cellspacing="0"cellpadding="0"><tr><td width="9"background="images/tab_12.gif"> </td><td bgcolor="e5f1d6"><table width="99%"border="0"align="center"cellpadding="0"cellspacing="1" bgcolor="#CECECE"><tr><td width="6%"height="26" background="images/tab_14.gif"class="STYLE1"><div align="center"class="STYLE2 STYLE1">职工号</div></td><td width="8%"height="18" background="images/tab_14.gif"class="STYLE1"><div align="center"class="STYLE2 STYLE1">姓名</div></td><td width="6%"height="18" background="images/tab_14.gif"class="STYLE1"><div align="center"class="STYLE2 STYLE1">年龄</div></td><td width="6%"height="18" background="images/tab_14.gif"class="STYLE1"><div align="center"class="STYLE2 STYLE1">性别</div></td><td width="18%"height="18" background="images/tab_14.gif"class="STYLE1"><divalign="center"class="STYLE2 STYLE1">所在系</div></td><td width="10%"height="18" background="images/tab_14.gif"class="STYLE1"><div align="center"class="STYLE2">职称</div></td><td width="15%"height="18" background="images/tab_14.gif"class="STYLE1"><div align="center"class="STYLE2">电话</div></td><td width="17%"height="18" background="images/tab_14.gif"class="STYLE1"><div align="center"class="STYLE2">备注</div></td></tr><tr><td height="18"bgcolor="#FFFFFF"><div align="center"class="STYLE2 STYLE1"><input id="tno1"size="11"type="text"/></div></td><td height="18"bgcolor="#FFFFFF"class="STYLE2"><divalign="center"class="STYLE2 STYLE1"><inputid="tname1"type="text"/></div></td><td height="18"bgcolor="#FFFFFF"><div align="center"class="STYLE2 STYLE1"><input id="tage1"size="5"type="text"/></div></td><td height="18"bgcolor="#FFFFFF"><div align="center"class="STYLE2 STYLE1"><select id="tsex1"><option value="男"> 男</option><option value="女"> 女</option></select></div></td><td height="18"bgcolor="#FFFFFF"><div align="center"class="STYLE2 STYLE1"><input id="depart1"type="text"/></div></td><td height="18"bgcolor="#FFFFFF"><div align="center"><select id="title1"><option value="讲师"> 讲师</option><option value="副教授"> 副教授</option><option value="教授"> 教授</option></select></div></td><td height="18"bgcolor="#FFFFFF"><div align="center"><inputid="tphone1"size="11"type="text"/></div></td><td height="18"bgcolor="#FFFFFF"><div align="center"><inputid="tintroduce1"type="text"title="1"onfocus="addtable(this)"/></div></td></tr></table></td><td width="9"background="images/tab_16.gif"> </td></tr></table><table width="99%"border="0"align="center"cellpadding="0"cellspacing="1" bgcolor="#CECECE"><tr><td height="18"bgcolor="#FFFFFF"><div align="center"class="STYLE2 STYLE1"><input id="tno2"size="11"type="text"/></div></td><td height="18"bgcolor="#FFFFFF" class="STYLE2"><div align="center"class="STYLE2 STYLE1"><input id="tname2"type="text"/></div></td><td height="18"bgcolor="#FFFFFF"><div align="center"class="STYLE2 STYLE1"><input id="tage2"size="5"type="text"/></div></td><td height="18"bgcolor="#FFFFFF"><div align="center"class="STYLE2 STYLE1"><select id="tsex2"><option value="男"> 男</option><option value="女"> 女</option></select></div></td><td height="18"bgcolor="#FFFFFF"><div align="center"class="STYLE2 STYLE1"><input id="depart2"type="text"></div></td><td height="18"bgcolor="#FFFFFF"><div align="center"><select id="title2"><option value="讲师"> 讲师</option><option value="副教授"> 副教授</option><option value="教授"> 教授</option></select></div></td><td height="18"bgcolor="#FFFFFF"><div align="center"><inputid="tphone2"size="11"type="text"/></div></td><td height="18"bgcolor="#FFFFFF"><div align="center"><inputid="tintroduce2"title="1"onfocus="addtable(this)"type="text"/></div></td></tr></table><div id="table3"></div><div align="center"><button onclick="savedata()">保存</button> <button onclick="checkdata()">检测</button></div> </td></tr></table></body></html>。