疯狂Android讲义(第2版)【迷你书】
- 格式:pdf
- 大小:381.03 KB
- 文档页数:11
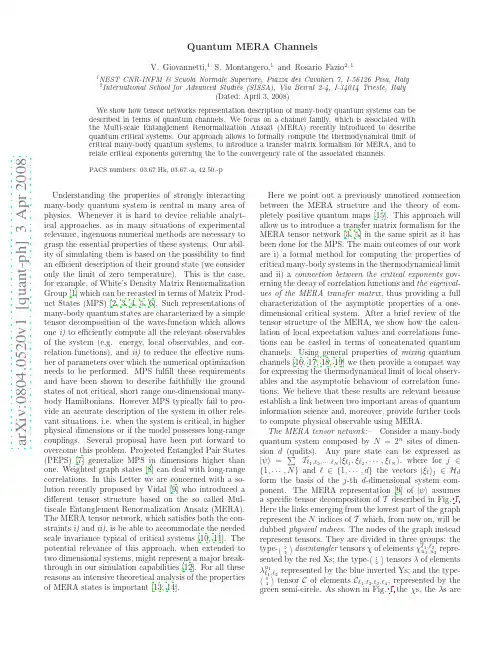
a r X i v :0804.0520v 1 [q u a n t -p h ] 3 A p r 2008Quantum MERA ChannelsV.Giovannetti,1S.Montangero,1and Rosario Fazio 2,11NEST CNR-INFM &Scuola Normale Superiore,Piazza dei Cavalieri 7,I-56126Pisa,Italy 2International School for Advanced Studies (SISSA),Via Beirut 2-4,I-34014Trieste,Italy(Dated:April 3,2008)We show how tensor networks representation description of many-body quantum systems can be described in terms of quantum channels.We focus on a channel family,which is associated with the Multi-scale Entanglement Renormalization Ansazt (MERA)recently introduced to describe quantum critical systems.Our approach allows to formally compute the thermodynamical limit of critical many-body quantum systems,to introduce a transfer matrix formalism for MERA,and to relate critical exponents governing the to the convergency rate of the associated channels.PACS numbers:03.67.Hk,03.67.-a,42.50.-pUnderstanding the properties of strongly interacting many-body quantum system is central in many area of physics.Whenever it is hard to device reliable analyt-ical approaches,as in many situations of experimental relevance,ingenuous numerical methods are necessary to grasp the essential properties of these systems.Our abil-ity of simulating them is based on the possibility to find an efficient description of their ground state (we consider only the limit of zero temperature).This is the case,for example,of White’s Density Matrix Renormalization Group [1]which can be recasted in terms of Matrix Prod-uct States (MPS)[2,3,4,5,6].Such representations of many-body quantum states are characterized by a simple tensor decomposition of the wave-function which allows one i)to efficiently compute all the relevant observables of the system (e.g.energy,local observables,and cor-relation functions),and ii)to reduce the effective num-ber of parameters over which the numerical optimization needs to be performed.MPS fulfill these requirements and have been shown to describe faithfully the ground states of not critical,short range one-dimensional many-body Hamiltonians.However MPS typically fail to pro-vide an accurate description of the system in other rele-vant situations,i.e.when the system is critical,in higher physical dimensions or if the model possesses long-range couplings.Several proposal have been put forward to overcome this problem.Projected Entangled Pair States (PEPS)[7]generalize MPS in dimensions higher than one.Weighted graph states [8]can deal with long-range correlations.In this Letter we are concerned with a so-lution recently proposed by Vidal [9]who introduced a different tensor structure based on the so called Mul-tiscale Entanglement Renormalization Ansatz (MERA).The MERA tensor network,which satisfies both the con-straints i)and ii),is be able to accommodate the needed scale invariance typical of critical systems [10,11].The potential relevance of this approach,when extended to two dimensional systems,might represent a major break-through in our simulation capabilities [12].For all these reasons an intensive theoretical analysis of the properties of MERA states is important [13,14].Here we point out a previously unnoticed connection between the MERA structure and the theory of com-pletely positive quantum maps [15].This approach will allow us to introduce a transfer matrix formalism for the MERA tensor network [3,5]in the same spirit as it has been done for the MPS.The main outcomes of our work are i)a formal method for computing the properties of critical many-body systems in the thermodynamical limit and ii)a connection between the critical exponents gov-erning the decay of correlation functions and the eigenval-ues of the MERA transfer matrix ,thus providing a full characterization of the asymptotic properties of a one-dimensional critical system.After a brief review of the tensor structure of the MERA,we show how the calcu-lation of local expectation values and correlations func-tions can be casted in terms of concatenated quantum ing general properties of mixing quantum channels [16,17,18,19]we then provide a compact way for expressing the thermodynamical limit of local observ-ables and the asymptotic behaviour of correlation func-tions.We believe that these results are relevant because establish a link between two important areas of quantum information science and,moreover,provide further tools to compute physical observable using MERA.The MERA tensor network:–Consider a many-body quantum system composed by N =2n sites of dimen-sion d (qudits).Any pure state can be expressed as |ψ = T ℓ1,ℓ2,···,ℓN |ξℓ1,ξℓ2,···,ξℓN ,where for j ∈{1,···,N }and ℓ∈{1,···,d }the vectors |ξℓ j ∈H d form the basis of the j -th d -dimensional system com-ponent.The MERA representation [9]of |ψ assumes a specific tensor decomposition of T described in Fig.1.Here the links emerging from the lowest part of the graph represent the N indices of T which,from now on,will be dubbed physical indices .The nodes of the graph instead represent tensors.They are divided in three groups:thetype-…22«disentangler tensors χof elements χℓ1,ℓ2u 1,u 2repre-sented by the red Xs;the type-…12«tensors λof elements λu 1ℓ1,ℓ2represented by the blue inverted Ys;and the type- 04«tensor C of elements C ℓ1,ℓ2,ℓ3,ℓ4,represented by the green semi-circle.As shown in Fig.1the χs,the λs are2FIG.1:Graphical representation of a MERA decompositionof the tensor T associated with a many-body state|ψ forN=16qudits(a dotted link emerging from the left side of thegraph re-enter thefigure as the corresponding dotted link onthe right).The light blue region represents the causal cone[9]associated with the local operatorˆΘj(black rectangle).It iscomposed by contraction of tensors M5(shown in the inset).coupled together to form a triangular structure with Cas the closing element of the top:any two joined legsfrom any two distinct nodes indicate saturation of theassociated indices.Consequently,the tensor T associ-ated with the N qudit state|ψ is written as a networkof O(N)tensors organized in O(log2N)different levelscomposed by one layer ofχconnected with one layer ofλtensor.In a generic MERA structure theχand theλdiffer from node to node but the dimensions of their in-dices are upper-bounded by afixed constant(for easy ofnotation here we omit the indeces expressing the tensorsposition dependence).What makes the MERA decomposition a convenientone is the assumption that theχs andλs satisfy spe-cial contraction rules.Specifically,for eachχandλletus define its adjoint¯χand¯λas the tensors of elements¯χℓ1,ℓ2 u1,u2=(χu1,u2ℓ1,ℓ2)∗and¯λu1,u2ℓ1=(λℓ1u1,u2)∗.With this def-inition the MERA contraction rules are¯χ•,⋄ℓ1,ℓ2χu1,u2•,⋄=χ•,⋄u1,u2¯χℓ1,ℓ2•,⋄=δℓ1,u1δℓ2,u2and¯λ•,⋄ℓ1λu1•,⋄=δℓ1,u1,withδbeing the Kronecker delta and where the typographic symbols•and⋄indicate summation over the correspond-ing index Under these conditions the expectation val-ues of local observables on|ψ requires only to evaluate O(log2N)non trivial tensor contractions[9].Local observables and quantum channels:-Wefirst show how the average of local observables can be related to the study of concatenated quantum channels.Given an operatorˆΘj which acts not trivially on no more than three consecutive qudits(say the(j−1)th,j th and (j+1)th),the quantity ˆΘj ≡ ψ|ˆΘj|ψ requires to perform contractions only over theχs andλs belonging to the causal cone[9]of the triple j−1,j and j+1.A compact expression is obtained by grouping these tensors in compounds composed by2χs and by3λs (see inset of Fig.1).This forms m=log2(N/4)non nec-essarily identical type-…36«tensors M5≡λχλχλwhere the productsλχandχλare defined by[λχ]u1,u2ℓ1,ℓ2,ℓ3≡λu1ℓ1,•χ•,u2ℓ2,ℓ3,and[χλ]u1,u2ℓ1,ℓ2,ℓ3≡χu1,•ℓ1,ℓ2λu2•,ℓ3. For each one of the m tensors M5we can then in-troduce two families of operators{ˆL r}r and{ˆR r}racting on the Hilbert space H⊗3dand labeled through the composed index r≡(r1,r2,r3)with r1,2,3being d-dimensional[20].In the computational basis they are defined by the matrices ξu1,ξu2,ξu3|ˆL r|ξℓ1,ξℓ2,ξℓ3and ξu1,ξu2,ξu3|ˆR r|ξℓ1,ξℓ2,ξℓ3of elements[M5]u1,u2,u3r1,ℓ1,ℓ2,ℓ3,r2,r3and[M5]u1,u2,u3r1,r2,ℓ1,ℓ2,ℓ3,r3respectively. They are related through a reshuffling of the input and output qudits,i.e.ˆR r=Π(ˆL r)≡ˆPˆL rˆP†,whereˆP=ˆP†is the unitary transformation which exchanges thefirst and the third qudit.Most importantly,according to the contraction rules defined previously,they satisfy the normalization conditions rˆL rˆL†r=ˆI⊗3= rˆR rˆR†r, withˆI being the identity operator of H d.This implies that{ˆL r}r can be used to define a completely positive, unital,not necessarily trace preserving super-operatorsΦ(L)H[15],which transforms the linear operatorˆΘofH⊗3dintoΦ(L)H(ˆΘ)= rˆL rˆΘˆL†r.Analogously{ˆR r}rdefines the mapΦ(R)Hwhich is related withΦ(L)Hthroughthe identityΦ(R)H=Π◦Φ(L)H◦Π,where”◦”indicates the composition of super-operators.We also introducethe vector of H⊗4d,|hat ≡ Cℓ1,ℓ2,ℓ3,ℓ4|ξℓ1,ξℓ2,ξℓ3,ξℓ4 , which without loss of generality is assumed to be nor-malized,and defineˆρC the three sites reduced density matrix obtained by tracing|hat hat|over one of the4 qudits.With these definitions one canfinally write theexpectation value ofˆΘj as ˆΘj =Tr[ˆρCˆB(m)j],with ˆB(m)j≡Φ(m)H◦···◦Φ(1)H(ˆΘj),and where(enumerating from the lower MERA level of Fig.1)Φ(k)H is either themapΦ(L)HorΦ(R)Hassociated with the k-th tensor M5of the causal cone(which one depends upon N and j).TheoperatorˆB(m)jis thus obtained by applying to the ob-servableˆΘj a sequence of m super-operators associated to the MERA causal cone.Exploiting Hilbert-Schmidt duality we can then writeˆΘj =Tr[Φ(1←m)(ˆρC)ˆΘj],(1)whereΦ(1←m)≡Φ(1)◦···◦Φ(m),withΦ(k)being thesuper-operatorΦ(k)Hin Schr¨o dinger picture.By con-struction theΦ(k)(and henceΦ(1←m))are Completely Positive,Trace Preserving(CPT)maps,i.e.quantum channels with Kraus operators[15]defined by either the set{ˆL†r}r or{ˆR†r}r.Equation(1)establishes a formal equivalence between the MERA tensor network and the successive application of a family of CPT maps(the QuMERA family).Since it holds for all the local ob-servableˆΘj this implies thatΦ(1←m)(ˆρC)must coincide with the reduced density matrixˆρj of the input state|ψ3associated with the qudits j−1,j and j+1,i.e.Φ(1←m)(ˆρC)=ˆρj.(2) Critical systems in the thermodynamic limit:–Con-sider now a family of MERA states|ψ which describes the ground state of a many-body HamiltonianˆH at crit-icality.We are specifically interested in the thermody-namic limit(i.e.N→∞).According to the above derivation,in the limit of large m Eq.(2)converges to-ward the reduced density matrixˆρT of three consecutive qubits of the systems lim m→∞Φ(1←m)(ˆρC)=ˆρT(the system is translational invariant).Of course the above limit should not depend upon the particular causal cone”trajectory”one choose to follow.Without loss of gen-erality we can thus pick the one associated with the cen-tral sites of the MERA,i.e.the one associated with the causal cone of N/2-th qudit.This allows us to identify all theΦ(k)ofΦ(1←m)with maps of the formΦ(R).A fur-ther simplification arises by enforcing the scale invariance property of the system.This can be done for instance by assuming that all the tensorsχs andλs of the MERA to be identical[9]and by requiringΦ(L)=Φ(R)=Φ[21]. With this assumption all the sequenceΦ(1←m)can now be written as a composition of m identical quantum chan-nels,i.e.Φ(1←m)=Φ◦···◦Φ=[Φ]m.(3) By general results on quantum channels the vast ma-jority of CPT maps are known to be mixing(or relax-ing)[16,17,18,19].This means that for a generic choice ofΦ,in the limit m→∞the transformation(3)will send all input states into a uniquefix pointˆρ∗identi-fied as the unique eigen-operator ofΦassociated with its largest eigenvalue.This property allows us to iden-tify the thermodynamic limitˆρT of the reduced density matrixˆρj withˆρ∗.As in the case of MPS[2,22],we can now provide a simplified expression for the thermo-dynamic limit of any local observableˆΘof scale invari-ant MERAs,i.e. ˆΘ T=lim N→∞ ˆΘ =Tr[ˆρ∗ˆΘ].A convenient way to express this is obtained by moving in Liouville space[15,23].By doing so the above identity rewrites asˆΘ T=limm→∞ˆΘ|(ˆEΦ)m|ˆρC = ˆΘ|ˆρ∗ ,(4)where the vectors|ˆA are the Liouville representations of the operatorsˆA,whileˆEΦis the Liouville operator associated to the mapΦ,i.e.ˆEΦ≡ rˆR r⊗ˆR∗r,(5)(hereˆR∗r is the complex conjugate ofˆR r evaluated with respect to the canonical basis).Within this formalism the vector|ˆρ∗ which describes thefix pointˆρ∗of the mix-ing mapΦis also found as the the(unique)eigenvector FIG.2:Causal cone associated with the two point correlation function ˆΘiˆΘj .The light blue regions generate the tensor product channelΦ(1←¯m)⊗Φ(1←¯m).The magenta region in-stead corresponds to the CPT mapΨ(¯m←m)which,acting on |hat produces the6qudits stateˆρ(¯m)ij.correspondent to the unitary eigenvalue ofˆEΦ.Because of the close similarities betweenˆEΦand the MPS trans-fer matrix[2,3,5,22]we dubbed the former the transfer operator of the MERA.The existence and uniqueness of thefix point is given by the physical assumption that the thermodinamical limit of a physical system exists and it is unique.Correlation functions:–The computation of the long range correlation functions of|ψ has also a clear inter-pretation in terms of CPT maps and the thermodynami-cal limit can be computed along the same lines presented for local observables.Here we specialize in the two point correlation functions as the generalization is straightfor-ward.Consider then the expectation value ˆΘiˆΘj with ˆΘiandˆΘj being two local operators acting on(say)the i-th and j-th qudit respectively.In this case the causal cone is formed by two single sites causal cones which in-tercept at the MERA level¯m=int[log2(i−j)]−1,(6) (see Fig.2).The resulting expectation values can then be written asˆΘiˆΘj =Tr[(Φ(1←¯m)i⊗Φ(1←¯m)j)(ˆρ(¯m)ij)(ˆΘi⊗ˆΘj)],(7)whereΦ(1←¯m)i,jare the two CPT maps of the two single-site causal cones associated with the sites i and j re-spectively(light blue regions of Fig.2).The operatorˆρ(¯m)ijinstead is a6qudits state associated with the last m−¯m levels of the MERA.It is obtained from the4 qubit state|hat through the application of a quantumchannelΨ(¯m←m)which,similarly toΦ(1←¯m)i,j,originates from a proper concatenation of CPT maps associated with M5or with the type-…510«and type-…48«tensors4 M9≡λχλχλχλχλand M7≡λχλχλχλ.Since thisapplies to all the two sites observable,we can then con-clude that(Φ(1←¯m)i ⊗Φ(1←¯m)j)(ˆρ(¯m)ij)must coincide withthe reduced density matrixˆρij of|hat associated with the sites i and j.Let us focus then on the thermodynamic limit of the correlation function ˆΘiˆΘj − ˆΘi ˆΘj which for Hamil-tonian systems at criticality decays as|i−j|−ν.Under the same assumptions used to derive Eqs.(3)and(4)we can assume j to be the central site of the MERA(i.e. j=N/2).Suppose then that the associated mapΦis mixing withfix pointˆρ∗.For any input stateˆρij of thesites i and j we then have lim¯m→∞(I i⊗Φ(1←¯m)j )(ˆρij)=ˆρi⊗ˆρ∗,withˆρi≡Tr j[ˆρij]and I i being the identity super-operator of the site i.The speed of convergency, evaluated through the trace distance,is exponentially fast[18,19]in¯m and,a part from some constant pre-fractor,can be upper-bounded by the quantity¯m d3κ¯m withκ<1being the modulus of the largest eigen-value ofΦwhose associated eigenvector contribute in the expansion of Eq.(7).This is sufficient for claim-ing that the distance between(Φ(1←¯m)i ⊗Φ(1←¯m)j)(ˆρ(¯m)ij)andΦ(1←¯m)i (ˆρi)⊗Φ(1←¯m)j(ˆρj)is bounded by∝¯m d3κ¯m.Therefore,given∆ij≡ ˆΘiˆΘj − ˆΘi ˆΘj we can write log(|∆ij|) ¯m logκ+O(log¯m),which through Eq.(6) provides a lower-bound for the critical exponentνof the system associated to the observableˆΘin terms of the properties of the mapΦ,i.e.ν −logκ.As a matter of fact one can show that such bound is tight,i.e.ν=−logκ.(8) This can be seen for instance by expressing Eq.(7)in the Liouville space formalism as in Eq.(4),and expandingthe transfer matricesˆEΦi ⊗ˆEΦjin Jordan blocks(thecalculation is similar to the MPS analysis of Ref.[22]). Concluding remarks:–Equations.(5)and(8)consti-tute the main results of our analysis.As already dis-cussed by Vidal[9],MERA networks are able to describe algebraic decaying correlations.In this work we put on firm grounds this observation giving an explicit expres-sion of the critical exponents in terms of properties of the associated quMERA channels.The combination of this approach with conformalfield theory methods may provide a powerful tool to achieve a complete descrip-tion of one-dimensional critical quantum systems.Simi-larly ourfindings yield a natural connection between the tensor network description of the thermodynamic limit of critical systems and the master equation formalism. Combining these results with the algorithms presented in[10,13]one can exploit the introduction of the trans-fer operator(5)studying directly the infinite size system improving simulation efficiency.The results presented here can be easily extended in several ways.For instance since a binary tree can be seen as a MERA with the disentanglersχset to the iden-tity,all the arguments presented previously can be easily adapted to this case.Similarly also the thermodinam-ical limit for MPS[5]can be described in terms of re-peated application of CPT maps(here the operator(5) reduces to the MPS transfer matrix).More generally our approach can be adapted to any tensor network by asso-ciating it with a family of CPT transformations which, properly concatenated,allows one to compute the local observables of the system.In this prospective the quan-tum circuit[9,14]associated with the tensor network can be seen as a unitary dilation or,Stinespring rep-resentation[15],of the corresponding CPT family.Fi-nally a generalization to higher spatial dimensions seems straightforward.This work was in part founded by the Quantum Infor-mation research program of Centro di Ricerca Matemat-ica Ennio De Giorgi of Scuola Normale Superiore.[1]S.R.White,Phys.Rev.Lett.69,2863(1992);Phys.Rev.B48,1034(1992).[2]M.Fannes, B.Nachtergaele,and R.F.Werner,Lett.Math.Phys.25,249(1992).[3]S.Ostlund and S.Rommer,Phys.Rev.Lett.75,3537(1995).[4]G.Vidal,Phys.Rev.Lett.91,147902(2003).[5]F.Verstraete,D.Porras,and J.I.Cirac,Phys.Rev.Lett.93,227205(2004).[6]U.Schollw¨o ck,Rev.Mod.Phys.77259(2005);K.Hall-berg,Adv.Phys.55477(2006).[7]F.Verstraete,J.I.Cirac,EprintarXiv:cond-mat/0407066;V.Murg, F.Verstraete, and J.I.Cirac,Eprint arXiv:cond-mat/0611522.[8]W.D¨u r et al.,Phys.Rev.Lett.94,097203(2005);S.Anders et al.,Phys.Rev.Lett.97,107206(2006). [9]G.Vidal,Phys.Rev.Lett.99,220405(2007).G.Vidal,Eprint arXiv:quant-ph/0610099.[10]M.Rizzi et.al.Eprint arXiv:quant-ph/0706.0868[11]M.Aguado and G.Vidal,Phys.Rev.Lett.100,070404(2008);G.Evenbly and G.Vidal,Eprint arXiv:quant-ph/0801.2449.[12]G.Evenbly and G.Vidal,Eprint arXiv:quant-ph/0710.0692;L.Cincio,J.Dziarmaga,and M.M.Rams, Eprint arXiv:quant-ph/0710.3829.[13]G.Vidal,Eprint:arXiv:0707.1454.[14]C.M.Dawson,J.Eisert,and T.J.Osborne,Eprintquant-ph/0705.3456.[15]I.Bengstsson and K.˙Zyczkowski,Geometry of QuantumStates(Cambridge Univ.Press,Cambridge,2006).[16]M.Raginsky,Phys.Rev.A65,032306(2002).[17]R.Gohm,Noncommutative Stationary Processes(Springer,New York,2004).[18]D.Burgarth and V.Giovannetti,New J.Phys.9,150(2007).[19]B.M.Terhal and D.P.DiVincenzo,Phys.Rev.A61022301(2000).[20]For easy of notation we consider the dimension D of thetensorsχandλto be equal to the physical dimension d.5However,the subsequent equations hold for any value of D .[21]A necessary and sufficient condition [15]for Φ(L )=Φ(R )is the existence of a unitary matrix U r,s ,such that ˆL r =P sU r,s ˆR s .This can then be easily casted into a necessary and sufficient condition for the tensor M 5.[22]M.M.Wolf,et al.Phys.Rev.Lett.97,110403(2006).[23]A.Royer,Phys.Rev.A 43,44(1991).。


创新创业学第二版完整全套教学课件一、教学内容本节课我们将使用《创新创业学》第二版教材第3章“创意与创新”和第4章“创业计划与实施”作为主要教学内容。
具体内容包括:理解创新的概念、类型及重要性;掌握创业机会的识别与评估方法;学习创业计划书的编写与创业团队的构建;探讨创业实施过程中可能遇到的挑战与解决方案。
二、教学目标1. 理解创新的重要性,能够区分不同类型的创新;2. 学会运用创业机会识别与评估方法,提高创业成功率;3. 掌握创业计划书的编写要点,构建高效的创业团队。
三、教学难点与重点教学难点:创业机会的识别与评估、创业计划书的编写;教学重点:创新的概念与类型、创业团队的构建。
四、教具与学具准备1. 教具:PPT课件、板书工具、案例资料;2. 学具:笔记本电脑、教材、笔记本、创业计划书模板。
五、教学过程1. 实践情景引入(5分钟)通过分享一个成功的创业案例,引发学生对创业创新的兴趣。
2. 创新概念与类型(15分钟)讲解创新的概念、类型,结合实际案例进行分析。
3. 创业机会识别与评估(20分钟)介绍创业机会的识别方法,通过小组讨论,让学生学会评估创业机会的可行性。
4. 创业计划书编写(25分钟)讲解创业计划书的编写要点,指导学生运用模板进行编写。
5. 创业团队构建(15分钟)分析高效团队的特点,引导学生学习构建创业团队的方法。
6. 随堂练习(20分钟)分组进行创业机会识别与评估的练习,巩固所学知识。
六、板书设计1. 创新概念、类型及重要性;2. 创业机会识别与评估方法;3. 创业计划书编写要点;4. 创业团队构建方法。
七、作业设计1. 作业题目:选择一个创业项目,完成创业机会的识别与评估报告。
答案:根据教材和课堂所学,对创业项目进行分析,从市场、竞争、团队、资源等方面进行评估。
2. 作业题目:编写一份创业计划书。
答案:按照课堂所学的创业计划书编写要点,结合实际情况进行编写。
八、课后反思及拓展延伸1. 反思:本节课的教学效果,学生的参与度,以及教学过程中的不足之处;2. 拓展延伸:推荐学生阅读相关创业案例,参加创业比赛,提高创业实践能力。

Android的管理主要是通过Activity栈和Task来进行的,这里将着重讲解Activity栈、Task以及Activity生命周期等概念。
1. Activity栈Android的管理主要是通过Activity栈来进行的。
当一个Activity启动时,系统根据其配置或调用的方式,将Activity压入一个特定的栈中,系统处于运行(Running or Resumed)状态。
当按Back键或触发finish()方法时,Activity会从栈中被压出,进而被销毁,当有新的Activity压入栈时,如果原Activity仍然可见,则原Activity的状态将转变为暂停(Paused)状态,如果原Activity完全被遮挡,那么其状态将转变为停止(Stopped)。
2. TaskTas与Activity栈有着密切的联系。
一个Task对应于一个Activity栈,Task是根据用户体验组成的运行期逻辑元素,其与应用的区别是,Task中的Activity可以由不同的应用组成。
在实际的终端使用中,在主界面长按Home键时弹出的一个网格界面即是当前运行的Task而非应用。
Task的定义位于frameworks\base\services\java\com\android\server\am\目录下的TaskRecord.java中,一个Task由tasked、affinity(亲和性)、clearOnBackground、intent、affinityIntent、origActivity、realActivity、numActivities、lastActiveTime、rootWasReset、stringName等属性构成。
(1)Task间移动配置android:allowTaskReparenting属性用来配置是否允许Activity从启动它的Task移动到和该Activity设置的Task亲和性相同的Task中,示例如下:<activity android:name="android.app.cts.ActivityManagerRecentOneActivity"android:label="ActivityManagerRecentOneActivity"android:allowTaskReparenting="true"android:taskAffinity="android.app.cts.recentOne"><intent-filter><action android:name="android.intent.action.MAIN" /></intent-filter></activity>(2)Task状态配置android:alwaysRetainTaskState属性用于配置是否保留Activity所在的Task状态,默认为“false”。

Android应用程序开发(第二版)课后习题答案最新版第一章Android简介1.简述各种手机操作系统的特点.答案:目前,手机上的操作系统主要包括以下几种,分别是Android、iOS、WindowMobile、WindowPhone7、Symbian、黑莓、PalmOS和Linu某。
(1)Android是谷歌发布的基于Linu某的开源手机平台,该平台由操作系统、中间件、用户界面和应用软件组成,是第一个可以完全定制、免费、开放的手机平台。
Android底层使用开源的Linu某操作系统,同时开放了应用程序开发工具,使所有程序开发人员都在统一、开放的开发平台上进行开发,保证了Android应用程序的可移植性。
(2)iOS是由苹果公司为iPhone、iPodtouch、iPad以及AppleTV开发的操作系统,以开放源代码的操作系统Darwin为基础,提供了SDK,iOS操作系统具有多点触摸操作的特点,支持的控制方法包括滑动、轻按、挤压和旋转,允许系统界面根据屏幕的方向而改变方向,自带大量的应用程序。
(3)WindowMobile是微软推出的移动设备操作系统,对硬件配置要求较高,一般需要使用高主频的嵌入式处理器,从而产生了耗电量大、电池续航时间短和硬件成本高等缺点,WindowMobile系列操作系统包括Smartphone、PocketPC和PortableMediaCenter。
随着WindowPhone7的出现,WindowMobile正逐渐走出历史舞台。
(4)WindowPhone7具有独特的“方格子”用户界面,非常简洁,黑色背景下的亮蓝色方形图标,显得十分清晰醒目,集成了某bo某Live游戏和Zune音乐功能,可见WindowPhone7对游戏功能和社交功能的重视。
(5)Symbian是为手机而设计的实时多任务32位操作系统,它的功效低,内存占用少,提供了开发使用的函数库、用户界面、通用工具和参考示例。

【最新整理,下载后即可编辑】Doit.im for Android版教程(一) 收集Posted on September 24, 2011 by bluefish现代社会的压力和日益纷繁复杂的工作,我们如何来掌控生活?根据GTD的方法,我们需要把所有盘旋在脑海中的未尽事宜整理收集,变成我们可供随时查阅,并可按时完成的任务,您也许会惊喜的发现Doit.im拯救了你的生活。
现在就开始尝试使用Doit.im吧。
第一部分收集登录Android版本Doit.im之后,您可以看到的界面如下:在Android版本中左上角第一个箱子就是收集箱。
其对应的就是GTD方法中用于收集“材料”的“工作篮”。
所有未指定具体执行日期和时间的任务,添加后会在收集箱中找到它们。
我们有两种方法可以用来添加任务,一种是快速添加任务,另一种是完整添加任务。
请看下面的步骤:a) 快速添加任务首先,我们来看如何快速添加任务:请点击主页右上角的快速添加任务,页面上方会弹出如下窗口:上方空白处是用来填写任务的标题,如图上的New Task位置。
(光设置标题而不设置日期选项,则任务默认直接进入收集箱。
) 下面的五个图标分别用来设置:日期,点击后可选项分别为今天、明天和一周中的其它五天。
选择后任务就会直接进入相应的箱子,不选任务直接进入收集箱。
情境,点击后可选项为系统默认的选项和您已经添加过的情境。
项目,点击后可选项为您已经添加过的项目。
优先级,点击后可选项为高,中,低三种优先级。
标签,点击后可选项为您已经添加过的标签。
在Doit.im中,您可以给任务标记最多5个标签。
然后通过这些标签来检索任务。
选择多个标签检索出的内容是这些标签的交集所对应的任务。
注意:若在快速添加时需要使用未添加过的情境、项目或标签,只需点击相应按钮或输入相应符号。
「^」添加开始时间,「@」添加情境,「#」添加项目,「!」添加优先级。
当您输入符号时,记得以空格符间隔情境,项目及标签等。


《Android应用开发教程第2版》课后习题参考答案第一章1.主流的Android版本有哪些,各有何特点?Android最早的一个发布版本开始于2007年11月的Android 1.0 beta,其后发布了多个更新版本。
这些更新版本都在前一个版本的基础上修复了bug并且添加了前一个版本所没有的新功能。
从2009年4月开始,Android操作系统改用甜点来作为版本代号,这些版本按照大写字母的顺序来进行命名:纸杯蛋糕(Cupcake)、甜甜圈(Donut)、闪电泡芙(Éclair)、冻酸奶(Froyo)、姜饼(Gingerbread)、蜂巢(Honeycomb)﹑冰激凌三明治(Ice Cream Sandwich)、雷根糖(Jelly Bean)、奇巧(KitKat)、棒棒糖(Lollipop)、棉花糖(Marshmallow)、牛轧糖(Nougat)、奥利奥(Oreo )、馅饼(Pie)等。
此外,Android操作系统还有两个预发布的内部版本,它们分别是铁臂阿童木(Astro)和发条机器人(Bender)。
2.Android的系统结构如何?由里向外有如下几层:1.Linux Kernel(Linux内核)Android是在Linux2.6的内核基础之上运行的,提供核心系统服务:安全、内存管理、进程管理、网络组、驱动模型。
2.Android Runtime(Android运行时)内核之上是核心库和一个叫做Dalvik的JAVA虚拟机。
核心库提供了Java语言核心库中包含的大部分功能,虚拟机负责运行程序。
3.Libraries(库)Android提供了一组C/C++库,它们为平台的不同组件所使用。
开发人员通过Application Framework来使用这些库所提供的不同功能。
4.Application Framework(应用程序框架)无论Android提供的应用程序还是开发人员自己编写的应用程序,都需要使用到Application Framework。

程序员各种PDF格式电⼦书--免费⽹盘资源-请妥善保存,后期还会有更多更新,如果读者有不同的书籍资源或者这⾥没有你要找的书籍,也可以直接评论,我在这⾥添加--如果有不存在的链接或者失效的,直接私信我或者在下⽅评论所有的數據链接:需要的直接⾃取*******2018/7/23 已更新320 本*******03_SpringBoot相关:《Spring Boot 2参考⼿册中⽂⽂档》《Spring Boot 2精髓带书签⽬录⾼清版》04_SpringCloud相关:《疯狂Spring Cloud微服务架构实战》《Spring Cloud Finchley.RELEASE参考⼿册中⽂⽂档》07_Hibernate相关:《Hibernate实战(第2版-⼈民邮电出版社)》《HIBERNATE逍遥游记》14_设计模式相关:《设计模式之禅(第2版)》15_Nginx相关:《实战Nginx:取代Apache的⾼性能Web服务器张宴.扫描版》27_架构相关:《系统架构:复杂系统的产品设计与开发》30_⼤数据相关:《HBase实战》《Spark快速数据处理》31_Java_EE相关:《servlet和jsp学习指南》《解密搜索引擎技术实战Java精华版》《深⼊分析Java Web技术内幕》《Activiti权威指南》《Java.Web开发学习⼿册-明⽇科技》《RESTful Web Services Cookbook 中⽂版_12879413》《Web安全开发指南》《Web应⽤安全权威指南》33_Docker相关:《Docker+容器与容器云(第2版)********2018/5/2 已更新300本********JAVAEE相关:《Java EE互联⽹轻量级框架整合开发 SSM框架(Spring MVC+Spring+MyBatis)和Redis实现》《⾼性能响应式Web开发实战》微信相关:《从零开始学微信⼩程序开发》《微信⼩程序开发⼊门与实践》《微信⼩程序⼊门指南》《⼩程序巧应⽤-微信⼩程序开发实战》⼤数据相关:《⼤数据时代:⽣活、⼯作与思维的⼤变⾰》《⼤数据之路:阿⾥巴巴⼤数据实践》《⽩话⼤数据与机器学习》《⼤数据:互联⽹⼤规模数据挖掘与分布式处理》《⼤数据存储MongoDB实战指南》《⼤数据架构师指南》《⼤数据架构详解:从数据获取到深度学习》《⼤数据算法》《⼤数据挖掘:系统⽅法与实例分析》《数据算法 Hadoop Spark⼤数据处理技巧》《⽤户⽹络⾏为画像⼤数据中的⽤户⽹络⾏为画像分析与内容推荐应⽤》《云计算和⼤数据时代⽹络技术揭秘》《⾃⼰动⼿做⼤数据系统.张魁(带书签⽂字版)》《⽩话⼤数据与机器学习》《Druid实时⼤数据分析原理与实践》《Hadoop⼤数据分析与挖掘实战》《Hadoop权威指南.⼤数据的存储与分析.第4版.修订版&升级版》《Python机器学习——预测分析核⼼算法》《Tensorflow 实战Google深度学习框架(完整版pdf)》程序员个⼈修养:《⾼效程序员的45个习惯(修订版)敏捷开发修炼之道》《⼈件(3版)》《⼈⽉神话.40周年中⽂纪念版.2015》********2018/3/1 已更新272本********Nginx相关:《决战Nginx 技术卷:⾼性能Web服务器部署与运维》《深⼊理解Nginx模块开发与架构解析》《深⼊剖析Nginx》《学习Nginx HTTP Server中⽂版》《Nginx开发从⼊门到精通》MongoDb相关:《深⼊学习MongoDb》《MongoDB实战》数据库相关:《MySQL数据库开发的三⼗六条规定-⽯展》《SQL HACKS:100个业界最尖端的技巧和⼯具》《MySQL开发者SQL权威指南》《MySQL技术内幕.第5版》《MySQL技术内幕 InnoDB存储引擎第2版》《MySQL管理之道,性能调优,⾼可⽤与监控(第⼆版)》《MySQL LVS+Keepalived+MHA ⾼可⽤群集应⽤部署操作⼿册》《MySQL 5权威指南中⽂版第3版》《⾼性能MySQL 第3版中⽂》微服务相关:《微服设计》《轻量级微服务架构(上册)》《轻量级微服务架构(下册)⼤数据:《Hive 简明教程》《Spark⼤数据处理技术、应⽤与性能优化》架构相关《⼤规模分布式存储系统:原理解析与架构实战.杨传辉》《⼤规模分布式系统架构与设计实战.完整版》git相关:《Git权威指南》elasticSearch相关:《深⼊理解ElasticSearch》********2018/2/2 已更新247本********Docker相关《Docker — 从⼊门到实践》《KUBERNETES权威指南从DOCKET到KURBERNETES实践全接触》Elasticsearch相关《Elasticsearch服务器开发(第2版)》《Elasticsearch技术解析与实战》《Elasticsearch权威指南(中⽂版)》tomcat相关《深⼊剖析Tomcat(中⽂版)》《Tomcat架构解析.刘光瑞(详细书签)》spring Cloud相关《Spring Cloud与Docker微服务架构实战》Spring相关《Spring Cloud与Docker微服务架构实战》《Spring Data实战》多线程相关《实战Java⾼并发程序设计》《图解Java多线程设计模式》《Java并发编程的艺术》《Java多线程编程实战指南设计模式篇》git相关《GitHub⼊门与实践_(⽇)_》架构相关《⼤型⽹站技术架构:核⼼原理与案例分析》数据结构和算法相关《编程珠玑2》《⼤话数据结构》《数据结构(Java版)》《程序员的数学3+线性代数》********2017/12/25 已更新227本********Docker相关《循序渐进学Docker》struts《精通Struts基于MVC的JavaWeb设计与开发》sql相关《[漫画数据库].(⽇)⾼桥⿇奈》《DB2+SQL性能调优秘笈》《⼲净的数据++数据清洗⼊门与实践》《MySQL最佳优化完美攻略》《SQL.24⼩时⾃学⼿册》《SQL语⾔艺术》Spring相关《精通Spring MVC4》《Spring+MVC+MYBatis企业应⽤实战》《Spring+Security3+张卫滨(译)》Spring Cloud《Spring Cloud Dalston中⽂⽂档+参考⼿册+中⽂版》python相关《Flask+Web开发:基于Python的Web应⽤开发实战》nodejs相关《了不起的Node js将JavaScript进⾏到底》myabtis《MyBatis技术内幕》《MyBatis3⽤户指南中⽂版》《MyBatis从⼊门到精通__刘增辉(著)》Kylin相关《Apache Kylin权威指南》性能相关《构建⾼性能WEB站点》《零成本实现Web性能测试》《java性能优化权威指南(带书签)》《Web性能测试实战详解+Web开发典藏⼤系》⽹络编程《TCPIP⽹络编程技术基础》前端相关《术与道移动应⽤UI设计必修课》《写给⼤家看的设计书(第4版)》《Ajax安全技术》架构《程序员必读之软件架构》《架构即未来现代企业可扩展的Web架构流程和组织原书第2版》《架构探险从零开始写javaweb框架》《⼈⼈都是架构师+分布式系统架构落地与瓶颈突破》《软件构架实践_第⼆版_林_巴斯等著》《系统架构:复杂系统的产品设计与开发》《⼀线架构师实践指南》《云计算架构技术与实践+第2版》《O2O实战+他们是如何利⽤互联⽹的》********2017/09/22 已更新192本********Docker相关《Docker技术⼊门与实战》《Docker容器与容器云(第2版)》《第⼀本Docker书 PDF电⼦书下载带书签⽬录完整版》Elasticsearch相关:《ElasticSearch可扩展的开源弹性搜索解决⽅案》《实战Elasticsearch、Logstash、Kibana++分布式⼤数据搜索与⽇志挖掘及可视化解决⽅案》Hibernate相关:《Hibernate5⽤户⼿册中⽂版》spring Boot相关:《深⼊实践Spring Boot.陈韶健》Java EE:《[使⽤Java.Web服务构建SOA].(汉森).成保栋》《Java+Web开发与实战--Eclipse+Tomcat+Servlet+JSP整合应⽤》《HTTPS权威指南在服务器和Web应⽤上部署SSL&TLS和PKI》《Java EE7权威指南卷2》《Java Web企业项⽬实战》《Java+Web技术整合应⽤与项⽬实战JSP+Servlet+Struts2+Hibernate+Spring3》《JavaEE7精粹》Java相关:《Java8函数式编程》《深⼊理解JAVA内存模型》多线程:《JAVA并发编程核⼼⽅法与框架 ,⾼洪岩著》********2017/08/10 已更新175本********java:《Head First Java 中⽂⾼清版》《Java核⼼技术(卷I)基础知(原书第9版)》《Java核⼼技术卷II ⾼级特性(原书第9版)》算法:《数据结构与算法分析_Java语⾔描述(第2版)》《算法基础.打开算法之门》《算法导论(原书第3版)》《算法概论》多线程《Java并发编程:设计原则与模式(第⼆版)》《java线程》《Java虚拟机并发编程》git《Git版本控制管理(第2版)《完全学会GIT GITHUB GIT SERVER的24堂课》nginx:《Nginx⾼性能Web服务器详解》********2017/07/02 已更新162本********java;《阿⾥双11系统管控调度架构与实践》《淘宝技术这⼗年,完整最终确认版》《啊哈!算法》《图解HTTP》完整彩⾊版《Apache服务器配置与使⽤⼯作笔记》《JAVA 8实战》《Java NIO 中⽂版》《Java+JVM》《Jsp、Tomcat、Sqlserver部分笔记》《从Paxos到Zookeeper 分布式⼀致性原理与实践(书签版)》《⼤型⽹站系统与JAVA中间件实践(⾼清版)》《深⼊分析Java Web技术修订版》Hibernate相关:《精通 Hibernate:Java 对象持久化技术详解(第2版)》HTML5相关:《HTML5移动Web开发指南》《HTML5移动开发即学即⽤(双⾊)》linux相关:《循序渐进Linux第2版》Netty相关:《Netty in Action第五版》Nginx相关:《Nginx教程从⼊门到精通》spring相关:《SPRING技术内幕:深⼊解析SPRING架构与设计原理》《Spring源码深度解析》SpringCloud:《Spring Cloud微服务实战》tomcat相关:《How Tomcat Works中⽂版》《Tomcat权威指南(第2版)》《Tomcat源码研究》数据库:《Effective MySQL之SQL语句最优化》《Sql Cookbook中⽂版》《SQL HACKS:100个业界最尖端的技巧和⼯具》《sql两⽇速成》《SQL注⼊攻击与防御原书第2版》《数据库查询优化器的艺术:原理解析与SQL性能优化》项⽬管理:《项⽬管理》********2017/06/22 已更新131本********java:《Java典型应⽤彻查1000例:Java⼊门》《Java典型应⽤彻查1000例:Web应⽤开发》《Java典型应⽤彻查1000例:数据库应⽤基础》《Java典型应⽤彻查1000例:图形与⽹络游戏开发》《Java典型应⽤彻查1000例:⽹络应⽤开发》《Java典型应⽤彻查1000例:⽹站数据库设计》《Java TCP IP Socket编程(原书第2版)》《Java程序员⾯试宝典(第2版)(欧⽴奇,刘洋,段韬) PDF 扫描版》《Java程序员⾯试宝典(杨磊) PDF 扫描版》《Java程序员⾯试笔试真题库_2017版》《Java程序员⾯试笔试真题与解析_迷你书_2017版》《TCPIP详解卷1》《TCPIP详解卷2》《TCPIP详解卷3》《UML精粹》《图解HTTP》多线程:《七周七并发模型》程序员个⼈修养:《编写⾼质量代码:改善Java程序的151个建议》linux相关:《LINUX SHELL脚本攻略(中⽂版带书签)》MongoDB相关:《MongoDB权威指南》Mybatis相关:《Mybatis_3中⽂⽤户指南》Node.js相关:《Node.js 开发指南》Struts相关:《Struts2 技术内幕——深⼊解析Struts2架构设计与实现原理》Spring相关:《Spring实战(第4版)》《Java EE设计模式:Spring企业级开发最佳实践》AngularJS相关:《AngularJS权威教程》《AngularJS深度剖析与最佳实践》********2017/06/02 已更新104本********java:《Java虚拟机并发编程》多线程:《Java并发编程学习笔记》《Java多线程编程深⼊详解》数据库:《MySQL性能调优与架构设计》《SQL必知必会》thymeleaf相关:《thymeleaf_3.0.5_中⽂参考⼿册》Redis相关:《Redis⼩⽩⼊门指南》MyBatis相关:《深⼊浅出MyBatis技术原理与实战》前端:《锋利的jQuery2》《[jQuery攻略].(印)哈⽡尼.扫描版》《锋利的jQuery》(⾼清扫描版-有书签)《jquery⾼級編程》********2017/05/11 已更新92本********java:《Java RESTful Web Service实战》《JAVA解惑》Netty相关:《Netty权威指南》Redis相关《Redis设计与实现》**2017/05/01**多线程:《Java 7并发编程实战⼿册》《Java并发编程实战(中⽂版)》Spring:《spring揭秘(完整)》《精通Spring》Nginx相关:《实战nginx》********2017/04/29********《Java常⽤算法⼿册第三版本》博主付费购买《数据结构与算法 Java版》博主付费购买《图解数据结构-使⽤Java》博主付费购买********2017/04/28********Spring相关:《精通Spring4.X企业应⽤开发实战》博主付费购买《亿级流量⽹站架构核⼼技术-跟开涛学搭建⾼可⽤⾼并发系统》博主付费购买********2017/04/27********前端相关:《超越CSS:Web设计艺术精髓》《精通CSS.-.⾼级Web标准解决⽅案.中⽂版》《CSS权威指南》CSS时尚编程百例CSS禅意花园linux相关:鸟哥私房菜(全)[鸟哥的Linux私房菜:服务器架设篇(第⼆版)]********2017/04/25********java⽬录:实战Java⾼并发程序设计Head First Servlet JSP(清晰中⽂版)java基础教程(强烈推荐)编程之美-完整版⼤话数据结构算法与数据结构-实⽤算法基础教程Java核⼼技术卷Ⅰ基础知识(第8版)Java核⼼技术卷Ⅱ⾼级特性(第8版)********2017/04/21********java⽬录:Java程序性能优化让你的Java程序更快、更稳定.pdf JavaSpringJava多线程MybatisHibernateStruts2GitPython算法数据库DockerRedis 前端Android C++ Maven 。

android移动开发基础案例教程第二版知识点1. 引言在移动互联网时代,Android移动开发已经成为一个非常热门的领域。
作为一名Android开发者,掌握Android移动开发基础知识是至关重要的。
本文将围绕《Android移动开发基础案例教程第二版》这本书籍中的知识点展开讨论,并为读者提供深度和广度兼具的学习指导。
2. Android移动开发基础概述Android移动开发基础是指在Android评台上进行应用程序开发所需的基本知识和技能。
这包括Android系统架构、应用程序开发框架、用户界面设计、数据存储与管理、多媒体开发、网络通信等方面的内容。
《Android移动开发基础案例教程第二版》系统地介绍了这些知识点,并通过实际案例来帮助读者深入理解和掌握。
3. 深度探讨Android移动开发基础知识点3.1 Android系统架构Android系统架构包括Linux内核、库、运行时、应用框架和应用程序。
在《Android移动开发基础案例教程第二版》中,详细介绍了Android系统的各个层次,以及它们之间的关系和交互方式。
读者可以通过学习这部分内容,了解Android系统的整体结构,为后续的应用程序开发打下基础。
3.2 应用程序开发框架Android应用程序开发框架是指用于构建Android应用程序的一系列软件组件和工具。
这包括活动(Activity)、服务(Service)、内容提供程序(Content Provider)和广播接收器(Broadcast Receiver)等。
通过《Android移动开发基础案例教程第二版》的详细讲解,读者可以系统地学习这些组件的使用方法,并掌握它们之间的交互关系。
3.3 用户界面设计Android应用程序的用户界面设计是非常重要的一部分。
《Android 移动开发基础案例教程第二版》通过大量的实例和案例,介绍了Android应用程序的布局、控件、事件处理等方面的知识,帮助读者设计出美观、实用的用户界面。

第一章到第十二章day01Java开发前奏(第1章)IT行业硬件- 各种硬件,技术含量越高,价格越贵。
软件- 看不到,摸不着。
软件比硬件值钱得多!!!iPhone 5 - 5000制造成本400块——其他在品牌,在软件。
美国几乎不造硬件——硬件不如软件挣钱。
程序——软件的核心部分程序:当我们要做一件事情时,需要按一种既定的流程、步骤,依次完成每个过程,——最后结果就出来了。
真正的程序员,会影响他的生活习惯,做所有事情,都会有计划,有步骤。
计算机程序:驱动机器去为我们按既定流程、步骤去完成某件事情。
=======计算机是很蠢的!它只会按我们规定的步骤去做事=======Java能做什么?1. 做桌面软件。
——针对个人。
Java在桌面软件领域、并不流行。
MS,win8向“移动操作系统”转型。
2. 大型信息化系统。
(Java最擅长)——针对企业。
taobao(阿里软件)、各种银行系统、证券、电信、移动……3. 移动互联网软件。
——针对个人。
Android编程语言的运行机制程序:驱动机器去为我们按既定流程、步骤去完成某件事情。
能直接驱动计算机的——机器指令。
(难度非常大)→汇编→高级语言(C、Java……)高级语言编程:源代码就像“作文”一样,容易编写。
但高级语言的源代码,机器看不懂,但人容易看懂、容易编写。
学编程的所有工具安装准则:1. 不要安装在有空格的路径下。
2. 不要安装在有中文的路径下。
(1)安装JDK.(2)既然要使用Java开发,经常需要使用javac、java命令。
执行计算机命令的两个方法A。
每次运行命令时,都输入该命令的绝对路径。
——可行,坏处是麻烦。
B。
告诉系统,总是到某些目录下去找命令。
这就需要PA TH环境变量:它的值是N条路径。
中间以分号隔开。
用于告诉操作系统,以后操作系统要找命令时,就依次在这N条路径中找,如果找到了,操作系统就执行这些命令。
如果没找到,操作系统就提示:“不是内部或外部命令,也不是可运行的程序”PATH环境变量的作用:告诉【操作系统】到哪些路径下去找【命令】。