cisco webex 视频会议系统使用说明
- 格式:ppt
- 大小:3.90 MB
- 文档页数:19

1目錄中所有項目皆為有效超連結,按一下即可進入相對應的區段。
如要在章節之間切換,可按一下側邊列中對應的圖示。
本指南說明已註冊至公司處所內的裝置中的 Cisco Desk 、Desk Mini 及 Desk Pro 的使用。
注意:此使用者指南中所敘述的某些功能在特定市場為任選, 不一定適用您的裝置。
本指南中的內容內容簡介Cisco Desk Pro ....................................................................4Cisco Desk ...........................................................................5Cisco Desk Mini ...................................................................6RoomOS 11:基本導航........................................................7與藍牙配對 ...........................................................................8與藍牙® 耳機及其他裝置配對 ...............................................9作為 USB 攝影機使用 .........................................................10以您自己的憑證登錄 ...........................................................11視訊通話RoomOS 11:通話控制項 ..................................................13音訊設定.............................................................................14從聯絡人清單撥號 ..............................................................15在撥話前編輯聯絡人 ...........................................................16使用姓名、號碼或地址撥打電話 .........................................17來電....................................................................................18進行另外一通通話時接聽來電 .............................................19將自己自通話中斷開 ...........................................................20將通話設為保留並恢復保留的通話 ......................................21轉移進行中的通話 ..............................................................22變更通話速率 .....................................................................23啟用「請勿打擾」模式 .......................................................24所有通話的自動轉接 ...........................................................25在進行通話時開啟鍵台 .......................................................26將參加者新增至進行中的通話 .............................................27將出席者自會議斷開 ...........................................................28允許出席者加入會議 ...........................................................29在會議中釘選發言人 ...........................................................30在會議中舉起手 ..................................................................31尋找近期通話的通話詳細資料 (32)Cisco ProximityCisco Proximity 超音波訊號................................................34內容共用在通話中共用內容 ..............................................................36在通話中變更畫面版面配置 ................................................37白板....................................................................................38結束您的階段作業以清除您的裝置 ......................................39有線觸控重新導向 ..............................................................40Web App ............................................................................41排定的會議加入排定的會議 ..................................................................43加入 Webex 會議 ...............................................................44聯絡人最愛、近期通話及目錄 .......................................................46在通話中將某人加入最愛 ....................................................47於非通話時將某人加入最愛 ................................................48編輯最愛.............................................................................49攝影機控制將攝影機開啟和關閉 ...........................................................51在通話中和非通話中存取和調整本端畫面 ...........................52移動本端畫面 .....................................................................53虛擬背景.............................................................................54手動控制您的攝影機 ...........................................................55新增攝影機位置預設 ...........................................................56控制遠端攝影機 (57)設定控制台及裝置設定 (59)Desk Pro 執行 USB 有線音訊裝置適用的標準通訊協定。

Cisco Webex User GuideTable of Contents1 Overview (3)2 Migration Process (4)3 The Webex Experience (5)3.1 New Features (5)3.2 Using Webex (6)3.2.1 Instant Messaging (6)3.2.2 Spaces (7)3.2.3 Teams (10)3.2.4 Presence Awareness (11)3.2.5 Contacts (16)3.3.6 Virtual Backgrounds (17)3.3.7 Bots (19)3.3 Phone Services (24)3.3.1 Phone Service Setup (30)3.3.3 Phone Calls (32)4 Common Issues and Resolutions (34)5 End User Business Continuity (38)1 OverviewAs part of our strategy to provide an integrated workplace environment for all employees, Information Technology is excited to announce the launch of Cisco Webex.Cisco Webex (formerly Webex Teams) is built on the long heritage of Cisco Jabber and incorporates a modern interface and enables easy collaboration amongst colleagues, groups and anyone on Webex. As a cloud based service, it is available from multiple devices including our Corporate desktop, smartphones and iPads as well as from any computer using a browser such as Google Chrome.Webex provides the ability to login to your City phone enabling you to make and receive calls using your standard City phone number regardless of where you are physically located. Webex maintains history of your chats and permits you to use powerful search features in recalling conversations or decisions. Finally, Webex fully integrates into the Cisco Webex Meetings platform enabling you to easily see upcoming meetings in your calendar view and permits you to easily join video and audio meetings from the Webex client.2 Migration ProcessThe instructions below illustrate how to launch and sign into Cisco Webex.To start Webex, double click the desktop icon named Webex.When presented with the first screen, enter your City issued email address.If you are using a City issued desktop or laptop and are connected to the City network, either within a City facility or through the GlobalProtect VPN service, you should beautomatically authenticated using the Single Sign On service.If you are using a device not connected to the City network, then you will be prompted through the “two-factor” validation /authentication process to confirm your sign in.3 The Cisco Webex Experience3.1 New FeaturesWebexCisco Webex offers many benefits to you which can be outline below:•Webex is available on multiple devices; corporate desktop, smartphone, iPad and any computer using Google Chrome.•Maintains history of your chats and permits you to use powerful search features in recalling conversations or decisions.•Allows you to share images and files not only with direct messaging but also in group chats called spaces and teams•Fully integrates into the Cisco Webex Meetings platform enabling you to easily see upcoming meetings in your calendar view and permits you to easily join video and audio meetings from the Webex client.•Presence awareness allows you to see the availability of your contacts•The contact list allows to you to organize and view the people you contact most•Webex allows you to create and use virtual backgrounds when attending Webex Meetings.3.2 Using Cisco Webex3.2.1 Instant MessagingClick the chat icon on the left pane. Alternatively click on the + icon to send a direct message. A direct message is where you will initiate a chat with someone else directly.Type in the name of the person you would like to contact3.2.2 SpacesA space can be easily defined where you invite multiple people to participate in that discussion group (space).To create a space, press the “+” icon and select Create a space.You will then need to give a name for the space, and then add your contacts you would like to join itYou can easily find all the information from within the Space. You can make the Space a favourite which will promote it higher in your list of contacts and spaces. The “People” option permits you to add and remove individuals from the Space. “Content” shows all content that has been shared with the Space, which includes documents, uploads and anything else relevent to the space. The “Schedule” option permits you to schedule a meeting with the members of the space. The “Meet” button will initiate an adhoc, in Space meeting with all members and the filter and search functions permit you to easily find content within the space.Creating a Meeting within a SpaceWith the new Webex update, you now have the ability to schedule a meeting for a specific space. The scheduler now shows you your daily calendar and allows you to easily pick a time space for the meeting3.2.4 TeamsTeams are group chats that can be created for certain groups or projects. They are predefined by a divisions, departments or areas. To create a team, click on the teams tab and click the Create ateam buttonProvide a name for your team, then add your contacts. Press Create3.2.5 Presence AwarenessYou can see people’s statuses and availability within the Webex app. When your contacts are using their computer, their availability displays as active in the app. If they are away from the computer, Webex will show when they were last active. This only applies to contacts within the organizationTurning off Presence AwarenessYou may choose to turn off your availability and online statuses. Note that if you choose to turn this option off you will be unable to see other people’s availability and statuses.To do this go to Settings > Privacy > Uncheck Show availability and statusesAt the prompt, confirm by pressing Don’t showSetting a custom statusOn top of the default statuses provided, you can also set a new custom status. Click your name or picture, then click Set a new status3.2.6 ContactsTo add contacts, press the + sign and then Add a contactType in the contact name and press AddYour contacts can now easily be viewed in the contacts tab3.3.7 Virtual BackgroundsWebex allows you to set a virtual background during video calls. To set a virtual background, go to SettingsSelect the Video Tab and click on the virtual background dropdown to make your selection, then press Save.3.3.8 BotsBots help users automate tasks and bring external content into the discussion. There a few different types of bots: notifiers, controllers and assistants. A bot can only access messages sent to it directly. You can access the Help Bot assistant in Webex which may be located at the bottom of your Webex chat list:Here are some things you can ask the botHere we asked how you can create a botTo add a bot, select the App Hub through Webexor visit https:///, log in using your city email at the top right and you will be presented with a page of available bots by Cisco Systems.Here we will add a Birthday Bot to assist with keeping track of birthdays.Now select if you would like to use the bot yourself or add it to a spaceOnce you make a selection, you will now receive a direct message from the bot where you can respond to itSome bots we think may be useful for you:3.3 Webex MeetingsWith the new Webex meetings update, Cisco has combined the Webex Meetings and the Webex Teams apps into the Webex app so you can have the ability the message, call, meet and share all in one convenience place. You will also notice that your Outlook calendar meetings will be synced within the Calendar section of the meetings page. Any Webex meetings invitations will also show up hereTo access the newly integrated Webex meetings section, find the icon below in your Cisco Webex:To Start a Personal Room meeting, simply click the Start a meeting button*Note this is also accessible within the “+” menu at the top of your WebexThe Meeting will now beginTo join a meeting, click the Join a meeting buttonYou will then be prompted to enter the Meeting number, video address, meeting link or someone’s name to join their personal room. Once entered, press Join. The meeting window will now display.3.3.3 Scheduling a MeetingYou also have the ability to schedule a meeting within the Webex app itself. This will create a Webex meeting and put it into your Outlook calendar.To schedule a meeting, press Schedule a meetingYou will then be presented with a window where you can enter the meeting title, adjust the date/time, and invite your attendeesOnce you press Schedule, Webex will input your meeting in the calendar view, as well as your Outlook Calendar.Webex calendar view:Outlook calendar:3.3.4 Meeting ControlsWebex has the full Webex Meetings experience when you schedule or attend a meeting from within Webex. For instance, icons for “Breakout sessions” and Reactions, Sharing and other options.The meeting window now has network/CPU performance indicators, letting you know what may be slowing your meeting room experience down3.4 Phone Services3.4.1 Phone Service SetupOnce you have signed in to Webex, if you see a warning message on the left bottom corner. It indicates your Webex phone service is not ready and is disconnected.Click on the Webex Options > Settings > Phone Service > Account Information > enter your City credentials > click Save.3.4.2 Phone Service SelectionYour Webex phone service is now registered. Now you can select the phone device to associate with your Webex session.•‘Use my computer’: If your account has been setup for ‘softphone’ functionality, you will be able to place/receives calls directly on your PC. This is the typical selection for users working from home (NOTE: A headset and microphone are recommended for this) •Cisco 88xx: Webex will control the desk phone associated with your account. This is the typical selection for users, who works at the office with access to their Cisco desk phone.The phone icon allows ‘4 digits extension’ dialing internally or calls to any external number (eg. 96041234567)You can also conduct a quick search by “name” to retrieve a list of users.Click the ‘audio call’ and select the number to call from the drop down menu > select a number > click to callYou can easily access your City voice mailbox and listen to voice messages.4 Common Issues and ResolutionsIssue: Phone service is disconnectedResolution: Webex Options > Settings > Phone Service > Account Information > enter your domain (Windows) credentials > click Save. You should then see the voicemail and phone services are connected.Issue: Your phone service account is already in use by Jabber or another device. Click to sign in to your phone servicesResolution: Press Yes to use the phone on WebexIssue:Controls on the headset do not allow you to answer or release a call.Resolution:This is a known issue with some makes/models of headsets. The Call Controls are available within the Webex application. When it is time to replace your existing headset ask an IT Service Desk or Delivery Specialist which models are recommended.Issue: Microphone– unable to answer calls/person cannot hear youResolution: Webex Options > Settings > Audio – ensure the correct device is set under the speaker and microphone settingsIssue: Webcam not being detectedResolution: Webex Options > Settings > Video – ensure the Webcam is detected and enabled. Ensure your webcam cover is not physically covering the camera.5 End User Business ContinuityBeing a product from Cisco, here are some links that can provide assistance with their collaboration products.If you are experiencing issues with certain features within Webex, it is possible there could be an issue on Cisco’s systems. You can check on the status in link below for the most up to date informationhttps:///service/status?lang=en_USThe below link is a great resource that outlines alternatives if you are trying to connect to a meeting with difference devices, a poor connection nor even no connection while trying to attend Webex meetingshttps:///business-continuity/business-continuity-low-bandwidth.html。


本指南中的內容目錄視訊會議簡介最佳實作 (4)音訊設定 (5)使用您自己的認證登入 (6)將 Room Kit Mini 當做 USB 攝影機 (7)視訊通話自聯絡人名單撥號 (9)通話前編輯聯絡人 (10)使用姓名、號碼或位址撥話 (11)接聽電話—非通話時 (12)在另一個通話中接聽電話 (13)自通話中中斷連線 (14)保留通話與繼續接聽保留中的通話 (15)轉接進行中的通話 (16)啟用「請勿打擾」模式 (17)自動轉接所有通話 (18)於通話中檢視鍵台 (19)將其他出席者加入現有通話 (20)中斷出席者與會議的連線 (21)允許出席者加入會議 (22)在會議中固定發言人 (23)使用音樂模式 (24)舉手參加會議 (25)尋找最近通話詳細資訊 (26)智慧型近接感測Cisco Proximity 超音波訊號 (28)內容共用通話中共用內容 (30)在非通話時共用內容 (31)於通話中變更簡報版面配置....................................................32已排程的會議加入已排程會議 (34)加入 Webex 會議 (35)聯絡人最愛、通話記錄及目錄 (37)於通話中將某人加入最愛 (38)未通話時將某人加入最愛 (39)編輯現有的最愛 (40)攝影機檢視攝影機設定 (42)新增預設攝影機位置 (43)編輯預設攝影機位置 (44)開啟或關閉攝影機 (45)追蹤發言者 (46)簡報講者追蹤 (47)控制自己的相機 (48)遠端攝影機控制 (49)管理自拍 (50)調整自拍畫中畫大小 (51)移動自拍 PiP (52)設定存取設定和監管資訊 (54)目錄中所有項目皆為有效超連結,按一下即可進入相對應的文章。
如要在章節之間切換,可按一下側邊列中對應的圖示。
請注意:本使用者指南提及的部分功能為選用功能,有可能不適用於您的裝置。
本指南會介紹如何在註冊至內部部署服務時,將 Touch 10或 Room Navigator 配合以下產品一同使用:Room 系列:• Room Kit• Room Kit Mini• Room Kit Plus 和 Codec Plus• Room Kit Pro 和 Codec Pro• Room 55 和 55 Dual• Room 70 和 70 G2• Room Panorama 和全景70視訊會議簡介使用攝影機預設功能透過 Cisco Webex 系統,您可以建立預先定義的縮放及攝影機指向(平移及傾斜)。
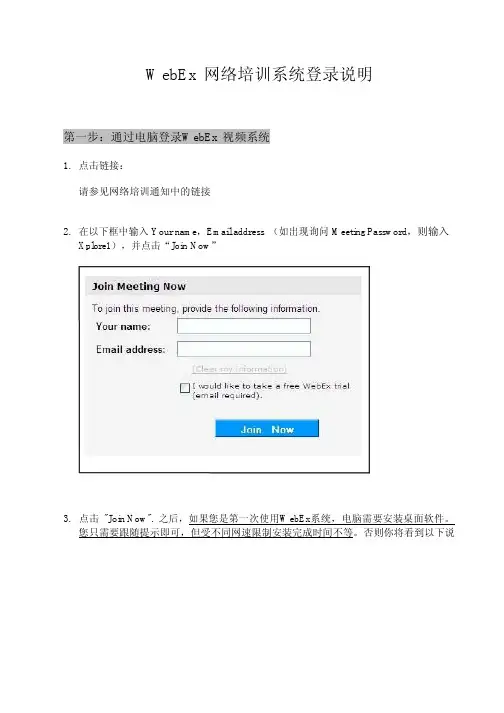
WebEx 网络培训系统登录说明
第一步:通过电脑登录W ebEx 视频系统
1.点击链接:
请参见网络培训通知中的链接
2. 在以下框中输入Your name,Email address (如出现询问Meeting Password,则输入
Xplore1),并点击“Join Now”
3. 点击"Join Now". 之后,如果您是第一次使用W e b E x 系统,电脑需要安装桌面软件。
您只需要跟随提示即可,但受不同网速限制安装完成时间不等。
否则你将看到以下说
明“Meeting In Progr e ss”,请耐心等待,您即将进入WebEx 视频系统。
4. 进入WebEx 视频系统之后,您将看到以下画面以及弹出窗口“Audio Conference”。
请大家使用麦克风和耳机,参加网络培训。
只要电脑配备耳机和麦克风,可通过 Web 直接接听培训并交流。
第二步:直接使用 W eb 方式收听培训和交流
进入系统后,您将看到以下弹出窗口,选择“Call Using Computer ”
然后您就会进入系统,看到以下画面。
画面左上方“Volume ”窗口可调节耳机和麦克的声音 大小,您可以关闭或者忽略。
培训开始后,电脑所显示的PPT 将和您的耳机、麦克风里的声音同步。


本指南内容目录所有目录条目都是可点击的超链接,点击即可打开相应的文章。
要在章节之间切换浏览,还可以单击侧边栏中的图标。
注:本用户手册中介绍的某些功能是可选的,因此可能不适用于您的系统。
视频会议简介最佳实践 ...................................................................................4其他提示 ................................................................................4使用您的个人凭证登录 ..............................................................5关于 Extension Mobility ..........................................................5将 Room Kit Mini 用作 USB 摄像机 ...........................................6视频呼叫从联系人列表发出呼叫 ..............................................................8关于联系人列表 ......................................................................8呼叫之前编辑联系人 ..................................................................9关于条目编辑 .........................................................................9使用姓名、号码或 IP 地址发出呼叫 .........................................10关于发出呼叫 .......................................................................10在非通话期间接收呼叫 ............................................................11如果有人呼叫您 ....................................................................11在通话期间接收呼叫 ................................................................12如果有人呼叫您 ....................................................................12从呼叫自行断开连接 ................................................................13关于自行断开连接 ................................................................13将呼叫置于保留状态和恢复保留的呼叫 ....................................14关于置于保留状态 ................................................................14转接正在进行的呼叫 ................................................................15关于转接 ..............................................................................15激活免打扰 ..............................................................................16关于免打扰 ...........................................................................16自动前转所有呼叫 ...................................................................17关于前转呼叫 .......................................................................17在通话期间查看键盘 ................................................................18在通话期间使用键盘 . (18)将其他参加者添加到现有呼叫 ..................................................19关于视频会议 .......................................................................19断开会议参加者的连接 ............................................................20关于视频会议 .......................................................................20Intelligent Proximity关于 Cisco Proximity 超声波信号 ............................................22关于 Proximity ......................................................................22内容共享在通话中共享内容 ...................................................................24关于内容共享 .......................................................................24在非通话期间共享内容 ............................................................25本地内容共享 .......................................................................25在通话期间更改演示布局 .........................................................26关于演示布局 .......................................................................26预定的会议加入预定会议 ..........................................................................28加入会议 ..............................................................................28加入 Webex 会议 新 .................................................................29联系人收藏夹、最近通话和目录 .........................................................31关于联系人列表 ....................................................................31通话期间,将某人添加到收藏夹 ..............................................32关于收藏夹 ...........................................................................32非通话期间,将某人添加到收藏夹 ...........................................33关于此功能 ...........................................................................33编辑现有收藏夹 .......................................................................34关于此功能 (34)摄像机查看摄像机设置 .......................................................................36关于摄像机控制 ....................................................................36添加摄像机预设位 ...................................................................37关于摄像机预设位 ................................................................37编辑摄像机预设位 ...................................................................38关于编辑预设位 ....................................................................38打开或关闭摄像机 ...................................................................39关于视频关闭 .......................................................................39发言人跟踪 ..............................................................................40关于发言人跟踪 ....................................................................40演示者跟踪 ..............................................................................41关于演示者跟踪 ....................................................................41控制自己的摄像机 ...................................................................42关于编辑预设位 ....................................................................42管理本端视频 ..........................................................................43关于编辑预设位 ....................................................................43调整本端视频 PiP 的大小 .........................................................44为什么要调整本端视频的大小? ...........................................44移动本端视频 PiP ....................................................................45为什么要移动本端视频? ......................................................45设置访问设置 .................................................................................47关于设置 ..............................................................................47视频会议简介使用摄像机预设位Cisco TelePresence 系统可让您创建预定义的缩放和摄像机指向(平移和倾斜)。
本指南中的內容目錄目錄中所有項目皆為有效超連結,按一下即可進入相對應的文章。
如要在章節之間切換,可按一下側邊列中對應的圖示。
請注意:在特定市場中,本使用者指南提及的部分功能可能為選用功能,您的裝置不一定適用。
簡介Cisco Webex Desk Pro .............................................................4與藍牙耳機及其他裝置配對 .......................................................5將 Room Kit Mini 當作 USB 攝影機 ............................................6使用您自己的憑證登入 .. (7)視訊通話自聯絡人名單撥號 .....................................................................9通話前編輯聯絡人 ...................................................................10使用姓名、號碼或地址撥號 .......................................................11來電.........................................................................................12在通話時接聽來電 ...................................................................13中斷通話連線 ..........................................................................14保留通話與繼續接聽保留中的通話 ...........................................15轉接進行中的通話 ...................................................................16變更通話速率 ..........................................................................17啟用「請勿打擾」模式 ................................................................18自動轉接所有通話 ...................................................................19於通話中檢視鍵台 ...................................................................20將其他參與者加入現有電話會議 ..............................................21中斷參與者與會議的連線 .........................................................22在會議中置頂發言人 ................................................................23使用音樂模式 ..........................................................................24查找最近通話的詳細資訊 .........................................................25 Intelligent ProximityCisco Proximity 超音波訊號 (27)內容共用通話中共用內容 .......................................................................29於通話中變更簡報版面配置 .....................................................30當做數位白板使用 ...................................................................31結束會話以清除您的 Desk Pro .................................................32有線觸控重新導向 ...................................................................33排定的會議加入排定的會議 .......................................................................35加入 Webex 會議 .. (36)聯絡人我的最愛、通話記錄及目錄 .......................................................38於通話中將某人加入我的最愛 ..................................................39未通話時將某人加入我的最愛 ..................................................40編輯現有的我的最愛 ................................................................41攝影機控制開啟和關閉自我檢視 ................................................................43移動自我檢視 PiP ....................................................................44遠端攝影機控制 .......................................................................45視訊背景 .................................................................................46手動攝影機控制 .......................................................................47設定可用設定 .................................................................................49Desk Pro 執行 USB 有線音訊裝置適用的標準通訊協定。

WebEx多方会议信息共享系统简明操作指引目录一、准备工作错误!未定义书签。
二、会议组织人如何主持会议错误!未定义书签。
三、与会人员如何参加会议错误!未定义书签。
四、如何进行桌面共享错误!未定义书签。
五、如何切换发言人错误!未定义书签。
六、如何结束/退出会议错误!未定义书签。
一、准备工作1、如何登陆在浏览器中输入访问佳兆业集团WebEx站点:、安装“Meeting Center”组件点击左侧菜单中“安装”,“Meeting Center”,点击“安装”,进行基础控件的安装(一台PC只需要安装一次)3、其他Webex同时只能支持2个网络会议(因只购买了2个会议主持人的许可授权),每一个会议只允许25个电脑终端同时加入。
二、会议组织人如何主持会议点击左侧“主持会议”,在右侧输入用户名和密码登录用户名:webex01 或者webex02,密码都是:JZY123jzy(注意大小写,此为公用密码,请不要随意修改)成功登陆系统后,点击左侧“主持会议”下的“安排会议”进入会议安排界面,填写相关信息,包括会议主题、会议密码(四位以上,建议统一为1234便于管理)、会议持续时间(根据实际情况尽量设置长一点),填写完毕后点击“现在开始”。
会议建立完毕三、与会人员如何参加会议1、登陆访问佳兆业集团WebEx站点:,如果此时已经有会议建立,则可以在默认界面找到正在进行的会议,点击右侧的“加入”2、加入会议在弹出的登录界面中,输入姓名(任意)、邮箱地址(任意)、会议密码(为建立会议时设置的密码,建议统一为1234便于管理),然后点击“现在加入”进入会议后的状态:四、如何进行桌面共享只有会议主持人或发言人具有共享自己桌面的权限。
点击菜单栏“共享”-〉“桌面”。
或者直接在会议主界面点击此时会议室画面消失,在屏幕右下角出现如下悬浮工具条(左图),桌面已经处于共享状态,所有与会者屏幕显示主持人桌面内容,并出现相应的工具条(右图)。
Cisco Webex User Guide (For HOST)Version 2.0Prepared by ITO/UCULast Update: 4 Mar, 2019Internal Use OnlyIntroductionWebEx is a video conferencing solution available to HKBU community to communicate with other parties via a simple web interface. This document is used for the host to initiate the Webex meetingSetting up a WebEx meeting (Initiated by HKBU)Step 1.Login on the Cisco WebEx Servicen Go to the website n Click “Sign In” buttonStep 2.Start the Web Conference Enter your Username and Password to login.Login successfullyUnder “Meeting Center” tab, Click “Start Meeting”.n A plug-in will be downloaded and installed to your device for the first time.1.Click “Install” to proceed2.Click “Yes” to allow download and install software.3. A conference session will start automatically.Step 3.Enable video and audioVideon Select the video source under “Select Video Connection” pull down menuAudion Select audio source under “Select Audio Connection” pull down menuThere are three ways to start the meeting in Webex session (Call using Computer, I Will Call in and Call Me)Option1: Call using Computern Select “Call Using Computer”n Select Microphone and Speakern To test the Audio connection, Click “More option”. Press “Test” to hear testing soundOption2: Call in Webex Conferencen Select “I will Call in ”n You can join the audio conference by using Deskphone or mobile to call in(If the caller is outside Hong Kong, please find the call-in number for the located country by clicking “All global call-in numbers ”)nAfter joined the audio conference with your attendee ID, you will see a headphone icon.1.Dial 3018 6828( Hong Kong only) to Webex Conference2.Enter the access code of audio connection3.Enter your attendee ID to recognize your identityOption 3: Call Men Select “Call Me ”, then select the country code and input the phone numberStep 5. Connect Audio and VideoAfter selected Audio and Video connection, click “Connect Audio and Video” to activate.123Step 4. Invite remote guest to join conferenceIn “More Option”, Click “Invite & Remind ”Add invitees email address into the textbox and click “Send” and invitation emails are sent toinvitees’ mailbox1.212The video conference setup is completed and ready for the invitees to join the meeting.Change presenter to guestRight click “Attendee”. Select “Change Role To” and then select “Presenter”.The privilege of presenter is passed to the attendeeShare desktop/applicationn Click “More option”. Select the Screen or Application to share with participantnFor example: shared a IE application to Webex conferenceShare ContentShare Screen or Application。
WebEx 網站管理使用者指南第一次發佈日期: 2015年06月14日上次修改日期: 2015年09月15日Americas HeadquartersCisco Systems, Inc.170 West Tasman DriveSan Jose, CA 95134-1706USATel: 408 526-4000800 553-NETS (6387)Fax: 408 527-0883THE SPECIFICATIONS AND INFORMATION REGARDING THE PRODUCTS IN THIS MANUAL ARE SUBJECT TO CHANGE WITHOUT NOTICE.ALL STATEMENTS, INFORMATION,AND RECOMMENDATIONS IN THIS MANUAL ARE BELIEVED TO BE ACCURATE BUT ARE PRESENTED WITHOUT WARRANTY OF ANY KIND, EXPRESS OR ERS MUST TAKE FULL RESPONSIBILITY FOR THEIR APPLICATION OF ANY PRODUCTS.THE SOFTWARE LICENSE AND LIMITED WARRANTY FOR THE ACCOMPANYING PRODUCT ARE SET FORTH IN THE INFORMATION PACKET THAT SHIPPED WITH THE PRODUCT AND ARE INCORPORATED HEREIN BY THIS REFERENCE.IF YOU ARE UNABLE TO LOCATE THE SOFTWARE LICENSE OR LIMITED WARRANTY, CONTACT YOUR CISCO REPRESENTATIVE FOR A COPY.The Cisco implementation of TCP header compression is an adaptation of a program developed by the University of California,Berkeley(UCB)as part of UCB's public domain version of the UNIX operating system.All rights reserved.Copyright©1981,Regents of the University of California.NOTWITHSTANDING ANY OTHER WARRANTY HEREIN,ALL DOCUMENT FILES AND SOFTWARE OF THESE SUPPLIERS ARE PROVIDED“AS IS"WITH ALL FAULTS. CISCO AND THE ABOVE-NAMED SUPPLIERS DISCLAIM ALL WARRANTIES,EXPRESSED OR IMPLIED,INCLUDING,WITHOUT LIMITATION,THOSE OF MERCHANTABILITY,FITNESS FOR A PARTICULAR PURPOSE AND NONINFRINGEMENT OR ARISING FROM A COURSE OF DEALING,USAGE,OR TRADE PRACTICE.IN NO EVENT SHALL CISCO OR ITS SUPPLIERS BE LIABLE FOR ANY INDIRECT,SPECIAL,CONSEQUENTIAL,OR INCIDENTAL DAMAGES,INCLUDING,WITHOUT LIMITATION,LOST PROFITS OR LOSS OR DAMAGE TO DATA ARISING OUT OF THE USE OR INABILITY TO USE THIS MANUAL,EVEN IF CISCO OR ITS SUPPLIERS HA VE BEEN ADVISED OF THE POSSIBILITY OF SUCH DAMAGES.Any Internet Protocol(IP)addresses and phone numbers used in this document are not intended to be actual addresses and phone numbers.Any examples,command display output,network topology diagrams,and other figures included in the document are shown for illustrative purposes only.Any use of actual IP addresses or phone numbers in illustrative content is unintentional and coincidental.Cisco and the Cisco logo are trademarks or registered trademarks of Cisco and/or its affiliates in the U.S.and other countries.To view a list of Cisco trademarks,go to this URL:http:// /go/trademarks.Third-party trademarks mentioned are the property of their respective owners.The use of the word partner does not imply a partnership relationship between Cisco and any other company.(1110R)©2016Cisco Systems,Inc.All rights reserved.目錄設定您的網站1變更使用者看到的內容1設定免責聲明1刪除免責聲明2停用免責聲明2啟用免責聲明3為您的網站指定預設服務和頁面3變更預設頁面3預設頁面選項4指定預設時區5指定清單中的項目數6設定預設的會議排定程式6變更會議資訊視窗6變更頂部導覽列7自訂「我的WebEx」的左側導航鏈結8自訂所有服務的左側導航鏈結8管理排定範本9變更預設排定範本9顯示或隱藏排定範本10刪除排定範本10隱藏WebEx促銷內容10顯示自訂免費撥號限制11啟用個人會議室11啟用或停用Spark互通性12為您的網站啟用高品質視訊13為您的網站啟用高解析度視訊13將聯絡人新增至公司通訊錄13WebEx 網站管理使用者指南iii目錄新增單個聯絡人14從CSV檔案匯入聯絡人14編輯聯絡人資訊15刪除聯絡人資訊15使用通訊群組清單15變更使用者可執行的操作16設定預設通信會議選項16設定預設音訊技術支援選項17指定預設撥入號碼17允許建立和編輯TSP音訊帳戶18允許內部回撥通信會議19允許使用者識別內部參加者19允許使用者將階段作業資訊新增至行事曆19變更所有使用者的通信會議特權20允許使用者申請額外的服務20服務請求選項21允許Cisco Unified MeetingPlace使用者加入外部會議21允許使用者下載WebEx Connect或AIM Pro22允許使用者使用文字訊息23允許使用者使用Cisco IP Phone整合23允許使用者選擇候補主持人23允許使用者為其他使用者排定會議23允許使用者個人化其個人會議室24允許使用者列印或儲存正被共用的檔案24啟用透過外部整合進行的內容共用25為Remote Support設定「聊天片語庫」25建立常用的語句和群組25將語句群組與代理和佇列關聯26允許使用者下載「WebEx生產力工具」26生產力工具的網站設定27變更網站管理選項28在超過網站儲存容量時接收警告28管理使用者31WebEx 網站管理使用者指南目錄關於使用者帳戶31允許使用者從網站申請帳戶32服務請求選項33處理申請33新增使用者帳戶34使用者特權34為WebACD選取佇列36使用者頁面37關於編輯使用者帳戶37編輯單個使用者帳戶38為使用者啟用個人會議室38變更使用者的個人會議室URL39新增單個聯絡人39開啟和關閉使用者帳戶40重新指定NBR錄製檔40從帳戶刪除NBR錄製檔41設定使用者帳戶特權41為個別帳戶設定特權41個別帳戶的特權42為所有使用者帳戶設定特權43處理密碼請求43處理服務請求44向所有使用者傳送電子郵件44關於使用追蹤碼45指定追蹤碼45匯入追蹤碼值46批次匯入/匯出使用者選項46匯入Cisco Unified MeetingPlace使用者的帳戶47匯入多個使用者帳戶47編輯多個使用者帳戶48匯入或匯出的狀態49管理Event Center51更新Event Center網站設定51WebEx 網站管理使用者指南目錄網站選項52Event Center排定範本概觀53顯示或隱藏Event Center排定範本53設定預設的Event Center排定範本54刪除Event Center排定範本54將活動重新指定給另一個主持人54自訂Event Center註冊表格55我的自訂選項55為您的網站啟用高品質視訊57設定Meeting Center59變更會議結束頁59網站選項60關於在行動裝置上使用WebEx Meetings61為行動裝置啟用WebEx Meetings61Meeting Center排定範本概觀61顯示或隱藏Meeting Center排定範本62設定預設的Meeting Center排定範本62刪除Meeting Center排定範本62設定最大視訊頻寬63為您的網站啟用高品質視訊63為您的網站啟用高解析度視訊64設定Remote Support選項65設定Remote Support下載選項65允許客戶選擇代理66為Remote Support設定視訊66Remote Support階段作業表格67自訂階段作業前表格和階段作業後表格上的項目67嵌入階段作業前表格68自訂Remote Support階段作業視窗69新樣式標籤69為共用客戶支援代表的應用程式指定選項71文件和Web內容共用71自動錄製客戶支援代表階段作業72WebEx 網站管理使用者指南目錄允許聊天上下文切換73自動結束非使用中的階段作業73為客戶支援代表自訂指示74設定Training Center選項75Training Center電子商務75輸入您的PayPal Payflow Pro資訊:76設定項目:PayPal Payflow Pro76輸入您的PayPal快速結帳(加拿大)資訊77設定項目:PayPal快速結帳(加拿大)77輸入您的PayPal快速結帳(美國)付款資訊78設定項目:PayPal快速結帳(美國)78輸入您的PayPal Website Payments Pro(英國)付款資訊78PayPal Website Payments Pro(英國)設定79在測試模式和生產模式之間切換79新增和刪除折扣優惠券80延長折扣優惠券使用期限81輸入您的公司資訊81自訂「信用卡」頁81設定Training Center電子郵件選項82管理電子郵件範本83電子郵件範本83自訂電子郵件範本83還原預設電子郵件範本84瞭解CMR混合範本84管理網站安全性87設定安全性選項87安全性選項88指定單一登入設定91啟用合作夥伴委派驗證92檢視憑證92指定強密碼準則92在您的密碼中使用特定字元93會議強密碼準則選項94WebEx 網站管理使用者指南目錄啟用數位憑證(PKI)95管理根憑證95為階段作業類型指定憑證95管理階段作業類型97關於階段作業類型97瞭解階段作業類型的功能98建立自訂階段作業類型100建立Cisco Unified Videoconferencing階段作業類型101為主持人帳戶啟用階段作業類型102為所有新使用者啟用階段作業類型102變更自訂階段作業類型103開啟或關閉自訂階段作業類型103設定Remote Access選項105關於Remote Access選項105Remote Access的電腦設定106為Proxy伺服器設定「Remote Access代理」106設定預設安裝選項106預設安裝值107向使用者傳送Remote Access安裝程式鏈結108下載「Remote Access代理」安裝程式109使用無訊息安裝程式來安裝Remote Access109使用無訊息安裝程式來安裝Remote Access110指定Remote Access安全性選項111為Remote Access群組變更存取碼或電話驗證選項112為Remote Access電腦變更存取碼或電話驗證選項112變更遠端電腦的描述或別名112管理Remote Access電腦的群組113建立Remote Access群組113將Remote Access群組和電腦指定給支援代表113變更群組名稱或描述114重新排列電腦或群組114刪除電腦或群組114監控Remote Access階段作業115WebEx 網站管理使用者指南目錄指定Remote Access的預設檢視和色彩115檢視和色彩設定115設定Access Anywhere選項117要求經過核准才能安裝Access Anywhere117處理Access Anywhere請求118檢視Access Anywhere遠端電腦的清單118結束使用者的Access Anywhere階段作業119從使用者的帳戶中移除遠端電腦119管理WebACD121建立新佇列121「設定」標籤上的選項122「使用者」標籤上的選項124「入口登記表」標籤上的選項124「入口鏈結」標籤上的選項125「規則」標籤上的選項126使用路由規則126使用分配規則127「規則」選項128第三方路由選項129編輯佇列130為入口登記表新增欄位130重新排列入口登記表上的欄位131關於個人佇列131編輯個人佇列131「設定」標籤上的選項(個人佇列)132管理留言表133留言表概觀133建立新的留言表134為留言表新增欄位134重新排列留言表上的欄位135「建立新表格」頁選項135「編輯表格」頁選項136變更順序選項136WebEx 網站管理使用者指南目錄文字方塊選項136勾選方塊選項137選項按鈕選項137下拉清單選項138將留言表指定給佇列138生成報告139報告概觀139「顯示報告」頁139檢視使用報告141檢視錄製檔儲存空間使用報告141檢視儲存空間使用(按使用者)報告142檢視Event Center儀表板報告142檢視Support Center報告143檢視Training Center報告143檢視Remote Access報告143檢視Access Anywhere報告144檢視WebACD報告144檢視「進行中的會議」報告145管理Event Center報告145自訂Event Center儀表板報告145建立新的Event Center報告146開啟儲存的Event Center報告146下載Event Center報告147編輯儲存的Event Center報告147刪除Event Center報告148使用安全的HTML標記和屬性149安全的HTML標記和屬性149CSV檔案格式參考151用於使用者帳戶的CSV檔案格式151建立CSV檔案範本152帳戶資訊欄位152適用於聯絡人的CSV檔案格式170建立CSV檔案範本171WebEx 網站管理使用者指南目錄聯絡人資訊欄位171用於追蹤碼值的CSV檔案格式173時區174電子郵件範本變數179Meeting Center的電子郵件範本變數179企業版電子郵件範本的變數182WebEx 網站管理使用者指南目錄WebEx 網站管理使用者指南第1章設定您的網站•變更使用者看到的內容,第1頁•變更使用者可執行的操作,第16頁•變更網站管理選項,第28頁變更使用者看到的內容變更網站設定以提供自訂WebEx體驗。
企业版WebEx视频会议操作手册武汉东浦信息技术有限公司运维服务事业部2015年7月武汉东浦信息技术有限公司文件履历表目录1.系统介绍 (33)2.常规使用说明 (33)2.1终端要求 (33)2.2会议申请 (44)2.3PC加入会议 (44)2.4IPHONE /IPAD加入会议 (1010)2.5语音呼叫 (1111)2.6视频图像 (1313)2.6桌面/程序共享 (1414)2.7文字交流 (14)3.其他场景使用说明 (1515)3.1IPHONE6.0及以上版本使用WEBEX的办法 (1515)3.2安卓手机使用WEBEX的方法 (1818)4.常见问题及处理 (2020)5.技术支持 (2323)1.系统介绍Cisco WebEx网络会议系统是以网络为媒介的多媒体会议平台,是一款基于网络IM 的多媒体通信系统,支持多人视频会议、视频通讯、多人语音、屏幕共享、动态PPT 演讲、文字交流、短信留言、电子白板、多人桌面共享、文件传输、投票、会议录制等功能,使用者可突破时间地域的限制通过互联网实现面对面般的交流效果。
Cisco WebEx视频会议系统为用户提供了随时随地与任何人进行交互,以更快的速度完成项目,实时共享应用程序、演示、文档及PC桌面的体验,避免频繁的邮件往来,确保业务更有效地进行。
目前,CWMS系统最大并发容量250个USER,每个会议最大参加人数100人,可分配50个主持人。
于2015年7月27日升级为2.5.1.29.B-AE版本。
2.常规使用说明2.1 终端要求➢Windows系统支持的操作系统Windows Vista(32 位或 64 位)Windows 7(32 位或 64 位)Windows 8(32 位或 64 位)Windows 8.1(32 位或 64 位)支持的浏览器Internet Explorer:版本 8 -11(32 位/64 位)Mozilla Firefox:版本 10 到 32Google Chrome:版本 23 -37Microsoft Outlook支持Microsoft Outlook 2007 SP2 和更高版本Microsoft Outlook 2010(32 位和 64 位版本;所有 Service Pack)Microsoft Outlook 2013系统要求Intel Core2 Duo CPU 2.XX GHz 或 AMD 处理器(推荐 2 GB RAM)启用 JavaScript 和 cookie对于 Microsoft Internet Explorer 启用 Active X 并且不拦截(推荐)Java 1.6.0_33 到 Java 1.6.0_37 或 Java 1.7.0_6 到 Java 1.7.0_9➢Mac系统支持的Mac 操作系统Mac OS X 10.6 Snow LeopardMac OS X 10.7 LionMac OS X 10.8 Mountain LionMac OS X 10.9 Macericks支持的浏览器Mozilla Firefox:版本 10 到 32Apple Safari: 6和7Google Chrome:版本 23-37系统要求Intel 处理器2.0GHZ或更快的CPU(推荐使用 512 MB RAM 或更多)启用 JavaScript 和 cookie在 Safari 中启用插件➢移动终端使用IOS5.0及更高版本的Apple iPhone和iPad使用Android2.1及更高版本的Android移动设备iPhone和Android版Jabber9.6及更高版本2.2 会议申请如果需要申请开通一个会议室,首先请填写《网络会议需求申请记录表》发送申请邮件到服务台,由服务台进行开通。
webex使用方法与功能摘要:一、Webex简介二、Webex的使用方法1.注册与登录2.创建与加入会议3.共享桌面与文件4.实时消息与通讯5.录制与回放会议三、Webex的功能特点1.高度集成2.强大的协作能力3.跨平台与跨设备支持4.高清视频与音频质量5.安全与隐私保护四、Webex的优缺点分析五、如何优化Webex使用体验1.合理设置会议参数2.掌握会议技巧与流程3.提高网络与硬件设备质量4.培训与会员六、结论正文:一、Webex简介Webex(现为Cisco Webex)是一款全球领先的在线会议和协作平台,为企业和个人提供高效、便捷的远程会议、协作和沟通解决方案。
它起源于1995年,目前已经在全球范围内拥有众多用户。
在我国,Webex也得到了广泛的应用,成为许多企业远程办公、教育培训、商务洽谈等场景下的首选工具。
二、Webex的使用方法1.注册与登录要使用Webex,首先需要在官网注册一个账户。
注册后,登录Webex平台,您可以创建和加入各种会议。
2.创建与加入会议登录后,您可以创建新会议,邀请参会人员,并设置会议主题、时间等相关信息。
同时,您也可以加入他人发起的会议,通过会议号码和密码参加会议。
3.共享桌面与文件在会议中,您可以随时共享自己的桌面,让其他参会人员查看您的操作。
此外,您还可以上传文件,与参会人员共同查看和编辑。
4.实时消息与通讯Webex提供实时消息通讯功能,让您与参会人员保持实时沟通。
您可以在会议中发送消息、表情和文件,增强沟通效果。
5.录制与回放会议Webex支持会议录制,您可以将会议内容保存为视频文件。
录制后的视频可以供会后回放,方便参会人员回顾和分享。
三、Webex的功能特点1.高度集成Webex集成了多种协作工具,如视频会议、音频会议、实时消息、文件共享等,满足用户在远程协作、沟通等方面的需求。
2.强大的协作能力Webex支持多人同时在线协作,实现实时互动,提高工作效率。
WebEx会议系统使用说明
北京合享智慧科技有限公司
original from incoShare
如何加入语音会议?
在弹出框中点击“是”,加入语音会议
如果误点“否”或关闭了前述弹出框,可通过快速启动→连接音频加入语音会议点击此处连接音频
进入会议系统后如何查看状态?
查看是否加入语音会议可通过语音图标状态确认是否加入语音会议
未加入语音会议
已加入语音会议
查看音频状态如果加入语音会议后仍没有声音,可通过测试计算机音频查看扬声器设置情况
点击此处切换扬声器
查看话筒状态
非静音
静音
培训过程中如何发言或提问?
举手示意点击“举手”,示意发言
语音发言取消麦克静音,可语音发言
文字发言点击“聊天”,可与主持人
或其它与会者进行文字沟通
合享智慧APP
original from incoShare 客服电话:400-0123-045
客服邮箱:*******************
北京合享智慧科技有限公司。
webex使用手册Webex 使用手册一、简介Webex 是一款功能强大且易于使用的在线会议和协作工具。
它提供了音视频通话、屏幕共享、文件共享等多种功能,使得远程办公和远程协作变得更加高效和便捷。
本文将为您详细介绍 Webex 的使用方法和技巧。
二、注册与登录1. 注册账号在使用 Webex 之前,您需要先注册一个账号。
访问 Webex 官方网站,在注册页面填写个人信息并创建账号。
2. 登录账号注册完成后,使用您的账号信息登录 Webex。
输入用户名和密码,点击登录按钮即可成功登录。
三、创建会议1. 调整会议设置登录后,在主界面点击“新建会议”按钮。
在会议设置中,您可以修改会议名称、时间、参与人数等参数。
2. 邀请参与者在会议创建完成后,您可以选择邀请其他人参与会议。
点击“邀请参与者”按钮,输入参与者的邮箱地址即可发送邀请。
3. 开始会议一切准备就绪后,点击“开始会议”按钮即可开始会议。
Webex 提供了丰富的会议控制选项,如静音、视频开关、共享屏幕等。
根据需求选择相应的功能即可。
四、会议功能1. 音视频通话Webex 支持高清音视频通话,确保会议的语音和画面质量。
您可以通过点击相应的按钮开关来控制是否开启音频和视频。
2. 屏幕共享在会议期间,您可以选择共享自己的屏幕,让其他人可以看到您所看到的内容。
点击“屏幕共享”按钮,选择要共享的屏幕或应用程序。
3. 文件共享您可以通过 Webex 轻松共享文件。
点击“文件共享”按钮,选择要共享的文件,其他参与者即可下载和查看。
4. 聊天与讨论Webex 提供了实时聊天功能,参与者可以在会议期间发送文字消息进行讨论和交流。
点击“聊天”按钮,即可打开聊天窗口。
五、会议记录1. 录制会议Webex 允许您录制会议内容,以供后续回放和查看。
点击“录制”按钮开始录制会议,点击“停止录制”按钮结束录制。
2. 查看录制文件录制完成后,您可以在会议结束后,通过访问 Webex 的“录制文件”功能来查看和下载录制的文件。
WebEx视频会议系统电脑端连接教程最近有个项目经常要用到WebEx视频会议系统,一直用手机,今天折腾了下电脑版,虽然不复杂,但注意的细节有一些多,所以整理下来以备有需要时使用。
WebEx视频会议系统电脑端安装有两种方式:方式二:浏览器插件版:Google Chrome 版 Webex 客户端更新日志:20230222 初始发布。
方式一、安装和设置 Cisco Webex Meetings 桌面应用程序安装 Cisco Webex Meetings 桌面应用程序如果您的站点管理员已为您的 Webex 站点启用了 Cisco Webex Meetings 桌面应用程序选项,Cisco Webex Meetings 桌面应用程序将自动安装到您的站点上。
此外,如果有新的版本可用,Cisco Webex Meetings 桌面应用程序会自动更新。
如果您已安装旧版 Cisco Webex Meetings 桌面应用程序,需要先卸载该版本才能安装新版。
在安装新版桌面应用程序前,您可能还需要关闭 Microsoft Outlook等应用程序及任意浏览器。
必须重新启动这些应用程序,您可能需要登录才能看到新界面。
3 运行 .msi 安装文件并按说明操作。
安装4 安装完成后 Webex Meetings 桌面应用程序将会打开。
然后,输入 Webex 站点URL、用户名和密码,即可加入会议。
设置 Cisco Webex Meetings 桌面应用程序1 在 Cisco Webex Meetings 桌面应用程序的右上角,选择齿轮图标。
2 在下拉列表中,选择首选项。
常规 - 使应用程序始终在桌面上显示并且在开机后自动打开。
帐户 - 查看用户名、Webex 站点 URL 和在应用程序中使用的电子邮件地址。
会议 - 选择日历和即时会议设置。
此外,还可将您的个人会议室或视频系统信息复制到剪贴板以与其他人共享。
通知 - 为会议启用通知并选择接收通知的时间。
DX70、用户手册本指南内容目录所有目录条目都是有效的超链接(仅适用于启用 javascript 的阅读系统),点击即可打开相应的文章。
要在章节之间切换浏览,还可以单击侧边栏中的图标。
注意!本用户手册中介绍的部分功能可能在某些市场中是可选的,因此可能不适用于您的系统。
简介Cisco DX70 概览 .......................................................................4关于本用户手册 ......................................................................4Cisco DX80 概览 .......................................................................5DX80 与 USB 头戴式耳机.......................................................5与蓝牙头戴式耳机配对 ..............................................................6使用您的个人凭证登录 ..............................................................7关于 Extension Mobility ..........................................................7视频呼叫从联系人列表发出呼叫 ..............................................................9关于联系人列表 ......................................................................9呼叫之前编辑联系人 ................................................................10关于条目编辑 .......................................................................10使用姓名、号码或地址发出呼叫 ..............................................11关于发出呼叫 .......................................................................11来电.........................................................................................12如果有人呼叫您 ....................................................................12在通话期间收到呼叫 ................................................................13关于选项 ..............................................................................13从呼叫自行断开连接 ................................................................14关于自行断开连接 ................................................................14将呼叫置于保留状态和恢复保留的呼叫 ....................................15关于置于保持状态 ................................................................15转接正在进行的呼叫 ................................................................16关于转接 ..............................................................................16更改呼叫速率 ..........................................................................17关于呼叫速率 .......................................................................17激活免打扰 ..............................................................................18关于免打扰 ...........................................................................18自动前转所有呼叫 ...................................................................19关于前转呼叫 .......................................................................19在通话期间查看键盘 ................................................................20在通话期间使用键盘 .............................................................20将其他参加者添加到现有呼叫 ..................................................21关于视频会议 .. (21)断开会议参加者的连接 ............................................................22关于视频会议 .......................................................................22Intelligent Proximity关于 Cisco Proximity 超声波信号.............................................24关于 Proximity 功能 ..............................................................24内容共享在通话中共享内容 ...................................................................26关于内容共享 .......................................................................26在通话期间更改演示布局 .........................................................27关于演示布局 .......................................................................27预定的会议加入预定会议 ..........................................................................29加入会议 ..............................................................................29联系人收藏夹、最近呼叫和通讯录 .....................................................31关于联系人列表 ....................................................................31通话期间,将某人添加到收藏夹 ..............................................32关于收藏夹 ...........................................................................32非通话期间,将某人添加到收藏夹 ...........................................33关于此功能 ...........................................................................33摄像机控制打开和关闭本端视频 ................................................................35为什么开启本端视频? .........................................................35移动本端视频 PiP ....................................................................36为什么要移动本端视频? ......................................................36远端摄像机控制 .......................................................................37关于摄像机控制 ....................................................................37设置可访问的设置概览 ...................................................................39关于设置 ..............................................................................39简介本用户手册适用于 DX70 和 DX80。