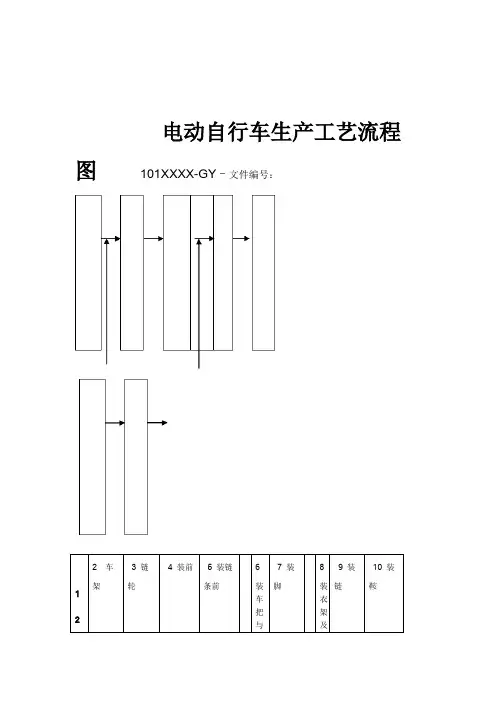
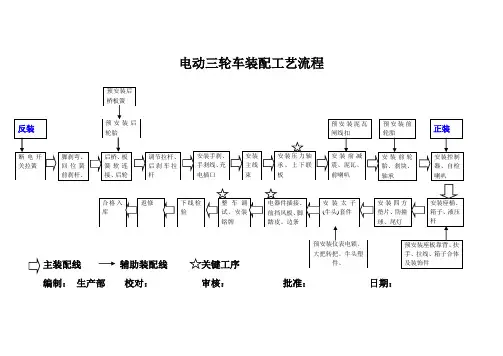
电动车专业装配流程图
- 格式:doc
- 大小:28.50 KB
- 文档页数:1
电动车生产线装配工艺卡片
编制:
审核:
批准:
年月日发布年月日实施
电动自行车组装工艺卡片
电动自行车组装工艺卡片
电动自行车组装工艺卡片
电动自行车组装工艺卡片
电动自行车组装工艺卡片
电动自行车组装工艺卡片
电动自行车组装工艺卡片
电动自行车组装工艺卡片
电动自行车组装工艺卡片
电动自行车组装工艺卡片
电动自行车组装工艺卡片
电动自行车组装工艺卡片
电动自行车组装工艺卡片
电动自行车组装工艺卡片
电动自行车组装工艺卡片
电动自行车组装工艺卡片。

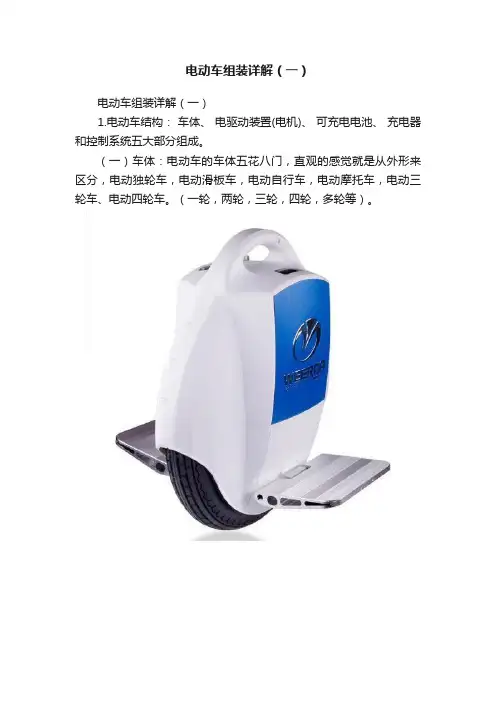
电动车组装详解(一)电动车组装详解(一)1.电动车结构:车体、电驱动装置(电机)、可充电电池、充电器和控制系统五大部分组成。
(一)车体:电动车的车体五花八门,直观的感觉就是从外形来区分,电动独轮车,电动滑板车,电动自行车,电动摩托车,电动三轮车、电动四轮车。
(一轮,两轮,三轮,四轮,多轮等)。
(二)电驱动装置(电机): 电机的驱动方式大体上有三类: 1. 磨擦传动式;2. 中轴驱动式;3. 电动轮毂式。
轮毂式驱动方式具有体积小、重量轻、能耗低、效率比较高等优点,目前国内电动车大多采用这种方式。
电机分为无刷电机和有刷电机两类。
无刷电机主要是低速大力矩电机,没有传动齿轮,避免了机械磨损,运行中几乎没有噪音,但无刷电机启动电流冲击较大,控制系统结构复杂。
轮毂有刷电机采用先进技术,提高了电刷寿命,电机效率较高,控制系统电子线路简单。
(三)电池(可充电):电池主要有三类,即小型密封式免维护铅酸蓄电池,镍镉电池和镍氢电池,小型密封式免维护铅酸电池使用成本低,容量大,被国内企业普遍采用。
(四)充电器:充电器设计采用恒流、恒压、浮充三阶段自动转换方式,对电池产生保护,有效地延长电池寿命。
(五)控制系统:电动车的控制部件大致有(1.控制器与传感器总成 2.刹车总成 3.灯光总成 4.防盗报警总成. 5.显示器总成)。
2.电动车组装:电动车控制器是灵魂,组装电动车,学会控制器的接线法是关键:控制器接线步骤:NO1: 接电机三根线(粗黄线,粗绿线,粗蓝线)。
同电动车电机三根线对应连接。
通过用手晃动后轮检查是否存在阻力感觉,若无阻力,则进行NO2步骤,若有阻力,则检查电机三根线是否正常连接。
检测电机好坏的方法:把电机的两根线两两相碰,若有阻力,则说明电机是好的,没有阻力,电机就有问题。
NO2: 接电源线(正负极)和电门锁线(粗红线为正极,粗黑线为负极,细红线为电门锁线)。
同电动车电机电源线,电门锁线对应连接。
(1.电源正负极请勿接反,若接反则会烧坏控制器2.若电动车没有电门锁线,请将控制器的电门锁一起即可)NO3: 接学习线(控制器上的一对白色线)。
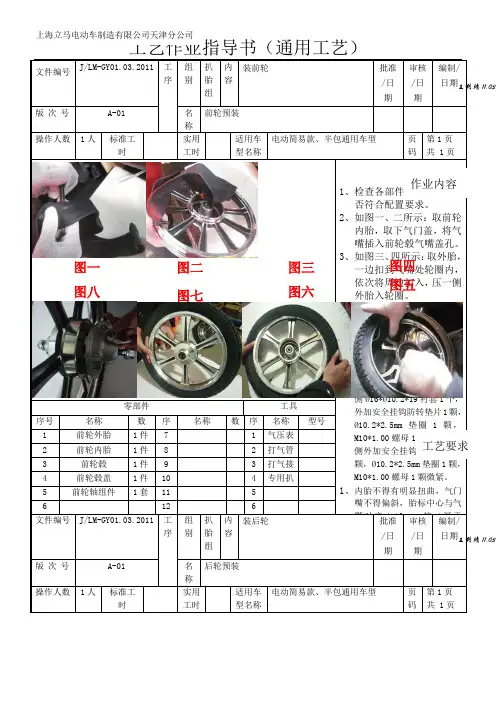
4、如图五、六所示:将内胎全部塞到轮圈内。
5、如图七所示:充气80%,拧上气门盖。
6、如图八所示:将前轮轴组件拆开,将前轴棍从前轮右侧穿入,左侧装入毂盖,右侧Ø16*Ø10.2*19衬套1个,外加安全挂钩防转垫片1颗,Ø10.2*2.5mm 垫圈1颗,M10*1.00螺母1颗微紧,左侧外加安全挂钩防转垫片1颗,Ø10.2*2.5mm 垫圈1颗,M10*1.00螺母1颗微紧。
1、内胎不得有明显扭曲,气门零部件工具 序号 名称 数序名称数序名称型号1 前轮外胎 1件 7 1 气压表2 前轮内胎 1件 8 2 打气管3 前轮毂 1件 93 打气接4 前轮毂盖 1件 10 4 专用扒5 前轮轴组件1套 11 5 工艺要求11.03.图一 图二 图七图八11.03.1、检查各部件外观,规格是否符合配置要求。
2、如图一、二、三所示:取后轮内胎,取下气门盖,将气嘴插入前轮毂气嘴盖孔,取外胎,一边扣到气嘴处轮圈内,依次将周边扣入,压一侧外胎入轮圈。
然后将内胎全部塞到轮圈内。
3、如图四所示:充气80%,拧上气门盖。
4、如图五、六所示:在电机右部(无线端)加厚度为2.5mm 飞轮垫圈(O 型圈)2个,将飞轮(有声16T 公制螺纹)安装在电机右端盖,装防转垫片1颗,M14*1.5螺母1颗。
1、内胎不得有明显扭曲,气门嘴不得偏斜,气嘴弯向右、胎标中心与气嘴对齐±10mm 、按(夏天240~370kpa ,冬天260~300 kpa )充上气2、飞轮应旋转灵活性,飞轮倒转应灵活无卡住现象,安装扭力不小于25N.m 。
工具 数序名称型号1 气压表2 打气管3 打气接4 专用扒5 壁纸刀作业内容图二 图三 图四 图五 图六图七工艺要求11.07.1、检查各部件外观,否符合配置要求。
2、如图所示:在电机右部(无线端)加厚度为2.5mm (O 型圈)2个,将飞轮公制螺纹)安装在电机右端盖。
电动车装配工艺流程Assembling an electric vehicle involves a complex and intricate process that requires careful planning, precision, and attention to detail. The assembly process typically begins with the arrival of various components and parts at the manufacturing facility. These components are then inspected for quality and sorted for assembly. The assembly line is a critical component of the process, as it is where the various parts come together to form the final product.One of the first steps in the assembly process is the installation of the vehicle's chassis. This involves attaching the various structural components that form the foundation of the vehicle. The chassis serves as the framework upon which the rest of the vehicle will be built, so it is essential that this step is carried out with precision and accuracy. Once the chassis is in place, the next step is to install the vehicle's powertrain, including the electric motor, battery pack, and associated components. This is a crucial step in the process, as the powertrain isthe heart of the electric vehicle and is responsible forits propulsion.After the powertrain is installed, the next step is tofit the vehicle with its body panels and interior components. This includes installing the doors, hood, trunk, and other exterior components, as well as the seats, dashboard, and other interior features. This step requires careful attention to detail to ensure that all componentsfit together seamlessly and that the vehicle's interior is comfortable and functional. Once the body and interior components are in place, the final step is to test the vehicle to ensure that all systems are functioning properly. This includes testing the vehicle's electrical systems, drivetrain, and overall performance.In addition to the physical assembly of the vehicle, there are also important quality control and inspection processes that take place throughout the assembly process. These processes are essential for ensuring that the vehicle meets the highest standards of quality and safety. Quality control measures may include visual inspections, functionaltests, and other checks to verify that all components are installed correctly and that the vehicle meets all necessary specifications. Any issues or discrepancies that are identified during these inspections must be addressed and resolved before the vehicle can proceed to the next stage of the assembly process.The assembly of electric vehicles also requires a skilled and dedicated workforce. Assembly line workers play a crucial role in the process, as they are responsible for carrying out the various tasks involved in assembling the vehicle. These workers must be well-trained and knowledgeable about the specific requirements of electric vehicle assembly. They must also be diligent and focused to ensure that each vehicle is assembled with the highestlevel of quality and precision. Additionally, collaboration and communication among the assembly line workers are essential to ensure that the entire process runs smoothly and efficiently.Overall, the assembly of electric vehicles is a complex and multi-faceted process that requires careful planning,precision, and attention to detail. From the initial inspection and sorting of components to the final testing and quality control measures, every step of the assembly process is essential for ensuring that the vehicle meets the highest standards of quality and safety. The skilled and dedicated workforce that carries out the assembly process plays a crucial role in bringing together the various components to create a fully functional andreliable electric vehicle. As the demand for electric vehicles continues to grow, the assembly process will continue to evolve and improve, with a focus on efficiency, sustainability, and innovation.。
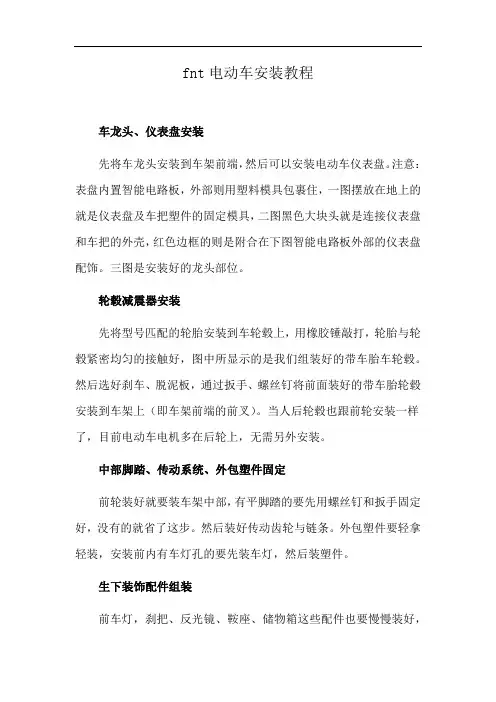
fnt电动车安装教程
车龙头、仪表盘安装
先将车龙头安装到车架前端,然后可以安装电动车仪表盘。
注意:表盘内置智能电路板,外部则用塑料模具包裹住,一图摆放在地上的就是仪表盘及车把塑件的固定模具,二图黑色大块头就是连接仪表盘和车把的外壳,红色边框的则是附合在下图智能电路板外部的仪表盘配饰。
三图是安装好的龙头部位。
轮毂减震器安装
先将型号匹配的轮胎安装到车轮毂上,用橡胶锤敲打,轮胎与轮毂紧密均匀的接触好,图中所显示的是我们组装好的带车胎车轮毂。
然后选好刹车、脱泥板,通过扳手、螺丝钉将前面装好的带车胎轮毂安装到车架上(即车架前端的前叉)。
当人后轮毂也跟前轮安装一样了,目前电动车电机多在后轮上,无需另外安装。
中部脚踏、传动系统、外包塑件固定
前轮装好就要装车架中部,有平脚踏的要先用螺丝钉和扳手固定好,没有的就省了这步。
然后装好传动齿轮与链条。
外包塑件要轻拿轻装,安装前内有车灯孔的要先装车灯,然后装塑件。
生下装饰配件组装
前车灯,刹把、反光镜、鞍座、储物箱这些配件也要慢慢装好,
这几个部位配件安装可不分先后的,需要注意的卡槽要卡到位,车灯的线路要布局好。
线路调控
控制器找好位置安装好,就可以对车灯、电机、仪表盘等需要供电的配件进行接线通电了,接线要用仪表进行检测下。
这样一部完整的电动车就组装成功了。
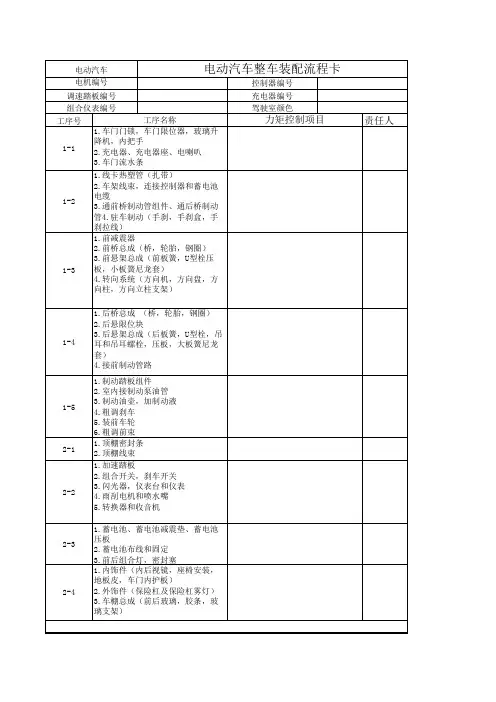
电动汽车电动汽车整车装配工艺流程卡车辆型号出厂编号/VIN代码电机编号控制器编号调速踏板编号充电器编号组合仪表编号车身颜色蓄电池编号1 2 3 45 6 7 8工序号工序名称力矩控制项目责任人1-1 1.车门门锁、车门限位器2.充电器、充电器座、电喇叭3.车门流水条1-2 1.线卡热塑管2.车架线束,连接控制器和后蓄电池电缆4根3.接前桥制动软管组件、通后桥制动管4.驻车软轴11-3 1.前减震器(左/右)2.横摆臂和转向臂(左/右)3.平衡杆、平衡杆胶套4.前制动器(左/右)5.接制动毂油管6.室内制动管路两通转向器7.转向球头、转向拉杆、转向防尘套1.固定减震器螺母2.连接横摆臂、转向臂螺母螺栓3.固定转向器螺母螺栓4.固定平衡杆螺母螺栓5.固定制动器螺栓6.固定制动鼓螺母1-4 1.后桥总成组件2.后悬限位块3.后减震弹簧4.接前地板制动管路1-5 1.制动踏板组件2.室内接制动泵油管1/23.制动油壶,加制动液4.驻车制动器5.粗调刹车6.装前车轮7.粗调前束1.固定制动踏板螺栓2.固定前轮螺母2-1 1.顶蓬密封条2.顶蓬线束3.后尾翼组件4.粘前轮包左右装饰件2-2 1.车身线束、手刹继电器、闪光器、制动开关2.加速踏板、刮水电机、喷水嘴、3.暖风机、喷水壶4.转换器、扩音机2-3 1.蓄电池、蓄电池减震垫2.前、后组合灯,密封塞2-4 1.蓄电池布线和固定2.后蓄电池压板word文档可自由复制编辑2-5 1.玻璃升降器(左/右)、玻璃导轨胶条2.车门玻璃(左/右)3.车门玻璃挡水条(左/右)4.电动门窗(选装)、中控锁(选装)工序号工序名称力矩控制项目责任人2-6 1.内饰2.内后视镜、遮阳板、内把手3.外后视镜、前后侧风窗胶条4.天线2-7 1.方向柱2.仪表板研配3.前后风挡玻璃和胶条4.粘侧围前/后风窗玻璃、雨刷5.粘顶盖密封条1.固定转向柱螺母螺栓2-8 1.仪表板组件2.点火开关、组合开关3.组合开关罩、方向盘1.固定方向盘螺母2-9 1.地板皮、中蓄电池罩2.车门密封条3.安全带、倒顺开关4.前后保险杠组件、密封塞、后轮包装饰件5.车门内护板、前格栅1.固定安全带的螺栓2-10 1.下线调试2.座椅安装,踏板胶块、轮辋装饰件3.粘标示、入库整车下线日期:整车下线检验卡检验项目实测数据结论检验员速度表示值标称值(30km/h) 制动性能制动距离(30km/h)前照灯发光强度 (cd) 左右前轮定位前束角(º)车轮外倾角(º)其它检验项目检验项目结论检验项目结论外观检验车身、装配检验风挡、门窗使用安全玻璃全车灯光齐全有效方向盘最大自由转向量符合要求后视镜齐全有效转向系工作可靠雨刮器齐全有效制动踏板自由行程符合要求轮胎符合标准轮胎螺母紧固可靠制动系无渗油漏气后桥无漏油驱动、变速系统紧固件检查3~10km行驶试验雨淋试验word文档可自由复制编辑整车下线检验日期:word文档可自由复制编辑。