BoundsChecker7.2使用教程
- 格式:doc
- 大小:565.50 KB
- 文档页数:23

Packet Tracer 软件使用教程第一篇、熟悉界面一、设备的选择与连接在界面的左下角一块区域,这里有许多种类的硬件设备,从左至右,从上到下依次为路由器、交换机、集线器、无线设备、设备之间的连线(Connections)、终端设备、仿真广域网、Custom Made Devices(自定义设备)下面着重讲一下“Connections”,用鼠标点一下它之后,在右边你会看到各种类型的线,依次为Automatically Choose Connection Type(自动选线,万能的,一般不建议使用,除非你真的不知道设备之间该用什么线)、控制线、直通线、交叉线、光纤、电话线、同轴电缆、DCE、DTE。
其中DCE和DTE是用于路由器之间的连线,实际当中,你需要把DCE和一台路由器相连,DTE和另一台设备相连。
而在这里,你只需选一根就是了,若你选了DCE这一根线,则和这根线先连的路由器为DCE,配置该路由器时需配置时钟哦。
交叉线只在路由器和电脑直接相连,或交换机和交换机之间相连时才会用到。
注释:那么Custom Made Devices设备是做什么的呢?通过实验发现当我们用鼠标单击不放开左键把位于第一行的第一个设备也就是Router中的任意一个拖到工作区,然后再拖一个然后我们尝试用串行线Serial DTE连接两个路由器时发现,他们之间是不会正常连接的,原因是这两个设备初始化对然虽然都是模块化的,但是没有添加,比如多个串口等等。
那么,这个Custom Made Devices 设备就比较好了,他会自动添加一些“必须设备的”,在实验环境下每次选择设备就不用手动添加所需设备了,使用起来很方便,除非你想添加“用户自定义设备”里没有的设备再添加也不迟。
当你需要用哪个设备的时候,先用鼠标单击一下它,然后在中央的工作区域点一下就OK了,或者直接用鼠标摁住这个设备把它拖上去。
连线你就选中一种线,然后就在要连接的线的设备上点一下,选接口,再点另一设备,选接口就OK了。

Soundcheck 7.01.安装原理系统硬件基础系统软件基础测试扬声器,耳机需要的配置:1. 声卡2. 功率放大器3. 标咪(扬声器)或者仿真耳(耳机)4.标咪或者仿真耳前置供电电源5.电脑2. 测试简图:耳机测试简图:扬声器测试简图:阻抗测试简图:3. 电脑配置要求SoundCheck将利用您的电脑来处理所有的计算以及信号处理功能,所以电脑的配置运行速度将影响SoundCheck的运行速度。
处理信号越长运行速度将越慢。
对电脑硬件的基本要求如下:Windows®XP or Windows®2000. (同样可以运行在Microsoft®Windows®98,)Windows 64 Bit OS is currently not supported. 64 bit device drivers are not available forrequired hardware. 暂时不支持Windows Vista.注:脚踏开关不能使用在Windows NT.Pentium®4, 1.6 MHz processor minimum or equivalent (Celeron处理器不建议使用).1 GB of RAM (2 GB or more recommended for large WAV files or high resolutionmeasurements below 50Hz).300MB of free hard-disk space required for complete software installation.4. 软件安装软件重新安装前,请注意备份之前的测试文件,如下。
SequencesStepsLast session.txt(Stores the preference that were last used inSoundCheck.)此时可以使用右图所示Flie/Import Seq Export Seq导入到处qc程序1 声卡3 扬声器2 功放仿真耳5. 注意事项:1.请不要直接将两个输出通道对接2. 外接线材请做好测试,没有短路等不良问题后,方可接入声卡接口3. 电脑开机状态,使用状态中,声卡接口处的插头不要做硬插拔4. 硬件系统的自检功能:只需要在搭建好后自检一次即可,无特殊变动,无需自检;5. 更换外设,如功放,仿真耳等,都需要重新校准功放和仿真耳6. 扬声器测试qc程序简介一个完整的qc 程序包括以下:1.硬件Hardware 设置2. 校准设置3. 信号发生器参数设置4. 信号发生与记录5. 信号的接受处理分析6. 对分析结果的后处理(数据)7. Limits 的编写8.结果显示界面的设置9.对话框弹出设置10. 序列号计数方法的设置11.数据保存设置QC 的编写信道的选择要完全符合以上硬件的连接。

数电实验笔记Quartus II 7.2使用方法谨此献给亲爱的王晶、江洋洋、黄琳同学我相信很多事情只要不懈努力就会有奇妙且温暖的结果你们就是我的榜样数字电路系统设计流程根据设计项目逻辑抽象自动设计流程特点:核心步骤由计算机自动完成1原理图或HDL编辑2自动检测格式,排错3选择器件类型4逻辑综合:生成逻辑电路原理图文件5结构综合:自动生成逻辑电路布线布局图6自动装配:生成硬件构7建文件和时序测试文件8时序仿真和功能仿真9嵌入式逻辑分析仪实时测试硬件系统使用方法Q uartus II 7.2使用方法建立工程1建立工程双击桌面“Quartus II 7.2 (32-Bit)”单击“File”中的“New Project Wizard:Introduction”单击“next>”三行依次填入“D:\自己学号的文件夹”“要做实验的实验名”“与上一个空一致:要做实验的实验名”单击“next>”单击“next>”Family:选择“Cyclone”Available devices:选择“EP1C3T144C8”单击“next>”单击“next>”单击“finish”原理图 或VHDL语言语言2建立文件建立文件 原理图单击“file”中的“New”单击“Device Design Files”单击“Block Diagram/Schematic File”单击“OK”在Block.bdf中鼠标右键单击“insert”中的“symbol”在Libraries中选择要选用的元件或在name中输入所要选用的元件要说明的是:(1)用鼠标选中每个Symbol Properties 鼠标右键Rotate by Degrees 可以进行翻转(2)用鼠标双击每个Symbol Properties 可进行命名(3)多余项用GND谨此献给亲爱的王晶、江洋洋、黄琳同学 1谨此献给亲爱的王晶、江洋洋、黄琳同学 2 (4)输入用Vcc(5)选用的元件支持Ctrl+C 和Ctrl+V单击单击““file file””中的中的““Save as Save as””点击点击““保存保存””取底层文件名取底层文件名(.bdf (.bdf 原理图文件原理图文件))3编译编译单击单击““Processing Processing””中的中的““Start Compilation Start Compilation””单击“Tools”中的“Netlist Viewers”中的“RTL Viewer”4仿真文件仿真文件 导入节点导入节点 建立波形文件建立波形文件 矢量波形矢量波形 保存文件保存文件单击“file”中的“New”中的“Other Files”中的“Vector Waveform File”单击“OK”单击“View”中的“Utility Windows”中的“Node Finder”中的“list”把信号A B …… Y 拖到“name” 中关闭“Node Finder”单击“Edit”中的“End Time”并设置为“10.0ms”单击“OK”5点信号点信号 选一部分信号,单击 “Count Value”中的“Timing”中的“Count every” 并设置为“50.0us”。

Package‘tabularaster’November1,2023Type PackageTitle Tidy Tools for'Raster'DataVersion0.7.2Description Facilities to work with vector and raster data in efficientrepeatable and systematic workflow.Missing functionality in existing packages is included here to allow extraction from raster data with'simple features'and'Spatial'types and to make extraction consistent and straightforward.Extract cell numbers from raster data and return the cells as a data framerather than as lists of matrices or vectors.The functions here allow spatial data to be used without special handling for the format currently in use.License GPL-3LazyData TRUEDepends R(>=3.2.5)Imports dplyr,fasterize,magrittr,raster,silicate,spatstat.geom,tibbleEncoding UTF-8Suggests covr,knitr,rmarkdown,testthat(>=2.1.0),spellingVignetteBuilder knitrURL https:///hypertidy/tabularasterBugReports https:///hypertidy/tabularaster/issues Language en-USNeedsCompilation noAuthor Michael D.Sumner[aut,cre]Maintainer Michael D.Sumner<******************>Repository CRANDate/Publication2023-11-0106:10:03UTC12as_tibble R topics documented:as_tibble (2)cellnumbers (3)decimate (5)ghrsst (5)index_extent (6)oisst (7)polycano (7)rastercano (7)sharkcano (8)tabularaster (8)Index10 as_tibble Convert a Raster to a data frame.DescriptionGenerate a data frame version of any raster e the arguments’cell’,’dim’,’split_date’and ’value’to control the columns that are included in the output.Usage##S3method for class BasicRasteras_tibble(x,cell=TRUE,dim=nlayers(x)>1L,value=TRUE,split_date=FALSE,xy=FALSE,...)Argumentsx a RasterLayer,RasterStack or RasterBrickcell logical to include explicit cell numberdim logical to include slice indexvalue logical to return the values as a column or notsplit_date logical to split date into componentsxy logical to include the x and y centre coordinate of each cell...unusedDetailsIf the raster has only one layer,the slice index is not e’dim=FALSE’to not include the slice index value.Valuea data frame(tibble)with columns:•cellvalue the actual value of the raster cell•cellindex the index of the cell(numbered from1to ncell()in the raster way).Columns cellindex or cellvalue may be omitted if either or both of cell and/or value are FALSE,respectivelyOther columns might be included depending on the properties of the raster and the arguments to the function:•year,month,day if split_date is TRUE•x,y if xy is TRUE•dimindex if the input has more than1layer and dim is TRUE.Examples##basic data frame version of a basic rasteras_tibble(raster::raster(volcano))##data frame with time column since raster has that setr<-raster::raster(volcano)br<-raster::brick(r,r)as_tibble(raster::setZ(br,Sys.Date()+1:2),cell=TRUE)cellnumbers Extract cell numbers from a Raster object.DescriptionProvide the’cellnumbers’capability of raster::extract and friends directly,returning a data frame of query-object identifiers’object_’and the cell number.Usagecellnumbers(x,query,...)##Default S3method:cellnumbers(x,query,...)##S3method for class SpatialLinescellnumbers(x,query,...)##S3method for class sfccellnumbers(x,query,...)##S3method for class sfcellnumbers(x,query,...)Argumentsx Raster objectquery Spatial object or matrix of coordinates...unusedDetailsRaster data is inherently2-dimensional,with a time or’level’dimension treated like a layers of these2D forms.The’raster’package cell number is counted from1at the top-left,across the rows and down.This corresponds the the standard"raster graphics"convention used by’GDAL’and the ’sp’package,and many other implementations.Note that this is different to the convention used by the graphics::image function.Currently this function only operates as if the input is a single layer objects,it’s not clear if adding an extra level of grouping for layers would be sensible.Valuea data frame(tibble)with columns•object_-the object ID(what row is it from the spatial object)•cell_-the cell number of the rasterExampleslibrary(raster)library(dplyr)r<-raster(volcano)%>%aggregate(fact=4)cellnumbers(r,rasterToContour(r,level=120))library(dplyr)cr<-cut(r,pretty(values(r)))suppressWarnings(tt<-cellnumbers(cr,polycano))library(dplyr)tt%>%mutate(v=extract(r,cell_))%>%group_by(object_)%>%summarize(mean(v))head(pretty(values(r)),-1)decimate5 decimate Decimate swiftly and ruthlesslyDescriptionReduce the resolution of a raster by ruthless decimation.Usagedecimate(x,dec=10)Argumentsx raster object(single layer).dec decimation factor,raw multiplier for the resolution of the outputDetailsThis is fast,it’s just fast extraction with no care taken for utility purposes when you need to reduce the detail.Valueraster layerExampleslibrary(raster)plot(decimate(raster(volcano)))contour(raster(volcano),add=TRUE)ghrsst Sea surface temperature data.DescriptionA smoothed subset of GHRSST.FormatA raster created GHRSST data and raster smoothing.DetailsSee"data-raw/ghrsst.R"and"data-raw/ghrsst-readme.txt"for details.sst_regions is a simple polygon region layer to sit over the SST data.6index_extent Exampleslibrary(raster)plot(ghrsst,col=hcl.colors(12,"YlOrRd",rev=TRUE))plot(sst_regions,add=TRUE,col=NA)cellnumbers(ghrsst,sst_regions)index_extent Index extentDescriptionExtent in index space.Usageindex_extent(x,ex)Argumentsx raster layerex extentDetailsConvert a geographic extent into purely index space.Valueextent objectExamples##the index extent is the rows/colsindex_extent(raster::raster(volcano),raster::extent(0,1,0,1))index_extent(raster::raster(volcano),raster::extent(0,1,0,.5))oisst7 oisst Optimally interpolated SST in near-native form.DescriptionSee data-raw/oisst.R in the source repository.Thefile was avhrr-only-v2.20170729.nc,its extent -180,180,-90,90with dimensions1440x720in the usual raster configuration.FormatA data frame of sst values created from OISST data.Examplesoisstpolycano The raster volcano as polygons.DescriptionSee data-raw/rastercano.r in the source repository.FormatA sp::SpatialPolygonsDataFrame with variables:volcano_elevation.Examplesexists("polycano")rastercano The raster volcano.DescriptionSee data-raw/rastercano.r in the source repository.FormatA raster created from the volcano data.Exampleslibrary(raster)plot(rastercano)sharkcano Sharkcano,the shark and the volcano.DescriptionThis is just a free image off the internet.The image was read in and all non-essential items dropped.The dimensions in raster::raster terms is stored in attr(sharkcano,"rasterdim").FormatA data frame with117843rows and2variables:cell_integer,cell indexbyte integer,byte value of shark image pixelsThese are cell values on a grid that is648x958.ReferencesThis is the small version from here,see script in data-raw/sharkcano.r /stockphoto/16214 Thanks to@jennybc for pointers onfinding free stuff:https:///jennybc/free-photosExampleslibrary(raster)rd<-attr(sharkcano,"rasterdim")rastershark<-raster(matrix(NA_integer_,rd[1],rd[2]))rastershark[sharkcano$cell_]<-sharkcano$byte##byte,heh##I present to you,Sharkcano!(Just wait for the3D version,Quadshark).plot(rastercano)contour(rastershark,add=TRUE,labels=FALSE)plot(rastershark,col="black")##another wayplot(rastercano)points(xyFromCell(rastershark,sharkcano$cell_),pch=".")tabularaster Tabular tools for rasterDescriptionExtract and index with raster tidy tools for raster.DetailsTabularaster includes these main functions.as_tibble convert raster data to data frame form,with control over output and form of dimension/coordinate columns cellnumbers extract a data frame of query identifiers and cell,pixel index numbersdecimate fast and loose resizing of a raster to coarser resolutionindex_extent build an extent in row column form,as opposed to coordinate value formIndexas_tibble,2,9cellnumbers,3,9decimate,5,9ghrsst,5graphics::image,4index_extent,6,9oisst,7polycano,7raster,5raster::extract,3rastercano,7sharkcano,8sst_regions(ghrsst),5tabularaster,8volcano,710。

SL1500-LVRT风机测试作业指导书编制:审核:批准:日期:2009-08-20目录1. 安全规程 (3)1.1个从保护装置 (3)1.2 安全说明 (3)1.2.1断开所有的电源和电杆 (3)1.2.2 防止无意重新送电的安全措施 (4)1.2.3 核实电源的安全隔离 (4)1.2.4 接地和短路 (4)1.2.5.罩住临近的带电部件,封闭危险区域 (4)1.3 警告 (4)2.调前准备 (4)2.1调前工具器件准备 (4)2.2.检查风机的完整性 (5)2.3打开调试所需接线盒 (5)2.4更改习惯性错误线路 (6)3.上电前的绝缘和屏蔽接地检查 (7)3.1屏蔽检查 (7)3.1.1检测方法 (7)3.1.2 检测点 (7)3.1.3重要测量点 (8)3.2接地检测 (8)3.2.1需接地部分 (8)3.2.2非接地部分 (9)3.3绝缘检测 (9)4.上电后检查事项 (10)4.1检测电压、相序 (10)4.1.1电压的测量方法 (10)4.1.2相序的测量方法 (10)4.2上电及元件检查 (11)4.2.1利用发光二极管显示检查的器件 (11)4.2.2急停按钮检查 (11)5.PLC程序下载 (12)5.1使用FLASH卡分配地址设置通讯.................................................... 错误!未定义书签。
5.2使用PC分配地址设置通讯 (20)5.2.1TCP/IP通讯设置.................................................................... 错误!未定义书签。
5.2.2CAN通讯设置.......................................................................... 错误!未定义书签。
5.3下载程序............................................................................................ 错误!未定义书签。
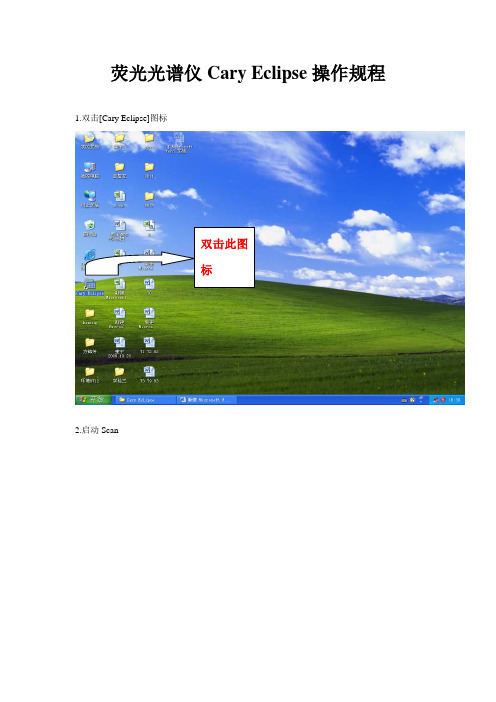
荧光光谱仪Cary Eclipse操作规程1.双击[Cary Eclipse]图标
2.启动Scan 双击此图标
双击此图
标
3.固定激发250nm扫描空白的荧光(发射)光谱图:
点击Setup
3.设置参数:
3.点击Options,设置灵敏度:
4.点击ok,再点击start:
出现下图所示图线:
固定激发250nm扫描空白的荧光(发射)光谱图
5.保存方法:
点击右键:
点击另存为,保存为.csv格式:
点击setup,设置参数如下:
7.点击ok,点击start,图线如下:
固定发射455nm扫描空白的激发光谱图
8. 固定激发250nm扫描样品的荧光(发射)光谱图:
点击setup,设置参数如下:
9.点击ok,点击start,图线如下:
固定激发250nm扫描样品的荧光(发射)光谱图10.固定发射455nm扫描样品的激发光谱图:
点击setup,设置参数如下:
11.点击ok,点击start,图线如下:
固定发射455nm扫描样品的激发光谱图。
ET-7002Modbus TCP Based Remote Ethernet I/O Data Acquisition module with 3-channel Voltage input & Current inputs, 6-channel Digital Inputs (Counters) and3-channel Relay OutputsQuick Start GuideCongratulations on purchasing ET-7002 - Modbus TCP Based Remote Ethernet I/O Data Acquisition module with 3-channel Voltage input & Current inputs, 6-channel Digital Inputs (Counters) and 3-channel Relay Outputs. The most popular automation solution for Ethernet remote monitoring and control application. This Quick Start Guide will provide information needed to get started with ET-7002. Please also consult the User Manual for detailed information on the setup and use of ET-7002.In addition to this guide, the package includes the following items:ET-7002 Module Software Utility CD- ET-7002 Websitehttps:///et_7002.html- ICP DAS USA Website / Phone : 1-310-517-9888 Email: ********************Tech Support:*******************21-----------------------------------------------------------Configuring Boot ModeInit mode: For configuration. After booting, ET-7002 will not run thedefault firmware and cannot surf the internet. Use this mode toupdate MiniOS7 image.Normal mode: For normal working. After booting, ET-7002 will run thedefault firmware and can use all ET-7002 functions.---------------------------------------------------------------------------------- Connecting to Network, PC and PowerThe ET-7002 is equipped with an RJ-45 Ethernet port for connection to an Ethernet hub/switch and PC.34---------------------------------------------------------------------------------Installing the MiniOS7 UtilityThe MiniSO7 Utility can be obtained from companion CD or our site: CD:\Napdos\minios7\utility\minios7_utility\ /minios7utility.htmlAfter the installation has been completed, there will be a new short-cut for MiniOS7 Utility on the desktop.----------------------------------------------------------------------------------Using MiniOS7 Utility to Assign a New IPThe ET-7002 are Ethernet devices, which comes with a default IP address, therefore, you must first assign a new IP address to the ET-7002. The factory default IP settings are as follows:ItemDefaultIP Address 192.168.255.1 Subnet Mask 255.255.0.0 Gateway192.168.0.1Double-click the MiniOS7 Utility shortcut on your desktop.After pressing F12 or choosing Search from Connection menu, the MiniOS7 Scandialog will appear, that will display a list of all the MiniOS7 modules on your network.See the status tip, waiting for the search to be done.Choose the module name for fields in the list, and then choose IP setting from the toolbar.After completing the settings, press the Yes button in the Confirm dialog box to exit the procedure.56---------------------------------------------------------------------------------- Enabling Adobe Flash Player in Your BrowerYour browser must support Adobe Flash Player and have it enabled in order to use theET-7002 web site.If you do not have it installed, please go to the following website and install it.The Adobe Flash Player Download Center:/flashplayer/---------------------------------------------------------------------------------- Go to the ET-7002 Web Site to Check out FunctionsThe ET-7002 contains an advanced web configuration system that provides users with accessET-7002 applications through a standard web browser.Make sure the switch placed in the“ Normal” position.Then reboot ET-7002Please use a standard internet browser to view the ET-7002 webpage, such as MozillaFirefox or Internet Explorer…etc.If you haven’t changed the default IP address of the ET-7002, please refer to “4. UsingMiniOS7 Utility to Assign a New IP” to configure it.After entering the IP address, the logindialog box will appear and prompt you toenter your username and password.The factory default user name and passwordare as follows (Case sensitive) :Item DefaultUser name AdminPassword AdminAfter logging into the ET-7002 web site, the welcome page will appear.Under the Main Menu, expand the Web HMI, andthen select the Web HMI option to check the values of the data acquisition.。
概述本文档说明在将南旨在与您的计算机管理员或所有建议,防病毒配置应该安装防病毒软件并将其配置为从实时扫描中排除下方概述的所有目录。
产品支持的操作系统恶意软件防护Biomek 声波移液工作站(FXp、NXp、4000)Win 7、10Windows Defender Antivirus是唯一由 Beckman Coulter Life Sciences 验证和批准的恶意软件防护软件。
Windows Defender Antivirus 实时扫描排除的目录:C:\Users\Public\Documents\BiomekC:\Users\Public\Documents\SAMI4.1C:\ProgramData\Beckman CoulterC:\ProgramData\Beckman Coulter IncBiomek i 系列声波移液工作站Win 10Windows Defender Antivirus是唯一由 Beckman Coulter Life Sciences 验证和批准的恶意软件防护软件。
Windows Defender Antivirus 实时扫描排除的目录:C:\Users\Public\Documents\Biomek5C:\Users\Public\Documents\SAMI5.0C:\ProgramData\Beckman CoulterC:\ProgramData\Beckman Coulter IncCytoFLEX Win 7、8、8.1、10McAfee Application Control是唯一由 Beckman Coulter Life Sciences 验证和批准的恶意软件防护软件。
请参阅 IFU 了解其他信息。
排除的目录:固化系统后不再需要。
Vi-CELL BLU CellMek SPS AQUIOS CL Win 10使用McAfee Application Control配置系统。
boundschecker使用方法
BoundsChecker是一种用于检测和调试内存错误、资源泄漏和并发问题的工具。
以下是使用BoundsChecker的基本步骤:
1. 安装BoundsChecker:从官方网站下载安装程序,并按照提示进行安装。
2. 配置目标应用程序:在BoundsChecker中设置要测试的目标应用程序。
这通常涉及指定目标可执行文件的路径。
3. 配置检测选项:根据需要配置BoundsChecker的检测选项。
例如,您可以选择检查内存错误、资源泄漏、线程同步等。
4. 运行应用程序:通过BoundsChecker启动您的目标应用程序。
BoundsChecker会监视应用程序的执行,并记录任何潜在的错误或问题。
5. 分析结果:当应用程序运行结束后,BoundsChecker会生成一个报告,其中包含了检测到的问题列表。
您可以通过报告来分析和解决这些问题。
6. 修复问题:根据报告中的信息,逐个解决问题。
对于每个问题,可以使用BoundsChecker提供的工具来跟踪和调试。
7. 重新运行测试:修复问题后,再次运行BoundsChecker以确认问题是否已经解决。
请注意,BoundsChecker可能会对应用程序的性能产生一些影响,因此建议在开发和测试阶段使用它,而不是在生产环境中使用。
另外,具体的BoundsChecker使用方法可能会因版本和环境而有
所不同,请参考官方文档或用户手册获取更详细的信息。
CHB2版本N7链路监控操作手册一、准备工作:1.1 数据准备以下的DUR只是作为模板,应用时,应根据要求具体抛值。
∙在管理模块SCSVTXEX查看Relation:R_N7LK_MON的Tuple数目该relation分布于各个N7链路监控的管理模块(SCSVTXEX)中,对于非STP的局,每个模块中的TUPLE数为15,也就是说一个管理模块可以管理15条N7链路监控。
对于STP 的局,每个模块中的TUPLE数为45,也就是说一个管理模块可以管理45条N7链路监控,由于一个接口中继模块DTM最多能收敛15条N7LINK,因此在STP局(TUPLE数为45)的情况下,至少需要3个接口中继模块DTM模块。
(GWB2PH2支持STP)∙填写Relation:R_N7LK_MON(SCSVTXEX )该relation分布于各个N7链路监控的管理模块(SCSVTXEX)中。
在某个管理模块上创建N7链路监控前,需要根据现场的实际使用情况对D_DTM_LSTN, D_JACK_TN1和D_JACK_TN进行预抛值。
以上预抛值可以通过DUR来实现。
(一般管理模块可以和接口模块一一对应,以便于管理)举例(此例中接口模块的逻辑地址:H’6F90 / H’6F60 / H’6F80) :DYJCA002 040609 CD GWB2PH2 LS3AB27B GDLY8KT4 SCSVTXEX 0430-0430 CAEprepop LIDTMLCEID & TN in R_N7LK_MON R_N7LK_MON zhangli XXXX$H: CREATE_ACTIVITY=FIT$H: CREATE_EFFORT=000H20$H: PROBLEM_PRIORITY=3$H: DEFECT_GRAVITY=N$H: TESTCASE_IDENTITY=NONE* MODIFIED BY zhangli ON 20040622SYMPTOMSThis DUR is used to prepopulate the LIDTM LCEID & TN in R_N7LK_MON REASONSDOMAIN TUPLE_KEY OLD_VALUENEW_VALUED_DTM_LSTN D_0007D_JACK_TN1 D_0008D_JACK_TN2 D_0009BEGINNING_OF_PATCH_:RELR_N7LK_MONDLS=430LOC=PAPRT=0,0MOD,T_0001, D_0007=90,6FD_0008=01,00;D_0009=02,00MOD,T_0002, D_0007=90,6F;D_0008=03,00;D_0009=04,00MOD,T_0003, D_0007=90,6F;D_0008=05,00;D_0009=06,00MOD,T_0004, D_0007=90,6F;D_0008=07,00;D_0009=08,00MOD,T_0005, D_0007=90,6F;D_0008=09,00;D_0009=0A,00MOD,T_0006, D_0007=90,6F;D_0008=0B,00;D_0009=0C,00MOD,T_0007, D_0007=90,6F;D_0008=0D,00;D_0009=0E,00MOD,T_0008, D_0007=90,6F;D_0008=0F,00;D_0009=10,00MOD,T_0009, D_0007=90,6F;D_0008=11,00;D_0009=12,00MOD,T_0010, D_0007=90,6F;D_0008=13,00;D_0009=14,00MOD,T_0011, D_0007=90,6F;D_0008=15,00;D_0009=16,00MOD,T_0012, D_0007=90,6F;D_0008=17,00;D_0009=18,00MOD,T_0013, D_0007=90,6F;D_0008=19,00;D_0009=1A,00MOD,T_0014, D_0007=90,6F;D_0008=1B,00;D_0009=1C,00MOD,T_0015, D_0007=90,6F;D_0008=1D,00;D_0009=1E,00MOD,T_0016, D_0007=60,6F;D_0008=01,00;D_0009=02,00MOD,T_0017, D_0007=60,6F;D_0008=03,00;D_0009=04,00MOD,T_0018, D_0007=60,6F;D_0008=05,00;D_0009=06,00MOD,T_0019, D_0007=60,6F;D_0008=07,00;D_0009=08,00MOD,T_0020, D_0007=60,6F;D_0008=09,00;D_0009=0A,00MOD,T_0021, D_0007=60,6F;D_0008=0B,00;D_0009=0C,00MOD,T_0022, D_0007=60,6F;D_0008=0D,00;D_0009=0E,00MOD,T_0023, D_0007=60,6F;D_0008=0F,00;D_0009=10,00MOD,T_0024, D_0007=60,6F;D_0008=11,00;D_0009=12,00MOD,T_0025, D_0007=60,6F;D_0008=13,00;D_0009=14,00MOD,T_0026, D_0007=60,6F;D_0008=15,00;D_0009=16,00MOD,T_0027, D_0007=60,6F;D_0008=17,00;D_0009=18,00MOD,T_0028, D_0007=60,6F;D_0008=19,00;D_0009=1A,00MOD,T_0029, D_0007=60,6F;D_0008=1B,00;D_0009=1C,00MOD,T_0030, D_0007=60,6F;D_0008=1D,00;D_0009=1E,00MOD,T_0031, D_0007=80,6F;D_0008=01,00;D_0009=02,00MOD,T_0032, D_0007=80,6F;D_0008=03,00;D_0009=04,00MOD,T_0033, D_0007=80,6F;D_0008=05,00;D_0009=06,00MOD,T_0034, D_0007=80,6F;D_0008=07,00;D_0009=08,00MOD,T_0035, D_0007=80,6F;D_0008=09,00;D_0009=0A,00MOD,T_0036, D_0007=80,6F;D_0008=0B,00;D_0009=0C,00MOD,T_0037, D_0007=80,6F;D_0008=0D,00;D_0009=0E,00MOD,T_0038, D_0007=80,6F;D_0008=0F,00;D_0009=10,00MOD,T_0039, D_0007=80,6F;D_0008=11,00;D_0009=12,00MOD,T_0040, D_0007=80,6F;D_0008=13,00;D_0009=14,00MOD,T_0041, D_0007=80,6F;D_0008=15,00;D_0009=16,00MOD,T_0042, D_0007=80,6F;D_0008=17,00;D_0009=18,00MOD,T_0043, D_0007=80,6F;D_0008=19,00;D_0009=1A,00MOD,T_0044,D_0007=80,6F;D_0008=1B,00;D_0009=1C,00MOD,T_0045, D_0007=80,6F;D_0008=1D,00;D_0009=1E,00END_OF_DUFF_INFOEND_OF_DUR_DYJCA002注:DLS即为需要在上面创建N7链路监控的SCSVTXEX的DLS号。
目录目录 (1)一、BOUNDSCHECKER 简介 (2)二、安装环境 (2)三、BOUNDSCHECKER两种工作模式 (3)3.1A CT IVE C HE CK (3)3.2F INAL C H E CK (3)四、特性和优点 (5)五、检测示例 (6)5.1内存泄漏检测示例 (6)5.2野指针检测示例 (8)5.3数组越界检测示例 (10)5.4GDI资源泄漏检测示例 (12)5.5句柄资源泄漏检测示例 (14)5.6死锁检测示例 (15)5.7MS C-R UNT IME L IBRARY内建的检测功能示例 (18)六、配置 (19)6.1S UPPRE SSION (19)6.2F ILTE R (20)6.3设置 (21)6.4代码控制 (22)6.5设置应用程序关联B OUNDS C HE CKE R (22)七、注意事项 (22)八、总结 (23)一、BoundsChecker 简介BoundsChecker是一个运行时错误检测工具,它主要定位程序在运行时期发生的各种错误。
它通过驻留在Visual C++ 开发环境内部的自动调试处理程序来加速应用程序的开发,缩短产品发布的时间。
BoundsChecker 对于编程中的错误,大多数是C++中特有的提供了清晰的详细的分析。
它能够检测和诊断出在静态,堆栈内存中的错误以及内存和资源泄漏问题。
在运行状态下,BoundsChecker验证超过8700APIs和OLE方法,包括最新的Windows APIs,ODBC, ActiveX,DirectX, COM 和Internet APIs。
BoundsChecker采用一种被称为Code Injection的技术,来截获对分配内存和释放内存的函数的调用。
简单地说,当你的程序开始运行时,BoundsChecker的DLL被自动载入进程的地址空间,然后它会修改进程中对内存分配和释放的函数调用,让这些调用首先转入它的代码,然后再执行原来的代码。
BoundsChecker在做这些动作的时,无须修改被调试程序的源代码或工程配置文件,这使得使用它非常的简便、直接。
程序员在开发过程中可能会经常遇到这样的问题:调试时语法没有问题,代码也没有错误,但应用程序运行就是不正常甚至死机,其实这有可能是由于逻辑错误引起的内存溢出或资源泄露等问题,这些错误一般是不容易被检测出来的。
而这类错误就是BoundsChecker错误检测范围之一。
通过对被测应用程序的操作,BoundsChecker提供清晰的、详细的程序错误分析,自动查明静态的堆栈错误及内存/资源泄露,并能够迅速的定位出错的源代码,即使在没有源代码的情况下也可检查第三方组件的错误。
BoundsChecker能检测的错误包括:1)指针操作和内存、资源泄露错误。
比如:内存泄露;资源泄露;对指针变量的错误操作。
2)内存操作方面的错误。
比如:内存读、写溢出;使用未初始化的内存。
3)API函数使用错误。
二、安装环境BoundsChecker 7.2支持的语言和主机平台包括C++, DelphiWindows NT, Windows95/98/2000支持Visual C++ 6.0 SP6,V isual Studio .NET 2002,V isual Studio .NET 2003。
安装说明:1.首先请确定你已经卸载了旧版本的程序。
2.运行Setup目录中的文件进行安装。
3.启动安装程序,使用Setup/Crack目录中的bc72.dat文件注册程序。
4.完成即0K。
5.调试方式有两种a. 直接启动BC.exeb. 集成在VC中,启动VC的debugBoundsChecker 集成在6.0的菜单项和工具条的界面如下:图(1)菜单项图(2)工具条三、BoundsChecker两种工作模式使用BoundsChecker对程序的运行时错误进行检测,有两种使用模式可供选择。
一种模式叫做ActiveCheck,一种模式叫做FinalCheck。
下面分别进行介绍。
3.1ActiveCheckActiveCheck是BoundsChecker提供的一种方便、快捷的错误检测模式,它能检测的错误种类有限,只包括:内存泄露错误、资源泄露错误、API函数使用错误。
要想使用ActiveCheck模式来检测程序的运行时错误,只需在VC++集成开发环境中打开BoundsChecker功能,然后从调试状态运行程序即可。
此时ActiveCheck会在后台自动运行,随时检测程序是否发生了错误。
下面说一下具体的使用步骤。
首先,在VC++集成开发环境中打开你要对其进行测试的程序,同时保证项目处于Debug编译状态下。
其次,确保VC++集成开发环境中[BoundsChecker/Error Detection]菜单项和[BoundsChecker/Log Events]菜单项处于被选中的状态。
只有这两项被选中,BoundsChecker才会在程序运行过程中发挥作用。
最后,在VC++集成开发环境中选择[Build/ Start Debug/Go]菜单命令,在Debug状态下运行程序,ActiveCheck也在后台开始运行了。
3.2FinalCheckFinalCheck具有BoundsChecker提供的所有检错功能。
FinalCheck是ActiveCheck 的超集,它除了能够检测出ActiveCheck能够检测出的错误,还能发现很多ActiveCheck 不能检测到的错误,包括:指针操作错误、内存操作溢出、使用未初始化的内存等等,并且,对于ActiveCheck能检测出的错误,FinalCheck能够给出关于错误更详细的信息。
所以,我们可以把FinalCheck认为是ActiveCheck的功能增强版。
我们付出的代价是:程序的运行速度会变慢,有时甚至会变的很慢。
要想在FinalCheck模式下测试程序,不能使用VC++集成开发环境提供的编译连接器来构造程序,而必须要使用BoundsChecker提供的编译连接器来编译连接程序。
当BoundsChecker的编译连接器编译连接程序时,会向程序中插装一些错误检测代码,这也就是FinalCheck能够比ActiveCheck找到更多错误的原因。
下面就介绍一下如何在FinalCheck模式下对程序进行测试:(1)在VC++集成开发环境中打开你所要测试的项目。
(2)由于要使用BoundsChecker的编译连接器重新编译连接程序,所以我们为BoundsChecker独自构造一个文件夹。
在VC++集成开发环境中,具体操作方法是:A)点击[ Build/Configurations...]菜单命令。
B)在弹出的对话框中点击Ad按钮。
在Configuration 编辑框中添入你为BoundsChecker创建的文件夹的名称,这个名称是任意的,比如我们取名为BoundChecker。
C)在Copy settings from组合框中选中XXX—Win32 Debug项,然后点击OK按钮,接着点击Close按钮。
现在,我们已经为FinalCheck构造好了一个文件夹。
(3)点击[B uild/Set Active Configuration…]菜单命令,选中你刚才为BoundsChecker 建的文件夹,然后点击OK按钮。
这样BoundsChecker编译连接程序时生成的中间文件、可执行程序,都会被放到该文件夹下。
(4)选择[BoundsChecker/Rebuild All with BoundsChecker]菜单命令,对程序重新进行编译连接,也就是在这时,BoundsChecker向被测程序的代码中加入了错误检测码。
编译连接完成后,BoundsChecker会在你为BoundsChecker构造的文件夹中生成可执行文件。
在FinalCheck模式下对程序进行检测的准备工作都已经做好,这时可以启动程序开始测试了,作步骤与在ActiveChecker模式下没什么区别。
具体步骤如下:确保VC++集成开发环境中[BoundsChecker/ Error Detection]菜单项和[BoundsChecker/ Log Events]菜单项处于选中状态,别外设置[BoundsChecker / Setting] Memory Tracking 选项中的Enable FinalCheckt为选中状态。
点击[ Build\Start Debug]菜单,选中“Go” 菜单项。
程序开始在Debug状态下运行。
按照你制定好的测试用例,对程序进行操作。
当BoundsChecker 检测到了错误时,会弹出窗口向你汇报,你可以当时就进行处理,也可以等到你的操作全部完成,退出程序之后再对列出的这些错误进行分析。
这完全取决于你是否选中了[BoundsChecker/Display Error and Pause] 菜单项。
退出程序后,BoundsChecker会给出错误检测结果列表。
该错误列表与ActiveChecker给出的错误列表的查看方法完全一样。
只不过这个列表中所报告的信息会更多、更详细一些。
ActiveChecker、FinalCheck这两种模式,比较而言各有长短。
ActiveChecker使用方便,只需在Debug状态下直接运行程序即可,并且程序的运行速度较快,但检测的错误种类有限;FinalCheck模式下,需要使用BoundsChecker的编译连接器重新编译连接生成可执行程序,并且程序的运行速度比较慢,但检测的错误种类、提供的错误相关信息要多于ActiveChecker。
所以,何时使用何种模式,应根据当时的具体情况而定。
四、特性和优点1.资源泄漏检测:BoundsChecker 能够自动定位难以发现的内存泄漏,并监视堆栈和静态内存的状况。
这样就节约了你的时间,使您能够开发出更加可靠,不出问题的应用程序。
2.Active API 检查:该特点可以减少你的调试时间,提供工业中最为全面的Windows API 校验。
这样的结果就会带来更高质量的代码,在程序发布时就不会失败。
3.IDE 集成:BoundsChecker 让你透明的调试。
它提供在C++ 中直接访问BoundsChecker 的菜单,工具条和设置,使得开发人员能够立即修复错误。
4.兼容性检查:BoundsChecker 允许你轻松的生成和发布跨Microsoft 平台的应用程序。
BoundsChecker 在多平台上校验代码,然后产生一个报告指出所有与Windows 平台兼容性相关的问题。
程序特点:1.本地应用程序死锁检查2.内存和资源查看器调用报告调用报告5.垃圾收集(Garbage collection)通知BoundsChecker错误检测范围主要包括:1).指针和泄露错误接口泄露内存泄露资源泄露未分配的指针错误2).内存错误动态存储溢出无效的句柄被锁定句柄没有被锁定内存分配冲突栈空间溢出静态存储溢出3).API和OLE错误API函数返回失败API函数未执行无效的变量(包括指针变量、字符串变量等)OLE接口方法的变量无效OLE接口方法失败线程调用库函数错误五、检测示例5.1 内存泄漏检测示例代码段类TempClass.cpp;TempClass::TempClass(){cout<<"构造对象TempClass"<<endl;}void TempClass::Print(){cout<<"TempClass.Print()"<<endl;}#include "stdafx.h"#include "OSTREAM.H"#include "TempClass.h"int main(int argc, char* argv[]){printf("-----BoundsChecker用例-----------!\n");TempClass* myTempPoint = new TempClass();// delete myTempPoint;// myTempPoint = NULL;/*if( NULL == myTempPoint ){cout<<"为空"<<endl;}else{myTempPoint->Print();}*/return 0;}图(3)测试结果窗口双击者点击下方的标签进入到Memory Leaks图(4)Memory Leaks窗口图(5)Memory Leak的详细资料图(6)源代码窗口结果表明在文件BoundChecker.cpp 下main函数的11行myTempPoint已经分配分间而程序退出时发生了内存泄漏。