e助手国际版操作流程
- 格式:ppt
- 大小:6.96 MB
- 文档页数:2

EAC使用详细教程EAC(Easy Anti-Cheat)是一种反作弊软件,广泛用于许多在线游戏中。
它的主要目标是检测和阻止玩家使用任何非法的第三方软件或修改器来获得不公平的游戏优势。
以下是一个EAC使用详细教程。
第一步:安装EAC1.打开你要使用EAC的游戏,点击游戏的启动器或者游戏文件夹中的EAC安装程序。
2.等待EAC安装程序启动并加载所需的文件。
3.点击接受EAC的许可协议并继续安装。
4.选择你要安装EAC的游戏目录。
如果你不确定游戏安装在哪里,可以在游戏启动器中找到游戏文件夹的位置。
5.等待EAC安装完成,并确保安装过程没有出现任何错误信息。
第二步:启动游戏1.双击游戏的启动器或者游戏桌面图标来启动游戏。
2.如果EAC正确安装并配置了,它会自动启动,并开始扫描你的电脑以检测任何非法软件。
这个过程可能需要一些时间,具体时间取决于你电脑上的文件数量和硬件性能。
第三步:更新EAC2.更新EAC可能需要重新启动游戏。
第四步:解决EAC错误1.如果在启动游戏时遇到任何EAC错误信息,如“EAC进程未找到”或“EAC未允许”,请尝试以下解决方案:-关闭任何可能与EAC冲突的程序或进程,如VPN、防火墙或杀毒软件。
-检查你的游戏文件是否完整。
如果有任何缺失或破损的文件,请尝试重新安装游戏。
-检查你的操作系统是否有任何更新。
一些EAC错误可能与操作系统问题有关。
第五步:遵守游戏规则1.请确保你遵守游戏的规则和条款。
EAC检测到任何非法行为都会马上通知游戏管理员,并可能导致你的游戏账户被封禁。
2.不要尝试使用任何非法的第三方软件或修改器来获得游戏优势。
这不仅破坏了游戏的公平性,还违反了EAC的使用规定。
总结:EAC是保护游戏公平性的重要工具之一、通过安装和使用EAC,游戏开发商可以减少玩家使用非法软件的可能性,提供更好的游戏体验。
尽管安装和配置EAC可能需要一些技术知识,但这个教程提供了一些基本的步骤和解决方案来帮助你开始使用EAC。

RNOHelper 网优助手使用说明V1.2.0 20150301RNOHelper 网优助手使用说明目 录1 概述 12源数据制作与准备 .............................................................................................................. 1 2.1 2.2 2.3 工参模板制作 ............................................................................................................ 2 邻区模板制作 ............................................................................................................ 2 其它模板制作 ............................................................................................................ 23基本使用介绍 ..................................................................................................................... 3 3.1 3.2 3.3 管理员权限设置 ........................................................................................................ 3 网络制式设置与版本信息查看 .................................................................................. 3 4G/3G/2G 扇区图层制作 .......................................................................................... 4 3.3.1 RNO 专用扇区图层制作.................................................................................. 4 3.3.2 RNO 专用扇区图层打开.................................................................................. 5 3.4 3.5 3.6 3.7 3.8 3.9 小区号-名/基站号-名/经纬定位 ................................................................................. 5 专题图层制作 ............................................................................................................ 5 网络标签显示 ............................................................................................................ 6 小区信息显示 ............................................................................................................ 6 其它图层制作 ............................................................................................................ 6 保存工作空间 ............................................................................................................ 74规划优化核查功能介绍 ....................................................................................................... 7 4.1 无线参数优化 ............................................................................................................ 7 4.1.1 全网参数检索 .................................................................................................. 7 4.1.2 小区参数相关性显示 ....................................................................................... 8DongbingQQ:81555804IRNOHelper 网优助手使用说明4.2PCI 自动规划 ............................................................................................................ 8 4.2.1 工参图层制作 .................................................................................................. 8 4.2.2 规划参数设置 .................................................................................................. 84.3邻区关系优化 ............................................................................................................ 9 4.3.1 邻区关系表导入 .............................................................................................. 9 4.3.2 邻区关系显示与手动添加删除 ........................................................................ 9 4.3.3 邻区规划更改关系表导出.............................................................................. 10 4.3.4 LTE 邻区自动规划 ........................................................................................ 10 4.3.5 站点间切换频度地理化显示 .......................................................................... 124.4全网参数核查功能 .................................................................................................. 12 4.4.1 邻区个数核查 ................................................................................................ 12 4.4.2 单向邻区核查 ................................................................................................ 12 4.4.3 邻区漏配核查 ................................................................................................ 12 4.4.4 全网 PCI 核查 ............................................................................................... 13 4.4.5 同站 PCI 核查 ............................................................................................... 13 4.4.6 全网 PRACH 核查......................................................................................... 13 4.4.7 同站 PRACH 核查......................................................................................... 13 4.4.8 站点 TAC 核查 .............................................................................................. 13 4.4.9 同站频扰核查 ................................................................................................ 14 4.4.10 全网主频核查............................................................................................... 14 4.4.11 同频同扰核查............................................................................................... 14 4.4.12 邻区扰码核查............................................................................................... 14 4.4.13 同频同扰码组核查 ....................................................................................... 14 4.4.14 同频同复合码组核查.................................................................................... 14 4.4.15 同频同扰码组同复合码组核查 ..................................................................... 14DongbingQQ:81555804IIRNOHelper 网优助手使用说明5常用功能介绍 ................................................................................................................... 15 5.1 5.2 MAPINFO 图层转换 GOOGLEEARTH 图层 .......................................................... 15 外场测试/扫频数据显示 .......................................................................................... 15 5.2.1 测试数据导出转换为 EXCEL 表格 ................................................................ 15 5.2.2 导入测试数据至 MAPINFO........................................................................... 16 5.2.3 进行阀值设置并生成生成对应图层 ............................................................... 16 5.2.4 单击小区或采样点显示对应小区覆盖关系 .................................................... 16 帮助与工具信息 ................................................................................................................ 17 6.1 6.2 6.3 工具信息 ................................................................................................................. 17 版本检查与常见问题处理 ....................................................................................... 17 VIPLICENSING ...................................................................................................... 186附录Ⅰ VIP 功能...................................................................................................................... 19 附录Ⅱ常见问题.......................................................................................................................... 19 附录Ⅲ更新记录.......................................................................................................................... 20DongbingQQ:81555804IIIRNOHelper 网优助手使用说明图目录图 1-1 RNOHELPER 工具图 ........................................................................................................................ 1 图 2-1 RNOHELPER 源表样式 .................................................................................................................... 2 图 2-2 LTE 工参模板样式 ........................................................................................................................ 2 图 2-3 邻区表样式 .................................................................................................................................. 2 图 3-1 管理员身份运行设置 .................................................................................................................. 3 图 3-2 网络设置菜单示意图 .................................................................................................................. 3 图 3-3 版本信息消息框 .......................................................................................................................... 4 图 3-5 图层制作结果图 .......................................................................................................................... 5 图 3-4 源表导入设置图 .......................................................................................................................... 4 图 3-7 专题图层制作图 .......................................................................................................................... 5 图 3-6 目标查找界面 .............................................................................................................................. 5 图 3-8 网络标签显示图 .......................................................................................................................... 6 图 3-9 小区信息显示图 .......................................................................................................................... 6 图 3-10 其它图层制作与结果图 ............................................................................................................ 7 图 4-1 234G 功能键界面图 ..................................................................................................................... 7 图 4-2 BCCH 检索示意界面图 ................................................................................................................. 8 图 4-3 单小区参数相关示意界面图 ...................................................................................................... 8 图 4-4 邻区导入菜单示意图 .................................................................................................................. 9 图 4-5 手动规划邻区关系导出图 ........................................................................................................ 10 图 4-6 邻区自动规划设置图 ................................................................................................................ 10 图 4-7 单小区邻区自动规划图 ............................................................................................................ 11 图 4-8 批量小区邻区自动规划图 ........................................................................................................ 11 图 4-9 切换频度线图 ............................................................................................................................ 12 图 4-10 邻区类核查功能菜单界面 ...................................................................................................... 12 图 4-11 邻区漏配核查条件设置界面 ................................................................................................... 12 图 4-12 参数类 1 核查功能菜单界面 .................................................................................................. 13 图 4-13 参数类 2 核查功能菜单界面 .................................................................................................. 14 图 5-1 谷歌图层制作菜单与设置界面 ................................................................................................ 15 图 5-2 谷歌图层乱码处理提示对话框 ................................................................................................ 15 图 5-3 外场测试数据导入模板 ............................................................................................................ 15 图 5-4 外场测试数据导入菜单 ............................................................................................................ 16 图 5-5 外场测试数据图层生成与颜色设置 ........................................................................................ 16DongbingQQ:81555804IVRNOHelper 网优助手使用说明图 5-6 外场数据单小区或采样点单击显示 ........................................................................................ 16 图 6-1 帮助菜单 .................................................................................................................................... 17 图 6-2 工具信息 .................................................................................................................................... 17 图 6-3 版本检查与常见问题处理页面 ................................................................................................ 18 图 6-4 VIPLICENSING 界面 ........................................................................................................................ 18DongbingQQ:81555804VRNOHelper 网优助手使用说明1概述RNOHelper(无线网络优化助手)可以快速制作 LTE、CDMA 、TD-SCDMA、 GSM 、CDMA2000、WCDMA、点、泰森等网络地理化显示图层,显示系统内/间邻 区关系,漏配邻区核查,常规参数核查,邻区批量自动规划,提供 4G/3G/2G 网络协 同规划优化功能,本文档对 RNOHelper 常用功能进行讲解,以方便大家提高优化工作 效率。


易维助手使用说明书V2.0目录1.产品简介 (3)1.1.软件描述 (3)1.2.功能简介 (3)1.2.1.从总体来说 (3)1.2.2.从各大模块来说 (3)2.服务端安装 (5)2.1.服务端的安装 (5)2.2.服务端运行及重启 (6)2.3.服务端版本 (7)3.客户端安装 (8)3.1.客户端安装可批量同时(静默安装)安装和单台安装 (8)3.1.1.单台安装 (8)3.1.2.批量(静默)安装 (10)3.1.3.通过维护通道等实现远程调用启动客户端 (10)3.1.4.已加载还原的客户机,通过PXE 不解还原安装易维助手客户端 (11)3.2.客户端版本与升级 (13)3.2.1.客户端版本查看 (13)3.2.2.客户端更新 (13)4.易维助手控制台 (14)4.1.主界面 (14)4.2.全局控制 (14)4.3.功能列表 (15)4.3.1.客户机管理 (15)4.3.2.安全中心 (16)4.3.3.内网攻击防御 (20)4.3.4.桌面管理 (23)4.3.5.智能维护 (24)4.3.6.如何添加任务单? (26)附录: (27)1.产品简介1.1.软件描述易维助手是一款优秀的大师级专业网吧维护软件,主要包括日常网吧维护、故障处理和网吧网络安全管理等功能!本产品仅适用于局域网,不适用家庭单机用户,易维助手包含服务端和客户端两部分,分别安装在2台或2台以上计算机中,由服务端控制及管理客户端。
1.2.功能简介易维助手的功能总体可以分为两方面(智能维护、病毒防御)五大功能模块(客户机管理、安全中心、内网攻击防御、桌面管理、智能维护),各功能模块可单独使用,互不影响,可实现不同的作用,对计算机进行多方面的控制和管理,实现局域网安全防御和对客户机简单易行的管理模式。
1.2.1.从总体来说1)智能维护方面:综合整理了网吧日常常用维护功能,并极大的优化了软件的管理界面!采用了一系列创新方案,通过管理界面人性化,维护流程智能化,程序运行自动化,操作方式简易化等各种手段,超乎想象地降低了对使用者的能力结构水平要求,并不可估计地提高用户的工作效率!用最少人做最多事,最短时间做最好效果!并且无须培训,上手即用,无须忙碌,悠闲管理!让您用的舒心。
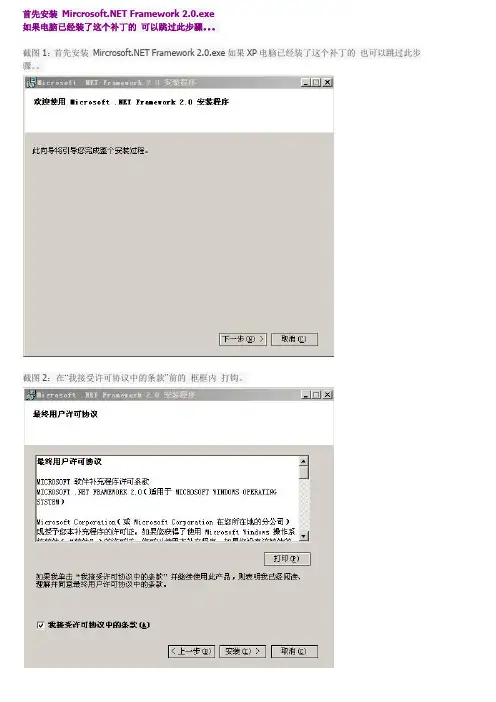
首先安装 Framework 2.0.exe如果电脑已经装了这个补丁的可以跳过此步骤。
截图1:首先安装 Framework 2.0.exe如果XP电脑已经装了这个补丁的也可以跳过此步骤。
截图2:在“我接受许可协议中的条款”前的框框内打钩。
截图3:安装中。
截图4:安装成功,点“完成”!------------------------------------------分割线----------------------------------------------------截图5:接下来安装EAC eac-1.0beta2.exe。
截图6:点击Next 截图7:点击I Agree截图8:选择路径,继续点击Next 截图9:点击Next截图10:点击Install截图11:安装完毕,点击Finish。
截图12:此时会出现第一次运行EAC 的操作向导和一个小对话框。
截图13:点击下一步截图14:看图内说明截图15:如图操作截图16:如图操作截图17:继续下一步截图18:继续下一步截图19:选择最后一个点击下一步截图20:填写自己的邮箱地址截图21:下一步截图22:选择第2个进阶使用者模式,点击完成并关闭EAC截图23:这个时候回到准备文件里面,把cddb1.5.2 这个文件夹复制到你的EAC 所安装的文件夹里面并把文件夹名字改为cddb关闭文件夹,双击打开桌面上的EAC图标,现在就开始设置EAC了,有的人肯定说EAC有中文版的为什么不用呢,因为1.0beat2的版本目前没有中文语言档,而且cddb功能必须在英文版本下才能获取,最重要的是再最终生成的log的时候如果是中文版本的EAC就会是中文的log,如果你想分享给国外的人肯定就不行啦。
所以我们用英文的EAC,国际认可。
EAC的设置大体都差不多,(以下设置引用至国外音乐PT网站BTM)一一图解设置。
截图24:首先EAC设置,点击进入。
截图26:按图设置截图27:按图设置截图28:按图设置,手动修改一下,"%tracknr2% - %artist% - %title%" (给出代码,修改第二个就行了)都设置好以后再点确定。
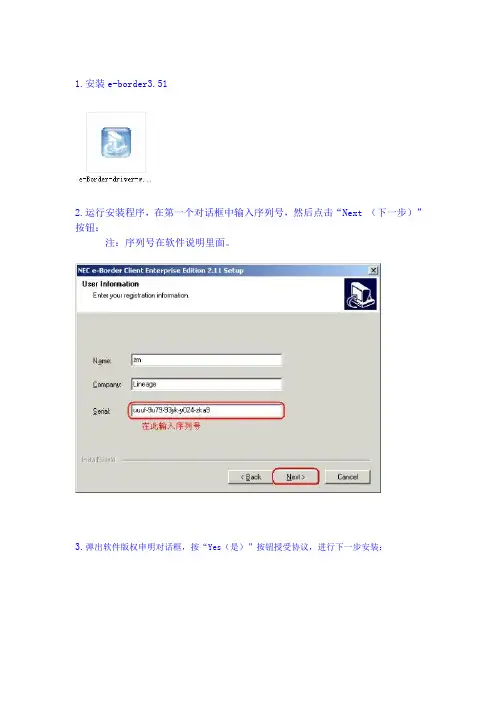
1.安装e-border3.51
2.运行安装程序,在第一个对话框中输入序列号,然后点击“Next (下一步)”按钮:
注:序列号在软件说明里面。
3.弹出软件版权申明对话框,按“Yes(是)”按钮授受协议,进行下一步安装:
4.选择程序安装路径对话框,如果要改变程序的安装路径,点击“Browse..(浏览)”按钮,否则点击“Next(下一步)”按钮:
5.接下来设置程序组名称,如果不想改变名称,直接点击“Next(下一步)”按钮:
6.最后,程序开始安装,完成后出现安装完成对话框,点击“Finish(完成)”按钮,完成安装并进行代理设置:
7.点击“完成”按钮后,出现以下对话框:
直接点击下一步按钮。
8.接着选择代理服务器的个数:
根据你拥有代理服务器的个数进行选择,在此选择第3项“我有一个代理服务器”,然后再击“下一步”按钮:
9.接着填写代理服务器名和代理端口:
10.点击“下一步”按钮,选择你所使用的代理服务器是否需要身份验证(即需要用户名和密码):
11.在此选择“需要身份验证”,再点击“下一步”按钮:
12.在此选择哪些应用程序需要使用代理上网,我们选择“代理所有应用程序”,再点击“下一步”按钮,出现完成对话框:完成
13.打开代理软件,选择需要身份验证和启动代理,确定。
14.运行需要代理上网的程序时,会弹出输入用户名和密码的对话框,输入用户名和密码
注:请用测试的朋友不要选择保存用户名和密码。
正式以后在保存。
注意:关闭eb或者关机前一定要把这两个勾勾去掉,再点应用,再点确定,不然会对您的电脑造成一定的伤害
4G网络加速器轻松上国外网站
官网:有什么不懂的可以联系客服。

FCKeditor使用方法详解目录一、FCKeditor简介 (2)1.1 FCKeditor是什么 (2)1.2 FCKeditor的特点 (3)二、安装与配置FCKeditor (5)三、基本功能使用方法 (6)3.1 文本格式化 (7)3.2 段落和列表操作 (9)3.3 图片和表格插入 (10)3.4 表单字段 (11)3.5 样式和脚本 (12)四、高级功能使用方法 (13)4.1 可视编辑器 (14)4.2 自动排版 (16)4.3 批量导入/导出 (17)4.4 国际化支持 (18)4.5 客户端存储 (20)五、自定义插件与扩展 (21)5.1 如何安装插件 (22)5.2 插件的使用方法 (24)5.3 开发自定义插件 (25)六、常见问题与解决方案 (27)6.1 常见问题列表 (28)6.2 问题解决步骤 (29)七、实例演示 (30)7.1 创建一个简单的HTML页面 (31)7.2 在页面中添加FCKeditor (32)7.3 配置和使用FCKeditor的各种功能 (34)八、FCKeditor在主流开发框架中的应用 (35)8.1 PHP+MySQL环境下的应用 (36)8.2 环境下的应用 (37)8.3 Java/Spring环境下的应用 (39)九、总结与展望 (39)9.1 FCKeditor的优点 (40)9.2 FCKeditor的局限性与未来发展趋势 (41)一、FCKeditor简介FCKeditor是一款由德国Maxthon公司开发的强大的网页文本编辑器,它具有丰富的功能、高度的可定制性和易用性,被广泛应用于各种Web应用中,如论坛、博客、新闻发布等。
FCKeditor不仅提供了基本的文本编辑功能,还支持图像、表格、超链接等元素的插入和编辑,以及自定义插件和宏,可以满足用户的各种编辑需求。
FCKeditor采用了基于JavaScript的富文本编辑技术,具有高效的性能和较小的体积,可以轻松地集成到各种Web应用中。

emobile 使用技巧emobile 是一种移动通信设备,为了更好地使用它,我们需要掌握一些使用技巧。
本文将为大家介绍一些关于 emobile 的使用技巧,帮助大家更好地使用这一设备。
一、了解 emobile 的功能和特点emobile 是一种便携式的移动通信设备,它具有一些特殊的功能和特点。
首先,emobile 可以实现无线通信,可以随时随地进行通话和信息传递。
其次,emobile 支持多种通信方式,包括语音通话、短信、彩信等。
此外,emobile 还具有一些其他的功能,比如浏览互联网、播放音乐等。
二、设置 emobile 的基本信息在使用 emobile 之前,我们需要进行一些基本的设置。
首先,我们需要插入 SIM 卡,并进行相应的激活操作。
然后,我们需要设置emobile 的基本信息,比如语言、时间、日期等。
此外,我们还可以设置 emobile 的铃声、振动等个性化参数,以满足个人需求。
三、掌握 emobile 的通话技巧emobile 作为一种通信设备,通话功能是其最基本的功能之一。
在通话过程中,我们可以使用一些技巧来提高通话质量。
首先,我们需要选择一个良好的通话环境,避免嘈杂的背景声音。
其次,我们需要掌握一些通话礼仪,比如保持礼貌、注意语音语调等。
此外,我们还可以使用一些功能来辅助通话,比如免提、静音等。
四、熟悉 emobile 的短信功能emobile 的短信功能是一种非常常用的通信方式。
在使用短信功能时,我们可以使用一些技巧来提高效率。
首先,我们可以使用快捷回复功能,预先设置一些常用的回复模板,以节省时间。
其次,我们可以设置短信提醒,以便及时收到重要的短信。
此外,我们还可以设置短信群发,方便同时向多人发送短信。
五、利用 emobile 浏览互联网emobile 不仅可以用于通信,还可以用于浏览互联网。
在使用这一功能时,我们需要注意一些事项。
首先,我们需要选择一个稳定的网络环境,以确保能够正常访问网页。


gta5线上小助手外育菜单使用教程
gta5线上小助手怎么用。
方法:
1、搜索并打开线上助手自网。
2、点击下载文件。
3、打开小助手。
4、登灵游戏后即可使用助手功能。
GTA5线上小助手官方版是一款十分好用的在线辅助工具,一个能够帮助每一个玩家在GTA5联机的时候轻松修改,直接开启小助手使用外置辅助、线上服务、赌场服务、获取幸运转盘奖品、15000经验(倒数第三个),然后一直点num5确认即可。
游戏设定游戏的背景多是设定在模仿美国各城市的虚构地点,游戏主要着重在开放世界的设定上,玩者可自由决定.。
User Manual Eshare2020ContentsUser Manual (1)1. About ESHare (4)1.1 Main Features (4)1.2 Feature List (5)1.3 Client Requirements (6)1.4 Network Requirements (6)ESharePro (6)AirPlay/iMirror (6)2. EShare APP GUIDe (7)2.1 Download THE EShare APP (7)2.2 Guide for Android Client Devices (7)2.2.1 Connect to the Large Display (7)2.2.2 File Sharing (8)2.2.3 Share Screen (9)2.2.4 Full-Screen (10)2.2.5 TV Mirror (11)2.2.6 Wireless Annotations (11)2.2.7 Camera (11)2.2.8 Remote Control (12)2.2.9 Share Files from Other APPs to Large Display (12)2.3 Guide for Windows/macOS/Chrome OS/Ubuntu Client Devices (13)2.3.1 Connect to the Large Display (13)2.3.2 Share Screen (13)2.3.3 TV Mirror (14)2.3.4 Wireless Annotations (15)2.3.5 Full Screen (15)2.3.6 Invitation for Mirroring (16)3. Guide for ESharePro (17)3.1 Multiple Screens (17)3.1.1 Multiple Screens Settings (17)3.1.2 Multiple Screens Display (17)3.1.3 Switch the Audio Output Source (18)3.1.4 Full-Screen or Multiple Screens (18)3.2 Display Group Settings (19)3.2.1 Display Group Settings (19)3.2.2 Share Screen to the Display Group (19)3.3 Moderator Mode (20)3.3.1 Options for “Share Screen” (21)3.3.2 Options for “View,Control and Wireless Annotation” (21)3.3.3 Other Options in Moderator Control Center (22)4. Technical SUPPORT (24)1. ABOUT ESHAREEShare is a set of multi-screen interactive software applications designed for sharing, wireless display and remote control between mobile devices (such as phones, tablets, laptops, etc.) and large displays.1.1 MAIN FEATURES● File sharing: share any file (such as audio, video, photo, office document, PDF, e-book, APK, etc.) from a mobile phone or tablet to large displays.● Remote control: supports wireless control via wireless mouse, air mouse, keyboard, touchpad, remote controller, etc.●Wireless camera and microphone: share the images or audio from your phone camera or microphone to the large display in real-time.● TV Mirror: mirror the large display to the client device, and touch to control the large display via the client device.● Mirroring: mirror the client device screen (such as iPhone, iPad, Android device, MacBook, Chromebook, Windows PC and Ubuntu PC, etc.) to the large display or projector, and touch to control client devices from the large display without touch control cable, VGA or HDMI.● AirPlay: share images, audio, videos, screen of iPhone or iPad to the large display with the feature of “Screen Mirroring” of iPhone or iPad.● DLNA: support any client APP compatible with DLNA protocol.● Wireless annotations: annotate the large display via phone in real-time inside the TV mirror function.● Multiple screens: share multiple device screens to a large display at the same time, and the screen of the large display will be split automatically.● Display group: users can share their screen from one client device to multiple large displays wirelessly.● Moderator control mode: the moderator can control the client devices for screen sharing, TV Mirror, wireless annotations, full-screen display, etc.1.2 FEATURE LISTFeature Description Video All popular video formatsAudio All popular video formatsImages Share images Real-time scaling RotateDocuments All Office documents PDF and othersRemote control Wireless mouseAir mouseWireless keyboard (supporting the input methods of voice, writing...)Wireless touchpadCommon keys (Home, Menu, Back, Vol+/-, etc.) Application list of large displayCamera Wireless cameraWireless annotations Annotate the large display via phone in real-timeTV mirror Mirror the large display to phone or laptop, and touch on the client device to control the large display wirelesslyiOS mirroring Mirror the screen of the iOS device to the large displayAndroid mirroring Mirror the screen of the android device to the large display, and support annotationsWindows mirroring Mirror the screen of Windows PC to the large display, and touch feedback from the large display to PCmacOS mirroring Mirror MacBook screen to the large display, and touch feedback from the large display to MacBookChrome mirroring Mirror the screen of Chromebook to the large display Ubuntu mirroring Mirror the screen of Ubuntu PC to the large display DLNA Support any APP compatible with DLNA protocolMultiple screens Share multiple screens to the large display, and the screen of the large display will be split automaticallyModerator control Control the client devices for screen sharing, TV Mirror, wireless annotations, full-screen display and so on.1.3 CLIENT REQUIREMENTSPlease ensure the client devices meet the following requirements:● Android 5.0 or later● Mac OS 10.9 or later● iOS 9.0 or later● Windows 7/8/10● Chrome OS● Ubuntu 12.04 or later1.4 NETWORK REQUIREMENTSESHAREPROPlease ensure that ESharePro and EShare client apps are in the same network.TCP Ports: 56789, 25123, 8121 & 8000UDP Ports: 48689, 25123DNS: Please enable the broadcast function of the router.To get a highly reliable, robust user experience, it is strongly recommended to connect the large display using Ethernet and the client device using a 5GHZ Wi-Fi band.AIRPLAY/IMIRRORPlease ensure that the mDNS of network/AP/router (if possible) is enabled.TCP Ports: 51040, 51030, 51020 & 51010UDP Ports: 5353 (mDNS to broadcast AirPlay)2. ESHARE APP GUIDE2.1 DOWNLOAD THE ESHARE APPPlease ensure that your client device and the large display are in the same network, and then launch “ESharePro”. Next, scan the QR-code or visit “eshare.app” to download and install the EShare app.2.2 GUIDE FOR ANDROID CLIENT DEVICES2.2.1 CONNECT TO THE LARGE DISPLAYPlease ensure that your client device and the large display are in the same network.⚫Set “Device Name” as the connection mode (default setting): launch the EShare app, and EShare will automatically search for large display devices in the samenetwork, and then select the device in the device list to connect to the large display.Or you can enter IP or PIN code to connect to the large display.⚫Set “PIN Code (6 digits)/PIN code (8 characters)” as the connection mode: launch the EShare app and enter the PIN code to connect to the large display.⚫Scan QR-code to connect: launch EShare app and scan the QR code to connect to the large display.2.2.2 FILE SHARING⚫Image: select any image to share it to the large display.⚫Audio/Video:select any audio/video to share it to the large display.⚫Doc: select any document to share it to the large display.⚫Storage:tap “Storage” in the top right corner of Doc sharing page to start the wireless storage, and visit the URL to upload files to your phone’s storage ordownload the files from it.2.2.3 SHARE SCREEN⚫Android devices: tap "Share Screen" to share screen to the large display.⚫iOS devices: tap "Share Screen" and follow the iOS screen sharing guide to share screen to the large display.1 2 34 52.2.4 FULL-SCREENYou can tap the full screen button to display your screen exclusively on the large display, even if two or more client devices are sharing the screen.Full-screen2.2.5 TV MIRRORTap “TV Mirror” to mirror the screen of the large display to your phone, and touch the phone to control the large display.2.2.6 WIRELESS ANNOTATIONSTap "TV Mirror", tap the pen button in the sidebar to start wireless annotations on the large display.2.2.7 CAMERATap “Camera” to share the photos or audio from your phone camera or microphone to the large display in real-time.2.2.8 REMOTE CONTROLTap “Remote” to use your phone as wireless mouse, remote controller, keyboard, air mouse, etc.2.2.9 SHARE FILES FROM OTHER APPS TO LARGE DISPLAYIn email, browser, file manager and other applications, you can share files to the large display through EShare app.Or you can share files to the large display with other apps supporting DLNA.2.3 GUIDE FOR WINDOWS/MACOS/CHROME OS/UBUNTU CLIENT DEVICES2.3.1 CONNECT TO THE LARGE DISPLAYPlease ensure that your Windows/macOS/Chrome OS/Ubuntu client devices and large display are in the same network.⚫Set “Device Name” as the connection mode (default setting): launch the EShare app, and EShare will automatically search for large display devices in the same network, and then select the device in the device list to connect to the large display.Or you can enter IP or PIN code to connect with to large display.⚫Set “PIN Code (6 digits)/PIN code (8 characters)” as the connection mode: launch the EShare app and enter the PIN code to connect to the large display.⚫Select the device in the history list to connect:click the input box “Enter IP or PIN code to connect” and you will see the history list (if any). Select the device to connect with to large display.2.3.2 SHARE SCREENTap "Share Screen" to share your PC screen to the large display, and touch to control client devices from the large display.Pause sharing Stop sharing⚫Share extend screen (for Win 10 only):for Windows users, you can click “Source”to select “Share extend screen” to just share your ex tend screen to the large display.2.3.3 TV MIRRORTap “TV Mirror” to mirror the screen of the large display to your PC, and control the large display on PC side.2.3.4 WIRELESS ANNOTATIONSTap "TV Mirror", and tap the pen button in the sidebar to start wireless annotations on the large display from the PC.2.3.5 FULL SCREENYou can click the full screen button to display your screen exclusively on the large display, even if two or more client devices are sharing the screen.2.3.6 INVITATION FOR MIRRORINGClick "Invitation for Mirroring” in Settings and the re are two following options for you:⚫Auto-accept:accept the moderator’s invitation for screen sharing automatically.When the moderator taps the button “Share Screen” in Moderator Control Center, your PC screen will be displayed on the large display.⚫Notify me:when the moderator taps the button “Share Screen” in Moderator Control Center, your PC screen won’t be displayed on the large display until you accept the invitation.3. GUIDE FOR ESHAREPRO3.1 MULTIPLE SCREENS3.1.1 MULTIPLE SCREENS SETTINGSLaunch ESharePro on the large display, tap the “Settings” button in the bottom right corner to set multiple screens.3.1.2 MULTIPLE SCREENS DISPLAYMultiple client device screens can be shared to the large display at the same time, and the screen of the large display will be split automatically.3.1.3 SWITCH THE AUDIO OUTPUT SOURCEThe audio of the last sharing device will be output by default from the large display on multi-screen mode. You can tap any one of the split windows on the large display to select the audio output source.Note: The audio of Android phones in sharing will be output from phones for lack of audio access permission to Android phones.3.1.4 FULL-SCREEN OR MULTIPLE SCREENSTap the Full-Screen icon at the bottom right corner of the large display on multi-screen mode to full-screen it. Click the icon again to exit the full-screen and go back to multiple screens.3.2 DISPLAY GROUP SETTINGS3.2.1 DISPLAY GROUP SETTINGSLaunch ESharePro, click the Display Group icon to enter the setting dialog, turn on the display group feature, and you will find other ESharePro preinstalled devices in the same network (if any) are listed. Next, select the device to join the display group, and click “OK” to save the settings.3.2.2 SHARE SCREEN TO THE DISPLAY GROUPAfter the setting mentioned above, share your screen to the main large display, and the screen of your client device will be shown on all the large displays in the group at the same time.3.3 MODERATOR MODELaunch "ESharePro" and click the moderator control button in the bottom right corner to enter the moderator control center. You can also enter the moderator control center by tapping the floating moderator button.3.3.1 OPTIONS FOR “SHARE SCREEN”⚫Allowed: client devices can share screens or share images/audio/videos/files to the large display. The client app for iOS or Android can also share the camera to the large display in real time.⚫Need authorization:client devices can share screen or share images/audio/videos/fi les/camera to the large display only when the option “Allow” is selected in the authorization dialog for screen sharing.⚫Disable: any client devices cannot share images/audio/videos/files/camera shot if the option of “Share Screen or File” is set as“Disable”.3.3.2 OPTIONS FOR “VIEW, CONTROL AND WIRELESS ANNOTATION”⚫Allowed: client devices can view and control the large display, can make annotations in TV Mirror or Remote Control.⚫Need authorization: client devices can view and control the large display and can make annotations in TV Mirror or Remote Control only when the option “Allow” is selected in the authorization dialog.⚫View only: client devices can only view the large display in TV Mirror but cannot control the large display or make annotations.⚫Disable: no client devices can view, control the large display in TV Mirror or Remote Control, or make annotations.3.3.3 OTHER OPTIONS IN MODERATOR CONTROL CENTERPrecondition: the client device is connected to the large display.⚫Invite the client device to share screen: select any one client device in the moderator control center, and click the button to invite the client device to share screen, and tap this button to stop sharing when the client device is sharing screen.⚫Allow the client device to control the large display: tap the screen control button to enable or disable the client’s control permission for the large display. If thisbutton is marked with a small green check mark, it shows the client can control the large display.⚫Disconnect the client device: tap the "disconnect" button , and select “OK” in the dialog to disconnect the client device.4. TECHNICAL SUPPORTPlease fill in your RMA or Product question on our websitehttps:///support/technical-support/If you have any questions, please email us at ************************TRIUMPH BOARD a.s.Neklanova 122/15128 00 Prague 2Czech RepublicEUPhone: +420 224 910 221E-mail: *********************NoticesEvery effort has been made to ensure all information contained in this user guide is correct, but the accuracy or completeness is not guaranteed. Before using this device, you must evaluate it and determine if it is suitable for your intended application. You assume all risks and liability associated with such use. Any statements related to this device not contained in this manual or any contrary statements appearing on your purchase order shall have no force of effect unless expressly agreed upon, in writing, with this company.Reproduction or reprinting of this user guide or any part without permission is prohibited.The content of this user manual is subject to change without prior notice.。
翻译流程:以“尽管还存在一点不确定因素,但大多数科学家仍认为及时采取预防措施是必需的。
针对气候变化的国际响应是随着联合国气候变化框架条约(UNFCCC)的发展而逐渐成型的。
”为例1.整句翻译工具:51fane助手操作方法:选中全句后,按ctr c 然后按 b从中间找出可用部分如:Although there are some uncertaintiesBut most scientists still believe thatTimely preventive measures are required对于不确定的内容,使用scholar.exe进行核实。
操作方法:选中需要核实的内容如there are some uncertainties 按ctr alt s发现有很多结果,而且作者基本上都是外国人,那就可以确定了。
其它的部分也按照这个方法进行核实和验证。
实际上谷歌对于本句的翻译已经非常准确了,可以直接使用。
尽管还存在一点不确定因素,但大多数科学家仍认为及时采取预防措施是必需的。
Although there are still some uncertainties, but most scientists still believe that timely preventive measures are required.继续演示:针对气候变化的国际响应是随着联合国气候变化框架条约(UNFCCC)的发展而逐渐成型的。
先整句翻译从中提取可用部分International response to climate changeFramework treatythe United Nations Framework Convention on Climate Change (UNFCCC) 并用scholar.exe逐一验证。
鉴于大部分同学对于英语不太敏感,建议使用以下流程1.全句翻译供稍后参考2.拆句方法:在术语的前后拆开本句可以拆为:气候变化针对的国际响应是随着的发展而逐渐成型的。
书目第一节概览 (2)其次节新建分析 (2)第三节新建仪表盘提示 (6)第四节新建仪表盘 (9)第五节过滤器 (11)第六节编辑列公式 (12)第七节列属性 (12)第八节列值排序 (15)第九节列重命名 (16)第十节编辑标题 (17)第十一节编辑表 (18)一、列排序 (18)二、表提示 (19)三、列隐藏 (19)四、列复制 (20)五、列解除 (20)六、列汇总 (20)七、表汇总 (21)八、表分页 (21)第十二节编辑图 (22)一、条形图 (22)二、条线图 (23)三、饼图 (23)四、堆叠图 (23)五、图属性 (23)第十三节数据透视表 (28)第十四节下钻 (29)一、无条件下钻 (29)二、有条件下钻 (30)第十五节联合分析 (30)第一节概览(图)如图为登录页面,输入相应用户名及密码即可胜利登录BI系统。
登录系统后如下图。
图图为BI系统主页,大致分两部分,菜单栏和最近打开的仪表盘。
一、书目:存放全部文件的地方。
二、仪表盘:在这里可以查看全部仪表盘。
三、新建:新建全部类型文件。
其次节新建分析当您登陆BI系统首先在页面标题栏找到“新建”下拉菜单,在这个下拉菜单了是我们BI 系统全部新建项目类型。
我们最常用的报表、图像都隶属于仪表盘,仪表盘又是由分析+仪表盘提示组合而成。
下面我们先了解分析,当你在新建菜单中点击分析后会有一个弹窗,在这里面有各种主题模型(主题模型好比一个数据仓库,里面有维表、事实表组成),现在我们以“用户培训”这个主题模型作为我们这本书的示例模型讲解。
第一步:新建—>分析—>用户培训,如下图(1.2.1)图其次步:依次双击时间维-年月、客户维-客户名称、产品维-产品名称、区域维-第四层区域、事实销售-本期实际销售数量,如下图图第三步:点击“结果”,查看结果数据。
如图图右侧表格数据即为某个月某个客户在某个省销售某个产品的实际数量。
1、修改标题:点击标题视图中铅笔形态图标后,如下图图 1.2.4填写标题名称,勾掉“显示保存的名称”,右侧“A”可以编辑标题样式,比如字体大小、颜色、对齐方式等。
© EZ-ACCESS ®, a division of Homecare Products, Inc. All rights reserved. All text and images contained in this document are proprietary and may not be shared, modified, distributed, reproduced, or reused without the express written permission of EZ-ACCESS.Installation ManualSupplementFortress OSHA Stair System CanopyRated Load: 100 psf, 300 lbs. concentratedThis supplement covers the special requirements for installing the Fortress Stair System Canopy. For additional instructions, refer to the main manual titled Fortress OSHA Stair System Adjustable Stair Installation Manual.1. SAFETY AND WARNINGSWARNING! Rated load is 100 psf, 300 lbs. concentrated. Never exceed rated load.Regularly check for damage and tighten any loose fasteners.Keep canopy clear of ice, snow, dirt, leaves and other debris at all times.Re-read your Fortress OSHA Stair System Adjustable Temporary Stair Manual before installing the Canopy and follow all warnings, maintenance, and safety information.Do not use the system without properly installed handrails.Periodically inspect and confirm all parts of the canopy are in good condition, correctly positioned, and securely fastened. If damaged, loose, or missing parts are noted, DO NOT USE and contact manufacturer.Regularly check and properly tighten fasteners as needed.Metal conducts electricity. Never use near electrical current.Use caution at all times. Do not run or jump on the system.Do not use any part of the system, including handrails, to support planters, power cords, decorations, etc.2. INSTALLATION TOOLS∙Tape measure ∙9/16” wrench∙Level ∙9/16” socket∙Ratchet wrench ∙1/2” wrench∙Marker ∙1/2” s ocket3. INSTALLATION:3.1. Remove handrails from Fortress OSHA Stair System, if installed, and set aside.WARNING!Use extreme caution on platform when handrails are removed.3.2. Insert 1 1/2” square canopy posts into platform corner pockets with the holes oriented toward the platform. Thecanopy corner post, the only one with holes on all four sides, must be in the corner where the two handrails will connect. Orient the two canopy posts at 90° from the corner post so the holes are in line with the holes in thecorner post (FIG. 1).3.3. Set canopy roof on canopy posts. Insert top of canopy posts into canopy roof corner pockets and tightencorner pocket set screws (FIG. 1).3.4. Insert 5/16”-18 x 3-1/2” button head socket cap screws, 5/16” flat washers, and 5/16”-18 locknuts as shown(with the locknuts on the inside) to attach handrails to the canopy posts. Tighten all fasteners securely (FIG. 2).3.5. Install 1/4” x 1” pan head Phillips self-tapping screws through the existing holes in the platform corner pocketsinto the 1 1/2” square canopy posts (FIG. 2). Pre-drill 1/8” pilot holes in the canopy posts if needed.3.6. Make sure all fasteners are in place and tightened securely. Regularly check and tighten fasteners as needed.FIG. 1FIG. 2。
目录目录 0第一章:系统概要 (3)第二章:系统结构 (3)第一节:网络拓扑图 (3)第二节:功能模块 (4)第三章:系统操作 (4)第一模块:登录系统 (4)第二模块:节目管理 (5)第一节:制作节目 (6)第一要素:编辑器 (6)1、新版编辑器 (6)2、旧版编辑器 (8)第二要素:节目制作 (11)1、名词介绍 (11)2、制作(旧版编辑器为例) (11)2.1文字插入功能 (11)2。
1。
1静态文字使用方法 (11)2。
1。
2动态滚动字幕使用方法 (12)2.2图片插入功能 (13)2。
2。
1背景图片使用方法 (13)2.2。
2普通图片使用方法 (14)2。
2.3广告图片使用方法 (15)2.2。
4 Logo图片使用方法 (16)2.3视频插入功能 (16)2.3。
1 Flash动画插入使用方法 (16)2.3。
2自动播放媒体插入使用方法 (17)2。
3。
3视频直播使用方法 (18)2.4日期时间插入功能 (18)2。
5倒计时和正计时插入功能 (18)2.5.1倒计时使用方法 (18)2。
5。
2正计时使用方法 (19)2。
6 Office组件插入功能 (20)2。
7数据采集组件插入功能 (20)2.8天气预报插入功能 (20)2。
9触摸卡片的使用方法 (21)2.9。
1 摘要卡片 (21)2.9.2 图片卡片 (22)2。
9。
3 视频卡片 (22)2.10 选择模版功能 (23)2。
11播放时间设置 (23)2.12框架节目(互动节目)的制作 (23)2。
13插入按钮的使用方法 (23)2。
14 保存、新建场景、生成节目与预览 (24)第三节:节目管理界面 (24)第四节:节目发布设置 (26)第五节:节目审批 (27)第六节:下载管理 (28)第七节:删除节目 (29)第一要素:终端节目删除 (29)第二要素:管理端节目删除 (30)第八节:节目备份 (30)第九节:节目发布界面 (31)第十节:节目审批界面 (32)第三模块:终端管理 (32)第一节:插播消息 (32)第二节:终端信息管理 (33)第三节:终端监控管理 (35)第四节:终端带宽管理 (36)第五节:终端升级 (37)第四模块:系统设置 (37)第一节:权限管理 (38)第一要素:机构管理 (38)第二要素:角色管理 (39)第三要素:用户管理 (41)第二节:分发服务器管理 (42)第三节:数据采集服务 (43)第一要素:数据采集服务 (43)第四节:参数设置 (44)数据组件节目制作 (46)第五节个性化 (48)第五模块:系统日志 (49)第一节:用户操作日志 (50)第二节:播放日报表 (50)第三节:素材统计表 (50)第六模块:素材管理 (51)第一节:素材管理 (51)第一要素:素材上传 (51)大文件上传 (52)第二节:模版管理 (53)第一要素:背景模板 (53)第二要素:普通模板 (53)第三节:在线资源 (53)多媒体信息发布系统V3。
协同移动平台安装设置手册一、协同移动平台安装协同移动平台是完全独立于ecology系统的标准的基于J2EE框架Java Web应用程序,可以在各种操作系统的各种Web平台上运行,协同移动平台本身默认已包含Resin3.1.12的Web应用服务器,因此只需简单的设置后,便可启动运行。
1、协同移动平台文件安装首先请在相关目录中解压缩协同移动平台的升级包,升级包分为2个部分,第1个部分为协同移动平台及Resin应用服务器的所有相关文件;第2个部分为需要在ecology系统中部署的相关接口文件,即ecology系统的补丁包。
因此,在升级前,请先停掉ecology系统,以便在ecology系统中升级相关补丁包及修改相关配置。
以下分别介绍相关的文件和相关配置。
→协同移动平台目录及文件安装其中emobile目录下webapps为协同移动平台,其余目录均为Resin的相关目录。
→ecology系统相关文件安装先停掉ecology系统,根据补丁包,将文件解压缩至ecology目录下。
2、协同移动平台服务器设置如需要修改服务器端口,请修改emobile\conf\resin.conf文件:<resin xmlns="/ns/resin"xmlns:resin="/ns/resin/core"><log name="" level="info" path="stdout:"/><log name="" level="info" path="log/resin.log"timestamp='[%Y-%m-%d %H:%M:%S.%s]' rollover-period='1W'rollover-size='5mb' archive-format="resin-%Y-%m-%d.log"/><cluster id=""><server id="" port="6801"><http port="89"/></server><resin:import path="${resin.home}/conf/app-default.xml"/><host id="" root-directory="./webapps"><web-app id="/" root-directory="ROOT"/><web-app id="/m1" root-directory="m1"/><web-app id="/manager" root-directory="manager"/></host></cluster></resin>6801为resin服务的端口(如果和ecology的Resin配置在同一台服务器,此端口不能与ecology的Resin端口相同)89为有Mobile访问端口如需要修改初始化程序端口,请修改emobile/ jetty/etc/jetty.xml<Call name="addConnector"><Arg><New class="org.mortbay.jetty.nio.SelectChannelConnector"><Set name="host"><SystemProperty name="jetty.host" /></Set><Set name="port"><SystemProperty name="jetty.port" default="90"/></Set><Set name="maxIdleTime">30000</Set> <Set name="Acceptors">2</Set><Set name="statsOn">false</Set><Set name="confidentialPort">8443</Set><Set name="lowResourcesConnections">5000</Set><Set name="lowResourcesMaxIdleTime">5000</Set></New></Arg></Call>90为Mobile初始化程序端口8443为Jetty服务端口3、协同移动平台数据库设置由于协同移动平台应用与ecology系统完全独立,但使用同一个数据库,所以需要单独设置数据库连接信息,需要分别设置新版本和1.0版本新版本的数据库连接配置文件位于:emobile\webapps\ROOT\WEB-INF\classes\ application.properties1.0版本的数据库连接配置文件位于:emobile\webapps\m1\WEB-INF\classes\ application.properties这两个文件不需要手动配置,后台配置时会自动写入。