esAPI1.7说明文档
- 格式:docx
- 大小:2.44 MB
- 文档页数:22

ElasticSearchHighLevelRESTAPI【1】⽂档基本操作获取ES客户端ES的提供了四种Java客户端,分别为节点客户端(node client)、传输客户端(Transport Client)、低级REST客户端、⾼级REST客户端。
节点客户端作为集群节点的⼀部分,在集群节点较多的情况下会影响集群的反应速度。
传输客户端客户端虽然实现了和集群的解耦,相对节点更“轻”,但是会在ES7.0或8.0之后被移除,被“⾼级Rest客户端”所取代。
在此截取了ES官⽅⽂档对此的说明。
因此学习“⾼级RestAPI”的使⽤还是很有必要的。
如下为ES 客户端的创建:@Configurationpublic class ElasticClient {private String host = "10.1.59.101";private int port = 9200;/*** 获取Rest⾼级客户端* @return*/@Beanpublic RestHighLevelClient getRestHighLevelClient(){RestClientBuilder builder = RestClient.builder(new HttpHost(host, port));return new RestHighLevelClient(builder);}/*** 获取Rest低级客户端* @return*/@Beanpublic RestClient getRestClient(){RestClient build = RestClient.builder(new HttpHost(host)).build();return build;}下⾯介绍下ES在Java中基本的⽂档增删改查操作索引操作索引即我们的新增操作,ES提供了三种形式的索引,分别为通过Json字符串、Map集合、XContentBuilder实现索引操作⽰例如下:public void save(User user) {RestHighLevelClient client = elasticClient.getRestHighLevelClient();//Json字符串作为数据源IndexRequest indexRequest1 = new IndexRequest("02","book","3");String jsonString = "{" +"\"name\":\"⽣命的诞⽣\"," +"\"type\":\"科学\"," +"\"price\":\"170\"" +"}";indexRequest1.source(jsonString, XContentType.JSON);//Map集合作为数据源Map jsonMap = new HashMap<>();jsonMap.put("user", "userByMap");jsonMap.put("postDate", new Date());jsonMap.put("message", "messageByMap");IndexRequest indexRequest2 = new IndexRequest("posts", "doc", "34").source(jsonMap);//XContentBuilder作为数据源XContentBuilder builder = null;try {builder = XContentFactory.jsonBuilder();builder.startObject();builder.field("user", "userXXX");builder.timeField("postDate", new Date());builder.field("message", "messageXXX");builder.endObject();} catch (IOException e) {e.printStackTrace();}IndexRequest indexRequest3 = new IndexRequest("posts", "doc", "1").source(builder);try {IndexResponse indexResponse1 = client.index(indexRequest1, RequestOptions.DEFAULT); client.index(indexRequest2, RequestOptions.DEFAULT);client.index(indexRequest3, RequestOptions.DEFAULT);client.close();} catch (IOException e) {e.printStackTrace();}}查询根据索引、类型、ID 查询⽂档,⽰例如下public void get(){RestHighLevelClient client = elasticClient.getRestHighLevelClient();GetRequest getRequest = new GetRequest("posts","doc","1");try {GetResponse getResponse = client.get(getRequest, RequestOptions.DEFAULT);client.close();} catch (IOException e) {e.printStackTrace();}}删除public void delete(){RestHighLevelClient client = elasticClient.getRestHighLevelClient();DeleteRequest deleteRequest = new DeleteRequest("02", "book", "2");deleteRequest.timeout(TimeValue.timeValueMinutes(10));deleteRequest.setRefreshPolicy(WriteRequest.RefreshPolicy.WAIT_UNTIL);try {client.delete(deleteRequest, RequestOptions.DEFAULT);client.close();} catch (IOException e) {e.printStackTrace();}}更新public void update(User user){RestHighLevelClient client = elasticClient.getRestHighLevelClient();UpdateRequest updateRequest = new UpdateRequest("posts", "doc", "35");Map map = new HashMap<>();map.put("message", "message_update");map.put("user", "user_update");updateRequest.doc(user.toJsonString(), XContentType.JSON);try {client.update(updateRequest, RequestOptions.DEFAULT);client.close();} catch (IOException e) {e.printStackTrace();}}查询⽂档是否存在public void exists() {RestHighLevelClient client = elasticClient.getRestHighLevelClient();GetRequest getRequest = new GetRequest("posts","doc","33");GetResponse getResponse = null;try {getRequest.fetchSourceContext(new FetchSourceContext(false));//禁⽤获取 _source字段getRequest.storedFields("_none_");//禁⽤获取存储字段。

es运维命令用法大纲全文共四篇示例,供读者参考第一篇示例:ES(Elasticsearch)是一个开源的分布式搜索和分析引擎,被广泛应用于实时数据分析、日志搜索和全文搜索等场景。
在进行ES运维工作时,运维人员需要使用一些命令来管理和维护ES集群,本文将介绍ES运维命令的用法。
主要包括集群状态查看、索引管理、节点操作、数据备份和恢复等方面。
一、集群状态查看1. 查看集群健康状态curl -XGET 'http://localhost:9200/_cluster/health'该命令可以查看ES集群的健康状态,返回的结果包括集群名称、健康状态、节点数量等信息。
二、索引管理1. 创建索引curl -XPUT 'http://localhost:9200/index_name'该命令可以创建一个新的索引,需要指定索引名称。
3. 索引重建curl -XPOST 'http://localhost:9200/index_name/_close'curl -XPOST 'http://localhost:9200/index_name/_open'该命令可以关闭和重新打开一个索引,可以用来进行索引的重建和维护。
三、节点操作2. 节点加入集群curl -XPUT 'http://localhost:9200/_cluster/settings' -d'{"persistent":{"discovery.zen.minimum_master_nodes":"2"}}'该命令可以设置集群中最小主节点数量,用于控制节点加入和离开集群的逻辑。
四、数据备份和恢复以上是对ES运维命令用法的一些介绍,希望可以帮助运维人员更好地管理和维护ES集群。
在使用命令时,请务必谨慎操作,避免对系统造成不必要的影响。
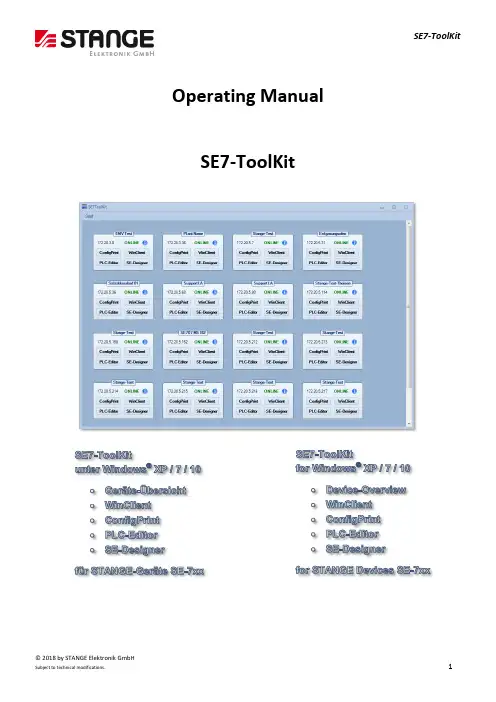
© 2018 by STANGE Elektronik GmbHSubject to technical modifications.1Operating ManualSE7-ToolKit© 2018 by STANGE Elektronik GmbH2Subject to technical modifications.The present manual has been prepared with all possible care.STANGE Elektronik GmbH can nonetheless not accept any liability for the essential correctness of foreign language terms and texts, if evidently their translation has been done by an expert translator who does not belong to our company.The content of the present manual is, as well as appurtenant software products, ownership of the company STANGE Elektronik and protected by copyright. Reproduction is - entirely or in part - not permitted without express approval by the STANGE Elektronik company.© STANGE Elektronik GmbHGutenbergstraße 3 D-51645 Gummersbach Tel: (02261) 9579-0 Fax: (02261) 55212 Software version: v0.0.0.61 Documentation: July 2018Registered trademarks:Windows™ and Windows NT™ by Microsoft Corp., InTouch™ by Wonderware Corp.TELEPHONE SUPPORT: +49 / 2261 / 9579-39© 2018 by STANGE Elektronik GmbHSubject to technical modifications.3CopyrightKeep documentation for future use!This documentation is the intellectual property of STANGE Elektronik GmbH, which also has the exclusive copyright. Any modification of the content, duplication or reprinting of this documentation, as well as any distribution to third parties can only be made with the express permission of STANGE Elektronik GmbH.STANGE Elektronik GmbH does not accept any liability for damages arising from the use of any incorrect or incomplete information contained in this documentation or any information missing there from.STANGE Elektronik GmbH reserves the right to make complete or partial modifications to this document.All brand and product names are trademarks or registered trademarks of the owner concerned.© 2018 by STANGE Elektronik GmbH4Subject to technical modifications.Table of ContentsSE7-TOOLKIT .......................................................................................................................................................................... 5 T HE FUNCTIONS OF THE SE7-T OOL K IT .......................................................................................................................................... 5 INSTALLATION PREPARATIONS .............................................................................................................................................. 5 S YSTEM R EQUIREMENTS ........................................................................................................................................................... 6 SE7-T OOL K IT I NSTALLATION ...................................................................................................................................................... 7 SE7-TOOLKIT OVERVIEW ........................................................................................................................................................ 9 S TART M ENU ....................................................................................................................................................................... 10 SE7-T OOL K IT TILE ................................................................................................................................................................. 11 D OWNLOAD IN CASE OF NOT AVAILABLE SUBPROGRAM ................................................................................................................... 12 U PDATE IN CASE OF AGED SUBPROGRAM VERSION .......................................................................................................................... 12 U NINSTALL PROCESS OF THE SE7-T OOL K IT .................................................................................................................................. 13 INSTALLATION INSTRUCTIONS OF THE SUBPROGRAMS ....................................................................................................... 14 I NSTALLATION : SE7-C ONFIG -P RINT ........................................................................................................................................... 15 I NSTALLATION : SE7-W IN C LIENT ............................................................................................................................................... 18 I NSTALLATION : SE7-PLC-E DITOR .............................................................................................................................................. 21 I NSTALLATION : SE-D ESIGNER ................................................................................................................................................... 25 FAQ – QUESTIONS / ANSWERS / SOURCES ........................................................................................................................... 30 W HY ARE NO TILES DISPLAYED ? ................................................................................................................................................. 30 W HY CAN THE SE-D ESIGNER NOT BE EXECUTED UNDER W INDOWS XP? .............................................................................................. 30 W HY IS THE INFO BUTTON NOT DISPLAYED IN THE DEVICE TILE ? ......................................................................................................... 30 W HY ARE THE BUTTONS SHOWN GREYED OUT IN THE DEVICE TILE ? ..................................................................................................... 31 W HY IS ONLY THE W IN C LIENT DISPLAYED IN THE DEVICE TILE ? . (31)© 2018 by STANGE Elektronik GmbHSubject to technical modifications.5SE7-ToolKitIn this chapter you find an overview of the important software functions. Further information is described in the individual chapters of the manual.The functions of the SE7-ToolKitWith the SE7-ToolKit you can let display you all available SE-7xx devices in your network and execute different functions:- Display device info- Open ConfigPrint, WinClient, PLC-Editor & SE-Designer with the actual and compatible version - Updating the device overview - Add device manually - Set display options- Call information about SE7-ToolKit version - Search and install SE7-ToolKit update - Call the operating manualInstallation preparationsBefore you can work with the program the following preparations should be checked:1. Check system requirements ( General – System Requirements)2. Computer logon always as administrator or with administrator rights until the completion of work© 2018 by STANGE Elektronik GmbH6Subject to technical modifications.System RequirementsSystem requirements: HardwareMinimumProcessor Core 2 Duo, ab 2,0 GHz Main memory 2 GB RAMHard disk space 500 MB, recommended 1 GB Drive DVD-ROMGraphic board 1024 * 768 Pixel 16 Bit colour depthEthernet interface for the communication with STANGE devices of the SE-7xx series SoftwareMinimumOperating systemsMS Windows XP-Professional SP2, Windows Vista, Windows 7, 32 Bit / 64 Bit, starting Home Edition (no Starter-Edition); In case of using foreign languages Ultimate Edition is recommended; Windows 10 incl. Framework 3.5 (Framework installation via Internet during ToolKit installation possible.The SE-Designer is not compatible with MS Windows XP.© 2018 by STANGE Elektronik GmbHSubject to technical modifications.7SE7-ToolKit InstallationExecute the SE7-Toolkit-Setup.exe file on the delivered installation CD in order to install the SE7-ToolKit. Follow the instructions of the setup program.Figure 1: Start of the installationFigure 2: Licensing agreement. Read the agreement and if you agree, set a hook and continue the installation by clicking …N ext >“.© 2018 by STANGE Elektronik GmbH8Subject to technical modifications.Figure 3: Installation assistant. Click the “Next >” button in order to start the installationFigure 4: Installation completion© 2018 by STANGE Elektronik GmbHSubject to technical modifications.9SE7-ToolKit overviewAfter the installation you can start the SE7-ToolKit. Therefor execute the SE7-ToolKit.exe which is located either in the program directory (All Programs/STANGE SE7-ToolKit/SE7-ToolKit) or on the desktop as link.Figure 5: SE7-ToolKit overview© 2018 by STANGE Elektronik GmbH10Subject to technical modifications.Start MenuA “Start” button is located in the upper part of the SE7-ToolKit that calls the following sub menu:Figure 6: Open start menuIn this sub menu the following actions can be executed (from left to right).-The device list below is refreshed by clicking the blue arrows.-Clicking the “i” calls information about the SE7-ToolKit. Here you can open the Eventviewer or check for updates.Figure 7.1: SE7-ToolKit information- The operating manual is called by clicking “?”.- The following 3 buttons open the programs, SE7-ConfigPrint, SE7-PLC-Editor or SE-Designer. - A click to “Config …” enables the manual adding of devices and modification of display options.Figure 7.2: SE7-ToolKit Config ...The start menu is displayed continuously by double click on the “Start” menu.© 2018 by STANGE Elektronik GmbHSubject to technical modifications.11SE7-ToolKit tileThe SE-7xx device list is located in the lower part of the SE7-ToolKit. All SE7 devices are displayed which are available in your network (blue tiles) and the manually added devices (yellow tiles). Each device has an own IP address and is displayed by a separate tile:Figure 8.1: Device tileFigure 8.2: Device tile manually addedThe tiles are built up from top to bottom like follows (see figure 8.1 and 8.2):- Device designation - Associated IP - Online state - Info-Tooltip-4 buttons to open the corresponding programs (ConfigPring, WinClient, PLC-Editor & SE-Designer)Holding the mouse on theicon a tooltip opens which displays the device information.Figure 9: Display of the device information according to IP addressFour different buttons are available below the corresponding unit name (see figure 8) which offers the main functions of the SE7-ToolKit. The compatible and actual programs (ConfigPrint, WinClient, PLC-Editor & SE-Designer) can be opened by operation the corresponding button of the desired device.This saves a lot of time because different parameters of the SE-7xx device are also transferred by opening the programs. This has the advantage that the SE-7xx compatible program can be opened directly and you can continue working further without making changes (like IP input) or find and install a compatible device version.© 2018 by STANGE Elektronik GmbH12Subject to technical modifications.Download in case of not available subprogramThe SE7-ToolKit automatically recognizes whether the compatible versions of the subprograms ConfigPrint, WinClient, PLC-Editor or SE-Designer are already installed or not.If one of those programs is not installed on your computer then the SE7-ToolKit recommends a download with following installation.The SE7-ToolKit searches for an installation at different places:1. If a suitable installation file is deposited in the SE7-ToolKit directory?2. If a suitable installation file is deposited on the corresponding device? A dialog window …Download available” appears if one of the two points is fulfilled:Figure 10: Download & installation in case of not available subprogram (ConfigPrint, WinClient, PLC-Editor or SE-Designer)Simply confirm with “Yes” and the download is executed and the installation started.Update in case of aged subprogram versionIf you already have installed a compatible subprogram (ConfigPrint, WinClient, PLC-Editor or SE-Designer) then the SE7-ToolKit automatically recognizes whether this subprogram is aged and searches for a compatible update. The SE7-ToolKit searches for an update at different places:1. Is a suitable installation file deposited in the SE7-ToolKit directory?2. Is a suitable installation file deposited on the corresponding device?© 2018 by STANGE Elektronik GmbHSubject to technical modifications.13An “Update Available!” dialogue appears if one of the two points is fulfilled:Figure 11: Update & installation in case of aged subprogram (ConfigPrint, WinClient, PLC-Editor or SE-Designer)Simply confirm with “Yes” and the download of the update is executed and afterwards the installation is started.Uninstall process of the SE7-ToolKitProceed like follows if you want to uninstall the SE7-ToolKit:1. Either open the “Uninstall SE7-ToolKit.exe” file which is located under “All Programs/STANGE SE7-ToolKit/UninstallSE7-ToolKit” or open the program manager under “Control Panel/All Control Panel Icons/Programs and Features”. 2. Simply follow the uninstall steps:Figure 12: Uninstall process for SE7-ToolKit, continue by clicking on "Next >"© 2018 by STANGE Elektronik GmbH14Subject to technical modifications.Figure 13: Confirm uninstall succeeded with "Finish"Installation instructions of the subprogramsThe following chapter explains the installation of the subprograms (ConfigPrint, WinClient, PLC-Editor & SE-Designer). The SE7-ToolKit automatically recognizes if a compatible version of the subprogram is already installed on the computer or not and offers an update function.If you want to install the subprograms manually, then you can find them either on the installation DVD, in the SE7-ToolKit installation folder in the subfolder “ToolSetups” or on our homepage: ( /en/downloads.html ).Please use the corresponding operating manual or send an E-Mail to our support (mailto:****************************).if you have questions concerning the operation or the uninstall process of subprograms.© 2018 by STANGE Elektronik GmbHSubject to technical modifications.15Installation: SE7-Config-PrintFollow the installation instructions:Figure 14: Choose installation language.Figure 15: Welcome to the installation wizard. The installation is continued by clicking the "Next >"button© 2018 by STANGE Elektronik GmbH16Subject to technical modifications.Figure 16: Licensing agreement. Read the agreement and if you agree, set a hook and continue the installation by clicking …Next >“..Figure 17: Select your program group or indicate your own.© 2018 by STANGE Elektronik GmbHSubject to technical modifications.17Figure 18: Start the installation by clicking on the “Next >” button.Figure 19: With a click on “Finish” the installation is completed and you can start the SE7-Config-Print program.SE7-ToolKit© 2018 by STANGE Elektronik GmbH18Subject to technical modifications.Figure 20: Surface of the SE7-Config-PrintInstallation: SE7-WinClientPlease follow the installation instructions:Figure 21: Choose installation language.© 2018 by STANGE Elektronik GmbHSubject to technical modifications.19Figure 22: Welcome to the installation wizard. The installation continues by clicking "Next >"Figure 23: Licensing agreement. Read the agreement and if you agree, set a hook and continue the installation by clicking …Next >“.© 2018 by STANGE Elektronik GmbH20Subject to technical modifications.Figure 24: Start the installation by clicking “Next >”.Figure 25: The installation is competed by clicking on “Finish” and the SE7-WinClient can be started.SE7-ToolKit© 2018 by STANGE Elektronik GmbHSubject to technical modifications.21Figure 26: Surface of the SE7-WinClientInstallation: SE7-PLC-EditorPlease follow the installation instructions:Figure 27: Choose installation language.© 2018 by STANGE Elektronik GmbH22Subject to technical modifications.Figure 28: Welcome to the installation wizard. The installation continues by clicking the "Next >" buttonFigure 29: License agreement. Read the agreement and if you agree, set a hook and continue the installation by clicking “Next >”.© 2018 by STANGE Elektronik GmbHSubject to technical modifications.23Figure 30: Select installation folder. We recommend not changing the target folder because the SE7-ToolKit will not find the PLC-Editor and might lead to problems!Figure 31: Select a program group or indicate an own.© 2018 by STANGE Elektronik GmbH24Subject to technical modifications.Figure 32: Start the installation process with “Next >”.Figure 33: Installation is completed by clicking “Finish” and the SE7-PLC-Editor can be started.SE7-ToolKit© 2018 by STANGE Elektronik GmbHSubject to technical modifications.25Figure 34: Surface of the SE7-PLC-EditorInstallation: SE-DesignerThe SE-Designer is not compatible with MS Windows XP. Follow the installation instructions:Figure 35: Choose installation language.© 2018 by STANGE Elektronik GmbH26Subject to technical modifications.Figure 36: Welcome to the installation wizard. The installation is continued by operating the "Next >" buttonFigure 37: Licensing agreement. Read the agreement and if you agree, set a hook and continue the installation by clicking “Next >”.© 2018 by STANGE Elektronik GmbHSubject to technical modifications.27Figure 38: Select a destination folder. We recommend not changing the target folder because the SE7-ToolKit will not find the PLC-Editor and might lead to problems!Figure 39: Select the setup type of the application. We recommend you to choose the “Complete” setup type.© 2018 by STANGE Elektronik GmbH28Subject to technical modifications.Figure 40: Select a program group or indicate an own.Figure 41: Start the installation by clicking “Next >”.© 2018 by STANGE Elektronik GmbHSubject to technical modifications.29Figure 42: Complete the installation by clicking “Finish” and start the SE-DesignerFigure 43: Surface of the SE-DesignerSE7-ToolKit© 2018 by STANGE Elektronik GmbH30Subject to technical modifications.FAQ – Questions / Answers / SourcesThis part of the operating manual answers your questions about frequently asked questions.Why are no tiles displayed?-Check whether the VM network adapter is available in case of Broadcast malfunction; if yes deactivate it.o Please proceed as follows:1. Open the control panel (click on “Start” and “Control Panel”)2. Navigate to the “Network and Sharing Center”(Control Panel\Network and Internet\Network and Sharing Center)3. Open the adapter settings by clicking on “Change adapter settings” in the left column4. In the window “Network Connections” you find active and inactive adapters. Deactivate the “VMwareNetwork Adapter VMnet1”Figure 44: Network Settings – Network Adapter. Deactivate the VMware Network Adapter VMnet1Why can the SE-Designer not be executed under Windows XP?- The SE-Designer is not compatible to Windows XP. Please use a later Windows version than XP.Why is the info button not displayed in the device tile?- This only happens if devices are OFFLINE. Device information can only be called and displayed for online devices. - Make sure that the device is switched on, connected to the network and correctly configured.SE7-ToolKit© 2018 by STANGE Elektronik GmbHSubject to technical modifications.31 Why are the buttons shown greyed out in the device tile?- This only happens if devices are OFFLINE. Devise information can be called only in case of switched on device, because the function version must be requested in order to open a compatible version of the sub programs. - Make sure that the device is switched on, connected to the network and correctly configured. Why is only the WinClient displayed in the device tile?- The standard display options of the ToolKit define that only the WinClient is displayed as button at start. - You can adjust the display options of the ToolKit under …Start/Settings …“.。

Package‘zdeskR’May2,2023Title Connect to Your'Zendesk'DataVersion0.3.0Description Facilitates making a connection to the'Zendesk'API and executing various queries.You can use it toget ticket,ticket metrics,and user data.The'Zendesk'documentation isavailable at<https:///rest_api/docs/support/introduction>.This package is not supported by'Zendesk'(owner of the software).URL https:///chrisumphlett/zdeskRBugReports https:///chrisumphlett/zdeskR/issuesLicense CC0Encoding UTF-8Imports dplyr(>=1.0.0),magrittr(>=1.5),jsonlite(>=1.6.1),purrr(>=0.3.3),httr(>=1.4.1),tidyr(>=1.0.0),plyr(>=1.8.6)RoxygenNote7.1.2NeedsCompilation noAuthor Chris Umphlett[aut,cre],Avinash Panigrahi[aut]Maintainer Chris Umphlett<******************************>Repository CRANDate/Publication2023-05-0212:40:02UTCR topics documented:get_all_ticket_metrics (2)get_custom_fields (3)get_tickets (4)get_users (5)Index712get_all_ticket_metricsget_all_ticket_metricsGet Metrics on All Zendesk TicketsDescriptionThis function takes your Email Id,authentication token,sub-domain and parse all the tickets and its corresponding metrics in a list.Since each iteration only returns100tickets at a time you must run the loop until the"next_page"parameter is equal to null.Usageget_all_ticket_metrics(email_id,token,subdomain)Argumentsemail_id Zendesk Email Id(username).token Zendesk API token.subdomain Your organization’s Zendesk sub-domain.DetailsIts not a good practice to write down these authentication parameters in your code.There are various methods and packages available that are more secure;this package doesn’t require you to use any one in particular.ValueData Frame with metrics for all ticketsReferenceshttps:///rest_api/docs/support/ticket_metricsExamples##Not run:ticket_metrics<-get_all_ticket_metrics(email_id,token,subdomain)##End(Not run)get_custom_fields3 get_custom_fields Returns the system and all the customfields defined by your organiza-tion’s zendesk administratorDescriptionIt takes your Email Id,authentication token,sub-domain as parameters and gets the system and all the customfields available for a zendesk ticket.Usageget_custom_fields(email_id,token,subdomain)Argumentsemail_id Zendesk Email Id(username).token Zendesk API token.subdomain Your organization’s Zendesk sub-domain.DetailsIt’s not a good practice to write down these authentication parameters in your code.There are various methods and packages available that are more secure;this package doesn’t require you to use any one in particular.ValueA data frame containing all ticketfieldsReferenceshttps:///rest_api/docs/support/ticket_fieldsExamples##Not run:fields<-get_custom_fields(email_id,token,subdomain)##End(Not run)4get_tickets get_tickets Get Zendesk TicketsDescriptionThis function takes your Email Id,authentication token,sub-domain and start time as parameters and gets all the tickets which have been updated on or after the start time parameter.By default each page returns1000unique tickets and an"after_cursor"value which stores a pointer to the next page.After getting thefirst page it uses the pointer to fetch the subsequent pages.Usageget_tickets(email_id,token,subdomain,start_time,remove_cols=NULL) Argumentsemail_id Zendesk Email Id(username).token Zendesk API token.subdomain Your organization’s Zendesk sub-domain.start_time String with a date or datetime to get all tickets modified after that date.remove_cols Vector of column names to remove from the results.DetailsThe start time parameter should be in’UTC’format as Zendesk uses the’UTC’time zone when retrieving tickets after the start time.For example,the US Eastern Time Zone is currently four hours being UTC.If one wanted to get tickets starting on August1at12am,you would need to enter"2020-08-0104:00:00".The user must do proper adjustment to accommodate the time zone difference,if desired.A date can be provided,it will retrieve results as of12am in the UTC time zone.Start and end times can be entered with or without the time component.End time cannot be in the future,but should work for values up to one minute prior to the current time.It’s not a good practice to write down these authentication parameters in your code.There are various methods and packages available that are more secure;this package doesn’t require you to use any one in particular.The remove_cols parameter allows the removal of customfields causing errors.Errors occurred when afield was sometimes blank and assigned a logical type and then appended to non-blank, non-logical inside of purrr::map_dfr.See issue#1on GH.Valuea Data Frame containing all tickets after the start time.Referenceshttps:///rest_api/docs/support/incremental_export#start_timeExamples##Not run:all_tickets<-get_tickets(email_id,token,subdomain,start_time="2021-01-3100:00:00",end_time="2021-01-3123:59:59")##End(Not run)get_users Returns All Available Zendesk Users.DescriptionIt takes your Email Id,authentication token,sub-domain and parse all the users in a list.It iterates through all the pages returning only100users per page until the"next_page"parameter becomes null indicating there are no more pages to fetch.Usageget_users(email_id,token,subdomain,start_time,user_role="all")Argumentsemail_id Zendesk Email Id(username).token Zendesk API token.subdomain Your organization’s Zendesk sub-domain.start_time String with a date or datetime to get all tickets modified after that date.user_role User role,one of"all","end-user","agent",or"admin".DetailsIt’s not a good practice to write down these authentication parameters in your code.There are various methods and packages available that are more secure;this package doesn’t require you to use any one in particular.The start_page parameter is useful if you have many users.Each page contains100users.Zendesk does not have an incremental method for pulling users by date but after you retrieve all of your users once,you can then increment your start page to something that will limit the number of users you are re-pulling each time.If you are pulling partial lists of users be aware that you will not get updates on older users.You will only get recently created users,not modified/deleted users and their modified data nor updated last login dates.ValueData Frame with user detailsReferenceshttps:///rest_api/docs/support/usersExamples##Not run:users<-get_users(email_id,token,subdomain)##End(Not run)Indexget_all_ticket_metrics,2get_custom_fields,3get_tickets,4get_users,57。

【elasticsearch使用手册】一、引言在当今信息爆炸的时代,我们面对的数据越来越庞大,各种数据存储和检索的需求也随之增加。
而Elasticsearch作为一种开源的分布式搜索引擎,具有强大的全文检索能力和高效的数据处理能力,成为了许多企业和数据科学家的首选。
本文将以Elasticsearch使用手册为主题,深入探讨其功能和操作,帮助读者更好地理解和运用该工具。
二、Elasticsearch概述Elasticsearch是一个基于Apache Lucene的开源搜索引擎,它提供了一个分布式、多用户的全文搜索引擎。
作为实时分析的理想选择,Elasticsearch可以用于各种用例中,例如日志聚合,监控,搜索,推荐等。
它具有高可用性、可扩展性和易用性的特点,使得用户可以方便地进行数据存储、搜索和分析。
三、安装和配置1. 环境准备:在安装Elasticsearch之前,需要确保Java环境已经安装并配置好。
2. 下载安装包:从官方全球信息湾下载最新版本的Elasticsearch安装包,并解压至指定目录。
3. 配置文件:修改config目录下的elasticsearch.yml文件,设置集群名称、节点名称、网络绑定位置区域等参数。
4. 启动Elasticsearch:运行bin目录下的elasticsearch脚本来启动Elasticsearch服务。
四、核心概念1. 索引:Elasticsearch中的索引类似于关系型数据库中的数据库,它是文档的集合。
2. 类型:每个索引可以包含一个或多个类型,类型相当于表的概念。
3. 文档:文档是索引中的最小数据单元,它是一个JSON格式的数据。
4. 分片和副本:Elasticsearch将索引分成多个分片,每个分片都是一个独立的索引,同时还可以创建多个分片的副本以提高容错性。
五、数据操作1. 索引数据:通过HTTP请求向Elasticsearch服务器发送文档数据,即可将文档数据索引到指定的索引中。

一、介绍Elasticsearch7Elasticsearch7是一个开源的分布式搜索和分析引擎,它提供了一个功能强大的RESTful API,可以用于实时搜索和分析大数据集。
它基于Apache Lucene搜索引擎构建,具有高性能、可伸缩性和容错性。
Elasticsearch7提供了丰富的查询功能、聚合功能和分析功能,可以帮助用户快速地处理海量数据,并从中获取有价值的信息。
二、Elasticsearch7 generic指标Elasticsearch7提供了丰富的指标(metrics)和分析功能,用于监控和优化其性能。
其中,generic指标是一类通用的指标,用于度量Elasticsearch7集群的整体性能和健康状况。
在实际的生产环境中,监控这些generic指标可以帮助管理员及时发现问题,并采取相应的措施,从而保证集群的稳定运行。
三、常见的generic指标1. 集群健康指标在Elasticsearch7中,有三种集群健康状态:green、yellow和red。
这些状态分别表示了集群的健康状况,管理员可以通过查询相关的generic指标来监控集群的健康状态,及时发现并解决问题。
2. 节点性能指标Elasticsearch7集群由多个节点组成,每个节点的性能指标都是非常重要的。
管理员可以监控节点的负载、内存使用、磁盘使用等指标,以便及时调整集群的配置,优化性能。
3. 索引性能指标对于大规模的数据集,索引的性能是关键。
管理员可以监控索引的写入速度、读取速度、存储空间占用等指标,以便调整索引的配置,提高性能。
4. 查询性能指标Elasticsearch7提供了丰富的查询功能,管理员可以监控查询的响应时间、结果的准确性等指标,以便优化查询的性能。
四、如何监控generic指标为了监控Elasticsearch7的generic指标,管理员可以采用以下几种方式:1. 使用Elasticsearch的监控APIElasticsearch提供了丰富的监控API,可以用于查询各种generic指标。

esbuild介绍和API使⽤介绍☀ esbuild是⼀种类似于webpack 的极速 JavaScript 打包器❄ 特性:极快的速度,⽆需缓存⽀持 ES6 和 CommonJS 模块⽀持对 ES6 模块进⾏ tree shakingAPI 可同时⽤于 JavaScript 和 Go兼容 TypeScript 和 JSX 语法⽀持 Source maps⽀持 Minification⽀持 plugins安装⾸先本地安装 esbuild,执⾏npm install esbuild命令,此命令会将 esbuild 安装到你本地的 node_modules, node_modules⾥⾯会有个esbuild的原⽣可执⾏⽂件执⾏./node_modules/.bin/esbuild可以看到esbuild的好多命令,也可以执⾏./node_modules/.bin/esbuild --version可以查看我们安装的esbuild的版本是0.14.2构建脚本1. 构建我们创建⼀个test.jsx ⽂件,然后⽤esbuild去构建./node_modules/.bin/esbuild test.jsx --bundle --outfile=out.js会输出⼀个名叫out.js的⽂件,然后我们⽤node out.js去运⾏,得出:<div>5</div>注:esbuild 除了 jsx 扩展名,⽆需任何配置就能够将 JSX 语法转换为 JavaScript。
尽管 esbuild 可以进⾏配置,但它试图提供合理的默认值,以便在常见的情况下⾃动完成构建。
如果你想在 .js ⽂件中使⽤ JSX 语法,你可以通过设置 --loader:.js=jsx 选项,来告诉 esbuild 对 js ⽂件进⾏ JSX 的编译。
因为我们要反复要执⾏构建命令,必须要写esbuild可执⾏⽂件的相对路径,⽐较繁琐。

SQ71 Series Secure Starter Kit使用手册目录1.变更历程 (3)2.使用环境 (4)3.Starter Kit介紹 (5)3.1硬件外观 (5)3.2Block Diagram (7)4.StarterKit软件安装 (8)4.1软件安装程序 (8)4.2软件启动 (12)5.StarterKit软件功能说明 (15)5.1 软件简介 (15)5.2 StarterKit 主界面 (15)5.2.1 指令建构区(Build Command) (16)5.2.2 工具栏(Tools Bar) (17)5.2.3 状态栏(Status Bar) (21)5.2.4 传输纪录区(Log) (23)5.2.5 AES-256 支援 (24)5.3存储器映像窗口(Memory) (26)5.3.1 存储器配置区段 (28)5.3.2 配置选单 (29)5.3.3 工具栏(Tool Bar) (32)5.4装置烧录窗口(Program Device) (37)5.4.1 存储器配置区段 (39)5.4.2 功能选项 (44)5.4.3 工具栏(Tools Bar) (49)5.4.4 Log Window (53)6.移除SQ71_Series_StarterKit (Uninstall) (55)1.变更历程Version ApprovedDateDescriptionV1.3 2022/1/12 1.更新「CH. 2 使用环境」2.新增「CH.5.2.1 指令建构区」注3V1.2 2021/6/11 1.更新「CH3. Starter Kit介绍」内容,硬件更新2.更新「CH4.2 软件启动」,Select Device 接口3.新增「CH5.4 装置烧录窗口」内容V1.1 2021/03/11 1.「CH3.1 硬件外观」新增叙述与图3.22.「CH4.2 软件启动」,新增更换Adapter Board 上IC相关备注V1.0 2021/01/15 首次发行2.使用环境在使用SQ71 Series Starter Kit之前,需先准备下面几个项目,并确认计算机之系统规格。

ESAPI操作文档Sense操作文档Sense操作文档 (1)Watcher操作 (2)#获取当前watcher的运行状态 (2)#获取所有已经配置的watcher (2)#删除watcher (2)#删除7天以后的watcher history (2) 集群操作 (3)#获取集群状态 (3)根据cluster 的health状态发现问题 (3) #动态更新最小发现数目 (5)索引操作 (5)#关闭索引 (5)#获取索引 (6)更改备份数量 (6)更新刷新间隔时间 (6)强制合并 (6)更新索引的分析策略 (6)Mapping操作 (7)#获取mapping (7)Template操作 (7)#删除template (10)数据查询 (11)Cluster设置 (12)获取当前的cluster设置 (12)设置ES slowlog的日志级别 (12)设置ES的存储吞吐类型 (12)设置ES每秒最大的吞吐数据量 (13)开启discovering的日志 (13)设置指定index的slowlog (13)节点状态 (14)GET _nodes/stats (14)cat 命令 (14)查看当前有哪些可以使用的cat api (14)获取集群健康信息 (15)获取节点状态信息 (15)获取thread_pool中对应各种operation的值设定 (17) thread_pool类型说明 (17)更新API (17)Watcher操作#获取当前watcher的运行状态GET _watcher/stats/_all#获取所有已经配置的watcherGET .watches/_search{"fields" : [],"query" : {"match_all" : { } }}#删除watcherDELETE _watcher/watch/monitor-server-op-warn-email DELETE monitor-data-quku-applog*DELETE _mapping/monitor-data-quku-applog#删除7天以后的watcher historyPUT _watcher/watch/manage_history{"metadata": {"keep_history_days": 7},"trigger": {"schedule": { "daily": { "at" : "00:01" }}},"input": {"simple": {}},"condition": {"always": {}},"transform": {"script" : "return [ indexToDelete : '/.watch_history-' + ctx.execution_time.minusDays(ctx.metadata.keep_history_days + 1).toString('yyyy.MM.dd') ]"},"actions": {"delete_old_index": {"webhook": {"method": "DELETE","host": "172.26.254.40","port": 8200,"path": "{{ctx.payload.indexToDelete}}"}}}}集群操作#获取集群状态GET _cluster/health根据cluster 的health状态发现问题比如说查询到的health的状态信息如下:{"cluster_name": "elasticsearch_zach","status": "red","timed_out": false,"number_of_nodes": 8,"number_of_data_nodes": 8,"active_primary_shards": 90,"active_shards": 180,"relocating_shards": 0,"initializing_shards": 0,"unassigned_shards": 20}已知有10个节点,很明显已经丢失了2个节点,出现了数据丢失的问题,但是我们无法判断是20个主数据都丢失了,还是10个主数据,10个备份数据丢失,为了进一步定位问题,使用如下api语句,可以列出这个cluster下面所有的index 的状态GET _cluster/health?level=indices{"cluster_name": "elasticsearch_zach", "status": "red","timed_out": false,"number_of_nodes": 8,"number_of_data_nodes": 8,"active_primary_shards": 90,"active_shards": 180,"relocating_shards": 0,"initializing_shards": 0,"unassigned_shards": 20"indices": {"v1": {"status": "green","number_of_shards": 10, "number_of_replicas": 1, "active_primary_shards": 10, "active_shards": 20, "relocating_shards": 0, "initializing_shards": 0, "unassigned_shards": 0 },"v2": {"status": "red","number_of_shards": 10, "number_of_replicas": 1, "active_primary_shards": 0, "active_shards": 0, "relocating_shards": 0, "initializing_shards": 0, "unassigned_shards": 20 },"v3": {"status": "green", "number_of_shards": 10, "number_of_replicas": 1, "active_primary_shards": 10, "active_shards": 20, "relocating_shards": 0, "initializing_shards": 0, "unassigned_shards": 0 },....}}从结果可以看出,v2状态是red,所有的未分配分片都是来自这个index,1个备份,10个主分片。

es知识点总结ES(Elasticsearch)是一个开源搜索引擎,用于全文搜索、结构化搜索和分析。
它被广泛应用于各种场景,如电子商务网站、日志分析、实时监控等。
ES具有强大的搜索能力、高可扩展性和易用性,因此备受开发者和企业的青睐。
本文将对ES的知识点进行总结,包括ES的介绍、基本概念、核心组件、数据操作、性能调优等内容,旨在帮助读者全面了解ES,并能够灵活运用ES解决实际问题。
一、ES介绍1. ES的定义ES是一个分布式、RESTful风格的搜索引擎,基于Apache Lucene构建。
它支持全文搜索、结构化搜索和分析,可以快速、准确地检索大规模数据,并提供丰富的查询和聚合功能。
2. ES的优势ES具有以下几个优势:(1) 分布式架构:ES采用分片和副本的方式存储数据,并支持自动故障转移和负载均衡,保证了系统的高可用性和性能扩展性。
(2) 强大的搜索能力:ES支持多种搜索方式,包括全文搜索、词项搜索、短语搜索等,能够满足不同场景下的搜索需求。
(3) 灵活的数据模型:ES支持动态映射和自定义映射,可以灵活处理结构化和非结构化数据,适用于各种数据类型和格式。
(4) 丰富的聚合功能:ES提供丰富的聚合功能,包括分组、统计、排序、汇总等多种聚合方式,能够满足复杂的数据分析需求。
3. ES的应用场景ES广泛应用于电子商务网站、新闻门户、日志分析、实时监控等领域,主要用于高效搜索和分析大规模数据。
二、ES基本概念1. 索引(index)索引是ES中最高层次的数据存储单位,类似于关系数据库中的数据库。
每个索引可以包含多个文档,每个文档可以包含多个字段。
2. 文档(document)文档是ES中的最小数据单位,它类似于关系数据库中的行。
每个文档由一个唯一的ID和一组字段组成。
3. 类型(type)类型是索引中的逻辑分组,用于对文档进行分类。
同一个索引中可以包含多个类型,每个类型可以有自己的映射配置。
4. 分片(shard)和副本(replica)分片和副本是ES用于存储和提高性能的重要概念。

esapi 的用法-回复ESAPI (Enterprise Security API) 是一个开源的安全编程接口,它提供了一套易于使用的工具和库来帮助开发人员构建安全的Web应用程序。
本文将逐步介绍ESAPI的用法,并提供一些实际的示例来帮助读者更好地理解和应用ESAPI。
第1步:引入ESAPI库ESAPI由OWASP (Open Web Application Security Project) 开发并维护,可以从OWASP的官方网站上下载ESAPI的库文件。
一旦下载完成,我们可以将ESAPI库文件添加到我们的项目中,并将其导入到我们的代码中。
这样我们就可以使用ESAPI提供的安全功能。
第2步:配置ESAPI在使用ESAPI之前,我们需要进行一些配置。
ESAPI通过一个配置文件来指定其行为。
我们可以从OWASP的官方网站上下载并编辑这个配置文件。
这个配置文件有许多选项,例如密码策略、输出编码和输入验证等。
根据我们的项目需求,我们可以根据具体的场景进行定制。
第3步:使用ESAPI进行输入验证ESAPI提供了一套强大的输入验证功能,可以帮助我们防止常见的安全漏洞,如跨站脚本攻击(XSS)和SQL注入。
我们可以使用ESAPI的验证器对象来验证用户输入。
下面是一个示例,使用ESAPI进行email地址的验证:String inputEmail = request.getParameter("email");Validator validator = ESAPI.validator();String cleanEmail = validator.getValidInput("Email Address", inputEmail, "Email", 200, false);在上面的示例中,我们首先从请求参数中获取用户输入的email地址。
然后,我们通过ESAPI的验证器对象进行验证,并指定了期望的输入类型为Email地址。
esapi 的用法
【实用版】
目录
1.ESAPI 简介
2.ESAPI 的使用方法
3.ESAPI 的优点和局限性
正文
1.ESAPI 简介
ESAPI(Enterprise Security API)是一种用于保护企业级应用程序的安全API。
它提供了一套完整的 API,用于实现各种常见的安全功能,如身份验证、授权和加密。
ESAPI 旨在提供一种标准的方法来实现安全功能,以减少开发人员在编写安全代码时犯错误的可能性。
2.ESAPI 的使用方法
要使用 ESAPI,首先需要在项目中引入 ESAPI 库。
这可以通过将 ESAPI JAR 文件添加到项目的类路径中来完成。
接下来,需要配置 ESAPI 以使用所需的安全实现。
这可以通过创建一个 XML 配置文件来完成,该文件指定了要使用的安全实现的类和配置参数。
在代码中使用 ESAPI 时,需要实例化一个 ESAPI 上下文对象。
这个上下文对象将用于执行身份验证、授权和加密操作。
然后,可以使用 ESAPI API 执行所需的安全操作,如验证用户身份、授权访问资源或加密数据。
第1页共1页。
Elasticsearch简单使用手册1.Win7系统下安装ES1.1ES的安装从官网上下载最新版本的ES,本次使用的是elasticsearch-5.5.0版本网址是解压缩,执行elasticsearch-5.5.0\bin下面的elasticsearch.bat即可在浏览器中输入,出现如下界面表示运行成功1.2安装elasticsearch-head插件(非必须)这个安装比较复杂,首先确保本地计算机安装有git和nodejs,npmStep1:将elasticsearch-head 从github上面clone下来。
具体操作如下,git clone git:///mobz/elasticsearch-head.gitStep2:修改elasticsearch-head/Grunt文件,增加hostname属性,设置为本地路径(127.0.0.1)或者*(代表任意)Step3: 修改elasticsearch-head /_site/app.js文件修改head的连接地址:this.base_uri = this.config.base_uri || this.prefs.get("app-base_uri") || "";把localhost修改成你es的服务器地址,如:this.base_uri = this.config.base_uri || this.prefs.get("app-base_uri") || "";Step4:文件目录elasticsearch-5.5.0 /config/elasticsearch.yml, 修改Elasticsearch的参数,注意,设置参数的时候:后面要有空格!# 增加新的参数,这样head插件可以访问eshttp.cors.enabled: truehttp.cors.allow-origin: "*"Step5:安装grunt,命令如下npm install -g grunt-cliStep6:在elasticsearch-head目录下执行npm install 下载elasticsearch-head运行的依赖包Step7:运行grunt server启动服务Step8:访问,出现如下界面表示安装成功2.Linux系统下集群部署ES2.1机器配置三台Linux虚拟机,安装系统CentOS6.5对应静态IP分别为192.168.244.128, 192.168.244.129,192.168.244.130开放9200和9300端口,步骤如下:#/sbin/iptables -I INPUT -p tcp --dport 9200 -j ACCEPT#/sbin/iptables -I INPUT -p tcp --dport 9300 -j ACCEPT然后保存:#/etc/rc.d/init.d/iptables save查看打开的端口:# /etc/init.d/iptables status2.2安装步骤Step1:从官网上下载ElasticSearch的tar包,本次使用版本5.5.1。
Table of ContentsAbout1 Chapter 1: Getting started with elastic-beanstalk2 Remarks2 Examples2 Installation or Setup2 Chapter 2: Deploy a Java Web Application to Elastic Beanstalk3 Introduction3 Examples3 Deploying a Spring Boot Application to Elastic Beanstalk3 Objectives:3 Prerequisites:3 Part 1: Create a Java application3 Steps4 Part 2: Deploy the Java application to Elastic Beanstalk5 Steps5 Part 3: Modify the Spring Boot application to include production-ready features.7 Steps7 Part 4: Deploy the modified application9 Steps9 Chapter 3: Setting JVM Options11 Remarks11 Examples11 Setting JVM Options Via Ebextensions Config11 Credits12AboutYou can share this PDF with anyone you feel could benefit from it, downloaded the latest version from: elastic-beanstalkIt is an unofficial and free elastic-beanstalk ebook created for educational purposes. All the content is extracted from Stack Overflow Documentation, which is written by many hardworking individuals at Stack Overflow. It is neither affiliated with Stack Overflow nor official elastic-beanstalk.The content is released under Creative Commons BY-SA, and the list of contributors to each chapter are provided in the credits section at the end of this book. Images may be copyright of their respective owners unless otherwise specified. All trademarks and registered trademarks are the property of their respective company owners.Use the content presented in this book at your own risk; it is not guaranteed to be correct nor accurate, please send your feedback and corrections to ********************Chapter 1: Getting started with elastic-beanstalkRemarksThis section provides an overview of what elastic-beanstalk is, and why a developer might want to use it.It should also mention any large subjects within elastic-beanstalk, and link out to the related topics. Since the Documentation for elastic-beanstalk is new, you may need to create initial versions of those related topics.ExamplesInstallation or SetupDetailed instructions on getting elastic-beanstalk set up or installed.Read Getting started with elastic-beanstalk online: https:///elastic-beanstalk/topic/7568/getting-started-with-elastic-beanstalkChapter 2: Deploy a Java Web Application to Elastic BeanstalkIntroductionElastic Beanstalk is a Cloud PaaS provider (Platform as a Service), meaning applications can be deployed to the platform without the fuss of manually setting up a deployment environment.Java applications are easily deployable to Elastic Beanstalk both via web interface or via command-line tools.ExamplesDeploying a Spring Boot Application to Elastic BeanstalkObjectives:Using the Spring CLI , we will create a new Spring Boot application to be deployed to Elastic Beanstalk.We will edit the generated Spring Boot application so that it will:Create a jar named aws-eb-demo.jar .○Listen on port 5000.○Include a single web page named index.html .○•1. Using the Elastic Beanstalk CLI , we will:Initialize the project for deployment to Elastic Beanstalk.•Create a new deployment environment and deploy the Spring Boot application in a single step.•Edit and redeploy the application to the same environment.•2. We will edit the Spring Boot application to add monitoring, management, and logging features.3. We will redeploy the Spring Boot application to its target environment.4. Prerequisites:Install the Spring CLI•Install the Elastic Beanstalk CLI•Part 1: Create a Java applicationLet's create a new Java application using the Spring CLI. The Spring CLI provides a convenient way to quickly get started with cloud-ready applications that leverage Spring Boot and the Spring Framework.Steps1.Create a Spring Boot web application with the Spring CLI and cd into the folder.$ spring init -d=web -name=aws-eb-demo aws-eb-demo$ cd aws-eb-demo2.Initialize the project with source control, then commit the initial revision. This will allow us to track changes as they are made and revert to a previously working state if necessary. This is always a good practice before you start making changes to your application.For this example, we will use Git:$ git init$ git add .$ git commit -m "initial commit"3.For convenience in deployment, edit pom.xml and add the <finalName> setting under the<project>/<build> section:<build><finalName>${project.artifactId}</finalName>...</build>The <finalName> setting will cause the built artifact to have the name aws-eb-demo.jar without the version. This ensures that deployment scripts won't have to be changed every time the application iterates to a new version.4.Configure the application to listen on port 5000 by adding the following property tosrc/main/resources/application.properties:server.port=5000By default, the Spring Boot web application listens for requests over port 8080. However, the AWS load balancer that fronts Elastic Beanstalk applications expects them to be listening on port 5000. Without this setting, we will get the error 502 Bad Gateway when attempting toaccess our application over the web.Give your application a static home page by creating a file at5.src/main/resources/static/index.html with the following sample content:<!DOCTYPE html><html lang="en"><head><meta charset="UTF-8"><title>AWS EB Demo</title></head><body><h1>Hello from Elastic Beanstock</h1></body></html>6.Test the web application locally.$ mvn spring-boot:runOpen your browser to http://localhost:5000 and verify that the home page is served up.When finished testing, type Ctrl+C in the running terminal to shutdown the application.Package the web application.7.$ mvn package -DskipTestsThe application jar will be created at target/aws-eb-demo.jar.Commit your changes to source control.8.$ git add .$ git commit -m "prepared for initial deployment"Part 2: Deploy the Java application to Elastic BeanstalkWith our application tested and ready to deploy for the first time, we can now use the Elastic Beanstalk CLI to initialize our deployment configuration, create the deployment environment, and push it to the cloud.Steps1.Using the Elastic Beanstock CLI, initialize your application for deployment.$ eb inita. When prompted to "Select a default region", accept the default.b. When prompted to "Select an application to use", accept the default to create a newapplication.c. When prompted to "Enter Application Name", accept the default or enter aws-eb-demo.d. When prompted to "Select a platform", choose Java.e. When prompted to "Select a platform version", choose Java 8.f. When prompted to deploy using AWS CodeCommit, accept the default (n).i. When prompted to set up SSH for your instance, select 'y'. This will allow you to use theElastic Beanstalk CLI to shell into the virtual machine where your application instance will be deployed.j. When prompted to "Select a keypair", choose the default (Create new KeyPair).Alternatively, you may select an existing keypair.k. When prompted to "Type a keypair name", accept the default or type a name.l. When prompted to "Enter a passphrase", leave empty or type a passphrase that you will remember. Type the same passphrase a second time and hit enter.2.Edit the newly created Elastic Beanstock deployment manifest by opening.elasticbeanstock/config.yml and adding the following setting to the bottom of the file:deploy:artifact: 'target/aws-eb-demo.jar'Using the Elastic Beanstock CLI, deploy your application to a new environment.3.$ eb createa. When prompted to "Enter Environment Name", accept the default value (aws-eb-demo-dev).b. When prompted to "Enter DNS CNAME prefix", accept the default value (aws-eb-demo-dev).c. When prompted to "Select a load balancer type", accept the default (classic).It may take up to 5 minutes for Elastic Beanstalk to complete the deployment. Meanwhile, Elastic Beanstalk is doing the following for you:creating the deployment environment•creating the load balancer••preparing a security group•setting up auto-scaling•launching one or more EC2 instanceslaunching the application•While this work is being done, it is safe to type Ctrl+C.While waiting, you may use the Elastic Beanstalk CLI to check the application's deployment 4.status.$ eb status5.When the Health: field shows Green and the Status: field shows Ready, you may browse to the application using the address shown in the CNAME field.For example, if you chose the region us-west-2 : (US West (Oregon), then your application will be deployed at the following URL:If the application's status is Ready, but the Health: field is not Green, see the application logs to diagnose the problem:$ eb logsPart 3: Modify the Spring Boot application to include production-ready features.For our application to be truly production-ready, we need smanagement, monitoring, logging and security. Fortunately, Spring Boot comes with these features out of the box. They simply need to be added as dependencies to our project.For details about the production-ready features provided by Spring Boot, see the Spring Boot Reference Guide, Part V, Spring Boot Actuator: Production-ready features.Steps1.Open the file pom.xml (found in the root directory of our project), and add the followingdependencies under the <project>/<dependencies> section:<dependency><groupId>org.springframework.boot</groupId><artifactId>spring-boot-starter-actuator</artifactId></dependency><dependency><groupId>org.springframework.boot</groupId><artifactId>spring-boot-starter-hateoas</artifactId></dependency><dependency><groupId>org.springframework.boot</groupId><artifactId>spring-boot-starter-security</artifactId></dependency>a. The spring-boot-starter-actuator dependency includes production-ready managementand monitoring features, called actuators. These features include ready-made RESTendpoints that allow administrators to quickly access runtime information about theapplication, such as health information, environment properties, configuration settings, logfiles, and so forth.b. The spring-boot-starter-hateoas dependency allows Spring Boot to list all actuators undera single convenient endpoint using HAL-style links that point to each actuator endpoint.c. The spring-boot-starter-security dependency gives our application the facilities to securethe actuator endpoints so they can only be accessed by an authenticated user having the ACTUATOR role.2.While still editing pom.xml, add a custom execution to the spring-boot-maven-plugin so that it will include information about the build with the packaged application artifact.<plugin><groupId>org.springframework.boot</groupId><artifactId>spring-boot-maven-plugin</artifactId><executions><execution><goals><goal>build-info</goal></goals></execution></executions></plugin>3.Customize the Spring Boot configuration so that all actuators will be listed under the path /management. Also, configure the user name and password of the administrator that will be able to see the actuator endpoints. Finally, configure the application logging so that logging statements will be written to a file in addition to the console.Open src/main/resources/application.properties and add the following settings:management.context-path=/management=adminer.password=password1logging.file=logs/application.logserver.tomcat.accesslog.enabled=true4.Edit .gitignore and add the following line at the top of the file so that local testing logs will be ignored by source control.logs/Test the web application locally.5.$ mvn spring-boot:runa. In a browser, open http://localhost:5000/management and verify that a JSON objectproviding links to available Spring Boot actuators is served up.b. Open http://localhost:5000/management/info and verify that build information is showing.b. Open http://localhost:5000/management/health and verify that the application status is UP.When not authenticated as a user having the ACTUATOR role, the status field should be the only health field displayed.c. Open http://localhost:5000/management/logfile and verify that it requires authentication.Type in the credentials of the administator (admin:password1) and verify that it grants youaccess.d. Open http://localhost:5000/management/health again and verify that additional healthdetails are showing. When authenticated as a user having the ACTUATOR role, the healthendpoint will show additional health details regarding the resources the application is using.e. Try out some of the other actuator endpoints. In particular, you may be interested in env,metrics, auditevents, and mappings.When finished testing, type Ctrl+C in the running terminal to shutdown the application.6.Perform a clean rebuild and repackage the web application.$ mvn clean package -DskipTestsAs before, the application jar will be created at target/aws-eb-demo.jar.7.Commit your changes to source control.$ git add .$ git commit -m "added management and monitoring features"Part 4: Deploy the modified applicationRe-deploying is usually much faster than the initial deployment because the environment has already been prepared. The CLI simply needs to upload the new jar to the environment's EC2 instances and restart the application.StepsWith the Elastic Beanstalk CLI, redeploy new jar.1.$ eb deployOnce the upload is complete, you may safely type Ctrl+CVerify that the application has deployed successfully.2.$ eb statusIn a browser, go to /management and3.verify that everything works as it did when it was tested locally.Read Deploy a Java Web Application to Elastic Beanstalk online: https:///elastic-beanstalk/topic/9207/deploy-a-java-web-application-to-elastic-beanstalkChapter 3: Setting JVM OptionsRemarks-bundle.zip //--> bundle file which will be uploaded|--.ebextensions //--> the file name must be exactly ".ebextensions"|--jvm.config //--> config file that will set the JVM options on deployment (upload)|--java_app.jar //Here, I am using Spring Bootoption_settings: //--> must have lineaws:elasticbeanstalk:application:environment: //--> namespace used to set JVM valuesXX:MaxPermSize: 256m //--> set XX:MaxPermSize to 256mXmx: 1024m //--> set Xmx to 1024mXms: 512m //--> set Xms to 512mExamplesSetting JVM Options Via Ebextensions ConfigTo setup JVM options inside elastic beanstalk, your bundle file must be like this:-bundle.zip|--.ebextensions //do not forget the dot at the beginning of the name|--jvm.config|--java_app.jarAnd, the jvm.config file must be set like this:option_settings:aws:elasticbeanstalk:application:environment:XX:MaxPermSize: 256mXmx: 1024mXms: 512mWhen you upload your bundle, first those settings will be read and applied to the server's (Ec2 instance's) JVM and you must see the health as "OK".SourceRead Setting JVM Options online: https:///elastic-beanstalk/topic/7569/setting-jvm-optionsCredits。
ESAPI(Enterprise Security API)是一个开源的Web应用程序安全工具包,它为开发人员提供了一套跨评台的安全API,用于防范常见的Web应用程序漏洞。
在ESAPI中,路径遍历是一个常见的安全问题,本文将对ESAPI路径遍历的用法进行详细解析,希望可以帮助开发人员更好地理解和应用ESAPI,提升Web应用程序的安全性。
一、什么是路径遍历漏洞?路径遍历漏洞也称为目录遍历漏洞,是指攻击者利用Web应用程序对文件路径处理不当的安全漏洞,通过对URL进行修改,获取服务器上的敏感文件或目录,甚至执行恶意代码。
路径遍历漏洞通常发生在文件上传、文件下载、文件包含等功能中,攻击者通过构造特定的URL 请求,尝试访问Web服务器上的敏感文件,从而达到获取敏感信息或者执行恶意操作的目的。
二、ESAPI路径遍历的防范措施ESAPI提供了一系列安全控制和验证方法,可以帮助开发人员防范路径遍历漏洞的攻击。
以下是一些常用的防范措施:1. 输入验证在处理文件路径时,开发人员应该对用户输入进行验证,确保用户输入的路径是合法且安全的。
ESAPI提供了一系列验证方法,例如isValidInput方法可以用来验证用户输入的路径是否合法。
2. 文件路径过滤在使用文件路径时,开发人员应该对文件路径进行过滤,确保只有合法的文件路径可以被访问。
ESAPI提供了一系列的过滤方法,例如getValidInput方法可以用来获取合法的文件路径。
3. 文件权限控制在访问文件时,开发人员应该对文件的权限进行严格控制,确保只有具有相应权限的用户可以访问敏感文件。
ESAPI提供了一系列的权限控制方法,例如assertAuthorizedForFile方法可以用来验证用户是否具有访问特定文件的权限。
以上是ESAPI路径遍历的防范措施的简要介绍,开发人员在使用ESAPI时,应该结合具体的业务场景和安全需求,合理选择和使用相应的安全控制方法,以确保Web应用程序的安全性。
设计说明书文档版本控制文档简要信息: 文档主题(Title) Ecology 系统安全配置说明作者(Author) 柳炉审批者 (To Be Approved By) 说明 (Comments) Ecology 系统安全配置说明文件名称(File Name)文档版本历史:序号 日期 版本 变更说明修改人 审批人 注释 1. 2015/03/20 1 新建柳炉2. 2015/03/22 2 针对使用非UTF-8编码开发的页面配置柳炉 3.2015/03/303增加webservice 安全验证柳炉E c o l o g y 系统安全配置说明Submitted By WeaverWeaver Software 上海浦东耀华支路39弄9号泛微软件大厦邮政编码:200127 电话:+86 21 50942228 传真:+86 21 509422784.2015/04/02 4 修正本文件说明格式,方便理解阅读柳炉5.2015/04/07 5 增加xss过滤字符的说明柳炉6.2015/04/13 6 增加log日志访问权限控制柳炉7.2015/04/22 7 增加参数值检查最小长度限制柳炉8.2015/5/26 8 增加httponly配置柳炉9.2015/6/15 10 增加一些必须配置的项柳炉10.2015/10/19 11 增加cookie检查柳炉11.2015/10/27 12 增加对攻击源IP进行告警和封杀的功能柳炉12.2015/11/24 13 增加了cookie+ip绑定、登录前页面参数格式严格限制、登录检查功能柳炉13.2016/3/31 14 增强了文件上传格式检查,增强了规则库,默认开启登录校验柳炉14.2016/5/27 15 默认开启了cookie重置、修复了安全包被绕过的bug,增强了安全规则库。
柳炉15.2016/7/14 16 新增自动更新规则库,安全包更新自动提醒,系统安全检测,攻击检查等功能,并且完善了规则库。
esapi 的用法一、概述ESAPI(Enterprise Security API)是一种用于保护应用程序安全的安全框架。
它提供了一组安全服务,用于防止各种攻击,如注入攻击、跨站脚本攻击(XSS)和目录遍历等。
本文档将详细介绍ESAPI 的使用方法。
二、安装和配置1. 下载ESAPI库和相关文件,并按照说明进行安装和配置。
2. 将ESAPI库添加到应用程序的包含路径中。
3. 配置应用程序以使用ESAPI提供的安全服务。
三、使用ESAPI进行安全防护1. 创建一个ESAPI安全对象,并配置相关参数,如验证机制、过滤器等。
2. 将安全对象添加到应用程序中,以便在执行用户提交的代码时使用ESAPI提供的安全服务。
3. 在应用程序中执行用户提交的代码,ESAPI将自动进行安全防护。
四、示例代码以下是一个使用ESAPI进行安全防护的示例代码:```pythonimport esapi# 创建一个安全对象,并配置相关参数security = esapi.Security(validate_inputs=True, # 启用输入验证机制filter_output=True, # 启用输出过滤器cookie_secure=True, # 设置cookie为安全模式header_x_frame_options=["DENY"] # 设置X-Frame-Options头为DENY,防止点击劫持攻击)# 将安全对象添加到应用程序中application = YourApplication()application.add_middleware(security)# 在应用程序中执行用户提交的代码result = application.process(request)```五、常见问题及解决方法1. 为什么我的应用程序仍然受到攻击?答:请检查是否正确配置了ESAPI,并确保所有相关的安全参数都已设置正确。
专业版esAPI1.7 操作指南网店管家市场部管家学院编制目录一、esAPI1.7概述 (3)二、API安装 (5)三、专业版esAPI1.7的基础设置 (7)3.1系统设置 (7)3.2店铺目录设置及授权 (8)3.3抓取订单设置 (9)3.4商品下载 (11)3.5发货同步设置 (12)3.6库存同步设置及操作 (13)四、业务流程使用 (19)4.1订单下载 (19)4.2发货同步 (20)4.3库存同步 (21)参考库存同步设置内容 (21)4.4订单查询 (21)五、帮助 (21)一、e sAPI1.7概述esAPI是实现销售前台与“网店管家”数据对接的功能模块,目前有两个版本:专业版和免费版。
区别如下:从上边的对比图可以总结出,专业版的esAPI1.7可以实现上图标记的大部分平台的订单下载、发货同步、库存同步等三大功能,从而大大提高了我们处理订单的效率,同时库存同步功能也保障了我们库存准确率!接下来就从这三方面给大家介绍专业版的esAPI1.7版本的使用。
二、A PI安装esAPI1.7不同于esAPI1.5版本的是esAPI1.1.7有自己专属的服务器,首先到官网上下载esAPI1.1.7和对应的服务器;打开esAPI1.7的服务器时,首先会提示如下图所示:将管家的服务器名称或者服务器所在电脑的IP填写在服务器地址一栏,然后填写sa及密码,点确定;然后弹窗提示填入商号和验证码,登录到网店管家官网:然后如下图所示点左上方的登录按钮,输入自己的管家会员名和密码,登录至自己的官方后台,如下图所示:如上图箭头所示,点API,会看到您的商号,在下边验证码一栏设置您的验证码,然后将这里的商号和验证码填入上边的弹窗中,即可正常登录esAPI的服务器,如下图界面所示:在esAPI1.7专业版的服务器界面,我们可以即时查看到自动抓单、库存同步是否启用,自动发货的已发数量及API的到期时间,版本号;如果您的专业版API将要到期时,可根据“如何充值”的说明进行自助充值!然后双击esAPI1.7的客户端,登录时弹窗提示在上图IP/域名一栏填入服务器所在电脑的IP地址,端口号保持默认;如果esAPI1.7服务器有设置验证码,将验证码填写在上图验证码一栏,至此esAPI1.7就可以正常登录。
三、专业版esAPI1.7的基础设置esAPI1.7中的基础设置跟网店管家中的基础设置是密切相关的,在做esAPI1.7的基础设置之前,需先在网店管家中把相应的基础资料建立好。
接下来我们一起来看下esAPI1.7相关基础设置简介。
3.1系统设置1.【服务器配置】:服务器配置的内容发生变动时到【系统】-【服务器配置】中进行更改;2.【同步本地时间】:为了减少下载订单时的时间误差,可以到【系统】-【同步本地时间】,将本地时间与淘宝平台的时间做同步;3.【数据终端查询】:这里是连接到SQL server的数据库的一个接口,当系统提示缺失字段等异常,可以到这里查询并进行修正。
3.2店铺目录设置及授权1.设置店铺目录进入【设置】-【店铺目录】-【新建】界面如下图所示:【1】:网店管家中所有的店铺名称都会显示在这里的下拉列表中,从下拉列表中选择要建立的店铺名称,后边对应的店铺类型就会自动弹出网店管家中已经设置好的店铺类型;然后选择该店铺对应的结算方式,收支账户;【抓取订单】:如果是淘宝平台,在这里根据个人情况进行选择,淘宝或天猫店铺订单勾选淘宝店铺订单;如果是分销的订单,就勾选淘宝分销订单;温馨提醒:如果自己经营的同时还做分销的话,建议分销的单独建立一个店铺,便于在网店管家中区分;【检测信息】:勾选“管家订单流程退款检测”,在管家系统中可检测出申请退款的订单,并弹窗提示,这个功能仅用于淘宝和天猫;“退货单”是指已经下载到系统中的的天猫订单,后发现退货,如果勾选此项,在抓单操作的时候才会去抓退货单,不勾选是不抓的,但是如果勾选了没有抓单的话也不会抓退货单;(仅限入塔用户)温馨提醒:这里设置了退款检测,还需要到管家中【系统设置】-【其他】-【退款检测】设置在哪些环节进行退款检测,这样在处理订单的过程中发现客户退款,系统会提示该订单已申请退款,是否对订单做出库处理;【2】做双11双12这样的大型促销活动时,单量非常大,可勾选此项,增加抓单速度,但是增量抓单容易造成漏单,所以增量抓单后,关闭增量抓单,再手动抓单操作下,避免漏单!【3】想实现esAPI1.7自动抓单,可勾选此选项,如果多店铺都设置自动抓单,需要设置下每个店铺的抓单时间间隔,以免抓单冲突,卡住进度。
【4】勾选此项可以更加提高抓单速度,但是入塔用户才能使用此项。
【5】这里是对各个平台的授权方式说明,大家对店铺授权时可参考这里;2.授权管理【设置】-【授权管理】-【店铺授权】对我们的店铺店铺进行授权,具体授权操作可参考上图【5】的帖子。
【设置】-【授权管理】-【授权刷新】:防止频繁对店铺进行授权,可到这里做【授权刷新】3.3抓取订单设置参数1进入【设置】-【订单抓取设置】如上图所示:【1】:对应原始单中“已付等备注”,设置此项主要是给客服留备注的时间,这里的不下载订单并不是不下载,而是下载后订单进入原始单的“已付等备注”中,等待客户对订单做备注,过了这个设定时间,再次抓单,新的备注信息就会覆盖原来的备注信息,同时订单由“已付等备注”进入“建议递交单”中【2】:勾选此项,订单会自动递交至订单审核,无需再到原始单中手动点递交;【3】:对应原始单中“已付等未付”,设置此项是防止同一客户的多个订单分多个包裹;当我们用esAPI 抓单时,一个客户有多个订单,其中有已经付款和未付款的,esAPI抓单后,该客户已付款的订单会进入原始单“已付等未付”中,等待未付款订单付款,过了这设定的时间,再次抓单,已付款订单进入“建议递交单”,然后在订单审核中对这些同名订单合并或者设置递交时自动合并同名订单。
【4】从原始单递交至订单审核时,同名订单自动合并;【5】勾选此项,聚划算且强制物流宝发货的订单不会被抓紧网店管家系统中;【6】从淘宝或拍拍下载商品到管家的货品档案中,如果匹配规则是:商家编码+子商家编码=条码+附加码,要勾选此项,一般建议是子商家编码=条码+附加码【7】针对淘宝、一号店、Amazon等平台,需勾选此项可以买家地址中的省市和详细地址进行合并;【8】避免重复铺货时,可设置干扰码【9】店铺做优惠活动的时候需要设置此项,下载订单时就把订单里的优惠商品或优惠信息也写入,如果没有就不要勾选,否则会造成订单异常;【10】:如果是淘宝的货到付款需要设置此项,不然会造成抓单异常;【11】淘宝分销订单合计金额和订单明细价格抓取买家实际付款需要在此设置才可以。
参数2:如上图所示:【启用反写备注】:勾选此项,并设置标记内容,这样订单被抓取后,标记内容会自动备注在淘宝订单后边,提示您此订单已抓取;(如果开启了“已付等备注”,第一次抓取不会反写备注的)【淘宝抓单不抓取所选旗帜颜色】【淘宝分销不抓取所选旗帜颜色】:对淘宝不抓取订单插上旗帜,并在API 中设置此项即可;【下载淘宝分销】:可设置下载几天内的分销订单。
物流匹配:在这里通过【新建】设置物流匹配规则,先选择客户要求,店铺名称,然后选择匹配方式;如果是客户要求快递,直接指定某一快递公司,则选择匹配方式为“替换为”,然后在货运方式中选择指定的快递公司;如果是按照网店管家中设置好的物流匹配规则进行匹配,匹配方式选择“自动匹配”。
标记匹配网店管家【设置】-【记录标记】为不同类型的销售单设置不同的颜色标记,这些颜色标记会显示在esAPI的标记匹配的下拉列表中,在这里做好旗帜和颜色标记的匹配,同时在淘宝平台上对特殊订单用不同颜色的旗帜来区分,【订单审核】中,匹配颜色的订单与淘宝上标的旗帜订单对应,便于我们在订单审核中区分不同类型的订单。
3.4商品下载【商品下载】功能可以将卖家平台上边的货品信息直接下载到网店管家的货品档案中,为前期建立货品档案节约一大部分时间,目前此功能仅支持淘宝和拍拍平台。
【商品下载】前需要先在淘宝或拍拍平台设置好相应的货品商家编码等信息,遵循规则:子商家编码=条码+附加码;【商品下载】操作:我们以淘宝店铺为例来演示下:第一步:宝贝下载选择店铺,选择下载哪个类型的宝贝,这些宝贝就会显示在下拉列表中,前边有三角符号标志的,可能是宝贝的商家编码设置有问题,需要仔细核对并修正相应的商家编码;第二部:导入相关选项如果我们店铺既有多规格也有单规格,选择单,多规格区分导入,如果全部是单品就选择第二项,需要导入货品资料的同时还要入库,可勾选导入宝贝数量,并选择仓库就可以了,后期再到【网店管家】-【库存】中盘点库存数量即可;第三步:导入到管家点击“全选”会选中所有的列表中所有的货品信息,如果要下载图片的话,先建立一个临时文件夹,将下载的图片放入临时文件夹中,再把图片拷贝到网店管家的服务器file文件夹中,然点击“导入到管家”,货品资料就会显示在网店管家的货品档案中;(这里的图片是商品的主图,如果需要在管家中显示每个规格的图片,需要到管家的货品档案中逐个上传)3.5发货同步设置进入【设置】-【发货同步设置】界面,如下图所示:【1】需API自动发货,需要勾选此项,目前API自动发货可支持淘宝、拍拍、京东、一号店、诚信通、库巴、天品、聚美、中百、QQ团购等平台;【2】在此处选择物流公司并设置对应的发货方式;【自己联系物流】:是自己打包好并且贴好快递单,联系物流公司上门取件;【在线下单】:淘宝平台会根据我们选择的物流公司去分配,但是这个时间比较慢,大部分卖家还是选择【自己联系物流】【虚拟发货】:主要是针对补邮费、充话费等这些无需物流的虚拟物品,虚拟发货无需填写快递单号;【3】勾选此项,同步发货出错时,即有声音提醒;【4】网店管家中填写好快递单号,API即可同步发货。
【京东、一号店发货设置】:需设置对应物流公司的关键词,才可以在API中同步发货;【退款检测】:主要针对淘宝、拍拍平台两个平台在API的同步发货前进行退款检测,如果符合下边勾选的选项,即阻止发货。
3.6库存同步设置及操作设置步骤为:1.做好库存同步设置;2.做好同步商品的匹配;3.货品同步。
1.做好库存同步设置如果想对个别货品不同步,可以不进行货品匹配,即不会同步。
已经做过匹配的货品不同步库存的话,到匹配查询那找到那个货品,勾上停用保存。
具体操作如下:进入【设置】-【库存同步设置】,如上图所示,先做基础设置,设置同步线程开启数量主要是加快库存同步速度,降低卖家平台和管家库存同步的时间误差,一般淘宝平台建议线程设置为1,其他平台设置3-5,但这只是参考,具体还要根据各平台的实际情况进行设置;另外需勾选开启库存同步才启用库存同步功能。