NETIQ的安装与使用说明
- 格式:pdf
- 大小:4.57 MB
- 文档页数:40

BMW Brilliance AutomotiveNETIQ VPN TOKEN USER GUIDEVERSION 1.7目录Contents1.更新配置文件-Update user profile (2)1.1 安装BBA-VPN-NetIQ用户配置文件–Install BBA-VPN-NetIQ user profile (2)2. NetIQ VPN令牌用户设置- NetIQ VPN Token User Setting (4)2.1登陆NetIQ自助设置页面- Logging into the NetIQ Self-service Portal (4)2.2设置用户自定义密码-Set the user self-defined Password (6)2.3设置NetIQ VPN令牌- Set the NetIQ VPN Token (7)3.连接BBA-VPN-NetIQ – Connect to BBA-VPN-NetIQ (9)1. 更新配置文件-Update user profile1.1 安装BBA-VPN-NetIQ用户配置文件–Install BBA-VPN-NetIQ user profileOpen software center in your computer, as shown below:打开电脑中的software center,如下图:Click “NETIQ VPN Update_V1.0” and Install:点击“NETIQ VPN Update_V1.0”并安装:Installation Compete, as shown below:安装成功,如下图:Note: The next chapter is for user self-defined Password settings. If you do n’t set it, you cannot receive the JoyChat token code and cannot meet multi-factor authentication security policy. Users who do not meet the security policy will be locked by the system.注:下章为用户自定义密码设置,如不设置则无法接收悦信令牌码,且不满足多因素认证安全策略。

Qcheck是NetIQ公司开发的一款免费网络测试软件,被NetIQ称为“ping命令的扩展版本”,主要功能是向TCP,UDP,IPX,SPX网络发送数据流来测试网络的吞吐率、回应时间等,从而测试网络的响应时间和数据传输率。
测试时需要使用两台计算机,并且均需运行Qcheck软件,在测试中,从一个客户端向另一个客户端发送文件,然后测试所消耗的时间,并计算出传输速率(以Mb/s为单位)。
例如TCP/UDP传输率测试,测试结果越高越好,100Mb/s端口的理论值最高为94Mb/s(传输率)。
Qcheck是一款免费软件,没有任何限制,任何用户都可以下载并使用该软件。
该软件适用于Windows 9x/Me/NT/2000/XP/2003等操作系统,用户可以从其官方网站(/)下载。
TCP响应时间(TCP Response Time)这项测试可以测得完成TCP通讯的最短、平均与最长时间。
这个测试和「ping」很像,目的在于让你知道收到另一台机器所需的时间。
这个测量一般称为「延缓」或「延迟」(latency)。
TCP传输率(TCP Throughput)这项测试可以测量出两个节点间使用TCP协议时,每秒钟成功送出的数据量。
通过这项测试可以得出网络的带宽。
UDP串流传输率(UDP Streaming Throughput)和多媒体应用一样,串流测试会在不知会的状况下传送数据。
在Qcheck中,使用无连结协议的IPX(Internetwork Packet Exchange,网络交换协议)或UDP。
Qcheck的串流测试是评估应用程序使用串流格式时的表现,例如IP线上语音以及视频广播。
此测试显示多媒体流通需要多少的频宽,以方便网络硬件速度和网络所能达到真正数据传输率间的比较。
另外也可以测得封包遗失(packet loss)情况以及处理中的CPU占用率(CPU utilization)。
/products/performance_applications/pa_display.php?skey=qcheck在要测试的网络两端分别运行一台计算机,这两台计算机均安装Qcheck软件,然后分别运行Qcheck程序。

NetIQ Single Sign-onApplication GuideSeptember 2023Legal NoticeCopyright 2023 Open Text.The only warranties for products and services of Open Text and its affiliates and licensors (“Open Text”) are as may be setforth in the express warranty statements accompanying such products and services. Nothing herein should be construed asconstituting an additional warranty. Open Text shall not be liable for technical or editorial errors or omissions containedherein. The information contained herein is subject to change without notice.2ContentsAbout This Book51Welcome to Single Sign-on7 How to Log in. . . . . . . . . . . . . . . . . . . . . . . . . . . . . . . . . . . . . . . . . . . . . . . . . . . . . . . . . . . . . . . . . . . . . . . . . . . . .7 How to Sign out. . . . . . . . . . . . . . . . . . . . . . . . . . . . . . . . . . . . . . . . . . . . . . . . . . . . . . . . . . . . . . . . . . . . . . . . . . .72Managing Applications9 Make an Application as a Favorite. . . . . . . . . . . . . . . . . . . . . . . . . . . . . . . . . . . . . . . . . . . . . . . . . . . . . . . . . . . .9 Sort the Applications . . . . . . . . . . . . . . . . . . . . . . . . . . . . . . . . . . . . . . . . . . . . . . . . . . . . . . . . . . . . . . . . . . . . . .9 Change the Tile Size of Applications . . . . . . . . . . . . . . . . . . . . . . . . . . . . . . . . . . . . . . . . . . . . . . . . . . . . . . . . . .9 Change the Settings for the Application Portal. . . . . . . . . . . . . . . . . . . . . . . . . . . . . . . . . . . . . . . . . . . . . . . . . .9Contents34About This BookThe NetIQ Single Sign-on User Guide provides information about how to use and navigate the Application Portal for Single Sign-on. This allows you to access all of the applications and services that you use for your job from a single location and use one user name and password to access these resources.Intended AudienceThis book provides information for individuals that log in and use applications or services as part of their daily jobs.Additional DocumentationFor the most recent version of this guide and other Single Sign-on documentation resources, visit the Single Sign-on Documentation website (https:///documentation/single-sign-on/help/).Contact InformationWe want to hear your comments and suggestions about this book and the other documentation included with this product. You can use the Add Comment at the top of each page of the online documentation, or send an email to *************************************.For specific product issues, contact Micro Focus Customer Care at https:/// support-and-services/.About This Book56About This Book1Welcome to Single Sign-on 7Welcome to Single Sign-onSingle Sign-on is a comprehensive access management solution that provides single sign-on and secure access to web-based applications, SaaS services, and federated business-to-businessinteractions. Single Sign-on provides you with adaptive, context-aware secure access to web, API, and cloud applications from anywhere and from any device.♦“How to Log in” on page 7♦“How to Sign out” on page 7How to Log inYou receive information from your IT department with your user name, password, and the URL of where you log in to the Application Portal. After you log in to the Application Portal and click on an application, you do not have to enter the user name and password for that application. Your IT department has configured the links to provide single sign-on access to these applications for you.How to Sign outYou can sign out of the Application Portal at any time. To sign out, in the title bar, click the down arrow, then click Sign Out .8Welcome to Single Sign-on2Managing Applications 9Managing ApplicationsSingle Sign-on provides an Application Portal that lists all of the applications and services with only one user name and one password. The Applications Portal provides you with the ability to make applications as favorites, sort the applications, and change the look of the page.♦“Make an Application as a Favorite” on page 9♦“Sort the Applications” on page 9♦“Change the Tile Size of Applications” on page 9♦“Change the Settings for the Application Portal” on page 9Make an Application as a FavoriteYou can make applications as a favorite so that you can sort by them. To mark an application as a favorite, hover over the application, then click Make Favorite . Favorite applications have a blue star on the upper left corner.Sort the ApplicationsThe Application Portal lists the applications alphabetically by default. You can sort the applications by favorites and most recently accessed to speed up finding an application. To sort the applications:1To sort by the favorite applications, click View Favorite Applications .2To sort by the mostly recently accessed applications, click View Recent Applications .Change the Tile Size of ApplicationsYou can change the tile size of the applications to fit what works best for you. To change the tile size:1In the upper right corner, click More View Options .2Select the appropriate tile size of Large Tile , Medium Tile , or Small Tile .Change the Settings for the Application PortalThe Application Portal displays 100 applications by default. You can change the number of applications that the Application Portal displays.1In the upper right corner, click More View Options > Settings .2Change the number of applications the Application Portal displays. The value range is from 1-1000.3Click Save .10Managing Applications。

NetIQ PortfolioAdaptive and Advanced Authentication|28 FEB 2023Umar Ashraf, Software EngineerAgenda•Authentication Methods with NetIQ•Adaptive Authentication with NetIQ•Custom Authentication (your own way) with NetIQProducts in scope•Access Manager (Access Control –Triple A)•Advanced Authentication (Multi-factor Authentication)•Self Service Password Reset (User Provisioning, Profile Management)Authentication MethodsAn overview of the different forms of authentication supported…5HTTP Basic (Username +Password)Zero Trust (Continuous Authentication)Machine Learning (super-human)Access ManagerDeveloper SDK Advanced AuthenticationHTTP Forms (Username +Password)X509(Certificates)KerberosRadiusFederated (SAML,OAuth, etc.)Social (Google, Facebook etc.)Basically anything !Biometrics(Face-Windows Hello,WBF Fingerprint-KSI/HID/NEXT/Touch ID)Passwordless (Windows Domain,WHfb, Azure)One Time Password(TOTP, HOTP)FIDO (WebAuthn,U2F)Passive (Geo-Fencing,Smartphone Push,Bluetooth, Device ID)Cards (PKI PKCS7,PKCS11,RFID,NFC)Adaptive Authentication Risk Based Access ControlsUsersDevicesThingsServicesRisk-Based Access ControlsNetIQ Risk Service Leverages Context to Evaluate RiskAllow AccessStep-UpAuthDeny AccessResource or ApplicationFinancialsHR Salesforce Travel Site Café MenuRisk ServiceExternal ParametersGeolocationUser Cookies HistoryHTTP Headers IP AddressDevice IDProfileCalculated Level of RiskHighMedium LowCustom Authentication Write your own authentication mechanism!NetIQ SDK•https:///documentation/access-manager/developer-documentation-5.0/pdfdoc/nacm_enu/nacm_enu.pdf•https:///documentation/netiq-advanced-authentication-framework-410R2/pdfdoc/naaf/rte/sdk-administrators-guide.pdfReferences and Resources•Product Page -https:///en-us/cyberres/identity-access-management/access-manager•Documentation -https:///documentation/access-manager/5.0/•Youtube playlist -https:///playlist?list=PL8yfmcqTN8GHQiXJ1UtgjKAyaBHJ3tGH8•Community website -https:///cyberres/netiq-access-management/accessmanagerThank you/opentext /company/opentext 。

Release Notes NetIQ SecureLogin 9.0.1 Patch 1 Release NotesOctober 2022NetIQ SecureLogin 9.0.1 Patch 1 enhances the product capability and resolves several previous issues. Many of these improvements were made in direct response to suggestions from our customers. We thank you for your time and valuable input. We hope you continue to help us ensure that our products meet all your needs. Youcan post feedback in the SecureLogin forum on our community website that also includes product information, blogs, and links to helpful resources. You can also share your ideas for improving the product in Ideas Portal.For more information about this release and the latest release notes, see the NetIQ SecureLogin documentation page. Note that SecureLogin 9 documentation is available on the Micro Focus domain. For SecureLogin documentation versions prior to 9, see NetIQ Documentation.If you have suggestions for documentation improvements, click comment on this topic at the bottom of anypage in the HTML version of the documentation posted at the NetIQ SecureLogin documentation page.♦“Resolved Issues” on page1♦“System Requirements” on page2♦“Upgrading NetIQ SecureLogin 9.0.1 with Patch 1 Update” on page2♦“Supported Upgrade Paths” on page2♦“Contacting Micro Focus” on page2♦“Legal Notice” on page2Resolved IssuesThe following issues have been resolved in NetIQ SecureLogin 9.0.1 Patch 1:ID Module Description211321Client for OES OES Client login fails and does not connect to the eDirectory when SecureLogin isinstalled.209965 Client General Special characters are typed incorrectly for all keyboards except ENG-US.210981 Client GUI SideBySide Error seen in Event Viewer and error in manifest or Policy File.209966Client General After upgrading SecureLogin from 8.7.1 to 9.0.0.1, trying to login with smart card causesSecureLogin to crash.1System RequirementsFor information about hardware requirements, supported operating systems, and browsers, see NetIQSecureLogin System Requirements.Upgrading NetIQ SecureLogin 9.0.1 with Patch 1 UpdateNetIQ SecureLogin 9.0.1 Patch 1 is available to download from the Software License and Download (https:// /) portal. For information about how to download the product from this portal, watch the following video:/watch?v=esy4PTVi4wYFor information about how to upgrade, see SecureLogin 9.0 Installation Guide.Supported Upgrade PathsTo apply NetIQ SecureLogin 9.0.1 Patch 1, NetIQ SecureLogin 9.0.1 is required.To upgrade to SecureLogin 9, you must be on one of the following versions of SecureLogin:♦8.7♦8.8♦8.8.1Upgrade or migration from SecureLogin 8.6, 8.5, 8.1, 8.0, or 7.0 might work, but it is not tested. Ensure that you test the upgrade from SecureLogin 8.6, 8.5, 8.1, 8.0, or 7.0 to SecureLogin 9.0 in your test environment before you upgrade in your production environment.Contacting Micro FocusFor specific product issues, contact Micro Focus Support at https:///support-and-services/.Additional technical information or advice is available from several sources:♦Product documentation, Knowledge Base articles, and videos: https:///support-and-services/♦The Micro Focus Community pages: https:///communities/Legal NoticeFor information about legal notices, trademarks, disclaimers, warranties, export and other use restrictions, U.S. Government rights, patent policy, and FIPS compliance, see https:///about/legal/.© Copyright 2022 Micro Focus or one of its affiliates2NetIQ SecureLogin 9.0.1 Patch 1 Release Notes。

1.,按默认路径安装好。
2.Copy chariot.lic to C:\Program Files\NetIQ\Chariot\3.Run gsendw32.exe.4.Click Next when installing.5.Select “Don’t install application monitoring support” then click Next.6.Repeat 1~5 step on another system.然后手动关闭Windows防火墙,并在管理工具 服务中停止Windows Firewall/Internet Connection Sharing(ICS).并手动指定被测板和标准系统的IP地址。
比如,被测板的IP地址为:192.168.0.11,子网掩码为:255.255.255.0,默认网关设为同一局域网网段服务器的IP地址192.168.0.1;标准系统的IP地址为:192.168.0.9,子网掩码为:255.255.255.0,默认网关也设为同一局域网网段服务器的IP地址192.168.0.1。
7.Run Chariot Console from one unit(don’t need to run it on two units on the sametest time).8.Click New.9.Click “Add Pair”.10.Enter the source IP address (源地址,即被测板的IP地址192.168.0.11)toEndpoint 1 network address, and target IP address(目标地址,即标准系统的IP 地址192.168.0.9)to Endpoint 2 network address.11.Click “Select Script”, double click “Benchmarks” folder.12.Select “” then click Open.13.Click OK.14.Select Run/Set Run Options.15.In “How to end a test run”, select “Run for a fixed duration”, then set the test timeyou want it to test.16.Click Run.17.Click the “Throughput” tab.18.After testing, write down the Pair 1 Average(Mbps) into your test report.19.If you want test the IPX/SPX, change the setting in step 13. Endpoint 1 pleasetype 00000000:[Source MAC address], Endpoint 2 please type 00000000:[Target MAC address], then change the network protocol to “IPX”.20. Select “” in Script folder.21.Please notice, the result by “” script is slower than “”, so if you want know theresult is pass or fail, please compare with other platforms, but you may ask why we don’t use the “” script to test IPX/SPX, sorry, the script is only for TCP/IP test, because when we try to use that script for test, AP pops a error message to remind user that the script is only for TCP test.That’s all.。


CLInetLabIQC系统实验室操作手册北京科临易检信息技术有限公司1.概述CLInetLabIQC(以下简称IQC)是北京科临易检信息技术有限公司在多年开发维护CLInet-EQA(实验室间质量评价系统)基础上,成功开发出的一套完善的实验室内部质量管理、质量控制的软件。
它不仅包含了各级临床实验室必备的质量控制管理模式,而且还集成了完善的网络汇总传递功能,实现了室内质控数据的实验室间质量比对。
IQC不是一个简单的数据管理分析系统,而是建立在大型关系型数据库体系上的很多应用的集合。
对于初次接触CLInet产品的用户,请仔细阅读本操作手册,以方便您能更快捷的掌握所有操作流程,以及更轻松的了解所有CLInet产品的通用风格。
1.1功能概述IQC系统旨在解决所有实验室日常工作中出现的与质量控制相关的各类问题,按照一种或者多种质量控制规则对实验室的质量进行监测和管理。
主要功能包括以下几个部分:1、质控计划:质控计划以年度来划分,每年开始进行质控活动前,都需要设置该年度的质控计划,目的是生成空白的上报表格。
2、数据录入:将质控品的检测结果录入到空白的上报表格中,该工作目前需要手工填写或使用Excel表格导入。
我们同时提供数据导入系统服务,可以从实验室LIS数据库或仪器中直接采集质控数据。
3、绘制多种常用质控图:在实验室进行日常的质量控制工作中,绘制质控图是一个相对繁琐、细致的工作,本系统的绘图功能不仅能够绘制一般的Levey‐jennings质控图,同时还可以绘制Z-分数图、Youden图、累计和、频数分布图五种常用质控图,使得质量评价活动更加直观、全面。
4、进行多规则失控判断:IQC系统中包含了多种质控规则如:常用质控规则(1_2s、1_2.5s、1_3s、1_3.5s、1_4s、2_2s、(2of3)2s、3_1s、4_1s、7T、7X)、计算控制界限规则(10.05、10.01、20.05、20.01、20.002、X0.05、X0.01、R0.01、R0.02)、累积和规则(CS(1.0s:2.7s)、CS(1.0s:3.0s)、CS(0.5s:5.1s))、极差规则等等5、数据上传:软件能够作为整个IQC评价系统的数据采集端,将每日质控的原始数据上传到互联网数据库中,参加更大范围内的室内质控实验室间的质量比对活动。

NetworkIntelligence4.0部署与安装手册(1.89MB)系统统安装部署手册册Ch hinaNetwork .Inc k安装署手册装部署Vers sion?4.0. .807 更新 2008/1 10/28?系统安装部署手册ChinaNetwork .Inc?1. 安装?..........................................................................?3 1.1. 系统要求?................................................................?3 1.2. 安装过程?................................................................?3 1.3. 服务?..........................................................................?4 1.4. 系统调优?................................................................?4 1.5. 登录?..........................................................................?4 2. 监视配置‐Apache?...............................................?5 2.1. Apache?Server 配置?..........................................?5 2.2. 添加Apache 监视器?..........................................?7 3. 监视配置‐Oracle?.................................................?7 3.1. 配置Oracle?Client?.............................................?7 3.2. 添加Oracle 设备?.................................................?9 3.3. 添加Oracle 监视器?............................................?9 4. 监视配置‐Syslog?................................................?10 4.1. Windows?Syslog 转发配置?...........................?10 4.2. Linux 下syslog 的配置?..................................?11 4.3. Cisco 下syslog 的配置?...................................?11 4.4. H3C 下syslog 的配置?.....................................?12 4.5. 在系统中查看SYSLOG 接受情况?...............?12 5. 监视配置‐Windows?SNMP?............................?13 5.1. 开启被监视服务器的 SNMP 功能?..............?13 5.2. 设置 SNMP 共同体名称?.................................?13 5.3. 在系统中添加可SNMP?Windows 设备?...?14 6. 在系统中添加 Windows?SNMP 监视器?...?16 6.1. Windows?SNMP 性能监视?...........................?16 6.2. Windows?SNMP?DHCP?....................................?16 6.3. Windows?SNMP?IIS?..........................................?17 7. 监视配置‐Windows?WMI?..............................?17 7.1. 在系统中添加 Windows 设备?.....................?17 7.2. 在系统中添加WMI 性能相关监视器?......?18 7.3. 在系统中添加WMI 日志监视器?...............?18 7.4. 在系统中添加WMI?Exchange 监视器?.....?19 8. WMI 常见问题?...................................................?19 9. 监视配置‐Ftp?......................................................?19 9.1. 在系统中添加ftp 监视器?..............................?19 10. 监视配置‐Linux?.................................................?20 10.1.?开启并配置SNMP?............................................?20 10.2.?在系统中添加Linux 设备?.............................?22 10.3.?在系统中添加Linux 性能监视器?..............?22 10.4.?在系统中添加 telnet 脚本监视?...................?23 11. 监视配置‐Cisco?..................................................?24 11.1.?开启并配置SNMP?............................................?24 11.2.?在系统中添加Cisco 设备?..............................?25 11.3.?在系统中添加Cisco 路由器监视器?..........?26 11.4.?在系统中添加Cisco 交换机监视器?..........?26 12. 监视配置‐华为、H3C?.....................................?27 12.1.?开启并配置SNMP?............................................?27 12.2.?在系统中添加huawei 设备..........................?27 12.3.?在系统中添加 huawei 路由器、交换机监视器13. 系统优化WebServer?Apache 转IIS?........?28 13.1.?安装IIS?.................................................................?28 13.2.?配置默认站点?.....................................................?29 14. 系统维护‐全面迁移系统并保留历史数据29 14.1.?备份现有数据库?................................................?3014.2.?在计算机安装 NI?..............................................?31 . 14.3.?连接数据库?.........................................................?31 14.4.?初始化数据库并保存?......................................?3114.5.?还原已备份的数据库?......................................?32 14.6.?设置NI 数据库连接?.......................................?33 15. 短信猫调试?.........................................................?34 15.1.?短信猫安装?.........................................................?34 15.2.?测试短信猫?.........................................................?34 15.3.?启动SmartView 服务?.....................................?35 15.4.?错误的解决?.........................................................?36 16. Windows 提供大内存支持?...........................?36 16.1.?概要?........................................................................?36 16.2.?更多信息?..............................................................?3627系统安装部署手册ChinaNetwork .Inc?1. 安装?安装部署手册的主要目的是指导首次使用该系统的用户方便快捷的安装系统和配置。

NetIQ Chariot快速使用手册目录1 Chariot工作原理................................................................................................ 错误!未定义书签。
2 安装..................................................................................................................... 错误!未定义书签。
2.1 Console ................................................................................................ 错误!未定义书签。
2.2 Endpoint .............................................................................................. 错误!未定义书签。
3 经验配置............................................................................................................. 错误!未定义书签。
4 开始测试............................................................................................................. 错误!未定义书签。
4.1 使用步骤............................................................................................. 错误!未定义书签。

password “vault,” that provides secure storage of your system, application, and database passwords. The Enterprise Credential Vault helps you to centrally manage your organization’s privileged accounts and provides an intuitive interface for privileged users to check-out and return passwords. It also enables broader privilege account support for applications (such as SAP this risk-based activity control to deliver automated policy enforcement during privileged user sessions. If a user performs a risky activity, such as accessing restricted data or stopping a service, an administrator may configure NetIQ Privileged Account Manager to disconnect the session automatically or revoke a user from accessing any privileged accounts.Key BenefitsControl and monitor unauthorized and un-monitored privileged user access across your entire heterogeneous environment.• Centrally manage security policies froma single point.• Continuously support compliance with internal policies and external regulations. • Virtually eliminate the need for complex manual scripting.• Enforce a consistent policy throughout your environment via centralized management.• Enable access enforcement, analysis and reporting to comply with privacy lawsand regulations.• Integration with ArcSight Intelligence by OpenText™ provides risk-aware services that considers risk associated with the activity when elevating an identities privileges. • Instantaneous real-time monitoring of privileged sessionsKey FeaturesDesign, configure, test and deploy a privileged account management solution across your entire environment from a single location.• Enterprise Credential Vault for secured• Smart risk ratings built on potentialthreat analysis• Deployment flexibility with both agent-based and agentless support for Windowsand Linux.Figure 1. The Command Control Console enablesadministrators protect and control user commands.Key DifferentiatorsBuild the most comprehensive audit trailavailable. With NetIQ Privileged AccountManager, you have the ability to audit all useractivity with 100-percent keystroke loggingand video capture for all credential-basedenvironments, including applications suchas SAP System, databases such as OracleDBMS, and cloud services such as Azure,AWS and .For specific access events, auditors may playback the entire event at a keystroke level—with color-coded, line-by-line detail—and apply a status of “authorized” orConnect with Us。

Quick Start NetIQ Secure API Manager 2.1 Quick StartInstalling and Configuring Secure API ManagerJune 2022This Quick Start explains how to install and configure Secure API Manager. It is a multi-step process. It is important to complete all of the steps listed to properly configure Secure API Manager.IMPORTANT: You must complete the steps in the order listed to have configuration options appear or to beable to save the configuration options.1. Obtain Secure API Manager, the License, and the Activation KeyAfter you purchase Secure API Manager, the full license, and the activation key are available from theSoftware Licenses and Downloads (https:///) portal. The trial license comes withAccess Manager and it is in the Access Manager Administration Console. You must install the trial or the full license to see the configuration options for Secure API Manager in the Access Manager Administration Console. For more information, see “Obtaining Secure API Manager and the License” in the NetIQ Secure API Manager 2.1 Installation Guide.IMPORTANT: The activation key for the appliance does not work on the Docker deployment. You mustobtain a valid registration key for the SUSE Linux Enterprise Service if you use the Docker deployment.2. Deploy Secure API ManagerDeploy Secure API Manager. We provide two different deployment options: the appliance or the Docker container. Choose one of the following items to deploy Secure API Manager.♦Deploy the appliance. You must deploy a minimum of two appliances to cluster Secure API Manager.For more information, see “Deploying the Secure API Manager Appliance” in the NetIQ Secure APIManager 2.1 Installation Guide.♦Deploy the Docker container. You must deploy a minimum of two Docker container to cluster SecureAPI Manager. For more information, see “Deploying Secure API Manager Using Docker” in the NetIQSecure API Manager 2.1 Installation Guide.3. Set the Administrator Password for the API GatewayYou must set an administrative password for the platform where the API Gateway runs. To increasesecurity, do not use root account. For more information, see “Set the Administrator Password for the API Gateway” in the NetIQ Secure API Manager 2.1 Administration Guide.14. Install the License and Activation KeyYou must install a trial license or a full license for Secure API Manager in the Access ManagerAdministration Console for the configuration options for the API Gateway to appear. If you do not install the trial or full license, you cannot configure and use Secure API Manager.You must install the activation key to receive updates or upgrades for the appliance deployment of Secure API Manager. For more information, see “Install the Secure API Manager License and Activation Key” in the NetIQ Secure API Manager 2.1 Administration Guide.5. Create or Import a Certificate for the API GatewayYou must create or import a certificate for the API Gateway into the Access Manager certificatemanagement system. During the configuration of the API Gateway, you must select a certificate to use to ensure that the communication between Secure API Manager and Access Manager is secure over SSL. For more information, see “Create or Import a Certificate for Secure API Manager” in the NetIQ Secure APIManager 2.1 Administration Guide.6. Configure the API Gateway Cluster and API GatewayAfter you install the Secure API Manager license there is a new API Gateway option on the Dashboard.Click the server object for the API Gateway, then create an API Gateway Cluster by defining its name.Configure one or more API Gateways depending on if you cluster Secure API Manager. For moreinformation, see “Create the API Gateway” in the NetIQ Secure API Manager 2.1 Administration Guide.7. Create Limiting Policies for the APIsYou create the Limiting Policies to protect the API Gateway after you configure the API Gateway cluster and the API Gateway. These policies create subscription tiers that the API developers select during thecreation of the APIs. These policies provide the ability to throttle the bandwidth or the requests to theAPIs so that you can protect the API Gateway from too many requests or too much bandwidth at any time.For more information, see “Configure the Limiting Policies for the APIs” in the NetIQ Secure API Manager2.1 Administration Guide.8. Create Access Policies for the Publisher and the StoreBy default, no account has access to the Publisher and the Store where the API developers create andconsume the APIs. You must assign the appropriate rights to grant access to the Publisher and the Store.You can create role policies in Access Manager after you configure the API Gateway to grant theappropriate roles to allow users to access and use the Publisher and the Store. For more information, see “Grant Access to the Publisher and the Store” in the NetIQ Secure API Manager 2.1 Administration Guide.Legal Notice© Copyright 2019-2022 Micro Focus or one of its affiliates.The only warranties for products and services of Micro Focus and its affiliates and licensors (“Micro Focus”) are as may be set forth in the express warranty statements accompanying such products and services. Nothing herein should be construed as constituting an additional warranty. Micro Focus shall not be liable for technical or editorial errors or omissions contained herein. The information contained herein is subject to change without notice.For information about legal notices, trademarks, disclaimers, warranties, export and other use restrictions, U.S.Government rights, patent policy, and FIPS compliance, see Micro Focus Legal Information (https:/// legal).2Installing and Configuring Secure API Manager。


NetIQ Access Manager Template Data Policy ReadmePolicy extension examples include:•PolicyDataExtnFactoryTemplate.java•PolicyDataExtnTemplate.javaPurposeThis example can be used as a template to implement a policy extension of type Data that iscom.novell.nxpe.NxpeContextDataElement. This example provides a basic framework that can be used as a starting point for creating data policy (com.novell.nxpe.NxpeContextDataElement.) extensions.This example covers the following topics:•How to configure and install the Data policy extension in the Administration Console.•Implementation details of the Data policy extension factory and extension classes. FunctionalityThis policy extension contains a simple logic that returns "A" if LDAP UserDN of the user is not empty or null otherwise it returns "B". In this example, this Data policy extension is used in an Identity Injection policy to inject the output of the policy extension in the custom header. Implementation Details•This Data Policy Extension example consists of the following two Java classes: PolicyDataExtnFactoryTemplate.java: Implements thecom.novell.nxpe.NxpeContextDataElementFactory interface. This is a factory that createsPolicyDataExtnTemplate objects.PolicyDataExtnTemplate.java: Implements the com.novell.nxpe.NxpeContextDataElement interface. It contains the methods required to create a context data element that can be used for injection, for activating roles, or in a condition.•This class needs a configuration parameter LDAP User DN of the user. Configuration parameters are set for a policy extension through the Administration Console. In the policyextension, the values for these configuration parameters are retrieved at the time of evaluation from the NxpeInformationContext object that is sent to it by the policy engine.•The getValue method in the NxpeContextDataElement interface is called by the policy engine when a request triggers a policy evaluation. It executes the logic present in the policyextension and returns the results.•The getLDAPUserDN method in PolicyConditionExtnTemplate is used to retrieve the value of the LDAP User DN configuration parameter from the NxpeInformationContext object •The NxpeException class is used for exceptions in PolicyDataExtnTemplate.•The Data policy extension can be used in the Access Gateway Authorization policies, Access Gateway Identity Injection policies, Identity Server Role policies, and Identity Server External Attribute Source policies.How to Customize This Example to Meet Your Needs?•Factory: Modify the PolicyDataExtnFactoryTemplate class to control the creation of PolicyDataExtnTemplate as needed. Synchronize the methods of PolicyConditionExtnTemplate accordingly to avoid problems due to concurrency.•Configuration parameters: Identify and set the configuration parameters required by your condition extension and provide their mappings in the Administration Console.•Implement getter methods for all of your configuration parameters in thePolicyDataExtnTemplate class, as it has been done for retrieving LDAP User DN in thisexample.•Modify getValue method to contain your own condition evaluation logic inPolicyDataExtnTemplate.•For creating the Data policy extension for other policies, create a policy extension from your customized extension classes of the type of that policy (Authorization, Role or ExternalAttribute Source respectively) and then create a policy of the same type (Authorization, Role or External Attribute Source respectively) that uses your policy extension.For more information, see Section 2.2, Creating Roles ,Section 4.2, Configuring an IdentityInjection Policy, Section 3.2, Creating Access Gateway Authorization Policies, and Section 6.0, Creating External Attribute Policies, Section 1.7, Adding Policy Extensions in the NetIQ Access Manager 3.2 Policy Guide.For more details on the implementation, see comments in the PolicyDataExtnFactoryTemplate and PolicyDataExtnTemplate classes or NetIQ Access Manager 3.2 Developer Kit.InstallationBefore you start the installation, you need the following:•The following Java classes and nxpe.jar:PolicyDataExtnTemplate.javaPolicyDataExtnFactoryTemplate.javaDownload novell-nacm3_2.tar.gz (SDK tar) from/developer/ndk/novell_access_manager_developer_tools_and_examples .html.For information on how to obtain nxpe.jar, see section 4.1.1 Prerequisites in the NetIQ Access Manager Developer Kit 3.2.•Java SDK (jdk1.6) to compile the Java sources.•Apache Ant. You can download it from /bindownload.cgi.•An Access Manager setup with the Identity Server, Access Gateway, and policies.• A basic knowledge of Java programming.Setup1.Extract the SDK tar (novell-nacm3_2.tar.gz). Go to nacm-3_2_0 > samples-jar folder.PolicyExtensions.jar will be present at this location. This jar contains all the policy extension example's compiled classes. This jar can be used for this example. If you want to customizethis example before installation then modify its java source, compile and generate a Jar file.Steps :Go to nacm-3_2_0 > samples > PolicyExtension >TemplateDataExtension_Example and run build.xml.This will generate the PolicyExtensions.jar in the same location where build.xml is available.To run build.xml:You need to copy nxpe.jar in the nacm-3_2 > samples > PolicyExtension > nxpe folder before running build.xml.Note the location where Java and Ant are installed on your system. Set them in the Pathenvironment variable and run the ant dist command. For example, run the following commands in the Linux environment:•export ANT_HOME=/usr/apache-ant-1.8.1<set it as per your environment>•export JAVA_HOME=/usr/java/jdk1.6.0_27<set it as per your environment>•export PATH=$ANT_HOME/bin:$JAVA_HOME/bin:$PATH•ant all2.Create a policy extension of the type Access Gateway: Identity Injection. For more information,see Installing the Extension on the Administration Console in the NetIQ Access Manager 3.2 Policy Guide.2.1. Creating a new policy extension:•Name: TemplatePolicyDataExtension•Policy Type: Access Gateway: Identity Injection•Class Name: com.novell.nam.custom.policy.data. PolicyDataExtnFactoryTemplate•File Name: name of the jar file created in step 12.2. Policy extensions configuration parameters: Configuration parameters are sent to thepolicy extension for execution.•Name: LDAP_User_DN (Name can be anything)•ID: 41 (This must match the parameter ID as mentioned in the policy extension implementation in the code)•Corresponding extract from PolicyDataExtnTemplate.java:private static final String LDAP_USER_DN_NAME = "LDAP User DN";private static final int EV_LDAP_USER_DN = 41;This parameter has to be mapped to LDAP User DN of the user present in thecredential profile as shown in the following image:3.Distribute the policy extension.For more information, see “Distributing Policy Extension”. Create an identity injection policy from the data extension, assign the policy to the Access Gateway and distribute the policyextension created in step 2.The “TemplateDataPolicy” Identity injection policy created in this step will be assigned to aprotected resource. For more information, see Assigning an Identity Injection Policy to aProtected Resource. It can be configured to inject the output of TemplatePolicyDataExtension in the HTTP header of the request sent to the protected resource.Rules defined for this policy“Inject into Custom Header” Action:• Custom Header Name: TemplatePolicyDataExtension Result (Name can be anything)• Value of the Custom Header: This points to the TemplatePolicyDataExtension, which is a policy data extension created in step 3.Copyright © 2012 Novell, Inc. All Rights Reserved.Novell grants permission, free of charge, to any person obtaining copies of this software and its associated documentation files (the "Software"), to deal in the Software without restriction, including to use, copy, adapt, publish, distribute, display, perform, sublicense, and sell copies of the Software, subject to the following condition: You must include the above copyright notice and this permission notice in all full or partial copies of the Software.NOVELL PROVIDES THE SOFTWARE "AS IS," WITHOUT ANY EXPRESS OR IMPLIED WARRANTY, INCLUDING WITHOUT THE IMPLIED WARRANTIES OF MERCHANTABILITY, FITNESS FOR A PARTICULAR PURPOSE, AND NON-INFRINGMENT. NOVELL, THE AUTHORS OF THE SOFTWARE, AND THE OWNERS OF COPYRIGHT IN THE SOFTWARE ARE NOT LIABLE FOR ANY CLAIM, DAMAGES, OR OTHER LIABILITY, WHETHER IN AN ACTION OF CONTRACT, TORT, OR OTHERWISE, ARISING FROM, OUT OF, OR IN CONNECTION WITH THE SOFTWARE OR THE USE OR OTHER DEALINGS IN THE SOFTWARE.。
教你用CHARIOT测量带宽、网速“网速怎么这么慢啊?”恐怕这是网管最常听到的一句话。
面对用户的投诉,如果是掉线或连接失败,我们可以通过简单的排查来解决。
但对于可以连通而速度缓慢的问题则不易解决,因为这类问题的产生大多和我们享用的网络带宽或网络设备有关,这就涉及到我们对网络服务商、网络设备的选择了。
那么,我们如何才能清楚明白地了解带宽的大小、设备的吞吐能力,以免被JS提供的数据误导呢?我们需要利用专业的工具测量网络带宽以及数据的吞吐量。
通过专业评测工具CHARIOT测量网络中的任意两台计算机之间的连通带宽,该软件还可以将测量结果以图形的形式表现出来,方便我们进行比较、浏览和及时了解网络带宽。
走近强大的CHARIOT运行平台:Windows 2000/XP/2003硬件要求:CPU为PⅢ以上,内存在128MB以上软件优点:通过简单的配置就可以图形化地显示两台计算机之间的网络连接速度。
这是一款目前世界上唯一被广泛认可的应用层IP网络及网络设备的测试软件,它可提供端到端、多操作系统、多协议测试、多应用模拟测试,应用范围包括有线网、无线网、广域网及各种网络设备。
可以进行网络故障定位、用户投诉分析、系统评估、网络优化等,能从用户角度测试网络或网络参数(吞吐量、反应时间、延时、抖动、丢包等)。
CHARIOT和一般的网管系统以及一些在线监测系统有本质上的不同。
网管系统及在线监测系统采取被动式监视,而CHARIOT采用主动式监视及测量;网管系统及在线监测系统提供定性的测量,而CHARIOT采取定量的测量。
CHARIOT产生并模拟真实的流量,采用End to End的方法测试网络设备或网络系统在真实环境中的性能。
能够广泛应用在交换机、路由器建立的有线网络以及无线网络,甚至是VOIP等高新技术中,测量这些网络各个方面的功能和性能。
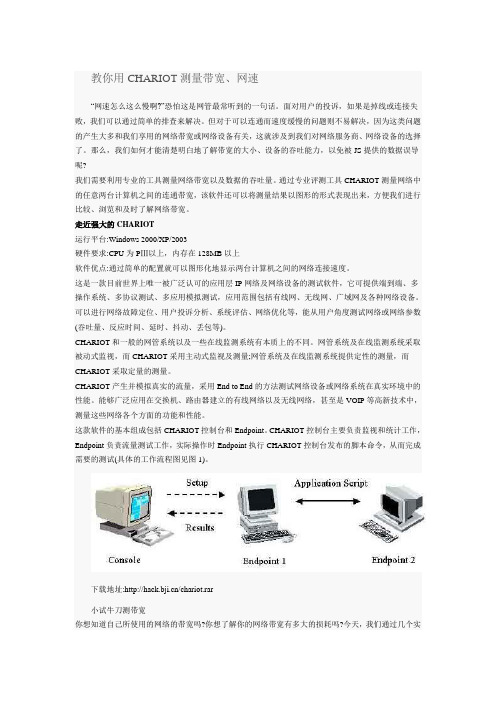
这款软件的基本组成包括CHARIOT控制台和Endpoint。
CHARIOT控制台主要负责监视和统计工作,Endpoint负责流量测试工作,实际操作时Endpoint执行CHARIOT控制台发布的脚本命令,从而完成需要的测试(具体的工作流程图见图1)。

Case StudyAt a Glance IndustryChallengeCreate a seamless end-user experience and streamline backend services while moving business-critical solutions to AWS cloud environmentProducts and ServicesNetIQ Identity Manager NetIQ Access Manager NetIQ Identity GovernanceNetIQ Advanced AuthenticationSuccess Highlights• E nriched functionality and seamless access across hybrid environment • Reduced business complexity with seamless end-user experience • Introduced Cloud Bridge for full bi-directional communication in hybrid environment • Increased scalability, flexibility, and cost-predictability with AWS deploymentOpenTextNetIQ supports global digital transformation totransparently bridge business-critical solutions hosted on premises and in AWS cloud environment.Who is OpenText?OpenText™ is one of the world’s largest enterprise software providers. It delivers mission-critical technology and supporting services that help thousands of customers worldwide manage core IT elements of their business so they can run and transform— at the same time. Cyberscurity is an OpenT ext™ line of business.Digital Transformation Drives Move to a SaaS Application ModelOpenText, like many of its customers, is a large organization grown significantly through acquisition. This strategy brought a plethora of tools used in different divisions. T o standardize its corporate identity management, OpenText trusts its own suite of identity and access solutions, under the NetIQ banner. NetIQ Identity Manager by OpenText™ and Access Manager by OpenText™ wereIT-managed in an on-premises environment and evolved more recently to include NetIQ Advanced Authentication by OpenText™ for multi-factor authentication as well as effective website protection.The merger between Micro Focus and HPE Software tripled the size of the organization and introduced new challenges around data hygiene, audit compliance, and security in general. At the same time, there was a definite market move towards a preference forSaaS-based solutions, to relieve the burden and cost of maintaining an on-premises IT environment. Jon Bultmeyer, CTO,Cybersecurity, runs the engineering teams involved in building Cybersecurity SaaS offerings. He works closely with other OpenText teams on the customer delivery model as well as the internal delivery of SaaS versions. He explains: “We found that we were lagging a little in version-currency, just because of the workload involved in an upgrade. To secure, run, and operate a large-scale identity management operation for over 12,000 staff is labor-intensive and time-consuming. This seemed a good opportunity to embrace the digital transformation at the heart of Micro Focus (now part of OpenText) and move our identity and access architecture to an AWS-hosted cloud environment.”“Cloud Bridge really streamlines the transition to SaaS and gives us the observability we need to ensure effective data flows between different systems.”Jon Bultmeyer CTOCyberResOpenTextIntroduce New Functionality and Comprehensive Access Reviewsin Hybrid EnvironmentOpenText took a wider view and introduced the SaaS Center of Excellence (CoE) organization, headed up by David Gahan, Senior Director, Cybersecurity SaaS. Rather than just make a ‘like for like’ move, the team chose to enhance the platform with NetIQ Identity Governance by OpenText™,as well as expanding the NetIQ Advanced Authentication by OpenText™ capability into a SaaS model. Pivoting from a ‘governance first’ principle with a focus on application access reviews, the project aimed to move via automated application access and approval to fully automated application access request and enablement.The full solution would provide seamless connectivity to the company’s key applications: Salesforce to manage customer interactions and order processing; Workday as an integrated HR solution; and NetSuite, which manages business finances and operational support, as well as other business-critical applications. It would also provide the capability to conduct certification reviews. This automated process builds a comprehensive directory of who has access to what. Periodically, all process and solution owners are asked to review their access list for accuracy. Job roles determine the level of access to specific solutions required for individuals. This ‘least privilege’ principle ensures that only colleagues with the right access level can configure the finance platform, for instance, or reach confidential personnel data in Workday.The project was part of the corporate digital transformation and as such had an executive spotlight on it, coupled with a tight delivery deadline of no more than 12 months. Cloud Bridge: Managing FullyIntegrated Identity Governancein a Hybrid EnvironmentOpenText’s own Professional Services skillsand their specific expertise in building thesesystems for Cybersecurity customers wasinvaluable. The SaaS CoE team workedon creating the SaaS infrastructure, andBultmeyer’s engineering teams werebuilding the SaaS applications. Meanwhile,Professional Services implemented NetIQIdentity Governance on premises to kickstartthe application integration, which relied onmany interconnected parts. Because theday-to-day business running takes ultimatepriority, this was a ‘run and transform’ scenariowith a hybrid approach. Key business systemsmoved in phases to the SaaS environmentwhile others remained on premises fornow. It is a challenge to integrate identitygovernance between on-premises and SaaS-based systems, and Cybersecurity wantedfully automated event-driven integration—they recognized that the manual process ofeither CSV file transfers or site-to-site VPNconnections that are offered by some marketalternatives can cause firewall complexities.As this, again, is not a challenge that isunique to OpenText, Bultmeyer’s teamturned its attention to creating the OpenTextCloud Bridge, as he explains: “Cloud Bridgeis a singular communication bridge for allour Cybersecurity SaaS solutions. It allowssecure bi-directional communication betweenon-premises and SaaS systems via a Dockercontainer. There are no special rules whenconfiguring the Cloud Bridge agent,so communication between on-premisesand cloud-based systems can be up andrunning within just an hour. There is just asingle location to monitor, so any issuesare resolved quickly. Cloud Bridge reallystreamlines the transition to SaaS and gives usthe observability we need to ensure effectivedata flows between different systems.”Reduced Business ComplexityWhile Navigating COVID-19Working PracticesOnce the CoE SaaS infrastructure wasoperational, the Professional Services teamtransitioned the on-premises NetIQ IdentityGovernance implementation to the AWSenvironment. The identity governanceenvironment now includes end-to-endintegrated workflows between key systems,integrated password management, singlesign-on, full visibility through Cloud Bridge,and advanced analytics leveraging OpenText™Vertica™ capabilities. Gahan says: “Leveragingour own NetIQ [by OpenText] solutions in aSaaS environment has allowed us to createa seamless end-user experience wherewe were once living in a world made up ofdifferent islands of access. The solutions ouremployees use to service our customers’needs and our own internal needs have beenstandardized, drastically reducing businesscomplexity across the board. It’s given usterrific backend benefits as well by helpingsimplify and standardize the concepts ofidentity and access acrossall of our business units.”“The project timelines coincided with theCOVID-19 pandemic, which presented uswith the same challenges our customersexperienced around the world,” addsBultmeyer. “Suddenly we could no longergather around a whiteboard to brainstorm,and we had to quickly adjust to workingremotely. Thankfully, this didn’t deter ourdetermination, and many teams—includingour Micro Focus (now part of OpenText) ITteam, the dedicated project implementationteam, our product management teams,backline engineering teams, the newlyformed CoE team, and our Customer Successteams—worked seamlessly together toadjust the implementation and manage anyproblems we encountered along the way.”2Enriched Functionalityand Cost Predictability in Flexible AWS DeploymentGahan spearheads the SaaS CoE, a new global organization dedicated to supporting SaaS customers. Leveraging expertise on defining governance policies, designingthe solution, and configuring this in a SaaS environment, the team created a truly hybrid identity governance platform where the end user does not know, nor need to care, whether the data they access resides on-premises or in the cloud. “And this is just how it should be,” Gahan says. “Our end users now benefit from much richer functionality such as seamless multi-factor authentication and sophisticated access review processes, drastically reducing manual processes.”Bultmeyer concludes: “NetIQ [by OpenText™] solutions have simplified our identity governance and shortened our communication lines. We were excited to leverage our strategic partnership with AWS, giving us a scalable and cost-predictable model as we grow, and allowing us to roll out additional functionality much faster than we otherwise could have done.”“NetIQ [by OpenText™] solutions have simplified our identitygovernance and shortened our communication lines.We were excited to leverage our strategic partnership withAWS, giving us a scalable and cost-predictable model aswe grow, and allowing us to roll out additional functionalitymuch faster than we otherwise could have done.”Jon BultmeyerCTOCyberResOpenText Cybersecurity provides comprehensive security solutions for companies and partners of all sizes. From prevention, detection and response to recovery, investigation and compliance, our unified end-to-end platform helps customers build cyber resilience via a holistic security portfolio. Powered by actionable insights from our real-time and contextual threat intelligence, OpenText Cybersecurity customers benefit from high efficacy products, a compliant experience and simplified security to help manage business risk.768-000087-003 | O | 11/23 | © 2023 Open Text。

An equal, if not greater, challenge is ensuring the protection of corporate assets, data and compliance with internal and external controls. Preventing unauthorized accessto sensitive information is enormously challenging when cloud applications and mobile devices are outside of the controlof anization. For example, it allows your:• CIO to decrease the costs of compliance and offer more convenient access, so the business can take advantage of new opportunities• CISO to enforce enterprise-wide access compliance and securityFigure 1. The Identity Management Lifecycle, Powered by NetIQ Identity Manager• Line of business managers to keep their teams productive by providing immediate, role-based access to resources• IT managers to better manage resources and provide identity rich usage data to key stakeholdersNetIQ Identity Manager manages the complete identity lifecycle in a modular yet integrated manner so you can address current and future needs as they come. Capabilities include: Managed Account Creation, Revocation and Job Changes—NetIQ Identity Manager offers an integrated roles-rules-workflow engine that provides the most efficient solution on the market today. Automate as much or as little provisioning as makes sense for your organization. The engine matches the way your organization does business bycombining business rules with the efficiencyof optional roles-based provisioning, allowingthe workflow engine to handle standardapprovals and exceptions such as separation-of-duties conflicts.Managed Identity and Access Changesacross the Enterprise—NetIQ IdentityManager leverages an event-basedarchitecture and enforces identity authorityacross all connected systems, ensuringidentities are created only from appropriatesources. Additionally, NetIQ Identity Managerenforces attributes authority, meaningsystems that “own” components of theidentity are the only ones that can changethem, and if changed in non-authoritativesources, they can be automatically re-set tothe value in the authoritative source. Both arecritical when basing provisioning and accesspolicies on attributes. NetIQ Identity Manageruses an event-based architecture to respondin real time when a user-lifecycle event,such as a hire, termination, promotion orrole change occurs, its data-managementengine triggers policy-based processeswith little-to-no human intervention.Additionally, various applications, such asMicrosoft SharePoint and SAP systems,have their own policy controls. IdentityManager makes it easy to integratedifferent entitlements into a consolidatedcatalog, leveraging the NetIQ IdentityManager resource reconciliation service.This capability allows you to automaticallydiscover permissions and use visualoperations to map resources to appropriateroles or NetIQ Identity Manager resources.Seamlessly integrating different policycontrols into one system quickly creates aunified governing mechanism that gives theright individuals a complete view of users’privileges, and empowers them to makeinformed decisions to evaluate and ensurethe right people have access to the rightresources. Not only does it deliver ease-of-use for initial setup but ongoing entitlementmaintenance provides your organization withan agile system for managing resources andentitlements across all connected systems,no matter where the systems are located—on premise or in the cloud.With constant connectivity beingthe new norm, the workplaceis now anywhere and businessuser preferences have shiftedtowards mobile device interfaces.Users wonder, “why can’t I haveaccess to what I need now”or “why can’t I just downloadan app” and “why am I beingasked for another password?”Designer for NetIQ Identity Manager offers the ability to produce access-request workflows that can dramatically reduce human error with no programming or customization required. In the graphical interface, your administrators can manage the entire project lifecycle, including designing and simulating various account management configurations without any scripting. As you expand NetIQ Identity Manager to applications throughout your environment, the challenge of “data clean-up” can be time consuming. Analyzer for NetIQ Identity Manager, a feature in Designer, efficiently displays and compares data from the identity vault and in connected systems, minimizing the time required to prepare applications for integration into the identity infrastructure, thereby minimizing the time and costs required to connect new systems.User Self-Service Access Request andA ppro val Pro cess—Using an intuitive, business-user friendly dashboard, business users can make and track access requests, and manage approval tasks all from one location. This self-service capability gives users control over their own identity information, so they can remain productive while reducing the workload on IT to handle requests.Full integration with the provisioning system means that users can get the access they need almost immediately, rather than waiting on manual fulfilment.Approvers are typically business managers who travel for business and are on the go. Productivity is lost when requests from users have to wait on an approver to be in the office. In today’s world, work is an activity and not a location. The Mobile Approval Application for NetIQ Identity Manager is a native and secure mobile application that can be easily installed on any mobile device allowing approvers to be immediately alerted and respond to requests from anywhere.Password Self-Service—One of the largest helpdesk costs is borne by helping users reset their passwords. NetIQ Self ServicePassword Reset (SSPR) by OpenText canvirtually eliminate the helpdesk’s involvementby allowing users to manage and reset theirown passwords and even re-enable lockedaccounts while still maintaining the securityyour company requires.With self-service password reset, usersconfirm who they are through methodsbefore they’re allowed to securely reset theirpasswords. Whatever method is selectedfor identification reflects the appropriatelevel of security your organization requires,and new passwords always adhere torequirements with as-you-type passwordrule enforcement. That way, there’s nodanger of replacing a strong passwordwith a weaker one that doesn’t meet thespecified requirements. New passwords andunlocked accounts are effective instantly,so users can gain immediate access to theirsystems and applications.User Activity Monitoring—Knowing andmanaging who has access to what is onlypart of the picture. Knowing what peopleare doing with their access—both historicallyand in real time—is equally important.Inadvertently allowing noncompliant,malicious or improper behavior could resultin hefty fines, failed audits and severedamage to your enterprise’s informationstores and business reputation. The availableIdentity Tracking for NetIQ Identity Managercombines the powerful information andprovisioning capabilities of NetIQ IdentityManager with a real-time correlation engineto give you a complete picture of whohas access to what and what people aredoing with their access. This user-activitymonitoring and remediation solution worksacross all systems that NetIQ IdentityManager provisions, significantly reducingthe risks of non-compliant, malicious orimproper behavior harming your enterprise.Access Certification—Periodic accessreviews are a compliance requirement andcan consume significant time. IT wastestime com p iling access entitlements and toomuch eff ort is required of the business tocertify those entitlements. NetIQ IdentityGovernance by OpenText, a complementarysolution to NetIQ Identity Manager,automates much of that process by enablingorganizations to review and certify useraccess to applications and systems acrossthe enterprise. NetIQ Identity Governanceallows review of managed and un-managedapplications, enables periodic and event-driven reviews, allows supervisor reviews,supports both application and permissionowner reviews, streamlines reviews basedon risk, and fulfills review decisionsautomatically or manually.Compliance Reporting—NetIQ IdentityManager is equipped with the comprehensivereporting capabilities that your organizationneeds to prove access compliance.The reports not only provide visibility intowhich systems users can currently access,but also into which systems they couldaccess on specific dates or between twopoints in time. The reporting frameworkalso allows users to create custom reportsto suit their specific requirements, and tosave the reports for future use. The policy-based data collection and storagecapabilities provide strong compliancesupport so that your organization isalways ready for its next audit.ConclusionThe time-tested and award-winning IdentityManager delivers a complete solution tocontrol who has access to what across yourenterprise—both inside the firewall and in thecloud. It enables you to provide secure andconvenient access to critical information forbusiness users, while meeting compliancedemands. Y ou can be confident in knowingthat it has achieved Common CriteriaCertification at Evaluation AssuranceLevel 3 with augmented assurance (EAL3+).Deployed by thousands of customers worldwide, NetIQ delivers a highly-scalable, differentiated identity management foundation, ensuring your organization can stay competitive, agile and secure—at low cost. It offers an integrated approach to deploying enterprise-wide solutions, or individual identity and access management products to address the most pressing needs first. With our products, and solutions, your enterprise gets the most value from its past, present and future IT investments.About NetIQ by OpenText OpenText has completed the purchaseof Micro Focus, including CyberRes.Our combined expertise expands our security offerings to help customers protect sensitive information by automating privilege and access control to ensure appropriate access to applications, data, and resources. NetIQ Identity and Access Management is part of Open T ext Cybersecurity, which provides comprehensive security solutions for companies and partners of all sizes.“With centralized user identity management,we can present our company in a seamless fashion.Customers no longer need to remember multipleIDs and passwords to access their many differentservices with us.”Kanon CozadSenior Vice President and Director of Application DevelopmentUMB Financial CorporationOpenText Cybersecurity provides comprehensive security solutions for companies and partners of all sizes. From prevention, detection and response to recovery, investigation and compliance, our unified end-to-end platform helps customers build cyber resilience via a holistic security portfolio. Powered by actionable insights from our real-time and contextual threat intelligence, OpenText Cybersecurity customers benefit from high efficacy products, a compliant experience and simplified security to help manage business risk.。
