高德导航软件用户手册
- 格式:pdf
- 大小:3.74 MB
- 文档页数:33
Manual OverviewThe manual is divided into the following sections:•Getting started - A basic introduction that discusses the controls and how tocommunicate with the system.•Entering a Destination - How to enter an address or locate a point of interest (POI).•Driving to your Destination – An explanation of the map features,guidance, and cautions.•Information Features - Message, V oice Help, Trip Computer, Map Legend,Calendar, Key to Zagat Ratings,Calculator, and Roadside Assistance.•System Set-up - How to set up and tailor the system for your personal use and use the Address Book.The back of this manual contains:•Map Coverage (p.99)•Frequently Asked Questions (FAQs) (p.113)•Troubleshooting Guide (p.116)•Glossary of Terms (p.117)•V oice Command List (p.120)•Operation specific to Alaska and Hawaii (p.108)System OverviewY our navigation system is a highlysophisticated location system with voicecontrol that uses satellites and a mapdatabase to show you where you are and tohelp guide you to a desired destination.The navigation system receives signalsfrom the global positioning system (GPS),a network of 24 satellites in orbit aroundthe earth. By receiving signals from severalof these satellites, the navigation systemcan determine the latitude, longitude, andelevation of your vehicle. In addition, agyroscopic yaw sensor and a vehicle speedsensor in your vehicle keep track of thedirection and speed of travel at all times.The navigation system applies this location,direction, and speed information to themaps and calculates a route to thedestination you enter. As you drive to thatdestination, the system provides map andvoice guidance.The navigation system is easy to use. Thelocations of many places of business andentertainment are already entered in thesystem. You can select any of them as adestination by using the Interface Dial orvoice control.There are several ways to enter adestination, such as by point of interest(POI), by address, by phone number, andby selecting it from the map. The last 50destinations are saved for reuse at a laterdate. The system also allows you to store ahome address to simplify returning homefrom your destination.Accessories PrecautionsIf you have rear window tintinginstalled, be aware that if the tint hasmetallic properties, it can seriouslydegrade or prevent GPS reception. Thisis because the GPS antenna is locatedunder the rear window beneath the rearshelf.If you plan to install electroniccomponents such as vehicle locationdevices, remote starters, additionalamplifiers, or other audio componentsensure that they are not located near thenavigation control unit in the trunk,or near the navigation display in thedash. Signal noise emanating fromthese devices can cause intermittentdisruption of the navigation system.IntroductionImportant Safety Information The navigation system can distract your attention from the road if you focus on the screen or operate the system’s controls while driving.Enter as much information as possible into the system before you begin driving, or when the vehicle is stopped. Then, as you drive, listen to the audio instructions and use voice commands when possible.While driving, do not look at the screenor operate the system controls for morethan a second or so at a time, and onlyafter deciding you can do so safely.Pull to the side of the road if you needmore time to look at the screen oroperate the controls.The navigation system is designed toprovide route information to help youreach your destination. However, thisroute guidance may sometimes conflictwith current road conditions such asstreet closures, road construction,detours, and out-of-date map data.Additionally, the system itself hascertain limitations (see page 95).Therefore, you must verify the audioand visual route information providedby the system by carefully observingthe roadway, signs and signals, etc. Ifyou are unsure, proceed with caution.Always use your own good judgment,and obey traffic laws while driving.Map OverviewYour navigation system has two kindsof streets: verified (dark colored) andunverified (light colored). Thedifferences between the two types ofstreets are contrasted in the followingchart.IntroductionIntroductionWhen displayedStreet color Map QualityRoutingdifferences CautionsGuidance voice Time and distance “to go”Verified streets (dark colored)These roads are found within metropolitan areas, and include interstate freeways and major roads connecting cities.Shown on daytime map screen as black or red, such as interstate freeways.The database vendor has verified these streets.Information like turn restrictions, average speed, and whether it is a one way street have been gathered and used when creating your route to a destination.While driving to your destination, the displayed route line is solid blue.The system provides voice and map guidance to your destination.There are no pop up boxes urging extra caution during a route. However, because roads constantly change, you are urged to use common sense, and always obey posted traffic restrictions.V oice guidance issues maneuvers such as “In a half mile make a right turn.”The time and distance “to go”, displayed while en-route to a destination, is based on the average speed and distance for the roads used for your route.Unverified streets (light colored)These roads are found in rural areas, and typically include residential streets away from the center of a town.Shown on the daytime map screen as light brown.These streets have not been verified by the database vendor.The system does not contain information about one-way streets, turn restrictions, or the road’s average speed.They are shown on the map for reference and can have errors in map location, naming,and address range.Your route line is either a blue dotted “vector line”, or a dashed pink/blue line. For information on selecting this option, and the routing differences, see Unverified Area Routing on page 81.Regardless of whether the user chooses route guidance, there are cautionary screens before and during the route urging the user to be extra cautious, and obey all traffic restrictions. See Unverified Area Routing on page 81.The suffix “if possible” is added to each guidance maneuver.For example: “In a half mile make a right turn, if possible.”Because the average speed of these roads is not known, the time and distance “to go” is based on a fixed average speed of 25mph for these roads.User AgreementIn using this DVD “Satellite Linked Navigation System” (the “DVD”), which includes HONDA MOTOR CO., LTD. software, ALPINE ELECTRONICS, INC. software,NA VTEQ database contents, INFO USA CORPORATION database, ZAGAT SURVEY database contents, and ZENRIN CO. database contents (hereinafter referred to as “Licensors”), you are bound by the terms and conditions set forth below.By using your copy of the DVD, you have expressed your Agreement to the terms and conditions of this Agreement. You should, therefore, make sure that you read and understand the following provisions. If for any reason you do not wish to be bound by the terms of this Agreement, please return the DVD to your dealer.•The DVD may not be copied,duplicated, or otherwise modified, inwhole or in part, without the expresswritten permission of the Licensors.•The DVD may not be transferred orsublicensed to any third party forprofit, rent or loan, or licensed forreuse in any manner.•The DVD may not be decompiled,reverse engineered or otherwisedisassembled, in whole or in part.•The DVD may not be used in anetwork or by any other manner ofsimultaneous use in multiplesystems.•The DVD is intended solely forpersonal use (or internal use wherethe end-user is a business) by theconsumer. The DVD is not to beused for commercial purposes.•The Licensors do not guarantee tothe customer that the functionsincluded in the DVD meet thespecific objectives of the user.•Licensor shall not be responsible forany damages caused by the use ofthe DVD to the actual user or to anythird party.•The warranty on the DVD shall notextend to an exchange or refund dueto misspelling, omission of letters, orany other cosmetic discrepancy inthe contents of the DVD.•The right to use the DVD shallexpire either when the user destroysthe DVD or software, or when any ofthe terms of this Agreement areviolated and the Licensors exercisethe option to revoke the license touse the DVD or software.User Agreement•The terms and conditions hereof apply to all subsequent users and owners as well as to the original purchaser.•The use of oil company logos in the display are for your information and convenience, and in no way implies any sponsorship, approval or endorsement of these companies, or their products. The logos are trademarks of their respective owners.The user shall indemnify and saveharmless the Licensors, and theirofficers, employees and agents, fromand against any claim, demand oraction, irrespective of the nature of thecause of the claim, demand or action,alleging loss, costs, expense, damagesor injuries (including injuries resultingin death) arising out of the use orpossession of the DVD or software.Use, duplication, or disclosure of thisDVD by or on behalf of the UnitedStates government is subject to“Restricted Rights” as set forth at FAR52.227-14, -19 or DFARS 252.227-7013, as applicable. Manufacturers arethe Licensors, including HONDAMOTOR CO., LTD., 2-1-1 MinamiAoyama Minato-Ku Tokyo 107-8556JAPAN., Alpine Electronics, Inc., 20-1Yoshima Kogyodanchi, Iwaki,Fukushima 970-1192 JAPAN.,NA VTEQ Corporation, 222Merchandise Mart, Suite 900, Chicago,IL, 60654, INFO USACORPORATION, 5711 South 86thCircle, Omaha, NE 68127.,Zagat Survey, LLC, 4 Columbus Circle,New York, NY, 10019., and ZENRINCO., LTD., 1-1-1 Muromachi,Kokurakita-ku, Kitakyushu, Fukuoka803-8630, JAPAN.。
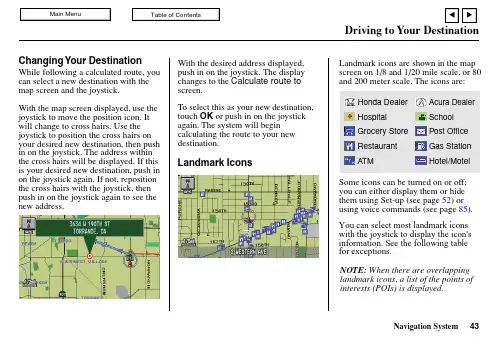
Navigation System 43Changing Your DestinationWhile following a calculated route, you can select a new destination with the map screen and the joystick.With the map screen displayed, use the joystick to move the position icon. It will change to cross hairs. Use the joystick to position the cross hairs on your desired new destination, then push in on the joystick. The address within the cross hairs will be displayed. If this is your desired new destination, push in on the joystick again. If not, reposition the cross hairs with the joystick, then push in on the joystick again to see the new address.With the desired address displayed,push in on the joystick. The display changes to the Calculate route to screen.To select this as your new destination,touch OK or push in on the joystick again. The system will begin calculating the route to your new destination.Landmark IconsLandmark icons are shown in the map screen on 1/8 and 1/20 mile scale, or 80and 200 meter scale. The icons are:Some icons can be turned on or off;you can either display them or hide them using Set-up (see page 52) or using voice commands (see page 85). Honda Dealer Acura Dealer Hospital School Grocery Store Post Office Restaurant Gas Station ATMHotel/MotelNOTE: When there are overlapping landmark icons, a list of the points of interests (POIs) is displayed.You can select most landmark icons with the joystick to display the icon's information. See the following table for exceptions.Navigation System44Driving to Your DestinationFor some icons you can choose either to show or hide them on the map, while others like Hospitals, are always shown. The table below shows the features for cach icon type. Some Points of Interest (POIs) like Police Stations are not shown as an icon, but you can still locate the nearest one with the voice command, “Find nearest Police station”.POI typeHonda/Acura dealer Hospital SchoolATMGas station*Restaurants**Post office Grocery store Hotel-MotelPolice stationShopping, Parking, Tourist attraction, BankIcon can bedisplayed on the mapYes, always Yes, always Yes, always Yes Yes Yes Yes Yes Yes No icon No iconIcon can be hidden on the map No No No Yes Yes Yes Yes Yes Yes No icon No iconIcon can be selected as a destination on MAP-GUIDE screen with the joystick Yes No No Yes Yes Yes Yes Yes Yes No NoPOI can be found onMAP-GUIDE screen using voice command “Find...”Yes Yes No Yes Yes Yes Yes Yes Yes Yes Yes*When gas station icons are selected for view on the map, some icons are shown as “brand icons”.**In Set-up , specialty types of restaurants, like Chinese or Italian, can be individually displayed or hidden.。
高德地图离线包下载安装(多图,官方最新版本)使用方法和步骤如下,希望可以帮到大家,帮大家省钱∙喜爱户外的朋友,喜爱自驾游的朋友,都离不开地图,纸质的地图已经过时了,电脑在线版本的可电脑太重,手机版本的地图随身携带,方便实惠啊……用智能手机的朋友都知道,凯立德电子地图、高德地图、百度地图、谷歌手机地图、搜狗手机地图、老虎地图等等,还有什么导航犬、QQ地图等,但据本人的实际使用经验来看,高德的手机版地图(高德导航的占据手机资源较大,小米M1用半小时手机发烫,且反应慢速,希望其他网友多做比较)做的比较好,现在高德地图的手机版本的都基本齐备了,比如高德地图塞班版、高德地图IPHONE版、高德地图安卓版,估计下一步就快出高德地图WP7版的了。
高德地图使用窍门:要是使用手机上网的话,流量是个绕不开的问题,使用比较频繁的话,建议大家下载高德地图离线包到本地,这样就非常节省流量了。
∙高德地图2D地图:高德地图全国离线包下载,2D版本点此下载(包含所有中国地图数据,对节约手机流量大有帮助。
大小:753M )高德地图2D地图全国概略图离线包下载,点此下载(包含省级等主要地图包概略图数据,对存储空间有限制等使用此数据包)高德地图2D地图使用说明:1、支持高德地图安卓版v2.0.6以下版本、ios版本v2.0以下版本;2、手机硬件支持v2地图引擎。
(查看方法:“menu键→设置→关于软件”中“地图引擎版本号”)高德地图3D离线地图使用说明:1、支持高德地图安卓版v2.0.6及以上版本、ios版本v2.0及以上版本;2、手机硬件支持v3地图引擎。
(查看方法:“menu键→设置→关于软件”中“地图引擎版本号”)高德地图官网:官网地图在线查询:/map.html高德地图离线包存在什么地方?不同的手机系统有所区别:高德地图离线包安装方法(iPhone版,ios版本v2.0以下版本适用,3D地图亦可)步骤一通过网站下载对应省市区域的地图数据文件包(请不要解压缩zip文件)步骤三在文件共享内,左侧选择应用程序高德地图,随后在“高德地图的文稿”右下角点击“添加...”在弹出的文件选择窗口内选择之前下载的地图数据文件包(可多选),确认完成添加。

MAP/GUIDE buttonPressing this button switches thedisplay between a map screen and the guidance or direction list screen.MENU buttonPressing this button changes the display from the current instructions to the Entering a destination by screen or the Calculate route to screen.SET UPbuttonPressing this button displays the Set-up screens to change and updateinformation in the system.INFO buttonPressing this button displays the screen for selecting Trip Computer, Calendar,Calculator, and V oice Command Help.CANCEL buttonPressing this button cancels the current screen and returns to the previous screen display.Getting StartedGetting StartedScreenAll selections and instructions aredisplayed on the screen. In addition, the display is a “touch screen” –– you can enter information into the system by touching the images (icons) on the screen with your finger.For example, when you need to enter a street name, a keyboard will bedisplayed. You can “type in” the street name by touching the individual characters on the screen.Clean the screen with a soft, damp cloth. You may use a mild cleaner intended for eyeglasses or computer screens. Harsher chemicals may damage the screen.JoystickThe joystick moves left, right, up, and down. Use the joystick to move the highlighting around the display, toscroll through a list, or to look around a displayed map. After making aselection in a menu or list, push in on the joystick to enter the selection into the system.In almost all cases, you can enter a selection into the system by pushing in on the joystick, or by touching the appropriate image on the screen.ZOOM (IN/UP)/ (OUT/DOWN)buttonsWhen you are displaying a map, these buttons allow you to change the scale.ZOOM IN reduces the scale, showing less area with greater detail. It is also used to scroll UP a page in a list.ZOOM OUT increases the scale,showing more area with less detail. It is also used to scroll DOWN a page in a list.Other buttons (Audio and Climate Control functions)See the vehicle owner’s manual for information on the rest of the buttons.Most of the audio and climate controlfunctions may be controlled by voice.Getting StartedVoice Control BasicsYour Honda has a voice control system that allows hands-free operation of most of the navigation system functions. You can also control the audio system and the climate control system. The voice control system uses the TALK and BACK buttons on the steering wheel and a microphone nearthe map light on the ceiling.NOTE: While using the voice control system, all of the speakers are muted.BACK buttonThis button has the same function as the CANCEL button. When you press it, the display returns to the previous screen. When the previous screen appears, the system replays the last prompt. This button is enabled for the navigation system commands only.However, it can be used to cancel an audio or climate control voicecommand up to one second after thecommand confirmation.Getting StartedUsing the Voice Control System Most of the system’s functions can be controlled by voice commands. The voice control system is activated with the TALK button. To control your navigation system by voice, press and release the TALK button, wait for the beep, then give a voice command. Once the microphone picks up your command, the system changes the display in response to the command and prompts you for the next command. Answer the prompts as required.If you hear a prompt such as “Pleaseuse the touch screen to...” or “Pleasechoose an area with the joystick.” thesystem is asking for input that cannotbe performed using the voice controlsystem.If the system does not understand acommand or you wait too long to give acommand, it responds with “Pardon,”“Please repeat,” or “Would you sayagain.” If the system cannot perform acommand or the command is notappropriate for the screen you are on, itsounds a beep.Anytime you are not sure of what voicecommands are available on a screen,you can always say “Help.” at anyscreen. The system then reads the listof commands to you.When you speak a command, thesystem generally either repeats thecommand as a confirmation or asks youfor further information. If you do notwish to hear this feedback, you can turnit off. See Voice Feedback setting onSet-upscreen 3.Getting StartedImproving Voice RecognitionTo achieve optimum voice recognition, the following guidelines should be followed:NOTE: Make sure the correct screen is displayed for the voice command that you are using. See Voice Command Index on page 85.•Close the windows and the sunroof.•Set the fan speed to low (1 or 2).•Adjust the air flow from the dashboard vents so they do not blow against the microphone on the ceiling.•After pressing the TALK button, wait for the beep, then give a voice command.•Give a voice command in a clear, natural speaking voice without pausing between words.•If the system cannot recognize your command, speak louder.•If the microphone picks up voices other than yours, the system may not interpret your voice commands correctly.•If you speak a command with something in your mouth, or your voice is either too high or too husky, the system may misinterpret yourvoice commands.Getting StartedSelecting an Item (Button) on the ScreenOn most screens, there are items that can be selected (like buttons with titles such as OK or Return ). To select an item on any screen, do one of the following:••Touch the desired item on the screen.•Move the highlighting to the desired item with the joystick, then push in on the joystick.Tip: If buttons are very dark colored,this means that they cannot be selected.Selecting an Item in a ListTo scroll through a list, do one of the following:•Use the joystick to scroll through the list item by item.•Use the voice control system and say “Next.” or “Previous.” or use the triangles in the upper right corner of the screen or the ZOOM buttons to scroll through the list page by page.If you cannot find the desired name, or have made an error, return to the previous screen by pressing the CANCEL or the BACK button.To select the desired item in the list, do one of the following:•Use the voice control system, and say the number of the desired item.•Touch the item on the screen.•Use the joystick to move thehighlighting to the item, then push in on the joystick.Use the voice control system and say the name of the desired item. Every selectable item on the screen, except keyboard keys and some listed items, is recognized by the voice controlsystem.Getting StartedUsing the On-screen KeyboardWhen the system needs input from you,the display changes to a keyboard.Use the displayed letters to enter the information. Enter each letter by doing one of the following:•Touch the desired letter on the screen.•Move the highlighting to the desired letter with the joystick, then push in on the joystick.Each entered letter will appear at the top of the display. Use Space to enter a space between words. Use Delete to erase a letter entered incorrectly.As you enter the letters, the system searches the database for words that match the letters you are entering. As a result, you will notice that some letters are no longer available.When the system finds only one entry that matches, it completes the entry of the name for you. If the system finds more than one entry that matches your input, the system displays a list.Tip: If you are unsure of the spelling of a name, enter the letters that you are sure of, and then select LIST . The system displays a list of names that most closely matches your input.You can change between alphabet and a regular keyboard (QWERTY). See Keyboard Layout on Set-upscreen 3.Getting StartedSystem Start-upWhen you turn the ignition to ON (II),it takes several seconds before the navigation system turns on the display.The first screen to appear is the Honda Navigation System logo screen. The screen then changes to the disclaimerscreen:NOTE: The OK button does not appearimmediately. It appears after the software is loaded.Read this disclaimer carefully so you understand it before continuing. Push in on the joystick, or touch OK , and the map screen will appear on the display.The “OK” cannot be activated by voice.If you do not press the joystick or touch OK , the screen will go dark after 30seconds. To return to the disclaimer screen, press any navigation or voice control button.NOTE: If you do not select OK on the screen, certain functions of thenavigation system will not be available.See the System Function Diagram on page 18.If you have entered any Calendarreminders, they are displayed after you select OK.The Calendar reminder screen remains displayed until you select OK , or press the Cancel button.If you select OK , the reminder will not show up again. If you wish to have the reminder show up again later in the day,go to Calendar in the Information If you press the Cancel button, the message will be displayed the next time you start the vehicle (on the same day).NOTE: The system only displays calendar reminders on the date you selected when you created the calendar entry. Messages do not accumulate, or get displayed on days other than the date it was originally set to display on.screen and set Reminder to ON.Getting StartedGreen: Signal Received(see page(Mile or Km per half inchappear only when youZOOM IN or OUT.)42)(Use voice command "Display thecurrent location." or touch the iconto show current location.)(see page 43)Map FeaturesDark Green: ParkLight Gray: HospitalBrown: Shopping Mall/UniversityGreen: Golf CourseGray: Airport/Stadium/BusinessBlue: Body of Water"Breadcrumbs"(see Track OffroadPosition 45)Acura DealerHonda DealerGrocery StoreHotel/MotelSchoolHospitalRestaurantPost OfficeGas StationATMMap Screen Legendon page 3)Map Overview on page 4,or Unverified Routing on page 39)Red: Interstates or FreewaysBlack: Verified RoadLight Brown: Unverified Road White: No Signal (seeAccessories Precaution sGetting StartedMap Screen DescriptionUse the ZOOM buttons to change the scale of the map. Zooming in increases the detail, while zooming out gives you a view of a wide area. After changing the scale, give the system a few moments to update the display.In the three most detailed map scales (1/20, 1/8, and 1/2 mile, or 80, 200, and 800 meter), the map can be oriented with north pointing up (North up) or with the way you see it out the front window (Heading up). The red arrow in both heading symbols always point north.You can switch between the two by saying “Display North up.” or “Display Heading up.” or by touching the North pointer icon in the upper corner of the screen.In the larger map scales (above 1/2 mile or 800 meter scales), the map is always oriented with north facing upward. You cannot change the orientation.To view other areas on the map, move the joystick left, right, up, or down. The map will shift in that direction. Toreturn the map to your current location,press either the MAP/GUIDE , the CANCEL , or the BACK button.The display automatically changes to the map screen when you reach your destination. Press the MENU button to return to the Enter destination by screen.Displaying Current Locationor touch the vehicle position icon at any time to see the current address,latitude, longitude and elevation. Thescreen will change to:NOTE: If the elevation is missing, the system is temporarily lacking the proper GPS information to display it.You can say “Save current position.” or select Save Current Location on the screen to save the current location in Previous Destinations .Select Return to return to the previous screen.You can say “Display current location.”Getting StartedSystem Function DiagramThis diagram shows the features of the navigation system starting at the center and working outward in layers. The navigation program starts at “Key ON,”and then displays the globe screen (blue). Once the Disclaimer screen (pink) is acknowledged, the yellow portions of the diagram become active. If OK is not selected, the yellow portions of the diagram will not be available. However, some functions of the INFO and SET UP buttons, and all functions of the AUDIO and A/C buttons (white) can be accessed immediately after the Disclaimer screen (purple) without selecting OK.The items above the map screen show various methods to begin a destination, such as “Go Home.” Once you begin driving to your destination (orange), you are provided with map/voice guidance, routing cautions (in unverified areas), and a directions list. While driving to your destination, use the voice control system as much as possible to interact with the navigation, audio, and climate control systems (green).Navigation System 18。
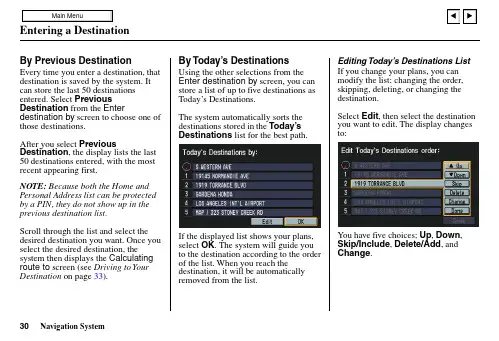
Entering a DestinationBy Previous DestinationEvery time you enter a destination, that destination is saved by the system. It can store the last 50 destinations entered. Select Previous Destination from the Enter destination by screen to choose one of those destinations.After you select Previous Destination, the display lists the last 50 destinations entered, with the most recent appearing first.NOTE: Because both the Home and Personal Address list can be protected by a PIN, they do not show up in the previous destination list.Scroll through the list and select the desired destination you want. Once you select the desired destination, the system then displays the Calculating route to screen (see Driving to Your Destination on page 33).By Today’s DestinationsUsing the other selections from theEnter destination by screen, you canstore a list of up to five destinations asToday’s Destinations.The system automatically sorts thedestinations stored in the Today’sDestinationslist for the best path.If the displayed list shows your plans,select OK. The system will guide youto the destination according to the orderof the list. When you reach thedestination, it will be automaticallyremoved from the list.Editing Today’s Destinations ListIf you change your plans, you canmodify the list: changing the order,skipping, deleting, or changing thedestination.Select Edit, then select the destinationyou want to edit. The display changesto:You have five choices; Up, Down,Skip/Include, Delete/Add,andChange.Navigation System30。
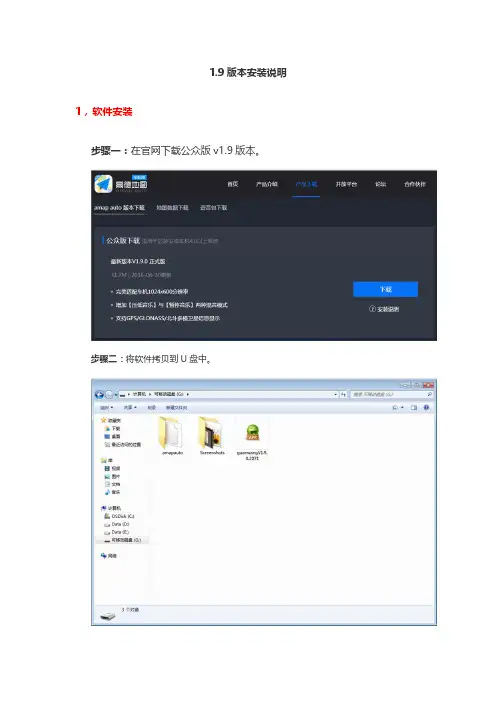
1.9版本安装说明1,软件安装步骤一:在官网下载公众版v1.9版本。
步骤二:将软件拷贝到U盘中。
步骤三:将U盘插入车机,用文件管理器打开,找到U盘中的软件,点击安装即可。
步骤四:安装成功。
2,数据安装方法一:U盘更新步骤一:在官网下载地图数据,可选择下载全国地图数据或分省地图数据,下载全国地图数据后,选择右键解压到当前文件夹即amapauto文件夹;若下载多个分省地图数据后,全选并右键解压到当前文件夹即amapauto文件夹。
步骤二:将解压后的数据存放于U盘根目录,进入【离线数据】页面,点击零流量更新,选择【U盘更新】。
步骤三:车机将自动识别您U盘中的数据,您可根据需要选择需要更新的数据。
方法二:手机热点更新步骤一:在手机版高德地图下载离线数据,车机端需和手机联网(具体参照车机的使用说明书)步骤二:点击车机端【手机热点更新】,按照引导与手机建立连接后,即可将您手机中的离线地图数据直接发送给车机使用。
步骤三:发送完成,即可离线使用高德地图车机版。
方法三:数据拷贝步骤一:在官网()下载地图数据包,可选择下载全国地图数据或分省地图数据,下载全国地图数据后,选择右键解压到当前文件夹即amapauto文件夹;若下载多个分省地图数据后,全选后右键解压到当前文件夹即amapauto文件夹。
步骤三:若提醒则选择全部覆盖,完成后即可离线使用高德地图车机版。
3,语音安装方法一:车机联网在程序内下载语音步骤一:在官网下载语音文件,将文件拷贝到U盘中。
步骤二:将U盘插入车机,打开文件管理器,找到对应irf文件,点击复制。
选择“是”。
了。
4、路口放大图安装步骤一:官网下载路口放大图的压缩包amapauto,右键解压到当前文件夹。
步骤二:将数据拷贝到U盘中,用文件管理器打开,将amapauto文件夹中400_400和list文件夹复制到车机数据存储路径amapauto文件夹下。
如提示是否覆盖,请选择“是”。
Manual OverviewThe manual is divided into the following sections:• Getting started - A basic introduction that discusses the controls and how to communicate with the system.• Entering a Destination - How to enter an address or locate a point of interest (POI).• Driving to your Destination - An explanation of the map features,guidance, and cautions.• Information Features - Message, Voice Command Help, TripComputer, Map Legend, Calendar,Key to Zagat Ratings, Calculator, and Roadside Assistance.• System Set-up - How to set up and tailor the system for your personaluse and use the Address Book.The back of this manual contains:• Map Coverage (page 114)• Cities with Traffic Coverage(page 123)• Frequently Asked Questions (FAQs)(page 129)• Troubleshooting Guide (page 133)• Glossary of Terms (page 134)• Voice Command List (page 137)• Operation specific to Alaska andHawaii (page 123)System OverviewYour navigation system is a highlysophisticated location system with voicecontrol that uses satellites and a mapdatabase to show you where you are andto help guide you to a desireddestination.The navigation system receives signalsfrom the global positioning system(GPS), a network of 24 satellites in orbitaround the earth. By receiving signalsfrom several of these satellites, thenavigation system can determine thelatitude, longitude, and elevation ofyour vehicle. In addition, a gyroscopicyaw sensor and a vehicle speed sensorin your vehicle keep track of thedirection and speed of travel at all times.The navigation system applies thislocation, direction, and speedinformation to the maps and calculates aroute to the destination you enter. Asyou drive to that destination, the systemprovides map and voice guidance.The navigation system is easy to use. The locations of many places of business and entertainment are already entered in the system. You can select any of them as a destination by using the Interface Dial or voice control.There are several ways to enter a destination, such as by point of interest (POI), by address, by phone number, and by selecting it from the map. The last 50 destinations are saved for reuse at a later date. The system also allows you to store a home address to simplify returning home from your destination.Accessories PrecautionsIf you have rear window tintinginstalled, be aware that if the tint hasmetallic properties, it can seriouslydegrade or prevent GPS reception. Thisis because the GPS antenna is locatedunder the rear window beneath the rearshelf.If you plan to install electroniccomponents such as radar detectors,vehicle location devices, remotestarters, additional amplifiers, or otheraudio components, ensure that they arenot located near the navigation controlunit in the trunk, near the navigationdisplay in the dash, or near the GPSantenna under the rear window. Signalnoise emanating from these devices cancause intermittent disruption of thenavigation system.Important Safety InformationThe navigation system can distract yourattention from the road if you focus onthe screen or operate the system’scontrols while driving.Enter as much information as possibleinto the system before you begindriving, or when the vehicle is stopped.Then, as you drive, listen to the audioinstructions and use voice commandswhen possible.While driving, do not look at the screen or operate the system controls for more than a second or so at a time, and only after deciding you can do so safely. Pull to the side of the road if you need more time to look at the screen or operate the controls.The navigation system is designed toprovide route information to help youreach your destination. However, thisroute guidance may sometimes conflictwith current road conditions such asstreet closures, road construction,detours, and out-of-date map data.Additionally, the system itself hascertain limitations (see page 110).Therefore, you must verify the audioand visual route information providedby the system by carefully observing theroadway, signs and signals, etc. If youare unsure, proceed with caution.Always use your own good judgment,and obey traffic laws while driving.Map OverviewYour navigation system has two kindsof streets: verified (dark colored) andunverified (light colored). Thedifferences between the two types ofstreets are contrasted in the followingchart.“Unverified” Road“Verified” RoadVerified streets (dark colored) Unverified streets (light colored)When displayed These roads are found within metropolitan areas, andinclude interstate highways and major roads connectingcities.These roads are found in rural areas, and typically includeresidential streets away from the center of a town.Street color Shown on daytime map screen as black or red, such asinterstate highways.Shown on the daytime map screen as light brown.Map Quality The database vendor has verified these streets.Information like turn restrictions, average speed, andwhether it is a one way street have been gathered andused when creating your route to a destination.These streets have not been verified by the database vendor.The system does not contain information about one-way streets,turn restrictions, or the road’s average speed. They are shownon the map for reference and can have errors in map location,naming, and address range.Routing differences While driving to your destination, the displayed routeline is solid blue. The system provides voice and mapguidance to your destination.Your route line is either a blue dotted “vector line,” or a dashedpink/blue line. For information on selecting this option, and therouting differences, see Unverified Area Routing on page 94.Cautions There are no pop up boxes urging extra caution during aroute. However, because roads constantly change, youare urged to use common sense, and always obeyposted traffic restrictions.Regardless of whether the user chooses route guidance, thereare cautionary screens before and during the route urging theuser to be extra cautious, and obey all traffic restrictions. seeUnverified Area Routing on page 94.Guidance voice Voice guidance issues maneuvers such as “In a halfmile make a right turn.”The suffix “if possible” is added to each guidance maneuver.For example: “In a half mile make a right turn, if possible.”Time and distance “to go”The time and distance “to go,” displayed while on routeto a destination, is based on the average speed anddistance for the roads used for your route.Because the average speed of these roads is not known, the timeand distance “to go” is based on a fixed average speed of25 mph for these roads.。
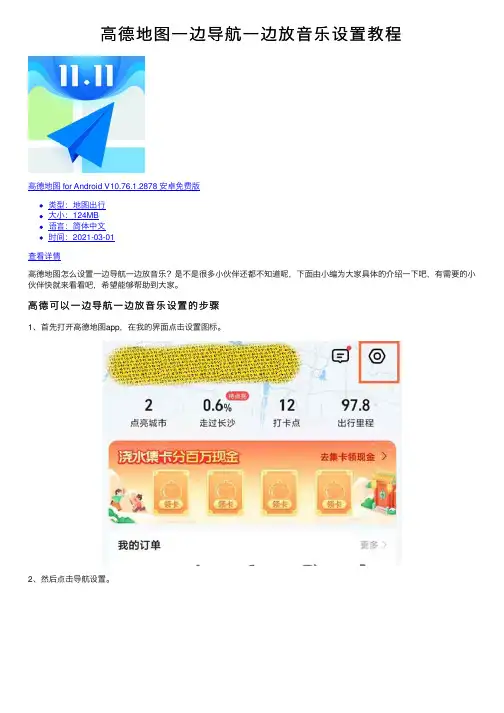
⾼德地图⼀边导航⼀边放⾳乐设置教程
⾼德地图 for Android V10.76.1.2878 安卓免费版
类型:地图出⾏
⼤⼩:124MB
语⾔:简体中⽂
时间:2021-03-01
查看详情
⾼德地图怎么设置⼀边导航⼀边放⾳乐?是不是很多⼩伙伴还都不知道呢,下⾯由⼩编为⼤家具体的介绍⼀下吧,有需要的⼩伙伴快就来看看吧,希望能够帮助到⼤家。
⾼德可以⼀边导航⼀边放⾳乐设置的步骤
1、⾸先打开⾼德地图app,在我的界⾯点击设置图标。
2、然后点击导航设置。
3、接着在语⾳播报时控制⾳乐⾳量选项中点击压低⾳乐即可。
以上就是⼩编给⼤家分享的全部内容了,感谢⼤家的阅读!希望这篇教程解答能对⼤家有所帮助。
更多相关软件教程请关注。
IntroductionManual OverviewThe manual is divided into the following sections:•Getting started - A basic introduction that discusses the controls and how tocommunicate with the system.•Entering a Destination - How to enter an address or locate a point of interest(POI).•Driving to your Destination – An explanation of the map features,guidance, and cautions.•Information Features - Trip Computer, V oice Help, Calendar, and Calculator.•System Set-up - How to set up and tailor the system for your personal use and add Personal Addresses.The back of this manual contains:•Frequently Asked Questions (FAQs)•Troubleshooting Guide•Glossary of Terms•V oice Command List System OverviewYour navigation system is a highly-sophisticated location system with voicecontrol that uses satellites and a mapdatabase to show you where you are and tohelp guide you to a desired destination.The navigation system receives signalsfrom the global positioning system (GPS),a network of 24 satellites in orbit aroundthe earth. By receiving signals from severalof these satellites, the navigation systemcan determine the latitude, longitude, andelevation of your vehicle. In addition, agyroscopic yaw sensor and a vehicle speedsensor in your vehicle keep track of thedirection and speed of travel at all times.The navigation system applies this location,direction, and speed information to themaps and calculates a route to thedestination you enter. As you drive to thatdestination, the system provides map andvoice guidance.The navigation system is easy to use. Thelocations of many places of business andentertainment are already entered in thesystem. You can select any of them as adestination by using the touch screen orvoice control.There are several ways to enter adestination, such as by point of interest(POI), by address, by phone number, andby selecting it from the map. The last 50destinations are saved for reuse at a laterdate. The system also allows you to store ahome address to simplify returning homefrom your destination.Accessories PrecautionsIf you have rear window tintinginstalled, be aware that if the tint hasmetallic properties, it can seriouslydegrade or prevent GPS reception. Thisis because the GPS antenna is locatedunder the rear window beneath the rearshelf.If you plan to install electroniccomponents such as vehicle locationdevices, remote starters, additionalamplifiers, or other audio componentsensure that they are not located near thenavigation control unit in the trunk,or near the navigation display in thedash. Signal noise emanating fromthese devices can cause intermittentdisruption of the navigation system.Important Safety Information The navigation system can distract your attention from the road if you focus on the screen or operate the system’s controls while driving.Enter as much information as possible into the system before you begin driving, or when the vehicle is stopped. Then, as you drive, listen to the audio instructions and use voice commands when possible.While driving, do not look at the screenor operate the system controls for morethan a second or so at a time, and onlyafter deciding you can do so safely.Pull to the side of the road if you needmore time to look at the screen oroperate the controls.The navigation system is designed toprovide route information to help youreach your destination. However, thisroute guidance may sometimes conflictwith current road conditions such asstreet closures, road construction,detours, and out-of-date map data.Additionally, the system itself hascertain limitations (see page 65).Therefore, you must verify the audioand visual route information providedby the system by carefully observingthe roadway, signs and signals, etc. Ifyou are unsure, proceed with caution.Always use your own good judgment,and obey traffic laws while driving.Map OverviewYour navigation system has two kindsof streets: verified (dark colored) andunverified (light colored). Thedifferences between the two types ofstreets are contrasted in the followingchart.Introduction“Verified” RoadIntroductionWhen displayed Street color Map QualityRouting differences CautionsGuidance voice Time and distance “to go”Verified streets (dark colored)These roads are found within metropolitan areas, and include interstate freeways and major roads connecting cities.Shown on daytime map screen as black or red, such as interstate freeways.The database vendor has verified these streets.Information like turn restrictions, average speed, and whether it is a one way street have been gathered and used when creating your route to a destination.While driving to your destination, the displayed route line is solid blue. The system provides voice and map guidance to your destination.There are no pop up boxes urging extra caution during a route. However, because roads constantly change, you are urged to use common sense, and always obey posted traffic restrictions.V oice guidance issues maneuvers such as “In a half mile make a right turn.”The time and distance “to go”, displayed while en-route to a destination, is based on the average speed and distance for the roads used for your route.Unverified streets (light colored)These roads are found in rural areas, and typically include residential streets away from the center of a town.Shown on the daytime map screen as light brown.These streets have not been verified by the database vendor. The system does not contain information about one-way streets, turn restrictions, or the road’s average speed. They are shown on the map for reference and can have errors in map location, naming,and address range.Your route line is either a blue dotted “vector line”, or a dashed pink/blue line. See the Set-up section “unverified routing” for information on selecting this option, and the routing differences.Regardless of whether the user chooses route guidance, there are cautionary screens before and during the route urging the user to be extra cautious, and obey all traffic restrictions. See the Unverified Routing on page 39.The suffix “if possible” is added to each guidance maneuver.For example: “In a half mile make a right turn, if possible.” Because the average speed of these roads is not known, thetime and distance “to go” is based on a fixed average speed of25 mph for these roads.User AgreementIn using this DVD “Satellite Linked Navigation System” (the “DVD”), which includes HONDA MOTOR CO., LTD. software, ALPINE ELECTRONICS, INC. software,NA VIGATION TECHNOLOGIES CORPORATION database contents and INFO USA CORPORATION database contents (hereinafter referred to as “Licensors”), you are bound by the terms and conditions set forth below. By using your copy of the DVD, you have expressed your agreement to the terms and conditions of this agreement. You should, therefore, make sure that you read and understand the following provisions. If for any reason you do not wish to be bound by the terms of this agreement, please return the disk to your Acura dealer.•The DVD may not be copied,duplicated, or otherwise modified, inwhole or in part, without the expresswritten permission of the Licensors.•The DVD may not be transferred orsublicensed to any third party forprofit, rent or loan, or licensed forreuse in any manner.•The DVD may not be decompiled,reverse engineered or otherwisedisassembled, in whole or in part.•The DVD may not be used in anetwork or by any other manner ofsimultaneous use in multiplesystems.•The DVD is intended solely forpersonal use (or internal use wherethe end-user is a business) by theconsumer. The DVD is not to beused for commercial purposes.•The Licensors do not guarantee tothe customer that the functionsincluded in the DVD meet thespecific objectives of the user.•Licensor shall not be responsible forany damages caused by the use ofthe DVD to the actual user or to anythird party.•The warranty on the DVD shall notextend to an exchange or refund dueto misspelling, omission of letters, orany other cosmetic discrepancy inthe layout of the DVD.•The right to use the disk shall expireeither when the user destroys theDVD or software, or when any of theterms of this agreement are violatedand the Licensors exercise the optionto revoke the license to use the DVDor software.User Agreement•The terms and conditions hereof apply to all subsequent users and owners as well as to the original purchaser.•The use of oil company logos in the display are for your information and convenience, and in no way implies any sponsorship, approval or endorsement of these companies, or their products. The logos are trademarks of their respective owners.The user shall indemnify and save harmless the Licensors, and their officers, employees and agents, from and against any claim, demand or action, irrespective of the nature of the cause of the claim, demand or action, alleging loss, costs, expense, damages or injuries (including injuries resulting in death) arising out of the use or possession of the DVD, data, or the Navigation Technologies Corporation e, duplication, or disclosure of this DVD by or on behalf of the United States government is subject to “Restricted Rights” as set forth at FAR 52.227-14, -19 or DFARS 252.227-7013, as applicable. Manufacturers are the Licensors, including HONDA MOTOR CO., LTD., 2-1-1 Minami Aoyama Minato-Ku Tokyo 107-8556 JAPAN., Alpine Electronics, Inc., 20-1 Yoshima Kogyodanchi, Iwaki, Fukushima 970- 1192 JAPAN., Navigation Technologies, 10400 W. Higgins Rd., Rosemont, IL 60018 and INFO USA CORPORATION, 5711South 86th Circle, Omaha, NE 68127.。
高德导航安装教程一、安装教程:软件比较大,建议用iTunes 安装下载高德导航软件(ipa格式,二楼有下载地址),下好后再去网上搜索一个叫AppSync3.1(或3.12更新的版本).deb的补丁软件(安装ipa格式的软件必须下载这个补丁,在电脑上安装到iphone,一次即可),这个软件很小很容易搜索和下载到。
一切准备工作做好后,我们开始紧张和刺激的安装过程。
首先,连接你的iphone和91手机助手。
一定记得91手机助手要最新版本的啊。
可以直接点击论坛最上方导航中的“91手机软件官网”下载,然后直接可以在线升级。
因为只有最新版的才可以安装.deb文件。
升级好后,直接在91助手上点击主页面的系统维护的软件安装包制作工具再点打开ipa,可以安装.deb文件的选项(选安装本地文件项)。
把刚才我们下好的AppSync3.x.deb文件安装到我们的iphone上。
然后,打开iTunes,点文件项,点添加文件到资料库,把高德导航软件(ipa格式文件)添加到资料库中。
最后,直接在iTunes的设备中点击我们的iphone,然后点应用程序的选项,点同步应用程序前面的对勾,然后点高德导航前面对号,再点下面的应用。
安装开始了,时间可能会稍微长一点。
让我们一起等待这样一个激动人心的时刻吧。
选装版安装方法:如果不愿安装完整版(太大),可安选装版,只安装下面的主程序,再将你需要的地图文件解压后放到以下目录内(用91助手的文件管理项添加上传地图文件夹)。
目录:/private/var/mobile/Applications/ xxxxxxxx-xxxx-xxxxxx-xxxxxx/AutoNavi.app/GPS 中(xxxxxx为随机生成的字母,每个人的机器都不同)。
AutoNavi 高德导航软件v3.1.1完全破解版下载地址:/software/etcsoft/201003/20100303165020.shtml#download 全国各地地图包下载浙江:/files/60e51340-1728-11df-9bd5-0015c55db73d/江西:/files/d89c3702-185b-11df-a0ea-0015c55db73d/上海:/files/01a0f48f-18af-11df-9f47-0015c55db73d/江苏:/files/7cd8da6b-1a13-11df-a7fe-0015c55db73d/天津:/files/13afc81c-21c4-11df-b84b-0015c55db73d/山西:/files/d16889d9-1868-11df-873e-0015c55db73d/重庆:/files/d8c9a3ae-185b-11df-aa77-0015c55db73d/河北:/files/462a6694-18b2-11df-8847-0015c55db73d/海南:/files/c5bde454-1b77-11df-b1bd-0015c55db73d/福建:/files/936b78cf-1783-11df-90fb-0015c55db73d/北京:/files/ea46df28-189e-11df-b755-0015c55db73d/四川:/files/83c2075e-18ba-11df-928d-0015c55db73d/云南:/files/c5e74e2b-1b77-11df-a9af-0015c55db73d/广东:/files/938df111-1783-11df-9595-0015c55db73d/广西:/files/93e33891-191c-11df-bbe6-0015c55db73d/ 吉林:/files/07ce2880-1c39-11df-a93c-0015c55db73d/湖北:/files/93ae0d94-1783-11df-8dac-0015c55db73d/ 辽宁:/files/8995dd51-18a3-11df-98f6-0015c55db73d/山东:/files/61773030-1961-11df-94a8-0015c55db73d/ 安徽:/files/446c2c80-20e7-11df-b26a-0015c55db73d/湖南:/files/d88032fa-185b-11df-a4a6-0015c55db73d/贵州:/files/95647c82-19f3-11df-bd3d-0015c55db73d/河南:/files/1390bd1e-21c4-11df-820a-0015c55db73d/ 黑龙江:/files/ea7b1951-189e-11df-b19b-0015c55db73d/ 新疆:/files/4cb72ee3-185e-11df-9230-0015c55db73d/。
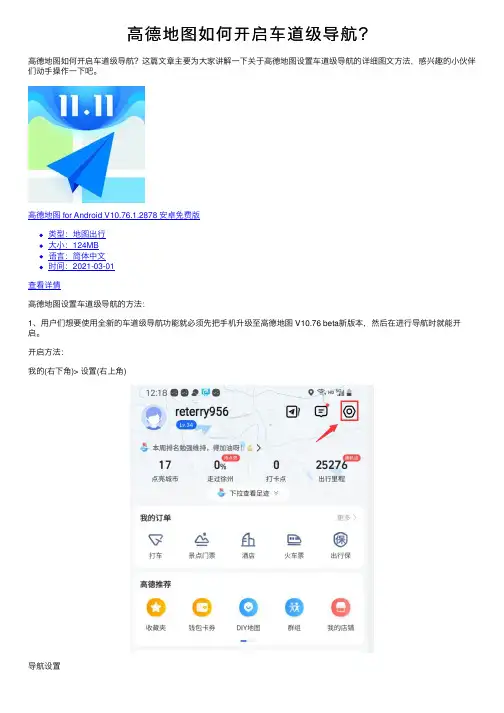
⾼德地图如何开启车道级导航?
⾼德地图如何开启车道级导航?这篇⽂章主要为⼤家讲解⼀下关于⾼德地图设置车道级导航的详细图⽂⽅法,感兴趣的⼩伙伴们动⼿操作⼀下吧。
⾼德地图 for Android V10.76.1.2878 安卓免费版
类型:地图出⾏
⼤⼩:124MB
语⾔:简体中⽂
时间:2021-03-01
查看详情
⾼德地图设置车道级导航的⽅法:
1、⽤户们想要使⽤全新的车道级导航功能就必须先把⼿机升级⾄⾼德地图 V10.76 beta新版本,然后在进⾏导航时就能开启。
开启⽅法:
我的(右下⾓)> 设置(右上⾓)
导航设置
这个默认就是开启的,需要额外消耗流量。
效果图如下:
2、⾼德车道级导航可⾼清展⽰真实道路场景,显⽰当前道路的车道数量、地⾯标识标线、出⼊⼝、特殊车道等,同时结合⾼清信号,还可以实时显⽰⽤户的车道位置。
这样⼤家在导航时可以更清楚的了解路况。
3、并且当车辆临近⾼速出⼝,或者驶⼊应急车道、公交专⽤道时,⾼德地图还会进⾏及时播报提醒,提供车道级的变道引导,驾车体验更加直观,有效减少⾛错路的可能性。
注意
当前,⾼德地图车道级导航除了有版本限制,还有机型限制,⽬前⽀持车道级导航的⼿机已包括 HUAWEI Mate 40 系列、HUAWEI P40 系列、HUAWEI Mate Xs、荣耀 30 Pro 系列和荣耀 V40 等,该服务已先期覆盖深圳市的⾼、快速路。
以上就是⼩编给⼤家带来的⾼德地图设置车道级导航的⽅法,更多精彩内容请关注⽹站。
高德导航中的欢迎语与结束语关闭方法
高德导航是一款功能强大的导航软件,它不仅可以帮助我们规划出行路线,还可以提供实时路况信息,帮助我们避开拥堵路段,节省时间。
在使用高德导航时,我们经常会遇到欢迎语和结束语,下面将分别介绍欢迎语与结束语的关闭方法。
一、欢迎语的关闭方法
当我们打开高德导航时,通常会出现欢迎语,以提醒我们导航已经成功开启。
在使用过程中,我们可以通过点击屏幕上的“开始导航”按钮或是语音控制“开始导航”来关闭欢迎语。
此外,还可以通过点击屏幕右上角的“X”按钮或是按返回键来关闭欢迎语。
二、结束语的关闭方法
在到达目的地或是取消导航后,高德导航会显示结束语,以提示我们已经结束导航。
在关闭结束语时,我们可以通过点击屏幕上的“关闭导航”按钮或是语音控制“关闭导航”来实现。
此外,还可以通过点击屏幕右上角的“X”按钮或是按返回键来关闭结束语。
总结:
通过以上介绍,我们了解到了高德导航中欢迎语与结束语的关闭方法。
在使用导航时,我们可以根据需要选择合适的操作方式来关闭欢迎语和结束语,以便更好地使用导航功能。
同时,我们还可以根
据实际情况调整导航设置,如设置避开拥堵路段、选择最优路线等,以提升出行效率。
高德导航作为一款智能导航软件,不仅方便实用,而且还提供了许多实用功能,如语音导航、实时路况等,为我们的出行带来了很大的便利。
希望以上内容对大家在使用高德导航时有所帮助。
高德导航软件用户手册MOTO XT711《高德导航软件用户手册》及其配套系统软件的版权属本公司所有,受中华人民共和国法律保护,未获高德软件有限公司明确的书面许可,任何人或单位不得对本软件的全部或部分内容进行复制或将其存储在数据库中,不得进行电子、机械或其他方式的影印、拷贝或备份,不得通过载声体或其他任何方式进行复制。
本文件所包含的信息可能更改,事先恕不另行通知。
1免责声明《高德导航软件用户手册》是由高德软件有限公司编制,旨在为用户提供一个使用手机导航系统的信息指引。
在编制过程中,本公司尽可能确保手册中所有内容(包括文字、图形、图标等)的准确性和完整性,但本公司对手册内容的准确性和完整性不作任何保证。
本手册的内容仅供参考,对于用户使用本手册带来的任何后果和损失,本公司概不负责。
用户一经购买使用《高德导航软件》,即表示同意本公司对于用户在使用本系统时所发生的任何直接或间接的损失一概免责。
本声明解释权归高德软件有限公司,如有争议,以中华人民共和国现行有效的法规法律为依据。
高德软件有限公司2重要提示感谢您购买本产品!为了实现您对本产品的安全和有效使用,本公司向您进行特别提示如下:1、本产品电子地图及路口语音提示仅供参考,可能与实际路况有所不同,请在遵守实地交通规则的前提下使用本系统,按照实际路况驾驶。
3、GPS定位与天气、环境及接收器等各因素相关,本系统不保证定位完全准确,请结合其他信息判断。
4、实际导航中请勿以本系统为唯一参考依据,因使用本系统而产生的直接的、间接的、连带的、特殊的后果由用户自行承担,系统设计者和生产者不负任何责任。
5、禁止非法拷贝、反编译、破解或传播本系统。
3目 录界面介绍 (5)一、启动与退出 (5)二、初始界面 (6)三、菜单界面 (7)四、漫游地图 (8)五、导航界面 (9)六、路口转弯提示 (10)七、高速公路路牌提示 (12)基本操作和功能设置详解 (13)一、目的地/起点/途径点设置 (13)二、路径管理 (20)三、实时路况 (24)四、系统设置 (25)45界面介绍一、启动与退出1、软件启动:点击“高德导航”图标,启动软件。
启动后系统自动进入地图界面 (或最后使用时退出的界面)。
2、软件退出:点击手机上返回键,如果您确定要退出程序,请选择“是”,否则请选择“否”。
6二、初始界面系统正常启动后将进入地图界面,在没有接收到GPS 信号时,地图定位在上一次的卫星丢失的位置或默认位置上;如下图:1 325 64(1)当前车位所在的道路名称或地名:显示当前车位所在的道路或者某个地名。
(2)比例尺:显示当前地图的比例尺;卫星信号强度:显示GPS接收状态。
(3)切换三种视图模式:北首朝上、车首朝上、3D视图。
(4)车位图标/GPS卫星信号提示:当前汽车所在的位置;不同颜色代表GPS不同定位状态,红色代表GPS未定位,蓝色代表GPS 正常定位;如果移动地图则该车位图标被移图光标替换(此时不提示GPS信息)。
(5)缩小按钮:将地图切换到上一比例尺地图,查看更广范围的地图,可缩小至1:1000km。
(6)放大按钮:放大地图,查看更详细的地图,可放大至1:15m。
三、菜单界面点击手机上菜单按钮,打开菜单。
78(1)地点查找:提供5种查找地点的方法,可设置目的地或起点。
(2)实时路况:提供实时交通服务。
(3)路径管理:设置路径后可对路径进行相关操作。
(4)系统设置:提供丰富的系统设置功能,为用户提供一个定制个性化导航系统的空间。
四、漫游地图点击屏幕的任意地方即可移动地图,持续点击某点后即可连续漫游,界面如下:1 23 49(1) 屏幕中心点:点击或拖动屏幕后,地图将移动到点击处,同时将车位图标替换为移图光标,并从原车位位置绘制一条直线到当前位置,同时显示当前位置距离原车位的直线距离。
(2) 收藏夹:将当前点保存至收藏夹。
(3) 设起点:将当前中心点设置为路径引导的起始位置;点击此按钮将自动取消上一次的导航设置,包括目的地、中途点、引导路径等。
(4) 设终点:直接将该点设置为目的地,获得引导路径。
(5) 回车位:返回到原始的车位状态;如果GPS 定位正常,则返回到真实车位。
五、导航界面设置引导路线后,界面如下:1 2 3 4 510(1) 下一路口转向提示:点击可选择停止导航。
(2) 即将转向,行驶车道提示。
(3) 引导路线:行驶过与未行驶过路径以不同颜色标识,当前车位与目的地之间以红线连接。
(4) 预计到达目的地时间,点击可切换路径规划原则。
(5) 当前车速,点击可切换路径规划原则。
(6) 距目的地距离,点击可切换路径规划原则。
(7) 当前车位所在道路名称。
(8) 摄像头提示:包括限速摄像头及照相摄像头。
六、路口转弯提示在引导路径的每一个转弯路口,系统会自动显示当前路口的详细情况,包括距离该路口的距离,如何转向,行驶车道提示等等,为驾乘者提供详尽的路口信息。
系统根据不同的路口提供不同模式的放1 4 5 23 7 8611大图,同时配备动态的距离显示和语音提示,帮助驾乘者准确快速的判断路口转弯情况。
模式一:简单/模拟路口放大图。
模式二:实景路口放大图。
1 2312(1) 实景路口放大图;(2) 路口距离指示;(3) 行驶车道提示;七、高速公路路牌提示在高速公路上导航时,系统根据本机道路信息将提示在道路上即将通过的入口、出口和服务区等信息。
如下图:13基本操作和功能设置详解一、目的地/起点/途径点设置1、地图界面设置目的地/起点/途径点(1)设置目的地/起点说明:直接在地图界面设置目的地/起点。
操作:在地图界面非车位处拖动移图,选定目的地位置,点击地图界面中“设终点”按钮,即可获得一条从原车位到该点的引导路线。
选择“设起点”则将该店设为起始点。
(2)设置途径点说明:直接在地图界面设置途径点。
操作:设置目的地后,在地图界面非车位处拖动移图,选定途径点位置,点击地图界面中“设终点”按钮,选择“途经点”即可在原引导14路线基础上增加一个途径点,选择“终点”则替换原终点重新规划路线;途径点只能设置一个。
2、查询设置目的地/起点/途径点的方法点击菜单中“地点查找”, 系统提供了5种常用设置目的地或起点的方法:首字母查询、关键字查询、周边查询、我的收藏、历史目的地,逐一说明如下。
注:搜索结果同样可设为途径点,方法与地图界面设置类似; (1)首字母查询说明:用目的地名称中每个字的拼音首字母检索。
操作:在【地点查找】窗口中选择“首字母查询”;首先选择目的地所在城市,在【首字母查询】界面选择“更换城市”,按省/市选择所需区域;在【首字母查询】窗口中输入需查询目的地名称的首字母,如“大恒科技大厦”则输入“dhkjds”(不区分大小写),点击“搜索”;进入【搜索结果】窗口,选定信息点;进入地图界面后点击“设终点”。
如下:151617(2)手写关键字 说明:用名称中的一个或多个连续的关键字检索。
操作:在【地点查找】窗口中选择“关键字查询”;进入【关键字查询】窗口中输入要查询的汉字,例如 “五道口”,在输入框中输入“五道口”,按下“搜索”;搜索成功则进入【搜索结果】窗口,选定信息点;后续操作及城市选择与首字母查询相同。
如下:18(3)周边查询说明:以当前车位或当前光标所在位置为参考点,分类查看周围信息的分布情况。
操作:在【地点查找】窗口中选择“周边查询”;进入【周边查询】窗口中,选择确定的类别(如“餐饮”)后开始搜索(有子类别的选项选定子类别后开始搜索);进入【搜索结果】窗口中,选定一个地址;进入【详细信息】窗口后,可查看该信息点的地址电话等详细信息,且可直接拨出相应电话;后续操作与首字母查询相同。
如下:19(4)我的收藏说明:将用户保存的信息点设置为目的地。
操作:在【地点查找】窗口中选择“我的收藏”;进入【我的收藏】窗口中,该窗口列出用户之前保存的所有地址,选择一个地址;后续操作与首字母查询相同。
可逐一删除收藏的地址,如下:20 (5)历史目的地说明:系统自动记录曾到达过的目的地,方便用户反复选择同一个目的地,最新设置过的目的地保存在最前面。
操作:在【地点查找】窗口中选择“历史目的地”;进入【历史目的地】列表窗口,翻看后选定地址;后续操作与首字母查询相同。
可逐一删除历史目的地,如下:二、路径管理设置引导路径后,在菜单中选择“路径管理”进入【路径管理】窗口;211、开始/停止模拟导航导航过程中,在【路径管理】窗口中选择“开始模拟导航”,模拟导航开始。
模拟导航开始后,该按钮变为“停止模拟导航”,选择即模拟导航终止;222、全程概览路径规划后,在【路径管理】窗口中,选择“全程概览”,在地图上查看全程的路线图;3、路径详情导航过程中,在【路径管理】窗口中选择“路径详情”,查看路线文字描述;点击任一路口可进一步查看路口详情;234、路径规划原则导航过程中,在【路径管理】窗口中选择“路径规划原则”,根据不同需求规划路线:最佳路线、高速优先、少走收费、距离最短。
245、删除当前路径导航过程中,在【路径管理】窗口中选择“删除当前路径”,确认后地图上删除当前路线,恢复初始状态;三、实时路况通过实时路况功能,用户可随时查看路况信息。
实时路况功能需要连接网络,产生的GPRS 流量费用由无线运行商收取。
通过主菜单可打开/关闭实时路况。
注:红色代表道路拥堵;黄色代表道路缓行;绿色代表道路畅通;25四、系统设置系统提供丰富的配置方案和显示风格,用户可根据个人需求和爱好量身定制。
系统设置由菜单进入。
261、字体设置地图界面字体大小:大/中/小,确定后地图上的字体根据设置改变大小;2、兴趣点优先显示设定在地图界面上详细显示哪些类别的信息点。
系统提供7大类优先显示信息:加油站、停车场、餐饮、住宿、娱乐、景点、医院。
可复选。
273、视图模式与地图界面切换视图模式键功能相同,用于变换不同的视图模式:北首朝上、车首朝上、3D视图;284、地图详细度设置地图显示的详细程度:详细、一般、简单;5、昼夜模式设置导航过程中白天黑夜模式,选择“白天”或“黑夜”所匹配的色盘是不一样的。
可根据喜好进行定制。
选择“自动”则根据系统时间自动切换。
296、模拟时速设置模拟导航时的速度:低速、中速、高速、跳跃;30 7、语音开关设置语音提示开关状态;8、语音提示频率设置语音提示频率:一般、频繁;319、电子狗开关设置“电子狗”提示开关状态;3210、背景灯设置背景灯状态:自动、常亮;11、移图方式设置地图界面移图方式:拖动、点击;3312、关于查看当前导航系统的版本信息;。