使用XIB自定义一个UIView,然后将这个view添加到controller的view
- 格式:doc
- 大小:335.00 KB
- 文档页数:3
IOS学习之第二个View使用UITabBarViewControllerIOS学习之第二个View使用UITabBarViewController 前面有一篇博文IOS学习之T ab Bar的使用和视图切换这是在AppDelegate里使用Tabbar,这样的程序打开就是TabbarView了,有时候我们需要给程序做一些帮助页面,或者登录页面,之后才跳转到tabbar View 里,或者后面的页面才使用Tabbar的,那这样怎么实现呢?我们建立一个视图,然后在这个视图通过[self presentModalViewController : tabBar animated:YES];跳转来实现。
当程序中需要在多个View直接切换的时候,可以使用UINavigationController,也可以用ModalViewController。
UINabigationController 是通过导航条来切换多个view。
而如果view 的数量比较少,且显示领域为全屏的时候,用ModalViewController 就比较合适(比如需要用户输入信息的view,结束后自动回复到之前的view)1、新建一个Single View app,按Command + N新建三个ViewController ,都选上.xib文件。
1.1 新建的Controller分别是:TestOneController TestTwoController TestThirdViewController ,他们都继承UIViewController。
单击xib文件,在.xib文件的属性窗口里修改View的颜色,这样好在切换页面的时候区分出来是切换了页面。
好吧,我的ThirdViewController没有xib,可能是漏了,不过也没关系,一样能用。
1.2 添加TabBarViewController最重要的是再添加一个TabBarViewController,这个需要继承的UITabBarController2、在ViewController也就是程序进来的第一个页面。

iosui的xib的用法
1.创建XIB文件:
在Xcode中,选择“File -> New -> File”,然后选择“User Interface”下的“View”选项。
在接下来的窗口中,输入文件名并选择保存的目录,然后点击“Create”按钮。
在Xcode中,打开XIB文件,可以看到Interface Builder视图。
在左侧的对象库中,可以找到各种控件和视图,可以通过拖拽的方式将它们添加到界面上。
3.连接控件和代码:
在XIB文件中,可以通过Control-drag的方式将控件和代码关联起来。
在关联之前,需要确保控件有一个唯一的标识符,可以通过修改属性面板中的“Identifier”属性来实现。
然后,在代码中可以使用IBOutlet和IBAction关键字来定义属性和方法,并在Interface Builder中将它们与控件连接起来。
4.自动布局和约束:
5.自定义视图和控件:
可以在XIB文件中创建自定义的视图或控件。
在左侧的对象库中,可以找到“Object”选项,选择“Custom View”可以创建一个自定义的视图,并设置其自定义类。
在自定义类中可以实现自定义的绘制和行为。
6.模块化和重用:
可以将XIB文件当作模块化的组件来使用,可以在多个界面中复用相同的XIB文件。
可以选择XIB文件,然后点击“Editor -> Refactor to Storyboard…”来将其转换为可重用的Storyboard。
7.本地化和国际化:
8.运行和测试界面:
总结:。
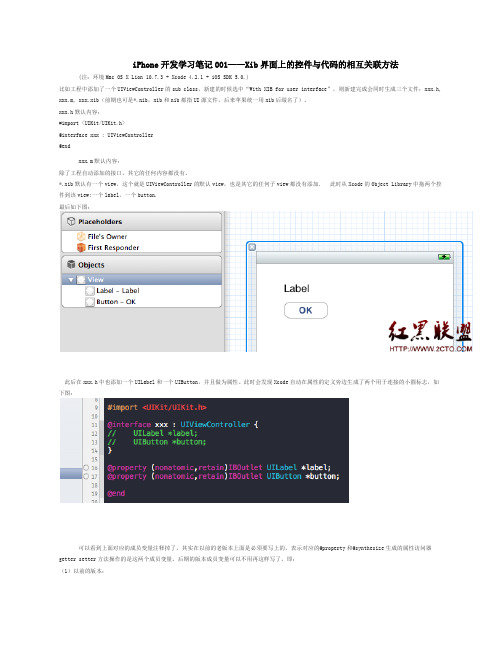
iPhone开发学习笔记001——Xib界面上的控件与代码的相互关联方法(注:环境Mac OS X Lion 10.7.3 + Xcode 4.2.1 + iOS SDK 5.0.)比如工程中添加了一个UIViewController的sub class,新建的时候选中“With XIB for user interface”,则新建完成会同时生成三个文件:xxx.h, xxx.m, xxx.xib(前期也可是*.nib,xib和nib都指UI源文件,后来苹果统一用xib后缀名了)。
xxx.h默认内容:#import <UIKit/UIKit.h>@interface xxx : UIViewController@endxxx.m默认内容:除了工程自动添加的接口,其它的任何内容都没有。
*.xib默认有一个view,这个就是UIViewController的默认view,也是其它的任何子view都没有添加. 此时从Xcode的Object Library中拖两个控件到该view:一个label,一个button.最后如下图:此后在xxx.h中也添加一个UILabel和一个UIButton,并且做为属性。
此时会发现Xcode自动在属性的定义旁边生成了两个用于连接的小圆标志,如下图:可以看到上面对应的成员变量注释掉了,其实在以前的老版本上面是必须要写上的,表示对应的@property和@synthesize生成的属性访问器getter setter方法操作的是这两个成员变量。
后期的版本成员变量可以不用再这样写了。
即:(1)以前的版本:头文件:@interface xxx :UIViewController {UILabel *label;UIButton *button;}@property (nonatomic,retain)IBOutletUILabel *label;@property (nonatomic,retain)IBOutletUIButton *button;@end*.m源文件:@implementation xxx@synthesize label;@synthesize button;。

ios uipagecontroller的用法iOS 的 UIPageViewController 是一个用于创建基于页面的用户界面的控制器类。
它允许用户在多个页面之间进行导航,类似于书的章节或者图片浏览器的图片之间的切换。
本文将深入探讨 UIPageViewController 的用法,重点解释其初始化、设置数据源、处理用户交互以及自定义界面等方面的内容。
第1步:初始化 UIPageViewController要使用 UIPageViewController,我们首先需要创建一个实例。
在代码中可以使用以下方法来初始化 UIPageViewController:let pageViewController = UIPageViewController(transitionStyle: .scroll, navigationOrientation: .horizontal, options: nil)这里我们指定了页面切换的过渡风格为滚动,导航方向为水平。
你也可以选择其他的过渡风格和导航方向,以适应你的应用。
第2步:设置数据源UIPageViewController 需要一个数据源对象来提供要显示的页面内容。
我们需要创建一个实现了 UIPageViewControllerDataSource 协议的类,并将其指定为UIPageViewController 的 dataSource 属性。
数据源类应该实现以下两个方法:func pageViewController(_ pageViewController: UIPageViewController, viewControllerBefore viewController: UIViewController) > UIViewController?func pageViewController(_ pageViewController: UIPageViewController, viewControllerAfter viewController: UIViewController) > UIViewController?第一个方法返回当前页面的前一个页面,第二个方法返回当前页面的下一个页面。

ios uiview基本用法iOS中的UIView是一种基本的用户界面元素,它用于构建应用程序的视图层次结构,并提供了丰富的功能和用法。
下面我将从多个角度来介绍UIView的基本用法。
1. 创建和初始化:要创建一个UIView,可以使用UIView类的初始化方法,比如initWithFrame:来指定位置和大小,或者直接使用UIView的类方法来创建一个实例。
例如:UIView myView = [[UIView alloc]initWithFrame:CGRectMake(20, 20, 100, 100)];2. 添加到父视图:要将UIView添加到父视图中,可以使用父视图的addSubview:方法。
例如:[superView addSubview:myView];3. 布局和位置,可以使用UIView的frame、bounds和center 属性来设置视图的位置和大小。
frame属性表示视图在其父视图坐标系统中的位置和大小,bounds属性表示视图自身坐标系统中的位置和大小,center属性表示视图的中心点位置。
4. 背景和颜色,可以使用UIView的backgroundColor属性来设置视图的背景颜色,也可以使用alpha属性来设置视图的透明度。
5. 响应用户交互,可以通过给UIView添加手势识别器(如UITapGestureRecognizer、UIPanGestureRecognizer等)来实现对用户交互的响应,也可以重写UIView的触摸事件方法(如touchesBegan:、touchesMoved:等)来处理用户的触摸事件。
6. 绘制和动画,可以通过重写UIView的drawRect:方法来自定义视图的绘制,也可以使用Core Animation和UIView的动画方法来实现视图的动画效果。
7. 子视图管理,可以使用UIView的subviews属性来获取视图的所有子视图,也可以使用bringSubviewToFront:、sendSubviewToBack:等方法来管理子视图的层级关系。

addviewcontrollers用法addViewControllers是一个UIViewController的方法,用于向当前的视图控制器中添加一个或多个子视图控制器。
使用方式如下:1. 创建一个UIViewController实例,作为子视图控制器。
2. 调用当前视图控制器的addViewControllers方法,将子视图控制器添加到当前视图控制器中。
3. 可以添加多个子视图控制器,每个子视图控制器都会被添加到当前视图控制器的子视图控制器列表中。
4. 子视图控制器被添加后,其视图会自动添加到当前视图控制器的视图层级中,并可以接收用户交互。
示例代码:UIViewController *childViewController = [[UIViewController alloc] init]; 创建一个子视图控制器实例[self addViewControllers:@[childViewController]]; 将子视图控制器添加到当前视图控制器中另外还可以使用addViewControllers方法添加多个子视图控制器:UIViewController *childViewController1 = [[UIViewController alloc] init]; UIViewController *childViewController2 = [[UIViewController alloc] init]; [self addViewControllers:@[childViewController1, childViewController2]];注意事项:- 添加的子视图控制器的视图会被自动添加到当前视图控制器的视图层级中,无需手动添加。
- 添加的子视图控制器必须是UIViewController的实例,或者是其子类的实例。
- 在添加子视图控制器之后,可以通过调用子视图控制器的willMoveToParentViewController:方法将其从当前视图控制器中移除。
uitabbarcontroller用法UITabBarController是iOS开发中常用的控制器,用于实现多个页面之间的切换。
下面来介绍一下UITabBarController的用法。
UITabBarController是一个容器控制器,可以在底部或顶部显示多个Tab选项卡。
每个选项卡对应一个独立的UIViewController,通过点击不同的选项卡可以实现页面之间的切换。
使用UITabBarController的步骤如下:1. 创建UITabBarController对象,并设置其代理。
2. 创建多个UIViewController作为各个选项卡的内容。
3. 将UIViewController添加到UITabBarController中。
4. 设置UITabBarController的选项卡的标题和图标。
5. 设置UITabBarController的其他属性,如选中的选项卡颜色、未选中的选项卡颜色等。
6. 将UITabBarController设置为窗口的根视图控制器。
通过以上步骤,可以实现一个简单的UITabBarController。
当用户点击不同的选项卡时,系统会自动切换到对应的UIViewController,并显示其内容。
除了基本的用法之外,UITabBarController还提供了一些其他功能,如通过设置代理可以在切换选项卡时执行一些自定义操作;也可以通过代码控制选中的选项卡等。
UITabBarController是iOS开发中实现多页面切换的重要工具,它可以方便地创建和管理多个UIViewController,并提供良好的用户交互体验。
开发者可以根据项目需求,灵活运用UITabBarController的各种属性和方法,实现不同的功能和效果。
ios cyltabbarcontroller 基础用法UITabBarController是iOS开发中常用的控件之一,用于管理多个视图控制器的切换和显示。
在iOS中,UITabBarController通常用来实现底部Tab栏,让用户可以方便地切换不同模块或页面。
在本文中,将介绍UITabBarController的基础用法,包括创建、配置和管理TabBarController。
首先,要使用UITabBarController,需要在AppDelegate中创建一个UITabBarController的实例,并将其设置为根视图控制器。
可以通过如下代码来创建和配置UITabBarController:```objcUITabBarController *tabBarController = [[UITabBarController alloc] init];// 创建多个视图控制器UIViewController *firstViewController = [[FirstViewController alloc] init];UIViewController *secondViewController = [[SecondViewController alloc] init];// 可以继续创建其他的视图控制器// 将视图控制器添加到UITabBarController中tabBarController.viewControllers = @[firstViewController, secondViewController];// 设置UITabBarController的tabBar的样式tabBarController.tabBar.barTintColor = [UIColor whiteColor]; // 设置TabBar的背景颜色tabBarController.tabBar.tintColor = [UIColor blueColor]; // 设置TabBar的选中颜色// 将UITabBarController设置为根视图控制器self.window.rootViewController = tabBarController;```在上述代码中,首先创建了一个UITabBarController的实例,然后创建了多个视图控制器,并将它们添加到UITabBarController的viewControllers数组中。
今天在做iphone开发时碰到了一个常用的需求,即在一个viewController中添加另外一个viewController,同时能保证这两个ViewController之间能够相互交互且相互调用方法和函数,在网上查了很多资料,很多开发者说需要使用objective-c变态的delegate,可是我感觉delegate是使用在两个同级之间的UIView比较好,至于能不能使用在父子关系而且是UIVeiwController我也不太清楚,也没有亲自实验过,通过查看SDK的API及其他资料我使用了自己的方法实现了我想要的需求,但是我不知道我的这种方法会不会有致命性的问题,或者会不会有很大的弊端,如果有高人存在的话还望指点一下,我只是一个初学者,下面我将我的方法贴上来:首先,定义两个UIVeiwController,姑且先命名为ViewControllerParent(父容器)和ViewControllChild(子容器)吧,我们可以通过UIView的insertSubview方法将子容器添加到父容器中,这点在这里先不用说了其次,我们先来看一下通过父容器调用子容器中的方法及函数,我先在子容器ViewControllChild和父容器ViewControllerParent中分别写了如下方法://该方法是弹出一个警告框-(void)AlertWindow:(NSString *)transValue{UIAlertView *alertView=[[UIAlertView alloc] initWithTitle:transValue message:transValue delegate:selfcancelButtonTitle:@"OK" otherButtonTitles:nil];[alertView show];[alertView release];}由于父容器ViewControllerParent要插入ViewControllChild,因此在ViewControllerParent 一定已经定义了ViewControllChild,如下:@synthesize ViewControllChild;if (self.ViewControllChild==nil) {ViewControllChild *ViewControll=[[ViewControllChild alloc] initWithNibName:@"ViewControllChild" bundle:nil];self.ViewControllChild=ViewControll;[ViewControll release];}所以当父容器调用子容器的方法只需要做下面一步即可:[self.ViewControllChild AlertWindow:@"我是从子容器中弹出来的"];这就实现了父容器调用子容器中方法;最后,看一下如何在子容器中调用父容器的方法,我的思路是这样的,在insertSubview 时我设置该子容器的父Controller,最后在子容器中通过父Controller来调用方法,因此我在子容器ViewControllChild中添加了一个这样的方法://设置当前窗口的父容器-(void)SetParentView:(UIViewController *)viewController{[self setParentViewController:viewController];}在ViewControllerParent实现insertSubview前加入下边代码:[self.ViewControllChild SetParentView:self];该代码实现了设置父容器这样在子容器ViewControllChild中通过以下代码就可以调用父容器的方法或者函数了:[self.parentViewController AlertWindow:@"我是从父容器中弹出来的"];以上便是实现ViewController相互交互的方法和思路,如果有什么错误或者弊端还希望大家能够提出来我们共同探讨更多信息请查看IT技术专栏。
UITableViewController的使⽤如果整个程序界⾯都只是使⽤UITableView来搭建,⼀般需要如下步骤:(1)向界⾯上拖⼀个UITableView(2)设置数据源(3)设置代理(4)遵守代理协议上述过程相对繁琐,为了简化操作,直接使⽤UITableViewController,但要⼀定要注意:需要和主控制器类进⾏关联,还有就是不要把UIViewController当成UITableViewController使⽤。
⾃定义TableViewCell(在ATDemoCell.m⾥):+ (instancetype)cellWithTableView:(UITableView *)tableView{static NSString *ID = @"cellID";ATDemoCell *cell = [tableView dequeueReusableCellWithIdentifier:ID];if (cell == nil) {cell = [[ATDemoCell alloc] initWithStyle:(UITableViewCellStyleDefault) reuseIdentifier:ID];}return cell;}- (instancetype)initWithStyle:(UITableViewCellStyle)style reuseIdentifier:(NSString *)reuseIdentifier{self = [super initWithStyle:style reuseIdentifier:reuseIdentifier];if (self) {// 在此处定义控件}return self;}在cellForRowAtIndexPath数据源⾥调⽤ATDemoCell *cell = [ATDemoCell cellWithTableView:tableView];分割线设置//设置分割线[tableView setSeparatorInset:UIEdgeInsetsMake(0, -67, 0, 0)];//分割线颜⾊self.tableView.separatorColor = [UIColor redColor];//隐藏分割线self.tableView.separatorStyle = UITableViewCellSeparatorStyleNone;//隐藏多余分割线self.tableView.tableFooterView = [[UIView alloc] init];取消选中样式//取消选中样式cell.selectionStyle = UITableViewCellSeparatorStyleNone;设置背景⾊// 改变整个tableView的颜⾊tableView.backgroundColor = [UIColor greenColor]// 设置选中的背景⾊UIView *selectedBackgroundView = [[UIView alloc] init];selectedBackgroundView.backgroundColor = [UIColor redColor];cell.selectedBackgroundView = selectedBackgroundView;// 设置默认的背景⾊ 1cell.backgroundColor = [UIColor blueColor];// 设置默认的背景⾊ 2UIView *backgroundView = [[UIView alloc] init];backgroundView.backgroundColor = [UIColor greenColor];cell.backgroundView = backgroundView;右边指⽰器显⽰,⽐如箭头、打勾,也可以⾃定义图⽚等等// 显⽰箭头cell.accessoryType = UITableViewCellAccessoryDisclosureIndicator; // ⾃定义显⽰,如开关Switchcell.accessoryView = [[UISwitch alloc] init];设置tableview 不能滚动self.tableView.scrollEnabled =NO;。