USB Monitor方案
- 格式:pdf
- 大小:370.26 KB
- 文档页数:10
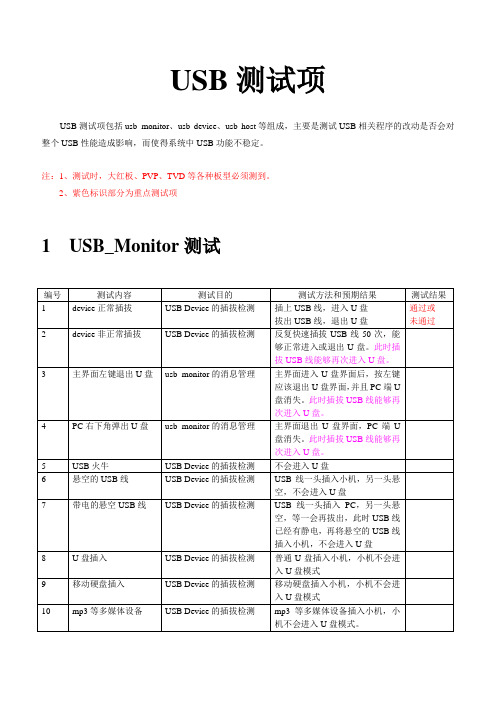
USB2.0-HOST/SYSTEM测试方案参考资料:1.USB Spec2.02.Intel ICH4 USB Electrical Test Method( APAC Lab Workshop Q1/2002 ) 3.USBIF Full and Low Speed Compliance Test Procedure Rev.1.0rc2 4.USBIF High-speed Electrical Test Toolkit Setup Instruction Rev.1.01 5.USBIF Host High-speed Electrical Test Procedure Rev.1.0 6.Tektronix USB2.0 Compliance Test Fixture7.Tektronix USB Measurements Package说明:1.本测试方案适用于USB2.0 HOST/SYSTEM级测试,包括主板;2.进行USB测试,所使用的连接电缆线规格:信号线:28 AWG;电源线:22或24AWG;本测试全部采用此种规格电缆线测试。
目录:一、信号质量测试1.高速信号质量测试2.全速信号质量测试3.低速信号质量测试二、Drop、Droop测试1.Drop测试2.Droop测试三、TDR测试一、信号质量测试1.高速信号质量测试1.1目的验证高速传输时,信号的质量;1.2标准通过高速传输眼图测试;1.3器材示波器:Tek 7404(加载软件:Tek USB2.0 Test Package);差分探头:Tek P7330×1个;夹具:Tek USB2.0 Test Fixture(SQIDD板);测试软件:USBHSET.EXE (从USBIF网站下载、升级) ;USB电缆线:1米×1根;1.4步骤(1)连接如下,差分探头与夹具暂不连接:(2)设置夹具上开关S6在Init位置,通电;(3)被测设备(Host Under Test)预安装要求:•安装Win2000操作系统;•安装芯片组、ICH4驱动程序;•安装测试软件USBHSET.EXE;(4)设置示波器:•按示波器面板按键“default setup”,将示波器置于出厂设置;•进入菜单File---Run Application,运行程序USB2.0 Test Package;•选择“High Speed”,选中“Eye Diagram”;在“Device ID”中输入被测设备的编号(系统自动生成的报告将以此命名);点击“Config”,选择tier1,Down Stream,Near End,设置差分探头所在的通道;•点击图标,示波器进行自动设置,进入等待触发状态;(5)设置被测设备:•进入Win2000,运行USBHSET.EXE,选中“HostController/System”,点击“Test”,进入测试界面;•点击“Enumerate Bus”,程序将列举所连接的高速USB设备;•选中设备,由下拉菜单设置Port Control为“TEST PACKET”;•将差分探头的正、负极与夹具上D+、D-相对应连接;•点击“EXECUTE”,程序将控制USB EHCI控制器,产生高速时测试包;(6)示波器采样到准确信号后,点击“OK”,完成信号测试,检查测试结果;(7)进入TDSUSB2 USB2.0 Test Package菜单Utilities,选择“Plug-FestSpecific”格式(此为通用的USB报告形式)和所希望的路径,点击“Generate”,系统将自动生成报告;(8)依次将被测设备的不同USB端口通过1米电缆线与夹具相连,测量每一个端口的信号;1.5说明1.:测试项通过测试;:测试项不能通过测试;:测试结果在限定的条件(waiver limits)内通过。

USB摄像头方案1. 引言USB摄像头是一种广泛应用于计算机和移动设备的外设,可以进行实时拍照和视频录制功能。
本文档将介绍USB摄像头的硬件和软件方案,以及其应用场景和使用方法。
2. 硬件方案USB摄像头的硬件方案需要包括摄像头模组、USB接口、图像传感器、镜头等组成。
以下是一种常见的硬件方案:•摄像头模组:摄像头模组是核心部件,负责采集图像并转化为电信号。
常见的摄像头模组包括CMOS和CCD传感器,可以根据不同应用场景选择合适的模组。
•USB接口:USB接口是连接摄像头和计算机的通信接口,常见的USB接口包括USB 2.0和USB 3.0。
USB 3.0接口具有更高的传输速度和更稳定的数据传输,适用于高清视频录制。
•图像传感器:图像传感器是摄像头的核心部件,负责将光信号转化为电信号。
常见的图像传感器包括CMOS和CCD传感器,两者在感光效果和成本方面有所差异。
•镜头:镜头用于调整光线和焦距,影响图像的清晰度和视角。
根据不同应用场景可以选择不同类型的镜头。
3. 软件方案USB摄像头的软件方案包括驱动程序和应用程序。
•驱动程序:USB摄像头需要安装相应的驱动程序才能在计算机上正常工作。
驱动程序负责与操作系统进行通信,控制摄像头的功能,以及提供图像和视频数据的接口。
•应用程序:USB摄像头的应用程序通常提供实时预览、拍照、录制视频等功能。
应用程序可以使用操作系统提供的图像处理接口,实现图像增强、滤镜美化等特效。
4. 应用场景USB摄像头在许多应用场景中都有广泛应用,下面是一些常见的应用场景:•视频会议:USB摄像头可以实现高清视频会议,提供实时的视频通信和远程协作功能。
•监控系统:USB摄像头可以连接到计算机或网络视频录像机,用于监控和录制视频。
•在线教育:USB摄像头可以用于远程教学和在线培训,教师可以通过摄像头实时展示教学过程。
•视频直播:USB摄像头可以连接到计算机或移动设备,用于实时直播和视频分享。

usbmuxd硬件方案usbmuxd是一个开源的软件,用于管理iOS设备与计算机之间的通信。
它允许通过USB连接访问iOS设备的文件系统、调试控制台和其他功能。
在本文中,我们将介绍usbmuxd的基本原理、硬件方案,并探讨其在设备管理和开发领域的应用。
1. usbmuxd概述usbmuxd是一个运行在iOS设备和计算机之间的守护进程,使用USB传输数据。
它通过在iOS设备上创建一个虚拟端口,将计算机连接到iOS设备的服务和应用程序。
这样,计算机可以通过usbmuxd与iOS设备通信,实现文件传输、数据备份、安装应用等功能。
2. usbmuxd硬件方案为了实现usbmuxd的功能,需要采用一些硬件方案。
下面是一个典型的usbmuxd硬件方案的示例:(图示设备连接示意图)2.1 iOS设备作为usbmuxd的端点设备,iOS设备需要具备以下硬件特性:- USB接口:用于与计算机建立物理连接。
- 虚拟端口:usbmuxd通过虚拟端口与计算机通信,因此iOS设备需要支持虚拟端口功能。
- 文件系统:usbmuxd通过USB传输文件,因此iOS设备需要具备可读写的文件系统。
2.2 计算机作为usbmuxd的控制端设备,计算机需要具备以下硬件特性:- USB接口:用于与iOS设备建立物理连接。
- 操作系统支持:计算机的操作系统需要支持usbmuxd,并提供相应的驱动程序或接口。
- 开发工具:为了方便开发人员使用usbmuxd,计算机需要安装相应的开发工具和库。
3. usbmuxd的应用由于usbmuxd提供了与iOS设备的通信接口,它在设备管理和开发领域具有广泛的应用。
3.1 设备管理usbmuxd可以用于管理大量的iOS设备,使其能够与计算机进行有效的通信和操作。
例如,在移动设备管理(MDM)和移动应用开发中,usbmuxd可以用于批量安装应用、备份设备数据、远程控制设备等。
3.2 应用开发对于开发人员而言,usbmuxd是一个强大的工具,可以用于调试和测试iOS应用。
8"USB MonitorManualCONTENTS1.Safety Instructions................................................................................................................................2.Product Features....................................................................................................................................3.connections and Installation............................................................................................................4.Installation Monitor Driver..............................................................................................................B MONITOR Display Setting.................................................................................................6.System Requirements .........................................................................................................................7. Touch Function Instruction Touch Function Instruction(for deviceswith touch function use only.)…………………………………………8. Cable specification(Y type USB cable)……………………………………………9.Specification............................................................................................................................................10.Accessories ..............................................................................................................................................11.troubleshootiong....................................................................................................................................1. Safety InstructionsThese safety instructions must be followed to ensure your safety and prevent property damage.Warning/Cautions Otherwise, it may result in personal injury or property damage. Make sure to read the instructions carefully and use the product in the correct manner.1.1.Power Source:Make sure to use USB Cable (DC 5v, 500mA) only.USB MONITOR doesn‟t require any additional power source1.2.Do not place USB MONITOR in a location exposed to moisture, dust, smoke,water, or in a car.Otherwise, this may result in electric shock or fire.1.3.Clean the product using a soft cloth with a monitor cleaner only.Make sure to disconnect USB Cable while cleaningEnsure that water does not enter the product and that it is not wet.Otherwise, this may result in electric shock, fire or a malfunction.1.3.1Do not force on LCD ScreenDo not tap or scratch LCD Screen with a sharp object,otherwise, LCD mayget damage.1.3.2.Product Input/Output ConnectorsDo not insert any metal, such as chopsticks, coins, pins and steel.If foreign material enters the product, disconnect the USB cable and contacta Service Center.1.3.3.Do not install USB MONITOR in an unstable location.Otherwise, it may fall and cause personal injury and/or damage the product.1.4. Ensure that users do not disassemble, repair or modify the product themselves.If the product needs to be repaired, contact a Service Center.If water enters the product, disconnect the USB and contact a Service Center.This may result in a product malfunction, electric shock, or fire.2. Product FeaturesUSB Monitor is A USB Powered Touch Screen Monitor, a user may utilize USB MONITOR as Multiple Input/output devices for Video Conference, Instant Messaging, News and Stock casting.The model has The model has special functions: extended monitoring and touch controlPicture101. Brightness up2. Brightness down3. POWER :ON/OFF4. POWER indicator light5. Bracket6. NO use7. Power and Signal Input (Mini USB interface )8. USB connect:extended interface9. NO use10. Touch pen3. Connections and Installation3.1. USB Monitor can connected with USB interface only.Mini USB input:connect the device and PC with USB cable.3.2. System RequirementsCPU: Intel Pentium/Celeron/AMD/K6/Athlon/Duron 1.2GHz or aboveRAM: 512MB RAM or aboveUSB: at least one or more USB2.0 portHDD: 30MB HDD space aboveO/S: Windows 2000 SP4/XP SP2 32bit/Vista 32bit/Win 7 32bit3.3. UsingWith only USB cable connection, a user may operate USB MONITOR as Extension monitor4. Installing monitor driver (Auto Run)4.1. Insert the CD into the CD-ROM drivePlease make sure that your USB MONITOR is connected to the PC4.2. Installation takes about 1 minute.Do not power off or disconnect the USB cable until installation is completely finished. This may damage systems or may cause system errors.The USB MONITOR screen resolution is fixed for the best picture quality with each model.4.3. Installation steps :Get“setup-UM-5.2.21675” install software from disk.4.3.1 Double click the icon4.3.2 If you see following message window, select “I agree” to accept the terms ofuse4.3.3 When the installation is complete, the USB MONITOR setting iconappears on your system tray and the connected USB monitor informationwill pop-up.5. USB MONITOR display setting5.1. When the USB MONITOR driver installation is complete, the USB MONITORsetting icon appears on your system tray.5.2. Click-on USB MONITOR icon then you may see the USB MONITOR setupmenu for Screen Resolution, Colors, Rotation, Extension and etc.Ps:If USB monitor goes black, please check whether the setting of USB monitor is shut down or not; if yes, please setup “Extend”.6. System Requirements & Restrictions6.1. Operating SystemsWindows XPService Pack 1prior: Not supportedService Pack 2 or after: SupportedWindows 2000Service Pack 3 prior: Not supportedService Pack 4 or after : supportedWindows Server 2003: Not supportedWindows vista/Win7: Supported except 64bit systemsUser may check the Operating System version by Right-click …My Computer‟→…Properties‟→…System Properties‟6.2. USB MONITOR is a USB monitor to be recognized as a Generic USB device.Therefore system boot-up screen or DOS screen cannot be displayed properly. 6.3.Any software that requires Hardware 3D accelerator cannot be displayedproperly with USB monitor. Such as below.Real Player(Expansion Mode)3D Graphic GamesPrograms based on Direct X graphic engine6.4. If the PC doesn‟t support USB2.0 USB MONITOR may not operate properly.6.5. If the systems‟Graphic card doesn‟t support WDDM (Windows DisplayDriver Model), the USM monitor‟s extension mode may not work properlywith Windows vista System.7. Touch Function Instruction(for devices with touch function useonly.)7.1. Touch software installation.1.1 Select file “TOUCHIT-DRIVERS” from disk.1.2 Enter and select file “ALL_In_One_2k_XP…”1.3 Enter, select and double click the following icon to start installation.Keep press“NEXT”until“FINISH”to finish installation. The task barshows icon.7.2 Touch Setting:Double click shortcut icon,or right click the icon on task bar,popup menu.pop-up below dialog box when selected "Calibration Utility"Picture 1c lick “Monitor Mapping", it shows as follows:Picture 2Click picture1, press SPACE bar, or waiting for 10seconds, and select the touch screen need to Calibrate. picture 2 shows 》Please touch here《, and then shows 》OK《to confirm this monitor to 4-point calibration(refer to 7.3.Touch Calibration) then can start calibration.Ps: please start calibration setting when touch abnormally.7.3.Touch Calibration:7.3.1 Double click shortcut icon,or right click the icon on taskbar,popup menu. Select “4 points calibration”in the toolbar, popup the following interface. Long press the middle point until shows “OK”, the same methods for the last 3 points.(Please finish calibration within 15 seconds.)7.3.2 Calibration when more than one touch monitors.the touch software can identify all the touch monitors when more than one touch monitors. The icon stands for the monitor,calibrating when highlight the relative icon of the monitor8.Cable specification (Y type USB cable)Connect PC cable(power&data)Connect USB MONITOR cableConnect PC branch cable(power) Please plug both USB ports when operating device to ensure power supply9. Specifications2.10. AccessoriesManual1 2 3 41. USB cable 1piece2. CD drive 1piece3. Touch pen 1piece(touch use only)4. Manual 1piece11. Troubles shootingBefore calling for assistance, please read carefully below. If you do need assistance, please call local service center or contact your desireQ: No image on screen, I cannot turn on the USB MONITORA: 1. Make sure you connected with USB cable and installed the driver CD. Please setup the installation software, for more information, please read 4. Installing monitor driver (Auto Run)2.Please check whether USB interfaces on computer work well or not, or changeanother USB interface.Q: I cannot turn my USB MONITOR screen on.A: 1.Please check if the USB cable is connectedTouch the USB MONITOR‟s power button once then check the screen status.Please check if …USB MONITOR Installation Software …has been installedproperlya. Right-click …My Computer‟.b. Click …Device Manager‟s at …Hardware‟ tabc. Locate the cursor on PC at the top of the system tree.d. Click …Action(A)’→“Add Hardware(A)”.e. Reboot the PC,Normal PC recognizes USB MONITOR as a generic USB device. Frequent power on and off of the device may cause USB device error. Please refer to Microsoft customer support for USB devices troubleshooting.2. please check whether the setting “Display link Device” is shut down or not; ifyes, please setup “Extend”.Q: I cannot boot my system after connecting USB MONITOR.A: in case i851 chipset once – Board Type PC system, please disable …Legacy USB support‟ option in system.BIOS setup method may differ from PC to PC, please refer to the User manual of the PC. Please refer to Microsoft homepage for more detail.Q: I cannot see DOS opening screen with USB MONITOR when my PC is booting up.A: USB MONITOR is using USB device. Since DOS doesn‟t recognize USB Device while booting –up, USB MONITOR cannot get video signal from the system. Q: I cannot run 3D graphic game with USB MONITOR screen.A: USB MONITOR is using USB 2.0 interface (480Mbps) for video data transfer.Therefore any program that requires 3D high speed graphic acceleration cannot be displayed properly.Restricted Programs.1.Real Player (Doesn‟t support Extension Mode)2.3d Graphic Games3.Programs that requires Direct X graphic acceleration4.Power DVD5.Win DVD (Version 5 or later)Supported Multimedia Players1.Windows Media Player (Version 10 or later)2.GOM Player3.KM PlayerQ: How to uninstall “USB MONITOR installation software”A: …Control Panel‟→…Program Add/Remove‟→…Display link Core software‟→Click …remove‟.Q: How many USB MONITOR can be connected to one PC?A: USB MONITOR is a generic USB device. Theoretically a PC can recognize up to 127 USB devices. However with the latest PC system, we recommend number of USB monitors and each respective PC system requirements as below.1.1~2 USB MONITOR connections -1.2GHz CPU/512 MB Memory2.3~5 USB MONITOR connections -1.8GHz CPU/1GB Memory3. 6 USB MONITOR connections -1.6GHz Dual core CPU/1GB MemoryDisplay response rates on each a USB monitor may vary upon the PC‟s resource management status.Q: USB MONITOR information remains in my …Display Properties‟even after disconnect or power off the USB MONITOR.A: The deactivated USB information implies power off or disconnected USB monitor status. To delete the deactivated monitor information, please uninstall …Displaylink Core software‟driver. Once the driver is uninstalled, you may not use USB MONITOR. To use USB MONITOR again please re-install the driver.Q: How can I clean the outer case/LCD Panel?A: Disconnect the USB cable and then clean the USB MONITOR with a soft cloth, using either a cleaning solution or plain water.Do not leave any detergent or scratches on the case. Do not let any water enter the monitor.Q: I lost USB MONITOR installation disc. Where can I get an additional installation disc?A: please contact with dealerQ: When USB MONITOR connected with PC first, after PC starts, USB MONITOR is standby and no display?A: Plug-out and plug in again with the USB cable between PC and USB MONITOR;or press “POWER” button on USB MONITOR to off, and then power on.Q:what should do when can not touch or touch abnormally?A:please check the touch software is installed if can not touch. (Please refer to 7.Touch Function Instruction 1. Touch software installation. )Please start calibration setting when touch abnormally. (Please refer to 7. Touch Function Instruction, touch calibration)。
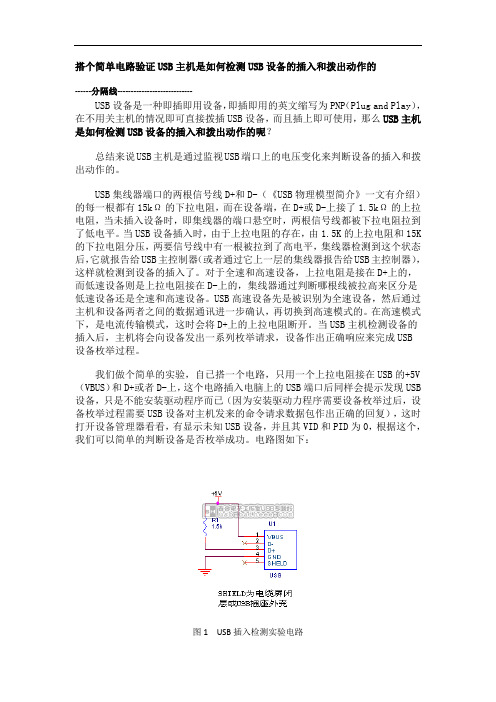
搭个简单电路验证USB主机是如何检测USB设备的插入和拨出动作的------分隔线----------------------------USB设备是一种即插即用设备,即插即用的英文缩写为PNP(Plug and Play),在不用关主机的情况即可直接拨插USB设备,而且插上即可使用,那么USB主机是如何检测USB设备的插入和拨出动作的呢?总结来说USB主机是通过监视USB端口上的电压变化来判断设备的插入和拨出动作的。
USB集线器端口的两根信号线D+和D-(《USB物理模型简介》一文有介绍)的每一根都有15kΩ的下拉电阻,而在设备端,在D+或D-上接了1.5kΩ的上拉电阻,当未插入设备时,即集线器的端口悬空时,两根信号线都被下拉电阻拉到了低电平。
当USB设备插入时,由于上拉电阻的存在,由1.5K的上拉电阻和15K 的下拉电阻分压,两要信号线中有一根被拉到了高电平,集线器检测到这个状态后,它就报告给USB主控制器(或者通过它上一层的集线器报告给USB主控制器),这样就检测到设备的插入了。
对于全速和高速设备,上拉电阻是接在D+上的,而低速设备则是上拉电阻接在D-上的,集线器通过判断哪根线被拉高来区分是低速设备还是全速和高速设备。
USB高速设备先是被识别为全速设备,然后通过主机和设备两者之间的数据通讯进一步确认,再切换到高速模式的。
在高速模式下,是电流传输模式,这时会将D+上的上拉电阻断开。
当USB主机检测设备的插入后,主机将会向设备发出一系列枚举请求,设备作出正确响应来完成USB设备枚举过程。
我们做个简单的实验,自已搭一个电路,只用一个上拉电阻接在USB的+5V (VBUS)和D+或者D-上,这个电路插入电脑上的USB端口后同样会提示发现USB 设备,只是不能安装驱动程序而已(因为安装驱动力程序需要设备枚举过后,设备枚举过程需要USB设备对主机发来的命令请求数据包作出正确的回复),这时打开设备管理器看看,有显示未知USB设备,并且其VID和PID为0,根据这个,我们可以简单的判断设备是否枚举成功。
Philips Business MonitorLCD monitor with USBdocking ArrayB Line24 (23.8"/60.5 cm diag.)1920 x 1080 (Full HD)243B1JHSimplify your connectionswith hybrid USB dockingThis Philips monitor offers 100 W power delivery and a simple laptop docking solution.One USB dual mesh cable with Type C and A connectors delivers video, Ethernet, powercharge and DisplayLink functions. Windows Hello webcam offers greater security.Single cable for USB docking•Built-in USB docking simplifies your connections•One USB dual-mesh cable further reduces cable clutter•USB-C enables laptop power charging directly from a monitor•USB-A with DisplayLink enables compatibility with existing laptops•Built-in RJ-45 Ethernet gives data securityExcellent performance•IPS technology for full colours and wide viewing angles•LowBlue Mode for easy-on-the-eyes productivity•Securely sign in with pop-up webcam with Windows Hello™•DisplayPort-out for connecting additional displaysDesigned for sustainability•Designed to meet environmental standards•PowerSensor saves up to 80% energy costs•LightSensor for the perfect brightness with minimal powerHighlightsUSB DockingPhilips USB-docking monitors deliver universal port replication for simple, clutter-free notebook connection. Securely connect to networks and transmit data, video and audio from a laptop using just a single USB cable. What's more, you can dock with a USB Type-C port for additional power charging. With docking monitors with built-in DisplayLink Technology, users can benefit from forwards and backwards USB compatibility with virtually any recent notebook. USB docking can boost business productivity and reduce costs.USB Type-C connectionThis Philips display features a built-in USB type-C docking station with power delivery. With intelligent and flexible power management, you can power charge your compatible* laptop directly. Its slim, reversible USB-C connector allows for easy, one-cable docking. Simplify by connecting all your peripherals like keyboard, mouse and your RJ-45 Ethernet cable to the monitor's docking station. You can watch high-resolution video and transfer data at super-speed, while powering up and re-charging your notebook at the same time.IPS technologyIPS displays use advanced technology that gives you extra-wide viewing angles of 178/178degrees, making it possible to view the display from almost any angle — even in 90-degree Pivot mode! Unlike standard TN panels, IPS displays gives you remarkably crisp images with vivid colours, making it ideal not only for Photos, films and web browsing, but also for professional applications that demand colour accuracy and consistent brightness at all times.LowBlue ModeStudies have shown that just as ultra-violet rays can cause eye damage, shortwave-length blue light rays from LED displays can cause eye damage and affect vision over time. Developed for wellbeing, the Philips LowBlue Mode setting uses a smart software technology to reduce harmful shortwave blue light.Windows Hello™ pop-up webcamPhilips' innovative and secure webcam pops up when you need it and securely tucks back into the monitor when you are not using it. The webcam is also equipped with advanced sensors for Windows Hello™ facialrecognition, which conveniently logs you into your Windows devices in less than 2 seconds, 3 times faster than a password.DisplayPort-outWith DisplayPort-out you can connectmultiple high-resolution displays with just one cable from your first display to the PC. The ability to daisy chain multiple displays enables you to maintain a clean desktop without the hassle of too many wires.PowerSensorPowerSensor is a built-in 'people sensor' that transmits and receives harmless infraredsignals to determine if the user is present and then automatically reduces monitor brightness when then user steps away from the desk, cutting energy costs by up to 80 percent and prolonging monitor lifeLightSensorLightSensor uses a smart sensor to adjust the picture brightness depending on the light conditions in the room for the perfect picturewith minimal power usage.Issue date 2023-03-22 Version: 4.0.212 NC: 8670 001 70327 EAN: 87 12581 77109 6© 2023 Koninklijke Philips N.V.All Rights reserved.Specifications are subject to change without notice. Trademarks are the property of Koninklijke Philips N.V. or their respective owners.SpecificationsPicture/Display•LCD panel type: IPS technology•Backlight type: W-LED system•Panel Size: 23.8 inch/60.5 cm•Display Screen Coating: Anti-Glare, 3H, Haze 25%•Effective viewing area: 578.04 (H) x 296.46 (V)•Aspect ratio: 16:9•Maximum resolution: 1920 x 1080 @ 75 Hz*•Pixel Density: 93 PPI•Response time (typical): 4 ms (Grey to Grey)*•Brightness: 300 cd/m²•Contrast ratio (typical): 1000:1•SmartContrast: 50,000,000:1•Pixel pitch: 0.2745 x 0.2745 mm•Viewing angle: 178º (H) / 178º (V), @ C/R > 10•Flicker-free•Picture enhancement: SmartImage•Colour gamut (typical): NTSC 88%*, sRGB 105%*•Display colours: 16.7 M•Scanning Frequency: 30–85 kHz (H) / 48–75 Hz (V)•sRGB•EasyRead•LowBlue ModeConnectivity•Signal Input: DisplayPort 1.4 x 1, HDMI 1.4 x 1, USB-C x 1 (DP Alt mode, DisplayLink)*•HDCP: HDCP 1.4 (HDMI/DP/USB-C video/ DisplayLink)•HBR3: for USB-C•Signal Output: DisplayPort out*•USB:: Upstream: USB-C 3.2 Gen 1 x 1; Downstream: USB-C x 1 (PD 15 W), USB-A 3.2 x 4 (with 1 fast charge B.C 1.2)•Audio (In/Out): Audio out•DCpowerout:x1(****************,max.90 W)*•RJ45: Ethernet LAN up to 1 G*, Wake on LAN •Sync Input: Separate SyncUSB•USB-C: Reversible plug connector•Super speed: Data and Video transfer•DP: Built-in Display Port Alt mode•Power delivery: USB PD version 3.0•USB-C max. power delivery: Up to 100 W* (5 V/ 3 A; 7 V/3 A; 9 V/3 A; 10 V/3 A; 12 V/3 A; 15 V/ 3 A; 20 V/4.5 A)Convenience•Built-in Speakers: 3 W x 2•Built-in webcam: Pop-up 2.0 megapixel FHD camera with microphone and LED indictor (for Windows 10 Hello)•User convenience: SmartImage, Input, PowerSensor, Menu, Power On/Off•Control software: SmartControl•OSD Languages: Brazil Portuguese, Czech, Dutch, English, Finnish, French, German, Greek, Hungarian, Italian, Japanese, Korean, Polish, Portuguese, Russian, Simplified Chinese, Spanish, Swedish, Traditional Chinese, Turkish, Ukrainian •Other convenience: Kensington lock, VESA mount(100 x 100 mm)•Plug and Play Compatibility: DDC/CI, Mac OS X,sRGB, Windows 10 / 8.1 / 8 / 7Stand•Height adjustment: 150 mm•Pivot: -/+ 90 degree•Swivel:-/+180 degree•Tilt: -5~30 degreePower•Energy Label Class: E•ECO mode: 13.5 W (typ.)•On mode: 14.2 W (typ.) (EnergyStar test method)•Standby mode: 0.5 W (typ.)•Off mode: 0.3 W (typ.)•Power LED indicator: Operation - White, Standbymode - White (flashing)•Power supply: External, 100–240 VAC, 50–60 HzDimensions•Product with stand (max height): 540 x 501 x205 mm•Product without stand (mm): 540 x 323 x 51 mm•Packaging in mm (W x H x D): 730 x 450 x 139 mmWeight•Product with stand (kg): 4.88 kg•Product without stand (kg): 3.27 kg•Product with packaging (kg): 7.56 kgOperating conditions•Temperature range (operation): 0°C to 40 °C•Temperature range (storage): -20°C to 60 °C•Relative humidity: 20%-80 %•Altitude: Operation: +12,000 ft (3658 m), Non-operation: +40,000 ft (12,192 m)•MTBF (demonstrated): 70,000 hrs (excludedbacklight)Sustainability•Environmental and energy: PowerSensor,LightSensor, EnergyStar 8.0, EPEAT*, RoHS, TCOCertified Edge•Recyclable packaging material: 100 %•Post-consumer recycled plastic: 85%•Specific Substances: PVC/BFR free housing,Mercury freeCompliance and standards•Regulatory Approvals: UKRAINIAN, CB, TUV/GS,TUV Ergo, CU-EAC, EAEU RoHS, CE Mark, FCCClass B, ICES-003, TUV Eye Comfort certifiedCabinet•Front bezel: Black•Rear cover: Black•Foot:Black•Finish: TextureWhat's in the box?•Monitor with stand•Cables: HDMI cable, DP cable, USB-C/A Y cable,DC out cable, Power cable•User Documentation*"IPS" word mark / trademark and related patents on technologiesbelong to their respective owners.*The maximum resolution works for either USB-C, DP or HDMIinput.*Response time value equal to SmartResponse*NTSC Area based on CIE 1976*sRGB Area based on CIE1931*DisplayPort out works only under either DP in or USB-C in.*Mac OS does not support DP-Out MST extension function.*USB-C DP Alt mode means USB-C to C cable, USB-C DisplayLinkmeans USB-C to A cable.****************************************************,max 90 W. Only one PC or notebook should be connected to eitherUSB-C or DC out port for power passthrough function)*If your Ethernet connection seems slow, please enter the OSD menuand select USB 3.0 or a higher version that can support the LANspeed up to 1G.*For Video transmission via USB-C, your Notebook/device mustsupport USB-C DP Alt mode*Activities such as screen sharing and online streaming over theInternet can impact your network performance. Your hardware andnetwork bandwidth will determine the overall audio and videoquality.*For USB-C power and charging function, your Notebook/devicemust support USB-C standard Power Delivery specifications. Pleasecheck with your Notebook user manual or manufacturer for moredetails.*USB-C max. power delivery is up to 100 W because of Smart Powerfunction. User can adjust monitor brightness setting to get differentlevels of power delivery. 1st USB-C port can support up to 90 Wmax and 2nd USB-C port can support up to 15 W max. For moreinformation, please refer to user manual.*EPEAT rating is valid only where Philips registers the product. Pleasevisit https:/// for registration status in your country.*The monitor may look different from feature images.。
USB Monitor的高版本太复杂了,都不会用,这里还是使用2.5的老版本.新建session,选择新插入的HID鼠标开始抓包,拔掉鼠标,清空记录,再次插入鼠标,现在就抓到了USB鼠标枚举数据流要看懂这些数据流,需要/deep_pro/blog/item/3f97effa7048f814a9d31115.html /deep_pro/blog/item/0ca086af97ca15f1faed5016.html里给出的14个表要注意的是USB数据包通常是先发LSB,再发MSB,所以低字节在前,高字节在后。
后面的讲解中2个字节长度以上的数据没有转换回高字节在前,低字节在后的顺序,保留了原始状态。
首先是两个PnP事件000026: PnP Event: Query ID (UP), 18.10.2009 09:53:28.9218750 +4.2656250 Hardware IDs: USB\Vid_15ca&Pid_00c3&Rev_0512, USB\Vid_15ca&Pid_00c3000027: PnP Event: Query ID (UP), 18.10.2009 09:53:28.9218750 +0.0 Compatible IDs: USB\Class_03&SubClass_01&Prot_02,USB\Class_03&SubClass_01, USB\Class_03接着主机发出了第一个包000028000028: Get Descriptor Request (DOWN), 18.10.2009 09:53:28.9375000+0.0156250Descriptor Type: DeviceDescriptor Index: 0x0Transfer Buffer Size: 0x12 bytes在这里没有给出主机包里的具体内容,跟Bus Hound是不一样的。
实例讲解USB的枚举(配置)过程启动您的USB Monitor1、运行安装好后的USB Monitor,点击“File”→“New Session”2、在弹出的对话框中点“下一步”3、在“Monitoring Session Type”对话框中选择“USB Monitor”后点下一步4、在“Configurating the USB Monitor”对话框中提示您选择哪一个USB设备需要监视,如果这时您还没有将任何USB设备插入主,将显示如下界面,我们怎么知道应该选择哪一项呢?请看第5步﹍5、将您需要监控的USB设备插入主机USB端口,这时将会在某在项后面多出一些内容,如下图所示,我这里选择“USB Mass Storage”。
小技巧:当我们要监控我们自己开发的设备时,可以先用一个优盘插入其中一个USB端口,在此步中选择我们插入的优盘,在实际监测过程中将我们开发的USB设备插入这个USB插口即可。
6、在“Configure Data Processing”对话框中选择“Request View”并点下一步7、弹出您的优盘,然后在USB Monitor主界面里点“Edit”->“Clear View”,如下图所示8、插入您的优盘,记得一定要插在同一USB插口哟!此时USB Monitor会检测许多的数据流,我们切换到Complete标签,如下图所示:分析USB设备的枚举过程通过以上的操作后,我们现在可以对USB Monitor监测到的数据进行分析了。
1、按“Ctrl + F”,查找第一个“Descriptor Request”,从这里开始是对我们有用的信息。
2、对USB Monitor显示的数据结构进行分析:①序列号,可理解为一个上行或下行数据流标号,无实际意义②命令类型,括号里的“Down”代表输出数据,即主机到设备③命令数据流,出现“Setup Packet”后面,十六进制④对命令数据的简单分析⑤传输类型,括号里的UP代表输入数据,即设备到主机⑥设备返回的数据流,十六进制⑦对命令(请求)数据的详略分析(其中对“Request”的分析应该有BUG,0x6应为Get_Descriptor,而USB Monitor解释为Get_Configuration)以上没有看到对上行数据(设备返回的数据)的分析,我们只要将鼠标停留在设备返回数据流处(上图所示标记⑥),就会弹出对上行数据的分析画面,如下图所示:3、枚举过程分析1)、主机第一次发出请求描述符命令,数据流为:80 06 00 02 00 00 09 00,bRequest的值为0x06,代表Get_Descriptor命令,但为什么描述符呢?wValue的高字节表示了描述符的类型,此处wValue的值为0x0100,所以高字节为0x01,代表设备描述符(见《USB开发基础--USB命令(请求)和USB描述符》中表5);设备返回的数据为:12 01 00 02 00 00 00 40 51 09 0E 16 00 02 01 02 03 01,bLenght的值为0x12,表示此描述符的长度。
USB C Dock - Triple 4K Monitor USB Type-C Docking Station - 100W Power Delivery - DP 1.4 Alt Mode & DSC, 2x DisplayPort 1.4/HDMI 2.0 - 6xUSB (2x 10Gbps), SD - Windows/ChromeProduct ID: DK31C2DHSPDThis USB-C Gen 2 10Gbps docking station turns your USB-C or Thunderbolt 3 Windows laptop or Chromebook into a powerful workstation. A USB 3.2 Gen 2 Type-C dock features everything you need, from triple video outputs up to 4K 60Hz to 10Gbps USB-C & USB-A downstream peripheral ports to 100W Power Delivery.This USB-C Gen 2 docking station with DP 1.4 and HDMI 2.0 HBR3 support, is a perfect choice for dual or triple monitor setup, supporting up to triple 4K 30Hz nearly uncompressed video resolution output , with two DisplayPort and one HDMI outputs. Maximum dual and triple 4K display performance is supported on USB-C 11th GenIntel-based (DP 1.4 HBR3 with DSC support) Windows Thunderbolt 3 or USB-C laptops, but backwards compatibility to older laptop generations and lower resolution monitor requirements.Power and charge USB-C/Thunderbolt 3 workstation laptops & ultrabooks with 100 watt power delivery, to keep high performance laptops sufficiently charged during heavy productivity usage.Charge smartphones and other devices with USB-C downstream charging ports featuring BC 1.2 charging specification. Fast-charge ports support always-on charging so devices will charge whether or not a host laptop is connected.This USB-C Gen 2 docking station features 6 downstream USB ports in total to connect USB peripherals and an SD (4.0) card reader for media storage.• 2x USB-C 3.2 Gen 2 - 10 Gbps (BC 1.2 Fast-Charge + Aways-On)• 2x USB-A 3.2 Gen 1 - 5 Gbps• 2x USB-A 2.0 - 480 Mbps• SD 4.0 Card ReaderAlso included, is a gigabit Ethernet port with PXE Boot, as well as 4-position TRRS stereo audio for a headset and mic.This USB-C docking station comes with plenty of security features two K-slots for a Kensington style laptop lock.The DK31C2DHSPD includes a free Windows application that enables you to better manage your enterprise network security. When you connect to your network through the ethernet port of the dock, the computer's MAC address is typically not broadcast to the network, as your network only sees the MAC address of the docking station. However, the MAC Address Changer or Cloning software enables the USB-C dock to use MAC address spoofing of the connected Windows laptop rather than the MAC address of the dock itself. This ensures your network administrators have full visibility of each device on the network and can monitor and limit activity accordingly. To request access to our MAC Address Changer utility, please contact our Technical Support Department by phone, live chat, or e-mail.Certifications, Reports and CompatibilityApplicationsFeatures• HIGH PERFORMANCE USB-C DOCK: USB-C docking station for Windows/Chrome OS, featuring up to three 4K video outputs (2x DisplayPort 1.4 & 1x HDMI 2.0), 100W PD, 6 port USB Hub (10Gbps), SD 4.0 Card Reader, Gigabit Ethernet, and headset port• DISPLAYPORT 1.4 WITH DSC: Triple monitor USB-C docking station (MST) supports dual 4K 60Hz or triple 4K30Hz on DP 1.4 Alt-Mode HBR3 w/ DSC enabled laptop (min. Intel 11th Gen); works with DP 1.2 supporting dual monitor 1080p @ 60Hz (see image gallery)• 100W POWER DELIVERY CHARGING: Power & charge Windows-based USB-C/Thunderbolt 3 workstation laptops, Chromebooks, ultrabooks including Lenovo X1 Carbon, ThinkPad P Series, Dell Latitudes, Precision, XPS 15, HP Spectre, and ZBook• 6-PORT USB HUB: 2x 10Gbps USB-C (USB 3.2/3.1 Gen 2), both BC 1.2 fast charge always-on ports), 2x USB 3.0 5Gbps, and 2x USB 2.0; a variety of USB ports to connect many peripherals incl. two 10Gbps high speed USB-C ports for external drives• DEPLOYMENT READY: Universal multi monitor USB Type-C docking station with no driver setup, features 2x security lock k-slots, On/Off button & MAC address changer for IT management, 3.3ft (1m) USB-C host cable; Windows/Chrome OS supportHardwareWarranty 3 Years4K Support YesFast-Charge Port(s)YesDisplays Supported3Audio YesInterface USB 3.2 Gen 2 - 10 Gbit/sBus Type USB 3.2 Gen 2 10GbpsIndustry Standards 1 Gigabit connectivity to any 1000Base-T device (IEEE802.3abcompliant), 100 Megabit connectivity to any 100Base-TX device(IEEE802.3u compliant), 10 Megabit connectivity to any 10Base-Tdevice (IEEE802.3i compliant)Chipset ID Cypress - CYPD3125Cypress - CYPD4236Synaptics - VMM5320BJG-RGenesys - GL850Genesys - GL3523Genesys - GL3590Genesys - GL3227TI - TUSB1064RNQRRealtek - RTL8153BRealtek - ALC4042PerformanceAudio Specifications Analog Stereo - 2 Channel AudioMemory Media Type SD/MMC (Secure Digital/Multimedia Card)PXE YesMTBF215,990 hoursConnector(s)External Ports USB Type-C (Fast-Charge, 24 pin) USB 3.0USB 3.1 USB Type-A (9 pin, Gen 1, 5 Gbps)USB Type-A (4 pin) USB 2.0DisplayPortHDMISD / MMC SlotRJ-453.5 mm Stereo AudioSecurity Lock SlotHost Connectors USB 3.1 USB Type C (10 pin, Gen 2, 10 Gbps)SoftwareOS Compatibility Windows 10, Windows 8.1, Chrome OS 78.xIndicatorsLED Indicators White On: PowerYellow On: Link DetectedYellow Flashing: ActivityGreen On: 1GbpsYellow On: 100MbpsPowerPower Source AC Adapter IncludedPower Delivery100WInput Voltage100 - 240 ACPlug Type MEnvironmentalOperating Temperature0C to 50CStorage Temperature-20C to 70CHumidity0% to 95% (non-condensing) at 25 degrees PhysicalCharacteristicsColor Black & Space GrayCable Length39.4 in [100 cm]Product Length8.3 in [21.0 cm]Product Width 3.5 in [90.0 mm]Product Height 1.2 in [30.0 mm]Weight of Product10.6 oz [300.0 g]PackagingInformationPackage Length10.6 in [27.0 cm]Package Width 5.9 in [15.0 cm]Package Height 3.7 in [94.0 mm]3.0 lb [1.4 kg]Shipping (Package)WeightWhat's in theBoxIncluded in Package USB-C DockPower Cable NA/JP & ANZUSB-C Cable (1 m)Quick-Start Guide*Product appearance and specifications are subject to change without notice.。