LabelShop手册_2.1
- 格式:doc
- 大小:652.00 KB
- 文档页数:98
DYMO A DDRESS L ABELSP RINT M ANUALVersion: 2.0Website:www.aquivemedia.n/shop/Support:**************T ABLE OF CONTENTSDYMO Address Labels Print Manual (1)1. Magento Installation (2)1.1. Backup your data (2)1.2. Download and extract fles (3)1.3. Upload fles (3)1.4. Activating the module (4)1.5. Logout and login again (4)2. DYMO drivers/software installation (4)2.1. Installing DYMO software (4)3. Confguration (5)3.1. General label settings (5)3.2. Sender label settings (6)4. Printing labels (6)4.1. Printing multiple labels (7)4.2. Printing a single label (7)5. Troubleshooting (8)5.1. Issue: Extension not visible (8)5.2. Issue: Access denied error (8)5.3. Issue: The Print button says no printer (9)5.4. Issue: The Dymo printer doesn’t print (9)5.5. Issue: The printed labels are malformed (10)6. Additional Support (10)6.1. Bugs (10)6.2. Extension clashes (10)1.M AGENTO I NSTALLATIONThis chapter explains how to install the DYMO Directprint Magentoextension1.1.B ACKUP YOUR DATAFirst backup all your Magento data. You can backup your databasethrough the Magento admin under the System > Tools > Backups menuoption. Or you can use your prefered database management tool such as phpmyadmin. Backing up your fles can be done using FTP or the confguration panel of your hosting provider.1.2.Always make backups before installing the extension.Please do not skip this step as it is crucial. Installation couldpossibly cause problems. We do not take anyresponsibilities regarding problems during installation.Restoring backups is the only safe way to roll back a failed D OWNLOAD AND EXTRACT FILESDownload the extension from our website. You can login to your account to see purchased extensions. Extract the archive to a location on your hard drive.1.3.U PLOAD FILESUsing a FTP client upload all folder and fles from the root of the extension folder from your hard drive to the root of your Magento store. Make sure you preserve the folder structure. Your Magento root already contains these folders. When asked choose to overwrite/append existing folders. There will be no fles overwritten.1.4.A CTIVATING THE MODULEbin folder.This should result in a list of enabled and disabled modules for your Magento 2 installation, here you have to copy the name of the disabled module in this case AquiveMedia_DymoOrder.if the module does not show up in the list of enabled and disabledmodules you most likely don’t have the appropriate permissions toread/write to the module’s folder.Before we can continue you have to make sure the plugin shows up in the list of enabled and disabled modules.Once it shows up we can run the following command from the bin folder magento module:enable AquiveMedia_DymoOrder after that we have to runmagento setup:static-content:deploy the plugin should now be enabled.1.5.L OGOUT AND LOGIN AGAINLogout from the backend and relogin to reset the permissions needed to access the new menus of the installed extension. If you skip this step you could see a permission denied error when accession certain pages.2.DYMO DRIVERS/SOFTWARE INSTALLATIONThis chapter explains how to make sure the DYMO printer and ourextension can connect to each other.2.1.I NSTALLING DYMO SOFTWAREIf you haven’t installed the DYMO Printer label software yet, this is the time to do it. The software is packaged with you printer on a CD-ROM.But it is recommended to download the newest software from the Dymo website. You can visited the website by clicking on the following . The software should be at least version 8.3.1 (released August 24, 2011).The direct download link to the software is available on the DYMODirectprint product page of our extension store.3.C ONFIGURATIONThe extension has some built-in confguration options. Those options can be accessed through the Magento admin panel. Go to Stores > Settings > Confguration > Aquive Media.3.1.G ENERAL LABEL SETTINGSIn this section we explain the general settings that can be used.Label Layout: you can choose on which DYMO label to print, thefollowing labels are supported:1135211354113551135699010/9901199012/990139901299014Costumer address label template: this is where you defne what the label should look like, and which information is printed on the label.Print sender label: this part of the confguration defnes if an extra label will be printed for the sender, only if this is activated you will see what is defned in .3.2.S ENDER LABEL SETTINGSIn this section all options for the optional sender labels can be customized, you will only see this option if the Print sender label option is activated.Sender Label Template: this defnes which information will be printed on the extra label that will be printed.4.P RINTING LABELSPrinting one or more labels is very easy and straightforward. This section describes how to print just one label from the order detail page or print one or more labels from the sales grid.4.1.P RINTING MULTIPLE LABELSMultiple labels can be printed as follows. Go to Sales > Orders and tick the checkbox on the orders you wish to print a label for. From the actions dropdown menu select Print Labels and click on submit.You will be taken to a label preview page where you can preview the labels which will be printed. If everything looks ok, you can click on print. All order labels will now be printed. If enabled in the settings, per label a sender label will be printed. It is possible to print another batch when needed by clicking print again you can click back to return to the sales grid.4.2.P RINTING A SINGLE LABELSometimes it’s necessary to just print a single label for an order. You can do this from the grid by just checking one order. But there is also a convenient function on the order detail page. Depending on thesettings this print button on the order detail page will be placed above or just beneath the grid.5.T ROUBLESHOOTINGMost common problems which occur while installing and using this extension are listed in this chapter. Pay close attention when trying to troubleshoot problems. If your problem is not listed here or the problem cannot be solved using the solutions provided here you can contact us by e-mail or by phone.5.1.I SSUE: E XTENSION NOT VISIBLEIf the extension is not visible in your Magento shop, there might be twocommon problems.The installation might not have been done properly. Recheck if all fles are in the right place on the server.The Magento Cache is not fushed yet. To do so go to System > Cache Management in the backend of your store and click on Flush MagentoCache.5.2.I SSUE: A CCESS DENIED ERRORIf you cannot access some or all pages of this extension there might be a problem with permissions. Always logout en try to login again to make sure this problem disappears.5.3.I SSUE: T HE P RINT BUTTON SAYS NO PRINTERInstall the drivers as described in Section 2.1of this manual.5.4.I SSUE: T HE D YMO PRINTER DOESN’T PRINTMake sure the DYMO printer is connected properly to your computer with its USB cable. Check both ends of this cable. Also check if the printer is connected to a power source. Try to disconnect the printer both from your computer and power source and reconnect it again. This should make sure your computer recognizes the printer is connected.5.5.I SSUE: T HE PRINTED LABELS ARE MALFORMEDMake sure you are using proper labels for your printer. Also make sure the correct label type you are using is selected in the settings of the extension. See Section 3.1for more information.6.A DDITIONAL S UPPORTIf you need help installing this extension you should purchase ourinstallation service for extensions. This can be found in our Magento Extension Store.6.1.B UGSOur software is tested on many diferent versions of Magento and is bug free as far as we have tested. Unfortunately we couldn’t test the extension in every diferent scenarios, which in fact would beimpossible. When you come across any bugs while using the extension we will guarantee that we fx the bug at no charge if we can. Please contact us by e-mail.6.2.E XTENSION CLASHESAs far as we know there are no clashes with other popular extensions. If we come across any clashes we will report a fx for it. Extension clashes are not considered bugs. So beware of this distinction. We can try to fx this at no charge but it depends on how much time it will cost. Please feel free to contact us.。

ARP.Shop后台管理系统使用说明书目录ARP.Shop后台管理系统 (1)1. 系统介绍 (5)2. 运行环境搭建 (5)3. 数据安装 (5)4. 基本功能 (5)4.1 运行与登陆 (6)4.2 系统设置 (7)4.2.1 系统用户角色管理 (7)4.2.1.1 新增系统用户角色 (7)4.2.1.2 编辑系统用户角色 (8)4.2.1.3 删除系统用户角色 (9)4.2.2 系统用户管理 (9)4.2.2.1 添加系统用户 (10)4.2.2.2 编辑系统用户 (11)4.2.2.3 删除系统用户 (12)4.2.3 系统用户权限管理 (13)4.2.4 系统配置 (14)4.2.4.1 APP LOGO 配置 (15)4.2.4.2 APP 缓存更新 (15)4.3 会员管理 (15)4.3.1 会员信息管理 (15)4.3.1.1 查询会员列表 (16)4.3.1.2 添加会员信息 (17)4.3.1.3 编辑会员信息 (18)4.3.1.4 删除会员信息 (18)4.4 商品管理 (19)4.4.1 商品类型管理 (19)4.4.1.1 添加商品一级分类 (20)4.4.1.2 添加商品子分类 (21)4.4.1.3编辑商品分类信息 (22)4.4.1.4 删除商品分类 (23)4.4.2 品牌库管理 (24)4.4.2.1 查询商品品牌 (25)4.4.2.2 添加商品品牌 (25)4.4.2.3 编辑商品品牌 (26)4.4.2.4 删除商品品牌 (27)4.4.3 商品管理 (27)4.4.3.1 查询商品列表 (28)4.4.3.2 添加商品信息 (29)4.4.3.3 编辑商品信息 (29)4.4.3.4 商品规格管理 (30)4.4.3.5 商品相册管理 (31)4.4.3.6 商品发布 (31)4.4.3.7 商品下架 (32)4.4.3.8 商品推送首页模块 (33)4.4.3.9 商品推送首页轮番模块 (33)4.4.3.10 商品推送至主题馆 (34)4.4.3.11 商品删除 (35)4.5 APP前端管理 (35)4.5.1 公告信息管理 (35)4.5.1.1 查询公告列表信息 (36)4.5.1.2 添加公告信息 (37)4.5.1.3 编辑公告信息 (37)4.5.1.4 删除公告信息 (38)4.5.2 商城首页模块管理 (39)4.5.2.1 商城首页模块搜索 (39)4.5.2.2 商城首页模块添加 (40)4.5.2.3 商城首页模块编辑 (41)4.5.2.4 商城首页模块删除 (41)4.5.3 商城首页模块数据管理 (42)4.5.3.1 查询模块数据 (43)4.5.3.2 修改模块数据 (43)4.5.4 主题馆管理 (45)4.5.4.1 查询主题馆列表 (45)4.5.4.2 添加主题馆信息 (46)4.5.4.3 编辑主题馆信息 (47)4.5.4.4 删除主题馆 (47)4.5.5 主题馆数据管理 (48)4.5.5.1 查询主题馆数据列表 (49)4.5.5.2 编辑主题馆数据信息 (49)4.5.5.3 删除主题馆数据 (50)4.5.6 意见反馈 (51)4.5.6.1 查询意见反馈列表 (51)4.5.6.2 查看意见并标记已读 (52)4.5.6.3 删除意见 (53)4.6 订单管理 (54)4.6.1 商品订单管理 (54)4.6.1.1 查询订单及统计 (54)4.6.1.2 查询订单详情 (55)4.6.1.3 取消订单 (56)4.6.1.4 查询收货地址信息 (56)4.6.1.5 标记发货 (57)4.6.1.6 查询配货信息 (58)系统使用基本步骤1.运行环境搭建2.数据库安装3.运行系统4.登陆系统1. 系统介绍ARP.Shop是由伊犁艾瑞普软件开发有限公司自主研发的B2C移动电子商城,直接面向移动终端消费者销售商品和服务,为消费者提供一个新型的购物环境—移动商城,消费者可以随时随地通过网络进行购物、在线消费。

Thermo King Map Editor BenutzerhandbuchTK 61076-8-OP63InhaltsverzeichnisEinleitung (65)Nur zur Erinnerung: PIEK-Protokollregeln (66)Anwendungsbereich (66)Hauptregeln (67)Menüs (68)Anwendungsmenü (68)Bereichsabschnitt (70)Kartenabschnitt (72)Bereich bearbeiten (75)Erstellen einer Karte (78)Hochladen der Karte auf das HSLO-Modul (83)Herunterladen von Ihrem HSLO-Gerät (88)Analyse des HSLO-Downloads (89)64EinleitungWillkommen zum Benutzerhandbuch von Thermo King Map Editor. Dieses Handbuch enthält hauptsächlich Informationen zu den folgenden Themen:1.So erstellen Sie eine Karte – hier erfahren Sie, wie Sie für Ihre eigenen Routen Zonendefinieren, in denen Ihr Whisper Pro-Gerät in den geräuscharmen Betriebwechselt (auch PIEK-Zonen genannt).2.Hochladen dieser Karten auf Ihr HSLO-Gerät (Schnelllaufsperre).3.Herunterladen von Ereignisprotokollen und Analysen.65Nur zur Erinnerung: PIEK-ProtokollregelnAnwendungsbereichDas PIEK-Protokoll ist ein normatives Rahmenwerk, das die Anforderungen an dieGeräuschentwicklung während nächtlicher Auslieferungen in Wohngebieten definiert. Eine Compliance mit diesem Protokoll, das ursprünglich von örtlichen Behörden in den Niederlanden entwickelt wurde, kann auch von Outsourcern in anderen Ländern und/oder Städten in Europa verlangt werden (z. B. CERTIBRUIT-Konvention Paris/Frankreich intramural). Es liegt in der Verantwortlichkeit des Transportunternehmens, die Anforderungen des Endkunden hinsichtlichder Geräuschentwicklung bei Auslieferungen zu prüfen (Compliance mit PIEK-Protokoll erforderlich, ja oder nein).Der Thermo King Map Editor ist ein benutzerfreundliches Werkzeug, das Ihnen die Einhaltung der nachfolgend aufgeführten Regeln ermöglicht.66Hauptregeln-Die Geräuschentwicklung während nächtlicher Auslieferungen darf in einer Entfernung von 7,5 m 60 dBA nicht überschreiten (dies wird durch eine Sperre desHochgeschwindigkeitsmodus des Thermo King Kühlgeräts, Version Whisper Pro mit PIEK-Zertifizierung, erreicht).-Zeitraum des Tages, in dem diese Regel einzuhalten ist = 23:00 Uhr bis 7:00 Uhr am nächsten Morgen (ein nicht gesperrter Betrieb in niedriger oder hoher Geschwindigkeit, je nachAnforderung der Anwendung, ist von 7:00 Uhr bis 23:00 Uhr erlaubt)-Geografischer Bereich, in dem diese Regel einzuhalten ist: der Auslieferungsort selbst + Umgebung innerhalb von mindestens 300 Metern um den Auslieferungsort -Der Umschaltvorgang von einem Betriebsmodus in den anderen (niedrige Geschwindigkeit hohe Geschwindigkeit) muss während des entsprechenden Zeitraums und innerhalb desAnwendungsbereichs des Protokolls (PIEK-Protokoll, Version 2015) ohne manuelle Eingriffe ablaufen6768 MenüsAnwendungsmenüAnwender können über das Hauptanwendungsmenü Daten- undProtokolldateien verwalten. Daten- und Protokolldateien lassen sich hieröffnen, speichern und schließen.Create new data file (Neue Datendatei erstellen)Erstellt eine leere Datendatei und öffnet sie.Open data file (Datendatei öffnen)Öffnet die Datendatei vom Laufwerk und lädt alle in derDatendatei enthaltenen Bereiche.Open log file (Protokolldatei öffnen)Öffnet die vom HSLO-Modul heruntergeladene Protokolldatei.69Save data file (Datendatei speichern)Speichert die verwalteten Lärmschutzbereiche in die geöffnete Datendatei.Close data file (Datendatei schließen)Schließt die geöffnete Datendatei mit den Gebieten.Close log file (Protokolldatei schließen)Schließt die verwaltete Protokolldatei.Close application (Anwendung schließen)Schließt die gesamte Anwendung.BereichsabschnittDer Bereichsabschnitt enthält detaillierte Informationen über die verwalteten Lärmschutzbereiche. Der Hauptteil des Abschnitts besteht aus einer Tabelle mit den aufgeführten Bereichen – der jeweiligen ID, der Kategorie und den detaillierten Zeit- und Positionsangaben. Über der Tabelle finden Sie zudem Informationen zu der verwalteten Datenversion.7071 Add circle area (Kreisbereich hinzufügen)Erstellt einen neuen Lärmschutz-Kreisbereich(Mittelpunktskoordinaten und Radius).Add square area (Rechteckbereich hinzufügen)Erstellt einen neuen Lärmschutz-Rechteckbereich (Koordinaten zweier Eckpunkte).Edit area (Bereich bearbeiten)Ermöglicht Änderungen des ausgewählten Bereichs, der Bereichstyp wird automatisch erkannt.Delete area (Bereich löschen)Entfernt den ausgewählten Bereich nach einer Bestätigungsnachricht.72KartenabschnittDer Kartenabschnitt zeigt die verwalteten Lärmschutzbereiche und zudem die abgerufenen Protokolleinträge in einer Karte an. In der Karte lassen sich Einträge auswählen.73Focus all areas (Alle Bereiche anzeigen)Zeigt alle verwalteten Lärmschutzbereiche an.Focus selected areas (Ausgewählte Bereiche anzeigen)Zeigt alle ausgewählten Bereiche an.Add new circle area (Neuen Kreisbereich hinzufügen) (Kartenmodus)Erstellt einen neuen Kreisbereich in der Karte.Add new square area (Neuen Rechteckbereich hinzufügen) (Kartenmodus)Erstellt einen neuen Rechteckbereich in der Karte.Handtool (Handwerkzeug) (Kartenmodus)Ermöglicht ein Verschieben der Karte mithilfe der Maus.Move Area (Bereich bewegen)Bewegt alle ausgewählten Bereiche in der Karte nach oben/unten, links oder rechts (nachNorden, Süden, Osten oder Westen).Extend/Reduce Area (Bereich vergrößern/verkleinern)Erhöht/verringert die Größe aller ausgewählten Bereiche.MultiplikatorJeder Klick auf die vorherigen Schaltflächen bewirkt eine Bewegung um diese Entfernung. Daskönnen 50, 100 oder 150 m sein – je nachdem, welcher Wert im Dropdown-Menü ausgewählt wurde.Zoom-in/ Zoom-out (Vergrößern/verkleinern)Vergrößert/verkleinert die angezeigte Karte.7475Bereich bearbeitenDie Bereichseigenschaften lassen sich im Bereichsabschnitt bearbeiten. Die Eigenschaften lassen sich je nach Bereichstyp im Dialog ändern/bearbeiten.KreisbereicheID – erzeugte ID des Bereichs (nur lesen),Category (Kategorie) – Kategorie des Bereichs,Time from (Zeit ab) – Startzeit der Bereichsgültigkeit (Stunde),Time to (Zeit bis) – Endzeit der Bereichsgültigkeit (Stunde),Center X (Mittelpunkt X) –geografische Breite des Mittelpunkts des Kreisbereichs (in Grad),76Center Y (Mittelpunkt Y) – geografische Länge des Mittelpunkts des Kreisbereichs (in Grad), Radius (Radius) – Radius des Kreisbereichs (in Meter).RechteckbereicheID – erzeugte ID des Bereichs (nur lesen),Category (Kategorie) – Kategorie des Bereichs,Time from (Zeit ab) – Startzeit der Bereichsgültigkeit (Stunde),Time to (Zeit bis) – Endzeit der Bereichsgültigkeit (Stunde),Left top (Links oben) X – geografische Breite der linken oberen Ecke des Rechteckbereichs (in Grad), Left top (Links oben) Y –geografische Länge der linken oberen Ecke des Rechteckbereichs (in Grad),Right bottom (Rechts unten) X – geografische Breite der rechten unteren Ecke des Rechteckbereichs (in Grad),Right bottom (Rechts unten) Y – geografische Länge der rechten unteren Ecke des Rechteckbereichs (in Grad).77Erstellen einer Karte1.Entnehmen Sie die Map Editor Software-CD aus der Dokumententasche Ihres Geräts.2.Öf fnen Sie die Datei …start_mapeditor.bat“ auf dieser CD783.Ihr TK Map Editor öffnet sich wie unten gezeigt4.Vergrößern Sie mithilfe des Mausrads Ihren gewünschten Standort (alternativ stehenZoom-Schaltflächen im Karteneditor selbst zur Verfügung).5.Klicken Sie auf die Schaltfläche …Neue Datendatei erstellen“ oben links auf Ihrem Bildschirm.. Dies aktiviert die Schaltflächen …Neuen Kreisbereich erstellen“ und …Neuen Rechteckbereich erstellen“ in der Taskleiste.Über diese Schaltflächen lassen sich Ihre HSLO-Zonen für die Schnelllaufsperre erstellen796.Zonen erstellen:d.Zum Erstellen einer Kreiszone wählen Sie den Mittelpunkt der Zone, die Sieerstellen möchten, in der Karte aus und drücken die linke Maustaste. Halten Siedie Maustaste gedrückt und vergrößern Sie die Zone auf den gewünschtenRadius.e.Zum Erstellen einer Rechteckzone wählen Sie den ersten Eckpunkt der Zone, dieSie erstellen möchten, aus und drücken die linke Maustaste. Halten Sie dieMaustaste gedrückt und vergrößern Sie die Zone auf die gewünschte Größe.Hinweis: Wenn Sie sich unsicher sind, wo Sie den Bereich finden, in dem Sie eine Zoneerstellen möchten, können Sie auch Koordinaten mit geografischer Länge und Breiteeingeben. Anstelle der Schaltflächen zur Zonenerstellung in der Taskleiste nutzen Sie dazu die Felder auf der linken Seitenleiste. Dort können Sie Koordinaten, Radius usw. eintragen.807.Bearbeiten von Zonen: Für jede erstellte Zone wird ein Datensatz auf der linken Seitedes Bildschirms angezeigtUm eine Zone zu bearbeiten, wählen Sie den entsprechenden Eintrag aus. (Wie Sie sehen, ist die Schaltfläche …Edit (Bearbeiten)“ oberhalb der Datensatzliste jetzt81aktiviert). Klicken Sie auf die Schaltfläche …Edit (Bearbeiten)“. Es wird eine Tabelle angezeigt, in der Sie Koordinaten, Radius usw. bearbeiten können.Hinweis: Wenn Sie die Zonen nur leicht verschieben oder vergrößern möchten, ist dies auch über die Schaltflächen auf der Taskleiste möglich. Siehe …Kartenabschnitt“, Seite 6.8.Vergewissern Sie sich, dass Sie Ihre Datei gespeichert und mit einem geeigneten Namenversehen haben – Sie können z. B. eine Datei für jede Route erstellen, die zudem dieSeriennummer des Geräts enthält.82Hochladen der Karte auf das HSLO-Modul1.Schließen Sie Ihren Thermo King Map Editor2.Öffnen Sie auf Ihrer Software-CD jetzt die Datei …start_upload.bat“3.Verbinden Sie Ihren Computer mit dem programmierten WiFi-Zugangspunkt des HSLO-Geräts.Hinweis: Wenden Sie sich an Ihren Händler, wenn Sie diesen Zugangspunkt nicht kennen oder einen neuen einrichten möchten.Wählen Sie im Dropdown-Menü der Upload/Download-Anwendung …GPS-Gerät“, um das(HSLO)-Gerät auszuwählen83Hinweis: Sollte im Dropdown-Menü kein Gerät angezeigt werden, müssen Sie das HSLO-Gerät zurücksetzen. Schalten Sie dazu Ihren SR-3-Controller aus und wieder ein. Gehen Sie anschließend an Ihren Computer zurück und klicken Sie auf die Schaltfläche …Locate (Lokalisieren)“ im Pop-up-Fenster neben dem Dropdown-Pfeil. Die Software zeigt das HSLO-Gerät nach etwa 30 Sekunden Suche an. Sie können das Gerät jetzt im Dropdown-Menü auswählen.844.Wählen Sie jetzt Ihre entsprechende Kartendatei aus und klicken Sie anschließend auf …Open(Öffnen)“.855.Wählen Sie …Upload (Hochladen)“6.Nachdem die Datei erfolgreich hochgela den wurde, wird das Dialogfenster …File wassuccessfully uploaded (Datei wurde erfolgreich hochgeladen)“ angezeigt867.Ihr Gerät wird jetzt die Schnelllaufsperre aktivieren, sobald es in eine der vordefiniertenZonen kommt.87Herunterladen von Ihrem HSLO-Gerät1.Befolgen Sie die oben angegebenen Anweisungen bis zu Punkt 4.2.Wählen Sie …Download (Herunterladen)“. Dies öffnet einen Browser, in dem Sie einen Ortzum Herunterladen auswählen können.3.Geben Sie den Dateinamen ein und wählen Sie …Open (Öffnen)“4.Es wi rd das folgende Dialogfenster angezeigt: …Successfully downloaded logs: (Protokolleerfolgreich heruntergeladen:) ##5.Wählen Sie OK88Analyse des HSLO-Downloads1.Um die heruntergeladenen Daten anzuzeigen, öffnen Sie auf der Software-CD dasProgramm …start_mapeditor.bat“Hinweis: NB – schließen Sie alle vorherigen Protokolldateien, bevor Sie eine neueProtokolldatei öffnen.2.Klicken Sie auf die Schaltfläche …Logs (Protokolle)“ , suchen Sie Ihre Download-Dateiund wählen Sie …Open (Öffnen)“3.Die Protokolldatei wird jetzt im Karteneditor geöffnet. Auf der linken Seite werden alleProtokolle der Orte angezeigt, an denen das Gerät eine Zone betreten oder verlassen hat894.Sie können …Focus all areas (Alle Bereiche anzeigen)“ wählen, um alle Ereignisse imKartenbereich anzuzeigen.c.Beim Eintritt in eine Zone wird ein grüner Punkt angezeigtd.Beim Verlassen einer Zone wird ein blauer Punkt angezeigt905.Um eine detailliertere Analyse zu erhalten, wählen Sie einen Protokolleintrag auf derlinken Seite und anschließend wiederum …Focus all areas (Alle Bereiche anzeigen)“ aus.Der eingekreiste Punkt ist das ausgewählte Ereignis. Array6.Um diese Protokolldatei mit der ursprünglich hochgeladenen Karte zu vergleichen,können Sie jetzt die entsprechende Karteneditor-Datei (Upload-Datei) öffnen (stellen Sie sicher, dass die entsprechende Protokolldatei GEÖFFNET bleibt). Die Ereignisse undZonen werden jetzt auf einer Karte und die grünen und blauen Punkte an den Rändernder Zonen angezeigt. Auf diese Weise können Sie erkennen, dass das Gerätordnungsgemäß funktioniert.Hinweis: Sollten Sie Fragen zum Betrieb des Geräts haben, wenden Sie sich bitte an Ihrenautorisierten Thermo King-Händler.9192 TK 61076-8-OP Rev.1。
Package‘KoboconnectR’October19,2022Type PackageTitle Download Data from Kobotoolbox to RURL https:///asitav-sen/KoboconnectRBugReports https:///asitav-sen/koboconnectR/issuesVersion1.2.1Description Wrapper for'Kobotoolbox'APIs ver2men-tioned at<https:///api.html>,to down-load data from'Kobotoolbox'to R.Small and simple package that adds immense conve-nience for the data professionals using'Kobotoolbox'.License GPL(>=3)Encoding UTF-8RoxygenNote7.2.1Imports httr,curl,jsonlite,mime,openssl,R6,methods,dplyr,readxl,rlang,purrrSuggests knitr,rmarkdown,spelling,testthat(>=3.0.0)Config/testthat/edition3Language en-USVignetteBuilder knitrNeedsCompilation noAuthor Asitav Sen[aut,cre,cph]Maintainer Asitav Sen<*******************>Repository CRANDate/Publication2022-10-1823:08:08UTCR topics documented:get_kobo_token (2)kobotools_api (3)kobotools_kpi_data (4)12get_kobo_tokenkobo_df_download (4)kobo_exports (6)kobo_export_create (7)kobo_media_downloader (9)kobo_xls_dl (10)Index12 get_kobo_token Know your API token or checkDescription‘get_kobo_token‘is a wrapper for kobotoolbox API‘https://"[url]"/token/?format=json‘Usageget_kobo_token(url="",uname="",pwd="",encoding="UTF-8")Argumentsurl The‘[url]‘of kobotoolbox.Default is"".uname is username of your kobotoolbox accountpwd is the password of the accountencoding is the encoding to be used.Default is"UTF-8".DetailsThe function returns the API token.ValueThe function returns the token associated with your id and password in the given url.kobotools_api3 kobotools_api Check kobotoolbox API and retrieve overall info about theprojects/assetsDescription‘kobotools_api‘is a wrapper for kobotoolbox API‘https://[kpi-url]/api/v2/assets.json‘Usagekobotools_api(url="",simplified=TRUE,uname="",pwd="",encoding="UTF-8")Argumentsurl The‘[kpi-url]‘of kobotoolbox.Default is""simplified A logical value,default is trueuname takes the usernamepwd takes the passwordencoding is the encoding to be used.Default is"UTF-8".DetailsThe function takes two variables.First one is‘url‘which is the‘[kpi-url]‘.For most users it will be""or"".Former is the default.The second parameter is‘simplified‘which takes a logical value.If set to true,the function will return selected values from the parsed data and return a data frame.When set to false,a json will be returned with all the details.ValueThe function returns the asset details from the API,inform of a data frame or json.kobotools_kpi_data Extract data from kobotoolboxDescription‘kobotools_kpi_data‘is a wrapper for kobotoolbox API‘https://[URL]/api/v2/assets/assetid/data/‘Usagekobotools_kpi_data(assetid,url="",uname="",pwd="",encoding="UTF-8")Argumentsassetid is the asset id of the asset for which the data is to be downloaded.The id can be found by running[kobotools_data_list_kc()]url The‘[kpi-url]‘of kobotoolbox.Default is""uname is username of your kobotoolbox accountpwd is the password of the accountencoding is the encoding to be used.Default is"UTF-8".DetailsThe function takes the url as one of the inputs.And asset id as another.Both are strings.The asset id is found by running the[kobotools_api()]function.Other parameters are username and password. ValueThe function returns the data in json formatkobo_df_download Creates a data frame after creating a’csv’export and downloading itDescription‘kobo_df_download‘is a wrapper for kobotoolbox API‘https://[url]/exports/..‘Usagekobo_df_download(url="",uname="",pwd="",assetid="",all="false",lang="_default",hierarchy="false",include_grp="true",grp_sep="/",fsep=";",multi_sel="both",media_url="true",fields=NULL,sub_ids=NULL,sleep=2)Argumentsurl The‘[url]‘of kobotoolbox Default is"".uname is username of your kobotoolbox accountpwd is the password of the accountassetid is the id of the asset for which the export is to be createdall takes logical value in string ed to specify whetherfields from all formversions will be included in the export.Acceptable values are"true"or"false".Default value is"false".lang takes the language.For e.g."English(en)".For"XML Values as headers",use’_xml’.hierarchy takes logical value in string ed to specify whether the group hierarchywill be displayed in labels.Acceptable values are"true"or"false".Default valueis"false".include_grp defines whether or not to include groups.Default value is"true".grp_sep is the group separator.Default value is"/".fsep is the separator of the downloaded csvfile.In most of the cases,it is";",whichis the default.However,if you notice that the separator is the downloaded datais","or something else,you can change it.multi_sel is used to specify the display of multiple_select-type responses.Valid inputsinclude"both","summary"or"details".Default is"both".media_url This will include an additional column for media-type questions("question_name_URL") with the URL link to the hostedfile.Valid inputs are"true"or"false".Defaultvalue is true.6kobo_exports fields is an array of column names to be included in the export(including their group hierarchy).Valid inputs include:An array containing any string value thatmatches the XML column name,An empty array which will result in all columnsbeing included,If"fields"is not included in the"export_settings",all columnswill be included in the exportsub_ids is an array of submission ids that willfilter exported submissions to only the specified array of ids.Valid inputs include an array containing integer values oran empty array.sleep is the sleep time between API actions.For example,it takes time to download an export.But R does not wait for the download tofinish before going to next step.Hence the need to provide a break between consecutive API actions.Defaultvalue is2(seconds).DetailsThe function creates an export of survey data in’csv’.If successful,it attempts to download the data and and return a data frame.ValueThe function returns a data frame of data downloaded from’Kobotoolbox’.kobo_exports See list of exports createdDescription‘kobo_exports‘is a wrapper for kobotoolbox API‘https://[url]/exports/‘Usagekobo_exports(url="",uname="",pwd="",encoding="UTF-8")Argumentsurl The‘[url]‘of kobotoolbox.Default is"".uname is username of your kobotoolbox accountpwd is the password of the accountencoding is the encoding to be used.Default is"UTF-8".DetailsThe function returns the export views.ValueThe function returns a list of exports available for the account id and password entered.kobo_export_create Create an exportDescription‘kobo_export_create‘is a wrapper for kobotoolbox API‘https://[url]/exports/..‘Usagekobo_export_create(url="",uname="",pwd="",assetid="",type="csv",all="false",lang="_default",hierarchy="false",include_grp="true",grp_sep="/",multi_sel="both",fields=NULL,media_url="true",sub_ids=NULL,qry=NULL,flatten="true",sleep=2)Argumentsurl The‘[url]‘of kobotoolbox Default is"".uname is username of your kobotoolbox accountpwd is the password of the accountassetid is the id of the asset for which the export is to be createdtype specifies the export format.Valid formats include"csv","xls","spss_labels"and "geojson"all takes logical value in string ed to specify whetherfields from all formversions will be included in the export.Acceptable values are"true"or"false".Default value is"false".lang takes the language.For e.g."English(en)".For"XML Values as headers",use’_xml’.hierarchy takes logical value in string ed to specify whether the group hierarchywill be displayed in labels.Acceptable values are"true"or"false".Default valueis"false".include_grp defines whether or not to include groups.Default value is"true".grp_sep is the group separator.Default value is"/".multi_sel is used to specify the display of multiple_select-type responses.Valid inputsinclude"both","summary"or"details".Default is"both".fields is an array of column names to be included in the export(including their grouphierarchy).Valid inputs include:An array containing any string value thatmatches the XML column name,An empty array which will result in all columnsbeing included,If"fields"is not included in the"export_settings",all columnswill be included in the exportmedia_url This will include an additional column for media-type questions("question_name_URL") with the URL link to the hostedfile.Valid inputs are"true"or"false".Defaultvalue is true.sub_ids is an array of submission ids that willfilter exported submissions to only thespecified array of ids.Valid inputs include an array containing integer values oran empty array.#’qry is a JSON object containing a Mongofilter query forfiltering exported submis-sions.Valid inputs include a JSON object containing a valid Mongo query orAn empty JSON object(nofiltering)flatten is a is a boolean(in form of string)value and only relevant when exporting to"geojson"format.Valid inputs are"true"and"false"sleep is the sleep time between API actions.For example,it takes time to download anexport.But R does not wait for the download tofinish before going to next step.Hence the need to provide a break between consecutive API actions.Defaultvalue is2(seconds).DetailsThe function creates an export of survey data.If successful,returns the URL of the data that can bedirectly downloaded/read/imported in R.ValueThe function creates an export,prints and returns the URL of the export createdkobo_media_downloader9 kobo_media_downloader Downloads media data from KobotoolboxDescription‘kobo_media_downloader‘downloads media from data downloaded using‘kobo_df_download‘.Loops through media columns and downloadsfiles individually.‘Usagekobo_media_downloader(url="",uname,pwd,assetid,fsep=";",sleep=2,identifier="URL",timeoutval=300,destfolder="media")Argumentsurl The‘[url]‘of kobotoolbox Default is"".uname is username of your kobotoolbox accountpwd is the password of the accountassetid is the id of the asset for which the export is to be createdfsep is the separator of the downloaded csvfile.In most of the cases,it is";",which is the default.However,sleep is the sleep time between API actions.For example,it takes time to download an export.But R does not wait for the download tofinish before going to next step.Hence the need to provide a break between consecutive API actions.Defaultvalue is2(seconds).identifier is the key using with the columns with URL is identified.Default value is"URL"because in most of the cases,the columns containing the URL values end with"URL".Please note that any other column name with similar value may causeerror.timeoutval is the timeout value in seconds to download the mediafiles.Default is300 seconds.destfolder is the folder where the media is to be stored.DetailsThe function creates an export of survey data in’csv’.If successful,it attempts to download the data and and return a data frame.10kobo_xls_dlValueThe function returns a data frame of data downloaded from’Kobotoolbox’.kobo_xls_dl Downloads data(xls type)from KobotoolboxDescription‘kobo_xls_dl‘is a wrapper for kobotoolbox API‘https://[url]/exports/..‘Usagekobo_xls_dl(url="",uname="",pwd="",assetid="",all="false",lang="_default",hierarchy="false",include_grp="true",grp_sep="/",multi_sel="both",media_url="true",fields=NULL,sub_ids=NULL,sleep=2)Argumentsurl The‘[url]‘of kobotoolbox Default is"".uname is username of your kobotoolbox accountpwd is the password of the accountassetid is the id of the asset for which the export is to be createdall takes logical value in string ed to specify whetherfields from all form versions will be included in the export.Acceptable values are"true"or"false".Default value is"false".lang takes the language.For e.g."English(en)".For"XML Values as headers",use ’_xml’.hierarchy takes logical value in string ed to specify whether the group hierarchy will be displayed in labels.Acceptable values are"true"or"false".Default valueis"false".include_grp defines whether or not to include groups.Default value is"true".kobo_xls_dl11grp_sep is the group separator.Default value is"/".multi_sel is used to specify the display of multiple_select-type responses.Valid inputsinclude"both","summary"or"details".Default is"both".media_url This will include an additional column for media-type questions("question_name_URL") with the URL link to the hostedfile.Valid inputs are"true"or"false".Defaultvalue is true.fields is an array of column names to be included in the export(including their grouphierarchy).Valid inputs include:An array containing any string value thatmatches the XML column name,An empty array which will result in all columnsbeing included,If"fields"is not included in the"export_settings",all columnswill be included in the exportsub_ids is an array of submission ids that willfilter exported submissions to only thespecified array of ids.Valid inputs include an array containing integer values oran empty array.sleep is the sleep time between API actions.For example,it takes time to download anexport.But R does not wait for the download tofinish before going to next step.Hence the need to provide a break between consecutive API actions.Defaultvalue is2(seconds).DetailsThe function creates an export of survey data in’xls’.If successful,it attempts to download the dataand and return a data frame(reading using‘readxl::read_excel‘).ValueThe function returns a data frame of data downloaded from’Kobotoolbox’.Indexget_kobo_token,2kobo_df_download,4kobo_export_create,7kobo_exports,6kobo_media_downloader,9kobo_xls_dl,10kobotools_api,3kobotools_kpi_data,412。
Zeekr Label Editor 操作手册一、简介Zeekr Label Editor 是一款强大的标签编辑软件,用于处理、设计和导出条形码、QR 码以及文本标签。
这款软件具有直观的界面和丰富的功能,能够满足各种标签编辑需求。
本操作手册将指导您如何使用Zeekr Label Editor 的各项功能,帮助您快速掌握软件的使用方法。
二、安装与启动请按照以下步骤进行Zeekr Label Editor 的安装与启动:1.下载Zeekr Label Editor 安装程序,并双击打开。
2.按照安装向导的提示完成软件的安装。
3.安装完成后,在桌面或开始菜单中找到Zeekr Label Editor 图标,双击启动软件。
三、界面介绍Zeekr Label Editor 的界面如下:1.工具栏:包含常用的命令按钮,如文件、编辑、图像处理等。
2.标签预览区:显示当前标签的设计预览。
3.属性面板:显示当前选中对象的属性,如文本、图形等。
4.标签设计区:用于设计标签的主体部分。
5.状态栏:显示当前选择的状态及坐标信息。
四、基本操作以下是Zeekr Label Editor 的基本操作:1.创建新标签:点击“文件”->“新建”或使用快捷键Ctrl+N。
2.打开现有标签:点击“文件”->“打开”或使用快捷键Ctrl+O,选择要打开的标签文件。
3.保存标签:点击“文件”->“保存”或使用快捷键Ctrl+S。
4.选择对象:单击标签设计区中的对象即可选中。
按住Shift 键可多选对象。
5.移动对象:选中对象后,拖动鼠标即可移动对象。
6.调整对象大小:选中对象后,拖动对象的角点即可调整大小。
7.删除对象:选中对象后,按Delete 键即可删除。
8.复制对象:选中对象后,按Ctrl+C 复制,再按Ctrl+V 粘贴。
9.撤销操作:点击“编辑”->“撤销”或使用快捷键Ctrl+Z,可撤销最近的操作。
10.恢复操作:点击“编辑”->“恢复”或使用快捷键Ctrl+Y,可恢复最近的操作。
Lidl_Project_Handbook-with_Chinese_version Lidl 项⽬⼿册Table of Content⽬录1.Introduction前⾔2.General概要2.1.Associate Partner合作伙伴/doc/ddac8c56b9d528ea80c779bc.html rmation Obligations 提供信息义务2.3.Responsibility Assignment 责任分配2.4.Elimination of Competition 消除竞争2.5.Handbook Contrary Acting与⼿册要求不⼀致⾏为3.Price & Order 价格和订单3.1.General Conditions⼀般情况3.2.VAT Refund增值税退税3.3.Test‐/Artwork Samples 测试/彩盒样品3.4.Test Costs测试费⽤3.5.Certification Costs认证费⽤3.6.PSI Costs PSI费⽤3.7.Freight Costs 运费3.8.BSCI Costs BSCI费⽤3.9.Costs for subsequent technical changes 后续技术变化费⽤3.10.Warranty质保3.11.Payment Terms 付款条件4.Product Requirements 产品要求4.1.Chemical Requirements 化学要求4.2.Technical Requirements 技术要求4.2.1.Specifications 规格4.2.2.Safety 安全性/doc/ddac8c56b9d528ea80c779bc.html ability 可⽤性4.2.4.Durability耐久性4.2.5.Weight 重量4.2.6.Color 颜⾊5.Artwork & Packing Requirements 彩盒和包装要求5.1.Lidl ‐ Manual Requirements Lidl ⼿册要求5.2.Lidl ‐ Packing Requirements Lidl 包装要求5.3.Test & Sales Samples – Transport Packing 测试和销售样品‐运输包装Lidl 项⽬⼿册6.TUV Munich Test (FFU Test) TUV慕尼⿊检测(FFU测试)6.1.Test Period 测试期间6.2.Scope of Testing 测试范围6.3.France Test 法国测试6.4.England Test 英国测试6.5.Chemical Test化学测试6.6.Re‐Test and Rework 重新测试和返⼯7.Einhell Tests / TUV China Tests 安海测试/TUV 中国测试7.1.Chemical Test 化学测试7.2.Pre‐Shipment‐Inspection (PSI) 出货前检验(PSI)8.Samples 样品8.1.Sales Sample 销售样品8.2.Einhell Germany AG ‐ Artwork Samples 德国安海股份公司‐包装样品8.3.Color Release Sample for Lidl Lidl颜⾊放⾏样品8.4.Prototype 原型样机8.5.Pilot Production 试⽣产8.6.Mass Production 批量⽣产8.7.Einhell China ‐ Test Sample 安海中国‐测试样品8.8.17 Week Sample 17周样品8.9.8 Week Sample 8周样品9.Certification 认证9.1.Requirements 要求9.2.Validity有效性9.3.Test Institute 测试机构10.BSCI商业社会准则⾏动(即BSCI)10.1.BSCI – Audit BSCI‐审核10.2.Einhell China – Support 安海中国‐⽀持11.Pre‐Shipment‐Inspection 出货前检验12.Container Loading & Shipment 集装箱装运和出货12.1.Warehouse 仓储12.2.Production Finish Date ⽣产完成⽇期12.3.Time of Delivery发运时间13. Clauses 条款13.1.Exceptions例外情形Lidl 项⽬⼿册1.Introduction 前⾔This handbook is supposed to give Einhells Suppliers (hereinafter referred to as “Supplier”) an overview of a Lidl‐Project. It declares the surrounding conditions, special requirements and projects procedure. It should help the supplier to plan, organize and conduct a Lidl‐Project, as well as preventing any misunderstandings and disputes between the supplier and Einhell. The supplier is required to follow this Handbook.本⼿册旨在向安海供应商(以下简称“供应商”)介绍Lidl 项⽬基本情况,并说明相关条件、特别要求和项⽬流程。
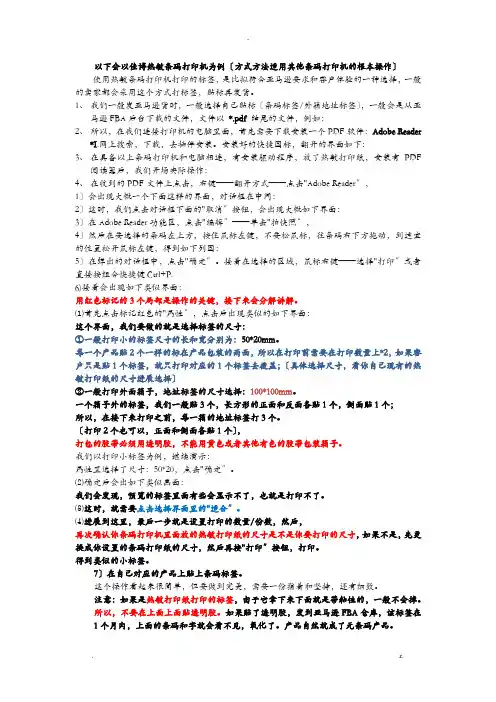
以下会以佳博热敏条码打印机为例〔方式方法适用其他条码打印机的根本操作〕使用热敏条码打印机打印的标签,是比拟符合亚马逊要求和客户体验的一种选择,一般的卖家都会采用这个方式打标签,贴标再发货。
1、我们一般发亚马逊货时,一般选择自己贴标〔条码标签/外箱地址标签〕,一般会是从亚马逊FBA后台下载的文件,文件以*.pdf 结尾的文件,例如:2、所以,在我们连接打印机的电脑里面,首先需要下载安装一个PDF软件:Adobe Reader*I.网上搜索,下载,去插件安装。
安装好的快捷图标,翻开的界面如下:3、在具备以上条码打印机和电脑相连,有安装驱动程序,放了热敏打印纸,安装有PDF阅读器后,我们开场实际操作:4、在收到的PDF文件上点击,右键——翻开方式——点击"Adobe Reader〞,1〕会出现大概一个下面这样的界面,对话框在中间:2〕这时,我们点击对话框下面的"取消〞按钮,会出现大概如下界面:3〕在Adobe Reader功能区,点击"编辑〞——单击"拍快照〞,4〕然后在要选择的条码左上方,按住鼠标左键,不要松鼠标,往条码右下方拖动,到适宜的位置松开鼠标左键,得到如下列图:5〕在弹出的对话框中,点击"确定〞。
接着在选择的区域,鼠标右键——选择"打印〞或者直接按组合快捷键Ctrl+P.6)接着会出现如下类似界面:用红色标记的3个局部是操作的关键,接下来会分解讲解。
⑴首先点击标记红色的"属性〞,点击后出现类似的如下界面:这个界面,我们要做的就是选择标签的尺寸:①一般打印小的标签尺寸的长和宽分别为:50*20mm。
每一个产品贴2个一样的标在产品包装的两面,所以在打印前需要在打印数量上*2,如果客户只是贴1个标签,就只打印对应的1个标签去覆盖;〔具体选择尺寸,看你自己现有的热敏打印纸的尺寸进展选择〕②一般打印外面箱子,地址标签的尺寸选择:100*100mm。
目录1. 简介 (3)1.1 启动GoLabel (3)1.2 主界面 (3)2. 工作环境 (4)2.1 一般说明 (4)2.2 命令编辑区 (4)3. GoLabel工具栏 (5)3.1 常用工具栏 (5)3.2 控制及参数设定工具栏 (6)3.3 绘制工具栏 (7)4. 一般操作 (8)4.1 建立标签 (8)4.2 开启标签文件 (9)4.3 更改打印机设定 (10)4.4 资料库打印设定 (11)4.5 标签尺寸与纸张种类 (13)4.6 打印机通讯介面设定 (16)4.7 文本设定- 在标签中输入文字 (17)4.8 使用Windows字体 (20)4.9 制作条码 (22)4.9.1 制作一维条码 (22)4.9.2 制作GS1条码 (25)4.9.3 制作MaxiCode 条码 (28)4.9.4 制作PDF417 条码 (30)4.9.5 制作DataMatrix Code 条码 (32)4.9.6 制作QRCode 条码 (34)4.10 绘制直线、框线与圆弧 (36)4.10.1 绘制直线(水平线、垂直线、斜线) (36)4.10.2 绘制实心框 (37)4.10.3 绘制直角框 (38)4.10.4 绘制圆角框 (39)4.10.5 绘制椭圆形 (40)4.11 插入图形 (41)4.12 锁住内容 (42)5. 高级功能 (43)5.1 命令编辑区的使用 (43)5.2 序列号 (44)5.2.1 新增序列号 (44)5.2.2 序列号的修改 (46)5.3 变数 (47)5.3.1 新增变数 (47)5.3.2 变数的修改 (49)5.4 日期及时间设定 (50)5.4.1 设定打印机日期及时间 (50)5.4.2 插入日期时间至标签内容 (50)5.5.1 资料库连接方式 (52)5.5.2 资料库的使用 (53)5.6 网络连接 (55)5.6.1 搜索打印机 (55)5.6.2 设定IP位址 (56)5.7 载入图形/字体/标签/DBF档/Cmd档 (57)5.7.1 载入字体 (57)5.7.2 确认载入的文件 (59)5.7.3 载入标签 (60)5.7.4 其它内容 (61)5.7.5 删除打印机内容 (61)5.7.6 同步GoLabel与打印机内容 (62)6. 条码的应用 (63)6.1 EAN 128 / GS1 Databar条码及应用识别码(AI) (63)6.1.1 关于应用识别码(Application Identifiers, AI) (63)6.1.2 AI Wizard (64)7. 其他功能说明 (66)7.1 打印机控制 (66)7.2 其他选项 (67)1.简介1.1 启动GoLabel点击Windows「开始」按钮,然后点击GoLabel,或直接点击桌面上的图标执行程序。

ECshop使用手册ECshop使用手册1、简介1.1 什么是ECshop1.2 ECshop的特点1.3 ECshop的优势2、安装与配置2.1 系统要求2.2 与安装ECshop2.3 配置ECshop2.4 数据库设置2.5 后台管理设置3、商品管理3.1 添加商品3.2 编辑商品3.3 删除商品3.4 商品分类管理3.5 商品属性管理4、订单管理4.1 创建订单4.2 订单支付4.3 订单发货4.4 查看订单详情 4.5 取消订单4.6 退款与售后服务5、用户管理5.1 用户注册5.2 用户登录5.3 修改个人信息 5.4 查看订单历史 5.5 购物车管理5.6 用户评论与评分6、促销与营销6.1 优惠券6.2 积分系统6.3 团购与拼团活动7、物流与配送7.1 物流公司管理7.2 配送区域设置7.3 发货流程8、网站设置8.1 网站基本信息设置 8.3 导航菜单管理8.4 页面布局管理8.5 插件与扩展管理9、数据备份与恢复9.1 数据库备份9.2 数据库恢复10、系统日志与错误处理 10.1 系统日志查看10.2 错误处理与调试11、常见问题与解答11.1 如何处理商品缺货情况?11.2 如何配置多个支付方式?11.3 如何添加新的配送方式?附件:- ECshop安装包- ECshop使用手册PDF版法律名词及注释:- 商标:商标是指为区别商品或者服务来源,以图形、字词、数字、三维标志、颜色组合等方式,以及联合声音等方式,单独或者结合使用,能够区别商品或者服务来源并能够在法律上受到保护的标志。
- 版权:版权是指作者对其创作的文学、艺术、科学等作品享有的权利,包括对作品的复制权、发行权、表演权、放映权、广播权、信息网络传播权等权利。
IntroductionWe are happy to announce general availability of iText DITO 2.1, the latest version of our low-code, data-driven and template-based PDF generator.Since the release of iText DITO 2.0 at the end of March this year we’ve continued to build upon the changes it introduced, such as the further integration of the new iText DITO Manager component with the Editor. For this release we’ve also implemented a number of new features, includingone we’ve been working on for quite some time. We now support the automated creation of charts in templates, which has been a much-requested feature.There’s a couple of other nice features included in this release, and some important news for iText DITO users who prefer the native Java versionover the REST SDK/API.ContentsIntroduction2Contents2 iText DITO Manager2 New Composition Features2 Conditional Template Insertion2 Header and Footer Settings2 Richer Template Import/Export Format3 Legacy Template Import and Export3 iText DITO Editor3 Line and Column Chart Creation3 Dynamic Lists4 Properties Panel for Template Heading Styles4 Conditional Logic in Header and Footer Templates4 iText DITO SDK/API5 The Native Java SDK/API is Back5iText DITO ManagerNew Composition FeaturesCompositions have proven to be a very effective means of centrally managing and re-using templates. The feature has received an upgrade in the new release, with more control over the header and footer area and now allowing you now to insert templates conditionally.Conditional Template InsertioniText DITO 2.1 brings conditional logic to the composition level. Using the same convenient conditional content wizard you may already know from iText DITO Editor, you can now define conditions for insertion of templates within a composition. Combining re-usability with conditional insertion logic, the updated compositions have become a great instrument of content asset management efficiency.Header and Footer SettingsMany documents require a header and/or footer on the first page that differs from the other pages. iText DITO 2.1 allows you to define if headers and footers should be inserted on all pages or only on the first page. In contrast to earlier versions, no CSS coding is required to define this placement logic.Richer Template Import/Export FormatiText DITO 2.1 marks the introduction of a new standard format for template export and import. The iText DITO Template Archive (*.dta) format replaces the legacy *.dito format for export and import of template packages. The main advantage of the new format is that it contains additional template metadata, such as the template type. Moreover *.dta exports can contain multiple versions of a template. As such no editing history is lost upon import.Legacy Template Import and ExportNotwithstanding the new *.dta format, iText DITO 2.1 still allows you to import and export template projects in the legacy *.dito format. The common use case for importing *.dito files into your iText DITO Manager workspace is upgrading from version 1.5 to 2.1. The common use case for export to the legacy *.dito format is to create a standalone template project that can be used to generate PDFs with the iText DITO native Java SDK/API.Legacy import and export can be activated through the new Advanced Settings panel in the Settings area of iText DITO Manager.iText DITO EditorLine and Column Chart CreationThe capability of visualizing data in a chart has been a much-anticipated feature. Charting features will be introduced iteratively. Version 2.1 of iText DITO contains the very beginning of chart generation, allowing you to generate line charts and column charts based on data in an array. There is a convenient wizard to create chart elements, where you can select a data array, a field that will contain the labels on the horizontal axis and a field that will contain the corresponding values on the vertical axis. The wizard also allows you to configure chart size and colors.Dynamic ListsThe new version of iText DITO Editor allows you to easily build structured and unstructured lists with items from an array in the data collection associated with the template. Numbering or bullets are automatically inserted. Lists can be filtered and limited to a preset minimum and maximum number of list items. Moreover, lists can combine dynamically generated list items and static items.Properties Panel for Template Heading StylesFrom the very first version of iText DITO, there has been support for the use of headings (level 1 to 6), paragraph and other styles in templates. CSS coding has however been the only means of defining the look and feel of these text styles. Not anymore. Version 2.1 marks the introduction of an easy-to-use template heading style panel to configure layout for the different styles.Conditional Logic in Header and Footer TemplatesConditional content insertion has been a very intensively used feature for quite a while. These features now also extend to headers and footer templates. Combined with the new conditional insertion of header and footer templates within compositions, this new addition allows you to define business logic on different levels.iText DITO SDK/APIThe Native Java SDK/API is BackWhen iText DITO 2.0 was launched, we announced the deprecation of the native Java SDK/API to generate PDF documents. Upon popular demand,we are re-introducing it in version 2.1. The native Java SDK/API works in conjunction with the legacy export feature, that allows you to export the latest version of a template as a local *.dito project file, containing a single template. The native Java SDK/API can reference a project and a templatewithin it and merge it with data to produce a PDF.Java SDK/APIs are standalone, they cannot be included in a promotion path. In order to make full use of the template deployment and promotion capabilities of iText DITO Manager, the recommended flavor of the SDK/API component remains the iText DITO REST SDK/API for Docker.。
This Labelling Machine set-up Work Method has been generated as a general guide to the most common settings of the labeller.This Work Method in no way replaces the machine manufacturers recommendations and setting standards for setting their particular machine.The information contained in this document has been extracted from a Krones labeller set-up manual.此贴标机设定操作方法手册仅作为最为普通类型贴标机设定值的概括性指南。
此设定操作方法手册决不可替换现正在使用的贴标机供应厂商所提供的各项操作建议和各项设定值标准。
2002-04Glue roller shaft胶辊轴2 –3 mm6. Work Method for checking the Label Pallet contact with the Glue Roller.检查标板和胶辊接触状态的操作方法6. - Align pallet turret to the previously marked position.- Evenly and firmly tighten the drive coupling.- Grease the coupling.- Carefully replace the rubber boot.- 校直标签台与前面的所标注的位置- 均匀而且牢固地固定驱动万向联轴节- 向万向联轴节注油- 小心地更换胶皮套Label pallet标板Anvil垫条Clearance间隙Anvil垫条Pallet标板Label 商标Bottle table centre贴标台中心线Bottle瓶子Gripper cylinder centre夹标转鼓的中心N ATIONAL国民31。
golabel操作手册摘要:一、Golabel 操作手册概述二、Golabel 安装与配置1.安装步骤2.配置环境三、Golabel 基本操作1.数据标注2.标注管理3.数据审核四、Golabel 高级功能1.标注策略2.自定义工具3.团队协作五、Golabel 性能优化与故障排查1.性能优化方法2.故障排查指南六、常见问题与解答七、附录正文:一、Golabel 操作手册概述Golabel 是一款集数据标注、管理、审核于一体的强大工具,广泛应用于人工智能、机器学习等领域。
本操作手册将为您详细介绍Golabel 的安装、配置、基本操作、高级功能以及性能优化与故障排查等内容。
通过学习本手册,您将能够熟练掌握Golabel 的使用方法,提高数据标注效率。
二、Golabel 安装与配置1.安装步骤(1)下载Golabel 安装包:访问Golabel 官方网站,根据您的操作系统选择相应的安装包下载。
(2)安装程序:运行安装包,按照提示完成安装过程。
(3)启动Golabel:安装完成后,双击桌面上的Golabel 图标启动程序。
2.配置环境(1)创建项目:首次启动Golabel 时,需要创建一个新项目。
您可以根据实际需求为项目命名、设置项目简介等。
(2)数据目录:在项目设置中,配置数据目录。
您可以自定义数据目录,以便于管理和查找数据文件。
(3)标注工具:Golabel 提供了丰富的标注工具,如矩形、圆形、多边形等。
您可以在设置中自定义标注工具的样式,以满足不同场景的需求。
三、Golabel 基本操作1.数据标注(1)导入数据:点击“文件”>“导入”,选择需要标注的数据文件(如图片、视频等)。
(2)开始标注:选中需要标注的物体,点击标注工具进行标注。
(3)保存进度:标注过程中,您可以随时点击“保存”按钮,以防意外丢失进度。
2.标注管理(1)查看标注结果:在“标注结果”面板中,您可以查看已完成标注的数据。
css中label的用法CSS(Cascading Style Sheets)是一种标准化的样式语言,它被用于设计网页的样式和布局。
在CSS中,我们可以使用label元素来实现某些特定的功能,在本文中,我们将讨论CSS中label的用法。
1. 什么是label元素?label元素是一种非常流行的HTML标签,它通常与表单元素一起使用。
使用label元素可以使用户更方便地点击或选中表单元素。
label标签不仅可以定义表单元素,还可以定义其他内容。
2. 在CSS中使用label元素在CSS中,我们可以使用label元素来实现某些特定的功能,比如:2.1 控制表单元素的样式label标签经常用于为表单元素添加样式,例如修改文本输入框的背景颜色、字体大小等等。
2.2 自定义复选框和单选按钮我们可以使用CSS控制label元素的样式来自定义复选框和单选按钮。
这样用户将能够更方便地点击图标而不是小框框来选中或取消选中。
2.3 创建更好的用户体验我们也可以使用label元素来提高用户体验。
比如,为了确保表单中的文本框能够唤起键盘输入,在移动设备上选中输入框时,我们可以使用label元素作为跟踪目标,使用户更容易点击到文本框。
3. 如何使用label元素我们可以通过以下步骤使用label元素:3.1 在HTML中添加label元素要使用label元素,我们首先需要在HTML代码中添加它。
可以使用以下代码:<label for="input1">我的输入框</label>这将创建一个label元素,并将其与一个ID是“input1”的输入框关联。
3.2 在CSS中为label元素添加样式为了向label元素添加样式,我们可以使用CSS的伪类选择器:hover,active和focus。
例如,我们可以使用以下代码添加悬停效果:label:hover {background-color: #ccc;}3.3 用label元素水平对齐文本框要将文本框与label元素水平对齐,可以使用以下代码:label {display: inline-block;width: 80px;text-align: right;margin-right: 20px;}input {display: inline-block;width: 200px;}4. 总结CSS中label的用法包括控制表单元素的样式、自定义复选框和单选按钮以及创建更好的用户体验。
E - Commerce Online Shop 网上商店系统模板制作引导手册by Lu Hengqi16- Nov - 07E - Commerce Online Shop 网上商店系统2目录关于ECSHOP................................ ................................ ................................ (3)产品特点:................................ ................................ ................................ ................................ (3)1. 前言................................ ................................ ................................ (5)1.1. 模板系统介绍................................ ................................ ................................ ................................ .. (5)1.2. 涵盖内容................................ ................................ ................................ ................................ .. (5)1.3. 适用版本................................ ................................ ................................ ................................ .. (5)1.4. ECShop 团队主要成员................................ ................................ ................................ .. (5)2. 模板结构说明................................ ................................ ................................ .. (6)2.1. 模板目录结构................................ ................................ ................................ ................................ .. (6)2.2. 链接模板文件使用例子................................ ................................ ................................ (6)2.3. 模板文件结构................................ ................................ ................................ ................................ .. (6)3. 模板系统标签说明................................ ................................ . (9)3.1. 变量调节标签................................ ................................ ................................ ................................ .. (9)3.1.1. escape [ 编码] ................................ ................................ ................................ ................................ .. (9)3.1.2. nl2br [换行符替换成<br />] ................................ ................................ ................................ (9)3.1.3. default [ 默认值] ................................ ................................ ................................ ................................ (9)3.1.4. truncate [ 截取] ................................ ................................ ................................ ................................ .. (10)3.1.5. strip_tags [去除html标签] ................................ ................................ ................................ .. (10)3.2. 控制标签................................ ................................ ................................ ................................ .. (11)3.2.1. if,elseif,else ................................ ................................ ................................ .......................... ...... (11)3.2.2. foreach,foreachelse ................................ ................................ ................................ ............... .. (12)3.3. 显示标签................................ ................................ ................................ ................................ .. (14)3.3.1. cycle ................................ ................................ ................................ ................................ ....... (14)3.3.2. html_options................................ ................................ ................................ .......................... ...... .. (15)3.3.3. html_select_date................................ ................................ ................................ .................... ............ (16)3.3.4. html_radios ................................ ................................ ................................ ........................... ..... .. (19)3.3.5. html_select_time................................ ................................ ................................ ................... ............. (21)3.4. 辅助标签................................ ................................ ................................ ................................ .. (25)3.4.1. assign................................ ................................ ................................ ................................ .... . (25)3.4.2. Include ................................ ................................ ................................ ................................ . . (25)E - Commerce Online Shop 网上商店系统3关于ECSHOPECShop 是Comsenz公司推出的一款B2C 独立网店系统,适合企业及个人快速构建个性化网上商店。
F S C标签使用指南(中英文对照)FSCLabeling Publication System USER GUIDEFSC标签发行系统使用指南Version 1.0第1.0版September 2007Content目录1.0 Getting started开始 52.0 Create a Label 创建标签 92.1 Select label version 选择标签种类 102.2 Select label orientation 选择标签方位 112.3 Select label color 选择标签颜色 122.4 Percentage information 百分比信息 132.5 Adding language versions 添加语言种类 142.6 Add a comment to track your label 添加追溯标签的注释 173.0 Download your label 下载标签 184.0 History panel 历史面板 204.1 Navigating the history panel 浏览历史版面 205.0 Documents for consultation指导的文件 216.0 Information about internet browsers 因特网浏览器的相关信息 22This guide has been prepared to explain how to use the FSC LabelingPublication System once your company has been granted access by anFSC authorizing body.本指南用于解释当你的公司受FSC认证机构授权后如何使用FSC标签发行体系The labeling system is a tool that allows users to create and downloadpersonalized FSC product labels according to FSC graphic requirements.The labels created will be saved in the history panel (see 4.0 History panel) and may be edited or later downloaded if needed.标签体系是一个允许使用者根据FSC图示要求创建和下载具体的FSC产品标签的工具.创建的标签将被保存在历史版面(见4.0历史版面)且在需要时可修改和下载.1.0 Getting started(开始):As a registered FSC Certificate Holder you will receive an email message fromyour FSC Certification Body granting you access to the Labeling PublicationSystem. The email message (see example below) will be sent to the contactperson of the company registered in the FSC Certification Data Base:作为一个注册的FSC 证书持有者,你将收到一个来自于你的FSC认证机构的邮件,邮件准许你进入一个标签发行系统.这个电子邮件信息(见下面的范例)会被发送给公司提供给FSC认证机构的数据库中联系人.The link located at the close of the email message (see above) will allow you tocreate a username and a password to access the labeling publication system.位于上述邮件信息靠下边的链接地址会允许你创建一个使用者名称和密码来进入标签发行系统Note: this link can only be used once.注意:这一链接将仅只能使用一次The web link to create the username and password will look as shown below.Please:用于创建使用者名称和密码的网页链接将出现下图所示,请1. enter your Certificate code as username键入你的证书号码作为’你的使用者名称2. create your password,创建你的密码3. confirm your password确认你的密码4. click OK单击OKThe following image will appear. Click OK:下述页面将会出现,单击OKThe system will now bring you to the Login page –. Toenter the labeling system, enter your created username and password and click Login: 系统现在将带你进入一个注册页面- ,为进入标签系统,键入你的使用者名称和密码并单击”Login”进行注册。