路由重分布
- 格式:ppt
- 大小:589.00 KB
- 文档页数:15

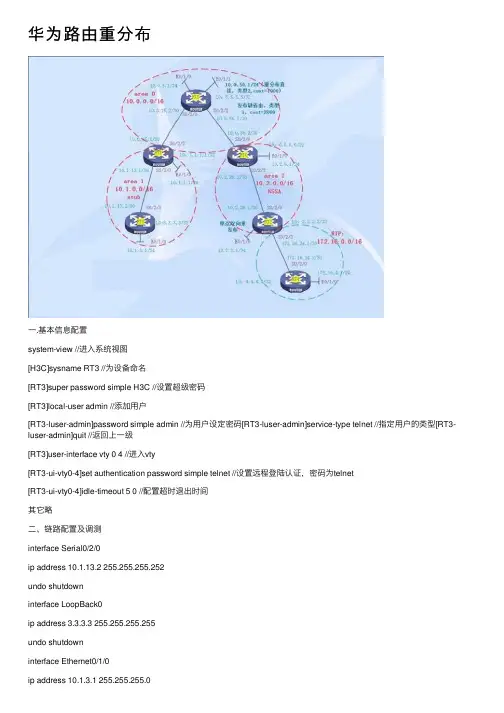
华为路由重分布⼀.基本信息配置system-view //进⼊系统视图[H3C]sysname RT3 //为设备命名[RT3]super password simple H3C //设置超级密码[RT3]local-user admin //添加⽤户[RT3-luser-admin]password simple admin //为⽤户设定密码[RT3-luser-admin]service-type telnet //指定⽤户的类型[RT3-luser-admin]quit //返回上⼀级[RT3]user-interface vty 0 4 //进⼊vty[RT3-ui-vty0-4]set authentication password simple telnet //设置远程登陆认证,密码为telnet[RT3-ui-vty0-4]idle-timeout 5 0 //配置超时退出时间其它略⼆、链路配置及调测interface Serial0/2/0ip address 10.1.13.2 255.255.255.252undo shutdowninterface LoopBack0ip address 3.3.3.3 255.255.255.255undo shutdowninterface Ethernet0/1/0ip address 10.1.3.1 255.255.255.0undo shutdown其它略三、OSPF多区域及RIP配置[RT3]ospf 1 router-id 3.3.3.3 //配置OSPF ROUTER-IDsilent-interface all //配置所有端⼝为被动接⼝undo silent-interface Serial0/2/0 //关闭此接⼝的被动接⼝undo silent-interface Serial0/2/2area 1 //OSPF区域,可以写成点分⼗进制 0.0.0.1 network 3.3.3.3 0.0.0.0 //宣告OSPF的⽹段network 10.1.13.0 0.0.0.3 network 10.1.3.0 0.0.0.255[RT1]ospf 1 router-id 1.1.1.1silent-interface allundo silent-interface Serial0/2/0undo silent-interface Serial0/2/2area 0network 10.0.15.0 0.0.0.3network 1.1.1.1 0.0.0.0area 1network 10.1.13.0 0.0.0.3network 10.1.1.0 0.0.0.255[RT5]ospf 1 router-id 5.5.5.5silent-interface allundo silent-interface Serial0/2/0undo silent-interface Serial0/2/2area 0network 5.5.5.5 0.0.0.0network 10.0.5.0 0.0.0.255 network 10.0.56.0 0.0.0.3[RT6]ospf 1 router-id 6.6.6.6silent-interface allundo silent-interface Serial0/2/0 undo silent-interface Serial0/2/2 area 0network 10.0.56.0 0.0.0.3network 6.6.6.6 0.0.0.0area 2network 10.2.6.0 0.0.0.255 network 10.2.26.0 0.0.0.3[RT2]ospf 1 router-id 2.2.2.2silent-interface allundo silent-interface Serial0/2/2 area 2network 10.2.26.0 0.0.0.3network 10.2.2.1 0.0.0.255rip //启动RIPundo summary //关闭⾃动汇总version 2 //RIPV2network 172.16.0.0 //宣告RIP的⽹段silent-interface all //配置所有接⼝为被动接⼝undo silent-interface Serial0/2/3 //将接⼝不设为被动接⼝[RT4]ripundo summaryversion 2network 172.16.0.0network 4.0.0.0silent-interface allundo silent-interface Serial0/2/1四、OSPF重分布外部路由及下发缺省路由[RT5]ospf 1area 0import-route direct cost 1000 type 2 //重分布直连路由default-route-advertise always //下发缺省路由default cost 2000 //指定缺省路由的COST为2000 default type 1 //指定下发的缺省路由为类型1 [RT2]ospf 1area 2import-route rip 1 cost 1000 //重分布RIP到OSPF ripimport-route ospf 1 cost 5 //重分布OSPF到RIP 五、OSPF特殊区域配置及路由汇总[RT3]ospf 1area 1stub //配置为STUB区域[RT1]ospf 1area 1stub no-summary //配置完全STUB区域abr-summary 10.1.0.0 255.255.0.0 //区域内汇总[RT6]ospf 1area 2nssa no-summary //配置完全NSSA区域abr-summary 10.2.0.0 255.255.0.0 //区域内汇总area 2nssa //配置NSSA区域asbr-summary 172.16.0.0 255.255.0.0 cost 1000 //外部路由汇总六、OSPF虚链路system-view[Sysname] ospf 100[Sysname-ospf-100] area 2[Sysname-ospf-100-area-0.0.0.2] vlink-peer 1.1.1.1 指定对⽅的ROUTER-ID[Sysname-ospf-100-area-0.0.0.2]vlink-peer 1.1.1.1 md5 10 cipher H3C 虚链路MD5认证vlink-peer 1.1.1.1 simple cipher H3C 虚链路明⽂认证虚链路的另⼀端也类似配置display ospf vlink //显⽰虚链路七、OSPF认证[RT1]ospf 1[RT1ospf-1]area 1[RT1-ospf-1-area-0.0.0.1]authentication-mode md5[RT1-ospf-1-area-0.0.0.1]quit[RT1-ospf-1]quit[RT1]int s0/2/0[RT1-Serial0/2/0]ospf authentication-mode md5 10 cipher H3C[RT3ospf-1]area 1[RT3-ospf-1-area-0.0.0.1]authentication-mode md5[RT3-ospf-1-area-0.0.0.1]quit[RT3-ospf-1]quit[RT3]int s0/2/0[RT3-Serial0/2/0]ospf authentication-mode md5 10 cipher H3C 或是采⽤明⽂认证,配置⽅法与上类似authentication-mode simpleospf authentication-mode simple cipher H3C⼋、OSPF调测调试命令display ospf brief //显⽰OSPF的摘要信息display ospf cumulative //OSPF的统计信息display ospf interface //显⽰OSPF的接⼝信息display ospf peer //显⽰OSPF的邻居信息display ospf lsdb //显⽰OSPF的LSDBdisplay ospf routing //显⽰OSPF的路由信息display ospf error //显⽰OSPF的错误信息reset ospf process //重启OSPF进程其它命令int e0/2/0ospf cost 1000 //修改OSPF的COST值 COST=10的8次⽅/带宽ospf network broadcast|nbma |p2mp |p2p //修改OSPF的⽹络类型ospf dr-priority 10 //修改接⼝的优先级,缺省为1九、H3C与CISCO的路由协议管理距离的区别:CISCO:H3C:。
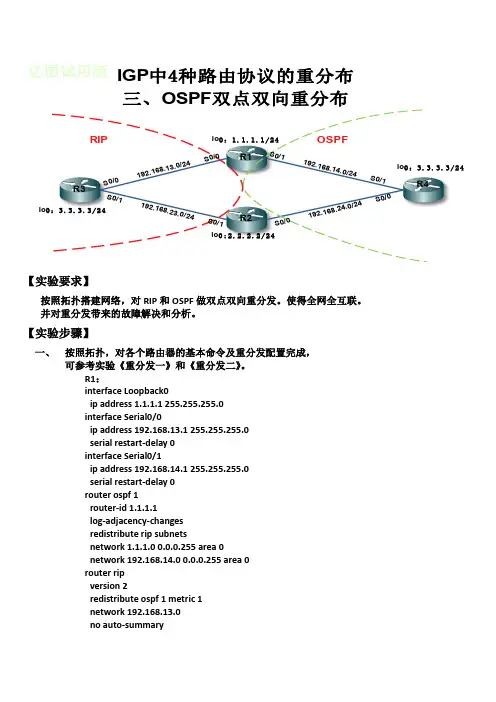
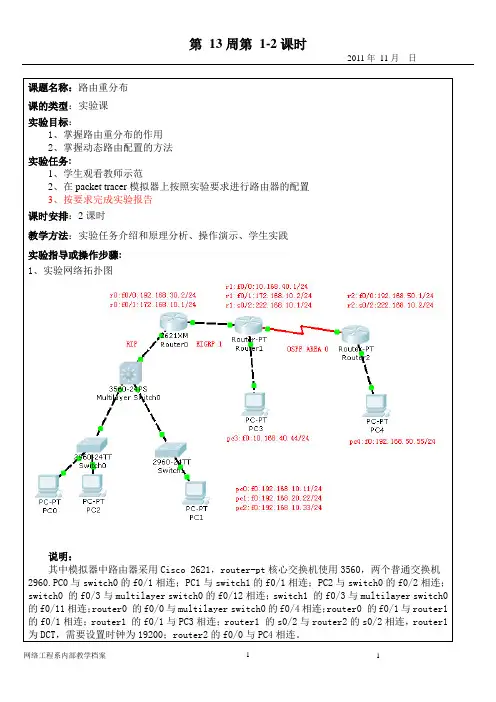
【实验要求】按照拓扑搭建网络,对RIP 和OSPF 做双点双向重分发。
使得全网全互联。
并对重分发带来的故障解决和分析。
【实验步骤】一、 按照拓扑,对各个路由器的基本命令及重分发配置完成,可参考实验《重分发一》和《重分发二》。
R1:interface Loopback0ip address 1.1.1.1 255.255.255.0interface Serial0/0ip address 192.168.13.1 255.255.255.0serial restart-delay 0interface Serial0/1ip address 192.168.14.1 255.255.255.0serial restart-delay 0router ospf 1router-id 1.1.1.1log-adjacency-changesredistribute rip subnetsnetwork 1.1.1.0 0.0.0.255 area 0network 192.168.14.0 0.0.0.255 area 0router ripversion 2redistribute ospf 1 metric 1network 192.168.13.0no auto-summaryRIP OSPFR1R2R3R4S 0/0 192.168.13.0/24 S 0/0S 0/0 192.168.24.0/24 S 0/0S 0/1 192.168.14.0/24 S 0/1S 0/1 192.168.23.0/24 S 0/1lo 0:1.1.1.1/24lo 0:2.2.2.2/24lo 0:3.3.3./24lo 0:3.3.3.3/24IGP 中4种路由协议的重分布三、OSPF 双点双向重分布R2:!interface Loopback0ip address 2.2.2.2 255.255.255.0interface Serial0/0ip address 192.168.24.2 255.255.255.0serial restart-delay 0interface Serial0/1ip address 192.168.23.2 255.255.255.0serial restart-delay 0router ospf 1router-id 2.2.2.2log-adjacency-changesredistribute rip subnetsnetwork 2.2.2.0 0.0.0.255 area 0network 192.168.24.0 0.0.0.255 area 0!router ripversion 2redistribute ospf 1 metric 1network 192.168.23.0no auto-summaryR3:interface Loopback0ip address 3.3.3.3 255.255.255.0interface Serial0/0ip address 192.168.13.3 255.255.255.0serial restart-delay 0interface Serial0/1ip address 192.168.23.3 255.255.255.0serial restart-delay 0router ripversion 2network 3.0.0.0network 192.168.13.0network 192.168.23.0R4:interface Loopback0ip address 4.4.4.4 255.255.255.0interface Serial0/0ip address 192.168.24.4 255.255.255.0serial restart-delay 0interface Serial0/1ip address 192.168.14.4 255.255.255.0serial restart-delay 0router ospf 1router-id 4.4.4.4log-adjacency-changesnetwork 4.4.4.0 0.0.0.255 area 0network 192.168.14.0 0.0.0.255 area 0network 192.168.24.0 0.0.0.255 area 0R1#sh ip rou//查看R1的路由表1.0.0.0/24 is subnetted, 1 subnetsC 1.1.1.0 is directly connected, Loopback0C 192.168.13.0/24 is directly connected, Serial0/02.0.0.0/8 is variably subnetted, 2 subnets, 2 masksO 2.2.2.2/32 [110/129] via 192.168.14.4, 00:03:05, Serial0/1 R 2.2.2.0/24 [120/2] via 192.168.13.3, 00:00:24, Serial0/0C 192.168.14.0/24 is directly connected, Serial0/13.0.0.0/24 is subnetted, 1 subnetsO E2 3.3.3.0 [110/20] via 192.168.14.4, 00:03:05, Serial0/14.0.0.0/32 is subnetted, 1 subnetsO 4.4.4.4 [110/65] via 192.168.14.4, 00:03:06, Serial0/1O 192.168.24.0/24 [110/128] via 192.168.14.4, 00:03:06, Serial0/1 O E2 192.168.23.0/24 [110/20] via 192.168.14.4, 00:03:06, Serial0/1 R1#R2#sh ip rou//查看R2的路由表1.0.0.0/8 is variably subnetted, 2 subnets, 2 masksO 1.1.1.1/32 [110/129] via 192.168.24.4, 00:02:46, Serial0/0 R 1.1.1.0/24 [120/2] via 192.168.23.3, 00:00:23, Serial0/1O E2 192.168.13.0/24 [110/20] via 192.168.24.4, 00:02:46, Serial0/02.0.0.0/24 is subnetted, 1 subnetsC 2.2.2.0 is directly connected, Loopback0O 192.168.14.0/24 [110/128] via 192.168.24.4, 00:02:46, Serial0/03.0.0.0/24 is subnetted, 1 subnetsR 3.3.3.0 [120/1] via 192.168.23.3, 00:00:23, Serial0/14.0.0.0/32 is subnetted, 1 subnetsO 4.4.4.4 [110/65] via 192.168.24.4, 00:02:46, Serial0/0C 192.168.24.0/24 is directly connected, Serial0/0C 192.168.23.0/24 is directly connected, Serial0/1R1#traceroute 3.3.3.3//R1上跟踪路由3.3.3.3Type escape sequence to abort.Tracing the route to 3.3.3.31 192.168.14.4 116 msec 112 msec 100 msec2 192.168.24.2 136 msec 104 msec 44 msec3 192.168.23.3 152 msec * 244 msecR1#//发现,R1去往3.3.3.0/24的路由,要通过R4,再通过R2,才到达R3,在OSPF区域绕了一圈之后进入RIP,OSPF双点双向重分布会造成环路。
路由重分发工作原理路由重分发工作原理网络协议有很多种,例如isis、rip、ospf、bgp等,在大型公司中经常会出现网络设备之间运行多种网络协议的情况,各种网络协议之间如果不进行一定的配置那么设备之间是不能进行互通信息的,在这种情况下就出现了路由重分发技术,路由重分发的作用就是为了实现多种路由协议之间的协同工作。
路由重分发的工作原理:通过在各种路由协议的配置中添加一定的配置使将路由协议广播到另外的路由协议中,让各个路由协议都能检测到运行其他的路由协议的网段,从而实现数据的传输。
路由重分发技术需要用到redistribute命令rip协议的redistribute命令redistribute protocol 【metric metric-value】【match internal | external nssa-external type】【route-map map-tag】protocol:路由重分发的源路由协议 metric metric-value:设置路由重分发的度量值(1···6),没有将使用default-metric命令设置的metric值 match internal | external nssa-external type:设置重分发路由的条件,只适合重分发的源路由协议是ospf route-map map-tag应用路由图进行重分发ospf协议的redistribute命令 redistribute protocol 【subnets】【metric metric-value】【metric-type{1 | 2}】【tag tag-value】【route-map map-tag】protocol:路由重分发的源路由协议subnets:设置是否重分发子网metric metric-value:设置路由重分发的度量值(1···16777214),没有将使用default-metric命令设置的metric值metric metric-type:设置重分发的路由度量类型,默认值为2 tag tag-value:设置重分发的路由的tag(0···2147483647)默认为0 route-map map-tag应用路由图进行重分发重分发到ospf中的时候,除了直连路由和默认路由外,其他重分发的路由的默认的度量值是20,默认度量值类型是2,且默认不重分发子网。

一、实验拓扑图:AucklandSanJose3Singapore 192.168.224.1/30S1/2192.168.240.2/30S1/2 S1/0192.168.224.2/30S1/1192.168.240.1/30 Engineers Lo0 192.168.232.1/24T1 1.544Mbps19.2Kpbs RIP v2Managers Lo1 192.168.236.1/24Lo0 192.168.5.1/24二、实验目的1、在实验中应用到高级路由功能来操作路由更新,这些特性包括分发列表,默认路由,被动接口和路由重分布。
2、掌握高级路由特性来控制路由更新。
三、实验要求1、公司的SanJose3和Singapore 之间的网络使用的RIPV2动态路由协议。
2、在SanJose3上面连接了一个stub network 192.168.5.1/24,为了减少流量,过滤RIPv2更新流量在整个192.168.5.1/24网络发送。
3、在Singapore 有Engineers 和Managers 部门,Managers 网络并不想被SanJose3所学习到。
4、有一条非常慢的19.2Kpbs 的链路连接Singapore 和Auckland ,为了减少这条链路的 流量,我们要禁止动态路由更新通过这条链路5、在满足上述条件的情况下,实现全网互通。
四、实验步骤1、按照拓扑图中IP ,配置好路由器接口的 IP 地址,但是不要配置RIPv2协议,使用CDP 协议检测相邻设备的连通性。
配置如下:Router(config)#hostname SanJose3SanJose3(config)#line c 0SanJose3(config-line)#exec-timeout 0 0SanJose3(config-line)#logging synchronousSanJose3(config)#no ip domain-lookupSanJose3(config)#interface s1/2SanJose3(config-if)#ip address 192.168.224.1 255.255.255.252SanJose3(config-if)#no shutdownSanJose3(config)#interface loopback 0SanJose3(config-if)#ip address 192.168.5.1 255.255.255.0Router(config)#hostname AucklandAuckland (config)#interface s1/2Auckland (config-if)#ip address 192.168.240.2 255.255.255.252Auckland (config-if)#no shutdownAuckland (config)#interface loopback 0Auckland (config-if)#ip address 192.168.248.1 255.255.255.0Router(config)#hostname SingaporeSingapore(config)#interface loopback 0Singapore(config-if)#ip address 192.168.232.1 255.255.255.0Singapore(config-if)#description EngineersSingapore(config)#interface loopback 1Singapore(config-if)#ip address 192.168.236.1 255.255.255.0Singapore(config-if)#description ManagerSingapore(config)#interface s1/0Singapore(config-if)#ip address 192.168.224.2 255.255.255.252Singapore(config-if)#no shutdownSingapore(config)#interface s1/1Singapore(config-if)#ip address 192.168.240.1 255.255.255.252Singapore(config-if)#no shutdown配置完成后使用CDP 协议检查相邻设备的连通性,如下2、在SanJose3上,配置RIPv2协议通告物理直连的网络,配置如下:SanJose3(config)#router ripSanJose3(config-router)#version 2SanJose3(config-router)#network 192.168.224.0SanJose3(config-router)#network 192.168.5.0因为192.158.5.0是一个stub network,这个网络里没有路由器或者主机需要RIPv2协议的更新。


路由重分布概念
路由重分布是指在不同路由协议之间共享路由信息的过程。
为了在同一个网络中有效地支持多种路由协议,需要在不同的路由协议之间进行路由信息的交换。
这个过程将一种路由协议获悉的路由信息告知给另一种路由协议,从而实现在不同的路由协议之间路由信息的共享。
在执行路由重分布时,需要注意一些关键问题。
首先,应避免在同一个网络中同时使用两个不同的路由协议,除非在网络之间有明显的界限。
其次,如果有多台路由器作为重分布点,应使用单项重分布以避免回环和收敛问题,并在不需要接收外部路由的路由器上使用默认路由。
此外,在单边界的情况下,可以使用双向重分布,但如果没有任何机制来防止路由回环,则不要在一个多边界的网络中使用双向重分布。
在进行路由重分布时,还需要考虑度量标准和管理距离。
种子度量值是在路由生分布时定义的,它是一条通过外部重分布进来的路由的初始度量值。
同时,由于不同路由协议的度量标准不同,需要进行协议标准的转换以实现兼容性。
总之,路由重分布是实现多个路由协议在同一个网络中协同工作的关键技术之一。
通过在不同路由协议之间进行路由信息的共享和转换,可以实现更加高效和可靠的路由选择和网络通信。
静态路由重分布例子配置要求一台设备,通过RIP 与其它设备交换路由信息,另外还有3 条静态路由,要求只允许RIP 重新分布172.16.1.0/24、192.168.1.0/24 两条路由。
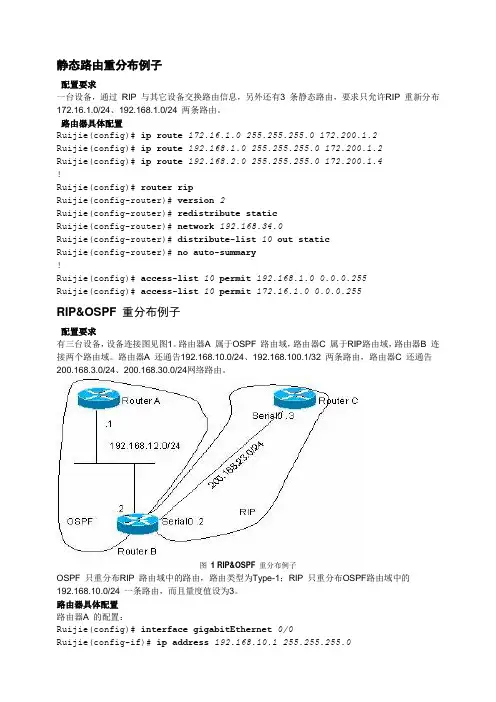
路由器具体配置Ruijie(config)# ip route 172.16.1.0 255.255.255.0 172.200.1.2Ruijie(config)# ip route 192.168.1.0 255.255.255.0 172.200.1.2Ruijie(config)# ip route 192.168.2.0 255.255.255.0 172.200.1.4!Ruijie(config)# router ripRuijie(config-router)# version 2Ruijie(config-router)# redistribute staticRuijie(config-router)# network 192.168.34.0Ruijie(config-router)# distribute-list 10 out staticRuijie(config-router)# no auto-summary!Ruijie(config)# access-list 10 permit 192.168.1.0 0.0.0.255Ruijie(config)# access-list 10 permit 172.16.1.0 0.0.0.255RIP&OSPF 重分布例子配置要求有三台设备,设备连接图见图1。
路由器A 属于OSPF 路由域,路由器C 属于RIP路由域,路由器B 连接两个路由域。
路由器A 还通告192.168.10.0/24、192.168.100.1/32 两条路由,路由器C 还通告200.168.3.0/24、200.168.30.0/24网络路由。
图 1 RIP&OSPF 重分布例子OSPF 只重分布RIP 路由域中的路由,路由类型为Type-1;RIP 只重分布OSPF路由域中的192.168.10.0/24 一条路由,而且量度值设为3。
参考命令:switch0:switch>enswitch#conf tswitch(config)#hostname switch0 switch0(config)#exitswitch0#vlan databaseswitch0(vlan)#vtp clientswitch0(vlan)#vtp domain network switch0(vlan)#vtp password 123 switch0(vlan)#exitswitch0#conf tswitch0(config)#interface f0/3switch0(config-if)#switchport mode trunkswitch0(config-if)#switchport trunk allowed vlan allswitch1:switch>enswitch#conf tswitch(config)#hostname switch1switch1(config)#exitswitch1#vlan databaseswitch1(vlan)#vtp clientswitch1(vlan)#vtp domain networkswitch1(vlan)#vtp password 123switch1(vlan)#exitswitch1#conf tswitch1(config)#interface f0/3switch1(config-if)#switchport mode trunkswitch1(config-if)#switchport trunk allowed vlan allmultilayer switch0:switch>enswitch#vlan databaseswitch(vlan)#vtp serverswitch(vlan)#vtp domain networkswitch(vlan)#vtp password 123switch(vlan)#vlan 2 name salesswitch(vlan)#vlan 3 name marketingswitch(vlan)#vlan 4 name ToRouterswitch(vlan)#exitswitch#conf tswitch(config)#interface f0/11switch(config-if)#switchport mode trunkswitch(config-if)#switchport trunk allowed vlan all switch(config)#interface f0/12switch(config-if)#switchport mode trunkswitch(config-if)#switchport trunk allowed vlan allswitch0:switch0#sh vlanswitch0#conf tswitch0(config)#interface f0/1switch0(config-if)#switchport access vlan 2switch0(config-if)#exitswitch0(config)#interface f0/2switch0(config-if)#switchport access vlan 3switch1:switch1#sh vlanswitch1#conf tswitch1(config)#interface f0/1switch1(config-if)#switchport access vlan 2switch1(config-if)#exitswitch1(config)#interface f0/2switch1(config-if)#switchport access vlan 3multilayer switch0:switch>enswitch#conf tswitch(config)#interface vlan 2Switch(config-if)#ip add 192.168.10.1 255.255.255.0 switch(config)#interface vlan 3Switch(config-if)#ip add 192.168.20.1 255.255.255.0 switch(config)#interface vlan 4Switch(config-if)#ip add 192.168.30.1 255.255.255.0 switch(config)#interface f0/4switch(config-if)#switchport access vlan 4router0:router>enrouter#conf trouter(config)#hostname router0router0(config)#int fa0/0router0(config-if)#ip add 192.168.30.2 255.255.255.0 router0(config-if)#no shrouter0(config)#int fa0/1router0(config-if)#ip add 172.168.10.1 255.255.255.0 router0(config-if)#no shrouter1:router>enrouter#conf trouter(config)#hostname router1router1(config)#int fa0/0router1(config-if)#ip add 10.168.40.1 255.255.255.0 router1(config-if)#no shrouter1(config)#int fa0/1router1(config-if)#ip add 172.168.10.2 255.255.255.0 router1(config-if)#no shrouter1(config)#int s0/2router1(config-if)#ip add 222.168.10.1 255.255.255.0 router1(config-if)#clock rate 19200router1(config-if)#no shrouter2:router>enrouter#conf trouter(config)#hostname router2router2(config)#int fa0/0router2(config-if)#ip add 192.168.50.1 255.255.255.0 router2(config-if)#no shrouter1(config)#int s0/2router1(config-if)#ip add 222.168.10.2 255.255.255.0 router1(config-if)#no sh。

zebra重分布原理摘要:一、引言二、zebra重分布原理概述1.zebra的定义2.重分布的定义3.zebra重分布的作用三、zebra重分布的实现1.重分布过程2.重分布算法3.重分布的优化四、zebra重分布的应用1.负载均衡2.网络优化3.其他应用场景五、zebra重分布的局限性与未来展望1.局限性2.未来发展趋势正文:一、引言随着互联网的快速发展,网络通信技术也在不断进步,网络设备数量和规模的不断扩大,使得网络拓扑结构变得越来越复杂。
为了解决网络中的诸多问题,如路由选择、负载均衡等,一种名为zebra的重分布技术应运而生。
本文将对zebra重分布原理进行详细阐述。
二、zebra重分布原理概述1.zebra的定义zebra是一种网络设备之间进行路由信息交换的技术,通过动态地更新路由表,实现网络中的负载均衡和优化。
2.重分布的定义重分布是指在网络中,当某个网络设备发现到达目的网络的路径发生变化时,将这一信息传播给其他相关设备,从而使整个网络的路由表得到更新。
3.zebra重分布的作用zebra重分布技术主要作用于网络设备之间,实现以下目的:(1)负载均衡:通过重分布,使网络中的流量在各个路径之间合理分配,避免某些路径过载,提高网络的传输效率。
(2)网络优化:当网络中出现故障或者拓扑发生变化时,zebra重分布可以协助网络设备快速适应新的网络环境,保证网络的连通性。
三、zebra重分布的实现1.重分布过程zebra重分布的过程主要包括以下几个步骤:(1)网络设备之间的邻居关系建立:通过发送Hello报文,实现设备之间的通信和邻居关系的建立。
(2)路由信息交换:邻居设备之间通过交换路由信息(如链路状态协议(Link State Protocol)),各自更新路由表。
(3)路由表更新:根据收到的路由信息,设备更新自己的路由表,从而实现重分布。
2.重分布算法zebra重分布采用距离矢量路由算法(Distance Vector Routing Algorithm),该算法通过计算设备到目的网络的距离(如跳数),来选择最佳路径。
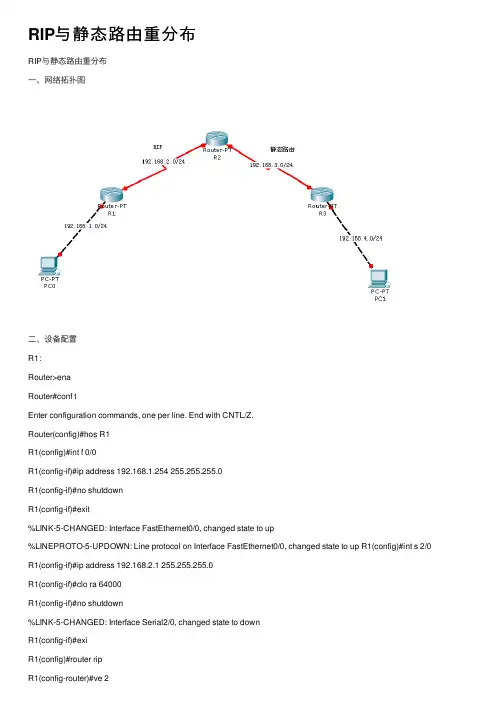
RIP与静态路由重分布RIP与静态路由重分布⼀、⽹络拓扑图⼆、设备配置R1:Router>enaRouter#conf tEnter configuration commands, one per line. End with CNTL/Z.Router(config)#hos R1R1(config)#int f 0/0R1(config-if)#ip address 192.168.1.254 255.255.255.0R1(config-if)#no shutdownR1(config-if)#exit%LINK-5-CHANGED: Interface FastEthernet0/0, changed state to up%LINEPROTO-5-UPDOWN: Line protocol on Interface FastEthernet0/0, changed state to up R1(config)#int s 2/0 R1(config-if)#ip address 192.168.2.1 255.255.255.0R1(config-if)#clo ra 64000R1(config-if)#no shutdown%LINK-5-CHANGED: Interface Serial2/0, changed state to downR1(config-if)#exiR1(config)#router ripR1(config-router)#ve 2R1(config-router)#network 192.168.1.0R1(config-router)#network 192.168.2.0R1(config-router)#exiR1(config)#do wrBuilding configuration...[OK]R2:Router>Router>enaRouter#conf tEnter configuration commands, one per line. End with CNTL/Z.Router(config)#hos R2R2(config)#int s 2/0R2(config-if)#ip address 192.168.2.2 255.255.255.0R2(config-if)#no shutdown%LINK-5-CHANGED: Interface Serial2/0, changed state to upR2(config-if)#exiR2(config)#int s 3/0%LINEPROTO-5-UPDOWN: Line protocol on Interface Serial2/0, changed state to up R2(config-if)#ip address 192.168.3.1 255.255.255.0R2(config-if)#clo ra 64000R2(config-if)#no shutdown%LINK-5-CHANGED: Interface Serial3/0, changed state to downR2(config-if)#exiR2(config)#router ripR2(config-router)#ve 2R2(config-router)#network 192.168.2.0R2(config-router)#default-information originateR2(config-router)#redistribute static metric 3R2(config-router)#exiR2(config)#ip route 0.0.0.0 0.0.0.0 192.168.3.2R2(config)#ip route 192.168.4.0 255.255.255.0 192.168.3.2R2(config)#do wrBuilding configuration...[OK]R3:Router>Router>enaRouter#conf tEnter configuration commands, one per line. End with CNTL/Z.Router(config)#hos R3R3(config)#int f 0/0R3(config-if)#ip address 192.168.4.254 255.255.255.0R3(config-if)#no shutdownR3(config-if)#exit%LINK-5-CHANGED: Interface FastEthernet0/0, changed state to up%LINEPROTO-5-UPDOWN: Line protocol on Interface FastEthernet0/0, changed state to up R3(config)#int s 2/0 R3(config-if)#ip address 192.168.3.2 255.255.255.0R3(config-if)#no shutdownR3(config-if)#exit%LINK-5-CHANGED: Interface Serial2/0, changed state to upR3(config)#ip route 0.0.0.0 0.0.0.0 192.168.3.1%LINEPROTO-5-UPDOWN: Line protocol on Interface Serial2/0, changed state to upR3(config)#ip route 192.168.2.0 255.255.255.0 192.168.3.1R3(config)#ip route 192.168.1.0 255.255.255.0 192.168.3.1Building configuration...[OK]测试结果:从PC0 ping PC1:。
路由重分发/各种列表介绍RIP*******A协议分布到RIP =A协议的直连接口地址和打A协议都被引入到RIP中,SEED-METRIC 默认是无穷大,需要手工添加METRIC直连分布到RIP =直连分布到RIP中SEED-METRIC默认是1 不用手工添加。
静态/默认分布到RIP =静态分布到RIP中SEED-METRIC默认是1 不用手工添加。
OSPF*******A协议分布到OSPF =A协议的直连接口地址和打A协议都被引入到OSPF中,必须手工添加SUBNETS,SEED-METRIC默认是20直连分布到OSPF =直连分布到OSPF必须手工添加SUBNETS,SEED-METRIC默认是20静态/默认分布到OSPF =静态分布到OSPF必须手工添加SUBNETS,SEED-METRIC默认是20,(默认路由不能被分布进去*)EIGRP*******A协议分布到EIGRP =A协议的直连接口地址(ISIS除外,有BUG)和打A协议都被引入到EIGRP中。
SEED-METRIC默认是无穷大,需要手工添加METRIC,直连分布到EIGRP =直连分布到EIGRP中,不用手工添加静态/默认分布到EIGRP =静态分布到EIGRP中,不用手工添加ISIS*******A协议分布到ISIS =A协议的直连接口地址和打A协议都被引入到ISIS中,SEED-METRIC 默认是0直连分布到ISIS =直连分布到ISIS中,SEED-METRIC默认是0静态/默认分布到ISIS =静态分布到ISIS中,SEED-METRIC默认是0,(默认路由不能被分布进去*)实验任务1:双点双向重分发出现次优路径选择,解决方法实验任务2:重分发问题:在R4上show ip route能学习到几条路由!!结论:两条,在路由器协议A引入协议B动作:R上的所有运行A的协议和直连路由(除ISIS,ODR)以及R上的所有学习到的A的协议路由,都会重分布的B协议中实验任务3:passive-interface interfaceX被动接口命令总结:RIP:此命令不主动发送路由更新,但接收路由更新EIGRP: 此命令不发送和接收HELLO信息OSPF:此命令不发送和接收HELLO信息ISIS:此命令不发送和接收HELLO信息以RIP举例:R1:router ripversion 2passive-interface Serial1/0--------------配置被动接口network 1.0.0.0network 13.0.0.0no auto-summaryR3:R3#show ip route ----------------没有学习到R1的1.1.1.0/24的路由3.0.0.0/24 is subnetted, 1 subnetsC 3.3.3.0 is directly connected, Loopback013.0.0.0/24 is subnetted, 1 subnetsC 13.1.1.0 is directly connected, Serial1/0查看R1的路由表:R1#show ip route ---------------可以接收到R3的3.3.3.0/24的路由3.0.0.0/24 is subnetted, 1 subnetsR 3.3.3.0 [120/1] via 13.1.1.3, 00:00:09, Serial1/0开启R1的debug开关R1#debug ip ripR1#clear ip route *-------清除路由表*Mar 1 01:05:30.767: 3.3.3.0/24 via 0.0.0.0, metric 2, tag 0-----------接收到R3的路由分发列表:distribute-list {access–list-number | name} out ------------出方向[interface–name| routing–process [routing-process parameter]]distribute-list [access–list-number | name] | [route-map map-tag] in [interface-type interface-number]]------------进方向分发列表的作用是影响到控制层,可以灵活的指定那些路由可以进入,那些路由被拒绝!实验任务4:两台路由器运行EIGRP协议,并宣告所有的接口到EIGRP中。
路由重分布在网络中的应用作者:钟林来源:《消费电子·理论版》2013年第06期摘要:在一个自治系统内运行单一路由协议可以方便网络管理和减少网络故障,但在现实网络环境中由于网络合并或公司政策等一些因素强迫我们的网络中存在多IP路由选择协议。
在网络中采用路由重分布能够实现网络中多IP路由协议的存在。
本文主要列举了RIP路由协议和OSPF路由协议的路由重分布和配置。
关键词:路由重分布;RIP;OSPF中图分类号:TP393.1 文献标识码:A 文章编号:1674-7712 (2013) 12-0000-01一、路由重分布概述为了在同一个互联网络中高效地支持多种路由选择协议,必须在这些不同的路由选择协议之间共享路由信息。
例如,一个RIP路由进程学习到的路由可能需要被输入到一个OSPF路由进程中去。
在路由选择协议之间交换路由信息的过程称为路由重分布(Redistribution)。
这种分布可以单向的(一种路由协议从另一种协议那里接收路由)或双向的(两种路由协议相互接收对方的路由)。
执行路由重分布的路由器被称为边界路由器,因为它们位于两个或者多个自治系统或路由域的边界上。
目前使用的每一种路由协议都支持重分布。
在一个网络上配置多种协议的原因有很多,如:a、公司对原有网络上进行扩展升级时购买了与原有设备不同公司的路由器,它使用不同的路由协议。
比起重新配置所有网络而言,在新买的路由器上进行路由重分布的配置会更加容易,并且不会对原有通信造成影响;b、公司可能从一种协议过渡到另外一种协议;c、公司内部的部分商业部门可能有基于主机的路由器,它们需要在网络边缘配置RIP;d、公司不同部门或地域网络进行合并时,可能存在不同网络使用了不同的路由协议。
因此需要进行路由重分布。
二、路由重分布的原则路由协议之间特性相差非常大,对路由重分布影响最大的协议特性是度量值和管理距离的差异性,以及协议的有无类别能力,在重分发时如果忽略了对这些差异的考虑,将导致网络中出现某些或者全部路由交换失败,甚至造成路由环路或者网络黑洞。
重分布原则(影响的是该协议中其他路由器路由表,不影响本路由器路由表,只影响本路由器数据库)
1.复制粘贴路由表.
2.寻找被直连取代的路由(必须在路由进程下通告出来的直连路由).也会被复制粘贴。
3.往同一个协议的重分布中,重分布直连最优先处理,并且被重分布直连处理过的接口以后都不再处理了.
4.向EIGRP重分布RIP和OSPF时,重分布OSPF被最优先处理。
RIP
重分布EIGRP,OSPF,ISIS协议的时候要挂metric参数或者default-metric 1
重分布直连,静态,rip的时候不需要
EIGRP
重分布ospf,rip,isis协议的时候需要挂metric或者default-metric
重分布静态,直连,eigrp的时候不需要
OSPF
重分布任何协议,静态,直连的时候都不需要挂metric,但是注意subnets参数
IS-IS
IS-IS 度量必须在1 和63 之间。
IS-IS 中没有
default-metric 选项,应该为每个协议定义权值,如果没有为重分配到IS-IS 的路由指定权值,则度量值默认为0。