萨塔喷枪
- 格式:ppt
- 大小:37.51 MB
- 文档页数:102
德国萨塔SATA整体配套产品方案
佚名
【期刊名称】《汽车维修与保养》
【年(卷),期】2012(000)005
【摘要】人们在拥有了一件新的物品后,会想不断配置与其相适应的物品,以达到心理上平衡,这在心理学上叫做"配套效应"。
根据配套效应原理分析,漆工在有了一
把萨塔SATA面漆喷枪后,也想拥有和使用萨塔SATA系列的其它产品,如底漆喷枪、水性涂料喷枪、小修补喷枪、RPS免洗枪壶、油水分离器、全面式供气面罩、快
速洗枪机、洗枪机、软管和维修保养工具等。
【总页数】1页(P79-79)
【正文语种】中文
【中图分类】TQ633
【相关文献】
1.德国萨塔喷涂系列产品整体配套解决方案 [J],
2.“2012萨塔之夜SATA's Evening”暨萨塔中国经销商联欢晚会在京成功举行[J],
3.“2014萨塔之夜SATA’s Evening”暨萨塔中国经销商年度酒会在京圆满落幕[J],
4.“2014萨塔之SATA’sEvening”暨萨塔中国经销商年度酒会在京圆满落幕[J],
5."2012萨塔之夜SATA's Evening"暨萨塔中国经销商联欢晚会在京成功举行[J],
因版权原因,仅展示原文概要,查看原文内容请购买。

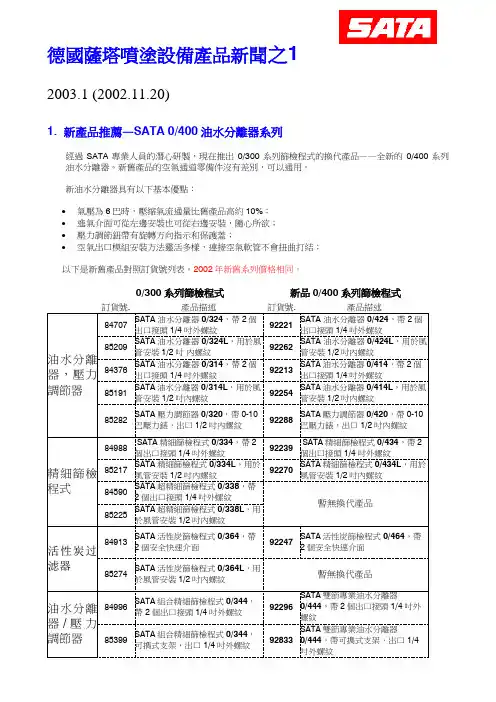
德國薩塔噴塗設備產品新聞之12003.1 (2002.11.20)1. 新產品推薦—SATA 0/400油水分離器系列經過SATA專業人員的潛心研製,現在推出0/300系列篩檢程式的換代產品——全新的0/400系列油水分離器。
新舊產品的空氣通道零備件沒有差別,可以通用。
新油水分離器具有以下基本優點:∙氣壓為6巴時,壓縮氣流通量比舊產品高約10%;∙進氣介面可從左邊安裝也可從右邊安裝,隨心所欲;∙壓力調節鈕帶有旋轉方向指示和保護蓋;∙空氣出口模組安裝方法靈活多樣,連接空氣軟管不會扭曲打結;以下是新舊產品對照訂貨號列表。
2002年新舊系列價格相同。
0/300系列篩檢程式新品0/400系列篩檢程式油水分離器,壓力SATA SATA精細篩檢活性炭过SATA力2. SATAjet K3 RP和HVLP改良版:不銹鋼型為了更好的適應噴塗水性塗料的需要,甚至適應艦隊的工作需要,SATA jet K3將會在塗料通道增加不銹鋼層。
訂貨號保持不變。
數字噴槍立即改良;標準噴槍將在2003年1月起實現這一改良技術。
3. 採用新的噴嘴技術和表面處理的SATA自動噴槍今後,以下類型的SATA LP Jet自動噴槍將採用新的K3噴嘴技術:∙LP Jet K3 RP (以前的:LP 90 Jet)∙LP Jet K3 RP ROB (以前的:LP 90 Jet ROB)∙LP Jet K3 HVLP (以前的:LP 90 Jet-NR 95/HVLP)∙LP Jet K3 HVLP ROB (以前的:LP 90 Jet-NR 95/HVLP ROB)為了增加使用水性塗料時的耐腐蝕性,上述自動噴槍以及SATA LP LM 2000 RP 和SATA LPS RP/R 2000噴槍槍體均採用黑色陽極電鍍。
4. Minijet 3 HVLP粘度杯—新款:帶防滴落裝置今後,0.125升塑膠杯將增加防滴落裝置,配合“大的”SATA油漆噴槍使用。

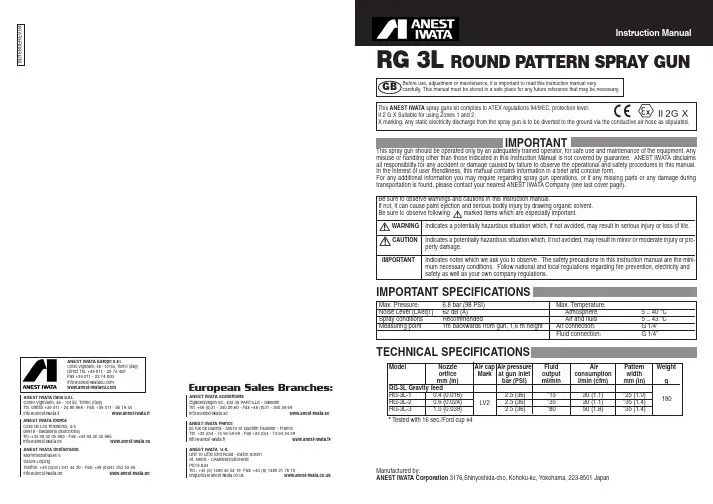
IMPORTANTThis spray gun should be operated only by an adequately trained operator, for safe use and maintenance of the equipment. Any misuse or handling other than those indicated in this Instruction Manual is not covered by guarantee. ANEST IWATA disclaims all responsibility for any accident or damage caused by failure to observe the operational and safety procedures in this manual.In the interest of user friendliness, this manual contains information in a brief and concise form.For any additional information you may require regarding spray gun operations, or if any missing parts or any damage during transportation is found, please contact your nearest ANESTIWATA Company (see last cover page).IMPORTANT SPECIFICATIONSBe sure to observe warnings and cautions in this instruction manual.If not, it can cause paint ejection and serious bodily injury by drawing organic solvent.Be sure to observe following marked items which are especially important.WARNING Indicates a potentially hazardous situation which, if not avoided, may result in serious injury or loss of life.CAUTION Indicates a potentially hazardous situation which, if not avoided, may result in minor or moderate injury or pro-perty damage.IMPORTANTIndicates notes which we ask you to observe. The safety precautions in this instruction manual are the mini-mum necessary conditions. Follow national and local regulations regarding fire prevention, electricity and safety as well as your own company regulations.TECHNICAL SPECIFICATIONSManufactured by:Instruction ManualMax. Pressure:6.8 bar (98 PSI)Max. Temperature:Noise Level (LAeqT)62 dB (A)Atmosphere5 ~ 40 °C Spray conditions RecommendedAir and fluid 5 ~ 43 °C Measuring point1m backwards from gun, 1,6 m heightAir connection:G 1/4”Fluid connection:G 1/4”This ANEST IWATA spray guns kit complies to ATEX regulations 94/9/EC, protection level:II 2 G X Suitable for using Zones 1 and 2.X marking: Any static electricity discharge from the spray gun is to be diverted to the ground via the conductive air hose as stipulated.*Tested with 16 sec./Ford cup #4RG 3L ROUND PATTERN SPRAY GUNBefore use, adjustment or maintenance, it is important to read this instruction manual verycarefully.This manual must be stored in a safe place for any future reference that may be necessary.GBM J 1680E R E V .04ModelNozzle Air cap Air pressureFluid Air PatternWeight orifice Mark at gun inlet output consumption width mm (in)bar (PSI)ml/min l/min (cfm)mm (in)g RG-3L Gravity feed RG-3L-1 0.4 (0.016)1 2.5 (36)*1530 (1.1)*25 (1.0)RG-3L-20.6 (0.024)2 2.5 (36)*3530 (1.1)*35 (1.4)RG-3L-3 1.0 (0.039)3 2.5 (36)*8050 (1.8)*35 (1.4)180LV2ANEST IWATA Italia S.r.l.Corso Vigevano, 46 - 10155, Torino (Italy)Tel. diretto +39 011 - 24 80 868 - Fax: +39 011 - 85 19 44*******************www.anest-iwata.it ANEST IWATA IbericaCalle de Les Teixidores, 3-508918 - Badalona (Barcelona)Tel.:+34 93 32 05 993 - Fax.:+34 93 32 05 965*******************www.anest-iwata.es ANEST IWATA Deutschland Mommsenstrasse 504329 LeipzigTelefon: +49 (0)341 241 44 30 - Fax: +49 (0)341 252 55 95*******************www.anest-iwata.deANEST IWATA Europe S.r.l.Corso Vigevano, 46 - 10155, Torino (Italy)Direct Tel. +39 011 - 22 74 402Fax +39 011 - 22 74 000**********************ANEST IWATA ScandinaviaÖgärdesvägen 6C, 433 30 PARTILLE - SwedenTel. +46 (0)31 - 340 28 60 - Fax +46 (0)31 - 340 28 69*******************www.anest-iwata.se ANEST IWATA France25 rue de Madrid - 38070 St Quentin Fallavier - France Tél. +33 (0)4 - 74 94 59 69 - Fax +33 (0)4 - 74 94 34 39*******************www.anest-iwata.fr ANEST IWATA U.K.Unit 10 Little End Road - Eaton Socon St. Neots - CAMBRIDGESHIRE PE19 8JHTel.: +44 (0) 1480 40 54 19 Fax: +44 (0) 1480 21 76 10************************.uk European Sales Branches:SAFETY WARNINGS1.Sparks and open flames are strictly prohibited.Paints can be highly flammable and can cause fire. Avoid any ignition sources such as smoking, open flames, electrical goods, etc.2.- Unsuitable solvents methyl chloride, dichloromethane, 1.2-dichloroethane, carbon tetrachloride, trichloroethylene, 1.1.1-trichloroethane- Be sure that all fluids and cleaner are compatible with gun parts.We can supply a list of materials used to manufacture the product.3.Securely ground spray gun by using air hose with built-in ground wire.Ground wire : Less than 1M ΩCheck the earth stability periodically.If not, insufficient grounding can cause fire and explosion due to static electric sparking.1.Never point gun towards peoples or animals.If done, it can cause inflammation of eyes and skin or bodily injury.2.Never exceed maximum operating pressure and maximum operating Temperature.3.Be sure to release air and fluid pressures before cleaning,disassembling or servicing.In order to release pressure, first stop supply of compressed air, fluid and cleaner to spray gun. Then remove fluid adj. knob and pull fluid needle set towards you.4.Tip of fluid needle set has a sharp point.Do not touch the tip of fluid needle during maintenance for the protection of the human body.Use in a well-ventilated site by using spray booth.If not, poor ventilation can cause organic solvent poisoning and catch fire.2.Always wear protective gear (safety glasses,mask,gloves).If not, cleaning liquid, etc., can cause inflammation of eyes and skin.If you feel something wrong with eyes or skin, immediately see a doctor.3.Wear earplugs if necessary.Noise level can exceed 85 dB(A), depending on operating conditions and painting site4.If operators pull the trigger many times during operation,it may cause carpal tunnel syndrome.Rest if you feel any discomfort in your hand.1.Never alter this spray gun.If done, it can cause insufficient performance and failure.2.Enter working areas of other equipment (robots,reciprocators,etc.) after machines have been turned off.If not, contact with them can cause injury.COMMENTSSPARE PARTS LISTFluid nozzle Fluid needle setOrifice Mark Markmm(in)0.4 (0.016)0410.6 (0.024)0621.0 (0.039)103Marked parts are wearable parts.NOTE: When ordering parts, specify gun’smodel, part name with ref.No. and markedNo. of air cap set, fluid nozzle and fluid nee-dle.FLUID NOZZLE-FLUID NEEDLE SETCOMBINATION3.Never spray foods or chemicals through this gun.If done, it can cause accident by corrosion of fluid passages or adversely affect health by mixed foreign matter.4.If something goes wrong,immediately stop operation and find the cause.Do not use again until you have solved theproblem.HOW TO CONNECT1. Connect an air hose to air nipple tightly.2. Connect a gravity cup, to fluid nipple tightly.3. Flush the gun fluid passages with a compatible cleaner.4. Pour paint into container, test spray and adjust fluid output as well as pattern width.HOW TO OPERATESuggested air pressure is 2.0 to 3.5 bar (29 to 50 PSI)Recommended paint viscosity differs according to paint propertyand painting conditions. 12 to 23 sec. / Ford cup#4 is recommendable.Keep fluid output as small as possible to the extent that the job willnot be hindered. It will lead to better finishing with fine atomization.Set the spray distance from the gun to the work piece as near aspossible within the range of 50-200 mm (2_7.9 in).The gun should be held so that it is perpendicular to the surface of the workpiece at all times. Then, the gun should move in a straightand horizontal line. Arcing the gun causes uneven painting.CAUTION- Use clean air filtered through air dryer and air filter.If not,dirty air can cause painting failure.- When you use this gun for the first time after purchasing,adjust fluid needle packing set.Slowly tighten fluid packing seat and loosen a bit when fluid needle set does not returnsmoothly,and adjust so that fluid needle set smoothly moves.- When you use this gun for the first time after purchasing,clean fluid passages sprayingcleaner and remove rust preventive oil.If not,remaining rust preventive oil can cause painting failure such as fish eyes.- Firmly fix cup to spray gun.If not,disconnection and drop of cup can cause bodilyinjury.OTHER PRECAUTIONSIMPORTANT1. Basically, air volume should be adjusted by air regulator for atomizing air.However, its fine adjustment is possible by adjusting air cap position.- First loosen jam nut and adjust aircap position.Note:Normally the best position of nozzle tip is 0.1~0.3 mm projected from air cap.2. Adjustment of air adj. setOnly RG-3L1 is provided the air adj. set.It is easy to obtain the finest regulation by adjusting the air adj. set.50-200 mm2-7.9 inTROUBLESHOOTINGSpray PatternProblemsRemedies1.Air enters between fluid nozzle and 1. Remove fluid nozzle to clean seat.Flutteringtapered seat of gun body.If it is damaged, replace nozzle.2.Air is drawn from fluid needle packing set. 2. Tighten fluid needle packing.3.Air enters at fluid container fitting nut.3. Fully tighten joint section.1. Paint viscosity too low. 1. Add paint to increase viscosity.Split2.Fluid output too high.2. Tighten fluid adj. knob to reduce fluid output or turn pattern adj. knob clockwise.PROBLEMS AND REMEDIESProblem Where it Parts to be CauseRemedyoccurred checked Retighten Adjust Clean ReplaceAir leaks Air valve setAir valve *Dirt or damage on seat x x (from tip of air cap)Air valve seat set *Dirt or damage on seat xx *Wear on air valve spring x O ring*Damaged or deteriorated x Paint Fluid nozzleFluid nozzle -*Dirt, damage, wear leaksfluid needle seton seatxx*Loose fluid needle adj. knobx*Wear on needle springxFluid nozzle -*Insufficient tightening xgun body *Dirt or damage on seat xx Fluid needle - *Needle does not return due packing setto packing set too tight x x*Needle does not return due to paint buildup on fluid needlexxFluid needleNeedle packing *Wearx xset, needle set Packing seat *Insufficient tightening xPaint does not Tip of gunFluid adj. knob *Insufficient opening xflowTip hole of nozzle *Clogged x Paint filter*CloggedxxMAINTENANCE AND INSPECTIONStep-by-step procedureImportant1.Pour remaining paint to another container. Clean fluid passages and air cap set. 1. Incomplete cleaning can fail pattern shape and uniform particles.Spray a small amount of cleaner to clean fluid passages.Especially clean fully and promptly after use with two-component paint.2.Clean each section with brush soaked with cleaner and wipe out with waste cloth.2. Do not immerse the whole gun in cleaner. If done, it can damage parts.When cleaning, never scratch any holes of air cap set, fluid nozzle, or fluid needle set.3. Before disassembly, fully clean fluid passages. 3. During disassembly, do not scratch seat section.(1) Disassemble fluid nozzle.(1) Remove fluid nozzle after removing fluid needle set or while keeping fluid needle pulled, in order to protect seat section.(2) Disassemble fluid needle set.(2) Be careful when handling tip of fluid needle set since it is sharp.You do not need to remove fluid adj. guide set from gun body.Disassemble fluid adj. guide set as little as possible.Remove fluid adj. knob and fluid needle spring, then pull out fluid needle spring, and then pull out fluid needle set from back of fluid adj. guide set.4.The fluid needle packing set, must be adjusted while the fluid needle set is inser- 4.Too much tightening of fluid needle packing set can cause bad movement ted.Tighten fluid needle packing seat by hand and then tighten further by spanner.of fluid needle set and fluid leakage from the tip of fluid needle set.5.In order to assemble air valve, first assemble air valve & air valve spring 5. If you try to fit air valve spring and air valve to gun body set without fluid & fluid adj. guide set together. Next, insert fluid needle set into fluid adj. guide set, needle set, air valve will not be fitted correctly and packing inside fluid then fit it to gun body set and screw fluid adj. guide set.adj. guide set will be damaged.6.Turn pattern adj. knob counterclockwise to fully open. 6. If pattern adj.Knob is not fully opened, tip of it can brush against and Then tighten pattern adj. set or air adj. set.damage fluid nozzle and cause seizure of thread.Where to inspectParts replacement standard 1. Each hole passage of air cap and fluid nozzle Replace if it is crushed or deformed.2. Packings and O ringsReplace if it is deformed or worn out.3. Leakage from seat section between fluid nozzle and fluid needle setReplace them if leakage does not stop after fully cleaning fluid nozzle and fluid needle set. If you replace fluid nozzle or fluid needle only, fully match them and confirm that there is no leakage.WARNING-First release air and fluid pressure fully according to item No.3 of “Improper use of equipment”of WARNING on page 2.-Tip of fluid needle set has a sharp point.Do not touch the tip of needle valve during maintenance for protection of the human body.-Be careful not to damage the tip of the fluid nozzle or put your hand on it.-Only an experienced person who is fully conversant with the equipment can do maintenance and inspection.CAUTION-Never use commercial or other parts instead of ANEST IWATA original spare parts.-Never immerse the whole gun into liquid such as cleaner.-Never damage holes of air cap,fluid nozzle or fluid needle.。

萨塔喷枪操作方法萨塔喷枪是一种被广泛应用于汽车修复、汽车喷漆等领域的高压液态涂装设备。
它由喷枪、喷漆杯、压缩空气供应装置等组成,操作灵活简便,喷漆效果优良。
以下是萨塔喷枪的操作方法,详细介绍了从准备工作到正式喷漆的全过程。
1. 准备工作(1)清洁:在操作之前,一定要彻底清洁喷枪。
将松散的灰尘、涂层残留物等从喷嘴、嘴盖和喷嘴附近的区域中清除干净。
确保喷枪干净无杂质。
(2)调节松紧度:根据需要,调整喷枪上的涂层挡片、嘴盖和嘴罩等零部件的松紧度,确保它们能够完美配合并保持稳定。
2. 涂装材料准备将要使用的涂装材料按照施工方案准备好,确保颜色、稀释剂、胶粘剂等与要求相符。
如需稀释,按比例将涂料稀释,并加入配套的硬化剂。
3. 喷枪组装按照使用说明书,将喷枪进行正确的组装。
确保喷嘴、喷漆杯、喷嘴盖等零部件正确安装,且组装牢固。
检查喷嘴是否完好,没有损坏或堵塞,喷枪是否漏气等。
4. 设置喷气压力(1)连接气源:将喷枪连接到压缩空气供应装置上,确保气源可靠、稳定。
(2)调节压力:根据涂装材料、涂装面积等要求,调节喷枪上的压力调节旋钮,使喷气压力保持在适当范围内。
一般来说,汽车修复涂装时压力范围为2-4巴,汽车整车喷漆则为2-5巴。
5. 喷枪测试在正式喷漆之前,进行一次喷枪测试以确保喷枪正常工作。
将喷枪对准试板或试品,按下喷枪开关,观察喷漆均匀度、喷射量等指标是否符合要求。
如有异常,必要时进行调整。
6. 开始喷漆(1)持握喷枪:正确握持喷枪,将食指放在喷枪杆上,中指和无名指放在喷嘴盖后面的槽内。
掌握稳定的杆压,将喷枪与涂装表面保持恒定的角度和距离,一般为15-25厘米。
(2)开关控制:按下喷枪开关,开始喷漆。
在喷漆过程中,可以根据需要调整喷漆速度和喷枪与喷漆表面的距离。
要坚持均匀的握压和喷射速度,避免出现漏喷、堵塞或过度喷涂等问题。
(3)交叉喷涂:通过交叉喷涂方式,保证整体涂装均匀一致。
先进行垂直喷涂一层,然后再进行水平喷涂一层。
栏目编辑:高中伟******************钃L a w y e r's V ie w法律园地萨塔有限两合公司(SATA GmbH &C〇.KG)1907年成立于 德国(以下简称“德国萨塔公司”)。
作为德国工匠精神的典型代 表,一个世纪以来德国萨塔公司只专注做一件事,就是研发和生 产高品质的喷枪、油水分离器、免洗枪壶、呼吸面罩等喷涂设备及 相关辅助产品。
如今,萨塔已经成为世界喷涂领域广受认可的品 牌。
自从上世纪80年代进入中国市场以来,凭借出色的性能、先 进的技术以及贴心的服务,德国萨塔公司和萨塔产品在中国以及 世界各地都臝得了喷涂行业高度的赞誉,获得广大业内人士和喷 涂技师的广泛认可和深度信赖。
与此同时,德国萨塔公司也面临 着严重的知识产权被侵犯问题。
消费者需要时刻保持警惕,假冒 伪劣喷涂枪产品在品质上与萨塔正品没有可比性,其安全性也无 法保障。
德国萨塔公司一直严密监控制假售假等侵权行为,一经 发现,立即采取法律行动,积极依法维权,制止恶意侵权行为。
虽然2020年“新冠肺炎”疫情在全世界范围内肆虐,但中国没 有停止鼓励创新的步伐,包括修改了《专利法》等多部保护知识产 权法律,将专利侵权法定赔偿数额提升至500万元,设置恶意侵权 惩罚性赔偿制度等,中国将知识产权保护提升到了一个全新高度。
为了维护客户的权益,守护品牌的优良声誉,德国萨塔公司 的维权力度逐渐加大,2020年其在中国多地法院就开展了知识 产权的民事维权诉讼近20件(包括一二审),向涉嫌侵权企业发送 律师警告函20封,同电商平台积极合作删除1 500余条展示侵权 产品的链接信息,求助公安等司法机关追究刑事责任共计4人,其中1人已经被法院判决有期徒刑一年六个月,其余3人仍在审理 之中;各级法院判决支付德国萨塔公司损失和维权费用合计超过 270万元。
在知识产权维权案中,最严厉的就是刑事责任,因为涉及剥 夺人身自由。
2018年7月至2020年7月间,被告人李某通过网络购 买喷枪等配件,并使用光刻机在配件上刻印“SATA”商标标识,随后组装配件并冒充萨塔原装正品喷枪在淘宝等电商平台上销 售。
对汽车维修行业而言,小面积漆膜修补工作占整个汽车喷涂工作量一个很大的比例。
可是,还有部分汽车维修企业采用的是一种传统的漆膜修补方法,即不论喷涂面积的大小,都使用同一把喷枪(相同喷嘴口径)完成各种大、小面积的面漆修补,而忽略了小面积的局部修补对喷枪的特殊要求,造成小面积修补质量难以达到要求、各种喷涂所需材料的浪费(遮蔽纸、胶带、沙纸、漆料、溶剂、清洗剂等)、工作效率不高等现象。
适合做小修补的车体位置:翼子板边缘、车门底部边缘、前后保险杠边缘、所有低于保险杠最高水平线的表面。
小修补喷枪操作手法:1、遮盖中涂底漆时,喷涂气压调至0.7~1.5巴,油漆流量调小,喷幅扇面尽量调至最大,喷涂时由内向外扩展施喷,喷涂多遍底色漆以慢慢遮盖。
2、底色漆过渡时,喷涂气压调至1.5~2.0巴,油漆流量适当调大,喷幅扇面调宽,喷涂时从外至内(可根据各涂料商提供的技术参考),喷涂范围一层比一层稍宽,以便颜色过渡,直至接口位置已不明显。
3、罩光时,喷涂气压调至2.0巴,油漆流量调大,喷幅扇面调宽。
喷涂第一遍清漆要完全覆盖底色漆范围,第二遍清漆喷涂范围应大于第一遍清漆的范围,直至预定的接口位置。
驳口时,完成清漆喷涂后立刻换上驳口水(或在原有清漆中加入添加剂或稀释剂),在清漆的接口位置将驳口水或加入驳口水的清漆以多次薄喷的手法进行涂层接口的消除。
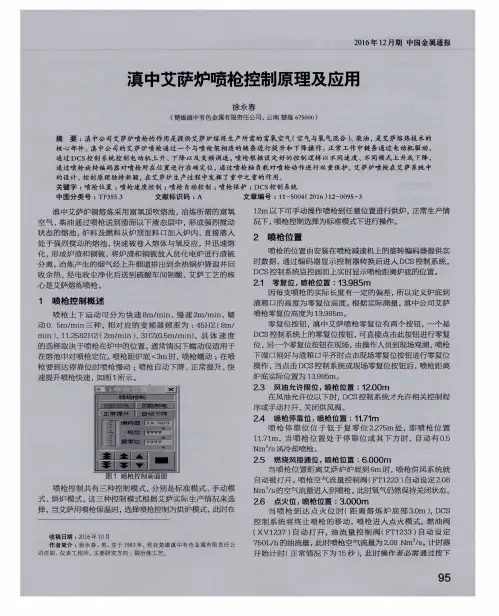
小修补喷枪问答问:使用SATAminijet 3000 B HVLP环保省漆小修补喷枪为什么可减少喷涂面积?答:通常使用普通大面积施喷的喷枪,其操作气压都较高,一般都在2.0巴以上。
如果作小面积修补时,难于控制小面积喷涂。
而使用环保省漆小修补喷枪,其最低喷涂气压可控制在0.7巴都能将涂料进行完美的雾化,在较低的喷涂气压操作下,更容易控制面漆的修补范围,不但可以节省更多的油漆,还可提高工作效率。
问:使用SATAminijet 3000 B HVLP环保省漆小修补喷枪为什么能提高工作效率?答:目前,在很多汽车维修企业都存在业务量大,而生产场地小的现象。
SATA喷涂设备知识问答(六)
佚名
【期刊名称】《汽车维修与保养》
【年(卷),期】2007(000)007
【摘要】@@ (接上期)rnHVLP环保省漆喷枪风帽(空气喷嘴)上的空气孔如何分工?rn答:风帽中心的圆孔为主雾化孔,流经涂料喷嘴的涂料就是依靠主雾化孔的压缩空气进行雾化的.主雾化孔旁边的小圆孔是辅助雾化孔,这些圆孔喷射出的压缩空气形成一个空气罩,使雾化后的涂料不会散开或溅到风帽其他部位,确保雾化效果和风帽的洁净.
【总页数】1页(P71)
【正文语种】中文
【中图分类】U4
【相关文献】
1.SATA喷涂设备知识问答(一) [J],
2.SATA喷涂设备知识问答(二) [J],
3.SATA喷涂设备知识问答(三) [J],
4.SATA喷涂设备知识问答(四) [J],
5.SATA喷涂设备知识问答(五) [J],
因版权原因,仅展示原文概要,查看原文内容请购买。
栏目编辑:胡凯溶 ******************市场推广Marketing德国萨塔喷涂系列产品整体配套解决方案德国萨塔(SATA)喷涂系列产品整体配套解决方案是以OEM制造厂、巴士制造厂、4S店(维修企业)的实际使用需求为中心,为他们提供“环保、高效、省漆、节约”的一站式服务。
1.SATA产品整体配套解决方案的提出SATA产品整体配套解决方案来源于对“配套效应”的认知。
“配套效应”是指人们在拥有一件新物品后,会有不断配置与其相适应的物品的意愿,以达到心理上的平衡。
类似的,喷漆技师在拥有一把SATA面漆喷枪后,就会产生拥有和使用其他SATA系列产品的意愿,如底漆喷枪、水性涂料喷枪、小修补喷枪、RPS免洗枪壶、油水分离器、全面式供气面罩、快速洗枪机、洗枪机、软管及维修工具等。
2.SATA产品整体配套解决方案的构成由于各OEM汽车制造厂和4S店在质量、服务、购买预算、整厂规划、资金投入等方面均有不同,配套方案不能千篇一律,而需根据客户的具体情况给出一个专业、可行的产品配套方案。
SATA产品整体配套解决方案以客户的需求为基础,客观、理性地完成方案和产品的配套,从而满足客户的真正需求。
SATA产品可分为三个层次进行讨论。
(1)核心利益层次:产品能够提供给用户的基本效用或益处,是用户真正的需求。
对SATA产品而言,就是能够带给客户全面的喷涂效果、高效的工作效率以及优秀的成本控制和喷涂体验。
(2)形式产品层次:产品在市场上出现时的具体物质形态,主要表现在品质、特征、式样、商标、包装等方面,是核心利益的物质载体。
SATA产品的形式层次包括高品质、德国制造、合乎人体工程学的设计和式样,易施工出完美喷涂效果且科技含量高的产品,广受喷漆技师熟悉和爱戴的SATA商标以及确保消费者利益的双重防伪包装等方面。
(3)附加产品层次:由产品的生产者或经营者提供的购买者有需求的产品层次,主要是帮助用户更好地使用核心利益和服务。