On X-ray Optical Depth in the Coronae of Active Stars
- 格式:pdf
- 大小:432.16 KB
- 文档页数:41
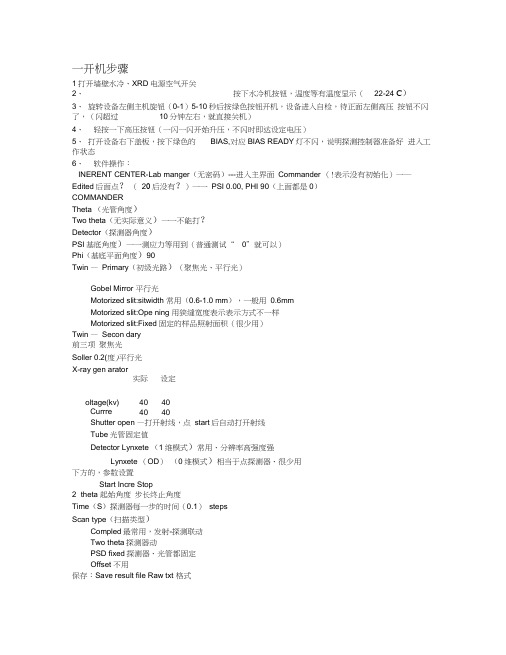
一开机步骤1打开墙壁水冷、XRD电源空气开关2、按下水冷机按钮,温度等有温度显示(22-24 C)3、旋转设备左侧主机旋钮(0-1)5-10秒后按绿色按钮开机,设备进入自检,待正面左侧高压按钮不闪了,(闪超过10分钟左右,就直接关机)4、轻按一下高压按钮(一闪一闪开始升压,不闪时即达设定电压)5、打开设备右下盖板,按下绿色的BIAS,对应BIAS READY灯不闪,说明探测控制器准备好进入工作状态6、软件操作:INERENT CENTER-Lab manger(无密码)---进入主界面Commander (!表示没有初始化)一― Edited后面点?(20后没有?)一一PSI 0.00, PHI 90(上面都是0)COMMANDERTheta (光管角度)Two theta(无实际意义)一一不能打?Detector(探测器角度)PSI基底角度)一一测应力等用到(普通测试“0”就可以)Phi(基底平面角度)90Twin —Primary(初级光路)(聚焦光、平行光)Gobel Mirror 平行光Motorized slit:sitwidth 常用(0.6-1.0 mm),一般用0.6mmMotorized slit:Ope ning 用狭缝宽度表示表示方式不一样Motorized slit:Fixed固定的样品照射面积(很少用)Twin —Secon dary前三项聚焦光Soller 0.2(度)平行光X-ray gen arator实际设定oltage(kv) 40 40Currre nt(kv) 40 40Shutter open —打开射线,点start后自动打开射线Tube光管固定值Detector Lynxete (1维模式)常用、分辨率高强度强Lynxete (OD)(0维模式)相当于点探测器、很少用下方的,参数设置Start Incre Stop2 theta 起始角度步长终止角度Time(S)探测器每一步的时间(0.1)stepsScan type(扫描类型)Compled最常用,发射-探测联动Two theta探测器动PSD fixed探测器、光管都固定Offset 不用保存:Save result file Raw txt 格式Raw v3格式,可以用Jade打开文件格式转换(也可分时保存不同的文件格式),也可使用软件Fileexcha nge 二更换样品台,校准流程(小角度掠射)将样品台上放上glass slit (玻璃狭缝)1 将探测器Cu0.1 替换正常的镍的狭缝(正常测试用狭缝为镍狭缝,Cu0.1 用来校准位置)2 Theta 角度设置成0°? ,detecter 设置成0°?3 Twin-primary 设置2mmTwin- Secondary 5mm4 将电压电流设置成20Kv 5mA5 将detector 模式设置成0维模式LYNXEZE ,然后点击右侧的设置对话框,设成5mm-apply- ok接着设置校准时测试参数6 scan type 选择Theta范围-1°到1°,步长0.01,时间0.17 点start 扫描测试完后8 选择菜单栏中commander 中列表倒数第二项referece and offset Determination 看reference 这项看peak position若peak position 后边参数大于0.004 则点击Save and send New Reference若peak position 后边参数小于0.004 则点击cancel(该项是为了校准位置,小于等于0.004 为正确)换掉glass slit后换成标准样品AlO,探测器狭缝换成镍(替换CuO.1, 铜狭缝用来校准,衰减入射光强)9 然后重新设置测试参数换成标准测试程序将电压电流设置成40kV,40mATWIN primary 0.6Twin secondary 510选择一维模式LYNXEYE点apply11 然后接着点菜单栏Commander 选择referece and offset Determination 看峰的位置一般参数为35.149-0.1 到35.149+0.1 范围内;若不在该范围,则在theoretical position 输入35.139 到35.149 之间一个数,然后点apply-ok直到校准完成手动待机:将软件参数设置成20kV 5mA 点set ,即进入待机状态(若一直使用可不关机)关机顺序:开机的反过程。

小中大这是一种让所渲染的图看起来就象用摄像机拍摄下来的特效,镜头聚焦于场景中某一点。
On –打开或关闭景深特效。
Focal dist –视点到所关注物体的距离。
Get from camera –当该选项打开时,焦距自动采样摄像机的焦距。
当采用Target camera 时,该距离是摄像机至其目标点的距离。
当采用Free camera时,该距离是你所设定的摄像机的参数。
Shutter size –快门大小采用world units。
较大的值产生较大的模糊。
Subdivs –它决定用于景深特效的采样点的数量,数值越大效果越好。
Filtering On –打开或关闭过滤器。
当过滤器打开时,你可以选择一种适合你的场景的过滤器。
除了“Plate Match”过滤器外,VRay支持MAX的所有标准过滤器。
Size –对应于过滤器的场景的值。
注意:当过滤器关闭时,VRay 将使用一个内部的1x1 像素的box filter。
3. Indirect Illumination (GI) / Advanced irradiance map parameters 间接照明(全局照明GI)/高级光照贴图参数VRay采用两种方法进行全局照明计算-直接计算和光照贴图。
直接照明计算是一种简单的计算方式,它对所有用于全局照明的光线进行追踪计算,它能产生最准确的照明结果,但是需要花费较长的渲染时间。
光照贴图是一种使用复杂的技术,能够以较短的渲染时间获得准确度较低的图像。
On - 打开或关闭全局照明。
First diffuse bounce 首次漫反射Multiplier –该值决定首次漫反射对最终的图像照明起多大作用。
Direct computation params 直接计算参数Direct computation –采用直接光影追踪方式计算全局照明。
Subdivs –该值决定用于计算间接照明的半球空间采样数目,较低值产生较多的斑点。

VRay 渲染器参数VRay :Authorization(授权)主要是设置填写当前系统计算机的计算机名称或IP 地址以保证VRay 服务器程序文件运行,确认填写正确后就可以重新启动MAX 来使用了About VRay (关于VRay )显示当前版本以及官方连接。
VRay :Frame buffer (帧缓存器)对静帧画面御览和调整。
VRay :Globil switches (全局开关)控制和调整渲染总体环境设定。
VRay :Image sampler(Antialiasing)(图像采样)图像采样参数选项和使用调和阴影来使图象线条的锯齿边平滑的过程选项。
VRay :Indirect illumination(GI)(间接照明)启用(GI )全局光照,计算光子在物体间的反弹。
VRay :Irradiance map (发光贴图)记录和调用GI 计算后的结果数据来渲染图像。
VRay : Quasi-Monte Carlo GI (类蒙特卡洛Gl)—种GI 计算标准。
VRay : Caustics (焦散)计算光反弹/折射后的光汇集状况。
VRay : Environment (环境)启用环境(天光)光源和反射/折射环境源。
VRay : QMC Sampler (类蒙特卡洛采样)类蒙特卡洛计算标准的采样设定。
VRay::Color mapping (色彩贴图)渲染通道和色彩饱和的选项设定。
VRay : Camera (摄像机)对摄像机的控制。
VRay; : Default displacement (默认置换)默认置换认的参数设置。
VRay : System (系统)系统控制参数及打开信息提示。
VRay Frame buffer (帧缓存器)Enable built-in Frame Buffer (使嵌入的帧缓冲器能够使用)选择启用帧缓存。
Get resolution from MAX (从MAX 获取分辨率)使用MAX 设定的图像输出分辨率。

a r X i v :0706.3085v 1 [a s t r o -p h ] 21 J u n 2007Baltic Astronomy,vol.15,p.521–530.THE OPTICAL SPECTRUM OF R CORONAE BORE-ALIS CLOSE TO 2003DECLINET˜o nu Kipper 1and Valentina G.Klochkova 21Tartu Observatory,T˜o ravere,61602,Estonia;tk@aai.ee 2Special Astrophysical Observatory RAS,Nizhnij Arkhyz,369167,Rus-sia;valenta@sao.ru Received ...,2006Abstract.Two sets of high-resolution spectra of R CrB obtained during the 2003light decline are described.The first set was obtained on the descending branch of the light curve when V ≈12.0and the second one in the recovery phase with V ≈7.5.The usual sharp and broad emissions are described and the lines radial velocities measured.C 2Swan system (0,0)band was found to be in emission for the first set.The other C 2bands were in absorption.Few CN red system (5,1)band rotational lines and low excitation Fe I lines were in absorption.A table with measured radial velocities of various spectral features is presented.Key words:stars:atmospheres –stars:individual:R CrB 1.INTRODUCTION R CrB is the prototype of peculiar supergiant stars with fast and deep dimmings by several magnitudes at unpredictable times.These dimmings last several weeks or months.The atmospheres of R CrB type stars are extremely hydrogen deficient and carbon rich.The light minima are believed to be caused by the formation of obscuring clouds of carbon soot (O’Keefe 1939).About 30stars of the class are known and the prototype is one of the most studied since its discovery 210years ago.Due to unpredictability of the dimmings the spectral observations during the light minima are sparse.However,these observations could provide novel information about the outer stellar atmosphere and circumstellar region as the photosphere is almost completely obscured for several weeks before the soot cloud disperses.2T.Kipper,V.G.KlochkovaFig.1.The light curve of R CrB during the2003decline(AAVSO). The time is counted from February12003.Longer vertical ticks indi-cate our observations and shorter ones Rao et al.(2006)spectra.Our observations after the full recovery are not indicated.In this note we report on spectra obtained during the2003light minimum of R CrB.Clayton(1996)gave a general review of R CrB spectra in and out of declines.Rao et al.(1999)studied the optical spectrum of R CrB in the very deep and prolongated minimum in 1995.The previous minimum of R CrB on2000was described by Kipper(2001).The2003minimum was also observed by Rao et al. (2006).Our spectra were obtained somewhat earlier and later and therefore well complement Rao et al.data.In Fig.1the light curve of R CrB during the2003light minimum is shown(AAVSO data)and the moments of our(long vertical lines) and Rao et al.(2006)specroscopic observations are marked.The first set of our spectra was obtained on February24with the star at V≈12.0and the second one on April11when the star has recovered to V≈7.5.Finally,two sets of the spectra were obtained on January 12,2004and April18,2006when the star has completely recovered.2.OBSERVATIONSR CrB2003minimum3 All our high resolution(R≈42000)spectra were obtained with the Nasmyth Echelle Spectrometer(Panchuk et al.1999;Panchuk et al.2002)of Russian6m telescope.The spectrograph was equipped with an image slicer(Panchuk et al.2003).As a detector a CCD camera with2052×2052pixels produced by the Copenhagen Uni-versity Observatory was used.Thefirst set,which was observed close to the light minimum and the last one at the maximum light cover the wavelength region516.0÷666.0nm without gaps up to600.0nm. The set observed when the star’s brightness has almost recovered is shifted toward blue and covers448.0÷600.0nm without gaps.3.DESCRIPTION OF THE SPECTRA3.1.Reduction of the spectraThe spectra were reduced using the NOAO astronomical data anal-ysis facility IRAF.The continuum was placed byfitting low order spline functions through the manually indicated points in every order. The use of image slicer results in three parallel strips of spectra in each order.These strips are wavelength shifted.Therefore all strips were reduced separately and then already linearized in the wavelength spec-tra were coadded.We checked the accuracy of this procedure(Kipper &Klochkova2005)and found that the wavelengths of the terrestial lines in the stellar spectrum were reproduced within a few0.001˚A-s. After that all spectra of the set were coadded.As measured from the Th-Ar comparison spectra the resolution is R≈42800with FWHM of comparison lines about7km s−1.As it was expecting for the spectrum of R CrB close to its mini-mum light,the spectrum by February24contains numerous emission sharp lines,the complex profile of Na I D lines including broad and sharp emissions,weak Hαemission,strong C I lines,the remarkable emission of forbidden[O I],the C2,CN molecular bands.All these spectral features were considered below in detail.It should be noted here that main abovementioned spectral pecu-liarities caused by circumstellar gas are also observed in spectra of selected post-AGB stars with circumstellar envelopes.The most ap-propriate example is a semiregular variable star QY Sge identified with the IR-source IRAS20056+1834(Rao et al.2002).But,in contrast to R CrB stars,typical spectral peculiarities in spectra of post-AGB stars are independent on observing moment,the are per-manently visible.4T.Kipper,V.G.KlochkovaFig.2.The profiles of some emission lines in velocity scale.The velocity scale is set for the blue components.3.2.The sharp emission linesAs during the earlier declines of R CrB the emission lines dominate the spectrum and most lines could be classified as sharp lines of neutral and singly ionized metals.By April11,when the star was still by1.5 magnitudes fainter than in maximum,the sharp emission lines have dissapeared.The mean heliocentric radial velocity of these sharp lines is v rad=21.0±0.5km s−1and mean FWHM is about22.2±1.9km s−1. Therefore we confirm Rao et al.(2006)findings that the sharp lines in2003are somewhat broader than in1995-1996,when their FWHM was about15km s−1,and that the sharp emission lines were not shifted relative to the mean stellar velocity at maximum light(+22.5km s−1). During the earlier dimming in2000the sharp emission lines showed the blueshift around6km s−1relative to mean systemic velocity(Kipper 2001).Most of the sharp emission lines have red components which are shifted by about22km s−1and the widths somewhat less than of the main(Fig.2)components.As an example in Fig.3the gaussian decom-position of Ba II line at649.691nm is presented.The main component of this line has the heliocentric radial velocity21.5km s−1and FWHMR CrB2003minimum5Fig.3.The gaussian decomposition of the Ba II line at649.691nm. The positions of the components are indicated by the vertical lines.The sum of the gaussian components is drawn by dashed line.6T.Kipper,V.G.Klochkova 20.8km s−1.The red component is shifted by22.2km s−1and has FWHM=12.9km s−1.During the2000light decline the sharp emis-sion lines had inverse P Cygni profile with red absorption shifted by 42.0±2.5km s−1from the emission core(Kipper2001).During the 1995minimum these absorption components were also visible(Rao et al.1999).Such inverse P Cygni components were not reported for the 2003decline by Rao et al.(2006).However,their Fig.10shows weak absorption components at both sides of sharp emission lines.He I is presented only by weak emission line at587.567nm.This line usually shows broad emission during light declines.In the Febru-ary24spectra the line is sharp with FWHM=24.5km s−1and shows red emission component similarily to other sharp lines.In the observed spectral region C I is presented only with two emis-sion lines at569.313and667.553nm with heliocentric velocities of15.8 and16.8km s−1.This means that the C I lines are blueward shifted about6km s−1relative to other sharp lines.From forbidden lines only the[O I]lines at630.031and557.734nm were present on February24spectra.Thefirst[O I]line is blended with Sc II line at630.074nm.The gaussian decomposition of that blend is depicted in Fig.4.The heliocentric velocity of the[O I]line is 21.0km s−1.The Sc II line also has a red emission component shifted by20.5km s−1.We were not able to identify nonmolecular absorption lines in February24spectra,with possible exception of few nearly zero-exci-tation(εi=0.11÷0.12)Fe I lines with velocities about14km s−1. The identification of these lines is uncertain.In this respect the2003 decline differs from the2000minimum when we found rich absorption spectrum.The strongest lines belonged to C I but the lines of Fe I, Fe II,Cr I,O I,Mg I,Na I and Si II were also present(Kipper2001).3.3.The broad emission linesFrom the category of broad emission lines only the Na I D lines were visible in February24,2003spectra(Fig.5).As during the ear-lier declines the Na I doublet consists of broad and sharp emission components.Also,the sharp interstellar(IS)lines of the doublet were visible.The mean over three observing epochs heliocentric velocity of IS lines is22.1±1.1km s−1.The stated error could be considered as the possible error of all our radial velocity mearurements.The sharp emissions of Na D lines are slightly blueshifted(≈3km s−1) relative to other sharp emission lines and FWHM=21.4km s−1.The broad component of D2line extends to−266km s−1.SuperimposedR CrB2003minimum7Fig.4.The gaussian decomposition of the blend of[O I]and Sc II lines at630.05nm.The solar wavelengths are indicated for the identified lines.The measured value is indicated for the Sc II red component.8T.Kipper,V.G.KlochkovaFig.5.Observed spectra of R CrB near the Na I D doublet.The velocity scale is set for the D2line.Full line–specrum for February24, dashed line–the one for April11,2003,and dotted line–spectrum in light maximum(January12,2004).R CrB2003minimum9Fig.6.The spectrum of R CrB near the Hαline.Full line–spectrum on February24,2003,dotted line–spectrum on April11,2003,and dashed line–spectrum on April18,2006.on this broad wing is an absorption component at−99km s−1.The absorption nearly at the same velocity was found also by Rao et al. (2006).In the April spectra two strong blueshifted absorption components of D2line are visible at heliocentric velocities−230and−172km s−1. The absorption profile in D1line is more complicated.The most blueshifted components are at the velocities of−218and−178km s−1. Such high-velocity gas has also been reported for other declines of R CrB stars after minimum light(Rao et al.2004).The photospheric absorption of Na I consists of two components at heliocentric radial velocities of4.4and31.5km s−1(D2),and6.5 and29.9km s−1(D1).The separation of these components could be caused by sharp emission in the line core.The Hαline shows weak two-peaked emission in the February spec-tra.This emission was blueshifted relative to the photospheric absorp-tion.In the recovery phase the line is in absorption as it is in the light maximum(Fig.6).10T.Kipper,V.G.KlochkovaFig.7.The portion of the spectrum of R CrB close to the C2Swan system(0,0)band head.Full line–spectrum at February24,dotted line –at April11,2003.The emission lines of Mg I and the emission blend of Fe I and Fe II are also visible.3.4.The molecular linesRao et al.(2006)reported that their spectra of R CrB during the late phases of the2003dimming show C2Swan bands(1,2),(0,2), and(1,4)in emission.Our spectra for February24,2003show only the C2Swan system(0,0)band in emission(Fig.7).The lines of this band are broadened so that the rotational structure is not visible.The other observed bands(1,2),(0,1),(0,2),and(1,3)were in absorption (Fig.8).The absorption lines are sharp with FWHM≈22km s−1.We were able to determine velocities from the rotational lines of(0,1)and (0,2)bands16.0±1.0and15.4±2.6km s−1correspondingly.Some absorption lines of CN red system(5,1)band were identified with the velocity of15.0±2.3km s−1.This means that the molecular absorption lines were blueshifted relative the systemic velocity by7km s−1.resolved.Table1.Heliocentric radial velocities of various spectral lines in the spectrum of R CrB during the2003light decline and in maximum(January,122004).Na I D IS:D2−23.2−23.6−21.9D1−21.2−21.0−21.9Na I D sharp emission:D2+19.1D1+19.6Na I D broad emission:Blue limit of D2−266Abs.on blue wing−99Na I photosph.absorption:D2+4.4+30.5+31.9D1+6.5+33.0+29.9Na I D blue absorption:D2−230−172D1−218−178−145Sharp emissions:Main component+21.0Red component+43C I emission+16.3[O I]emission+21.0C2rot.lines absorption+15.7CN rot.lines absorption+15.0Fe I absorption+14time the lines widths are larger than usually.Already the usual widths around15km s−1are much larger than if caused by ther-mal broadening.The small or absent blueshift together with large linewidth could indicate that the line-forming region is expanding roughly with v exp≈10km s−1.In2003the sharp lines did not show inverse P Cygni profiles which were prominent in2000.Instead,the lines showed red emission com-ponents.The quite universal are also the broad and blueshifted absorptions of Na I D lines developing in the recovery phase.On the descending part of the light curve C2Swan bands were in absorption except the(0,0)ter,during minimum light these bands were in emission.At the maximum light the C2Swan system bands are weakly in absorption.ACKNOWLEDGEMENTS.This research was supported by the Estonian Science Foundation grant nr.6810(T.K.).V.G.K.acknowl-edges the support from the programs of Russian Academy of Sciences “Observational manifestations of evolution of chemical composition of stars and Galaxy”and“Extended objects in Universe”.V.G.K. also acknowledges the support by Award No.RUP1–2687–NA–05of the U.S.Civilian Research&Development Foundation(CRDF).We acknowledge with thanks the observations from the AAVSO Inter-national Database.REFERENCESClayton G.C.1996,PASP,108,225Kipper T.2001,IBVS,5063Kipper T.,Klochkova V.G.2005,Baltic Astronomy,14,215O’Keefe J.A.1939,ApJ,90,294Panchuk V.E.,Klochkova V.G.,Naidenov I.D.1999,Preprint Spec.AO, No135Panchuk V.E.,Piskunov N.E.,Klochkova V.G.,et al.2002,Preprint Spec.AO,No169Panchuk V.E.,Yushkin M.V.,Najdenov I.D.2003,Preprint Spec.AO, No179Rao N.K.,Lambert D.L.,Adams M.T.,et al.1999,MNRAS,310,717 Rao N.K.,Goswami A.,Lambert D.L.2002,MNRAS,334,129Rao N.K.,Reddy B.E.,Lambert D.L.2004,MNRAS,355,855 Rao N.K.,Lambert D.L.,Shetrone M.D.2006,MNRAS,370,941。

Reflect(反射)- 选择这个选项VRayMap 将起到如同一个反射贴图的作用。
之后Reflection params 使用,来控制这个“反射贴图”的设置(此时用在这个“反射贴图”上Reraction params折射参数栏里的变换设置不起任何作用)。
Refract(折射)-选择这个选项VRayMap将起到如同一个折射贴图的作用。
之后Reraction params (折射参数)栏能够被使用,来控制这个“折射贴图”的设置(此时用在这个“反射贴图”上Reflection params反射参数栏里的变换设置不起任何作用)。
Reflection params(反射参数)Filter color(过滤颜色)-反射用的倍增器。
不要使用材质里的微调器来设置反射的强度。
使用这个过滤颜色来替代。
(否则光子图Photon map将不被校正)Reflect on back side(背面反射)- 这个选项强制VRay 始终跟踪反射。
使用这个选项结合一个折射贴图使用将增加渲染的时间。
Glossy(光泽性、平滑性)-反射时有无光泽(模糊blurry)的开关。
Glossiness(光泽度、平滑度)- 材质的光泽度。
值为0时,反射非常的模糊。
大的值使反射更清楚。
Subdivs(细分)-控制光线的数量,作出有光泽反射估算。
Low subdivs(低细分)-当VRay 采用低精度计算low accuracy computations时一些光线被用来估算反射,(在GI 正在采样期间/光线跟踪深度达到the Degrade depth 这个值时)。
Max depth(最大深度)-光线跟踪深度的最大值。
光线跟踪更大的深度时,这个贴图将返回到the Exit color的值。
Degrade depth(深度降级)- 当前光线跟踪深度达到这个值时VRay 将切换到低精度计算low accuracy computations (Low subdivs值将被用来替代Subdivs 值)。

中英⽂对照(材料研究⽅法) Optical microscopy 光学显微镜 XRD (X-ray diffraction) X射线衍射 TEM Transmission Electron Microscopy 透射电⼦显微镜 SEM Scanning Electron Microscopy 扫描电⼦显微镜注:扫描电⼦显微镜和透射电⼦显微镜的成像原理完全不同,它是使⽤从样品表⾯激发出的各种物理信号来调制成像的。
resolution 分辨率 focal point 焦点 focal distance 焦距 Depth of field 景深 depth of focus 焦长 Aberrations 偏差,差错 Astigmatism 像散 Spherical aberration 球差 Chromatic aberration ⾊差 x射线和γ射线区别:Gamma rays are now usually distinguished by their origin: X-rays are emitted by definition by electrons outside the nucleus, while gamma rays are emitted by the nucleus. Spectroscopy 光谱 Residual strain/stress 参与应⼒ Neutron beam 中⼦束 Laue pattern 劳埃衍射花样 Debye pattern 德拜衍射花样 The structure of crystalline 晶体结构 Primitive cell 原胞 smallest possible unit cell Unit cell 单胞 arbitrarily chosen but in practical always highest possible symmetry, so as many right angles as possible Crystal structure = lattice + basis 晶体结构 = 点阵 + 基元 7 crystal systems(7个晶系): according to symmetry(对称性) 7 lattice systems (7个点阵系统): according to lattice cubic ⽴⽅ hexagonal 六⽅ tetragonal 四⽅ trigonal 三 orthorhombic 正交晶系 monoclinic 单斜 triclinic 三斜 HCP 密排六⽅ Diffraction intensity 衍射强度。

VRAY渲染器中英文对照表一VRay的渲染参数这些参数让你控制渲染过程中的各个方面。
VRay的控制参数分为下列部分:1. Image Sampler (Antialiasing) 图像采样(抗锯齿)2. Depth of field/Antialiasing filter景深/抗锯齿过滤器3. Indirect Illumination (GI) / Advanced irradiance map parameters间接照明(全局照明GI)/高级光照贴图参数4. Caustics散焦5. Environment环境6. Motion blur 运动模糊7. QMC samplers QMC采样8. G-buffer G-缓冲9. Camera摄像机10. System 系统1. Image Sampler (Antialiasing) 图像采样(抗锯齿)VRay采用几种方法来进行图像的采样。
所有图像采样器均支持MAX的标准抗锯齿过滤器,尽管这样会增加渲染的时间。
你可以选择Fixed rate采样器,Simple two-level采样器和Adaptive subdivision采样器。
Fixed rate 采样这是最简单的采样方法,它对每个像素采用固定的几个采样。
Subdivs –调节每个像素的采样数。
Rand –当该选项选择后,采样点将在采样像素内随机分布。
这样能够产生较好的视觉效果。
Simple two-level 采样一种简单的较高级采样,图像中的像素首先采样较少的采样数目,然后对某些像素进行高级采样以提高图像质量Base subdivs –决定每个像素的采样数目。
Fine subdivs –决定用于高级采样的像素的采样数目。
Threshold –所有强度值差异大于该值的相邻的像素将采用高级采样。
较低的值能产生较好的图像质量。
Multipass –当该选项选中后,当VRay对一个像素进行高级采样后,该像素的值将与其临近的未进行高级采样的像素的值进行比较。

A 3-D (STEREOSCOPIC) X-RAY IMAGING TECHNIQUE BASED ON LINEAR ARRAY DETECTORSM Robinson, JPO Evans and SX GodberIn general the problem of interpreting the three-dimensional structure of an object from an X-ray image is a difficult one 1. This is due to the almost complete absence of depth cues in a typical radiograph containing as it does only shape and grey scale information. The spatial information usually encountered in two-dimensional images, for example photographs, is missing. Psychological depth cues such as linear perspective 2, occlusion and so on are usually present in reinforcing combinations in photographs.In order to provide X-ray images with spatial information an X-ray technique has been developed which introduces the powerful physiological depth cue of binocular parallax into the image. This system was originally designed to assist in the interpretation of X-ray images routinely encountered by operators using standard 2-D X-ray systems for the screening of passenger baggage at airports.The solution to the problem is not however specifically confined to it but is in fact more general in nature. Indeed theoretical designs have already been proposed for other X-ray screening applications including mammography.The 3-D X-ray techniqueThe principle is based on the use of linear array X-ray detectors. In the normal 2-D mode of operation a collimated curtain of X-rays is derived from an X-ray source and targeted onto the linear detector (see Fig. 1). Relative movement is introduced between the X-ray beam and the object to be imaged which causes a 2-D image to be built up as the linear detector scans in synchronism with the speed of movement. The digitised image data is captured and processed using a frame-store and associated electronics. In order to provide a stereoscopic view of the object a second perspective view must be acquired. An obvious solution to this would be to use a second X-ray source/detector combination. This would be cumbersome, expensive and require some matching of the X-ray source characteristics.A more elegant solution has been to derive two collimated beams from a single source and to use two linear array detectors (see Fig. 2). In order to accurately reconstruct the 3-D image of the object being screened it is vital to design the machine geometry and timing electronics from a knowledge base of fundamental stereoscopic theory. A general design methodology has been derived which provides a solution to these inter-related spatial and temporal problems. A number of working systems have been produced using the simple geometry described 3. Later developments have involved the use of folded linear array detectors having materials identification(organic/inorganic) capability 4. The X-ray source characteristics such as spectral output and detector parameters such as resolution and sensitivity have been optimised for the security application being addressed. However, since linear array detectors are now available for use in a wide range of medical 5 and non-destructive testing roles then it follows that stereoscopic imaging systems based on the principle described are also possible. For example the theoretical design of a mammography machine is shown schematically in Fig. 3. Other designs for use in cargo screening and nuclear waste classification have been proposed.M Robinson, JPO Evans and SX Godber are with The Nottingham Trent University, Nottingham.Fig 1. Standard 2-D X-ray linescan geometry.Fig 2. 3-D linescan X-ray system using twindivergent beam geometry.(a) Basic system geometry (b) Complete systemFig 3. Theoretical design of a 3-D mammography X-ray system.Coordinate measurementThe extraction of three-dimensional coordinate data from stereoscopic displays, known as photogrammetry, is a mature technology 6. Algorithms have been developed 7 which are specific to this new X-ray imaging geometry and enable coordinate and volumetric information to be obtained. The use of linear arrays in the methoddescribed means that image distortion due to the point source nature of the X-ray generator only occurs in the vertical y-axis of the image. The horizontal x-axis, which in turn controls the depth or z-axis is not affected by this problem. This is clearly a major advantage of this technique.Solid image modelsWork that is currently being undertaken relates to the alternative visual presentation of information derived from the stereoscopic X-ray equipment.Computer generated solid image models, or 2 ½-D images as they are sometimes referred to, are finding increasing use in computer aided design situations, virtual reality displays and so on.Using these 2 ½-D representations it is possible to manipulate the image information in a number of ways which provide alternative views of the same object. Examples are image rotation and layer removal. These display techniques have proved particularly beneficial for the viewing of images derived from computed tomography (CT) and magnetic resonance (MR) scanners, which are now widely used by the medical profession. Both of these types of scanners produce information in a slice by slice format and a great deal of software has already been developed to convert this multiple slice information into the volume rendered 2 ½-D representation.It has been shown by the Nottingham research group 8 that a stereoscopic image in video format can be considered to be a series of depth planes or slices. Once this depth plane information has been obtained in one manner or another then it can be used to interface with software available for the reconstruction of slice data from CT or MR scanner type systems to produce 2 ½-D models.An advantage of the technique is that, despite starting with a stereoscopic image rather than a multiple slice image, a reconstruction can still be made automatically in software to produce a 2 ½-D display with all its current features. The net result is both a full binocular stereoscopic image (3D) and also a 2 ½-D solid model reconstruction derived from it.This new technique has been successfully applied to images obtained from the 3-D X-ray equipment previously described. In the first instance slice data was identified by a manual technique.Work is currently underway in Nottingham to automate this process. A fully operational system suitable for trials is intended as the next outcome of this research programme.AcknowledgementThe 3-D Imaging and Machine Vision Research Group at The Nottingham Trent University would like to acknowledge the support of the Police Scientific Development Branch, Home Office Science and Technology Group with this work.References1.Seemann, H E: “Physical and Photographic Principles of Medical Radiography”,Wiley (1968) p 1112.Okoshi, T: “Three-dimensional Imaging Techniques”, Academic Press (1976) pp 49-593.Evans, J P O, Robinson, M and Godber, S X: “A new stereoscopic X-ray imaging technique using asingle X-ray source: theoretical analysis”, NDT&E Int., Vol. 29, No. 1 Feb. 1996, pp 27-35,ISSN 0963-86954.Evans, J P O, Godber, S X and Robinson, M: “Three-dimensional X-ray imaging techniques”,Stereoscopic Displays and Virtual Reality Systems, Proc. SPIE 2177, 1994, pp 161-165,ISBN 0-8194-1472-75.Tumer, T: “Biophotonics Int.”, Laurin Publications, Nov./Dec. 1995, pp 22-236.Karara H M: "Manual of Photogrammetry-4th Ed.", American Society of Photogrammetry, 1980,pp 846-8577.Evans JPO: “Development of a 3-D X-ray system”, Ph.D. Thesis, The Nottingham Trent Univ., 19938.Robinson M, J P O Evans, Godber S X and Murray N: “Solid image models derived from securityX-ray equipment”, IEE Publ. No. 408 1995, pp 306-309, ISBN 0-85296-640-7。

4K Ultra-HD CameraHUAWEI CloudLink Camera 200 is a next-generation 4K UHD PTZcamera that works with Huawei's UHD video conferencing endpointrange or cloud-registered soft clients, creating an unprecedentedvideo conferencing experience.CloudLink Camera 200Designed with EleganceThe camera 200 was built with the integrator in mind, enabling ultra-wide field of view and powerful zoom capabilities. The professional-grade and elegant appearance adds to the aesthetics that delights the customer.Effortless to UseEasy maintenance and configuration are made possible by the embedded OSD UI, through which the Camera 200 can be operated independently. The Camera 200 operations are also supported on the remote control or touch panel of the connected Huawei endpoint.Unmatched Video QualityThe 8.51-megapixel CMOS image sensor provides HDMI video outputs of up to 4K. Image enhancement based on human visual system and 3D video denoising based on motion estimation present images in true color and with every detail, creating the ultimate video confer-encing experience. The Camera 200 provides four image modes including Standard, Natural, Vivid, and Scenery for you to choose from.Intelligent Image ProcessingThe Camera 200 provides intelligent viewing with auto-sensing capabilities including automatic white balance (AWB), automatic exposure (AE), and automatic focus (AF).High-performance Pan/Tilt/Zoom (PTZ)The high-precision pan, tilt, and zoom (PTZ) has a localization deviation of only ±0.1°, which is industry-leading. The PTZ is also fast-switch-ing with a 170-degree-wide field of view.12 x Optical ZoomThe high-performance AF lens support stable focusing and 12 x optical zoom for best overview, which provides ideal framing to the far end.254 PresetsPTZ positions can be predefined. (A predefined PTZ position is named preset.) The PTZ can be adjusted to a specific position to capture desired images with just one button push through presets. Presets are saved even when the Camera 200 is turned off.USB3.0 Video OutputThe Camera 200 can be connected to a laptop to deliver images through the USB3.0 port.SpecificationsModel HUAWEI Camera 200-1080P HUAWEI Camera 200-4K Video output resolution 1080p 50/60, 1080i 50/60, 1080p 25/30, and 720p 50/60 4K 25/30, 1080p 50/60, 1080i 50/60, 1080p 25/30, and 720p 50/60Image sensor8.51-megapixel, 1/2.5-inch CMOS 12x optical zoom ZoomF1.8–F3.56±5%Max. aperture3.85–43.06 mm ±5%Focal lengthPan: ±110°; tilt: ±30°Pan/Tilt anglePan: 1.7°/s (tele) to 80°/s (wide); tilt: 0.7°/s to 28°/s Pan/Tilt speed3 lux (50 IRE, F1.8)Min. illumination1/25–1/10000 seconds Shutter speed254Number of presets 80°/50°Max. horizontal/vertical field of viewStandard, Natural, Vivid, and SceneryImage mode Auto, manual, or one-button-push Auto, manual, aperture priority, shutter priority, or brightness priority Auto, manual, or one-button-pushWhite balanceExposureFocus Supported Ceiling-mountedRemote control over an endpoint through the connected camera Remote control (infrared)Software upgrade through the local USB portSoftware upgrade 100–240 V AC, 50–60 Hz Input voltage12 V DC Output voltage≤ 12 WPower 0℃ to 40℃Operating temperatureNet weight: 4.23 lb (1.92 kg)Weight 2 x RS232 serial portControl port Camera: 6.10 in. x 9.80 in. x 5.47 in. (155 mm x 249 mm x 139 mm)Packages: 12.60 in. x 16.73 in. x 11.22 in. (320 mm x 425 mm x 285 mm)Dimension1 x HDMI 1.4b 1 x USB3.0Video output portSupported Digital wide dynamicrange (WDR)Copyright©2019 Huawei Technologies Co., Ltd. All rights reserved.。

VRay for Rhino 参数讲解来源:赵嘉骏Ray的日志好久没写什么了,今天ray的班级开始新课程,暂时挺清闲的,于是兴起写一份vfr的参数攻略,和大家一起研究一下vfr这个渲染器。
首先单击菜单的渲染按钮,将当前渲染器指定为vray for rhino。
选择了vray for rhino之后,会出现它的工具条出现了工具条之后,在渲染的时候就可以快捷选取渲染器中的VRay Materials<M>、VRay Options<O>、Show VRay Frame Buffer<F>这三个工具。
打开VRay Options,弹出的内容是vray for rhino渲染参数控制面板,这里包括了所有控制VRay渲染的参数设置。
关于这个控制面板的所有英译中的资料,在我的相册的总期16.[Industrial Design]vray for rhino教程中有详细的翻译。
1.Global Switches<全局开关>Hidden Lights <隐藏灯光>:表示是否渲染被隐藏的灯光Materials <材质>Reflection/Refraction <反射/折射>:表示是否对材质或者贴图使用反射/折射的效果Max Depth <最大深度>:这个是对材质或者贴图的反射/折射的最大反弹次数的控制,如果不选中的话,反射/折射的最大反弹次数就是取决于材质或者贴图的局部参数了Max Transp.Level <最大透明度>:控制光线追踪计算透明物体的最大深度。
Transp. Cutoff <透明度截止的最小值>:表示透明度低于这个参数值光线将在透明物体中停止追踪计算Maps <纹理贴图>:表示是否使用纹理贴图Filter Maps <纹理贴图过滤>:表示是否使用纹理贴图过滤Glossy Effects <光滑效果>:表示是否对材质光滑处理Override materials <材质替换>:表示是否用别的材质来代替场景中的物体的材质来进行渲染,后面有一个白色矩形框是用来指定起替代作用的材质的,如果不指定,默认使用Rhino的标准材质。

VRay 材质VRay渲染器提供了一种特殊的材质-VrayMtl-VRay材质。
在场景中使用该材质能够获得更加准确的物理照明(光能分布),更快的渲染,发射和折射参数调节更方便。
使用VrayMtl,你可以应用不同的纹理贴图,控制其反射和折射,增加凹凸贴图和置换贴图,强制直接全局照明计算,选择用于材质的BRDF.该材质的参数都列入以下部分。
Basic parametersDiffuse –这是该材质的漫射颜色.你可以在texture maps部分中的折射贴图栏中,使用一种贴图来覆盖它。
Reflect –漫反射颜色的倍增器.你可以在texture maps部分中的反射贴图栏中,使用一种贴图来覆盖它。
Glossiness –该值表示该材质的光泽度。
当该值为0。
0时表示特别模糊的反射。
当该值为1。
0时将关闭材质的光泽(VRay将产生一种特别尖锐的反射)。
注意,提高光泽度将增加渲染时间。
Subdivs –控制发射的光线数量来估计光滑面的反射。
当该材质的Glossiness (光泽度)值为1.0时,本选项无效。
(VRay不会发出任何用于估计光滑度的光线)Fresnel reflection –当该选项选中时,光线的反射就象真实世界的玻璃反射一样。
这意味着当光线和表面法线的夹角接近0o时,反射光线将减少至消失。
(当光线与表面几乎平行时,反射将是可见的,当光线垂直于表面时将几乎没有反射.)Max depth –贴图的最大光线发射深度.大于该值时贴图将反射回黑色。
Refract –折射倍增器。
你可以在texture maps部分中的折射贴图栏中,使用一种贴图来覆盖它。
Glossiness -该值表示该材质的光泽度。
当该值为0。
0时表示特别模糊的折射.当该值为1。
0时将关闭材质的光泽(VRay将产生一种特别尖锐的折射)。
注意,提高光泽度将增加渲染时间。
Subdivs -控制发射的光线数量来估计光滑面的折射.当该材质的Glossiness (光泽度)值为1.0时,本选项无效。

XGT-9000XRF Analytical MicroscopeScreen, Check, Map and MeasureThe combination of elemental images and transmission images allows one to detect hidden defects.Large working distance and coaxial vertical optics provide a clear transmission image without the shadow effect in undulating electronic boards.with elemental image only)and identifiedLine profile of blue part What is the XGT-9000?Screen, check, map and measureThe XGT-9000 is an X-ray Fluorescence Analytical Microscope, which provides non-destructive elemental analysis of materials.Incident X-ray beam is guided towards thesample placed on the mapping stage.X-ray fluorescence spectrum and transmission X-ray intensity are recorded at each point.Information available: Qualitative & quantitative elemental analysis/Mapping/Hyperspectral imaging.123Optical image Elemental imagesTransmission image Elemental imagesTransmission imageTransmission imageFull spectrum at each pixelfil f blXYThe XGT-9000 can detect anddetermine the composition of foreign particles, and therefore track the source of contamination.X-ray Fluorescence photons can be partially absorbed by theencapsulated material and will not show in the spectrum. The X-ray transmission image provides a complete picture.XGT-9000 with a wide range of applicationsOptical imageTiCrFeX-ray backscatter imageX-ray transmission imageAu thicknessOptical imageMapping areaLayered imageAu patternThe combination of microbeam and thickness measurement capability makes the XGT-9000 a useful tool for the QC of semiconductors,which feature thin and narrow patterns. Thickness sensitivity depends on elements traced, but can be at the Angstrom level.Biological samples contain water or gas, and will be heavily modified or damaged if measured in a vacuum. The unique partial vacuum mode of the XGT-9000 keeps the sample in ambient conditions while the detection is in a vacuum for optimum light elements measurement.Archeological artifacts are valuable materials and can only be analyzed by non-destructive methods.Dragonfly eye: XGT-9000 measurement has helped to ascertain the Dragonfly eye found in China actually originated Egypt/Middle East during the 2nd century B.C.Sample: Foreign matter in thecapsuleSample: Fly5 c mAlCaCu ComImage processing for mappingStandard GUI RoHS mode GUI Raw imageFloating viewQueue functionMultiple measurements including mapping /multi pointsResult list viewOptical imageParticle detectionFe image Particle detectionEdited GUIProcessed imageThe user interface offers a flexible way to measure multiple samples or areas in unattended mode (queue function),display the analytical results, present the data, and edit reports. Advanced treatments include image processing, particle finder, colocalization measurement and multivariate analysis (refer to "Combination of XRF and Raman Spectroscopies").XGT-9000 Software SuiteThe particle finding function is available from all the 3 images in the XGT-9000 (Optical, Fluorescence X-ray and Transmission). The particle finding function automatically detects particles and marks their position for multi-point measurement, classification and analysis.Coordinates of detected particles are automatically stored and transferred to the multi-point analysis modeViewbaTeh t s ak c a t S dn a p x ELabSpec linkCombination of XRF9 samples For 2”/4” wafersLow backgroundXGT-9000SLThe XGT-9000SL provides a non-destructive analysis of your most valuable pieces, which may be large or fragile.MESA-50 seriesElemental analysis and RoHS characterizationSLFA seriesThe reference instrument for sulfur-in-oil analysisIn/On-line solutionsReal time analysis forthickness and compositionDo more with your HORIBA XRFHORIBA XRF family* The sample chamber of the XGT-9000SL complies with the radiation safety requirement. The sample is measured in ambient conditions, while the detector operates at ambient or vacuum modes.XRF and Raman spectroscopies are complementary techniques.XRF provides information about elemental composition of the material, whereas Raman spectroscopy offers molecular information.Co-localized measurements between the XGT-9000 and HORIBA Raman spectrometers provide more information about the sample.Transfer of the XGT-9000 data to the advanced LabSpec Suite software using LabSpec link.Various sample holders areprovided to fit different shapes and types of samples.Fast and easy change between holders with HORIBA's modularstage design.Customization examplesTransfer vessel:Measurement of samples isolatedfrom airDimensionsXGT-9000SLXGT-9000(Unit: mm)(134)(476)(38)(9)(50)(1500)(2640)(1090)(1837)(1616)(74)(12)(16)(159)(769)74(2400)1800)003()003()A E R A E C N A N E T N A M()A E R A E C N A N E T N A M((3)(MANTENANCEAREA)DOOR OPENED914.5Bulletin:HRE-3764Ba Printed in Japan 2002SK62 The specifications, appearance or other aspects of products in this catalog are subject to change without notice.Please contact us with enquiries concerning further details on the products in this catalog.The color of the actual products may differ from the color pictured in this catalog due to printing limitations.It is strictly forbidden to copy the content of this catalog in part or in full.The screen displays shown on products in this catalog have been inserted into the photographs through compositing.All brand names, product names and service names in this catalog are trademarks or registered trademarks of their respective companies.3 Changi Business Park Vista #01-01, Akzonobel House,Singapore 486051Phone: 65 (6) 745-8300 Fax: 65 (6) 745-8155Unit D, 1F, Building A, Synnex International Park, 1068 WestTianshan Road, 200335, Shanghai, ChinaPhone: 86 (21) 6289-6060 Fax: 86 (21) 6289-5553Beijing Branch12F, Metropolis Tower, No.2, Haidian Dong 3 Street, Beijing,100080, ChinaPhone: 86 (10) 8567-9966 Fax: 86 (10) 8567-9066Guangzhou BranchRoom 1611 / 1612, Goldlion Digital Network Center,138 Tiyu Road East, Guangzhou, 510620, ChinaPhone: 86 (20) 3878-1883 Fax: 86 (20) 3878-1810Head Office2 Miyanohigashi-cho, Kisshoin, Minami-ku, Kyoto, 601-8510, JapanPhone: 81 (75) 313-8121 Fax: 81 (75) 321-5725HORIBA, Ltd.HORIBA Instruments (Singapore) Pte Ltd.HORIBA (China) Trading Co., Ltd.JapanSingaporeChina HORIBA India Private LimitedHORIBA (Thailand) LimitedIndiaTaiwanThailandPT HORIBA Indonesia Indonesia9755 Research Drive, Irvine, CA 92618, U.S.A.Phone: 1 (949) 250-4811 Fax: 1 (949) 250-0924HORIBA New Jersey Optical Spectroscopy Center20 Knightsbridge Rd, Piscataway, NJ 08854, U.S.A.Phone: 1 (732) 494-8660 Fax: 1 (732) 549-5125Via Luca Gaurico 209-00143, ROMAPhone: 39 (6) 51-59-22-1 Fax: 39 (6) 51-96-43-34Neuhofstrasse 9, D_64625, BensheimPhone: 49 (0) 62-51-84-750 Fax: 49 (0) 62-51-84-752016-18, rue du Canal, 91165, Longjumeau Cedex, FrancePhone: 33 (1) 69-74-72-00 Fax: 33 (1) 69-09-07-21HORIBA FRANCE SASGermanyFranceHORIBA Jobin Yvon GmbHItalyHORIBA ITALIA SrlHORIBA Instruments Incorporated USA246, Okhla Industrial Estate, Phase 3 New Delhi-110020, IndiaPhone: 91 (11) 4646-5000 Fax: 91 (11) 4646-5020Bangalore OfficeNo.55, 12th Main, Behind BDA Complex, 6th sector, HSR Layout,Bangalore South, Bangalore-560102, IndiaPhone: 91 (80) 4127-3637393, 395, 397, 399, 401, 403 Latya Road, Somdetchaopraya,Klongsan, Bangkok 10600, ThailandPhone: 66 (0) 2-861-5995 ext.123 Fax: 66 (0) 2-861-5200East Office850 / 7 Soi Lat Krabang 30 / 5, Lat Krabang Road, Lat Krabang,Bangkok 10520, ThailandPhone: 66 (0) 2-734-4434 Fax: 66 (0) 2-734-4438Jl. Jalur Sutera Blok 20A, No.16-17, Kel. Kunciran, Kec. PinangTangerang-15144, IndonesiaPhone: 62 (21) 3044-8525 Fax: 62 (21) 3044-852125, 94-Gil, Iljik-Ro, Manan-Gu, Anyang-Si, Gyeonggi-Do,13901, KoreaPhone: 82 (31) 296-7911 Fax: 82 (31) 296-7913HORIBA KOREA Ltd.KoreaRua Presbitero Plinio Alves de Souza, 645, LoteamentoMultivias, Jardim Ermida II - Jundiai Sao Paulo - CEP13.212-181 BrazilPhone: 55 (11) 2923-5400 Fax: 55 (11) 2923-5490HORIBA Instruments Brasil, Ltda.BrazilKyoto Close Moulton Park Northampton NN3 6FL UKPhone: 44 (0) 1604 542500 Fax: 44 (0) 1604 542699HORIBA UK Limited UK8F.-8, No.38, Taiyuan St. Zhubei City, Hsinchu County 30265,Taiwan (R.O.C.)Phone: 886 (3) 560-0606 Fax: 886 (3) 560-0550HORIBA Taiwan, Inc.Lot 3 and 4, 16 Floor, Detech Tower II, No.107 Nguyen Phong SacStreet, Dich Vong Hau Ward, Cau Giay District, Hanoi, VietnamPhone: 84 (24) 3795-8552 Fax: 84 (24) 3795-8553HORIBA Vietnam Company Limited Vietnam。


一篇文章学会VR物理相机应用,VRay物理相机全参数详解VR物理相机采用的是现实世界里的相机的设置,有f-stop, 焦距, 快门速度等,用它配合真实世界的灯光类型,比如VR太阳,VR灯和VR天空等,可以快速得到良好的效果。
基本参数type –相机的类别,这个参数在动态模糊上会产生不同的效果。
Still cam –模拟普通相机在常规快门速度下的效果。
Cinematic camera –模拟带有圆形快门的影视摄影机效果。
Video camera –模拟带有CCD矩阵的摄影机效果。
targeted –决定在场景里是否看到相机的目标点film gate (mm) –以毫米为单位,定义片门的水平数值。
垂直数值则由渲染图的比例进行相应的缩放(垂直胶片尺寸 = 水平胶片尺寸 / 宽高比)。
focal length (mm) 焦距–决定了相机的焦距。
fov –当勾选时,这个参数的数值会取代之前的film gatefocal length两项参数。
zoom factor (变焦)–模拟相机的变焦效果。
数值高于1,相当于放大效果,小于1,相当于缩小效果。
horizontal shift –调整相机的水平视界,比如0.5的数值,会让相机向左侧移动当前画面水平宽度的一半。
vertical shift –调整相机的垂直视界,比如0.5的数值,会让相机向上方移动当前画面垂直高度的一半。
f-number(光圈值)–决定了相机的光圈。
如果Exposure(曝光)选项被勾选的话,更改这个参数还会对画面的亮度产生影响。
target distance –定义了相机与目标点之间的距离。
vertical tilt和horizontal tilt –模拟偏斜镜头的效果。
点Guess vert tilt和Guess horiz tilt按钮对画面进行两点透视的修正(保持透视的垂直和水平)。
auto guess vert. –当勾选时,相机在动画时也会自动修正偏斜。

Service ManualCarl Zeiss Spectroscopy GmbHLamp Replacement and CalibrationCorona extremeKnowledge of this manual is required for operation of the device. Therefore, please familiarize yourself with its contents and pay special attention to information concerning safe handling of the device.We reserve the right to make changes in the interest of technical advancement. The manual is not covered by an update service.© Unless expressly authorized, forwarding and duplication of this manual, and the utilization and communication of its contents are not permitted. Violations will result in claims for damages. All rights reserved in the event of granting of patents or registration of a utility model.GENERAL HAZARDObserve the safety instructions in the "Corona extreme" User manual, publication number:UM Corona extreme / E.Further information on the proper use of the spectrometer system can be found in the "Coronaextreme" User manual.Carl Zeiss Spectroscopy GmbHCarl-Zeiss-Promenade 10 07745 Jena, Germany Service: + 49 3641 64-3200Tel: + 49 3641 64-2838email:****************************** /spectroscopyEN_40_070_0011I | 2022-10Design, scope of delivery and technical information subject to change. © Carl Zeiss Spectroscopy GmbHContents1 Preparing lamp replacement 52 Getting device information 63 Performing firmware update 114 Replacing the halogen lamp 194.1 General work 194.2 Opening the housing 214.3 Replacing halogen lamp – Hardware Revision 2 244.4 Replacement of halogen lamp – Hardware Revision 3 304.5 Closing the housing 345 Performing sensor calibration 366 Create *.ini file containing device information 487 Accessories and spare parts 52 EN_40_070_0011I | Service Manual | Lamp replacement and calibration - Corona extreme3List of figuresFig. 1 Device selection 6 Fig. 2 Entering or scanning the IP address 7 Fig. 3 Opening the “Get device information” context menu 8 Fig. 4 Selecting device (measuring system) 8 Fig. 5 Getting the device information 9 Fig. 6 Creation of *.ini file 10 Fig. 7 Opening the “Get device information” context menu 11 Fig. 8 Getting the firmware version 12 Fig. 9 Performing firmware update 13 Fig. 10 Firmware version warning 14 Fig. 11 Firmware update confirmation 14 Fig. 12 Updating of firmware 15 Fig. 13 Confirming successful firmware update 15 Fig. 14 Confirmation prompt for batch file 16 Fig. 15 Entering IP address 17 Fig. 16 Running batch file 17 Fig. 17 Entering IP address 18 Fig. 18 Removing housing screws 21 Fig. 19 Lifting the base plate off the housing 22 Fig. 20 Removing housing seal 23 Fig. 21 Removing the old lamp cable 24 Fig. 22 Removing the lamp holder 25 Fig. 23 Installing adapter cable for type B lamp 26 Fig. 24 Inserting new O-ring and new reflector 26 Fig. 25 Mounting the reflector holder 27 Fig. 26 Centering the reflector 27 Fig. 27 Installing a new halogen lamp 28 Fig. 28 Connecting lamp cable and adapter cable 28 Fig. 29 Attaching the lamp cable 29 Fig. 30 Exposing the lamp cable 30 Fig. 31 Disconnecting the lamp cablefrom the adapter cable 31 Fig. 32 Removing the halogen lamp 31 Fig. 33 Installing a new halogen lamp 32 Fig. 34 Connecting lamp cable and adapter cable 32 Fig. 35 Attaching the lamp cable 33 Fig. 36 Applying the new housing sealand insert mounting pins 34 Fig. 37 Inserting the base plate into the housingand screw tight 35 Fig. 38 System overview – Flanges and standards 37 Fig. 39 Performing device scan 38Fig. 40 Confirming device selection 38 Fig. 41 Device information displayed 39 Fig. 42 Selecting device profile 39 Fig. 43 Selecting certificates 40 Fig. 44 Calibrating white reference standard 40 Fig. 45 Calibrating cavity (black reference standard) 41 Fig. 46 Photometric verification 41 Fig. 47 Calibrating gray reference standard 42 Fig. 48 Calibrating white reference standard 42 Fig. 49 Evaluating photometric verification 43 Fig. 50 Photometric verification unsuccessful 43 Fig. 51 Resetting counter 44 Fig. 52 Saving new configurations 44 Fig. 53 Backup of factory configuration 45 Fig. 54 Opening the acceptance protocol 45 Fig. 55 Back to profile selection 46 Fig. 56 Selecting a further device profile 46 Fig. 57 Exporting calibration workflow data 47 Fig. 58 Selecting device 48 Fig. 59 Entering or scanning the IP address 49 Fig. 60 Opening the “Get device information”context menu 49 Fig. 61 Selecting device (measuring system) 50 Fig. 62 Creating *.ini file 504Lamp replacement and calibration - Corona extreme | Service Manual | EN_40_070_0011I5EN_40_070_0011I | Service Manual | Lamp replacement and calibration - Corona extreme Preparing lamp replacementLamp Replacement and Calibration - Corona extreme 1 Preparing lamp replacement• Determine the hardware revision status of the Corona extreme measuringsystemIf possible, ask the customer for the serial number of the device. You can obtain the hardware revision status of the device from the ZEISS Servicedepartment(******************************)bygivingtheserial number.• Download the Test Center SoftwareMake sure that the latest version of the Test Center Software is installed on your test computer. This can be downloaded from /info-ce .• Have the following service / maintenance parts ready / on hand.–Maintenance package ȩHardware revision 2: Maintenance Package 2,order no. 000000-2397-832 ȩHardware revision 3: Maintenance Package 3,order no. 000000-2402-119–Ethernet cable, order no. 000000-2036-573–Laboratory power supply unit, order no. 000000-2045-548• Check the white, gray and black reference standardsSENSITIVE SURFACESDo not touch the surface of the white reference standard.Make sure that the white, gray and black reference standards are clean. If necessary, clean the reference standards with compressed air.The white and gray reference standards are set in glass and can be cleaned using alcohol.Make sure that the white and gray reference standard certificates are not expired.The corresponding certificate can be found on the USB memory stick included in the delivery package.Requirements6Lamp replacement and calibration - Corona extreme | Service Manual | EN_40_070_0011I⇒ C:\Program Files (x86)\ZEISS\InProcess⇒ C:\Program Files (x86)\ZEISS\InProcess\OSIS\ManagementConsole\3 Select deviceSelect the Corona extreme measuring system.Fig. 1 Device selectionup to InProcess version 2.9:from InProcess version 2.10:7EN_40_070_0011I | Service Manual | Lamp replacement and calibration - Corona extremeFig. 2 Entering or scanning the IP address8Lamp replacement and calibration - Corona extreme | Service Manual | EN_40_070_0011IFig. 3 Opening the “Get device information” context menu6 Select device (measuring system)Select Corona extreme under “Please select one entry ...” if necessary.Fig. 4 Selecting device (measuring system)9EN_40_070_0011I | Service Manual | Lamp replacement and calibration - Corona extremeFig. 5 Getting the device information8 Decide on further actionIt is not possible to change the lamp on a Revision 1 sensor on your own. To have the necessary work performed, the sensor must be sent to Carl Zeiss Spectroscopy GmbH in Jena.Please contact the service department of Carl Zeiss Spectroscopy GmbH for this purpose.⇒ ******************************If Hardware Revision 2 is displayed, the lamp can be replaced with a new lamp (type B).⇒ You will need Maintenance Package 2 for this.If Hardware Revision 3 is displayed, the lamp can be replaced with a new lamp (type B).⇒ You will need Maintenance Package 3 for this.Hardware revision 1:Hardware revision 2:Hardware revision 3:Fig. 6 Creation of *.ini file10Lamp replacement and calibration - Corona extreme | Service Manual | EN_40_070_0011I1 Open the “Get device information” context menuRight click on Corona extreme and then select Get device information.. . Fig. 7 Opening the “Get device information” context menuProcedureFig. 8 Getting the firmware version3 Decide on further actionIn this case a batch file must be run.⇒ “Install.bat” (see step 5 in this chapter)If the displayed firmware version is < 210, we recommend updating to thelatest version. ⇒ “V03.01_0210.fwx”Hardware revision 2:Hardware revision 3:Fig. 9 Performing firmware update Select the correct firmware.Fig. 10 Firmware version warningOnce you have selected the correct firmware, the following window appears. Start the firmware update by clicking OK.Fig. 11 Firmware update confirmationFig. 12 Updating of firmwareThe update was successful.Confirm by clicking OK.Fig. 13 Confirming successful firmware updateOpen the folder. It contains several files and subfolders. Do not remove these. Use only the file “Install.bat”.Start the batch file by double-clicking on Install.bat .Read the info text.Fig. 14 Confirmation prompt for batch fileSelect [y] (Yes) if Hardware Revision 2 is installed and you intend to replace the lamp.Select [n] (No) if you do not intend to replace the lamp.[y][n]Fig. 15 Entering IP addressThe batch file is run. This can take several minutes.Fig. 16 Running batch fileFig. 17 Entering IP addressThe preparatory work for the lamp replacement is now complete.Return to chapter “4 Replacing the halogen lamp” on page 19 and read the safety instructions. Replace the lamp as follows.ResultReplacing the halogen lamp Lamp Replacement and Calibration - Corona extreme4 Replacing the halogen lamp4.1 General workHAZARD FROM ELECTRICAL ENERGYMake sure that the power supply is disconnected. The entire measuringsystem must be disconnected from the power supply.Make sure that the measuring system cannot be unintentionally reconnectedto the power supply by third parties.GENERAL HAZARDThe activities below may only be performed by Service employees ofCarl Zeiss Spectroscopy GmbH or by appropriately trained personnel.HAZARD FROM THERMAL ENERGYAllow the halogen lamp to cool down for approx. 10 minutes beforeremoving it.SENSITIVE OPTICAL COMPONENTSBe careful not to touch the reflector and the glass bulb of the new halogenlamp without cotton gloves.Only carry out work on optical components in a very clean workingenvironment. Use gloves which are free of all traces of lint, powder orgrease.SENSITIVE ELECTRONIC COMPONENTSPerform all the activities below at an ESD workstation.Replacing the halogen lampLamp Replacement and Calibration - Corona extreme 1 Exit control software Exit the InProcess control software.2 Disconnect power supply Disconnect the power supply to the Corona extreme measuring system.3 Dismantle Corona extreme from customer interface If necessary, dismantle the Corona extreme measuring system from the customer interface (tool selection based on specific constellation).4 Remove system cables Loosen the sleeve nuts of the connected plugs and remove the cables from the connection sockets on the Corona extreme measuring system.5 Set up ESD workstation Perform all the activities described below at an ESD workstation. 6 Have the spare parts ready If you have not already done so, have the following spare parts ready: –Maintenance Package 2, order no. 000000-2397-832 –Maintenance Package 3, order no. 000000-2402-1197 Have all tools and equipment ready If you have not already done so, have the following tools and equipment ready: –TX 10 and TX 25 Torx screwdrivers – 2 mm slot-head screwdriver –Gloves ProcedureHardware revision 2:Hardware revision 3:4.2 Opening the housing1 Remove housing screwsPlace the Corona extreme spectrometer system so that the measurementwindow is facing upwards.Unscrew the 12 Torx screws 2 from the base plate 1 of the housing. Use a TX 25 Torx screwdriver for this.2 Lift the base plate off the housingCarefully lift the base plate 1 straight off the housing 2.This disconnects the plug connections between the boards, which are located in the housing and on the base plate.Turn the base plate through 180° and place it on the ESD workstation.3 Remove old housing seal Remove the housing seal 1 from the groove 2 in the base plate.The seal must be replaced by a new seal each time the housing is opened (see chapter “4.5 Closing the housing” on page 34).Fig. 20Removing housing seal4.3 Replacing halogen lamp – Hardware Revision 2• The base plate has been removed and placed on an ESD base (see section “4.2 Opening the housing” on page 21).• If you have not already done so, put the following spare parts ready: –Maintenance package 2, order no. 000000-2397-8321 Disconnect the plug connections Disconnect the lamp cable from the halogen lamp 2.Disconnect the lamp cable plug from the connector / jack 4 on the lampRequirementsProcedure3 Remove the lamp holderUnscrew the two Torx screws 1 from the lamp holder. Use a TX 25 Torx screwdriver for this.Remove the entire lamp holder – consisting of the lower lamp holder ring 3 and upper lamp holder ring 4 together with the old halogen lamp 2 – carefully upwards.Put all disassembled type A lamps aside. These are no longer needed.5Install adapter cable for type B lamp If necessary, open the right cable clip 1. If necessary, use a slot-head screwdriver for this.Insert the adapter cable 2 into the cable clip and close it again. Place the new O-ring 3 concentrically into the reflector 2.7 Mount the reflector holderAlign the hole in the reflector holder 4 and the centerbore in the lamphousing 5 (red line in the diagram below).Place the reflector holder 2 onto the lamp housing centrally above thereflector.Provisionally screw the two fixing screws 3 only half way into the threaded holes in the lamp housing 1. Use a TX 25 Torx screwdriver for this.9 Install a new halogen lampBring the hole on the edge of the lamp cap 4 in line with the counterbore in the lamp housing 2 (red line in the diagram below).Insert the new halogen lamp 3 carefully into the opening of the reflector holder 1.Tighten the three Torx screws 5 on the lamp cap. Use a TX 10 Torxscrewdriver for this.11 Insert lamp cable into cable clipInsert the lamp cable 2 in the left cable clip 3 so that the connecting plugs are secured between both cable clips.Close the left cable clip again.12 Attach screw-on cable tieScrew on a new cable tie 1. Use a TX 10 Torx screwdriver for this.recalibrated.Refer to chapter “5 Performing sensor calibration” on page 36.4.4 Replacement of halogen lamp – Hardware Revision 3• The base plate has been removed and placed on an ESD base (see section “4.2 Opening the housing” on page 21)• If you have not already done so, put the following spare parts ready: –Maintenance Package 3, order no. 000000-2402-1191 Remove the lamp cable from the cable clip Open the left cable clip 1 . If necessary, use a slot-head screwdriver for this. Proceed very carefully. Take the lamp cable 2 out of the cable clip.2 Remove screw-on cable tie Unscrew the cable tie 3. Use a TX 10 Torx screwdriver for this.Cut the cable tie and remove it.Note: The screw-on cable tie 3 must be replaced by a new one each timeRequirementsProcedureReplacing the halogen lamp Lamp Replacement and Calibration - Corona extreme3 Disconnect the lamp cable from the adapter cableUnplug the lamp cable plug 1 from the adapter cable 2.Replacing the halogen lamp Lamp Replacement and Calibration - Corona extreme5 Install a new halogen lampBring the hole on the edge of the lamp cap 4 in line with the counterbore inthe lamp housing 2 (red line in the diagram below).Insert the new halogen lamp 3 carefully into the opening of the reflectorholder 1 .Tighten the three Torx screws 5 on the lamp cap. Use a TX 10 Torxscrewdriver for this.Replacing the halogen lamp Lamp Replacement and Calibration - Corona extreme7 Insert lamp cable into cable clipInsert / place the lamp cable 2 in the left cable clip 3 so that the connectingplugs are secured between both cable clips.Close the left cable clip again.8 Attach screw-on cable tieScrew on a new cable tie 1. Use a TX 10 Torx screwdriver for this.recalibrated.Refer to chapter “5 Performing sensor calibration” on page 36.Replacing the halogen lamp Lamp Replacement and Calibration - Corona extreme 4.5 Closing the housing • All service activities have been properly complete. All disconnected plug connection have been reconnected and cables are laid properly.• Put the following spare parts ready: –Housing seal (part of the Maintenance Package)• P ut the following tools and equipment ready: –Centering aid for seal replacement (part of the Service Package), consisting of 8 mounting pins –TX 25 Torx screwdriver 1 Apply the new housing seal and insert mounting pins Always apply a new housing seal 2 to the housing 3 .Make sure the seal is correctly positioned. The side of the seal with the larger corner radius (red circle) must coincide with the corresponding corner of the housing. Insert the 8 mounting pins 1 into the threads of the housing 3 . The 8 pins can be distributed freely to any of the threads as they will be removed in a later step.Requirements ProcedureReplacing the halogen lampLamp Replacement and Calibration - Corona extreme 2 Insert the base plate into the housing and secureFirst check the correct mounting position. The electrical connectors of the board and the housing need to be aligned to each other.RISK OF COMPONENT DAMAGEWhen the base plate is put back onto the housing, there is a risk of damage to the boards, e.g. through individual components shearing off.Therefore put the base plate very slowly and carefully back onto the housing, visually monitoring the movement at all times.[ A ] Carefully put the base plate 1 in a straight line back onto the housing 2.The two plug connections between the boards of the housing and the base plate are reconnected.[ B ] Remove the 8 mounting pins 3.[ C ] Screw the 12 fixing screws 4 back into the housing.Use a TX 25 Torx screwdriver for this.Fig. 37 3A BC412Inserting the base plate into the housing and screw tightPerforming sensor calibration Lamp Replacement and Calibration - Corona extreme 5 Performing sensor calibration • The halogen lamp has been replaced and the device is closed.• The “TestCenter” software is installed on your test computer. If this is not the case, you can download the software from your download portal at /info-ce .• The white and gray reference standard certificates are already on the test computer. If this is not the case, they must be copied to the test computer.• If not already done so, put the following equipment ready: –Laboratory power supply unit (000000-2045-548) –Ethernet cable (000000-2036-573) –Reference holder “Sapphire Flange“ (000000-1462-668) incl. 3x Fixing screw (000000-0452-139) –Reference holder “Sample pan - 5.5 mm thick base” (in TURNSTEP) (000000-2130-893) –Reference holder “Sample pan - thin base” (in TURNSTEP) (000000-2285-627) –Centering aid for reference standards (000000-2051-306) –White reference standard with certificate (000000-2393-701) –Gray reference standard with certificate (000000-2394-676) –Black reference standard (cavity) (000000-1270-164)1 Connect the device to the power supply For acceptance testing with “TestCenter”, always connect the device to a power supply unit.2 Connect the device to the test computer Connect the device to the measuring computer via Ethernet cable.Make sure that you have the same IP address range. You may need to change the IP address range on the test computer.3 Apply the reference holder to the device Apply the required reference holder to the device.Requirements ProcedurePerforming sensor calibrationLamp Replacement and Calibration - Corona extreme 4 Position the reference standard on the reference holderPlace the required reference standard on the reference holder.Ensure that the reference standard is correctly oriented.IMPORTANT NOTETo ensure a correct position during calibration, the sapphire flange must be fixed with the three enclosed screws (000000-0452-139) when placing it.Fig. 38System overview – Flanges and standardsFig. 39 Performing device scanOnce the scanning process is completed, any devices which have been found will be displayed.Confirm your device selection by clicking OK.Fig. 40 Confirming device selectionFig. 41 Device information displayedClick to proceed to the next step.6 Select test block/device profileA scan is performed for potential / available / connected test blocks / device profiles.Select a test block.Fig. 42 Selecting device profileClick to proceed to the next step.= Skip to next program section= Restart workflowConnection status:yellow: "connected to device"gray: "not connected" Profile: Sapphire Flange⇨ Reference holder:“1462-668”Profile: Sample pan - 5.5 mmthick base (in TURNSTEP)⇨ Reference holder:“2130-893”Profile: Sample pan - thin base(in TURNSTEP)⇨ Reference holder:“2285-627”Use the buttons to select your reference standard certificates.Fig. 43 Selecting certificatesNote: Make sure that the correct profile attachment is placed on the sensor.Click to proceed to the next step.8 Referencing – Calibration of white reference standardPlace the white reference standard on the centering aid. Ensure correct alignment (interlocking of groove and pin).Click OK to start the calibration.Fig. 44 Calibrating white reference standardRemove the white reference standard when the measurement is complete.“Maximum certificate ”= White reference standard= SRS-99“Gray reference standard ”= Gray reference standard= SRS-60Fig. 45 Calibrating cavity (black reference standard)10 Photometric verification – Cavity measurement (black reference standard)Place the black reference standard on the centering aid.Click OK to start the measurement.Fig. 46 Photometric verificationClick to repeat the measurement.Click to proceed to the next step.Fig. 47 Calibrating gray reference standardRemove the gray reference standard when the measurement is complete.12 Photometric verification – White reference standard measurementPlace the white reference standard on the centering aid. Ensure correct alignment (interlocking of groove and pin).Click OK to start the measurement.Fig. 48 Calibrating white reference standardFig. 49 Evaluating photometric verificationIf measurements are unsuccessful, this is indicated by the following pictogram: .Fig. 50 Photometric verification unsuccessfulClickto repeat the measurement.Click to proceed to the next step.= Measurement successful= Restart the workflow= Measurement unsuccessfulFig. 51 Resetting counterSeveral steps now need to be taken to store the current reference as the new default setting on the device.Fig. 52 Saving new configurationsFig. 53 Backup of factory configuration15 Open and transmit protocolClick Open Protocol to open the acceptance protocol.Fig. 54 Opening the acceptance protocolThis protocol can be printed out or sent in digital form to the customer.Send the protocol to the Service department of Carl Zeiss Spectroscopy GmbH.⇒******************************Fig. 55 Back to profile selection 17 Select a further test block / device profile A scan is performed for potential / available test blocks / device profiles.Select the next test block / device profile.Fig. 56 Selecting a further device profile Click to proceed to the next step. Profile: Sapphire Flange⇨ Reference holder:“1462-668”Profile: Sample pan - 5.5 mmthick base (in TURNSTEP)⇨ Reference holder:“2130-893”Profile: Sample pan -thin base (in TURNSTEP)⇨ Reference holder:“2285-627”Click onto start the export.Fig. 57 Exporting calibration workflow data19 Transmission of *.zip filesSend the TestCenterExport_*.zip files to the Service department ofCarl Zeiss Spectroscopy GmbH. ⇒ ******************************20 Exiting the “TestCenter” softwareWhen all steps are complete, close the TestCenter program.= Start export Final steps2 Select deviceSelect the Corona extreme measuring system.Fig. 58 Selecting deviceFig. 60 Opening the “Get device information” context menuFig. 61 Selecting device (measuring system)6 Create *.ini fileClick on Export details under “Device info”.An *.ini file is created. Save this file.Fig. 62 Creating *.ini file。

a rXiv:076.48v1[astro-ph]27J un27On X-ray Optical Depth in the Coronae of Active Stars Paola Testa 1,Jeremy J.Drake 2,Giovanni Peres 3,David P.Huenemoerder 1ABSTRACT We have investigated the optical thickness of the coronal plasma through the analysis of high-resolution X-ray spectra of a large sample of active stars observed with the High Energy Transmission Grating Spectrometer on Chandra .In particular,we probed for the presence of significant resonant scattering in the strong Lyman series lines arising from hydrogen-like oxygen and neon ions.The active RS CVn-type binaries II Peg and IM Peg and the single M dwarf EV Lac show significant optical depth.For these active coronae,the Ly α/Ly βratios are significantly depleted as compared with theoretical predictions and with the same ratios observed in similar active stars.Interpreting these decrements in terms of resonance scattering of line photons out of the line-of-sight,we are able to derive an estimate for the typical size of coronal structures,and from these we also derive estimates of coronal filling factors.For all three sources we find that the both the photon path length as a fraction of the stellar radius,and the implied surface filling factors are very small and amount to a few percent at most.The measured Ly α/Ly βratios are in good agreement with APED theoretical predictions,thus indicating negligible optical depth,for the other sources in our sample.We discuss the implications for coronal structuring and heating flux requirements.For the stellar sample as a whole,the data suggest increasing quenching of Ly αrelative to Ly βas function of both L X /L bol and the density-sensitive Mg xi forbidden to intercombination line ratio,as might generally be expected.Subject headings:Radiative transfer —X-rays:stars —stars:coronae —stars:late-type1.IntroductionA fundamental issue in the physics of stellar outer atmospheres concerns the relationship between magnetic activity on stars with a wide range of physical parameters and solar magnetic activity.How directly and how far does the solar analogy apply to other stars,and do any of the underlying physical processes differ?The X-ray luminosities of late-typestars can span several decades(e.g.,Vaiana et al.1981),and these hot coronae are foundon such a wide range of spectral types that the extrapolation of the now well-studied solar corona to the extremes of stellar activity is by no means obvious and could be inappropriate. Indeed,“scaled up Sun”scenarios,in which a stellar surface is covered with bright solar-likeactive regions,only realise X-ray luminosities100times that of the typical active Sun(e.g.,Drake et al.2000).The most active stars,with X-ray luminosities of up to10,000times thesolar X-ray luminosity,must have coronae which are structured differently in some way.Since coronal structures can be imaged presently only on the Sun,the structuring ofother stellar coronae is generally investigated through the application of techniques suchas the study of lightcurves duringflares(e.g.,Schmitt&Favata1999;Favata et al.2000a; Maggio et al.2000;Reale et al.2004;Testa et al.2007),rotational modulation(e.g.,Brickhouse et al. 2001;Marino et al.2003;Huenemoerder et al.2006),and study of density properties to-gether with information on emission measure(e.g.,Testa et al.2004a,hereafter TDP04;Ness et al.2004).Most of these analyses indicate that the emitting plasma is rather com-pact(scale height≤0.5R⋆)and localized at high latitude(see e.g.,Schmitt&Favata1999; Brickhouse et al.2001;Testa et al.2004b,TDP04);however,the presence of extended coro-nal plasma has also been claimed on some stars based on UV and X-ray Doppler studies(e.g.Chung et al.2004;Redfield et al.2003).The search for signs of quenching in strong lines through resonance scattering representsa further technique that offers a potentially powerful diagnostic of the sizes of X-ray emitting regions;the escape probability of a photon emitted by a resonance line in a low density homogeneous plasma is in fact dependent on the line-of-sight path length through the plasma region.Significant scattering optical depth can be combined with density measurements toobtain an estimate of photon path length within the emitting plasma.Several existing studies have explored optical depths of both solar and stellar coronal emission lines.Studies of solar X-ray spectra have aimed at probing the optical depth inthe strong(gf=2.66)2p53d1P1−2p61S0resonance line of Fe xvii at15.01˚A as comparedto nearby weaker Fe xvii lines,though with controversial results concerning whether opticaldepth effects were seen or not(Phillips et al.1996,1997;Schmelz et al.1997;Saba et al. 1999).In particular,Saba et al.(1999)review recent observationalfindings on the opacity inferred from the study of the bright iron resonance line at15.01˚A and on the center-to-limb behaviour.Among other issues,Saba et al.(1999)address the discrepancy they find in the derived direction and magnitude of the center-to-limb trend(also in agreement with Schmelz et al.1997),as compared to thefindings of Phillips et al.(1996)whofind that the effect of resonant scattering is decreasing from the disk center toward the solar limb,a trend irreconcilable and totally opposite to that found by Saba et al.(1999)and Schmelz et al.(1997).Brickhouse&Schmelz(2006)have recently reanalized solar X-ray spectra and suggest that previously ignored blends might explain the departure of measured ratios from theoretical calculations.Resonant scattering in stellar coronae has been investigated by Phillips et al.(2001) and Ness et al.(2003)through the analysis of the same transition observed at high resolu-tion(λ/∆λup to∼1000)by Chandra and XMM-Newton.Both stellar studies of Fe xvii transitions fail tofind evidence for significant deviation from the optically thin regime,and in particular the large survey of stellar spectra analyzed by Ness et al.(2003)show that nofirm results can be obtained from Fe lines.One exception is the suggestion of resonance scattering in Fe xvii15.01˚A on the basis of the observed variability of line ratios seen during aflare on AB Dor by Matranga et al.(2005).We note that Phillips et al.(2001)attempted to derive constraints on emitting region size based on their upper limit to optical depth in the coronae of Capella,though,as we discuss in this paper(§6),such upper limits cannot be reliably used in this fashion because scattering into the line of sight renders optical depth measurements themselves only lower limits to the true scattering depth.In a previous Letter(Testa et al.2004b,hereafter Paper I)we presented results obtained using a different approach to the study of coronal optical depth,through the analysis of Ne and O Lyαto Lyβline strength ratios as observed by the High Energy Transmission Grating(HETG)on board the Chandra X-ray Observatory.Significant depletion of Lyαlines to resonance scattering were seen in the spectra of the RS CVn-type binaries II Peg and IM Peg.In this paper we follow up on that exploratory study and examine the Ne and O Lyman series lines in a large number of active stars(namely,the same sample for which the plasma density was analysed in TDP04)in order to survey the X-ray optical depth properties of active stellar coronae.We discuss in§2the advantages of the Lyman series analysis with respect to the“stan-dard”approach using Fe xvii lines.The observations are briefly described in§3.Our techniques of lineflux measurement and spectral analysis are described in§4.The results are presented in§5.We combine the results of this study with our earlier density estimates and discuss these in the context of coronal structure on active stars in§6;we draw our conclusions in§7.2.Resonant scattering in Ne and O Lyman series lines.The Fe xvii soft X-ray complex at∼15˚A has been a primary tool to probe coronal op-tical depth because of the large oscillator strength of the2p61S0-2p53d1P115.01˚A resonance line and its consequent prominence in solar spectra.However,Doron&Behar(2002)and Gu(2003b)have recently shown that the indirect processes of radiative recombination,di-electronic recombination,and resonance excitation involving the neighbouring charge states are important for understanding the relative strengths of Fe xvii–xx lines.There is thus still some considerable difficulty in reconciling theoretical and observed line strength ratios. Recently,Brickhouse&Schmelz(2006)have found good agreement of solar observed ratios with new theoretical calculations(Chen&Pradhan2005),and suggest that center-to-limb observed trends(Phillips et al.1996;Schmelz et al.1997;Saba et al.1999)are due to chance rather than to optical depth effects.An additional problem in using Fe xvii lines as diagnostics of optical depth is that this element has been found to be depleted in the coronae of active stars by factors of up to10(e.g.,Drake et al.2001;Huenemoerder et al.2001;Drake2003;Audard et al.2003) as compared with a solar or local cosmic composition.The ratio of the line-center optical depths,τi/τj,of two lines i and j is given byτi m i(1)m jwhere f is the oscillator strength,λis the wavelength,φis the fractional population of the ion in question,A is the element abundance and m the ion mass.The line optical depth is directly proportional to abundance and,in the case of stellar coronae,where only the very strongest spectral lines might be expected to undergo any significant resonance scattering, any abundance depletions also reduce the sensitivity of lines as optical depth indicators.For coronal abundances typically found in RS CVn systems(see e.g.reviews by Drake2003; Audard et al.2003),we expect resonant lines from the more abundant ions like oxygen and neon to be more sensitive to resonant scattering processes than the resonant Fe xvii line. This is illustrated in Figure1,where we show the relative optical depths for the O viii and Ne x Lyαlines and the Fe xvii∼15.01˚A resonance line for both a representative solar chemical composition(Grevesse&Sauval1998)and for a chemical composition typically found for active stars.For the latter,we assumed Ne and Fe abundances0.3dex higher and 0.5dex lower,respectively,than the corresponding solar values;we note that in several active coronae abundance anomalies even more pronounced have been found(e.g.,Brinkman et al. 2001;Huenemoerder et al.2001).Fig.1.—The relative sensitivity of Lyαlines of Ne x,O viii,and the strong Fe xvii15.01˚A transition to resonant scattering,as a function of plasma temperature.Relative line optical depths,normalised to the maximum depth in O viii,are shown for two sets of abundances. Dashed lines correspond to the solar photospheric abundance mixture of Grevesse&Sauval (1998);filled profiles correspond to coronal abundances typically found in RS CVn’s(see text).Because of the typically higher Ne abundance and lower Fe abundance found in the coronae of RS CVn systems,the expected resonant scattering effects are greater for O viiiand Ne x Lyαthan for the Fe xvii.As discussed in Paper I,the effect of resonance scattering of Lyαand Lyβphotons can be diagnosed by comparison of the measured Lyα/Lyβratio with respect to the theoretical ratio.In principle,both n=2→1Lyαand n=3→1Lyβlines can be affected by resonant scattering:when a large optical depth is reached in Lyα,an enhanced population of the n=2 level can lead to a potentially confusing enhancement in Lyβ(and Baα)through collisional excitation of the n=2→3transition.However,in the limit of fairly small scattering optical depth that we expect to characterize stellar coronae,Lyβessentially remains optically thin and should make a reliable comparison with which to diagnose optical depth in Lyα.3.ObservationsChandra High Energy Transmission Grating Spectrometer(see Canizares et al.2000, 2005for a description of the instrumentation)observations of22cool stars covering a wide range activity level were analysed.The stellar parameters and particulars of the observa-tions were discussed in detail in a companion paper that addressed the coronal densities of active stars(TDP04).To the sample analysed in TDP04we added a set of observations of IM Peg obtained subsequent to thefirst three segments analysed in Paper I and TDP04;the parameters of these additional observations are listed in Table1.Table1.Parameters of the HETG observations of IM Peg.Obs ID Start date and time t exp L X a L X b[ks][erg s−1][erg s−1]a relative to the HEG range:1.5-15˚Ab relative to the MEG range:2-24˚AThe HETG spectra and the corresponding X-ray lightcurves for the observations can befound in TDP04;we also discuss there the variability observed for some of the stars.Thesource sample covers very different stellar characteristics,providing a wide view of X-rayemitting stellar coronae;e.g.,the X-ray luminosities(in the hetgs bandpasses;see TDP04)span more thanfive orders of magnitude,from the relatively weak emission of ProximaCentauri with a few1026erg s−1,up to the very high luminosity(∼6×1031erg s−1)of thegiant HD223460.4.AnalysisThe data used here were obtained from the Chandra Data Archive4and have beenreprocessed using standard CIAO v3.2.1tools and analysis threads.Effective areas were cal-culated using standard CIAO procedures,which include an appropriate observation-specificcorrection for the time-dependent ACIS contamination layer.Positive and negative spectralorders were summed,keeping heg and meg spectra separate.For sources observed in sev-eral different segments,we combined the different observations and analysed the coaddedspectra.For IM Peg,as noted above,a number of observations are available with which toprobe optical depth properties at different times and orbital phases;IM Peg will be discussedin more detail in§5.1.Spectra were analyzed with the PINTofALE5IDL6software(Kashyap&Drake2000)using the technique of spectralfitting described in TDP04.We measured the spectral lineintensities of the Ne x Lyα(2p2P3/2,1/2−1s2S1/2)and Lyβ(3p2P3/2,1/2−1s2S1/2)transitions from both heg and meg spectra,and the O viii lines from meg spectra alone(since thelatter lie outside the heg wavelength range).In order to take into account the mild dependence of the Lyα/Lyβratio on plasmatemperature,we also measured the intensities of the Ne ix and O vii resonance line,r(1s2p1P1−1s21S0),providing us with an estimate of a representative temperature through the Lyα/r ratio.There are two potential problems with this approach.Firstly,where reso-nant scattering is relevant,both Lyαand r transitions can be depleted,and in such a case the Lyα/r ratio might deviate from its expected theoretical behaviour.Secondly,the coro-nae in which these X-ray lines are formed are expected to be characterised by continuousranges of temperatures,rather than by a single,isothermal plasma.However,both of these concerns prove unproblematic.Figure2illustrates the theoretical temperature dependence of the Lyα/r ratio and of the Lyβ/Lyαratio for Ne lines(O lines show analogous behaviour).The Lyα/r is much more temperature-sensitive than Lyβ/Lyα,and the relatively small deviations from the optically-thin case that might be expected in stellar coronae can only incur small errors in temperature that will have a negligible impact on the predicted Lyβ/Lyαratio.Fig.2.—Temperature sensitivity(in the isothermal case)of the Lyα/r ratio compared to theLyβ/Lyαratio,for neon lines.The corresponding oxygen lines show analogous behaviour.The accurate temperature determination from the Lyα/r ratio strictly holds only for isothermal plasma,whereas stellar coronae are characterised by a thermal distribution of the plasma,so that this diagnostic would give us a temperature weighted by the emission mea-sure distribution(DEM).By computing line ratios for non-isothermal plasma models,and interpreting as if isothermal,we can estimate the errors incurred by an isothermal assump-tion.We considered two different sets of DEMs:those derived from actual observations of some of the stars in our sample,and simple DEM models in which the emission mea-sure is proportional to T3/2(as expected for simple hydrostatic loop models;Rosner et al. 1978),or proportional to T5/2(as observed in some stars such as31Com,Scelsi et al. 2004,and reproduced by some hydrodynamic loop models,Testa et al.2005).For these models we used peak temperatures varying from106.5K to107.3K.Observed DEMs were culled from the literature for the following sources:AB Dor(Sanz-Forcada et al.2003b), HD223460(Testa et al.2007),31Com,βCet,µVel(Garc´ıa-Alvarez et al.2006),ER Vul, TZ CrB,ξUMa(Sanz-Forcada et al.2003a),44Boo(Brickhouse&Dupree1998),UX Ari (Sanz-Forcada et al.2002),II Peg(Huenemoerder et al.2001),λAnd(Sanz-Forcada et al. 2002),AR Lac(Huenemoerder et al.2003),HR1099(Drake et al.2001).Given the line ratio computed for each DEM model,we inverted the isothermal relation to obtain T(Lyα/r).Using that T,we then obtained the theoretical isothermal Lyα/Lyβratio(Lyα/Lyβ[T(Lyα/r)])and compared to the synthetic ratio(Lyα/Lyβ[DEM]).We find that the isothermal assumption is a good predictor of the ratio for both theoretical DEMs and for representative stellar models:Figure3shows that the isothermal and DEM ratios are in very good agreement,with differences between the two generally amounting to a few percent.We conclude that the Lyα/r temperatures are quite adequate to assess the appropriate expected Lyα/Lyβratio,even if the real plasma temperature distributions of the coronae in our study are far from isothermality.Fig. 3.—Left panel:DEM models (DEM ∝T 3/2,T 5/2)used to test the validity of the isothermal approximation.Right panel:The Ne x Ly α/Ly βratios obtained for model (left panel)and observed DEMs (see text;black empty symbols)compared with the Ly α/Ly βratios expected for isothermal temperatures diagnosed from the DEM Ne Ly α/r ratios.4.1.Deblending of Ne x Lyαand O viii LyβNe x Lyαand O viii Lyβlines are affected by blending of iron lines unresolved at the hetgs resolution level.Specifically,significant blending is expected for O viii Lyβby an Fe xviii line(2s22p4(3P)3s2P3/2−2s22p52P3/2,λ=16.004˚A),and,to a lesser extent,for the Ne x Lyαline by a nearby Fe xvii transition(2s22p5(2P)4d1P1−2s22p61S0,λ=12.124˚A).O viii Lyβ—In order to estimate the often significant contribution of Fe xviii to the O viii Lyβspectral feature,we used the same method described in Paper I,which was also subsequently adopted by Ness&Schmitt(2005)in an analysis of spectra of the classical T Tauri star TW Hya.We estimated the intensity of the16.004˚A Fe xviii line by scaling the observed intensity of the slightly stronger neighbouring unblended Fe xviii16.071˚A (2s22p4(3P)3s4P5/2−2s22p52P3/2)transition.Gu(2003b)has recently pointed out the similar behaviour of Fe L-shell lines originating from3s and3p upper levels in respect to the indirect excitation processes of radiative recombination,dielectronic recombination, and resonance excitation.The16.004˚A and16.071˚A transitions originate from similar3s upper levels and their ratio should therefore not deviate greatly from current theoretical predictions.The APED(v.1.3.1)database(Smith et al.2001)lists their theoretical ratio as0.76at the temperature of the Fe xviii population peak(∼6.8MK),with a decrease of onlya few percent up to10MK or so;this range covers the expected formation temperatures of Fe xviii in our target stars.We investigated this scaling factor empirically by examining the departure of the re-sulting deblended Lyα/Lyβratios from the theoretical value as a function of the ratio of the observed Fe xviii16.071˚A to Lyβline strengths.If the deblending scaling factor is correct, there should be no residual slope in the resulting data points;a positive slope would instead indicate an over-correction for the blend and a negative slope an under-correction.We found that a slope of zero was obtained for a scaling factor of∼0.70—in good agreement with the APED value within expected uncertainties.This is illustrated in Figure4.Fig. 4.—O viii Lyα/Lyβratios(relative to the theoretical ratio)before(left)and after (right)the correction for the contamination of the Fe xviii line blending with the O Lyβline,plotted vs.the relative intensity of the Fe xviii line at∼16.07˚A and the O Lyβbe-fore the deblending process.The effect of the blending Fe xviii line is clear from the left plot.The right plot shows the effectiveness of the deblending procedure which eliminates the strong correlation between the departure from the theoretical Lyα/Lyβvalue and the Fe xviii/OLyβratio before the deblending.Ne x Lyα—In analogy with the procedure used for the O viii Lyβwe searched for isolated and strong Fe xvii lines to estimate the amount of blending from Fe xviiλ=12.124˚A inthe Ne x Lyαline.A potentially good candidate would be the nearby12.266˚A Fe xvii line(2s22p5(2P)4d3D1−2s22p61S0),which has a similar intensity and behavior as a function of temperature;however this transition is rather weak in most of the observed spectra,andcan be affected itself by blending with a close Fe xxi transition(12.284˚A)barely resolved byhetg.We therefore chose to use a larger set of Fe xvii lines including stronger transitions.The intensity of the Fe xvii line blending with the Ne x Lyαis estimated by scaling theobserved intensity of other Fe xvii lines(12.266,15.014,15.261,16.780,17.051,17.096˚A)bythe ratio expected from Landi&Gu(2006)(see also Gu2003a;Landi et al.2006),assuminglog T=6.8.These calculations include indirect processes involving the neighboring chargestates,and are quite successful at reproducing the relative intensity of these Fe xvii lines.Previous calculations(including those adopted in APED v.1.3.1)fail here,with,e.g.,theratio of the15˚A line to the17˚A lines being overestimated by about a factor2.The detailedcomparison of the observed Fe xvii line ratios with the predictions of different theoreticalcalculations are addressed in a paper in preparation.The measured linefluxes after application of deblending corrections,together with thestatistical errors,are listed in Table2.5.ResultsThe observed Lyα/Lyβratios and the temperature derived from the Lyα/r ratios arelisted in Table3and illustrated in Figure5.Measurements obtained from the meg spectragenerally result in smaller statistical errors due to the higher S/N;however,wefind a generalagreement of heg and meg results7.The main differences of the present work with respect tothe analysis of Paper I,where results were presented for4sources(II Peg,IM Peg,HR1099,and AR Lac),are that the linefluxes have been remeasured in the reprocessed data,Ne xmeg/,where sys-tematic discrepancies of8-10%are found in the10-12˚A range(megfluxes being lower than corresponding hegfluxes at the same wavelength)therefore not significantly affecting the Lyα/Lyβratios.We note that our measured hegfluxes are in agreement with meg measurements within2σfor the large majority of cases; the only significant exceptions are the Ne x Lyαof TZ CrB and of HR1099(3,5σrespectively)whose heg fluxes are∼10%larger than the corresponding megfluxes in agreement with the comparisons presented in /ASC/calib/hegLyαfluxes have been corrected for blending,and the deblending procedure for O viii Lyβhas been slightly refined(see previous section).Also,IM Pegfluxes listed here refer to the total (∼192ks)hetgs spectrum including ObsID2530-2534not yet publicly available when we carried out the analysis presented in Paper I(where we used thefirst three25ks pointings; see§5.1for a detailed discussion).Table2.Measured linefluxes(in10−6photons cm−2s−1).Source Ne O FeAU Mic374±50356±1551±1044±4208±15990±40134±20243±4021±567±11 Prox Cen-69±20-6.5±2.947±9306±2838±14100±706±219±13 EV Lac278±22262±1030±632±3209±8875±19137±11330±3024±573±9 AB Dor668±50682±2496±1686±9332±271400±50200±22280±5041±9158±16 TW Hya97±1995±812±89.6±2.8155±14265±3038±12114±405.9±211±8 HD223460158±20137±1122±616.0±2.720±7229±2227±1148±2410±242±10 HD11181258±5-7.9±1.614±3124±1615±740±308.8±248±5βCet419±24408±1053±1048±4146±10764±2962±23140±40116±21426±21 HD45348-54±4-4.7±2.335±7127±2216±840±3011.6±330±5µVel173±21159±1516±1318±795±7400±3045±1646±2762±12163±10 Algol898±50832±40136±23120±8196±201318±50166±30190±6063±14258±23 ER Vul218±22201±1226±824.3±2.874±7362±2939±1266±4024±588±9 44Boo572±60537±2475±1168±8254±201450±60122±22266±6053±11151±16 TZ CrB1126±301043±24145±14127±6516±202110±50178±26300±50131±25445±20 UX Ari730±40767±20126±17107±8245±18926±50147±21158±4014.5±355±13ξUMa419±27394±1342±847±4309±161510±60169±22496±6083±17185±15 II Peg1300±701200±30183±24191±10356±201950±70350±30250±5018±486±16λAnd557±30556±1480±1184±5189±14984±40113±17110±3024.6±6137±12 TY Pyx341±29312±646±1240±5142±15468±5051±2196±5025±5106±17 AR Lac648±40621±17104±1594±6182±20888±5094±23130±5034±7129±14 HR10991960±401730±18255±14230±7566±182680±50367±21410±4058±12246±14 IM Peg408±25383±1062±760±379±8490±3075±1250±2010.6±2.545±8Fig. 5.—Lyα/Lyβ,both from heg(filled symbols)and from meg(empty symbols)vs. temperature,as derived from the ratio of the Lyαand the He-like resonance line.The solid line mark the theoretical ratio from APED,expected for isothermal plasma at the corresponding temperature.As indicated on the right plot,different symbols are used for different classes of sources.Lyα/Lyβratios from heg are shifted in T by2%to separate them from the meg measurements.Table3.Lyα/Lyβphoton ratios and plasma temperature,with1σerrors.Source Ne OT a Lyα/Lyβ∆[σ]b T a Lyα/Lyβ∆[σ]b[106K]HEG MEG HEG MEG[106K]MEG MEGa T derived from the Lyα/r line ratio diagnostics.b Discrepancy between Lyα/Lyβmeasured and theoretical value in units ofσ.The observed Ne x Lyα/Lyβratios follow closely the APED theoretical predictions as a function of temperature.The values for the O viii ratios(right panel of Fig.5)show slightly more scatter,with some departures below theory and some1-2σexcursions above. We note that an enhancement of the Lyα/Lyβratio is possible for the particular geometry in which an emitting region is optically-thick in some directions but is optically-thin in the line-of-sight of the observer(see also the radiative transfer study of Kerr et al.2004).Such a situation is disfavoured by the isotropic nature of the scattering process in which any line enhancements through scattering are diluted,roughly speaking,by the ratio of solid angles of optically-thin to optically-thick lines-of-sight.In the case of loop geometries,such a ratio is much larger than unity.We therefore interpret these small upward1-2σexcursions as normal statisticalfluctuations.In the case of the Ne x lines,the meg Lyα/Lyβratio for II Peg is∼3σlower than the expected value;the ratio derived from heg is consistent with the meg measurement but does not depart significantly from theory.The only sources showing O viii Lyα/Lyβsignificantly(>3σ)lower than the theoretical ratio are II Peg and EV Lac.We note that the low Lyα/Lyβratios for IM Peg discussed in Paper I were found in the spectra obtained in thefirst three pointings while here we analyze the whole set of observations;in§5.1below we discuss the variability observed in Lyα/Lyβratios for IM Peg.One other interesting case is the T Tauri star,TW Hya,that shows very high density, n e 1012cm−3,at the temperature of O vii lines(e.g.,Kastner et al.2002).In this case,the high densities are generally believed to arise from an accretion shock,rather than coronal loops;significant scattering effects could in principle provide interesting constraints on the dimensions of the shock region.Unfortunately,for this source the relatively low S/N results in large error bars in the Lyα/Lyβratios that do not provide any useful constraints(as was also noted in the analysis of Fe xvii lines by Ness&Schmitt2005).5.1.IM PegThe different Chandra hetg observations of the RS CVn system IM Peg provide an opportunity for studying the optical depth and its possible variation with time.This system has been analyzed in great detail at optical wavelengths by Berdyugina et al.(1999,2000). These works depict a scenario with stellar spots concentrated mainly close to the polar regions,similar to those found for many other active systems(e.g.,Schuessler et al.1996; Hatzes et al.1996;Vogt et al.1999;Hussain et al.2002;Berdyugina et al.1998).。