非接触眼压计技术参数
- 格式:doc
- 大小:207.50 KB
- 文档页数:1

第七节非接触眼压计检查法
非接触眼压计通过气体脉冲力将气体喷射到角膜中央部,使直径3.6mm范围的角膜压平。
通过监测系统接受角膜表面反射的光线,记录角膜压平到一定程度的时间,将其换算为眼压值。
测量方法:患者颏部置颏架上,前额紧靠头部固定器,调整坐椅高低及位置。
双眼要自然睁开,向前平视。
嘱受检眼注视测压头。
开机,患者被检查眼盯住仪器内的定位光点,检查者调节焦点至监视屏上出现自动测量信号,系统即自动发出一阵气体压平角膜,监视屏上自动显示眼压值和几次测量的平均值。
同上述方法,测量另眼,非接触眼压计自动打印结果,交给患者,最后关机。
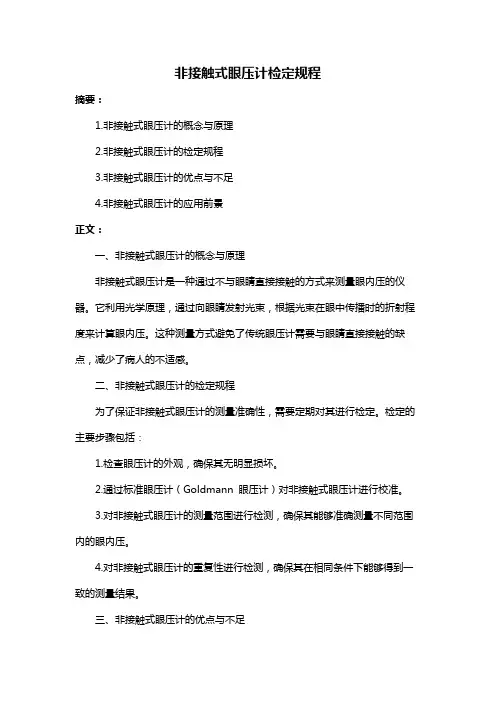
非接触式眼压计检定规程【原创版】目录一、非接触式眼压计的概念与特点二、非接触式眼压计的检定规程三、非接触式眼压计的使用方法与注意事项四、非接触式眼压计的优缺点分析五、结语正文一、非接触式眼压计的概念与特点非接触式眼压计是一种通过不接触眼睛的表面来测量眼内压的仪器。
与传统的接触式眼压计相比,非接触式眼压计具有操作简单、测量速度快、精度高等优点,而且避免了与眼睛直接接触造成的不适感和可能的感染风险。
二、非接触式眼压计的检定规程为了保证非接触式眼压计的测量精度和可靠性,需要定期对其进行检定。
检定规程主要包括以下几个步骤:1.检查外观:检查非接触式眼压计的外观是否完好,表面是否有划痕或破损。
2.环境条件:确保检定环境温度、湿度和气压等条件符合要求。
3.设备准备:将非接触式眼压计连接到检定设备上,并确保连接正常。
4.校准:使用标准眼压计对非接触式眼压计进行校准,确保其测量结果准确无误。
5.测量:分别对左右眼进行测量,记录测量结果。
6.数据处理:对测量结果进行分析,计算其误差范围,并与标准眼压计的测量结果进行对比。
7.结论:根据检定结果判断非接触式眼压计是否合格,并出具相应的检定报告。
三、非接触式眼压计的使用方法与注意事项非接触式眼压计的使用方法相对简单,主要包括以下几个步骤:1.开机:接通电源并打开非接触式眼压计的开关。
2.调整:根据被测者的身高和坐姿,调整非接触式眼压计的高度和角度。
3.对准:确保非接触式眼压计的测量头对准被测者的眼睛。
4.测量:按下测量按钮,非接触式眼压计会自动进行测量。
在使用非接触式眼压计时,需要注意以下几点:1.保持被测者的眼睛放松,避免眨眼和转动眼球。
2.确保非接触式眼压计的测量头与眼睛的距离适中,避免过近或过远。
3.在测量过程中,不要触碰被测者的眼睛和测量头。
4.若被测者有眼疾或佩戴眼镜,需要在测量前告知医护人员。
四、非接触式眼压计的优缺点分析非接触式眼压计具有以下优点:1.操作简单,测量速度快。
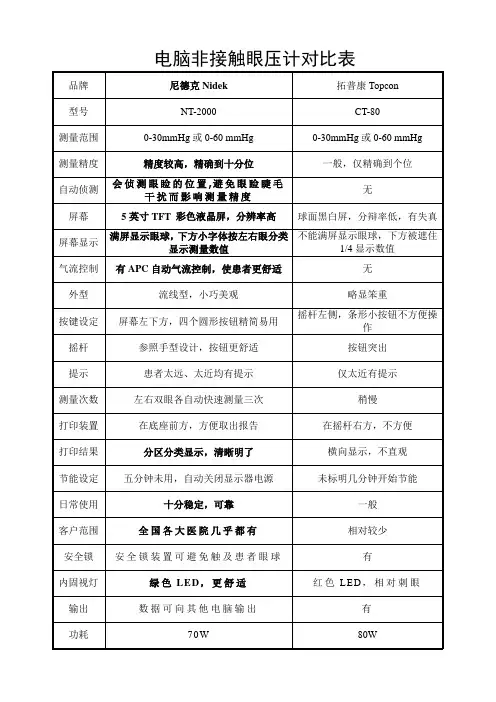
电脑非接触眼压计对比表产品介绍:1. NIDEK NT-2000利用自动对焦功能进行检测,即使是初次使用也可以轻松掌握操作。
2. NT-2000具有独特的软气流设计:NT-2000在第一次读数后将会自动启动APC功能,根据眼压情况调整喷气量的大小,从而在保证测量准确的同时尽可能让患者感觉更舒适。
3. NT-2000的安全锁装置可避免触及患者眼球。
4. 在检测前,NT-2000会侦测眼睑的位置,避免眼睑睫毛干扰而影响测量精度。
NIDEK眼压计进入中国市场已有十年,目前全国各大医院几乎都有NIDEK眼压计在使用中。
NIDEK眼压计稳定的性能已得到广大医务人员的认可。
功能参数:测量范围:1-60毫米贡柱(1毫米贡柱间隔)APC40.APC60工作距离;11毫米(喷头到角膜顶点)对位模式:一个对位光点和对焦显示内固视灯:绿色LED操纵柑工作范围:前/后36毫米左/右86毫米上/下28毫米对位模式:(对位)(对焦)(喷气)测量范围:1-60毫米贡柱(1毫米贡柱间隔)APC40.APC60工作距离;11毫米(喷头到角膜顶点)对位模式:一个对位光点和对焦显示内固视灯:绿色LED操纵柑工作范围:前/后36毫米左/右86毫米上/下28毫米对位模式:(对位)(对焦)(喷气)(自动) 自动手动自动(手动) 手动手动自动测量范围:1-60毫米贡柱(1毫米贡柱间隔)APC40.APC60工作距离;11毫米(喷头到角膜顶点)对位模式:一个对位光点和对焦显示内固视灯:绿色LED操纵柑工作范围:前/后36毫米左/右86毫米上/下28毫米对位模式: (对位)(对焦)(喷气)(自动) 自动手动自动(手动) 手动手动自动适用范围:测量范围:1-60毫米贡柱(1毫米贡柱间隔)眼科最基本视功能检查项目之一.适用于眼外伤,青光眼,眼底病,白内障,验光,以及原因不明性眼压升高.零配件:标准配件:保险丝打印纸颌托纸颌托纸固定针电源线防尘罩脉冲探测器顶盖。
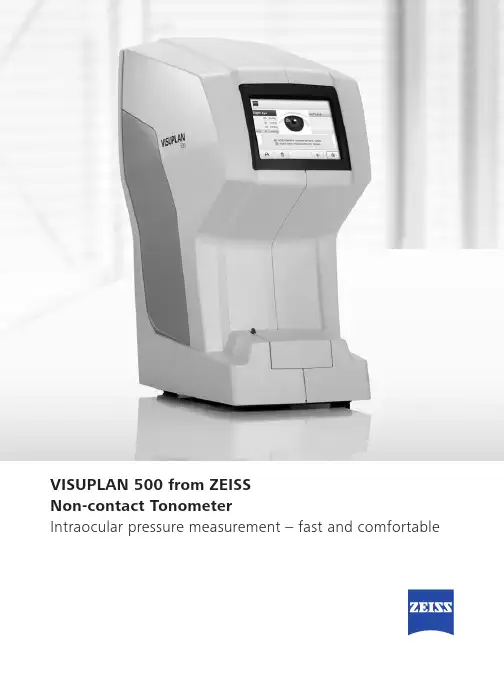
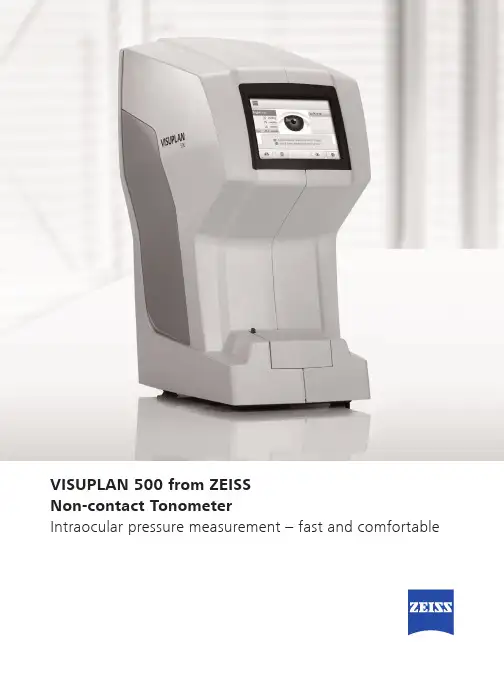
VISUPLAN 500 from ZEISSNon-contact TonometerIntraocular pressure measurement – fast and comfortableComfortable measurement of intraocular pressureNon-contact. Problem-free. Easy to delegate.The measurement of intraocular pressure is a regular part of every professional glaucoma screening. The VISUPLAN® 500 from ZEISS makes this examination very easy and, unlike Goldmann tonometry, does not require contact or anesthesia. The measurement is made with a soft puff of air and can be administered by your practice team.Easy to useThe ZEISS VISUPLAN 500 impresses through its intuitive operation and can be optimally integrated into general screenings. The measurement process runs automatically.Start directly via the touchscreen and choose from single or multiple measurements. You also have the option of initiating a test puff to prepare your patients for the examination.The results appear directly on the monitor. Alternatively, you can print out the results with the integrated thermal printer, or export via the serial interface.The optional VISUCONNECT® 500 accessory from ZEISS allows network integration, e.g. if you wish to run devices in a dedicated pretest area and export results to an exam room via EMR.The highlights at a glanceReliable LED fixation and automatic measurementThanks to the integrated LEDs patients fixate intuitively. The stable headrest and the optional chinrest allow for simple positioning of the patient, especially in a clinical environment. The auto-tracking of the probe helps you to find the right position and initiate the measurement.Soft puff of air for more comfortThe ZEISS VISUPLAN 500 makes the measurementof intraocular pressure gentler and more comfortable for your patients. The non-contact measurement uses one or more puffs of air. Patients at risk of glaucoma can be quickly and reliably identified.Connectivity with ZEISS VISUCONNECT 500 Connect your device to a local network, usea patient work list on a tablet and transfer measurements to your EMR/PMS or FORUM® from ZEISS with the optional ZEISS VISUCONNECT 500.The key benefits for you• You identify patients at risk quickly and reliably• You receive accurate measuring results, regardless of the operator• Your staff can take the measurement• The optional ZEISS VISUCONNECT 500 provides network connectivity, directDICOM and a well-defined EMR interfaceE N _33_022_0007I I P r i n t e d i n G e r m a n y . C Z -V I /2016 I n t e r n a t i o n a l e d i t i o n : o n l y f o r s a l e i n s e l e c t e d c o u n t r i e s .T h e c o n t e n t s o f t h e b r o c h u r e m a y d i f f e r f r o m t h e c u r r e n t s t a t u s o f a p p r o v a l o f t h e p r o d u c t o r s e r v i c e o f f e r i n g i n y o u r c o u n t r y . P l e a s e c o n t a c t o u r r e g i o n a l r e p r e s e n t a t i v e s f o r m o r e i n f o r m a t i o n . S u b j e c t t o c h a n g e s i n d e s i g n a n d s c o p e o f d e l i v e r y a n d a s a r e s u l t o f o n g o i n g t e c h n i c a l d e v e l o p m e n t . V I S U P L A N a n d V I S U C O N N E C T a r e e i t h e r t r a d e m a r k s o r r e g i s t e r e d t r a d e m a r k s o f C a r l Z e i s s M e d i t e c A G o r o t h e r c o m p a n i e s o f t h e C a r l Z e i s s G r o u p i n G e r m a n y a n d /o r o t h e r c o u n t r i e s .© C a r l Z e i s s M e d i t e c A G , 2016. A l l r i g h t s r e s e r v e d .Carl Zeiss Meditec AG Goeschwitzer Strasse 51–5207745 Jena Germany/visuplan500 /med/contactsPower frequency 50/60 Hz Power consumption 60 – 85 VA Voltage 100 – 240 V Protection class 1Instrument type B (DIN EN 60601-1)Measuring range 7 – 60 mmHg Monitor 5.7" LCD TFT Printer Thermal printerPrinter paperThermal paper (width: 57 mm, roll diameter: 50 mm)ZEISS VISUPLAN 500 enables the non-contact, comfortable measurement of intraocular pressure.0297。
非接触眼压计测压法技术操作规范【适应证】1.需要了解眼压时。
2.进行眼内血管搏动测定。
3.进行房水动力学测定。
【禁忌证】1.全身状况不允许坐于非接触眼压计之前接受检查者。
2.结膜或角膜急性传染性或活动性炎症者慎用。
3.严重角膜上皮损伤者。
4.眼球开放性损伤者。
【操作方法及程序】1.以X-Pert 非接触眼压计为例说明操作方法和程序。
2.受检者坐于非接触眼压计之前,嘱将其头部固定于眼压计头架上,向前注视,尽量睁开睑裂。
3.调节调焦手柄,将眼压计测压头对准待测眼角膜,此时眼压计监视屏上自动显示待测眼眼别。
4.在眼压计控制板上选择“ auto ”系统进行自动测压。
嘱受检眼注视测压头内的绿色注视灯,调节焦点至适当时,监视屏上两个方框重叠,系统自动发出一阵气体压平角膜,监视屏上自动显示出眼压值和几次测量的平均值。
如果受检者欠合作,或测量方法有误,所显示的数值自动标上“ * ” 号,或不显示数值。
5.也可在控制板上选择“ man",此时对焦后需手按调焦手柄上开关才能测量眼压。
6.测量完成后在控制板上按“ print" ,可将测量结果打印出来。
【注意事项】1.非接触眼压计与Goldmann 压平眼压计相比,在正常眼压范围内的测量值是可靠的,但在高眼压时其测量值可能出现偏差,角膜异常或注视困难的受检者中可能出现较大误差。
2.由于测压时非接触眼压计不直接接触眼球,因而减少了应用其他眼压计测压可能引起的并发症,如角膜擦伤、对表面麻醉药过敏和播散感染。
但对角膜异常者应慎用,因为不但测量值可能不准确,而且还可能引起角膜上皮下气泡。
由于测压头前表面污染而引起感染播散也已有报道。
VISUPLAN 500 from ZEISSNon-contact TonometerIntraocular pressure measurement – fast and comfortableComfortable measurement of intraocular pressureNon-contact. Problem-free. Easy to delegate.The measurement of intraocular pressure is a regular part of every professional glaucoma screening. The VISUPLAN® 500 from ZEISS makes this examination very easy and, unlike Goldmann tonometry, does not require contact or anesthesia. The measurement is made with a soft puff of air and can be administered by your practice team.Easy to useThe ZEISS VISUPLAN 500 impresses through its intuitive operation and can be optimally integrated into general screenings. The measurement process runs automatically.Start directly via the touchscreen and choose from single or multiple measurements. You also have the option of initiating a test puff to prepare your patients for the examination.The results appear directly on the monitor. Alternatively, you can print out the results with the integrated thermal printer, or export via the serial interface.The optional VISUCONNECT® 500 accessory from ZEISS allows network integration, e.g. if you wish to run devices in a dedicated pretest area and export results to an exam room via EMR.The highlights at a glanceReliable LED fixation and automatic measurementThanks to the integrated LEDs, patients fixate intuitively. The stable headrest and the optional chinrest allow for simple positioning of the patient, especially in a clinical environment. The auto-tracking of the probe helps you find the right position and initiate the measurement.Soft puff of air for more comfortThe ZEISS VISUPLAN 500 makes the measurementof intraocular pressure gentler and more comfortable for your patients. The non-contact measurement uses one or more puffs of air. Patients at risk of glaucoma can be quickly and reliably identified.Connectivity with ZEISS VISUCONNECT 500 Connect your device to a local network, usea patient work list on a tablet and transfer measurements to your EMR/PMS or FORUM® from ZEISS with the optional ZEISS VISUCONNECT 500.The key benefits for you• You identify patients at risk quickly and reliably• You receive accurate measuring results, regardless of the operator• Your staff can take the measurement• The optional ZEISS VISUCONNECT 500 provides network connectivity, directDICOM and a well-defined EMR interfaceV P N .6753 R e v D P r i n t e d i n t h e U n i t e d S t a t e s . C Z -I /2018 U n i t e d S t a t e s E d i t i o n : O n l y f o r s a l e i n s e l e c t e d c o u n t r i e s .T h e c o n t e n t s o f t h e r e f e r e n c e g u i d e m a y d i ff e r f r o m t h e c u r r e n t s t a t u s o f a p p r o v a l o f t h e p r o d u c t o r s e r v i c e o ff e r i n g i n y o u r c o u n t r y . P l e a s e c o n t a c t o u r r e g i o n a l r e p r e s e n t a t i v e s f o r m o r e i n f o r m a t i o n . S u b j e c t t o c h a n g e i n d e s i g n a n d s c o p e o f d e l i v e r y a n d o n g o i n g t e c h n i c a l d e v e l o p m e n t . V I S U P L A N , F O R U M a n d V I S U C O N N E C T a r e e i t h e r t r a d e m a r k s o r r e g i s t e r e d t r a d e m a r k s o f C a r l Z e i s s M e d i t e c A G o r o t h e r c o m p a n i e s o f t h e Z E I S S G r o u p i n G e r m a n y a n d /o r o t h e r c o u n t r i e s .© C a r l Z e i s s M e d i t e c I n c ., 2018. A l l r i g h t s r e s e r v e d .Reichert Inc. 3362 Walden Ave.Depew, NY, 14043USAchinrest CR4VP Power frequency 50/60 Hz Power consumption 60 – 85 VA Voltage 100 – 240 V Protection class 1Instrument type B (DIN EN 60601-1)Measuring range 7 – 60 mmHg Monitor 5.7" LCD TFT Printer Thermal printerPrinter paperThermal paper (width: 57 mm, roll diameter: 50 mm)ZEISS VISUPLAN 500 enables the non-contact, comfortable measurement of intraocular pressure.0297Carl Zeiss Meditec, Inc.5160 Hacienda Drive Dublin, CA 94568USA/medCarl Zeiss Meditec AG Goeschwitzer Strasse 51–5207745 Jena Germany//med/contacts。
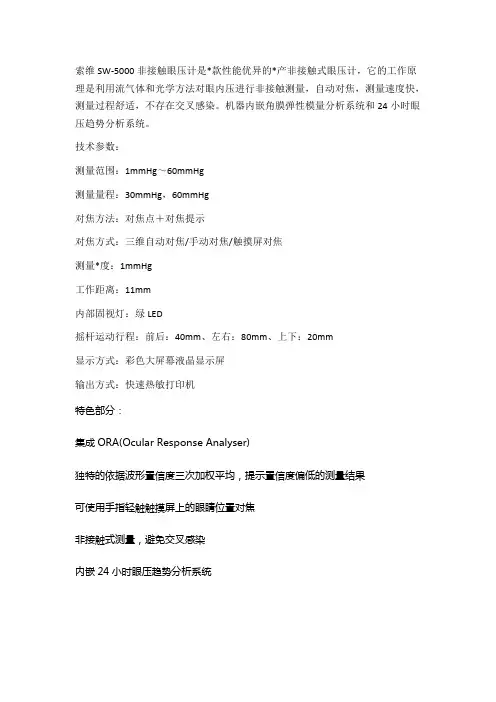
索维SW-5000非接触眼压计是*款性能优异的*产非接触式眼压计,它的工作原理是利用流气体和光学方法对眼内压进行非接触测量,自动对焦,测量速度快,测量过程舒适,不存在交叉感染。
机器内嵌角膜弹性模量分析系统和24小时眼压趋势分析系统。
技术参数:
测量范围:1mmHg~60mmHg
测量量程:30mmHg,60mmHg
对焦方法:对焦点+对焦提示
对焦方式:三维自动对焦/手动对焦/触摸屏对焦
测量*度:1mmHg
工作距离:11mm
内部固视灯:绿LED
摇杆运动行程:前后:40mm、左右:80mm、上下:20mm
显示方式:彩色大屏幕液晶显示屏
输出方式:快速热敏打印机
特色部分:
集成ORA(Ocular Response Analyser)
独特的依据波形置信度三次加权平均,提示置信度偏低的测量结果
可使用手指轻触触摸屏上的眼睛位置对焦
非接触式测量,避免交叉感染
内嵌24小时眼压趋势分析系统。
非接触式眼压计检定规程摘要:1.非接触式眼压计的概念与原理2.非接触式眼压计的检定规程3.非接触式眼压计的优点与不足4.非接触式眼压计的应用前景正文:一、非接触式眼压计的概念与原理非接触式眼压计是一种通过不与眼睛直接接触的方式来测量眼内压的仪器。
它利用光学原理,通过向眼睛发射光束,根据光束在眼中传播时的折射程度来计算眼内压。
这种测量方式避免了传统眼压计需要与眼睛直接接触的缺点,减少了病人的不适感。
二、非接触式眼压计的检定规程为了保证非接触式眼压计的测量准确性,需要定期对其进行检定。
检定的主要步骤包括:1.检查眼压计的外观,确保其无明显损坏。
2.通过标准眼压计(Goldmann 眼压计)对非接触式眼压计进行校准。
3.对非接触式眼压计的测量范围进行检测,确保其能够准确测量不同范围内的眼内压。
4.对非接触式眼压计的重复性进行检测,确保其在相同条件下能够得到一致的测量结果。
三、非接触式眼压计的优点与不足非接触式眼压计具有以下优点:1.减少了病人的不适感,提高了测量的舒适度。
2.避免了与眼睛直接接触,降低了感染的风险。
3.测量速度快,便于操作。
然而,非接触式眼压计也存在一些不足:1.测量精度相对较低,与Goldmann 眼压计相比,存在一定误差。
2.受眼球壁硬度、角膜弯曲等因素影响,对于部分特殊人群(如高度近视、角膜疾病等)的测量结果可能不准确。
四、非接触式眼压计的应用前景尽管非接触式眼压计存在一定的局限性,但其在临床应用中仍具有广泛的前景。
随着技术的不断发展,非接触式眼压计的精度和稳定性将得到进一步提升。
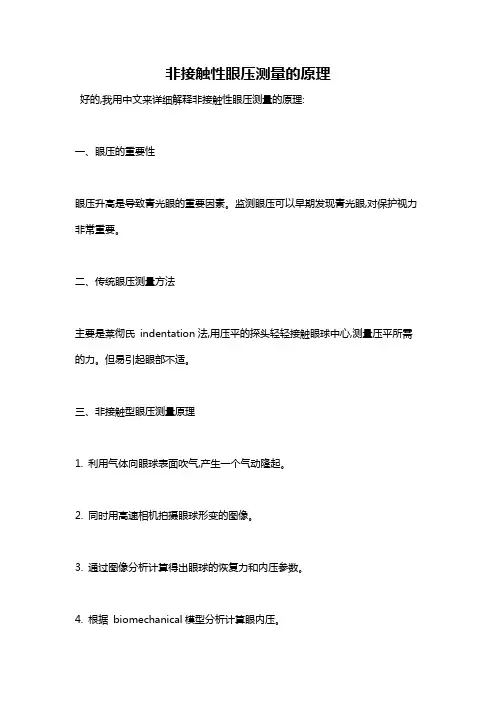
非接触性眼压测量的原理
好的,我用中文来详细解释非接触性眼压测量的原理:
一、眼压的重要性
眼压升高是导致青光眼的重要因素。
监测眼压可以早期发现青光眼,对保护视力非常重要。
二、传统眼压测量方法
主要是莱彻氏indentation法,用压平的探头轻轻接触眼球中心,测量压平所需的力。
但易引起眼部不适。
三、非接触型眼压测量原理
1. 利用气体向眼球表面吹气,产生一个气动隆起。
2. 同时用高速相机拍摄眼球形变的图像。
3. 通过图像分析计算得出眼球的恢复力和内压参数。
4. 根据biomechanical模型分析计算眼内压。
四、影响测量的关键因素
1. 气流参数的精确控制。
2. 高速摄像的分辨率和曝光控制。
3. 眼球形变的精确识别和分割。
4. 选择合适的眼球机械模型。
五、优势
1. 完全无接触,过程舒适无痛感。
2. 不需要眼药麻醉,操作简便。
3. 可以重复高频率测量。
4. 可以用于儿童及特殊人群。
5. 可以检测眼压变化规律。
非接触眼压测量通过气动和图像技术实现快速、无创测量,更适合眼科筛查和随访监测。
但需要克服技术难点,提高准确性。
非接触式眼压计的使用说明书非接触式眼压计使用说明书一、产品概述非接触式眼压计是一款用于测量眼压的医疗设备,相比传统的接触式眼压计,它具有操作简便、无痛无创、准确度高等优点。
非接触式眼压计适用于医院、眼科诊所、药房等医疗机构,也可在家庭中使用。
二、产品特点1.非接触式测量,无需触碰眼睛,避免了交叉感染的风险。
2.使用方便,一键式测量,适合各种人群进行自测。
3.快速测量,只需几秒钟即可完成测量。
4.高度准确,具有精准、可靠的测量数据。
三、产品使用方法1.打开设备电源,待屏幕出现欢迎界面后,即可开始测量。
2.使用前请先清洁眼部,去除眼部化妆品、油脂等物质。
3.将测试者按照正确的位置坐好,使其放松身体,抬头注视前方。
4.将设备对准眼睛,使红外线对准瞳孔中央,按下测试按键,进行测量。
5.测量完成后,设备会自动显示测试结果。
四、注意事项1.使用时请注意保持设备清洁,防止使用过程中的污染。
2.使用过程中请勿摇晃设备,以免影响测量结果。
3.请勿将设备放置在高温、潮湿等环境中。
4.请勿将设备放置在易碎物品、锐利器具等物品附近。
5.请勿将设备投掷或撞击,以免损坏设备。
6.请勿自行更换设备上的电池,如需更换,请联系售后人员。
五、维护保养1.使用完毕后,请及时清洁设备,尤其是测试部位,以免污垢影响测量精度。
2.请勿使用化学药品或锐利物品清洗设备,以免损坏设备。
3.长时间不使用设备时,请取出电池,以免电池老化影响设备性能。
4.请勿将设备存放在过于潮湿或过于干燥的环境中。
六、售后服务如有任何产品质量问题,请及时联系售后人员,我们将在收到您的反馈后,为您提供优质的售后服务。

非接触式眼压计检定规程摘要:1.非接触式眼压计的原理和特点2.非接触式眼压计的检定规程3.非接触式眼压计的应用场景4.非接触式眼压计的优点和局限性5.市场上常见的非接触式眼压计产品正文:一、非接触式眼压计的原理和特点非接触式眼压计是一种通过不与眼睛直接接触的方式来测量眼内压的仪器。
其工作原理通常基于一种称为“喷气测压”的技术,通过向眼睛表面喷射一股柔和的气流,根据气流被反弹回来的时间和速度来计算眼内压。
非接触式眼压计具有操作简单、测量速度快、精度高等特点。
二、非接触式眼压计的检定规程为了保证非接触式眼压计的测量精度和可靠性,需要定期对其进行检定。
检定规程通常包括以下几个步骤:1.检查仪器的外观和性能,确保其完好无损。
2.使用标准眼压计(如Goldmann 眼压计)对非接触式眼压计进行校准。
3.对非接触式眼压计的测量范围和分辨率进行测试。
4.评估非接触式眼压计的重复性和稳定性。
5.对非接触式眼压计的喷气系统进行检查和清洁。
三、非接触式眼压计的应用场景非接触式眼压计广泛应用于眼科诊断和研究领域,主要用于测量患者的眼内压。
此外,非接触式眼压计还可以用于评估眼科手术效果和监测眼压变化。
四、非接触式眼压计的优点和局限性非接触式眼压计具有操作简单、测量速度快、精度高等优点,且不需要与眼睛直接接触,降低了交叉感染的风险。
然而,非接触式眼压计的测量结果可能受到眼球壁硬度、角膜弯曲等因素的影响,因此在某些情况下可能需要与接触式眼压计结合使用。
五、市场上常见的非接触式眼压计产品目前市场上常见的非接触式眼压计产品包括NT 系列、AT555 系列等。
Puls air EasyEyeCopyright and TrademarksThe information contained within this manual must not be reproduced in whole or part without the manufacturer’s prior written approval.The manufacturer reserves the right to make changes to specifications and other information contained in this document without prior notice.Pulsair EasyEye™ is a registered Trademark of Keeler Limited 2001.Copyright © Keeler Limited 2001.Printed in the UK. October 2001.Applicable StandardsApprovals; EN 60601-1, EN 60601-1-2, UL 2601-1, EN8612, EN ISO15004: 1997, Patent Pending.As part of our policy of continued product improvement we reserve theright to alter and/or amend specifications at any time without prior notice.Puls air EasyEyeTo Change the Printer Paper (22)Eyecaps (23)The Rechargeable Battery (24)Maintenance and Cleaning (25)Bulb Change (26)Power Supply Unit (26)General (26)Optional Accessories and Spares (27)Troubleshooting (28)Spectral Radiance (29)Pulsair EasyEye Technical Data (30)Power Supply Unit (30)Notes (31)Puls air EasyEyeAutoactivationThe Pulsair EasyEye automatically fires a gentle puff of air at the corneawhen the hand unit is correctly aligned with the eye.MemoryThe Pulsair EasyEyes’ memory holds the readings taken, on both eyes, fora patient, up to a ma ximum of ten readings per eye. The memory is onlycleared when the hand unit is removed from the holster for use on another patient.You must review the readings taken for a patient or print a patient recordbefore the unit is removed from the holster, reviewing and printing cantake place whilst the hand unit is located in the holster.WarningDo not use the Pulsair EasyEye near mobile telephones as performance will be affected. Advise patients to switch mobile telephones off before use.WarningThe Pulsair EasyEye maybe affected by Electro-magnetic interference(i.e. mobile telephone). If this happens:•Switch off the offending equipmentor•Increase the distance between the offending equipment andEasyEye.WarningEyecaps are designed for training use only. The Eyecaps are disposable and must only be used once.Puls air EasyEyePrinter Status Pulsair EasyEye UnitCable FootPower Socket(for desk topoperation userear socket)PulsairOverview of the Base UnitThe following overview discusses all the main parts of the Pulsair EasyEye and their use. All the parts covered below are listed on the diagramslocated on pages 8 and 9.The PrinterTo turn the printer on, press the Print on/off switch, which is located on the cover of the unit. A green indicator underneath the Print buttonilluminates.A typical printout is displayed below:Keeler PulsairPatient's Name:Date:Right EyeAverage: 16Number of Readings: 4Left EyeAverage: 14Number of Readings: 5You need to manually write the patient’s name and date on to theprintout.Test EyeUse the Test Eye located on the cover of the Pulsair EasyEye to practicetaking readings.Status IndicatorStatus Indicator displays:Green light - The Pulsair EasyEye is powered up and ready for use.Flashing yellow light - Rechargeable battery power is low. The unitmust be connected to the mains as soon as possible.Yellow light - The battery is charging, however the unit can still be used via the mains power.Overview of the Hand UnitDisplayThe display shows the recorded IOP reading or the averaged IOP reading.After the first reading is taken the display shows the measured IOP. Aftereach of the consecutive reading is taken the display shows the average ofthe readings taken so far, i.e. the first figure displayed is the actual reading, the second figure is an average of the first two readings etc., up to amaximum of ten readings, per eye.Note:The displayed figure is rounded to the nearest whole number.The displayed average is based on the actual readings which are taken toone decimal place. For example, readings of 15.4, 16.3, 14.2 and 16.9 are averaged by adding them together which equals 62.8 and dividing by thenumber of readings taken, 4. This gives a final figure of 15.7, so the display shows 16.When all the required readings have been taken the figure displayed is the IOP that is recorded for the patient.Review ButtonYou can review the readings taken at any time:Press the Review button. The display shows the readings taken in theorder they were taken, the final figure displayed is the cumulative average.The Pulsair EasyEye’s memory is capable of holding a maximum of tenindividual readings, per eye. When the memory is full no further readingscan be taken.To clear the memory you can either replace the hand unit in the holsterand remove again or press the Change Eye button.Right/Left Eye IndicatorsThe Right/Left Eye Indicators are two arrows located above the ChangeEye button. The illuminated LED indicates the eye that readings arecurrently being taken from.EyepieceThe Eyepiece allows the user to view the patients eye and align thetargetting system.QuickPulse IndicatorThis indicator illuminates if the QuickPulse mode is active. QuickPulse ButtonQuickPulse mode may need to be invoked for patients who have cornealscarring, a high level of astigmatism, or a less reflective eye than normal.The patient should be asked to blink several times and further readingsattempted before engaging QuickPulse.The Pulsair EasyEye checks that the eye focus is correct and if so,produces an air pulse.Before invoking QuickPulse mode ensure that the correct image is seenthrough the eyepiece.If this is the case and no air pulse occurs, it may be that the particular eye is less reflective than normal. Press the QuickPulse button. It should now be easier to obtain a reading. QuickPulse should always be used on postoperative eyes with corneal scarring. QuickPulse mode can be toggled onand off by pressing the button, the QuickPulse Indicator illuminates if themode is active.The QuickPulse facility should only be used when necessary.QuickPulse can also aid in training new operators. They may have difficulty initially in obtaining the correct focus (refer to the pull out instructions,located underneath the Pulsair EasyEye).Getting StartedBefore you can start to use your Pulsair EasyEye, follow the proceduresoutlined below.1.Remove the hand unit from the base unit. Turn the Pulsair EasyEyeover to display the label and transit knob.The label displays the IEC and CE classifications for the PulsairEasyEye, and also the serial and part numbers which will be requiredfor registration and re-ordering.2.Remove the transit knob from the bottom of the Pulsair EasyEye unit asinstructed by the label.Note:The transit knob should be replaced whenever the unit is transported.3.Take the power supply unit and replace the blanking plate with theappropriate mains plug adapter. Alternatively you can use an I.E.C.60320 Type 7 extension lead (not supplied), see your local distributorfor more details.Patient PreparationBefore using the Pulsair EasyEye you should make your patient feel at ease and ensure they are located in an optimum reading location. This isbecause apprehension and nervousness may adversely affect the readingsobtained. Follow the points outlined below to achieve this:•Ask the patient to switch their mobile telephone off if they have one.•Ensure that the patient is comfortable and in a relaxed position.•Ask the patient to remove their contact lenses or spectacles if worn and to blink normally.In order to reassure the patient, you can demonstrate the procedure onthe back of the patient's hand prior to taking a reading:•Position the hand unit above the patient's hand and press Demo.The patient experiences a gentle puff of air.Before taking a reading you should:•Ensure the patient and instrument optics are not positioned under direct lighting (i.e. spot lights or sunlight).•Ensure the patient’s eyes are fully opened. This helps to prevent squeezing, where the patient unconsciously tenses their eyelids andincreases IOP.Throughout the reading process, you should:•Allow the patient to blink at intervals in order to maintain the corneal tear film.Instrument Preparation1.Plug the power supply in to the Pulsair EasyEye unit.2.Turn the On/Off switch to l, the status indicator on the front of theunit luminates green. The display on the hand unit initially shows 8.8,this demonstrates that all segments of the display are functioning. Aftera pause the display shows 0, this indicates that the unit is ready for use.3.Lift the hand unit from the holster. The unit is supplied with an orangedust cover which protects the puff tube lens from dust and scratchingwhilst in transit. Remove the cover before using the unit.Note:When the unit is not in use you should replace the dust cover to protectthe puff tube lens.When the hand unit is removed from the holster the two green LED’s on3.From a distance of about 25 cms(10 inches), look through theeyepiece and locate the patientseye.6.Continue to move closer, a redreflex appears.4.Slowly move closer to the patient,maintaining alignment. Support thePulsair EasyEye against your freehand, and rest the hand againstthe patient’s forehead.5.Continue to move in slowlytowards the patient, two greendots appear.7.Move closer. At a distance of approximately 15mm, a bow tie image appears. Centralise this image (on the central bar) and thePulsair EasyEye fires.8.If you see filaments you are too close. Move back and repeat.9.Once you have taken a reading,remain in the operating position,wait a few seconds for the air chamber to refill. When the bow tie image appears Pulsair EasyEyetakes a subsequent reading. Keelerrecommends you take fourreadings.10.If the reading is recorded as a nonevent or bad event the 30+indicator illuminates. 30+ mode isautomatically activated, wait for afew seconds and try again.11.If the unit does not fire, repeatstep 4-8. See Troubleshooting onpage 28 for more details .Closing Down the InstrumentHaving performed the required readings for a patient return the hand unit to the holster and turn the On/Off switch to O. If the instrument is toremain unused for any length of time, it should be switched off at themains.To Change the Printer PaperTo change the printer paper:1.Lift the cover of the Pulsair EasyEye and remove the empty printer roll.2.Place the new roll of paper into the paper holder, making sure the freeend is loose at the top of the roll.3.Feed the free end of paper through the gap in the cover.4.Clip the cover back into position.The Rechargeable BatteryThe Pulsair EasyEye can be used with a rechargeable battery instead of the mains. The rechargeable battery is an optional extra and can be requested at the time of purchase. If you don’t currently have a rechargeable battery and you require one, please contact your local distributer.The rechargeable battery must be charged for 12 - 14 hours before it isused for the first time.To fit the battery:1.Lift the front cover of the Pulsair EasyEye and insert the rechargeablebattery into the back of the compartment as shown below, ensure thebattery strap fits under the new battery. Make sure the batteryorientation is correct (+ to +, and - to -) as shown on the top of themoulding.2.Close the cover.Bulb ChangeThe bulb (Part No. 1024-P-7156) is located at the top of the hand unit. To replace, pull the old bulb out and insert replacement .Power Supply UnitInspect your power supply unit and cable for damage regularly.Before inspecting, disconnect the power supply from the Pulsair EasyEyeand the mains.If the outer insulation of the cable appears to be damaged discontinue use immediately. Contact your local dealer for a replacement.GeneralKeep the instrument free from dust.If the unit is to remain unused for any length of time, turn the On/Offswitch to O and remove the power supply. Use the dust cover to protectthe unit.Before using the Pulsair EasyEye again, press the Demo button to dispelany minute particles of dust or moisture which may have settled on theinstrument between readings.TroubleshootingDifficulty firingClean the puff tube lens, see page 25, if this does not solve the problemcall your local distributer.No audible sound when the hand unit is liftedEnsure the unit is connected to the power supply or that the battery isfully charged, if this does not solve the problem call your local distributer.No red light visible through the puff tube when the unit is onReplace the bulb.Paper jamRemove the paper reel and re insert as described on page 22.No powerCheck that the mains plug is switched on, the power supply cable isinserted fully and that the On/Off switch is turned to I. If you are using a rechargeable battery check it is fully inserted and that the orientation iscorrect, see page 24 for more details.Puls air EasyEyePulsair EasyEye Technical DataConsole dimensions355 x 305 x 205 mm (14 x 12 x 8 inches) Hand Unit dimensions265 x 115 x 40 mm (10.5 x 4.5 x 1.5 inches) Console weight 3.18kg (7lb), 4.0kg inc. battery (8.8lb)Hand Unit weight0.887 kg (1.95 lb.)Calibrated range7 to 50 mm HgDisplayed accuracy± 1 mm HgDisplayed scale Direct in mm HgLength of umbilical cord 2.0 m / 6’6"Complies with EN 60601 class II, type BF.(Type BF definition as type B butwith isolated or floating applied parts) Power Supply UnitPower input30 VAInput voltage100, 110, 120, 220, 240 V - Note: ± 10% Input frequency50/60 HzPuls air EasyEyeKeeler LimitedTel: +44 (0) 1753 857177 Fax: +44 (0) 1753 857817Keeler Instruments Inc,Toll Free:180****5620Tel: 610 353 4350 Fax:Manufacturing Practice.amend specifications at any time without prior notice.Patent Pending。
非接触眼压计
非接触眼压计介绍:
非接触眼压计(NCT)以其操作简便、测量迅速、自动打印检测结果、不直接接触眼球、不用表面麻醉、患者无任何痛苦等优点逐渐被越来
越多的患者认可和接受。
非接触眼压计正常值:
当3次眼压值相差>3mmHg或测得的眼压值带“[]”时应重新测量。
如患者无视力,可嘱其自然平视前方。
若患者瞳孔上移或下移时,嘱
其稍向下或向上注视。
非接触眼压计临床意义:
异常结果:由于不了解其方法,可产生紧张恐惧心理。
而紧张恐
惧情绪会引起神经调节失常、睫状肌痉挛,睫状体及虹膜的血管充血,使眼压升高而影响眼压的真实性。
需要检查人群:眼睛有问题者。
非接触眼压计注意事项:
不合宜人群:没有特殊说明。
检查前禁忌:情绪切忌紧张。
检查时要求:配合医生。
非接触眼压计检查过程:
1)检测开始前,打开检测喷嘴上的保护盖,然后打开电源开关和N CT工作键,使NCT进入预备状态。
2)指导患者面向眼压计坐好,两眼自
然平视,将下颚固定于下支架上,前额紧贴上支架板,调整支架高度,使眼睛与NCT喷嘴在同一高度上,同时调试被检眼的焦距,根据需要选
择NCT自动或手动功能键开关,嘱患者精神集中,尽量睁大眼睛注视检
测喷嘴内的红色亮点。
护士转动操纵杆,当眼压计的焦距与瞳孔的亮
点重叠且清晰时,NCT即自动喷气,显示屏上就显示所测数值,连测3次,取平均值。
然后按以上程序完成对另一眼的检测。