条形码操作手册
- 格式:doc
- 大小:2.05 MB
- 文档页数:15

69码编码操作指南
1. 在物品编码中心官方网站注册一个账号,填写企业基本信息,包括企业名称、企业类型、企业所在地等。
2. 申请成为物品编码中心的会员,需要填写企业的详细信息,包括企业规模、经营范围、员工人数等,同时提供企业的营业执照等相关证明文件。
3. 成为物品编码中心会员后,开始申请69条码。
在申请时,需要填写商品信息,包括商品名称、商品类型、品牌、型号、生产日期、保质期等,同时提供商品图片等相关信息。
申请69条码时需要缴纳一定的费用,具体费用标准可以根据企业情况和申请条件来确定。
4. 申请成功后,使用条码打印软件制作商品条码。
启动Label mx商品条码打印软件,在左侧工具条中选择“一维条码”按钮,在页面中划一下就会出现默认的EAN-13标准商品条码。
在右侧属性栏的尺寸设置里,可以自定义输入条码的宽度和高度。
5. 双击页面中的商品条码,在弹出的“条码字符辅助输入”中,输入字符数据。
只需要输入前12位数据即可,因为EAN-13条码完整数据是13位,最后一位的校验码是软件根据前12位数据自动校验生成的。
输入之后点“完成”即可。
6. 缩短码商品条码的制作。
重复上述操作,双击页面中设计好的商品条码,在弹出的“条码字符辅助输入”中,条码类型里选择EAN-8。
输入条码数据。
7. 缩短码的商品条码最后一位也是校验码,所以字符数据里输入前7位数据,点击“完成”,EAN-8商品条码就制作完成了。
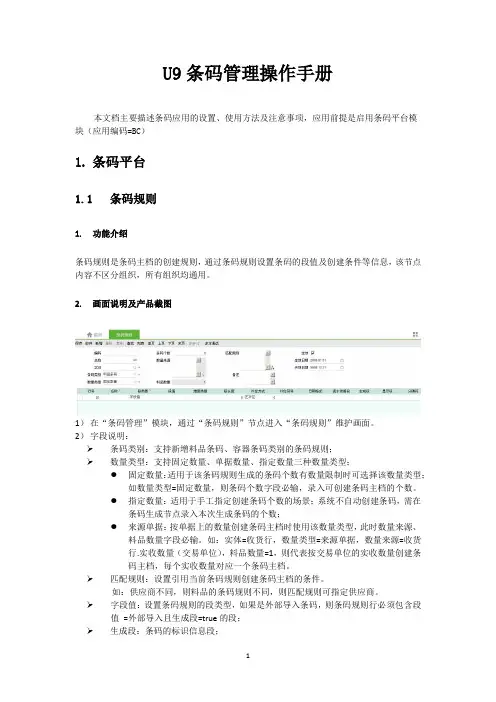
U9条码管理操作手册本文档主要描述条码应用的设置、使用方法及注意事项,应用前提是启用条码平台模块(应用编码=BC)1.条码平台1.1条码规则1.功能介绍条码规则是条码主档的创建规则,通过条码规则设置条码的段值及创建条件等信息,该节点内容不区分组织,所有组织均通用。
2.画面说明及产品截图1)在“条码管理”模块,通过“条码规则”节点进入“条码规则”维护画面。
2)字段说明:条码类别:支持新增料品条码、容器条码类别的条码规则;数量类型:支持固定数量、单据数量、指定数量三种数量类型;●固定数量:适用于该条码规则生成的条码个数有数量限制时可选择该数量类型;如数量类型=固定数量,则条码个数字段必输,录入可创建条码主档的个数。
●指定数量:适用于手工指定创建条码个数的场景;系统不自动创建条码,需在条码生成节点录入本次生成条码的个数;●来源单据:按单据上的数量创建条码主档时使用该数量类型,此时数量来源、料品数量字段必输。
如:实体=收货行,数量类型=来源单据,数量来源=收货行.实收数量(交易单位),料品数量=1,则代表按交易单位的实收数量创建条码主档,每个实收数量对应一个条码主档。
匹配规则:设置引用当前条码规则创建条码主档的条件。
如:供应商不同,则料品的条码规则不同,则匹配规则可指定供应商。
字段值:设置条码规则的段类型,如果是外部导入条码,则条码规则行必须包含段值=外部导入且生成段=true的段;生成段:条码的标识信息段;显示段:不是条码的标识段,但在打印标签时可以作为显示项打印出来供用户查看。
维度类型:当条码类别=料品条码时有效。
设置段值与“条码维度映射关系”表的关系,便于扫码生单功能使用。
具体参见2.5扫码生单。
3.业务规则1)系统预制单据条码的条码规则,不支持手工新增,如需增加预制内容,需向总部申请。
2)预制单据条码范围:杂收单、杂发单、盘点单、调入单、调出单、生产订单、生产领料、完工报告、完工申报、成品入库、标准采购、标准收货、委外采购、非成套领料、成套领料、委外收货、标准销售、出货计划、标准出货、供应链备料;3)档案敏感性:修改:一旦引用则条码类别、数量类型、数量来源、匹配规则、段值均不可修改,唯有段长度可改,影响未来;当条码类别=料品条码,且数量类型=固定数量时,条码个数可改,但不能小于该条码规则已创建的条码个数。
word条码系统操作手册目录第一篇: 条码系统简述第二篇: 进出货操作指引第三篇: IQC操作指引第四篇: 程序组操作指引第五篇: 计划组操作指引第六篇: 仓库操作指引第七篇: 套料库操作指引第八篇: SMT操作指引第一篇: 条码系统简述一. 条码根底知识:条码是由一组按一定编码规如此排列的条、空符号,用以表示一定的字符、数字与符号组成的信息。
条码系统是由条码符号设计、制作与扫描阅读组成的自动识别系统。
识读装置条码是条码系统的根本设备,它把条码条符宽度、间隔等信号转换成不同时间长短的输出信号,并将该信号转化为计算机可识别的二进制编码,然后输入计算机。
条码是迄今为止最经济、实用的一种自动识别技术。
条码技术具有以下几个方面的优点:A.输入速度快:与键盘输入相比,条码输入的速度是键盘输入的5倍,并且能实现“即时数据输入〞。
B.可靠性高:键盘输入数据出错率为三百分之一,利用光学字符识别技术出错率为万分之一,而采用条码技术误码率低于百万分之一。
C.采集信息量大:利用传统的一维条码一次可采集几十位字符的信息,二维条码更可以携带数千个字符的信息,并有一定的自动纠错能力。
D.灵活实用:条码标识既可以作为一种识别手段单独使用,也可以和有关识别设备组成一个系统实现自动化识别,还可以和其他控制设备联接起来实现自动化管理。
E.条码标签易于制作,对设备和材料没有特殊要求,识别设备操作容易,不需要特殊培训,且设备也相对廉价。
二. 公司条码系统立项的必要性与迫切性:随着SMT技术的开展,机器自动化程度与生产效率大大提高了,而与之配套的人工作业效率,与机器自动生产的效率差距,日趋明显,提升当前人工操作的工作效率,势在必行我们公司目前的操作流程是:1、仓库按配发单据内容,将清点准确的材料发给SMT套料库;2、套料库的发料员根据配发单内容,再次核对数量与齐套性,并将材料按BS/TS面分开;3、检查完毕后,根据SMT的转机通知,由套料库人员去程序组申领Z位表,由套料库材料员核对材料描述、Z位表,对每一卷材料粘贴Z位标签,Z位标签上至少填写材料编码、机器型号、对应Z位序号、该卷材料数量等信息;套料库人员需要从每一种材料里面,根据Z位表的需要,每一个Z位的材料抽出一卷,以便后续安装飞达;4、IPQC需要对每一卷材料进展检查,核对公司BOM、客户BOM、Z位表,确认材料型号描述、Z位标签内容无误后,再返还给套料库。
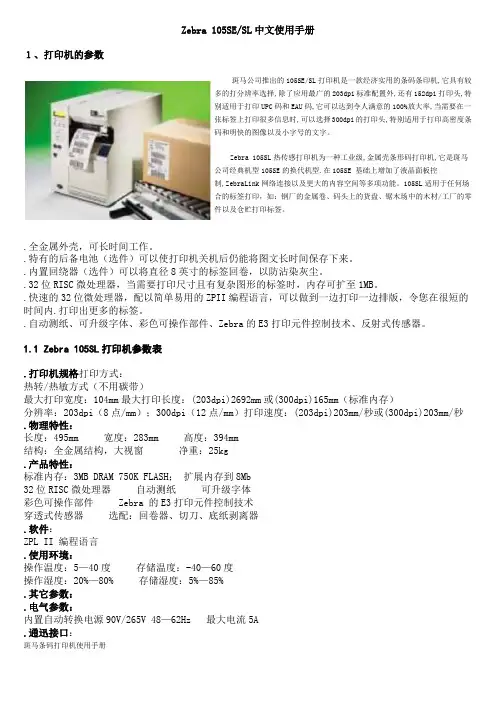
Zebra 105SE/SL中文使用手册1、打印机的参数斑马公司推出的105SE/SL打印机是一款经济实用的条码条印机,它具有较多的打分辨率选择,除了应用最广的203dpi标准配置外,还有152dpi打印头,特别适用于打印UPC码和EAU码,它可以达到令人满意的100%放大率,当需要在一张标签上打印很多信息时,可以选择300dpi的打印头,特别适用于打印高密度条码和明快的图像以及小字号的文字。
Zebra 105SL热传感打印机为一种工业级,金属壳条形码打印机,它是斑马公司经典机型105SE的换代机型.在105SE 基础上增加了液晶面板控制,ZebraLink网络连接以及更大的内容空间等多项功能。
105SL适用于任何场合的标签打印,如:钢厂的金属卷、码头上的货盘、锯木场中的木材/工厂的零件以及仓贮打印标签。
.全金属外壳,可长时间工作。
.特有的后备电池(选件)可以使打印机关机后仍能将图文长时间保存下来。
.内置回绕器(选件)可以将直径8英寸的标签回卷,以防沾染灰尘。
.32位RISC微处理器,当需要打印尺寸且有复杂图形的标签时,内存可扩至1MB。
.快速的32位微处理器,配以简单易用的ZPII编程语言,可以做到一边打印一边排版,令您在很短的时间内.打印出更多的标签。
.自动测纸、可升级字体、彩色可操作部件、Zebra的E3打印元件控制技术、反射式传感器。
1.1 Zebra 105SL打印机参数表.打印机规格打印方式:热转/热敏方式(不用碳带)最大打印宽度:104mm最大打印长度:(203dpi)2692mm或(300dpi)165mm(标准内存)分辨率:203dpi(8点/mm);300dpi(12点/mm)打印速度:(203dpi)203mm/秒或(300dpi)203mm/秒.物理特性:长度:495mm 宽度:283mm 高度:394mm结构:全金属结构,大视窗净重:25kg.产品特性:标准内存:3MB DRAM 750K FLASH;扩展内存到8Mb32位RISC微处理器自动测纸可升级字体彩色可操作部件 Zebra 的E3打印元件控制技术穿透式传感器选配:回卷器、切刀、底纸剥离器.软件:ZPL II 编程语言.使用环境:操作温度:5—40度存储温度:-40—60度操作湿度:20%—80% 存储湿度:5%—85%.其它参数:.电气参数:内置自动转换电源90V/265V 48—62Hz 最大电流5A.通迅接口:RS232/422/485 接口及标准并口:IEEE1284双向并口准并口.标签:标签宽度:25.4mm-114mm标签最大直径:外径203mm,内径76mm标签纸类型:连续型、模切型、缺口型、黑标型、穿口型标签间隙:2mm—4mm 标签厚度:0.058-0.25mm最小长度:撕裂方式:16mm;剥离方式:25mm:切刀方式:38mm.碳带:标准长度:300m、450m,提供2:1标签卷宽度:51—4.311mm 卷轴内径:25mm 卷轴最大直径:81mm1.2 打印机支持的条码条码比例:2:1, 7:3, 5:2, 3:1 LSBT-128codebar(支持的条码比例尺2:1,3:1) LOGMARSMaxiCodecodeblock code11Micro pdfcode 39(支持的条码比例尺2:1,3:1) MSIcode93 PDF-417(二维码)code128(A,B,C) PlessyDataMatrix PostnetEAN-3,EAN-13,EAN extensions QR-CodeIndustrial2of5 Standard 2 of 5Interleaved 2 of 5(支持的条码比例尺2:1,3:1)UPC-1,UPC-3,UPCv扩展2 打印机的使用2.1 打印机电源电源开关位于打印机后面,而且可以看见有一个230V或110V的拨动开关。
条形码的使用流程教程1. 什么是条形码条形码是一种用于标识和记录商品信息的图形符号。
它由一系列不同粗细、不同间距的条纹和间隔组成,通过扫描设备读取条码上的信息。
2. 条形码的种类主要有一维码和二维码两种类型。
2.1 一维码一维码是由一组不同粗细的垂直线条和间隔组成的图形符号。
常见的一维码包括EAN、UPC、Code39等。
2.2 二维码二维码是由一组黑白方块、圆点等图形元素排列组成的图形符号。
二维码可以存储较多的信息,常见的二维码有QR码、Data Matrix码等。
3. 条形码的使用流程使用条形码的流程通常包括条形码生成、打印、扫描和解码。
3.1 条形码生成条形码可以使用专门的软件或在线生成工具生成。
生成条形码时,需要输入相关的商品信息,如商品名称、价格、条形码类型等。
生成后,将条形码保存为图片格式。
3.2 条形码打印将生成的条形码图片打印在商品包装上或标签上。
打印时,需要选择合适的打印机和打印纸张,以保证条形码的清晰度和稳定性。
3.3 条形码扫描使用条形码扫描设备,将扫描设备对准条形码上的图形,并触发扫描。
扫描设备可以是条形码枪、手持式扫描器或手机扫码应用。
3.4 条形码解码扫描设备将读取到的条形码信息解码成数字或字母等可识别的格式。
解码后的信息可以用于商品的出入库管理、销售记录等。
4. 条形码的应用领域条形码广泛应用于商业领域,包括商品销售、库存管理、物流追踪等。
此外,条形码也被用于票券、电子支付、固定资产管理等领域。
5. 条形码的优势条形码具有易读性高、容错率高、存储信息量大等优势。
它可以提高工作效率、简化操作流程,减少错误率和成本。
6. 条形码的发展趋势随着技术的不断发展,条形码正不断创新和演进。
新型的条形码如QR码、Data Matrix码等应运而生,使得条形码的应用范围更加广泛。
7. 结论条形码作为一种快速、高效的信息识别方式,在商业和物流领域得到了广泛应用。
通过了解条形码的使用流程和优势,我们可以更好地利用它来提高工作效率和管理水平。

条形码的使用流程讲解1. 什么是条形码条形码是一种用来表示数据的图形化表达方式。
它是由一系列黑白条纹组成的,每个条纹代表一个数字或字符,通过扫描读取这些条纹,可以获取相应的数据信息。
2. 条形码的应用领域条形码广泛应用于商品销售、物流管理、图书馆管理、票务系统等领域。
它可以提高工作效率,减少错误率,方便信息管理和查询。
3. 条形码的使用流程步骤一:选择合适的条形码类型根据不同的应用场景和需求,选择合适的条形码类型。
常见的条形码类型有CODE39、CODE128、EAN-13 等。
步骤二:生成条形码使用条形码生成软件或在线工具,输入相关信息(如商品编号、价格等),生成对应的条形码图像。
步骤三:打印条形码将生成的条形码图像输出,打印到合适的介质上,如商品包装、标签纸等。
步骤四:贴码将打印好的条形码贴在对应的物品上,确保条形码清晰可见,方便扫描读取。
步骤五:扫码读取使用条形码扫描仪或智能手机上的条形码扫描应用,对条形码进行扫描读取。
扫描仪会将条形码中的信息转化为数字或字符,显示在相应的设备上。
步骤六:信息处理读取到的条形码信息可以进行后续的信息处理,如将数据存储到数据库中、进行货物的入库操作等。
4. 条形码的注意事项•条形码贴码时,要确保贴在物品表面的平整、干净的位置,避免影响扫描读取。
•在打印条形码时,要选择高质量的打印机和耐用的打印介质,以保证条形码的清晰度和耐久度。
•使用条形码扫描仪时,要注意扫描枪的光线是否正常,避免扫描过程中出现误读或无法读取的情况。
•针对不同类型的条形码,要使用相应的扫描模式或设置,以获得最佳的扫描效果。
5. 条形码的优势和劣势优势•高效:条形码扫描可以实现快速自动化的数据读取,大大提高工作效率。
•精确:条形码的数字化特性能够减少人为输入引起的错误,提高数据准确性。
•易于使用:扫描条形码只需要一个简单的操作,不需要专业的培训和技能。
•应用广泛:条形码适用于各种大小、形状的物品,可以应用于各个行业和领域。
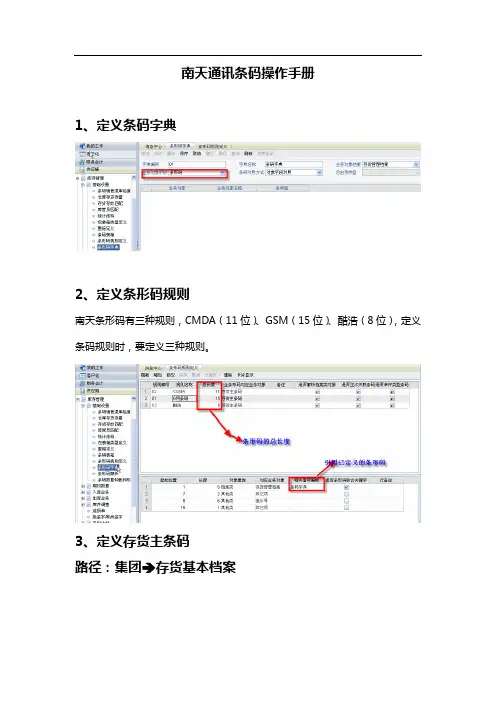
南天通讯条码操作手册1、定义条码字典2、定义条形码规则南天条形码有三种规则,CMDA(11位)、GSM(15位)、酷浩(8位),定义条码规则时,要定义三种规则。
3、定义存货主条码路径:集团 存货基本档案4、日常业务操作操作方式:A、系统支持Excel格式条码导入B、通过扫描枪的方式输入用友软件南天项目组2008-6-20出师表两汉:诸葛亮先帝创业未半而中道崩殂,今天下三分,益州疲弊,此诚危急存亡之秋也。
然侍卫之臣不懈于内,忠志之士忘身于外者,盖追先帝之殊遇,欲报之于陛下也。
诚宜开张圣听,以光先帝遗德,恢弘志士之气,不宜妄自菲薄,引喻失义,以塞忠谏之路也。
宫中府中,俱为一体;陟罚臧否,不宜异同。
若有作奸犯科及为忠善者,宜付有司论其刑赏,以昭陛下平明之理;不宜偏私,使内外异法也。
侍中、侍郎郭攸之、费祎、董允等,此皆良实,志虑忠纯,是以先帝简拔以遗陛下:愚以为宫中之事,事无大小,悉以咨之,然后施行,必能裨补阙漏,有所广益。
将军向宠,性行淑均,晓畅军事,试用于昔日,先帝称之曰“能”,是以众议举宠为督:愚以为营中之事,悉以咨之,必能使行阵和睦,优劣得所。
亲贤臣,远小人,此先汉所以兴隆也;亲小人,远贤臣,此后汉所以倾颓也。
先帝在时,每与臣论此事,未尝不叹息痛恨于桓、灵也。
侍中、尚书、长史、参军,此悉贞良死节之臣,愿陛下亲之、信之,则汉室之隆,可计日而待也。
臣本布衣,躬耕于南阳,苟全性命于乱世,不求闻达于诸侯。
先帝不以臣卑鄙,猥自枉屈,三顾臣于草庐之中,咨臣以当世之事,由是感激,遂许先帝以驱驰。
后值倾覆,受任于败军之际,奉命于危难之间,尔来二十有一年矣。
先帝知臣谨慎,故临崩寄臣以大事也。
受命以来,夙夜忧叹,恐托付不效,以伤先帝之明;故五月渡泸,深入不毛。
今南方已定,兵甲已足,当奖率三军,北定中原,庶竭驽钝,攘除奸凶,兴复汉室,还于旧都。
此臣所以报先帝而忠陛下之职分也。
至于斟酌损益,进尽忠言,则攸之、祎、允之任也。

Table of ContentsRevision History (3)Chapter 1 Getting Started (1)Introduction (1)About This Guide (2)Barcode Scanning (2)Configuring the XL-3100 (2)Barcode Programming (2)Command Programming (2)Read Register (3)Write Register (7)Save Register Data in EEPROM (11)Relationship between Programming Command and Serial Command (12)Registers (14)Programming Barcode Data (26)Factory Defaults (26)Chapter 2 Communication Interfaces (27)TTL-232 Interface (27)Baud Rate (28)USB Interface (29)USB DATAPIPE (29)USB HID-KBW (29)Standard Keyboard (30)Emulate ALT+Keypad (30)Function Key Mapping (31)ASCII Function Key Mapping Table (32)USB Country Keyboard Types (33)Beep on Unknown Character (36)Inter-Keystroke Delay (36)Caps Lock (37)Convert Case (38)Emulate Numeric Keypad (39)USB COM Port Emulation (40)HID-POS (40)Access the Scanner with Your Program (41)Acquire Scanned Data (41)VID/PID (41)Chapter 3 Scan Mode (42)Manual Mode (42)Continuous Mode (43)Decode Session Timeout (43)Timeout between Decodes (44)Sense Mode (45)Decode Session Timeout (45)Timeout between Decodes (46)Image Stabilization Timeout (46)Sensitivity (47)Command Trigger Mode (48)Decode Session Timeout (48)IR Trigger Mode (49)Chapter 4 Illumination & Aiming (50)Illumination (50)Aiming (51)Chapter 5 Notification (52)Mute Mode (52)Good Read Beep (52)Good Read Beep Frequency (53)Good Read Beep Duration (53)Good Read LED (54)Decode Result Notification (54)Chapter 6 Data Formatting (55)AIM ID Prefix (55)CODE ID Prefix (56)Terminating Character Suffix (57)Chapter 7 Symbologies (58)Global Settings (58)Enable/Disable All Symbologies (58)Enable/Disable 1D Symbologies (58)Enable/Disable 2D Symbologies (58)Video Reverse (59)1D Symbologies (60)Code 128 (60)Restore Factory Defaults (60)Enable/Disable Code 128 (60)UCC/EAN-128 (GS1-128) (61)Restore Factory Defaults (61)Enable/Disable UCC/EAN-128 (61)AIM 128 (62)Restore Factory Defaults (62)Enable/Disable AIM 128 (62)EAN-8 (63)Restore Factory Defaults (63)Enable/Disable EAN-8 (63)Transmit Check Digit (63)Add-On Code (64)Add-On Code Required (65)EAN-8 Extension (65)EAN-13 (66)Restore Factory Defaults (66)Enable/Disable EAN-13 (66)Transmit Check Digit (66)Add-On Code (67)Add-On Code Required (68)ISSN (69)Restore Factory Defaults (69)Enable/Disable ISSN (69)ISBN (70)Restore Factory Defaults (70)Enable/Disable ISBN (70)Set ISBN Format (70)UPC-E (71)Restore Factory Defaults (71)Enable/Disable UPC-E (71)Transmit Check Digit (71)Add-On Code (72)Add-On Code Required (73)Transmit System Character (73)UPC-E Extension (73)UPC-A (74)Restore Factory Defaults (74)Enable/Disable UPC-A (74)Transmit Check Digit (74)Add-On Code (75)Add-On Code Required (76)Transmit Preamble Character (76)Interleaved 2 of 5 (77)Restore Factory Defaults (77)Enable/Disable Interleaved 2 of 5 (77)Check Digit Verification (78)Transmit Appended “0” (79)ITF-6 (80)ITF-14 (81)Matrix 2 of 5 (82)Restore Factory Defaults (82)Enable/Disable Matrix 2 of 5 (82)Check Digit Verification (83)Industrial 25 (84)Restore Factory Defaults (84)Enable/Disable Industrial 25 (84)Check Digit Verification (85)Standard 25 (86)Restore Factory Defaults (86)Enable/Disable Standard 25 (86)Check Digit Verification (87)Code 39 (88)Restore Factory Defaults (88)Enable/Disable Code 39 (88)Transmit Start/Stop Character (88)Check Digit Verification (89)Enable/Disable Code 39 Full ASCII (89)Codabar (90)Restore Factory Defaults (90)Enable/Disable Codabar (90)Check Digit Verification (91)Transmit Start/Stop Character (91)Start/Stop Character Format (92)Code 93 (93)Restore Factory Defaults (93)Enable/Disable Code 93 (93)Check Digit Verification (94)Code 11 (95)Restore Factory Defaults (95)Enable/Disable Code 11 (95)Check Digit Verification (96)Plessey (97)Restore Factory Defaults (97)Enable/Disable Plessey (97)Check Digit Verification (98)MSI-Plessey (99)Restore Factory Defaults (99)Enable/Disable MSI-Plessey (99)Check Digit Verification (100)RSS-14 (101)Restore Factory Defaults (101)Enable/Disable RSS-14 (101)Transmit Application Identifier “01” (101)RSS-Limited (102)Restore Factory Defaults (102)Enable/Disable RSS-Limited (102)Transmit Application Identifier “01” (102)RSS-Expand (103)Restore Factory Defaults (103)Enable/Disable RSS-Expand (103)2D Symbologies (104)PDF417 (104)Restore Factory Defaults (104)Enable/Disable PDF417 (104)Data Matrix (105)Restore Factory Defaults (105)Enable/Disable Data Matrix (105)Rectangular Barcodes (105)Mirror Images (106)QR Code (107)Restore Factory Defaults (107)Enable/Disable QR Code (107)Micro QR (107)Mirrored Micro QR (108)Appendix (109)Appendix A: Factory Defaults Table (109)Appendix B: AIM ID Table (115)Appendix C: Code ID Table (118)Appendix D: ASCII Table (119)Appendix E: Parameter Programming Examples (123)Program the Decode Session Timeout (123)Program the Timeout between Decodes (123)Program the Image Stabilization Timeout (123)Program the Sensitivity Level (124)Appendix F: Digit Barcodes (125)Appendix G: Save/Cancel Barcodes (128)Appendix H: Frequently-Used Serial Commands (129)IntroductionThe XL-3100supports all mainstream 1D as well as PDF417, QR Code (QR1, QR2, Micro QR), Data Matrix and GS1-DataBar TM(RSS) (RSS-Limited, RSS-14, RSS-14 Stacked and RSS-Expand).The XL-3100 can read barcodes on virtually any medium - paper, plastic card, mobile phones and LCD displays. It provides an ideal solution for both emerging mobile phone-based barcode applications, like coupons, e-tickets and boarding passes, and traditional applications.The XL-3100’s instant power on/off feature along with ultra low power consumption brings greaterefficiency and convenience in barcode scanning applications.About This GuideThis guide provides programming instructions for the XL-3100. Users can configure the XL-3100 by scanning the programming barcodes included in this manual.The XL-3100 has been properly configured for most applications and can be put into use without further configuration. Users may check the Factory Defaults Table in Appendix for reference. Throughout the manual, programming barcodes marked with asterisks (**) are factory default values.Barcode ScanningPowered by area-imaging technology,the XL-3100features fast scanning and accurate decoding.Barcodes rotated at any angle can still be read with ease. When scanning a barcode, simply center the aiming pattern projected by the XL-3030-M over the barcode.Configuring the XL-3100There are two ways to configure the engine: barcode programming and command programming.Barcode ProgrammingThe XL-3100 can be configured by scanning programming barcodes. All user programmable features/ options are described along with their programming barcodes/commands in the following sections.Command ProgrammingBesides the barcode programming method, the XL-3100can also be configured by serial commands sent from the host device. Note that communication parameters on the engine and the host must match so that two devices can communicate with each other. The default settings of the engine are 9600bps, no parity check, 8 data bits, 1 stop bit, and no flow control. The engine uses 8-bit registers.Read RegisterThe read command is used to read the contents of 1 to 256 contiguous registers in the engine. Syntax: {Prefix1} {Types} {Lens} {Address} {Datas} {FCS}Prefix1 : 0x7E 0x00Types : 0x07Lens : 0x01Address: 0x0000~0x00FF, starting register address.Datas : 0x00~0xFF, number of registers to be read. When Datas=0x00, 256 contiguous registers are to be read.FCS : CRC-CCITT checksum, 2 bytes.Computation sequence: Types+ Lens+Address+Datas;polynomial: X16+X12+X5+1 (0x1021), initial value: 0x0000.The following C language program is provided for reference.Reply: {Prefix2} {Types} {Lens} {Datas} {FCS}1)Success message:Prefix2 : 0x02 0x00Types : 0x00 (success)Lens : The number of data returned. If Lens=0x00, that means values of 256 contiguous registers are returned.Datas : 0x00~0xFF, data that are returned.FCS : CRC-CCITT checksum.2)CRC check failure message:Prefix2 : 0x02 0x00Types : 0x01 (CRC check failure)Lens : 0x01Datas : 0x00FCS : CRC-CCITT checksum (0x04 0x01)3)Invalid command message:Prefix2 : 0x02 0x00Types : 0x03 (invalid command)Lens : 0x01Datas : 0x00FCS : CRC-CCITT checksum (0x6A 0x61)Example:Read the content (0x3E) of register 0x000A1)Read operation succeeds:Command sent: 0x7E 0x00 0x07 0x01 0x00 0x0A0x01 0xEE 0x8AMessage received: 0x02 0x00 0x00 0x01 0x3E 0xE4 0xAC2)CRC check fails:Command sent: 0x7E 0x00 0x07 0x01 0x00 0x0A0x01 0x11 0x22Message received: 0x02 0x00 0x01 0x01 0x00 0x04 0x013)Situations that may cause the engine to respond with an invalid command message: Command sent isshorter than the required length, or the third byte is not sent out within 400ms after the first two bytes “0x7e 0x00” are sentCommand sent: 0x7E 0x00 0x07 0x01 0x00 0x0A0x01Message received:0x02 0x00 0x03 0x01 0x00 0x6A 0x61Write RegisterThe write command is used to write contiguous registers (1 to 256 registers) in the engine.Syntax: {Prefix1} {Types} {Lens} {Address} {Datas} {FCS}Prefix1 : 0x7E 0x00 (2 bytes)Types : 0x08 (1 byte)Lens : 0x00~0xFF (1 byte), byte count, i.e. number of registers written. When Lens=0x00, 256 contiguous registers are to be written.Address : 0x0000~0xFFFF (2 bytes), starting register address.Datas : 0x00~0xFF (1~256 bytes), data to be written into the register(s)FCS : CRC-CCITT checksum, 2 bytes.Computation sequence: Types+ Lens+Address+Datas; polynomial: X16+X12+X5+1(0x1021), initial value: 0x0000.The following C language program is provided for reference.Reply: {Prefix2} {Types} {Lens} {Datas} {FCS} 1)Success message:Prefix2 : 0x02 0x00Types : 0x00 (success)Lens : 0x01Datas : 0x00FCS : CRC-CCITT checksum (0x33 0x31) 2)CRC check failure message:Prefix2 : 0x02 0x00Types : 0x01 (CRC check failure)Lens : 0x01Datas : 0x00FCS : CRC-CCITT checksum (0x04 0x01) 3)Invalid command message:Prefix2 : 0x02 0x00Types : 0x03 (invalid command)Lens : 0x01Datas : 0x00FCS : CRC-CCITT checksum (0x6A 0x61)Example:Write 0x3E into register 0x000A1)Write operation succeeds:Command sent: 0x7E 0x00 0x08 0x01 0x00 0x0A0x3E0x4C 0xCFMessage received: 0x02 0x00 0x00 0x01 0x00 0x33 0x312)CRC check fails:Command sent: 0x7E 0x00 0x08 0x01 0x00 0x0A0x3E0x11 0x22Message received: 0x02 0x00 0x01 0x01 0x00 0x04 0x013)Situations that may cause the engine to respond with an invalid command message: Command sent isshorter than the required length, or the third byte is not sent out within 400ms after the first two bytes “0x7e 0x00” are sentCommand sent: 0x7E 0x00 0x08 0x01 0x00 0x0A0x3EMessage received: 0x02 0x00 0x03 0x01 0x00 0x6A 0x61Save Register Data in EEPROMThe save command is used to save register data into an external EEPROM. Syntax: {Prefix1} {Types} {Lens} {Address} {Datas} {FCS}Prefix1 : 0x7E 0x00Types : 0x09Lens : 0x01Address: 0x0000Datas : 0x00FCS : CRC-CCITT checksum (0xDE 0xC8)Reply: {Prefix2} {Types} {Lens} {Datas} {FCS}1)Success message:Prefix2 : 0x02 0x00Types : 0x00 (success)Lens : 0x01Datas : 0x00FCS : CRC-CCITT checksum (0x33 0x31)2)CRC check failure message:Prefix2 : 0x02 0x00Types : 0x01 (CRC check failure)Lens : 0x01Datas : 0x00FCS : CRC-CCITT checksum (0x04 0x01)3)Invalid command message:Prefix2 : 0x02 0x00Types : 0x03 (invalid command)Lens : 0x01Datas : 0x00FCS : CRC-CCITT checksum (0x6A 0x61)Relationship between Programming Command and Serial Command1.Program general parameter with serial commandA programming command (i.e. the characters under programming barcode) contains 7 characters. The function of each character is described in the table below.Note:1. CMD: Command type.2.ADDR: Address of register to be written.3.BITPOSITION: Bit(s) the value is written to. For example, if only bit 3 is to be written, theBI TPOSITION should be “08”; if all bits are to be written, the BITPOSITION should be “FF”.4.DATA: Value written to the BITPOSITION.The ADDR and DATA in programming command correspond to Address and Datas in serial command, respectively:1)If BITPOSITIO N=”FF”, the values of ADDR and DATA can be used directly in the write command.e.g., programming command: WFFD9D8 (write value 0xD8 to register 0x00D9)serial command sent : 0x7E 0x00 0x08 0x01 0x00 0xD90xD80x91 0x53reply received : 0x02 0x00 0x00 0x01 0x00 0x33 0x312)If BITPOSITION≠”FF”, users need to read the register content, calculate the value (Datas) and thenwrite the value into the register, as shown in the following example.e.g., programming command: W030002 (write value 0x02 to bit1and bit0 of register 0x0000)Step 1: Read the content of register 0x0000.serial command sent : 0x7E 0x00 0x07 0x01 0x00 0x000x010x01 0x41reply received : 0x02 0x00 0x00 0x01 0xD40xB8 0xC8Step 2: Calculate the value written to the register.Datas = (0xD4 & (! 0x03)) + 0x02 = 0xD5Step 3: Write the value into the register.serial command sent : 0x7E 0x00 0x08 0x01 0x00 0x000xD50xEF 0x41reply received : 0x02 0x00 0x00 0x01 0x00 0x33 0x312.Program special parameter with serial commandThe serial commands used for programming the following parameters are practically irrelevant to their programming commands.Note:Red: Address of register.Blue: Value written to register. For example, to set the sensitivity level to 10, 0xTT should be 0x0A.Pink: CRC checksum calculated.3.Save register data in EEPROMScanning a programming barcode can change register value and save register data in EEPROM as well. As for command programming, it requires a write command and a save command to perform these two tasks. To save register data in an external EEPROM, users need to send the save command to the engine.save command sent: 0x7E 0x00 0x09 0x01 0x00 0x00 0xDE 0xC8reply received : 0x02 0x00 0x00 0x01 0x00 0x33 0x31RegistersProgramming Barcode DataProgramming barcode data (e.g. WFFD980) can be transmitted to the Host. To enable this feature, scan the barcode below. After the feature is enabled, programming barcodes will be handled as non-programming barcodes and they cannot be used to configure the scan engine. The barcode data will be sent to the Host when a programming barcode is scanned and decoded. By default, the XL-3100 does not transmit programming barcode data.After the engine is powered down and re-energized, this feature will be automatically disabled (i.e. the engine does not transmit programming barcode data) and the ability of programming barcodes to configure the engine will be restored.Transmit Programming Barcode DataFactory DefaultsScanning the following barcode can restore the engine to the factory defaults. See Appendix A: Factory Defaults Table for more information.Note: Use this feature with discretion.Restore All Factory DefaultsThe XL-3100 provides a TTL-232 interface and a USB interface to communicate with the host device.The host device can receive scanned data and send commands to control the engine or to access/alter the configuration information of the engine via the TTL-232 or USB interface.TTL-232 InterfaceSerial communication interface is usually used to connect the engine to a host device (like PC, POS).When the XL-3100 is connected to a host device through its TTL-232 interface, serial communication is enabled by default. However, to ensure smooth communication and accuracy of data, you need to set communication parameters (including baud rate, parity check, data bit and stop bit) to match the host device.The serial communication interface provided by the engine is based on TTL signals. TTL-232 can be used for most application architectures. For those requiring RS-232, an external conversion circuit is needed.Default serial communication parameters are listed below, among which only baud rate can be altered.Baud RateBaud rate is the number of bits of data transmitted per second. Set the baud rate to match the Host requirements.** 96001200 192002400 384004800 5760014400 115200USB InterfaceWhen the XL-3100 is connected to a host device through its USB interface, USB DATAPIPE is enabled by default. User can switch between options –USB DATAPIPE, USB HID-KBW, USB COM Port Emulation and HID-POS, upon actual need.USB DATAPIPEA driver is required when using this protocol to communicate with the engine.** USB DATAPIPEUSB HID-KBWWhen the engine is connected to the Host via a USB connection, you can enable the USB HID-KBW feature by scanning the barcode below. Then the engine’s transmiss ion will be simulated as USB keyboard input. The Host receives keystrokes on the virtual keyboard. It works on a Plug and Play basis and no driver is required.USB HID-KBWStandard KeyboardWhen the USB HID-KBW feature is enabled, the engine selects Standard Keyboard by default. Besides that, the other two options are provided: Emulate ALT+Keypad and Function Key Mapping.** Standard KeyboardEmulate ALT+KeypadWhen Emulate ALT+Keypad is enabled, any ASCII character (0x00 - 0xFF) is sent over the numeric keypad no matter which keyboard type is selected. Since sending a character involves multiple keystroke emulations, this method appears less efficient.1.ALT Make2.Enter the number corresponding to the ASCII character on the keypad.3.ALT BreakEmulate ALT+KeypadNote: It is recommended to turn on the Num Lock light on the host when using this feature.Function Key MappingWhen Function Key Mapping is enabled, function character (0x00 - 0x1F) are sent as ASCII sequences over the numeric keypad.1.CTRL Make2.Press function key (Refer to the ASCII Function Key Mapping Table on the following page)3.CTRL BreakFunction Key MappingASCII Function Key Mapping TableUSB Country Keyboard TypesKeyboard layouts vary from country to country. All supported keyboard types are listed below. The default setting is US keyboard.** 1 - U.S. 2 - Belgium3 - Brazil4 - Canada5 - Czech6 - Denmark7 - Finland 8 - France9 - Austria 10 - Greece11 - Hungary 12 - Israel13 - Italy 14 - Latin America15 - Netherland 16 - Norway17 - Poland 18 - Portugal19 - Romania 20 - Russia21 - Slovakia 22 - Spain23 - Sweden 24 - Switzerland25 - Turkey1 26 - Turkey 227 - UK 28 - JapanBeep on Unknown CharacterDue to the differences in keyboard layouts, some characters contained in barcode data may be unavailable on the selected keyboard. As a result, the engine fails to transmit the unknown characters.Scan the appropriate barcode below to enable or disable the emission of beep when an unknown character is detected.** Beep on Unknown Character Do Not Beep on Unknown CharacterInter-Keystroke DelayThis parameter specifies the delay between emulated keystrokes.** No Delay Short Delay (5ms)Medium Delay (10ms) Long Delay (15ms)Caps LockThe Caps Lock ON option can invert upper and lower case characters contained in barcode data. This inversion occurs regardless of the state of Caps Lock key on the Host’s keyboard.** Caps Lock OFF Caps Lock ONNote: Emulate ALT+Keypad ON/ Convert All to Upper Case/ Convert All to Lower Case prevails over Caps Lock ON.Example: When the Caps Lock ON is selected, barcode data “AbC” is transmitted as “aBc”.Convert CaseScan the appropriate barcode below to convert all bar code data to your desired case.**No Case ConversionConvert All to Lower Case Convert All to Upper CaseExample: When the Convert All to Lower Case feature is enabled, barcode data “AbC” is transmitted as “abc”.Emulate Numeric KeypadWhen this feature is disabled, sending barcode data is emulated as keystroke(s) on main keyboard.To enable this feature, scan the Emulate Numeric Keypad barcode. Sending a number (0-9) is emulated as keystroke on numeric keypad, whereas sending other character like “+”, “_”, “*” , “/” and “.” is still emulated as keystroke on main keyboard. However, this feature is influenced by the state of the Num Lock key on the host: if the Num Lock light on the host is ON, numbers are sent over numeric keypad, if it is OFF, numbers are sent over main keyboard.Emulate Numeric Keypad** Do Not Emulate Numeric KeypadNote: Make sure the Num Lock light of the Host is turned ON when using this feature.Emulate ALT+Keypad ON prevails over Emulate Numeric Keypad.USB COM Port EmulationIf you connect the engine to the Host via a USB connection, the USB COM Port Emulation feature allows the Host to receive data in the way as a serial port does. However, you need to set communication parameters on the engine to match the Host requirements. A driver is required for this feature.USB COM Port EmulationHID-POSThe HID-POS interface is recommended for new application programs. It can send up to 56 characters in a single USB report and appears more efficient than USB HID-KBW.Features:✧HID based, no custom driver required.✧Way more efficient in communication than USB HID-KBW and traditional RS-232 interface.Note: HID-POS does not require a custom driver. However, a HID interface on Windows 98 does. All HID interfaces employ standard driver provided by the operating system. Use defaults when installing the driver.HID-POSAccess the Scanner with Your Programe CreateFile to access the engine as a HID device.e ReadFile to deliver the scanned data to the application program.e WriteFile to send data to the engine.For detailed information about USB and HID interfaces, go to .Acquire Scanned DataVID/PIDUSB uses VID (Vendor ID) and PID (Product ID) to identify and locate a device. The VID is assigned by USB Implementers Forum. vendor ID is1EAB (Hex). A range of PIDs are used for each product family. Every PID contains a base number and interface type (keyboard, COM port, etc.).Manual ModeManual Mode (default): A trigger pull activates a decode session. The decode session continues until the barcode is decoded or the trigger is released.**Manual Mode。

条形码的使用流程解大全什么是条形码?条形码是一种能够通过一维图形形式来表示以及记录数据的编码方式。
它是由一系列黑白线条组成的,并通过不同的线条宽度和间距来表示不同的数字、字母或其他字符。
条形码广泛应用于商业领域,用于商品的追踪、库存管理以及快速结账等功能。
条形码的类型条形码有多种不同的类型,最常见的是UPC码(Universal Product Code)和EAN码(European Article Number)。
除了这两种常见的条形码类型,还有CODE39码、CODE128码、QR码等。
条形码的使用流程使用条形码的过程涉及到生成、打印、扫描等多个环节。
下面是条形码的使用流程的详细解析:1. 确定需要编码的内容在使用条形码之前,首先需要确定需要编码的内容。
这可以是商品编号、价格、批次号等信息。
确保这些信息是准确且规范的。
2. 选择合适的条形码类型根据需要编码的内容选择合适的条形码类型。
不同的条形码类型适用于不同的应用场景,选择合适的类型可以提高条形码的识别率和使用效果。
3. 生成条形码图形使用条形码生成软件或在线生成工具,输入需要编码的内容和选择的条形码类型,生成条形码图形。
生成的文件可以是图片格式(如PNG、JPEG)或矢量格式(如SVG),根据需要选择合适的格式。
4. 设计条形码标签根据实际需求,使用图形设计软件设计条形码标签。
在设计时,可以选择合适的字体、大小和颜色等参数,以及添加额外的文本或图形元素。
5. 打印条形码标签使用打印机将设计好的条形码标签打印出来。
在打印时,注意选择合适的材料和打印质量,以确保条形码的清晰度和耐用性。
6. 在产品上贴附条形码标签将打印好的条形码标签贴附到对应的产品上。
保持标签的平整和牢固,确保条形码的可读性。
7. 使用扫描枪扫描条形码使用扫描枪或条码扫描设备扫描产品上的条形码。
扫描枪将条形码的图形信息转化为数字编码,以供后续处理和识别。
8. 数据处理和识别通过扫描枪扫描到的条形码数据,进行进一步的处理和识别。
1.1开工准备❖打印任务单标签各车间主管,根据生管下达的“生产任务单”,打印任务单条码标签。
选择标签模板“任务单标号模板”(第一次使用时需选择,后续自动选择)打印“任务单标签”。
开工时,任务单标签应该张贴在机台指定位置。
❖打印产品标签(物料标示单)双击“生产业务标签管理”——“生产任务单”,点击“新建条形码标签”在“单据编号”栏输入生产任务单号(支持关键字模糊查询),点击查找。
计划生产数量:代表该工单的生产总数量实作数量:代表“任务单请检汇报”数量合格数量:代表“产品入库”数量选中该条记录,双击,录入产品标签信息。
生产/采购日期:指车间当天生产日期。
常用单位数量:指物料在各周转环节的最小包装数(SOP规定包规数量)填写完毕后,点击“复制标签数据”根据当天需生产产品数量及包规,计算需要的标签数量,点击“开始复制”。
比如:该产品当天计划生产1.75K,每个包装为0.175K,需要10张标签,则需要再复制9张标签,然后单击“开始复制”。
拉动滚动条,确认标签信息无误,点击保存。
选择标签打印模板。
首次打击需选择,后续会默认使用该模板,打印标签。
打印出来的产品标签(物料标示单),需和生产任务单标签一起,放置在生产现场。
生产开工时,应先核对任务单标签与产品标签,内容确认一致后,张贴物料标签,再进行生产作业。
1.2生产汇报扫码员定时(2小时一次),对现场生产完工情况(已装贴标签的整盒或整卷产品)进行汇报入库作业。
❖打开【生产汇报】。
❖打开【源单查询】,输入原单号,单击【查找】,或者直接扫描生产任务单条码。
❖界面介绍1、投料要求:显示投料单的详细信息。
2、实际投料:显示已扫描的标签的详细信息。
3、信息校验:填写生产实际情况的信息。
4、当前原料:显示当前扫描的原料标签的信息。
❖操作步骤开线点检:1、扫描物料标签2、扫描模号、线别号、选择班别3、填写合格和不合格数量。
(公司规定每2小时汇报一次,根据已张贴物料标签单完工产品的数量进行汇报,汇报时按整卷的倍数汇报,不拆零。
1.单据打印模板1.1单据模板位置(以备料通知单(条码)为例)1.打开UBF,点击报表打印个性化切换2.点击登录实用文档3.输入服务器,点击刷新,找到相应企业,组织,然后输入用户名和密码4.点击最右边的连接,选择打印元数据库实用文档5.在文件夹下MO---备料通知单(条码)实用文档6.双击{zh-CN}{zh-CN} 即可看到备料通知单(条码)的模板,其他模板同理可找到。
1.2单据模板复制和修改操作(以备料通知单(条码)为例)1.2.1 单据模板的复制1.找到备料通知单(条码)模板,右键选择另存为,输入名称,描述信息,确定。
实用文档实用文档2.另存模板位置如图所示:1.2.2单据模板的修改若需修改预制单据模板,请复制预制模板另存为自定义模板,在新模板上进行修改操作。
若要修改自定义模板可直接修改。
1.2.2.1 单据行条码为例1.点击行上最右边的条码,查看报表属性即可看到该条码的所有属性。
实用文档属性_条形码:可在选项中选择用户适用的码制实用文档属性_文本:在打印模板中增加一个函数GetBarCode,GetBarCode('条码类型标识'),GetBarCode('条码类型标识',条码规则编码'')。
对于头条码,行条码,子行条码来说,不需要传递参数。
对于料品条码则需要在模板上指定对应的条码规则头条码:文本应为行条码:文本应为实用文档子行条码:文本应为料品条码:文本应为其中‘001’对应的条码规则1.2.2.2 单据行条码修改举例:将行上的条码修改为料品条码信息1.选择行上某个字段位置,右键选择在左侧插入列实用文档点击左侧字段,将ItemBarCode拖放到新增列里面,点击=Fields!ItemBarCode.Value,右侧查看属性,点击属性条形码,选择二维码格式实用文档点击文本选择,输入表达式实用文档,其中‘001’是对应的条码规则。
最终结果如图所示:实用文档同理:行上打印出子行条码信息,操作如上只不过将文本表达式改成1.2.3单据模板的发布步骤一:点击做好的模板,右键选择发布应用实用文档步骤二:选择要发布的数据库服务器步骤三:点击下一步实用文档步骤四:若需要将该新做的模板作为默认的则需要勾选设定默认参照,不需要则不需要勾选,然后点击下一步实用文档步骤五:点击执行步骤六:点击下一步,点击确定,发布成功。
商品条形码管理使用指南英文回答:Product Barcode Management User Guide.Introduction.Barcodes are a vital part of modern inventory management. They allow businesses to quickly and accurately track inventory levels, manage orders, and process payments.Types of Barcodes.There are several different types of barcodes, but the most common are:UPC (Universal Product Code): These are the most common barcodes found on consumer products. They consist of 12 digits, which are divided into five parts: the manufacturer number, the product number, the check digit,and the start and stop codes.EAN (European Article Number): These are similar to UPCs, but they have 13 digits instead of 12.Code 39: These barcodes can encode any combination of numbers, letters, and symbols.Code 128: These barcodes are similar to Code 39, but they can encode a larger amount of data.Barcode Management.Effective barcode management requires a system for creating, tracking, and updating barcodes. This system should be able to:Generate unique barcodes for each product.Track the location of each product.Update barcodes when products are sold or transferred.Generate reports on barcode activity.Benefits of Barcode Management.Implementing a barcode management system can provide a number of benefits, including:Improved accuracy: Barcodes can help to reduce errors in inventory management and order processing.Increased efficiency: Barcodes can help to streamline inventory management and order processing tasks.Reduced costs: Barcodes can help to reduce labor costs and inventory costs.Improved customer service: Barcodes can help to improve customer service by providing fast and accurate information about products.Conclusion.Barcode management is an essential part of modern inventory management. By implementing a barcode management system, businesses can improve accuracy, efficiency, and customer service.中文回答:商品条形码管理使用指南。
一、软件的安装当你领到新的电脑和打印机时,首先要在电脑上安装必要的软件:1,安装专业条码打印软件LabelView(或CodeSoft)软件存放路径:\\update\FTP\program\BARCODE这套软件用于条码打印室(五楼),非条码打印室人员可以不做了解。
2,安装打印机驱动程序驱动存放路径:\\update\FTP\drivers\printers\ZEBRA根据打印机的型号及使用的软件,选择安装一种或多种驱动程序;如果是使用我们公司自己的条码管理软件打印条码,则只需安装GenericTextOnly 驱动:路径:\\update\FTP\drivers\printers\GenericTextOnly\GenericTextOnly如果是2000或XP的系统,这个GenericTextOnly驱动是系统自带的,在添加打印机时直接选择安装就可以了。
3,安装公司自己的条码管理软件:首先,安装H3系统:\\update\FTP\program\H3系统安装H3系统安装完之后,配置BDE:新建一个名为(UT)barcode的数据库连接,类型为MSSQL,DATABASENAME:(UT)barcode SERVERNAME:mrpiiserver USERNAME:mrpii_user然后,拷贝条码管理软件,存放路径:\\update\wangpeng\条码程序更新二、连接好打印机:注意:接打印机的时候一定要断电操作,并且要轻拔轻插接线头。
三、打印机电源电源开关位于打印机的后面,打印机使用的电源是交流电压230V和110V自适应。
安装打印机时,请确保供电电压和打印机的工作电压相符,同时检查供电电源是否接安全地,最重要的,在连接打印机和电脑时,一定要先将打印机和电脑的电源线拔下!按住面板的某些按键,再打开电源开关,可以进行特定用途的开机自检:■按住PAUSE键开机,检测打印机设置是否正常;常用来测试打印头是否损坏;■按住FEED键开机,输出打印机软件版本及各种温度下条码效果;[千万注意]在插拔任何连线时,都应该关闭电脑和打印机的电源。
条形码的使用流程教学1. 什么是条形码?条形码是一种用于储存和识别产品信息的编码图形。
它由一系列黑色和白色的线条组成,通过不同的组合来表示不同的数字或字母。
条形码广泛应用于商品销售、物流管理、图书管理等领域,能够提高工作效率和准确性。
2. 条形码的分类根据条码的编码方式和规范的不同,可以将条形码分为不同的类型,常见的条形码类型有:•EAN-13码:由13个数字组成,常用于商品的国际标准编号。
•UPC码:由12个数字组成,常用于北美地区的商品编号。
•QR码:由黑白方块组成,可以存储更多的信息,广泛应用于微信支付、电子票务等领域。
•Code39码:由字母、数字和特殊字符组成,广泛应用于物流管理、图书管理等领域。
3. 条形码的生成方式生成条形码可以使用各种工具和软件,以下是常见的几种生成方式:•在线生成:通过访问条码生成网站,输入相应的数据,网站会自动生成对应的条形码图片,然后可以下载保存。
•条码生成软件:通过在电脑上安装条码生成软件,用户可以根据需要设置条码的类型和内容,然后生成条码图片。
•编程生成:开发人员可以使用编程语言,调用相应的条码生成库或API,通过编写程序生成条形码。
4. 条形码的打印和应用生成了条形码之后,我们可以通过打印出来,然后应用到各个领域中。
•商品销售:商家可以将条形码打印在商品包装上,方便收银员扫描识别,快速完成商品结账。
•物流管理:物流公司可以将条形码打印在货物上,通过扫描条形码可以快速识别货物信息,实现自动化管理。
•仓库管理:仓库管理员可以将条形码打印在货架上,通过扫描条形码可以快速找到所需的货物。
•图书管理:图书馆可以将条形码打印在每本书上,通过扫描条形码可以实现图书的借还、盘点等管理操作。
5. 条形码的读取方式条形码的读取方式主要有两种:•扫描枪:扫描枪是一种常见的条形码读取设备,通过将扫描枪对准条形码,按下扫描按钮,即可快速读取条形码的信息。
•手机应用程序:随着智能手机的普及,我们可以通过安装相应的条码扫描应用程序,使用手机的摄像头对准条形码,软件会自动识别条形码,并给出相应的结果。
扫条码机操作方法
操作扫条码机的方法大致如下:
1. 将扫条码机连接到计算机或设备上,通常通过USB线或无线连接。
2. 打开扫条码机的电源开关,确保设备正常工作。
3. 将待扫描的条码放置在扫码机的扫描区域中,通常是一个窄长的槽口或平台。
4. 对准条码,使其位于扫码机的视线范围内,确保条码与扫描器垂直方向对齐。
5. 执行扫描动作。
通常有以下几种方式:
- 手动触发:按下扫描机上的按钮或扳机,将激活扫描动作。
- 自动触发:有些扫描机具有自动感应功能,当感应到条码时,会自动进行扫描。
- 连续扫描:适用于需要扫描多个条码的情况,将扫码机设置为连续扫描模式,然后按下触发按钮或扳机来开始连续扫描。
6. 扫描完成后,扫描机将根据设定的配置将条码数据传输到计算机或设备。
一般来说,可以通过连接线或无线方式将数据传输到电脑中。
请注意,不同型号的扫码机具体操作方法可能略有不同。
强烈建议参考扫码机的
说明书或向供应商寻求具体操作指南。
华德公司后台管理软件系统及标签打印软件系统操作手册 1/15 华德后台管理软件系统及标签打印软件系统 第一版
版本 时间 操作 人员 华德公司后台管理软件系统及标签打印软件系统操作手册
2/15 一、功能概述 .............................................................................. 3 1 后台管理软件系统菜单介绍 .............................................................. 3 2 后台管理软件系统操作流程介绍 .......................................................... 4 2.1 员工信息设置 .................................................................... 5 2.2 员工权限设置 .................................................................... 5 2.3 密码修改 ........................................................................ 6 2.4 订单信息 ........................................................................ 6 2.5 零件信息 ........................................................................ 6 2.6 客户信息 ........................................................................ 7 2.7 公司信息 ........................................................................ 7 2.8 删除托盘 ........................................................................ 8 2.9 删除箱 .......................................................................... 8 2.10 箱序列号报表 .................................................................... 8 2.11 托盘序列号报表 .................................................................. 9 2.12 订单报表 ....................................................................... 10 3 标签打印软件系统菜单介绍 ............................................................. 11 4 标签打印软件系统操作流程介绍 ......................................................... 11 4.1 箱标签打印 ..................................................................... 12 4.2 托盘标签打印 ................................................................... 13 4.3 打印特殊标签 ................................................................... 13 4.4 解除托盘 ....................................................................... 14 4.5 解除箱 ......................................................................... 14 4.6 箱标签补打 ..................................................................... 14 4.7 托盘标签补打 ................................................................... 15 华德公司后台管理软件系统及标签打印软件系统操作手册
3/15 一、功能概述
通过使用零件条码打印软件管理监测产品出货类型品种等情况,从而提高企业运作效率和管理水平。实现以上目的的主要手段是采用条码全程监控产品装箱后的流通,最终实现实时管理产品库存出货的目的。
1 后台管理软件系统菜单介绍
进入主界面后,能够看到四个菜单组 [系统管理] [基础信息设置] [托盘信息维护] [报表]
[系统管理] ----- 员工的信息设置,员工权限的设置和密码的修改等等。 [基础信息设置] ----- 包含了订单信息、零件信息、客户信息和公司信息等等。 [托盘信息维护] ----- 解除托盘和解除箱 [报表] -----包含了箱序列号报表、托盘报表和订单报表。 华德公司后台管理软件系统及标签打印软件系统操作手册
4/15 2 后台管理软件系统操作流程介绍 进入登录窗口, 输入正确的用户名和密码,登录系统。
登陆之后进入系统主界面: 华德公司后台管理软件系统及标签打印软件系统操作手册
5/15 2.1 员工信息设置 员工的新增删除,界面如下:
2.2 员工权限设置 员工权限的新增和删除,界面如下: 华德公司后台管理软件系统及标签打印软件系统操作手册
6/15 如果要给某个员工新增某个权限,首先在操作员的下拉框中选中要赋予权限的员工,然后在左边的框中双击某个需要的权限,在右边的框中就显示了,然后点击保存按钮,权限就增加成功了。 如果要删除某个员工的某个权限,同理,只要在右边的框中双击要删除的权限,权限就自动消失了,但是记住一定要点击保存按钮,删除权限的功能才能成功。
2.3 密码修改 员工密码修改,界面如下:
2.4 订单信息 订单信息窗口包含了订单的新增删除,查询打印等功能。界面如下:
2.5零件信息 零件信息窗口包含了零件的新增和删除功能,界面如下: 华德公司后台管理软件系统及标签打印软件系统操作手册 7/15 2.6 客户信息 客户信息窗口包含了零件的新增和删除功能.,界面如下:
2.7公司信息 公司信息窗口包含了公司的新增和删除功能,界面如下: 华德公司后台管理软件系统及标签打印软件系统操作手册 8/15 2.8 删除托盘 删除托盘窗口进行释放托盘序列号的功能,界面如下:
输入需要删除的托盘序列号,点删除按钮即可。 2.9 删除箱 删除箱窗口进行释放箱序列号的功能,界面如下:
输入需要删除的箱序列号,点删除按钮即可。 2.10 箱序列号报表 显示箱序列号的信息报表,可以根据箱序列号查询也可以无条件查询,界面如下: 华德公司后台管理软件系统及标签打印软件系统操作手册 9/15 2.11 托盘序列号报表 显示托盘序列号的信息报表,可以根据箱号和托盘号查询也可以无条件查询,界面如下: 华德公司后台管理软件系统及标签打印软件系统操作手册
10/15 2.12 订单报表 显示订单的信息报表,可以根据发运日期和订单号查询也可以无条件查询,界面如下: 华德公司后台管理软件系统及标签打印软件系统操作手册
11/15 3 标签打印软件系统菜单介绍 进入主界面后,能够看到四个菜单组 [打印标签] [托盘信息修改] [标签补打]
[打印标签] ----- 箱标签、托盘标签和特殊标签的打印功能。 [托盘信息修改] ----- 解除托盘和解除箱的功能。 [标签补打] ----- 箱标签和托盘标签的补打。
4 标签打印软件系统操作流程介绍
进入登录窗口, 输入正确的用户名和密码,登录系统。
登陆之后进入系统主界面: 华德公司后台管理软件系统及标签打印软件系统操作手册
12/15 4.1 箱标签打印 箱序列号打印窗口,界面如下: 华德公司后台管理软件系统及标签打印软件系统操作手册
13/15 箱序列号打印有2种方式:一种扫描直接打印,还有一种选择订单打印。 4.2 托盘标签打印 托盘标签打印窗口,界面如下:
扫描箱序列号,第一框显示其扫入的二维码,箱标签的信息就显示在下面的框中,特殊标签的信息就显示在底部框中。选中要打印的箱标签信息,输入打印数量,点打印托盘标签即可,还可显示已经扫描入的箱数。
4.3 打印特殊标签 打印特殊标签的窗口,界面如下: 华德公司后台管理软件系统及标签打印软件系统操作手册
14/15 4.4 解除托盘 删除托盘窗口进行释放托盘序列号的功能,界面如下:
输入需要删除的托盘序列号,点删除按钮即可。 4.5解除箱 删除箱窗口进行释放箱序列号的功能,界面如下:
输入需要删除的箱序列号,点删除按钮即可。 4.6 箱标签补打 当箱标签损毁或者其他原因造成的标签不能使用,就可以进行箱标签补打.,界面如下: