B0300使用说明书
- 格式:pdf
- 大小:46.57 KB
- 文档页数:4

OWNER'S MANUALCopyright © Professional Tool Products, 2018All rights reservedHARDWARE SPECIFICATIONSTOOLS NEEDED FOR ASSEMBLY:• 2 - 14mm Combination Wrenches • 13mm Socket or Universal Socket • 4" Extension• 1/4" Ratchet1a x 32 pcs.1b x 4 pcs. 2 x 72 pcs.3 x 16 pcs.24 x 40 pcs.4 x 4 pcs.9 x 16 pcs.Due to the weight of this cart we recommend that TWO PEOPLE work together on the assembly. This cart weighs approximately 170 lbs, please use caution during assembly. Step 1:Locate the key tied to the bottom tray. Using the key, open the lid and remove the caster box from the bottom drawer. Once removed make sure all drawers are completely closed and the inside lever is in the locked position. Close the top lid and lock.Step 2: Lay out a work surface using the protective foam provided. Once this surface is secure gently turn the cart onto its lid. (logo will be facing the foam)Step 3:(Before assembling the legs, remove the cable tie holding the bumper in place) Insert the front leg (#7), labeled FL or FR into top lip of the cart. Then place the Front bumper (#14 with Cornwell Logo) over the leg aligning the center bolt holes. With holes aligned insert stove bolt (#1a) and finger tighten with nyloc nut and washerStep 4:Install back leg (#7) labeled BL or BR and bumper (#14 without logo) following the same procedure as above. Note: Make sure the back leg is inside the hinge rivet. Otherwise the holes will not line up during assemblyASSEMBLY INSTRUCTIONSStep 7:Insert bottom shelf (#23) between the four legs flat side facing up towards the ceiling. Insert sixteen stove bolts (#1a) and completely tighten.Step 5:Repeat steps 3 & 4 to mount the legs on the opposite side. Step 6: Completely tighten the 8 bolts just inserted.Troubleshooting Points during CTBMM300 Assembly.Problem: Drawers appear not to fit, do not slide in accurately and bump the cart sides.Solution: The roller bearing slides must be fully engaged into the mounting slots on all drawers. They potentially could fall out of position while turning the cart on its lid, back, or onto its casters.Remove the drawer that is out of position. The drawer is removed by the two clips on the roller bearing slides.Simply push the roller bearing slide back down into position. Insert the drawer back onto the roller bearing slides.Problem: Back Lock/Unlock Switch does not engage the drawer.Solution: The inside Lock/Unlock slide potentially could fall out of its groove while turning the cart on its lid, back, or onto its casters during assembly.Unscrew the four screws that are holding the Lock/Unlock slide in place. Once the screws are removed simply place the latch back onto the slide and tighten the four screws back down.Problem: Back Lock/Unlock Switch does not engage the drawer.Solution: The inside Lock/Unlock slide potentially could fall out of its groove while turning the cart on its lid or back onto its casters.Unscrew the four screws that are holding the Lock/Unlock slide in place.Once the screws are removed simply place the latch back onto the slide and tighten the four screws back down.Step 13: Insert the remaining 8 stove bolts (#1a).Step 14: Using 13mm socket completely tighten all fasteners!!Step 15: Insert spray can holder divider (#19) into provided cutaway on the bottom shelf (#23). (Optional)ASSEMBLY INSTRUCTIONSStep 8:Mounting casters: Put the four casters in place. The two locking casters (#12) should be on one side of the cart and the two non locking casters (#10) should be on the other (Left or right side NOT front or back). Using the 16 bolts (#9), washers and fasteners (located in separate Caster bag) completely tighten the casters to the bottom tray using a 13mm socket and 14mm combination wrench for the bolt head. (Note: Bolt head and one washer should be on the inside of the bottom shelf, hex nut Step 10: Open top lid using the key providedStep 11: Mount push handle (#6) to the same side of the cart withthe locking casters using the four stove bolts (#1b) provided. Finger tighten at this time.Step 12: Insert the 4 Stove bolts (#4) provided to the opposite side of thecart. Note: This stove bolt is shorter due to not having to pass through a handle or bumper.TROUBLESHOOTINGI tem # Part # Description QTY. 1a M8 Bolt (6mm-17mm) 321b M8 Bolt (6mm-19mm) 42 Flat Washer (D8) 723 Hex Nut M8 164 M8 Bolt (3mm-17mm) 45 RSMM100HB Handle Brackets/Pair 16 RSMM100HDL Push Handle 17 RSMM300LGBK (Black) Leg 4RSMM300LGBL (Blue)RSMM300LGRD (Red)RSMM300LGRG (Orange)RSMM300LGNG (Neon Green)8 RSMM300SRPBK (Black) Screwdriver / Prybar holder 1 pairRSMM300SRPBL (Blue)RSMM300SRPRD (Red)RSMM300SRPRG (Orange)RSMM300SRPNG (Neon Green)9 Hex bolt M8-16 (for casters) 1610 RSSWCS 5" Swivel Caster (non-locking)/each 211 RSMM300RPBK (Black) Reinforced Piece /each 2RSMM300RPBL (Blue)RSMM300RPRD (Red)RSMM300RPRG (Orange)RSMM300RPNG (Neon Green)12 RSSWLCS 5" Swivel Caster with lock/each 213 RSMM300DHBL (Blue) Drawer Handle w/ Hardware 314 RSMM300BPRF Right Front Bumper 1RSMM300BPLF Left Front Bumper 1RSMM300BPLR Left Rear Bumper 1RSMM300BPRR Right Rear Bumper 115 Screw for Drawer Handles 1216 RSLKN Lock with Keys17 RSGP Gas Piston /each18 RSRBS Roller Bearing Slides/pair 319 RSMM300SCDBK (Black) Spray can divider 1RSMM300SCDBL (Blue)RSMM300SCDRD (Red)RSMM300SCDRG (Orange)RSMM300SCDNG (Neon Green)21 CTBMM3003DBK (Black) 3" Drawer 2CTBMM3003DBL (Blue)CTBMM3003DRD (Red)CTBMM3003DRG (Orange)CTBMM3003DNG (Neon Green)22 CTBMM3005DBK (Black) 5" Drawer 1CTBMM3005DBL (Blue)CTBMM3005DRD (Red)CTBMM3005DRG (Orange)CTBMM3005DNG (Neon Green)23 CTB300MMSBK (Black) Bottom shelf 1CTB300MMSBL (Blue)CTB300MMSRD (Red)CTB300MMSRG (Orange)CTB300MMSNG (Neon Green)24 Nylon Nut M8 4025 RSLMC300BKN (Black) Locking mechanism 1RSLMC300BLN (Blue)RSLMC300RDN (Red)RSLMC300RGN (Orange)RSLMC300NGN (Neon Green)26 RS50022 Power Strip w/ Cord 1 ALSO AVAILABLE:RSDET8PK Ball Bearing Slide Detents (Pk of 8),RSMM300LK 5pack EVA liner kitRSMM100DHP Plastic End Cap for Drawer Handle (2 pack)RSMM300BK4 Hardware Kit for opposite side of Push Handle (4 pc each #2, #4 & #24) RSMM300BK3 Caster Hardware Kit (each – 1 wheel) (4 pc each #3, #9 & 8 pc #2) RSMM300BK2 Push Handle Hardware Kit (4 pc each #1b, #2 & #24)RSMM300BK1 Leg/Bumper Hardware Kit (32 pc each #1a, #2 & #24)RS50022PC - Power Cord PART DRAWINGS5Push HandleBracket6Push Handle 7Legs (4)8Pry BarHolder (2)14Bumper (4)2 with logo, 2 without10Non-LockingCaster (2)11Front & BackBracket12Locking SwivelCaster (2)Narrow SideSmall Lip13DrawerHandle (3)19Paint CanHolder DividerPARTS LIST。


南方安华B3000系列变频调速器使用手册V1.2深圳市南方安华电子科技有限公司SHENZHEN NOWFOREVER ELECTRONICS TECHNOLOGY CO.,LTD.目录序 言 (3)开箱检查 (4)1 安全注意事项 (5)1.1 安全事项 (5)1.2 注意事项 (7)2 产品规格及选配件 (10)2.1 产品技术规格 (10)2.2 产品系列介绍 (11)2.2.1 B3000系列变频器型号 (11)2.2.2 B3000系列变频器型号与铭牌说明 (12)2.2.3 B3000系列变频器外形尺寸 (13)2.2.4 防护盖 (15)2.2.5 LED键盘显示单元尺寸 (16)2.3 选配件 (17)2.3.1 制动电阻及制动单元选型推荐动 (17)3 安装及配线 (19)3.1 变频器安装 (19)3.1.1 符合EMC要求的安装方法 (20)3.1.2 噪声抑制 (22)3.1.3 使用浪涌抑制器 (24)3.1.4 漏电流及其对策 (24)3.1.5 使用电源滤波器的场合 (25)3.1.6 使用交流电抗器的场合 (25)3.2 变频器的配线 (26)3.2.1 概述 (27)3.2.2 主回路输入输出端子 (28)3.2.3 控制回路配置及配线 (29)3.2.4 现场配线要求 (40)3.2.5 接地要求 (41)4 变频器运行和操作说明 (42)4.1 运行说明 (42)4.1.1 运行命令通道 (42)4.1.2 频率给定通道 (42)4.1.3 变频器工作状态 (42)4.1.4 变频器运行方式 (43)4.2 操作指南 (43)4.2.1 键盘使用方法 (43)4.2.2 按键功能 (44)4.2.3 指示灯说明 (45)4.2.4 功能码参数的设置方法 (46)4.2.5 速度调节 (47)4.2.6 如何锁定/解锁键盘显示单元 (47)5 详细功能介绍 (49)5.1 基本运行参数(P0组) (49)5.2 电机参数(P1组) (54)5.3 起动制动参数(P2组) (57)5.4 磁通矢量控制参数(P3组) (61)5.5 电流矢量控制参数(P4组) (64)5.6 输入端子控制参数(P5组) (64)5.7 输出端子控制参数(P6组) (75)5.8 过程闭环参数(P7组) (81)5.9 多段参数(P8组) (86)5.10 增强功能参数(P9组) (87)5.11 显示参数(PA组) (102)5.12 通讯参数(PB组) (104)5.13 专用功能参数1(PC组) (105)5.14 专用功能参数2(PD组) (109)5.15 故障保护参数(PL组) (114)5.16 变频器状态(PN组) (119)5.17 参数保护(PP组) (120)5.18 厂家参数(PU组) (121)6 故障对策及异常处理 (122)7 保养和维护 (128)7.1 日常保养及维护 (128)7.2 定期维护 (128)7.3 变频器易损件更换 (129)7.4 变频器的存贮 (130)7.5 变频器的保修 (130)8 功能参数简表 (131)9 通讯协议 (167)通信方式 (167)协议格式 (167)协议功能 (167)几点说明 (177)应用举例 (177)变频器的定标关系 (178)序 言感谢您购买南方安华生产的B3000系列变频器。

★★★★★Microlab 300半自动生化分析仪中文使用手册目录1. 安全注意事项1.1 简介1-2 1.2 操作者资格1-2 1.3 维修人员资格1-2 1.4 标志的描述1-2仪器上的标志1-2 手册中的标志1-2 1.5 电子部分1-3 1.6 机械部分1-3 1.7 灯泡1-3 1.8 化学部分1-3 1.9 生物污染成分1-4样品1-4 废液1-4 生物污染成分1-4 试剂1-4 1.10 附加事项1-5防火1-5 结果的准确性/精密度1-5 应用1-5 操作和保养1-5 安装要求1-6 仪器闲置时的处理1-6 2. 序言2.1 系统外观2-2 2.2 使用手册2-4 2.3 包装运输2-5 2.4 安装2-52.5 验收2-63. 系统描述3.1 概述3-2 3.2 盖子3-2 3.3 吸液器3-3 3.4 测量单元3-4 3.5 泵单元3-5 3.6 打印单元3-6 3.7 屏幕3-73.8 键盘3-83.8.1 硬键3-83.8.2 软键3-93.8.3 字母键3-93.8.4 键头键3-9 3.9 仪器的后面板3-10 3.10 值的输入和软件设置3-113.11 技术数据3-124. 理论4.1 概述4-2 4.2 吸光度4-2 4.3 动力法原理4-3 4.4 终点法原理4-44.4.1 标准终点法4-44.4.2 带试剂空白终点法4-44.4.3 带试剂空白和样品空白的终点法4-54.4.4 双波长终点法4-5 4.5 两点法原理4-64.6 非线性实验4-65. 运行仪器5.1 开机前准备5-2 5.2 开机5-4 5.3 冲洗比色池5-5 5.4 系统参数编程5-65.4.1 前言5-95.4.2 硬件5-115.4.3 滤光片5-135.4.4 仪器5-145.4.5 保护5-16 5.5 建立质控程序5.5.1 质控编程5-175.5.2 修改或清除质控5-195.6 注册定标液5-226. 测试6.1 实验选择6-2 6.2 测量6-36.2.1 水空白6-36.2.2 试剂空白6-46.2.3 定标液6-5附加信息6-76.2.4 质控6-8附加信息6-96.2.5 样品6-10附加信息6-116.2.6 样品空白6-12仅做样品空白6-12样品空白和试剂空白6-136.2.7 测量结果的标志6-156.2.8 测量类型的变换6-166.2.9 屏幕上的软键6-176.2.10 信息屏幕6-18动力学实验信息6-19 6.3 结束测量6-206.4 评估实验6-217. 质量控制7.1 概述7-27.2 统计7-28.实验和定标液编程8-2 8.1 概述8-2 8.2 用户定义的实验编程8-28.2.1 简介8-58.2.2 设置8-6动力法8-6终点法8-7两点法8-78.2.3 范围8-8 8.3 定标液编程8-98.3.1 定标液8-101点定标8-122点定标8-12多点定标8-13因数定标8-138.3.2 标准液8-148.4 在编程菜单和数据菜单的软键8-169. 使用密码9.1 概述9-29.2 修改密码9-310. 保养10.1 半天保养10-2 10.2 每天保养10-4 10.3 更换打印纸10-5 10.4 更换色带10-6 10.5 更换保险10-7 10.6 更换或调节灯泡10-8 10.7 打印保养表10-13 10.8 出错记录10-1310.9 维修10-1411. 故障11.1 常见故障11-211.1.1 样品和试剂的问题11-3样品11-3试剂、定标液和质控物11-311.1.2 分析仪的问题11-311.2 解决方法11-411.2.1 屏幕提示11-411.2.2 数据标志11-511.2.3 无样品吸入11-611.2.4 吸样量不足11-611.2.5 通讯错误11-711.2.6 没有结果11-711.2.7 结果不稳定11-8跳点11-8重复性差11-8结果太低11-9结果太高11-911.2.8 空白错误11-911.2.9 温度错误提示11-10附录A.1 外接键盘A-2A.1.1 安装外接键盘A-2A.1.2 键盘功能A-3A.2 订货信息A-4索引#开放通道个数5-141点定标8-122点定标8-12A吸光度4-2附加信息(定标液)6-7附加信息(质控)6-9附加信息(样品)6-11调节灯泡10-8修改质控5-19样品号自动增加功能5-14,6-10 自动打印结果5-14B仪器的背面3-10波特率5-11双波长终点法4-5C 定标8-10定标曲线8-14测量类型的改变6-16修改密码9-3修改质控6-9修改密码5-16检查选择框3-11,8-4 仪器的清洁6-20色带10-6质控6-8D 每日常规检查5-2日期5-9日期格式5-9E 编辑框3-11,8-4 终止日保养10-4每天工作结束的方法5-5带试剂空白的终点法4-4带试剂空白和样品空白的终点法4-5环境条件3-12方程4-2出错记录10-13评估实验6-21外接键盘5-11外接打印机5-11F 因数定标8-13滤光片5-13滤光片轮5-13标志6-15,6-18 保险丝10-7H 半日保养10-2I 动力法信息6-19信息屏幕6-18安装2-5内置打印机5-4K 键盘3-8动力法4-3L 实验室名称5-9语言5-9Levey-Jennings 图7-2列表框3-11,8-4 语言版本5-10M 保养列表10-13 测量纽6-17测量实验6-2多点定标8-13N 非线性4-3P 病人名称5-14电源要求3-12打印纸10-5标准编程8-9质控编程5-17系统参数编程5-6用户定义实验编程8-2Q 质量控制7-2R 反应图6-17屏幕上的反应6-19试剂空白6-4清除质控5-19换灯泡10-8结果格式5-14S 样品6-10样品空白测量6-12样品码5-14运输2-5标准终点法4-4质控的统计信息7-2T 实验选择6-2时间5-9气泡体积5-14两点法4-6V 确认定标6-5确认质控(按质控)7-2确认质控(按实验)7-2W 验收2-6 水空白6-31.安全注意事项1.1 简介在开始安装和使用仪器之前,应阅读本安全注意事项以及相关章节。
自动安平水准仪SOKKIAB30A通用型Weight1.5kgProtectionIPX6Minimum Focus20cm Weight1.5kgProtectionIPX6Minimum Focus20cm Accuracy1.5mm Objective Aperture36mm28xMagni cationB40A经济型Accuracy2.0mm Objective Aperture32mm24xMagni cationB20高精度型Weight1.85kgProtectionIPX6Minimum Focus20cm Accuracy0.7mm Objective Aperture42mm32x Magni cationB20B30A B40A耐用、可靠、高性价比▪ 三个型号和三种放大倍率(32x、28x和24x)▪ 快速、精确、稳定的自动补偿▪ 20cm超短焦距▪ 全天候高可靠性作业▪无限水平微调超短焦距B20/B30A/B40A可对距望远镜仅20cm远的目标实施对焦,为在狭窄空间环境下作业带来极大的便利。
水平度盘水平度盘采用1°刻划,可自由旋转将参考方向置零并直接读取任意方向的水平角度值。
全天候高可靠性B20/B30A/B40A的IPX6高防护等级可承受任意方向的强溅水,这意味着突如其来的阵雨或暴雨对仪器无影响;先进的保护设计还能防止望远镜内污斑或冷凝的产生。
经各种预期作业现场条件、使用专用检测设备对产品进行的温度、湿度、振动和跌落测试,索佳B系列自动安平水准仪的防水、耐用等优良性能得到了充分的验证,长期以来拥有着良好的口碑。
弯管目镜DE16 (B20)光学测微器OM5(B20)40X 目镜EL5(B20)STS-P-2020-1010•主机•六角扳手•校正针•仪器罩(B20/B30A)•垂球(B20/B30A)•清洁布•镜头盖•使用说明书•仪器箱B20・B30A ・B40A快速、稳定和耐用的补偿器B20/B30A/B40A补偿器所用的四根悬丝由低热膨胀系数的超抗拉金属制成,可提供无与伦比的耐用性和测量精度;即使附近的重型施工设备或者繁忙交通造成的微小振动,良好的磁阻尼系统也能快速安平仪器并确保视线稳定。
B0300SERIES PRESSURE TRANSMITTERS B0300系列工业级气体微压变送器Instruction Manual使用说明书北京艾凡鹏仪表有限公司BEIJING IV AN INSTRUMENTS LTD.B0300系列工业级气体微压变送器目录一.概述 (1)二.技术性能 (1)三.基本工作原理 (2)四.外形尺寸 (2)五.安装方式5.1安装前检查 (2)5.2安装方法 (2)5.3安装注意事项 (2)5.4电气连接 (3)5.5本安防爆型变送器电气连接方法 (3)六.调节6.1环路电流调节 (3)6.2现场数字显示表调节 (4)七.运行、维护及故障诊断7.1运行 (4)7.2维护 (4)7.3故障诊断 (4)八.防爆注意事项 (5)九.开箱验收及保管9.1开箱 (5)9.2保管 (5)-I-B0300系列工业级气体微压变送器-1-一、概述B0300两线制工业级气体微差压风压变送器,采用进口微小量程、高稳定性硅压阻传感器和高可靠性专用信号处理集成电路构成,通过应力隔离技术与ABS 工程塑料外壳牢固封装,被测差压或压力通过φ6、φ8一体化倒刺塔形压力接口进入传感器正负压腔,经传感器检测将对应差压或压力转换为与之成正比的4~20mA 二线制信号输出。
B0300工业级气体风压变送器具有低量程、高稳定性、高精度和安装使用方便等特点,可广泛用于测量管道风压、炉膛负压、供暖供风系统和其它微小压力的测量。
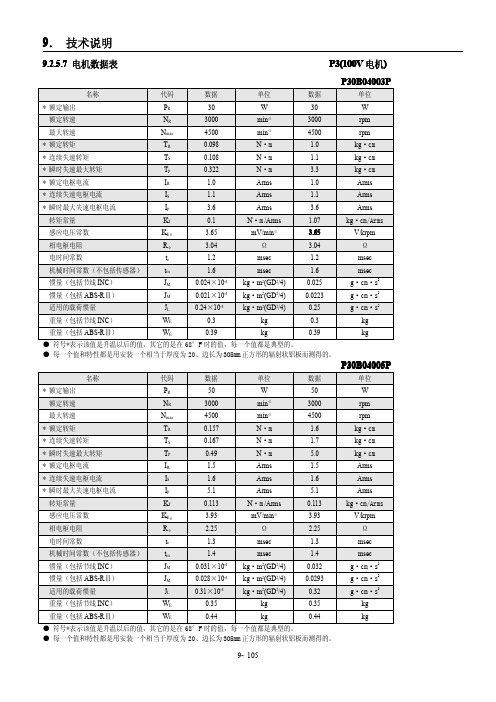
二、技术性能测量范围:0-0.1kPa~100kPa精确度:量程>35kPa 时优于0.2%;在1kPa~35kPa 时优于0.5%;量程<1kPa 时优于1.0%适用介质:非腐蚀性干燥气体过压极限:小量程可达10倍用户量程,大量程可达3倍用户量程,详见选型表补偿温度:0~60℃工作温度:-40~85℃(-20~70℃带LED 表头)保存温度:-40~100℃温度系数:补偿温度内零点和量程均为0.3%/10℃;量程<1kPa 时为1%/10℃稳定性:±0.8%FS/年电源电压:12~36V DC,带LED 显示表时为15~36V DC,通常24V DC 输出信号:4~20mA DC最大负载:50×(电源电压-U)Ω,带LED 显示表时U 为15,通常U 为12启动时间:2秒,不需预热位置影响:任何方向偏离90°,零点变化≤0.1%或≤2Pa 取较大值振动影响:对于l0g 峰值,20~2000Hz 条件下的影响小于0.1%FS湿度影响:0~95%相对湿度无影响外壳:ABS 工程塑料防护等级:IP65现场指示:31/2LED 数字显示表电气接口:C 型仪器仪表连接器(贺斯曼接头)过程连接:φ6、φ8一体化倒刺塔形压力接口接口材料:<过程连接>黄铜;<测量膜片>硅;<密封件>丁晴橡胶重量:0.5kgB0300系列工业级气体微压变送器-2-三、基本工作原理BO300型压力变送器的基本原理,就是利用半导体材料硅的压阻效应和高弹性效应,利用微机械加工工艺及离子注入技术制作的压力传感器,把检测到的压力量,通过变送器电路处理转换成与所受压力成正比的二线制4~20mA 标准信号,从而实现对压力的精确测量与控制。