证托尔克 LED 安装指南说明书
- 格式:pdf
- 大小:406.23 KB
- 文档页数:2
INSTALLATION SHEETPD14740Ceiling LED PendantSTART FROM HERE
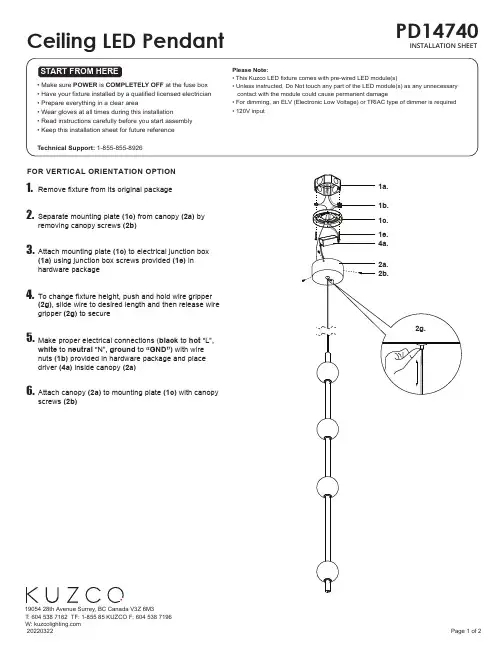
19054 28th Avenue Surrey, BC Canada V3Z 6M3T: 604 538 7162 TF: 1-855 85 KUZCO F: 604 538 7196W: Please Note:• This Kuzco LED fixture comes with pre-wired LED module(s)• Unless instructed, Do Not touch any part of the LED module(s) as any unnecessary contact with the module could cause permanent damage• For dimming, an ELV (Electronic Low Voltage) or TRIAC type of dimmer is required• 120V input• Make sure POWER is COMPLETELY OFF at the fuse box• Have your fixture installed by a qualified licensed electrician• Prepare everything in a clear area• Wear gloves at all times during this installation• Read instructions carefully before you start assembly• Keep this installation sheet for future referenceTechnical Support: 1-855-855-89261. 2. 3. 4. 5. 6. 1a.1b.4a.1c.1e.2a.2b.Remove fixture from its original packageSeparate mounting plate (1c) from canopy (2a) by removing canopy screws (2b)Attach mounting plate (1c) to electrical junction box (1a) using junction box screws provided (1e) in hardware packageTo change fixture height, push and hold wire gripper (2g), slide wire to desired length and then release wire gripper (2g) to secureMake proper electrical connections (black to hot “L”, white to neutral “N”, ground to “GND”) with wire nuts (1b) provided in hardware package and place driver (4a) inside canopy (2a)Attach canopy (2a) to mounting plate (1c) with canopy screws (2b)Page 1 of 22g.FOR VERTICAL ORIENTATION OPTION 20220322INSTALLATION SHEETPD14740Ceiling LED PendantSTART FROM HERE
INSTALLATION SHEETLED Pendant
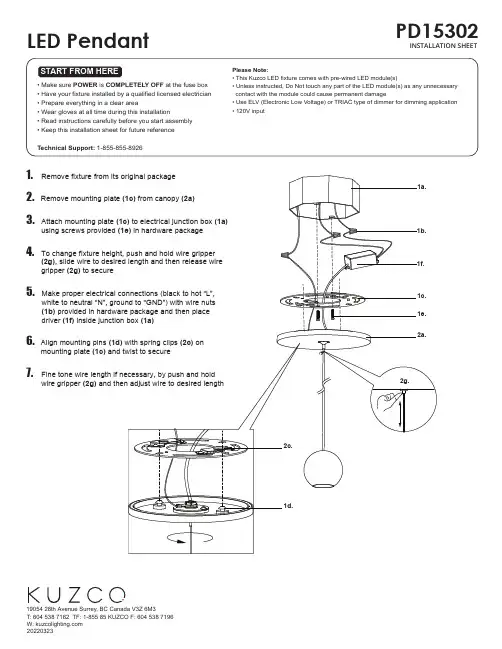
START FROM HERE• Make sure POWER is COMPLETELY OFF at the fuse box• Have your fixture installed by a qualified licensed electrician• Prepare everything in a clear area• Wear gloves at all time during this installation• Read instructions carefully before you start assembly• Keep this installation sheet for future referenceTechnical Support: 1-855-855-8926PD15302
19054 28th Avenue Surrey, BC Canada V3Z 6M3T: 604 538 7162 TF: 1-855 85 KUZCO F: 604 538 7196
W: 1. Remove fixture from its original package2. Remove mounting plate (1c) from canopy (2a) 3. Attach mounting plate (1c) to electrical junction box (1a) using screws provided (1e) in hardware package4. To change fixture height, push and hold wire gripper (2g), slide wire to desired length and then release wire gripper (2g) to secure5. Make proper electrical connections (black to hot “L”, white to neutral “N”, ground to “GND”) with wire nuts (1b) provided in hardware package and then place driver (1f) inside junction box (1a)6. Align mounting pins (1d) with spring clips (2c) on mounting plate (1c) and twist to secure7. Fine tone wire length if necessary, by push and hold wire gripper (2g) and then adjust wire to desired length
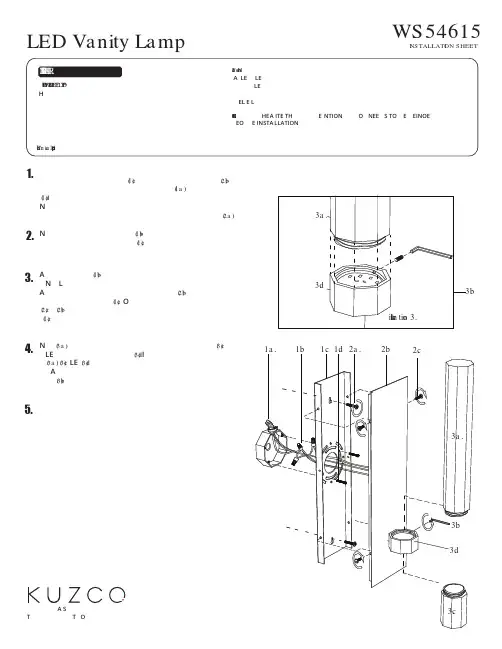
1 2 1a) 1 Ne F 2a)No 1 1 At 1 N L Al 2 1 On 2 2 1No 3a) 3 LED 3 It 3a) 3 LED 3 Al 3 NSTALLATION SHEETWS54615LED Vanity Lamp EE1. 2. 3. 4. 5. a t Al LED LED LED u ELV E Lo HEAV ITE THE NTION BOX NEEDS TO BE EINFOE EFOE INSTALLATION.
Av Su T: TF O F E LETELY Ha hnica t 1b2c1c2a.1a.2b1d3a.
3c3b3biltation 3.
3d 3d3a.
led工矿灯说明书
LED工矿灯是一种高亮度、节能、环保的照明设备,适用于各种工矿场所的照明需求。本说明书将详细介绍LED工矿灯的特点、安装方法、使用注意事项等内容,以供用户参考。
一、产品特点
1.高亮度:采用LED光源,照明亮度比传统照明设备更高,能够满足工矿场所的照明需求。
2.节能环保:LED工矿灯具有低能耗、长寿命的特点,比传统的荧光灯或白炽灯更加节能环保。
3.高效散热:采用优质铝材散热器,有效降低灯具温度,提升发光效率,延长LED的使用寿命。
4.高防尘防水性能:LED工矿灯具有良好的防尘、防水性能,适应各种恶劣的工矿环境。
5.安装简便:LED工矿灯结构紧凑、重量轻,可以便捷安装在天花板、墙壁或其他适合的位置。
二、安装方法
1.准备工具:螺丝刀、电钻、安装支架等。
2.安装步骤:
(1)将工矿灯放在合适的位置,标记安装孔位。
(2)使用电钻在标记的位置上钻孔,并安装支架。 (3)将工矿灯放置在支架上,通过螺丝将其固定。
(4)连接灯具的电源线与电源进行接线,确保接线牢固可靠。
(5)启动电源,检查灯具是否正常工作。
三、使用注意事项
1.请勿将灯具暴露在高温、湿度等恶劣环境中,以免影响其正常使用寿命。
2.定期清洁灯具,避免尘埃影响灯具散热效果。
3.使用过程中如发现灯具闪烁或照明效果降低,请及时停止使用,以免进一步损坏灯具。
4.请勿随意更换灯具的内部元件,避免发生电气故障或触电风险。
6.请勿将灯具处于长时间的开启状态,以免产生过多的热量影响灯具的正常使用。
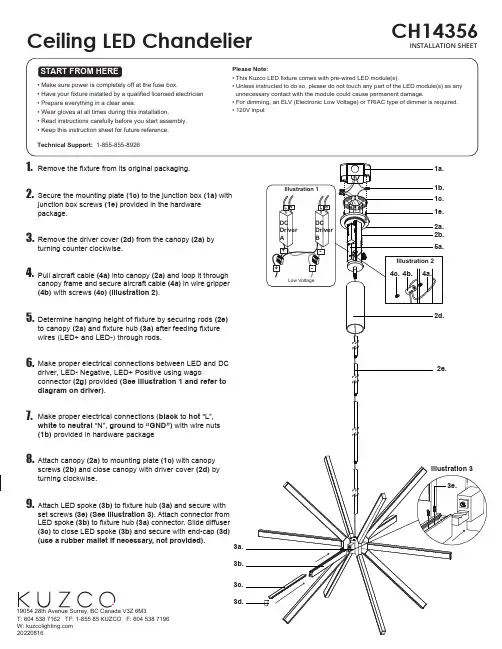
INSTALLATION SHEETCH14356Ceiling LED Chandelier
START FROM HERE• Make sure power is completely off at the fuse box.• Have your fixture installed by a qualified licensed electrician • Prepare everything in a clear area.• Wear gloves at all times during this installation.• Read instructions carefully before you start assembly.• Keep this instruction sheet for future reference.Technical Support: 1-855-855-8926
19054 28th Avenue Surrey, BC Canada V3Z 6M3T: 604 538 7162 TF: 1-855 85 KUZCO F: 604 538 7196 W: 20220816Please Note:• This Kuzco LED fixture comes with pre-wired LED module(s).• Unless instructed to do so, please do not touch any part of the LED module(s) as any unnecessary contact with the module could cause permanent damage.• For dimming, an ELV (Electronic Low Voltage) or TRIAC type of dimmer is required.• 120V input
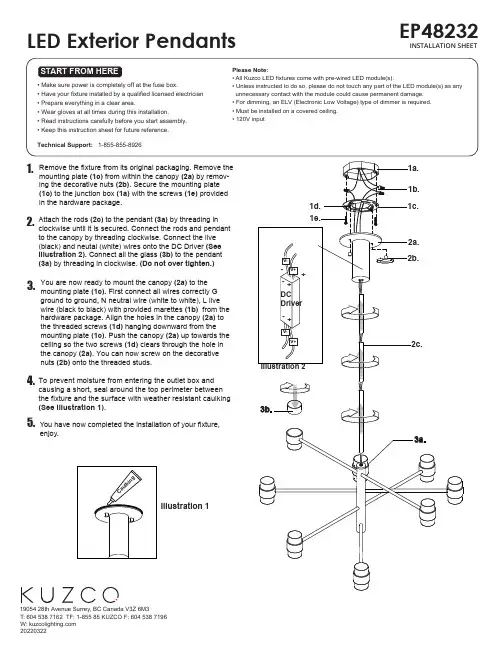
2a.You have now completed the installation of your fixture,enjoy.You are now ready to mount the canopy (2a) to the mounting plate (1c). First connect all wires correctly G ground to ground, N neutral wire (white to white), L live wire (black to black) with provided marettes (1b) from the hardware package. Align the holes in the canopy (2a) to the threaded screws (1d) hanging downward from the mounting plate (1c). Push the canopy (2a) up towards the ceiling so the two screws (1d) clears through the hole in the canopy (2a). You can now screw on the decorative nuts (2b) onto the threaded studs.1a.1b.2b.1e.
3a.1c.1d.Remove the fixture from its original packaging. Remove the mounting plate (1c) from within the canopy (2a) by remov-ing the decorative nuts (2b). Secure the mounting plate (1c) to the junction box (1a) with the screws (1e) provided in the hardware package.INSTALLATION SHEETEP48232LED Exterior PendantsSTART FROM HERE1. 3. Please Note:• All Kuzco LED fixtures come with pre-wired LED module(s).• Unless instructed to do so, please do not touch any part of the LED module(s) as any unnecessary contact with the module could cause permanent damage.• For dimming, an ELV (Electronic Low Voltage) type of dimmer is required.• Must be installed on a covered ceiling.• 120V input
LED灯带(彩虹管)使用说明
1.LED灯带盘为一卷时,尽量不要点亮灯带。 (只能做短时间测试,5秒以内)否则会过热引起问题
2.2米一单元,只能在灯带灯带上印有剪刀标记处剪开
3.在安装时,请将灯带向一侧弯曲,露出2-3MM铜线,并用剪钳剪干净,不得留有毛刺,避免短路。
4.请勿在安装或装配灯带过程中通电源,只有接驳,安装好且正确的情况下才能接通电源,
5.寒冷天气下安装LED灯带,可先通电几分钟,使灯身变软,易弯曲,再断电安装。
6.安装,使用过程中,勿用重物体敲打灯管,或摔击震动。
7.灯管尾端必须在尾塞套住前,用胶水粘牢。
8.只有规格,电压相同的两段灯管才可相互串接,总长度不可超过最大使用长度
9.接口必须牢固,无短路隐患,户外安装时,各接口处必须用玻璃胶密封接口,保证接口处不进水。
10.不可装于水中,易燃,易爆环境中,必须保证使用环境通风散热良好。
11.安装固定,不可用铁丝等金属材料紧扎灯管,防止铁丝陷入灯管内,造成短烧毁灯管。
12.电源电压应与灯管所标示一至,并安装适当保险装置。
13.灯管使用过程中,请勿用任何物体包住,遮盖灯管。
14.灯管灯身破损时,请立即剪去此部分,不可继续使用,以免引起危险。
15.
LED灯带(彩虹管)使用说明
LED彩虹管控制器安装
需闪动,渐变等效果,可使用LED控制器。
16.有任何问题,请与工厂联系
WI-09-562 Rev C P/N 701662 05.22.08 Page 1 of 9 SloanLED THINLED Constant Current Installation Guide Product covered in this guide: ThinLED CC: Part Number Description 701228-18-A Amber ThinLED Constant Current 701228-18-B Blue ThinLED Constant Current 701228-18-G Green ThinLED Constant Current 701228-18-R Red ThinLED Constant Current 701228-18-W White ThinLED Constant Current 701228-18-Y Yellow ThinLED Constant Current SloanLED (888) 747-4LED WI-09-562 Rev C P/N 701662 05.22.08 Page 2 of 9 Attention! Scope: This procedure is designed to aid in the installation of SloanLED’s ThinLED Constant Current channel letter illumination product. Skilled tradespersons that are familiar with general construction, electrical and sign installation techniques should do the installation. Licensed electricians should provide all installation and hook-up of both the primary input and secondary outputs of the Power Supply. All installation and hook-up should be done in accordance with all national and local codes. In no way is this document intended to construe warranty or fitness of use of the products described, nor is it intended to provide safety instruction for those installing the product. THE FIELD ASSEMBLY OF THIS SECTIONAL SIGN IS SUBJECT TO THE ACCEPTANCE OF LOCAL INSPECTION AUTHORITY. LES ENSEIGNES MODULAIRES MONTEES SUR PLACE PEUVENT ENTRE VERIFIEES EN TOUT TEMPS PAR LE SERVICE D’INSPECTION LOCAL. CAUTION: TURN OFF ALL INTEGRAL DISCONNECTS BEFORE SERVICING (IF INTEGRAL DISCONNECTS ARE NOT PROVIDED, TURN OFF POWER TO THE SIGN BY OTHER MEANS i.e. TURN OFF THE CIRCUIT BREAKER OR REMOVE THE FUSE AT THE SERVICE PANEL). ATTENTION! METTRES HORS TENSION TOUS LES SECTIONNEURS INTEGRES AVANT D’ENTREPRENDRE LE DEPANNAGE Attention! WI-09-562 Rev C P/N 701662 05.22.08 Page 3 of 9 ThinLED Constant Current (CC) ThinLED CC is a low voltage, long life alternative to neon and florescent lighting for reverse channel letter illumination and edge lighting applications. The light source for ThinLED CC is the Light Emitting Diode (LED) instead of traditional neon or florescent tubes. LED technology allows ThinLED CC to provide excellent color and brightness in a safe, low voltage circuit (12 Volts DC). ThinLED CC is a robust, easily installed product designed for a long life of safe, maintenance free operation. Figure 1 – ThinLED CC is made up of light strips 12” long, 3/4” wide, and 5/16” high. They can be cut to fit (cool colors can be cut in 1.33” increments, warm colors in 2” increments), and are daisy chained together with jumpers that have positive locking connectors. They are designed to mount to the return of the letter with the LEDs facing the wall on which the letters are to be mounted. Tools Required 1. Wire stripper 2. Measuring Tape 3. Drill 4. Screw Driver Standard Hardware and Supplies (UL listing may be required on certain items) (Supplies listed below may be purchased from SloanLED) 1. AWG # 18, 2 conductor, PVC jacketed, NEC type Power Limited Tray Cable (PLTC) with UL Listing.(100’ Roll is SloanLED part number 400299-1200) 2. AWG # 14, 2 conductors, PVC jacketed, NEC type Power Limited Tray Cable (PLTC) with UL Listing. (100’ Roll is SloanLED part number 400301) 3. 6” Jumper Wires (SloanLED PN 701655-B) 4. “Y” Connector (SloanLED PN 410115-B) 5. ThinLED CC Power Supply Hook-up kit (PN 701693) 6. 4” nylon zip ties. 7. Wire Nuts (IDEAL P/N #30-073 Orange) (SloanLED P/N 701573-10) 8. Outdoor rated caulk / Silicone sealant. 9. Conduit and J-Boxes as needed (Appropriate UL listing is required) 10. Disconnect switch for primary power shutoff if required by local/national Electrical Codes 11. UL Listed for wet location or NEMA 3R Box, min. dimensions 12” x 12” x 6”, vented (if power supply is to be mounted in a location exposed to weather) WI-09-562 Rev C P/N 701662 05.22.08 Page 4 of 9 Populating the Channel Letter ThinLED CC Layout NOTE: These guidelines are an estimating tool. More or less product may be used in the actual population of the letters depending on scrap or illumination needs. Select which channel letter returns will be populated with ThinLED CC, add up the linear distance of these returns and round up to the nearest full foot. This is approximately how many one-foot ThinLED CC strips will be needed to populate the letters. Each one-foot strip has four connector headers. Any one of these headers can power the entire one-foot strip or be used to transfer power to another ThinLED CC section. Each one-foot strip can also be cut on any of the marked cut lines. As long as the cut section has a connector header on it, the section can be lit. Any small section that is trimmed off which does not have a connector header on it cannot be lit. Items to consider: Stroke Width- The stroke width of the letter and the illumination effect you are seeking will help you determine if you need to populate both returns of the reverse channel letter, or just one. Generally, if the stroke width is 2” or less, populating one side of the letter will provide adequate illumination. If the stroke width is wider than 2” or more illumination is desired, both sides can be populated. Power routing- when laying out the ThinLED CC units, keep in mind that each unit will need a power hook up using a jumper. It is best to use as many full size 1’ strips as possible to minimize the amount of jumpers required. One jumper is provided with each 1’ strip of ThinLED CC and additional jumpers are available for purchase from SloanLED. Placing ThinLED CC in a Channel Letter 1. Ensure bonding surface is clean and oil free. 2. Lay out ThinLED CC in letter housing for positioning and cut strips on cut marks as required. 3. Connect all jumper wires ensuring each strip is connected. Peel off tape backing and, pressing firmly, affix ThinLED CC strips into place.
前言:
和庆光电生产的LED工矿灯不是一般的工矿灯。知名芯片封装的模组光源,亮度高、光衰小、显色好;知名品牌的电源做驱动;真空导管技术做散热器。在散热能力、使用寿命、结构工艺等方面领先同行。同时在工矿灯范畴产品种类齐全,满足客户多元化需求。一言以蔽之曰:合适的工矿灯,就在我和庆!
应用范围:适用于车间、厂房、仓库、地下停车场、收费站、加油站、超市、展览馆、体育馆等。
产品特点:不含铅、汞等污染元素;启动迅速;寿命长;比传统灯具省电50-80%;设计独特、优雅,是灯更是艺术。
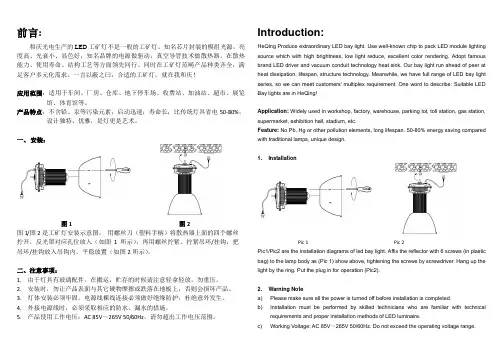
一、 安装:
图1 图2
图1/图2是工矿灯安装示意图。 用螺丝刀(塑料手柄)将散热器上面的四个螺丝拧开,反光罩对应孔位放入(如图1所示),再用螺丝拧紧。拧紧吊环/挂钩,把吊环/挂钩放入吊钩内,平稳放置(如图2所示)。
二、注意事项:
1. 由于灯具有玻璃配件,在搬运,贮存的时候请注意轻拿轻放,勿重压。
2. 安装时,勿让产品表面与其它硬物摩擦或跌落在地板上,否则会损坏产品。
3. 灯体安装必须牢固,电源线裸线连接必须做好绝缘防护,杜绝意外发生。
4. 外接电源线时,必须采取相应的防水、漏水的措施。
5. 产品使用工作电压:AC 85V~265V 50/60Hz,请勿超出工作电压范围。
Introduction:
HeQing Produce extraordinary LED bay light. Use well-known chip to pack LED module lighting
source which with high brightness, low light reduce, excellent color rendering. Adopt famous
2SGT4 SurgiCare LED Troffer 2x2
Surgical suite luminaire
Alkco_Surgical_Troffer_White_2x2 05/23
page 1 of 3Recessed
SurgiCare LED Troffer 2x2
Recessed Operating Room Troffer
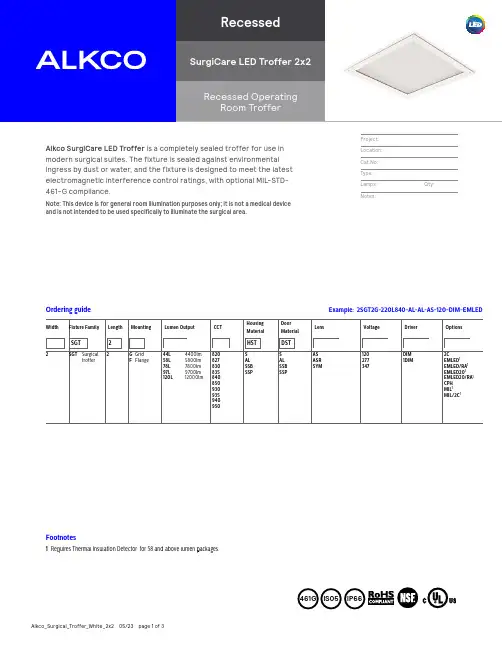
Alkco SurgiCare LED Troffer is a completely sealed troffer for use in modern surgical suites. The fixture is sealed against environmental ingress by dust or water, and the fixture is designed to meet the latest electromagnetic interference control ratings, with optional MIL-STD-461-G compliance.Note: This device is for general room illumination purposes only; it is not a medical device and is not intended to be used specifically to illuminate the surgical area.
Ordering guide Example: 2SGT2G-220L840-AL-AL-AS-120-DIM-EMLED
WidthFixture FamilyLengthMountingLumen OutputCCTHousing MaterialDoor MaterialLensVoltageDriverOptions
SGT2 HST DST 2 SGT Surgical troffer2 G GridF Flange44L 4400lm58L 5800lm78L 7800lm97L 9700lm120L 12000lm820827830835840850930935940950SALSSBSSPSALSSBSSPASASRSYM120277347DIM1DIM2CEMLED1EMLED/RA1EMLED201EMLED20/RA1CPHMIL1MIL/2C1
LED节能型吸顶灯使用说明书
致尊敬的用户:
感谢您购买产品!为了你更好的使用,安装使用前请仔细阅读本使用说明书!以便正确安装使用,同时请保管好此说明书。
安全注意事项:
[ 警 告 ]
¤ 请严格按照使用说明书进行安装。安装不当易引起坠落、触电、火灾等事故发生。
¤ 请勿随意改造、调换灯具部件,以免灯具破损、坠落、触电、火灾等事故发生。
[ 注 意 ]
¤ 电源电压不要超过规定范围(额定电压230±10V,频率50Hz)。灯具长时间在非额定电压范围下工作,易引起灯具过早损坏。
¤ 请勿将灯具安装于倾斜场所,不稳定、不坚固的天花板。此灯具专用于天花吸顶安装。
¤ 请勿将灯具安装于浴室等潮湿场所或室外使用。
¤ 请勿安装于高温物体上方,不可安装在火炉、煤气及排气筒等物体正上方,以免引起损坏。
¤ 请勿与调光器及频繁开关的电器(如声光控,感应开关等)并联使用。本灯具为非调光型产品,请勿接调光控制器,避免出现故障。
¤ 为确保安全,维修、检查灯具时,请委托电器专业人员操作。非专业人员施工容易发生危险。
¤ 灯具发生异常现象时,请迅速切断电源,并请专业人士检查维修。
¤ 灯具表面有脏物时需擦拭时,请用柔软布料沾肥皂水拧干后擦拭,再用干布擦净。请不要用稀释剂、汽油等易腐蚀液体进行擦拭,否则会导致灯具变色或损坏。
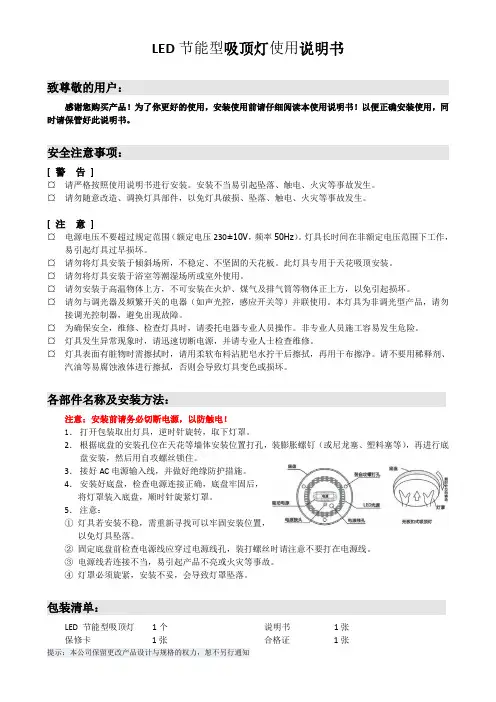
各部件名称及安装方法:
注意:安装前请务必切断电源,以防触电!
1. 打开包装取出灯具,逆时针旋转,取下灯罩。
2. 根据底盘的安装孔位在天花等墙体安装位置打孔,装膨胀螺钉(或尼龙塞、塑料塞等),再进行底盘安装,然后用自攻螺丝锁住。
3. 接好AC电源输入线,并做好绝缘防护措施。
companya
Installation guide for Toughbay™ LED Highbay
Important information
• It is recommended that luminaires are installed by a qualified
electrician to ensure the installation complies with the local current
wiring regulations.
• Any broken or damaged parts should be replaced as soon as possible.
JCC will not accept responsibility for claims arising from sub-standard
installations.
• It is recommended that the ambient room temperature should not
exceed 45°C.
• Caution. Risk of electric shock
• The external flexible cable or cord of this luminaire cannot be
replaced; if the cord is damaged the luminaire shall be destroyed.• These products are designed for connection to a 220-240V~50/60Hz
supply.
• The light source of this luminaire is not replaceable by the end user. The
light source contained in this this luminaire shall only be replaced by the
INSTALLATION SHEETLED Lamp Wall SconceSTART FROM HERE•Make sure power is completely off at the fuse box.•Have your fixture installed by a qualified licensed electrician•Prepare everything in a clear area.•Wear gloves at all times during this installation.•Read instructions carefully before you start assembly.•Keep this instruction sheet for future reference.Technical Support: 1-855-855-8926 Please Note:• All Kuzco LED fixtures come with pre-wired LED module(s).•Unless instructed to do so, please do not touch any part of the LED module(s) as anyunnecessary contact with the module could cause permanent damage.•For dimming, an ELV (Electronic Low Voltage) type of dimmer is required.1.
2.
3. WS10437
Attach the canopy (2a) with the bridge (2c) to the mounting plate (1a) on the wall. First, attach all wiring with the provided marettes (1b) (white to white “N”, black to black “L”, ground oground “G’). Now attach the canopy (2a) to the mountingplate (1a) (see illustration_02) by tightening the two setscrews (2a). You can now install the fixture (2e) onto thecanopy (2a) by tightening the four set screws (2d) (top andbottom) using the allen key provided in the hardware package.You have now completed the installation of your fixture, enjoy.
led灯具安装实施方案
LED灯具安装实施方案。
一、前期准备。
在进行LED灯具安装之前,需要做好充分的前期准备工作。首先,要对安装位置进行仔细的测量和评估,确保LED灯具的安装位置符合设计要求并且能够达到最佳的照明效果。其次,需要准备好所有安装所需的工具和材料,包括螺丝刀、电钻、螺丝、导线等。另外,也需要对安装现场进行清理和整理,确保安装过程中的安全和顺利进行。
二、安装步骤。
1. 安装支架。
首先,需要根据LED灯具的安装位置和类型选择合适的支架,并确保支架的安装位置牢固可靠。在安装支架的过程中,要注意支架的水平和垂直度,确保支架安装完全符合要求。
2. 连接电源线。
接下来,需要将LED灯具的电源线连接到电源上。在连接电源线的过程中,要确保电源线的接线正确无误,避免出现短路或者接线不良的情况。另外,也需要注意对电源线进行绝缘处理,确保安全使用。
3. 安装灯具。
将LED灯具安装在支架上,并进行固定。在安装灯具的过程中,要注意灯具的安装位置和角度,确保灯具的照明效果达到最佳状态。另外,也需要注意灯具的散热和防水处理,确保LED灯具的使用寿命和安全性。
4. 调试灯具。 安装完成后,需要对LED灯具进行调试,确保灯具的亮度和色温符合要求。在调试的过程中,要注意灯具的光线分布和照明范围,确保照明效果达到设计要求。
5. 安全检查。
最后,在安装完成后,需要对LED灯具进行全面的安全检查。检查灯具的接线、支架、固定等情况,确保LED灯具的安装符合安全要求,避免安装过程中出现的安全隐患。
三、注意事项。
在LED灯具安装过程中,需要注意以下几点:
1. 安全第一,确保安装过程中的安全性,避免发生意外事故。
2. 严格按照安装说明进行操作,确保LED灯具的安装符合要求。
3. 在安装过程中,避免对灯具造成损坏,确保LED灯具的完好性。
4. 在安装完成后,进行全面的功能测试,确保LED灯具的正常使用。
Document UT-MT-0837_EN Pagina 1 di 22
Via della Solidarietà n°2/1 40056 Valsamoggia Loc. Crespellano BOLOGNA ITALY Issue 03/09/2019 Suspended edition 05/11/2018
a division of Energy Technology srl Via della Solidarietà 2/1, 40056 Valsamoggia (Bologna) - Italy THIS COPY IS NOT SIGNED BECAUSE IT IS RECORDED AND DISTRIBUTED VIA THE AUTOMATIC KNOWLEDGE MANAGEMENT SYSTEM (SIGNED COPY AVAILABLE AT REQUEST) THIS DOCUMENT IS THE PROPERTY OF OCEM; ITS CONTENTS MAY NOT BE DISCLOSED OR ALTERED WITHOUT THE WRITTEN CONSENT OF OCEM
LED ELEVATED RUNWAY GUARD LIGHT
LETG
OPERATING, INSTALLATION AND
MAINTENANCE INSTRUCTION MANUAL
Drawn up by: E.RAULI Approved by: M.ROMAGNOLI
No. of Attachments: Copy no.:
Document UT-MT-0837_EN Pagina 2 di 22 Issue 03/09/2019 Suspended edition 05/11/2018 LETG - LED ELEVATED RUNWAY GUARD LIGHT EDITIONS
LED: Light Emitting Diodes
FACTS GUIDE
86 Worcester St. Natick MA 800-698-LITE
A.D.COLA LIGHTINGPhoto Courtesy of Feiss
2Lighting your home efficiently is continually
becoming more popular. LED products are now
available for every type of lighting. At A.D.Cola
Lighting we understand that with this new
technology finding the right product can be
challenging. It is our goal to make this process
easy for you. Our LED commitment begins with
carefully choosing and quality testing all of our
LED products and bulbs before bringing them
into our store. LED is continually changing. We
make it a priority to educate ourselves on new
innovations so you can feel confident when
choosing LED products from our showroom.
This facts guide will go over information and
benefits of using LED products. We hope you
CERTOLUXabrandConsult installation guide for exact dimensions.ABCDE1x449.7”13.7”5.7”12”48”2x225.7”25.7”5.7”24”24”2x449.7”25.7”5.7”24”48”Top ViewEnd ViewCDBAEHousingPrecision formed, TIG welded, one piece 18 gauge cold rolled steel housing.MountingSwing arm mounting brackets, with vertical adjustability, are used to mount the fixture against the ceiling. Brackets provide an improved continuous seal to plenum eliminating fixture distortion. Door FrameOne piece 60° beveled perimeter door frame, fabricated from 18 gauge, cold rolled steel with TIG welded corners. The door assembly is self centering by means of locating studs. It is retained by stainless steel aircraft cable when opened. Specialized, military grade, flat head, stainless steel, captive fasteners with integral silicone o-rings easily secure door frame to housing through use of floating cage nuts. Silicone o-rings offer superior performance and longer life over comparable teflon bushings. Protective stops prevent the fasteners from being over-tightened and bending the lens
door frame. Custom shaped, extruded closed cell silicone gasketing is used throughout to ensure precise, redundant seals between door assembly, housing and plenum. Vulcanized corners ensure continuity of the seal on the frame gasket. Continuous retention-mounts mechanically secure and evenly distribute force against both gasketing and diffuser.Lens & Lens RetentionStandard lens is high impact 0.125” thick acrylic lens with diffuse inner layer providing symmetric distribution. Smooth external surface for easy cleaning. Sealed to doorframe with RTV silicone sealant. See order key for other options.FinishWhite, polyester powder painted housing.ElectricalLong life LED’s coupled with high efficiency drivers provide quality illumination. Rated to deliver an L80 performance >50,000 hours. The standard driver has a THD of <10%. Standard low-voltage dimming (0-10v, 1%). All electrical components are CSA or UL approved.Warranty5 year limited warranty. For complete warranty terms visit:https://www.viscor.com/en/docs/VISCOR_LED_WARRANTY.PDFDimensionsApprovalsApproved to CSA and UL standards. UL listed for wet locations, insulated ceilings.IP65IP66ISO4WETLOCProduct DescriptionThe SAFR series by Certolux is a specification-grade, LED recessed flanged rear access IP65, IP66, IC-rated luminaire, for ISO Class 4 Cleanrooms. Ideal for Pharmaceutical manufacturing, Food Processing, Life Sciences and laboratories. NSF/ANSI 2 Food Zone Non-contact and Splash Zone Applications. For use in Wet Locations, Insulated Ceilings.Features• Standard low voltage dimming (0-10v)• 80+ CRI• Available in 1x4, 2x2, 2x4 • Top AccessFeatured Options• Emergency LED Battery Pack•
Red LED arraySAFR-4004LED - Superseal Alpha Flanged Top Access
Phone: (416) 245-7991 | www.viscor.com | Specifications and data subject to change without notice. | 02/13/2023Project:Notes:Catalogue #:Type:CERTOLUXabrandOrder KeyCRI8 - (80-89)CCT30K - 3000 K35K - 3500 K40K - 4000 K50K - 5000 K8NominalLumens026L - 2600039L - 3900052L - 5200078L - 7800104L - 10400150L - 15000VoltageOptionsDriver Options B02 Dimming Addressable Digital (DALI)B39 Emergency Lighting Battery Pack - LEDPackaging Options K0 Bulk Pack/Pallet Packed and/or WrappedHousing Construction OptionsC38 Housing Aluminum .050 PaintedC44 Housing SS #304 PaintedC77 Color Matched Stainless ScrewsDoor Frame Options OptionsPainted CRS is standardD3 Door Type 304 Stainless Steel #4 Polish D9 Door Type 316 Stainless Steel #4 PolishD10 Door Aluminum .063 Painted D17 Door SS (#304) Painted D18 Door SS (#316) Painted Mounting OptionsM38 Mounting Plaster Frame Kit (Stainless Steel #316)M62 Mounting Swing Arm for 4” Deep Ceiling(Note: Housing Depth increases by 1.5” - for Flange mount only)Wiring OptionsV57 Sealed Wireway 90 degree connector w/10ft Liquid Type Flex 3/14Ga. WireV80 LED Red array - One RowV81 LED Red array - Two RowsApproval and Rating Options X5 NSF (National Sanitation Foundation)UNV - 120-277V347 - 347VLens Options--LED
SizeDelivered LumensWatts1x426002552004778007510400982x22600253900365200472x4520047780075104009815000147Lumen & Watts
SizeRows of LEDLumensWatts1x41204554240901082x2110202722045542x4120455424090108Red LED Array - Lumen & WattsOther options may be available, consult factory. Specifications and data subject to change without notice.-4004TypeSAFRSeriesSize(Width xLength)1x42x22x4
* Comes with P05 or P56EXAMPLE: SAFR-40042x4-LED840K104LUNV-P82P56NEW - DSA Now Standard LensDSA 0.125” High Impact Clear Acrylic w/ Diffuse Inside layer (Std.)DSP 0.125 Clear Polycarbonate w/Diffuse inside layerP56 Lens Clear Acrylic .125”P11 Lens Prismatic Acrylic - P19 .156”P13 Lens Prismatic Acrylic - P12 .125” ThickP16 Lens Prismatic Polycarbonate - P12 .125” ThickP82* White Translucent Acrylic .040”P73 Lens White Translucent PolycarbonateSAFR-4004LED - Superseal Alpha Flanged Top Access