PowerScan-Auto自动化说明书
- 格式:doc
- 大小:19.08 MB
- 文档页数:44

How to automatetheHR document flowB usiness caseCONNEXXIONBart BallegeerMay 13th 2020Meet the speakerName Bart BallegeerLocation BelgiumRole Head of business development (South-West Europe)Started @ IRIS2011Business case CONNEXXION•Who is Connexxion•The background of the HR project•The solution•The roll out•Q & A4.135 taxi’s 3.147 city busses 152 touring cars 82 ambulances 43 trams 27 ferries 6 trainsWho is Connexxion?Dutch Market leader Passenger transportMember of Veolia-Transdev active over 27 countriesTurn over:1,1 billion EURO Employees:14.436Connexxion HQ HR HQAdmistrative siteNon-administrative siteThe HR document flowExample of document flow behind new hiring1 creation of contract and physical mailed to local manager 2Hand over to the new hired employee3Signed contract given back to manager4 posted back to HR5put the document in a box.The personal HR filesThe first digital babysteps The introduction of the digital HR fileWhat’s nextAcceptance of the manual process Based on results ofan audit.The creation of aproject and RFPNew RFP based onthe answers on thefirst RFPSecond RFPVery technical,nolonger in line withbusinessrequirementsWorkshop with allinvolved actors todefine final scopeThe ChallengeC OLLECT1.000 HR DOCUMENTS/DAY RECEIVED OVER MORE THAN150 SITES.•Convert paper documents to PDF/A•Convert electronic documents to PDF /A•Document type recognition•Metadata retrieval•Approval•Integration within AFAS ProfittHR Perspective•< 0.0001 % Document loss •Local end responsability •Optional HR Approval •Audit trail Business perspective•Maximum reduction of manual labour•Easy to handle (fool proof)•Guarantee confidentiality•Real Time•Easy(mobile) retrievalIT Perspective•Local deployment•Central management•Optimized bandwidth usage•Platform independent•Secure end to end•Usermanagement via ADThe metadata•Employee ID •Employee Name •Employee BSN •Dates•doument category •Document sub-category Validation against Connexxion HRDatabaseList of date formats (past–Future) IRISXtract Classification moduleInternal documents with a barcode.ClassificationDocuments with always the same layoutDocuments with an unknown layoutX-classify•Analyze samples on words and Graphicallayout•Create statistical Classification rulesCollect SamplesStart production•x% automation•Y% Manual Auto Learn Finetuning based on rulesDocument flowScan •Separation •Create Dig. file •Read Barcodes •Sign Recognition•Classification•IndexationValidation ApprovalHR ApprovalAFASPROFITICT DATACENTERHilversumOperational sitesHR administrationIRISPOWERSCAN IRISXTRACT VERIFYIRISXTRACTPrint screensPrintscreensGo to marketPreparation•Creation of user and support manual•Pilot case on2locations•Train students as train the trainer.•The trainers needed to work 1 week with thesolution in prod to get experience•Logistics•150 sites reduced to60•60new PC’s and scanners staged centrally by localIT•Students used to do the local installationUser onboarding•User manual•Training by students•Half day local support during start-up•During 2months dedicated helpdeskTo conclude✓0% document loss since prod.✓Time between received and processed from 1 week to < day ✓Total handling cost reduced with 60%✓Proven Confidentiality✓Documents available anytime anywhere✓No additional workload for IT to support✓Acceptable bandwidth usage through compression✓130 different document types classified automatically •tQuestions& Answers/webinarsThank you•R2。
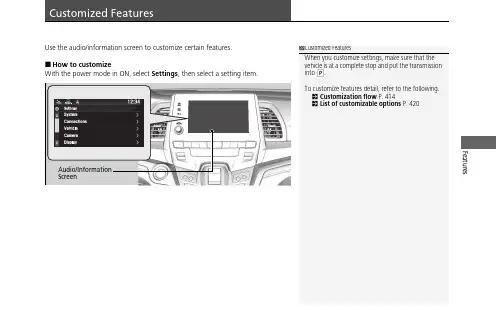
FeaturesUse the audio/information screen to customize certain features.■How to customizeWith the power mode in ON, select Settings , then select a setting item.1Customized FeaturesWhen you customize settings, make sure that the vehicle is at a complete stop and put the transmission into P .To customize features detail, refer to the following.2Customization flow P.4142List of customizable options P.420Audio/InformationScreenuu Customized Features uFeatures ■Customization flowSelect Settings.SystemSelect .Zone*Select Time FormatTouchSensitivitySubscriptionsLanguageFactory DataResetAboutSelect time zoneSystem SoundsSystem VolumesNavigation Guidance*uu Customized Features uFeaturesuu Customized Features u Featuresuu Customized Features uFeaturesuu Customized Features u Featuresuu Customized Features uFeaturesuu Customized Features uFeatures■List of customizable options*1:Default SettingSetup GroupCustomizable FeaturesDescriptionSelectable SettingsSystem Date & TimeSet Date & TimeAutomatic Date & Time Selects ON to have the GPS automatically adjust the clock. Select OFFto cancel this function.ON *1/OFFSet Date Adjusts date.2Adjusting the Clock P.144—Set Time Adjusts clock.2Adjusting the Clock P.144—Set Time ZoneAutomatic Time Zone *Sets the navigation system to automatically adjust the clock when driving through different time zones.ON *1/OFFSelect time zoneChanges the time zone manually.—Select Time FormatSelects the digital clock display from 12H to 24H.12H *1/24Huu Customized Features uFeatures*1:Default SettingSetup GroupCustomizable FeaturesDescriptionSelectable SettingsSystemSystem Volumes System Sounds Changes the system sounds volume.—Navigation Guidance *Changes the navigation guidance volume.—Touch Sensitivity Sets the sensitivity of the touch panel screen.High /Low *1SubscriptionsHondaLinkSubscription Status Lists subscriptions and subscription status for HondaLink ®.—LanguageChanges the display language.English (United States)*1/English (United Kingdom)/Korean /French /Spanish /Arabic Factory Data Reset Resets all the settings to their factory default.2Defaulting All the Settings P.431Continue /CancelAboutDisplays the Android setting items.—uu Customized Features uFeatures*1:Default SettingSetup GroupCustomizable FeaturesDescriptionSelectable SettingsSystemAdvanced OptionsApp Manager Displays the Android system memory and apps information.—Recent Location Request from AppsDisplays the recent location requests from apps.—Location SettingSelects OFF not to allow apps including thenavigation system * to access the vehicle’s location.ON *1/OFFInter-ruptionsInter-ruption Mode Sets the interruption mode for allowing to notify when calls and notifications arrive.Always interrupt *1/Don’t interrupt /Allow only priority interruptions Events and reminders Sets priority interruptions of events and reminders.ON *1/OFF Calls Sets priority interruptions of calls.ON /OFF *1Messages Sets priority interruptions of messages.ON /OFF *1Calls/messages fromSets priority interruptions of from who.Anyone *1/Contacts only /Starred contacts onlyuu Customized Features u Features*1:Default Setting SetupGroup Customizable Features Description Selectable SettingsConnec-tions Bluetooth +Connect New Device Pairs a new phone to HFL.2Phone Setup P.440—Saved Devices Connects, disconnects, or deletes a paired phone.2Phone Setup P.440—Wi-Fi Change Mode Changes the Wi-Fi work *1/HotSpot /OFFAvailable Networks /Devices Displays the available network(s) or currentconnected device(s).—Android Auto Sets up the Android Auto connection.—Apple CarPlay Sets up the Apple CarPlay connection.—CabinControl Options Cabin-Control Turns the Honda CabinControl function on and off.ON *1/OFFConnection Information Displays the Honda CabinControl connectioninformation.—(Device list)Selects functions or deletes a device.—uu Customized Features u Features *1:Default SettingSetup Group Customizable Features Description Selectable Settings Vehicle Driving Position Setup *Seat Position Movement at Entry/Exit Moves the seat rearward when you get in/get out of the vehicle. Changes the setting for this feature.ON *1/OFFMemory Position Link Turns the driving position memory system on and off.ON *1/OFF Meter Setup Adjust Outside Temp Display Adjusts the temperature reading by a few degrees.-5°F ~ ±0°F *1 ~ +5°F (U.S.)-3°C ~ ±0°C *1 ~ +3°C(Canada)Trip A Reset Timing Changes the setting of how to reset trip meter Aand average fuel economy A.With Refuel /IGNOff /ManuallyReset *1Trip B Reset Timing Changes the setting of how to reset trip meter Band average fuel economy B.With Refuel /IGNOff /ManuallyReset *1Reverse ShiftPosition Beep Turns the reverse alert tone on and off.ON *1/OFFAdjust Alarm Volume Changes the alarm volume, such as the buzzers,warnings, turn signal sound, and so on.High /Mid *1/Lowuu Customized Features u Features*1:Default SettingSetupGroup Customizable Features Description Selectable Settings Vehicle Meter Setup Turn by Turn Display Selects whether the turn-by-turn display comes on during the route guidance.ON *1/OFFFuel Efficiency BacklightTurns the ambient meter feature on and off.ON *1/OFFRear Seat Reminder Turns the Rear Seat Reminder feature on and off.ON *1/OFFPower Tailgate Setup *Power Tailgate Keyless Open Mode Changes the keyless setting for when the power tailgate opens.Anytime *1/WhenUnlockedPower Tailgate Open by Outer Handle Changes the setting to open power tailgate by tailgate outer handle.Off (Manual only)/On (Power/Manual)*1Hands Free Access Power Tailgate *Changes the setting to open power tailgate by aswift forward in and out kicking motion under the rear bumper.ON *1/OFFKeyless Access Setup Door Unlock Mode Changes which doors unlock when you grab the driver’s door handle.Driver Door orTailgate *1/All DoorsKeyless Access Light Flash Causes some exterior lights to flash when youunlock/lock the doors.ON *1/OFFKeyless Access Beep Causes the beeper to sound when you unlock/lockthe doors.ON *1/OFFuu Customized Features u Features *1:Default SettingSetup Group Customizable Features Description Selectable Settings Vehicle Keyless Access Setup Remote Start System On/Off Turns the remote engine start feature on and off.ON *1/OFFWalk Away AutoLock Changes the settings for the automatic locking the doors when you walk away from the vehicle while carrying the remote.Enable /Disable *1Driver Assist System Setup Forward Collision Warning Distance Changes at which distance CMBS TM alerts.Long /Normal *1/ShortACC Forward Vehicle Detect Beep Causes the system to beep when the systemdetects a vehicle, or when the vehicle goes out of the ACC with Low Speed Follow range.ON /OFF *1Road DepartureMitigation Setting Changes the setting for the road departure mitigation system.Normal *1/Wide /Warning Only /NarrowLane Keeping Assist Suspend Beep Causes the system to beep when the LKAS issuspended.ON /OFF *1Blind Spot Information Changes the setting for the blind spot information system.Audible and VisualAlert *1/Visual AlertTraffic Sign Recognition Selects whether the traffic sign icons come on thedriver information interface.ON *1/OFFuu Customized Features u Features*1:Default Setting SetupGroup Customizable Features Description Selectable Settings Vehicle Door Setup Auto Door Lock Changes the setting for the automatic locking feature.With VehicleSpeed *1/Shift from P/OFFAuto Door Unlock Changes the setting for when the doors unlock automatically.All Doors withDriver’s DoorOpens *1/All Doorswith Shift to P /AllDoors with IGN Off /OFFKey and Remote Unlock Mode Sets up either the driver’s door or all doors to unlock on the first push of the remote or built-inkey.Driver Door *1/AllDoorsKeyless Lock Answer Back LOCK/UNLOCK- The exterior lights flash.LOCK (2nd push)- The beeper sounds.ON *1/OFFSecurity Relock Timer Changes the time it takes for the doors to relockand the security system to set after you unlock the vehicle without opening any door.90 sec /60 sec /30sec *1Power Slide Door Keyless Open Mode Changes the keyless setting for when the power sliding door opens.Anytime *1/WhenUnlockeduu Customized Features u Features *1:Default SettingSetup Group Customizable Features Description Selectable Settings Vehicle Lighting Setup Interior Light Dimming Time Changes the length of time the interior lights stay on after you close the doors.60 sec /30 sec *1/15 secHeadlight Auto Off Timer Changes the length of time the exterior lights stay on after you close the driver’s door.60 sec /30 sec /15 sec *1/0 sec Auto Interior Illumination Sensitivity Changes the sensitivity of the brightness of the instrument panel when the headlight switch is in the AUTO position.Min /Low /Mid *1/High /MaxAuto Headlight On with Wiper On Changes the settings for the wiper operation whenthe headlights automatically come on while the headlight switch is in the AUTO position.ON *1/OFFAuto Light Sensitivity *Changes the timing for the headlights to come on.Max /High /Mid *1/Low /MinWirelessCharger *Turns the wireless charger feature on and off.ON *1/OFFMaintenance Information Oil Life Resets the engine oil life display when you haveperformed the maintenance service.—uu Customized Features u Features*1:Default Setting SetupGroup Customizable Features Description Selectable SettingsCamera Rear Camera Default Camera View Changes the camera view mode when the rearcamera monitor is turned on.2Multi-View Rear Camera P.580Last Used *1/NormalView /Wide ViewGuidelines Selects whether the guidelines come on the rearcamera monitor.2Multi-View Rear Camera P.580Dynamic /Fixed /Both *1/OFFCross Traffic Monitor Turns the cross traffic monitor on and off.ON *1/OFF Display Brightness Adjusts the settings of the audio/informationscreen.2Display Setup P.292ContrastBlack Leveluu Customized Features u Features *1:Default SettingSetup Group Customizable Features Description Selectable Settings Sound Bass / Treble Adjusts the settings of the audio speakers’ sound.2Adjusting the Sound P.291Center / Subwoofer Volume (Subwoofer Volume )Balance / FaderAudio Zones *Speed VolumeCompensationDTS NeuralSurround *Notifications Changes the notification settings for apps.—uu Customized Features u Defaulting All the Settings Features Defaulting All the SettingsReset all the menu and customized settings as the factory defaults.1.Select .2.Select Settings .3.Select System .4.SelectFactory Data Reset .uA confirmation message appears on thescreen.5.Select Continue to reset the settings.6.Select Continue again to reset the settings.u The system will reboot.1Defaulting All the Settings When you transfer the vehicle to a third party, reset all settings to default and delete all personal data.If you perform Factory Data Reset , it will reset the preinstalled apps to their factory default.If you perform Factory Data Reset , you cannot use the HondaLink ® because it becomes off line.2HondaLink ® P.324。
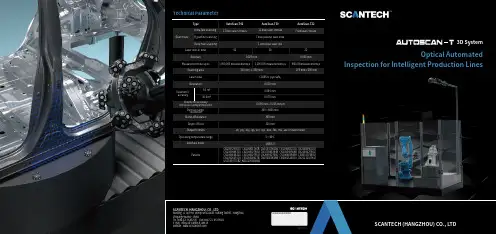
Optical AutomatedInspection for Intelligent Production LinesTechnical Parameter3D SystemTMTypeUltra-fast scanningLaser lines in totalAccuracyMeasurement rate up toScanning area 0.025 mm0.030 mm1,900,000 measurements/s1,200,000 measurements/s480,000measurements/s310 mm × 350 mm275 mm×250 mm1 extra blue laser line423022Deep hole scanning17 blue laser crosses11 blue laser crosses 7 red laser crosses AutoScan-T30AutoScan-T22AutoScan-T427 blue parallel laser linesHyperfine scanning0.020 mm Volumetric accuracy (With MSCAN-L15 photogrammetry system)Part size range(recommended)Stand-off distance Depth of fieldOutput formats Operating temperature rangeInterface modeUSB 3.0Patents Laser class Resolution9.1 m³16.6 m³0.064 mm 0.044 mm + 0.015 mm/mCLASSⅡ (eye-safe)0.078 mm200 ~ 6000 mm300 mm 320 mm.stl, .ply, .obj, .igs, wrl, .xyz, .dae, .fbx, .ma, .asc or customized5 ~ 40°CCN204329903U, CN104501740B, CN104165600B, CN204988183U, CN204854633U, CN204944431U, CN204902788U, CN105068384B, CN105049664B, CN204902784U, CN204963812U, CN204902785U, CN204902790U, CN106403845B, CN209197685U, CN209263911U, CN106500627B, CN106500628B, CN206132003U, CN211121096U, US10309770B2, KR102096806B1Volumetric accuracyScan modeSCANTECH (HANGZHOU) CO., L TDBuilding 12, No.998, Wenyi West Road, Yuhang District, Hangzhou, Zhejiang Province, ChinaTel: 0086-571-85852597 Fax: 0086-571-85370381E-mail:********************.cn Website : Authorized DistributorCopyright ©SCANTECH (HANGZHOU) CO., L TDBased on automatic optical tracking and seamlessly integrated into production line, it is designed for online batch inspection and enhances iterativeefficiency of the production process greatly.Work Seamlessly with Production LineConjunction with handheld 3D scanner, portable CMM, MSCAN photogrammetry system, rotary platforms, and guide rails, realize simultaneous optical tracking and scanning and personalizedsolutions.Multiple ConfigurationsWith adoptions of blue laser and synchronoustracking technologies, it reaches up to 1,900,000 measurements/s and accuracy of 0.025 mm. Efficient and flexible automated manufacturing can beachieved without being affected by external factors.Speed up Precise InspectionBeing insusceptible to temperature, vibration, dust, etc., the military-grade design presents superior adaptability in harsh industrial environment.Military-grade QualityDue to one-click start, offline programming and automatically generating inspection, it enables simple operation for users, regardless of their experience, to easily finish the measurement.Simple OperationAutoScan-T42 automated 3D system is a new upgrade for intelligent automatic inspection. It is specially designed for automated quality control in shop-floor conditions, facilitating enterprises to achieve the optimum matching between cost and efficiency.AutoScan-T42 conducts non-destructive scanning without attaching markers. Its seamless connection with production line greatly contributes to the reduction the workload. The military-grade manufacturing qualitypresents strong anti-interference and high adaptation to complex and harsh workshop environment. It can be extensively used in national defense, energy, 5G, mold manufacturing, etc., users can easily operate the system owing to one-click start, offline programming, and compatibility with 3D software.。
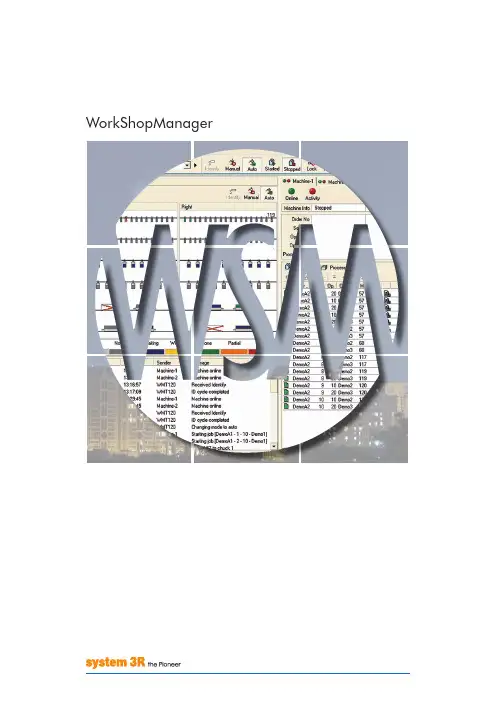
WorkShopManagerWorkShopManager offerS neW poSSibilitieSIt is generally thought that automated production is complicated to introduce and that it can only be appliedto long runs. The may be true when the robot grips the workpiece directly, but hardly when the workpiece is palletised.The handling units in System 3R’s automation programs are all intended to move pallets between a magazine and predefined chucks in one or more machines. When you work with pallets, the preparations are the same whether you are producing 100 different parts or 100 parts of the same type. When you have made the preparations for production in WorkShopManager, the operation of lifting the pallet into and out of the machine is not complicated at all. WorkShopManager has been developed …… to simplify the preparations for production in automatic cells… to maximise production capacity… to create the greatest possible flexibility… to ensure the security of the process. WorkShopManager is equally useful for manual loading of pallets in a single machine as for automatic production in a seven-axis linear robot cell, since this software grows with the task. Start with a single machine on the lowest level and then upgrade as your business develops.WorkShopManager SecureS the proceSSThe core of the system is a central database. All clients, machines and automation devices are in constant contact with the database.WorkShopManager links all machining processes together in a controllable and clearly-arranged production system. All machining data is available to the machines and can easily be transferred to the right machine at the right moment.User-friendly – necessary data are entered quickly and ina structured mannerQuick, precise overview of the entire process chainGreat flexibility – the order of priority can be changed at any timeSimpler, safer preparation of automatic cells. Information about workpieces, magazine positions, offset values and NC programs is always available.The risk of errors due to the human factor is minimised.Generates shorter lead timesGreater process securityOffers the possibility of automated one-piece productionJob status and machining times are recorded and stored in the database.Reports such as machining time per workpiece can be generated and transferred to a planning system.Alarm messages from machines and robots can be transferred via e-mail or SMS.All information about the machining is brought together in WorkCenter, which communicates with the database.In the database, a manufacturing order is created. This may contain:• an operation list• an NC program for the operation in question • documents linked to the operations • pallet identity • offset valuesWorkCenter does not produce its own data; it compiles information for every machining operation.The necessary information is fetched from the database and transferred to the machines.How the relevant order is executed depends on the type of cell…… manual creation of a batch with BatchBuilder, or … automatic execution with CellManager.A batch is a complete machining operation, containing several manufacturing orders with their magazine positions. This type of magazine loading can be regarded as static, since machining of the entire batch must be completed before changes can be made in the magazine.With CellManager, each individual job is startedaccording to a priority list. Here, you can change priorities and magazine content while the machine is working.EXECUTIONThe user-friendly procedure in WorkShopManager can be summarised in three stages: preparation, execution and monitoring.PREPARATIONSMONITORINGOrder creationIn WorkCenter, manufacturing orders can beorganised in accordance with the company’sstandard order structure.A manufacturing order covers one or moreidentical parts which may be located on one ormore pallets. The same pallet may also be carryingdifferent parts, each with its own manufacturingorder. This open structure offers great flexibilitywhen creating a manufacturing order.Article registerThe operation list can be saved as an article foruse if the part needs to be produced again. If anew order is created, based on an article, everymachining step and NC program will be present inthe new production order.Simpler and quickerReduces the risk of data entry errorsOption –planning system integrationWhen information is imported from ERP/MPS, amanufacturing order is created automatically.What then remains to be done is to place theworkpiece on its pallet, to identify it and to fetch anyoffset values from the measuring machine.Up-to-date machining information is fed back toERP/MPS for evaluation and post-calculation.IdentifyThe next step is to link the physical objects with their manufacturing orders.The object is mounted on a pallet with a code carrier which is recorded in the database.All information held in the database for that object can now be M integrationIf required, a measuring machine can be used before machining to determine offset values (X-Y -Z-C) for the workpiece on its pallet.The measurements are stored in a neutral format. They are then adapted and transferred to the machine tool.Reduces the risk of data entry errors Multi-pallet functionThere is no need to measure objects on multi-pallets. Every fixture on the pallet has a knownposition, and this automatically gives the objects the correct offset values.With this function, users can create their own multi-palletsEspecially suitable for milling applications Quality controlWhen the measuring machine has performed a geometrical inspection of the object and sent the status to the database, the object can be barred or released for further operations.Operation listsIn an operation list, the order of the variousmachining steps is defined. One operation must be complete before the next operation can start.DocumentsDocuments – machining instructions, reports,images, etc. – can be linked to every operation. This allows the operator to make use of the information directly at the machine.No searching for informationThe information is linked to the right machining operationIf the operation has been saved as an article, information from previous occasions will be available.Linked ordersFor an EDM operation, electrodes need to beproduced. Linking electrode manufacturing with the EDM operation minimises the risk of mistakes. As soon as the electrode blank has been identified on its holder, the electrode and the EDM operation are linked.The right electrode for the right EDM operation High process safety StatusThe status – waiting / machining / ready – of every object in the magazine is recorded in the database.cellManagerCellManager, which requires the pallets to have an identification system, manages the entire robot cell, handling all necessary data automatically. The cell is controlled entirely from the screen.• Starts the robot’s ID cycle.• Manages the pallet ID codes and magazine positions.• Displays the magazine content graphically.• Creates priority lists.• Automatically starts available jobs in the order of the priority list.• Updates the information in the database with the status and machining times of individual orders.Identification systemWhether you work with visual identification such as labels, or an electronic system with inductive readers and ID transponders, CellManager ensures the security of the process.Chaotic magazine loadingOn loading, the pallet is placed at the first available free magazine position.CellManager MultiManages a robot cell consisting of one robot and more than one machine, regardless of the type and make of the machines.Easy to change prioritiesThe order of priority of jobs can be changed while the machine is working.Easy to insert new jobsFinished workpieces can be lifted out of the magazine and new ones loaded into it, while the machine is working.Manually loaded machinesChaotic loading of a machine table with multiple chucks.After manual scanning of the machine table, a job list is created in CellManager. The jobs are then done in the sequence in the job list – one program at a time. The job sequence can be changed Automatic monitoringRobot-loaded machinesChaotic loading of the magazinesAfter automatic scanning of the magazine, a job list is created in CellManager.The jobs are then done in the sequence in the job list – one program at a time.The job sequence can be changed Automatic monitoringThe magazines can be lifted out and loaded while the machine is working.EXECUTION EXECUTION EXECUTION EXECUTION EXECUTIONEXECUTION EXECUTION EXECUTION EXECUTION EXECUTIONBatchBuilderBatchBuilder is a WorkCenter function for creating a complete machining operation – en batch – made up of several individual orders. You choose a number of orders and add magazine positions. The function then generates a main program with associated subprograms. The batch is transferred to the right machine and when the machine is started, the individual machining operations are executed – from the beginning to the end.Magazine positionsThe NC programs that were linked to the respective operation do not include the magazine positions. This information therefore must therefore beadded when the batch is created. This can be done manually or the information can be generated automatically.Simplified NC-programming.Loading listWhen the batch has been created, you can print out a loading list which describes the magazine positions of the objects.Less risk of loading at the wrong magazine positionTransfer of NC programsWhen creating the batch, you choose the machine or the cell that you want to perform the machining operation. The complete information is then transferred via the network. The magazines are loaded according to the loading list and the machining operation can start.Option – automatic electrode selection (AES)Automatically chooses the best electrode for the machining operation. Used to limit the number of electrodes when producing identical workpieces. However, for this function it is necessary to make an estimate of the electrode wear with coarse, intermediate and fine machining.You can, for instance, choose to “downgrade” the electrodes after the first bit. For the second bit you then use the first intermediate electrode for the coarse machining, the first fine electrode for the intermediate machining, and a new electrode for the fine machining.Option – cutting tool control (CTC)This function checks that all cutting tools that are needed for the milling operatins are available before machining starts.Option – RobotManagerOption for cells with industrial robot: CellManager handles communication between the various units of the cell, coordinates all activities, and monitors the status of every operation.MONITORING MONITORING MONITORING MONITORING MONITORINGCellManagerCellManager maintains constant contact with themachines and monitors what is happening in thecell.• When a machining operation starts and ends• What operation is being done• What object is in the machine• Messages coming from the maskinOption – AlarmServerAlarm messages from the machine and the robotcan be transferred via e-mail or SMS.WorkCenterAll information about the various operations issaved in the database. WorkCenter makes itpossible to use this information wherever youhappen to be.ReportingReports such as machining time per part can becreated and transferred to a production planningsystem (PPS).StatusWorkCenter keeps track of what is to be machined,and on which machine, as well as monitoring thestatus of jobs.Option –planning system integrationUp-to-date machining information can beautomatically fed back to ERP/MPS for evaluationand post-calculation.ModuleS in WorkShopManagerexaMpleS of applicationS1011baSic configurationSWorkShopManager is equally useful for manual loading of pallets in a single machine as forautomatic production in a seven-axis linear robotcell, since it grows with the task. Start with a single machine on the lowest level and then upgrade as your business develops.T -2219-E 08.05 S u b j e c t t o m o d i fi c a t i o n s • S y s t e m 3R , a m e m b e r o f t h e G e o r g F i s c h e r G r o u p .Combi, Delphin, Dynafix, Locx, LX, Macro, One Minute Set-Up, One System Partner, R2R, System 3R, VDP , WorkMaster, WorkPal, WorkPartner, WorkShopManager, 3HP , 3R, 3Ready-To-Run and 3Refix are registered trademarks of System 3R.EUROPESystem 3R Europe GmbH Wasserweg 19DE-64521, GROSS-GERAU tel +49 61 52 80 02 0fax +49 61 52 80 02 35**************************Chech Republic & SlovakiaSystem 3R Czech Tiskarska 10/257CZ-108 28 PRAHA 10tel +420 234 054 224fax +420 234 054 225**********************France & PortugalSystem 3R France56 Boulevard de Courcerin Les Espaces Multiservices 15F-77183 CROISSY BEAUBURG tel +33-01 60 95 90 80fax +33-01 60 37 88 16**************************Germany & BeNeLuxSystem 3R Deutschland Wasserweg 19DE-64521, GROSS-GERAU tel +49 61 52 80 02 0fax +49 61 52 80 02 35**************************Italy & SpainSystem 3R Italia Via Ponchielli, 2/4IT-20063 CERNUSCO SUL NAVIGLIO (MI)tel +39 02 92 38 821fax +39 02 92 11 23 19**************************ScandinaviaSystem 3R Nordic Sorterargatan 1SE-162 50 VÄLLINGBY tel +46-08 620 20 00fax +46-08 38 81 84**************************Järfälla Härdverkstad Elektronikhöjden 8SE-175 43 JÄRFÄLLA tel +46-08 580 125 50fax +46-08 580 126 55*****************Switzerland & AustriaSystem 3R Schweiz AG Wilerstrasse 98CH-9230 FLAWIL tel +41-071 394 13 50fax +41-071 394 13 60**************************Turkey & BulgariaSystem 3R TürkiyeAbdi Ipekci Cad. Ozel Idare Is Merk 150/209Bayrampasa 34030 ISTANBUL tel +90-212 613 8062-8063fax +90-212 613 8069******************************United KingdomSystem 3R UKRedvale House, New RoadPRINCES RISBOROUGH, Buckinghamshire HP27 0JN United Kingdom tel +44-01844 27 44 55fax +44-01844 34 88 00**************************ASIAFar East, China & IndiaSystem 3R Far East Pte.Ltd.6 Harper RoadLeong Huat Building, 01-01SINGAPORE SG-369 674tel +65-6289 4811fax +65-6289 3011**************************Shanghai Contact Office tel +86-21 6432 7927fax +86-21 6432 7928**************************Beijing Contact Office tel +86-10 8225 1632fax +86-10 8225 1635Guangdong Contact Office tel +86-769 8162 0628fax +86-769 8162 0638Malaysia Contact Office tel +60-03 7877 4785fax +60-03 7877 5948Taiwan Re gional Office tel +886-02 2278 3126fax +886-02 2278 3108Thailand Contact Office tel / fax +66-2 6422 764Japan & KoreaSystem 3R Japan CO., Ltd.Kaki Building2-5-22, Suido, Bunkyo-ku TOKYO JP-112-0005tel +81-03 5840-7383fax +81-03 5848-8723**************************Nagoya Regional Office tel +81-052 774 6250fax +81-052 774 6285Osaka Regional Office tel +81-06 6396 1500fax +81-06 6396 2855AMERICASystem 3R USA Inc.Headquarters & Technical Center 915 Busse RoadELK GROVE VILLAGE, US-IL 60007tel +1 847 439 4888fax +1 847 439 5099e-mail:********************Canada & Eastern MI116 Lynngate PlaceLondon Ontario Canada N6k 1S5Canadatel +1 519 870 8339, +1 248 320 1016 e-mail:***********************AZ, CA, CO, ID, MT, NM, NV, OR, TX, UT, WA, WY & Mexico1241 Celery LaneCorona, US-CA 91719Tel +1 909 226 1042e-mail:**********************1524 Valley Dr.Norco, US-CA 92860tel +1 714 299 4923e-mail:***************************IA, MN, ND, NE, SD & WI915 Busse RoadElk Grove Village, US-IL 60007tel +1 847 439 4888, +1 630 240 9825fax +1 847 439 5099e-mail:************************AR, IN, KY, OH & TN8466 Hill Pine CourtIndianapolis, US-IN 46227tel +1 317 215 4039, +1 317 694 7508fax +1 317 215 4041e-mail:*************************AL, FL, GA, LA, MS, NC & SC20934 Orchard Town nd O Lakes, US-FL 34638tel +1 813 326 0125e-mail:**************************IL, KS, MO, OK & Western MI915 Busse RoadElk Grove Village, US-IL 60007tel +1 847 439 4888, +1 630 240 9824fax +1 847 439 5099e-mail:******************************NJ, NY & PA67 Forest DrivePompton Plains, US-NJ 07444tel +1 201 248 3885e-mail:**************************CT, DC, DE, MA, MD, ME, NH, RI, VA, VT & WV915 Busse RoadElk Grove Village, US-IL 60007tel +1 847 439 4888, +1 201 214 7088fax +1 847 439 5099e-mail:************************System 3R International ABSorterargatan 1, SE-162 50 VÄLLINGBYtel+46-086202000,fax+46-087595234,e-mail:*****************,。
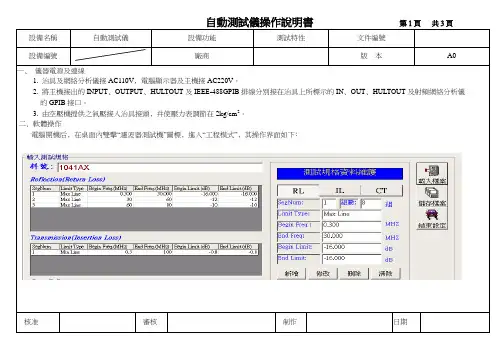
自動測試儀操作說明書第1頁共3頁設備名稱自動測試儀設備功能測試特性文件編號設備編號廠商版本A0一﹑儀器電源及連線1‧ 1. 治具及網絡分析儀接AC110V﹐電腦顯示器及主機接AC220V。
2‧ 2. 將主機接出的INPUT﹑OUTPUT﹑HULTOUT及IEEE-488GPIB排線分別接在治具上所標示的IN﹑OUT﹑HULTOUT及射頻網絡分析儀的的GPIB接口。
4‧ 3. 由空壓機提供之氣壓接入治具接頭﹐并使壓力表調節在2kg/cm2。
.二﹑軟體操作電腦開機后﹐在桌面內雙擊“濾波器測試機”圖標﹐進入“工程模式”﹐其操作界面如下﹕核准審核制作日期自動測試儀操作說明書第2頁共3頁設備名稱自動測試儀設備功能測試特性文件編號設備編號廠商版本1‧如果之前已有存檔﹐則不需輸入資料﹐點擊“載入檔案”,直接從檔案中調取資料。
2‧若沒有資料﹐則需輸入資料。
以40ST1041AX為例﹐介紹輸資料的方法如下﹕步驟一在“料號”欄中輸入40ST1041AX。
步驟二在“測試規格資料維護”欄中輸“RL”, “IL”的相關資料。
點擊“ RL”,則是選擇輸回饋損失值。
點擊“IL”﹐則是選擇輸插入損失值。
步驟三“ RL”的第一組資料如以上圖示﹐接下來輸第2組資料﹐在“SegNum”欄中輸數字2,并在“Begin Freq”欄中輸30﹐在“End Freq”欄中輸60﹐在“Begin Limit”欄中輸-12,在“End Limit”欄中輸-12﹐點擊“新增”,則第二組資料輸入完畢。
第三組資料可參照第二組的輸入方法。
步驟四“RL”的資料輸完后﹐接著輸IL的資料﹐IL與RL的資料輸入方法相同。
步驟五資料輸完后﹐點擊“儲存檔案”, 在彈出的菜單中輸入檔名40ST1041AX﹐選擇存檔類型為“.tsf”,然后確定﹐則存儲完成。
3.點擊“結束設定”﹐等5秒鐘后﹐回到測試狀態﹐其操作界面如下﹕核准審核制作日期自動測試儀操作說明書第3頁共3頁。

p R o d u c t o V e R V i e wA u t o M A t i o N2010Partner with Systematic Solutionst oolholding, workholding and Automationi ndustries. processes. Solutions.i ndustry SolutionsMachine- and PlantEngineeringAutomotiveF oundry and MetallurgyE lectronicsClocks, Watches andPartner with Systematic SolutionsGripping ModulesSCHUNK currently has the most comprehensive range of universal grippersand gripper modules for small components. Pneumatic or electric. Offering allf eatures from state-of-the-art materials and coatings employed as standard tointernal media feed-through. With our high level of technical expertise,SCHUNK sets the trend for cost-efficient handling in any industry, in any field.Rotary ModulesTechnology and functionality in the most compact form. SCHUNK’s range ofr otary modules represents the entire spectrum of compact turning and rotaryunits, s wivel heads and rotary fingers. In other words, it’s the ideal solution forhandling tasksLinear ModulesPrecision mini-slides, pneumatic linear modules, rigid gantry axes and axes withservo-electric linear drive – the SCHUNK product range offers linear technologyfor high-speed automated assembly. Compact and designed as a modularsystem.Robot AssessoiresRobot accessories from SCHUNK – the complete range of modules for perfecti nterplay between the robot arm and the tool. Suitable for all types of robot, itis also an ideal enhancement to flexible robot applications.Modular Assembly AutomationFlexible – fast – future-secure. This is the system GEMOTEC from SCHUNK.The comprehensive program of pneumatic and electric modules opens anu nforeseen variety of combination possibilities. All actuators are compatiblewith each other. Where other companies still have to conduct design work, thesystem GEMOTEC is already assembled. Fast and straightforward.Machine VisionIn automated assembly, image processing modules from SCHUNK represent theflexible solution for manifold sensor applications. All high-quality componentsare perfectly phased to each other. The necessary software for object andposition d etection stands for 100% process reliability.IP67 IP67Vacuum Gripper GSw-V cleaning unit RGG Gripper with Shank interface GSw G ripper Swivel ModulesS■ ■ ■ ■ S■ 3-Finger Centric GrippersVacu ■ clea ■ Grip ■M■■■■L inear ModulesL inear AxesM easuring.PEVMBS "TTFNCMZ 5FDIOPMPHZ.BDIJOF 7JTJPO)ZESBVMJD &YQBOTJPO 5FDIOPMPHZ 4QFDJBM 4PMVUJPOT )JHIMJHIUT /FX 1SPEVDUT4$)6/, (NC) $P ,(4QBOO VOE (SFJGUFDIOJL #BIOIPGTUS % -BVì FO /FDLBS 5PPMIPMEJOH BOE 8PSLIPMEJOH5PPMIPMEJOH 4ZTUFNT 4UBUJPOBSZ 8PSLIPMEJOH -BUIF $IVDLT $IVDL +BXT(SJQQJOH .PEVMFT 3PUBSZ .PEVMFT -JOFBS .PEVMFT 3PCPU "DDFTTPSJFT )JHIMJHIUT /FX 1SPEVDUT.PEVMBS "TTFNCMZ 5FDIOPMPHZ 1SPEVDU 0WFSWJFX.PEVMBS 3PCPUJDT *OEVTUSZ 4PMVUJPOT"VUPNBUJPO1SPEVDU 0WFSWJFX 1SPEVDU 0WFSWJFX.BHOFUJD $MBNQJOH 5FDIOPMPHZ 6OJWFSTBM 3PUBSZ "DUVBUPS 436 QMVT。

泛用自动化操作手册匯出日期:2023-05-10修改日期:2023-04-11••••••••••••••••••••••••••••••••••••••••••••目录前言画面/功能说明主画面介绍轴向模组—功能树状图机台座标画面说明座标显示F(进给率速率)S(主轴转速)加工时间工件数T(刀号)座标切换工件座标系载入机械座标工件座标增量程序编辑载入执行加工删除行图形辅助输入插入循环编辑循环档案编辑子功能搜寻搜寻下一个取代全部取代行数搜寻拷贝行插入行区域拷贝复制/贴上剪下复制贴上复原全选档案管理开启新档拷贝档案删除档案档案传输档案输入档案输出内容文件履历附录PDF•••••••••••••••••••••••••••••••••••••••••••••••••••加工监控画面说明机台监控区程序码监控区加工信息显示区加工设定显示区图形模拟区载入程序编辑加工信息/设定图形模拟显示MDI 输入加工记录表单操作系统状态未就绪就绪加工中暂停单节停止机台准备程序加工自动执行单节执行原点复归程序准备及执行加工指定加工档断点回归加工监控工件数量管理工件表单功能警报处理紧急停止警报显示现存警报历来警报警报汇出网路系统设定控制器端设定PC 端设定XP 系统设定VISTA 系统设定Win7系统设定简易系统诊断系统信息轴向信息环境设定操作模式设定系统时间设定系统字体大小系统资料备份查询版本信息••触控屏幕校正联系方式1.2.1 前言eHMC & FC 为新代针对自动化市场推出的控制器,自动化市场需求多样,经常需要客制专用画面满足机台需求。
eHMC & FC (以下称为自动化控制器)出厂提供【轴向模组】提供机械厂或电控人员二次客制的基础【电控模组】提供机械厂机台发生状况时诊断问题本操作手册针对【轴向模组】拥有的功能做说明,让机械厂或电控人员做二次开发时有基本认知。
2 画面/功能说明2.1 主画面介绍编号画面元件说明编号画面元件说明1日期8小键盘开启2时间9小键盘关闭3加工档及加工行号10上一页4状态11下一页5模式12警报6资料输入13功能键选择7提示2.2 轴向模组—功能树状图••••••••••以下将对轴向模组下的各功能进行说明。
PowerScan-Auto自动化 三维测量与检测系统
武汉惟景三维科技有限公司 目录 一 外观简介................................................................................................................ 1 1.1 机械手自动化总体预览: ........................................................................... 1 1.2 机械手自动化分项预览: ........................................................................... 1 二 机械手自动化仪器分项简介................................................................................ 2 2.1 扫描仪结构示意图 ....................................................................................... 2 2.2 扫描仪工作原理 ........................................................................................... 2 2.3 扫描设置简介 ............................................................................................... 3 三 系统操作步骤........................................................................................................ 4 3.1 扫描头操作................................................................................................... 4 3.1.1 扫描仪工作环境要求 ....................................................................... 4 3.1.2 配置要求 ........................................................................................... 4 3.1.3 硬件连接 ........................................................................................... 4 3.1.4 系统驱动和软件安装 ....................................................................... 5 3.1.5 开机 ................................................................................................... 6 3.1.6 标定系统 ........................................................................................... 7 3.2 机械手操作................................................................................................. 14 3.2.1 系统安装 ........................................................................................... 14 3.2.2 路径规划 ........................................................................................ 22 3.2.3 修改自动化程序代码 .................................................................... 22 3.2.4 自动化运行 .................................................................................... 23 3.3 quality软件操作 ......................................................................................... 24 3.3.1 采集点云数据 ................................................................................. 24 3.3.2 导入扫描数据 ................................................................................. 25 3.3.3 数据处理 ......................................................................................... 26 3.3.5 出具报告 ......................................................................................... 32 3.3.6 运行自动化 ..................................................................................... 33 四 注意事项.............................................................................................................. 41 4.1 使用注意事项 ............................................................................................. 41 4.2 设备注意事项 ............................................................................................. 41 4.3 安全警告 ..................................................................................................... 41 4.4 常见问题 ..................................................................................................... 41 1
一 外观简介 1.1 机械手自动化总体预览:
1.2 机械手自动化分项预览: 自动化扫描仪 ABB自动化机械臂
自动化机械臂 蓝光三维扫描仪 连接处
自动转台 2
二 机械手自动化仪器分项简介 2.1 扫描仪结构示意图
2.2 扫描仪工作原理 扫描时,光栅投影装置投影数副特定编码的结构光到待测物体,成一定夹角的两个摄像头同步采集相应的图像,然后对图像进行编码和相位计算,利用三角形扫描原理、匹配技术,算解出两个摄像头公共视区内像素点得到三维坐标。 自动化三维扫描与检测系统由于其自动化程度高,可针对不同外形的产品进行最优扫描路径规划,从而高效完成检测任务,整个过程无需人为干预。 使用的是武汉惟景三维科技有限公司所生产的PowerScan-Auto系列自化扫描测量与检测系统,设备由以下工业级机械臂与PowerScan-Pro1.3M扫描仪组成。 PowerScan-Pro1.3M扫描仪具体参数如下:
单幅测量范围(可调节) 摄像头分辨率(pixels) 测量点距(mm) 测量精度(mm) 单幅测量时间(S) 输出格式 3
200×150~400×300 131万 0.123~0.246 ±0.020 0.4 AC、ASC等标
准格式
2.3 扫描设置简介 (1)先检查电源和各种信号线有没有接上,再打开相应电源,最后打开本三维测量软件。 (2)点击 “三维测量”标签进入三维测量界面,如图
三维测量界面 工程设置:新建和保存工程。 视图设置: ●三维视图:使物体三维扫描数据窗口最大化; ●图像视图1:使相机1视图窗口最大化; ●图像视图2:使相机2视图窗口最大化; ●显示纹理:显示三维数据纹理; ●显示标记:在自动拼合过程中,显示扫描计算出的标志点。 系统标定:标定相机参数。 参数设置: ●系统设置:设置三维测量和自动拼合的参数 三维测量: ●图像预览:预览相机视图; ●三维测量:测量数据; ●确认当前数据:确认使用当前扫描所得数据进行自动拼合; ●撤销当前数据:取消使用当前扫描所得数据进行自动拼合。 投影仪设置: ●投影亮度: 设置投影亮度。