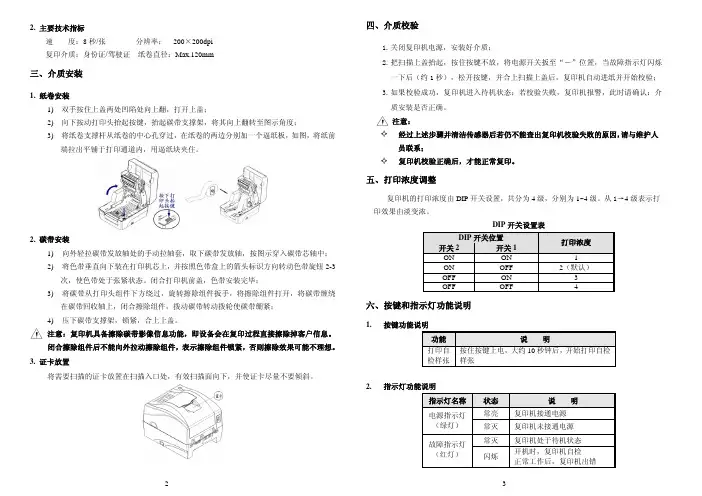
TC2008染色机控制电脑说明书
- 格式:pdf
- 大小:5.68 MB
- 文档页数:6

路遥知马力日久见“中成”EST─2008型内燃机测控系统使用说明书杭州中成测试设备有限公司太原市中成动力测试设备厂一、系统简介1.1系统的特点:在内燃机台架试验中,内燃机的负载调节和油门的调节,是整个台架试验的核心部分。
给予内燃机一个稳定的、按照试验要求所需的工况,是整个内燃机台架试验的基础。
试验中的所有数据,都是基于这个基础上获得、或在这个基础上获得进行比较的。
EST─2008型内燃机测试系统是“中成”根据多年来对内燃机台架试验不断地研究,根据“中成”EST—1型内燃机测试系统、EST—2型内燃机测试系统和EST─2002型内燃机测试系统近15年的使用经验和不断地改进完善的深切体会,以及与国内外数百家用户不断地交流经验,于2007年最新推出的用于EST—1型、EST—2型和EST—2002内燃机测试系统的更新换代的产品。
和以往的EST—1型、EST—2型和EST—2002型内燃机测试系统相比,EST─2008型内燃机测试系统具有以下特点:⑴采用最新的单片机作为采集和控制的核心,单片机自带高速12位A/D和D/A,因此大大减少了元器件的数量和电路板的尺寸,同时也大大提高了可靠性,并且使得维修变得很简单(只更换电路板而不在板上维修)。
⑵将控制核心和计算机结合在一起,取消了以往的仪表形式。
但:在试验室内部安排一个大屏幕的LED显示器(高度70mm的大尺寸数码管),显示转速、扭矩、功率和一个主要的温度参数。
⑶发动机负荷和油门双变量数字控制技术,可以在试验过程中在任何控制方式之间进行无扰动切换!⑷发动机的温度、压力参数,全部通过M系列内燃机参数测量模块测量,然后再通过RS485传送到计算机。
EST─2008型内燃机测控系统,与电涡流测功器及其它功能控制单元相匹配,能灵活地组成各种不同性能指标和使用目的的内燃机台架试验自动化系统,完全可以满足各种内燃机的台架试验要求。
EST─2008型内燃机测控系统采用测功器负载和油门双回路数字PID 控制技术,并且采用成熟可靠的元器件,以及通过长期试验考验和充分吸取用户意见的成熟软件,因此具有优异的控制特性、灵活的操作和很高的可靠性。


Pearl 2008Pearl Tigerፆүણ҂͘ΊEdited by Foxit Reader后面板的其它接口Qwerty(键盘接口):用于连接标准个人电脑的键盘。
可输入单步程序(memory),多步程序(chase) 和素材(palette) 的文本名称。
如果要使用键盘,应在开机前连接好。
VDU(外置显示器接口):连接外置的VGA 显示器。
所有符合VGA 标准的显示器都可用,640x480 的分辨率。
连接的VDU 显示器不能显示除控制台本身的显示之外的信息,但有些额外的显示信息可以利用,这对编程和操作复杂的演出非常有用。
Serial(串行接口):用于连接Stage Remote (舞台遥控器)或者graphics tablet模式选择转换器(Mode select keyswitch ) 设置控制台的操作模式。
Program (编程) 用于编辑演出程序,Run (运行) 用于运行演出程序,System (系统) 用于配置控制台。
预置推杆(Preset Faders ) 独立控制单通道常规灯(dimmer) 和电脑灯的光亮度。
推杆下面的2 个按键用于选择和点控灯具。
各个推杆和相应的按键被统称为“Handle”(手柄)。
总控推杆程序推杆和点控按键主显示屏控制转轮菜单软键灯具翻页按键数字键区和控制键灯具属性选择键命令按键多步程序号码和步号码多步程序进程栏转轮功能和数值Stage fixtures (舞台灯具):Stage Intensities (舞台亮度):按View (查看)键然后软键A 。
显示各个配灯推杆的光亮度(号码显示的是配灯推杆而非DMX 通道号码)。
预置推杆(Preset handles)模式转换器总控推杆程序翻页滚筒程序推杆和点控按键主显示屏控制转轮菜单软键灯具翻页按键数字键区和控制键灯具属性命令按键(相当于“shift”键) 再按下排的Swop键。
灯具翻页按键。
地址。
用户可以通过数字键区输入新的地址码。

目录一、功能特点 (1)二、主要技术指标 (2)三、结构及面板说明 (2)四、操作指南 (3)(一)接线 (3)(二)开机 (4)(三)设置 (4)(四)量程 (5)(五)测试 (6)(六)查阅 (7)五、测试仪记录波形叛读说明 (7)(一)测量记录过程的理想直流波形及测试规范 (7)(二)关于测试波形参数的说明 (8)(三)现场测试波形说明 (10)(四)根据标准分析测试波形,判断开关有何故障 (11)六、安全操作注意事项 (12)七、常见故障及解决方法 (13)八、随机附件 (13)九、附录打印机操作 (14)十、附录软件安装使用及SD卡使用说明 (15)BYKC-2008变压器有载开关测试仪说明书一、功能特点BYKC-2008型电力变压器有载开关智能测试仪,是用于测量和分析电力系统中电力变压器及特种变压器有载分接开关电气性能指标的综合测量仪器。
它采用微电脑控制,通过设计的精密测量电路,可实现对有载分接开关的过渡时间、过渡波形、过渡电阻、三相同期性等参数的精确测量。
用户可根据需要和现场条件,直接由分接开关引线进行测量,也可由变压器三相套管及中性点直接接线测量。
该仪器具有对所测数据进行显示、分析、存储、打印等功能。
解决了目前电力变压器有载分接开关测量方法落后,没有专用测试手段的问题。
可在电力设备预防性试验及变压器大修中及时诊断出有载分接开关的潜在故障,对提高电力系统运行的可靠性具有重要意义。
BYKC-2008型电力变压器有载开关智能测试仪具有以下几种特点:——高精度标准测量该仪器设计完全满足高电压测试设备通用技术条件DL/T846.8-2004的要求,采用高速数字信号处理器DSP和12位高分辨率A/D转换器,实现了高精度的标准测量。
——光线示波器功能仪器分三通道可同时记录A、B、C三相,仪器可自动捕捉和显示过渡过程中过渡电阻及时间跳变的过程。
能在复杂的环境下正常工作,在精度和智能化方面上远比光线示波器强。

D2008型电子称重仪表调试说明书2013年5月版宁波柯力传感科技股份有限公司仪表使用注意事项▲仪表电源接地线必须符合电气安全规定,接线盒、传感器的外壳必须接地良好。
▲数字传感器与仪表的连接必须可靠,数字传感器的屏蔽线必须可靠接地。
▲在仪表通电状态下,所有连接线不允许进行插拔,防止静电损坏仪表或传感器。
▲传感器和仪表都是静电敏感设备,在使用中必须切实采取防静电措施。
▲在雷雨季节,系统必须落实可靠的避雷措施,防止因雷击造成传感器和仪表的损坏,确保操作人员的人身安全和称重设备及相关设备的安全运行。
▲不得在有可燃性气体或可燃性蒸汽的场合使用,不得在有压力的罐装系统中使用。
▲仪表和传感器须远离强电场强磁场,远离强腐蚀性物体,远离易燃易爆物品。
▲严禁使用强溶剂(如:苯、硝基类油)清洗机壳。
▲不得将液体或其他导电颗粒注入仪表内,以防仪表损坏和触电。
▲本产品非经技术监督部门授权,不得擅自开启铅封,不破坏铅封不能标定。
◆为保证仪表显示清晰和使用寿命,仪表不宜放在阳光直射下使用,放置地点应较平整。
◆仪表不宜放在粉尘及振动严重的地方使用,避免在潮湿的环境中使用。
◆在插拔仪表与外部设备连接线前,必须先切断仪表及相应设备电源。
◆仪表对外接口须严格按使用说明书中所标注的方法使用,不得擅自更改连接。
◆本仪表属于精密测量仪器,为保证计量的准确性,未经授权不允许随意打开。
◆超过保修期以及人为故障或其他意外损坏,生产厂对仪表实行收费维修。
亲爱的用户,感谢您选择柯力公司的产品。
在使用仪表前,敬请仔细阅读说明书。
●使用前请仔细阅读本产品说明书●请妥善保管本产品说明书,以备查阅目录第一章技术参数................................................................................................................................错误!未定义书签。

目录一、性能简介 (03)二、使用说明 (04)2.1 按键功能 (04)2.2 主界面 (05)2.3 解锁上锁 (07)三、工艺管理 (08)3.1 工艺操作 (09)3.2 工艺编程 (09)3.3 “主”、“副”、“并”方式的作用 (09)3.3.1 主方式 (10)3.3.2 副方式 (10)3.3.3 并方式 (10)3.4各项功能简介 (11)四、运行工艺 (18)4.1 开始运行 (18)4.2 暂停跳步 (19)4.2.1暂停 (20)4.2.2 直跳运行 (20)4.2.3跳步运行 (20)4.2.4加入 (20)4.3 运行状态 (20)4.3.1开关输入状态 (21)4.3.2开关输出状态 (21)4.3.3模拟状态 (22)4.4 报警状态 (22)五、参数设置 (23)5.1普通参数 (23)5.1.1时间类 (23)5.1.2温度类 (24)5.1.3水位类 (25)5.1.4其它类 (25)5.2 系统参数 (27)5.3 输入输出配置 (29)5.3.1开关输入 (29)5.3.2开关输出 (29)5.3.3模拟输入 (30)5.3.4模拟输出 (31)5.4 密码修改 (31)5.5 日期时间设置 (31)5.6 校正设置 (32)六、历史记录 (32)6.1 运行记录 (32)6.2 报警记录 (33)七、其它功能 (34)八、HG-800X与PLC通讯协议 (35)7.1三菱FX系列(适用FX1N-FX2N) (35)7.2 LG–Master-K 系列(K10S1 除外) (35)一、性能简介HG-800X染色机控制电脑采用5.7寸(320X240象素)彩色/单色LCD显示,采用友好的人机界面,屏幕显示清晰度高, 屏幕宽大,一目了然。
该电脑为全自动控制电脑,可实现蒸纱过程自动化控制,是纺织行业提高纱线,面料质量,降低能源消耗,减轻劳动强度,提高经济效益的理想设备。


SW-LIFT-2008一体式控制器说明书(V2.00)1系统概述1.1 性能简介◆本系统适用于48层站及6m/s速度以内电梯控制;◆可选RS485或CAN两种串行通讯总线连接轿箱板及各层外呼板,16层站以上必须采用CAN通讯;◆主板含一路MODBUS协议的与变频器连接的RS485专用通讯接口,负责对变频器进行参数设定、运行监控及故障检查,使主板上操作界面实现一体式操作。
◆有多段速与模拟量两种速度指令方式可选,其中模拟量控制可实现直接停靠功能;◆轿顶板提供称重传感器接口,由主板模拟量输出端口提供变频器转矩偏置信号;◆两台梯主板可直接并联运行,群控则需增加并联控制板。
◆主板具有9路多功能输入点,11路多功能输出点,轿顶板与操纵箱板各具有4个多功能输入点,使电梯控制系统配置灵活;◆近50种故障检测,32条故障记录备查,记录信息包含故障发生所在楼层及发生时间;◆电梯控制各项功能齐备,完全符合GB7588-2003标准要求。
1.2 主板硬件构成主板选用美国微芯科技公司dsPIC30F高性能数字信号控制芯片,CPU内核、CAN模块、编码器接口、定时器、AD转换、DA转换(PWM)、UART异步通信、EEPROM、I/O端口等集成于芯片内,主板各个接口经过光藕、继电器或电平转换与芯片引脚连接,使主板元件减少,线路大为简化,相比多CPU或多分立外设系统具有更高的可靠性。
主板硬件接口配备:◆2路AC/DC110V光藕输入点,用于安全、门锁回路检测;◆26路DC24V光藕输入点,其中9路多功能输入点;◆16路继电器输出点,其中11路多功能输出点;◆2路CAN通讯口,用于本梯和并联通讯连接;◆2路RS485通讯口,用于本梯和变频器通讯连接;◆2路0~10V模拟量输出口,用于模拟量速度指令和轿箱称重信号输出;◆AB相高速计数接口,可选开路集电极信号或差分信号两种连接。
1.3 系统配置根据层站数目配置,以满足电梯控制要求为目的,适当选择配置各功能节点模块,达到优化结构降低成本的效果。
Installation of Windows Small Lab ManualInformation in this document is subject to change without notice. The example companies, organizations, products, people, and events depicted herein are fictitious. No association with any real company, organization, product, person or event is intended or should be inferred. Complying with all applicable copyright laws is the responsibility of the user. Without limiting the rights under copyright, no part of this document may be reproduced, stored in or introduced into a retrieval system, or transmitted in any form or by any means (electronic, mechanical, photocopying, recording, or otherwise), or for any purpose, without the express written permission of Microsoft Corporation. Microsoft may have patents, patent applications, trademarked, copyrights, or other intellectual property rights covering subject matter in this document. Except as expressly provided in any written license agreement from Microsoft, the furnishing of this document does not give you any license to these patents, trademarks, copyrights, or other intellectual property.Microsoft Corporation. All rights reserved.The example companies, organizations, products, domain names, e-mail addresses, logos, people, places, and events depicted herein are fictitious. No association with any real company, organization, product, domain name, e-mail address, logo, person, place, or event is intended or should be inferred.Microsoft, Hyper-V, OneCare, Windows, Windows Live, the Windows logo, and Windows Server are either registered trademarks or trademarks of Microsoft Corporation in the U.S.A. and/or other countries.Other product and company names herein may be the trademarks of their respective owners.Installation of Windows Small Business Server 2008Contoso, a small business of approximately 25 users/devices, is planning and executing their deployment of Windows ® Small Business Server (SBS) 2008. Like many organizations this size, Contoso works with a local value-added provider (VAP) to choose and deploy their server solution.Contoso has decided to make the switch from a peer-to-peer environment with no centralized file server. The new 64-bit server they ordered has just arrived, and it is time for Steve Masters, the IT administrator, to begin installation.This hands-on lab covers the pre-installation checklist, considerations for installation, and a step-by-step walkthrough of the installation process.One virtual machine (VM) is used in this lab: the Windows Small Business Server 2008 VM.ScenarioObjectivesArchitectureEstimated time to complete this lab: 2 hoursExercise 0:Lab Setup—Prepare the Lab EnvironmentOverviewIn this exercise, you will prepare the host server to run the lab.You need to be running Windows Server 2008 with the Hyper-V™role enabled. For information on getting started with Hyper-V, clickhere.↙Task 0: Download the SBS installation ISO image1.If the SBS installation ISO image did not come with this document,download it from /sbs/en/us/trial-software.aspx.2.Save the file to the SBS 2008 RTM Hands-On-Labs folder.↙Task 1: Add a Private virtual network to Hyper-V server3.On the host server, click Start >Administrative Tools > Hyper-V Manager.4.In the right column, click Virtual Network Manager.5.Select Private, and then click Add. the new virtual network SBS Network7.Ensure that Private is selected.8.Click OK.↙Task 2: Import virtual machines1.Under the right column, click Import Virtual Machine.2.Click Browse.3.Locate your SBS2008 HOL content folder.4.Double-click the SBS2008-Install folder.5.Select the SBS2008- Install folder, and then click Select Folder.6.Click Import.Exercise 1:Install the Windows Small Business Server 2008 Operating SystemOverviewThis section provides step-by-step instructions for installing Windows SmallBusiness Server 2008.Task 0: Prepare the virtual machines for this exercise1.From the Hyper-V Manager console, select SBS2008- Install and then clickSettings in the actions menu.2.Select DVD Drive in the left column.3.Select Image file: and then click Browse.4.Navigate to the SBS 2008 RTM Hands-On-Labs folder.5.Select the SBS installation DVD ISO image and then click Open.6.Click OK.7.Click Start in the right column.8.Click Connect in the right column. This brings up the console to the virtualmachine.Task 1: Begin operating system installation1.Leave defaults and click Next.Figure 1 Language selection page2.Click Install Now.Figure 2 Install now3.Leave the product key field blank.4.Clear Automatically activate Windows when I’m online,and then clickNext.Figure 3 Product key page5.On the Install Windows dialog, click No.Figure 4 Product key verification page6.Read the license terms. If you accept them, select the I accept the licenseterms check box, and then click Next.Figure 5 License terms pageNote:If you do not choose to accept the license terms, setup does not continue.7.Click Custom (advanced).Figure 6 Type of installation page8.Select the Disk 0location and then choose ‘Drive Options’ using TAB.Figure 7 Select Disk 0ing the ‘Drive Options’ selection – create a drive volume for both Disk 0and Disk 1 – APPLY to saveFigure 8 Select partition and create volume10.Choose the ‘FORMAT’ button to create volume on disk 1. Oncecompleted, proceed to install on DISK 0 - NEXTFigure 9 SelectImportant:You cannot change the partition that you install the operating system on after you finish this task.Task 2: Wait while setup installs the operating system1.Wait while setup proceeds. The time needed for this process variesdepending on your specific hardware. This task does not require any input from the user.Figure 10 Expanding files pageFigure 11 Windows restartingExercise 2:Configure the Operating SystemSetup prompts you to answer a few questions about your organization; it uses this information to configure the operating system.Task 1: Continue Installation1. On the Continue Installation page, click Next.Figure 12 Continue Installation pageOverview2.Verify clock and time zone settings, and then click Next.Figure 13 Clock and time zone settings page3. Click Do not get the most recent installation updates.Figure 14 Get important updates pageNote:In a real-world scenario, best practice would be to click Go online and get the most recent installation updates (recommended). Because of the network limitation in the lab, do not get updates.↙ Task 2: Enter Company Information1.On the Company information page, type in the following informationabout Contoso.Setup stores this information and uses it to configure the server tools, so that you do not have to supply the same information multiple times.Business name: ContosoStreet address 1: 123 Main StreetCity: YakimaState: WAZip/Postal Code: 17927Country/Region: United States2.Click Next.Figure 15 Company information page↙Task 3: Enter server and internal domain names1.On the Personalize your server and network page, type the followingname for your server in the Server Name text box.Server name: SERVERNote:The server name must be a unique name on your network.2.On the Internal Domain Name text box, type the following name for yourinternal domain name.A domain enables you to manage the access to resources on your network(for example, user accounts, client computers, shared folders, or printers).Setup provides default settings for your internal domain, separating your local (internal) network from the Internet (external network).Internal domain name CONTOSONote:You cannot change the server name or the internal domain name after you finish this task.3.Click Next.Figure 16 Server and domain names pageTask 4: Add a Network Administrator Account1.On the Add a network administrator account page, type the informationfor a new administrator account. This cannot be the same as the built-in Administrator account.First name: RolandLast name: WinklerAdministrator user name: RolandWAdministrator password: pass@word1Confirm administrator password: pass@word1Note:Specify a strong password for the Network Administrator account. A strong password is between 6 and 127 characters long, and it uses uppercase letters, lowercase letters, numbers, and symbols such as *, ?, and $.2.Click Next.Figure 17 Add a network administrator account pageTask 5: Finishing up1.Review the settings, and then click Next.Figure 18 Summary page2.The Expanding and installing files page displays the progress of the finalinstallation process.3.When Windows Small Business Server 2008 setup finishes, the serverrestarts one more time.Figure 19 Expanding and installing files pageNote:After installation completes, you are automatically logged on to the new administrator account. The built-in administrator account password is then set to the same password as the new administrator account that was added during installation, and then the built-in administrator account is disabled.Exercise 3:Getting Started TasksIn this next exercise, you perform post-installation tasks to configure your server. After the server restarts, the Successful Installation window appears. Continue to the Windows SBS Console to walk through the tasks listed in the Getting Started Tasks list.Task 1: Connect to the Internet1. Log on as CONTOSO\RolandW , using the password pass@word1.2. Click Start using the server .Figure 20 Successful installation pageOverview3.If prompted to activate Windows Live™ OneCare™, close message.4.In the Getting Started Tasks section, click Using the Windows SBSconsole.Figure 21 Windows SBS 2008 Console5.From here you can review help for Windows Small Business Server 2008.Figure 22 Windows SBS 2008 Help6.Close the help window.7.In the Getting Started Tasks section, click Connect to the Internet.8.On the Before you begin page, click Next.Figure 23 Before you begin page9.Windows attempts to detect an existing network at this point.Figure 24 Router IP address page10.At the Connect to the Internet prompt, click Yes.Figure 25 Connect to the Internet prompt11.Type 192.168.0.1 for the IP address of your router.12.Type 192.168.0.2 for the IP address of your server, and then click Next.13.On the Detecting the router and configuring your network page, clickNext.Figure 26 Detecting the router and configuring your network page14.On the Prepare to configure your router page, click Next.Figure 27 Prepare to configure your router page15.On the Configure your router page, click Test.Figure 28 Configure your router page16.Click Skip test.Figure 29 Skip test17.Click Finish.Figure 30 Your network is now connected to the Internet! pageTask 2: Set up your Internet address1.In the Getting Started Tasks section, click Set up your Internet address.2.On the Before you begin page, click Next.Figure 31 Before you begin3.Select I already have a domain name that I want to use and click Next.Figure 32 Do you want to register a new domain name? page4.Select I want manage the domain name myself,and then click Next.Figure 33 How do you want to manage your domain name? page5.Type and click Configure.Figure 34 Store your domain name information page6.Your server is now be configured for the domain.Figure 35 Configuring your server page7.Click Finish.Figure 36 Configuration completeTask 3: Configure a Smart Host for Internet e-mail1.In the Getting Started Tasks section, click Configure a Smart Host forInternet e-mail.Figure 37 Windows SBS 2008 Console2.On the Before you begin page, click Next.Figure 38 Before you begin page3.Here you can configure a Smart Host server that may be provided by yourISP. Because of network limitations, you cannot set up a smart host at this time.4.Select I do not need to configure a Smart Host server for Internet e-mail,and then click Next.Figure 39 Specify settings for outbound Internet mail page5.On the Configure Internet mail settings is complete page, click Finish.Figure 40 Configure Internet mail settings is complete pageTask 4: Add a trusted certificate1.In the Getting Started Tasks section, click Add a trusted certificate.Figure 41 Getting Started Tasks section2.On the Before you begin page, click Next.Figure 42 Before you begin page3.Select I want to use a certificate that is already installed on the serverand click Next.Figure 43 Get the certificateNote:If you prefer to purchase a certificate from a trusted certificate authority, you can select to do so at this point4.Select and click View certificate.Figure 44 Choose an installed certificate page5.Review the certificate properties, and then click OK.Figure 45 Certificate properties6.Click Next.7.Click Finish.Figure 46 The trusted certificate is imported successfully pageTask 5: Configure backup and storage1.In the Getting Started Tasks section, click Configure server backup.Figure 47 Configure server backup2.In the Getting started window, click Next.Figure 48 Getting started page3.Select Show all valid internal and external backup destinations.4.Select Disk [1], and then click Next.Figure 49 Specify the backup destination page5.Leave Disk1 label, and then click Next.Figure 50 Label the destination drives page6.On the Select drives to back up window, leave defaults, and then clickNext.Figure 51 Select drives to back up page7.Review backup schedule, and then click Next.Figure 52 Specify the backup schedule page8.Review backup details, and then click Configure.Figure 53 Confirm backup details page9.When prompted to format the selected drives, click Yes.Figure 54 Format drive prompt10.On the Server backup configured page, click Finish.Figure 55 - Server backup configured pageTask 6: Add a new user1.In the Getting Started Tasks section, click Add a new user account.Figure 56 Windows SBS 2008 Console2.On the Add a new user account and assign a user role page, enter thefollowing information, and then click Next.First name: DebraLast name: GarciaUser name: DebraGE-mail address: DebraGDescription: SalesPhone number: 555-555-5555Choose a user role: Standard UserFigure 57 Add a new user account and assign a user role page3.On the Create a password for accessing your network page, enter thefollowing information, and then click Add user account.Password: pass@word1Confirm password: pass@word1Figure 58 Add user account page4.Click Add a new computer for Don.Figure 59 User account added to network5.On the Add user accounts before connecting computers to your networkpage, click Next.Figure 60 Add user accounts before connecting computers to your network page 6.On the Run the Connect Computer program page, click Access theprogram through a Web browser (recommended).Figure 61 Run the Connect Computer program page7.On the Run the Connect Computer program through a Web browser page,note the Internet address to use to connect to domain: http://connect.Figure 62 http://connect/8.Click Finish.9.Click Finish.Task 7: Set up your Microsoft Office Live Small Business account1.Click the Home tab.2.On the Getting Started Tasks, click Set up your Microsoft Office Live SmallBusiness account.Figure 63 Windows SBS 2008 ConsoleNote:If you do not have an Internet connection, skip this exercise. You can review the remaining steps to see the steps of the process.3.On the Getting Started page, click Next.Figure 64 Getting Started page4.Click Sign up for a new Office Live Small Business account.Note:If you do not have an Internet connection, click Cancel to exit the wizard.You can review the remaining steps to see the steps of the process.Figure 65 Choose a setup option page5. A Web browser opens; click Sign Up FreeFigure 66 Sign Up Free6.Click Sign in.Figure 67 Create a Windows Live ID or Sign in7.Sign in with your Windows Live ID.Figure 68 Sign in8.Enter your information and click Save and continue.9.Click Go to my account.Figure 69 Sign up complete10.You are now signed up for Microsoft Office Live. Navigate around youraccount to familiarize yourself with the service.End of Lab。
SM-2008数字电视场强仪使用手册金赛讯(天津电子技术有限公司Jinsaixun(Tianjinelectronics technology co., ltd 第一次使用本产品的用户请仔细阅读本使用手册。
如有何需要,请向生产商查询。
SM-2008数字电视场强仪使用手册目录一、SM-2008数字电视场强仪概述∙∙∙∙∙∙∙∙∙∙∙∙∙∙∙∙∙∙∙∙∙∙∙∙∙∙∙∙∙∙∙∙∙∙∙∙∙∙∙3二、面板功能∙∙∙∙∙∙∙∙∙∙∙∙∙∙∙∙∙∙∙∙∙∙∙∙∙∙∙∙∙∙∙∙∙∙∙∙∙∙∙∙∙∙∙∙∙∙∙∙∙∙∙∙∙∙∙∙∙∙∙∙∙∙∙∙∙∙∙∙∙∙∙∙∙∙∙∙∙∙∙∙∙∙∙∙∙4三、详细操作指南∙∙∙∙∙∙∙∙∙∙∙∙∙∙∙∙∙∙∙∙∙∙∙∙∙∙∙∙∙∙∙∙∙∙∙∙∙∙∙∙∙∙∙∙∙∙∙∙∙∙∙∙∙∙∙∙∙∙∙∙∙∙∙∙∙∙∙∙∙∙∙∙∙∙∙∙∙71、开机∙∙∙∙∙∙∙∙∙∙∙∙∙∙∙∙∙∙∙∙∙∙∙∙∙∙∙∙∙∙∙∙∙∙∙∙∙∙∙∙∙∙∙∙∙∙∙∙∙∙∙∙∙∙∙∙∙∙∙∙∙∙∙∙∙∙∙∙∙∙∙∙∙∙∙∙∙∙∙∙∙∙∙∙∙∙∙∙∙∙∙∙∙72、频道测量功能∙∙∙∙∙∙∙∙∙∙∙∙∙∙∙∙∙∙∙∙∙∙∙∙∙∙∙∙∙∙∙∙∙∙∙∙∙∙∙∙∙∙∙∙∙∙∙∙∙∙∙∙∙∙∙∙∙∙∙∙∙∙∙∙∙∙∙∙∙∙∙∙∙∙∙∙∙73、QAM测量功能∙∙∙∙∙∙∙∙∙∙∙∙∙∙∙∙∙∙∙∙∙∙∙∙∙∙∙∙∙∙∙∙∙∙∙∙∙∙∙∙∙∙∙∙∙∙∙∙∙∙∙∙∙∙∙∙∙∙∙∙∙∙∙∙∙∙∙∙∙∙∙∙∙∙∙114、斜率测量功能∙∙∙∙∙∙∙∙∙∙∙∙∙∙∙∙∙∙∙∙∙∙∙∙∙∙∙∙∙∙∙∙∙∙∙∙∙∙∙∙∙∙∙∙∙∙∙∙∙∙∙∙∙∙∙∙∙∙∙∙∙∙∙∙∙∙∙∙∙∙∙∙∙∙∙∙∙125、频道扫描功能∙∙∙∙∙∙∙∙∙∙∙∙∙∙∙∙∙∙∙∙∙∙∙∙∙∙∙∙∙∙∙∙∙∙∙∙∙∙∙∙∙∙∙∙∙∙∙∙∙∙∙∙∙∙∙∙∙∙∙∙∙∙∙∙∙∙∙∙∙∙∙∙∙126、频谱分析功能∙∙∙∙∙∙∙∙∙∙∙∙∙∙∙∙∙∙∙∙∙∙∙∙∙∙∙∙∙∙∙∙∙∙∙∙∙∙∙∙∙∙∙∙∙∙∙∙∙∙∙∙∙∙∙∙∙∙∙∙∙∙∙∙∙∙∙∙∙∙∙∙∙∙∙147、载噪比测量功能∙∙∙∙∙∙∙∙∙∙∙∙∙∙∙∙∙∙∙∙∙∙∙∙∙∙∙∙∙∙∙∙∙∙∙∙∙∙∙∙∙∙∙∙∙∙∙∙∙∙∙∙∙∙∙∙∙∙∙∙∙∙∙∙∙∙∙∙∙∙∙168、干线电压测量功能∙∙∙∙∙∙∙∙∙∙∙∙∙∙∙∙∙∙∙∙∙∙∙∙∙∙∙∙∙∙∙∙∙∙∙∙∙∙∙∙∙∙∙∙∙∙∙∙∙∙∙∙∙∙∙∙∙∙∙∙∙∙∙∙∙∙∙179、仪器设置功能∙∙∙∙∙∙∙∙∙∙∙∙∙∙∙∙∙∙∙∙∙∙∙∙∙∙∙∙∙∙∙∙∙∙∙∙∙∙∙∙∙∙∙∙∙∙∙∙∙∙∙∙∙∙∙∙∙∙∙∙∙∙∙∙∙∙∙∙∙∙∙∙∙17四、仪器供电电源∙∙∙∙∙∙∙∙∙∙∙∙∙∙∙∙∙∙∙∙∙∙∙∙∙∙∙∙∙∙∙∙∙∙∙∙∙∙∙∙∙∙∙∙∙∙∙∙∙∙∙∙∙∙∙∙∙∙∙∙∙∙∙∙∙∙∙∙∙∙∙∙∙∙∙33五、技术资料∙∙∙∙∙∙∙∙∙∙∙∙∙∙∙∙∙∙∙∙∙∙∙∙∙∙∙∙∙∙∙∙∙∙∙∙∙∙∙∙∙∙∙∙∙∙∙∙∙∙∙∙∙∙∙∙∙∙∙∙∙∙∙∙∙∙∙∙∙∙∙∙∙∙∙∙∙∙∙∙∙∙∙34SM-2008数字电视场强仪使用手册一、SM-2008数字电视场强仪概述该产品是我公司最新研发的用于有线电视数字网改造的测量仪器。
目录目录第一部分概述 (1)1.1 注意事项 (1)1.2 功能简介 (4)1.3 性能指标 (6)第二部分电控部件及图符界面介绍 (8)2.1 显示界面及电脑操作箱面板 (8)2.2 按键及功能简介 (11)2.3 电源开关和插座 (14)2.4 拉杆和点动开关 (15)2.5 针位指示 (15)2.6 USB接口 (15)2.7 机头控制开关和断线指示灯 (16)2.8 刺绣前的准备 (16)2.9 图符说明 (16)第三部分怎样开始简单刺绣 (17)3.1 如何进行第一次刺绣 (17)3.2 刺绣前的准备 (17)3.3 选择内存花样及刺绣确定 (17)3.4 拉杆刺绣 (18)第四部分怎样输入花样 (20)4.1 从花样管理菜单下操作 (20)4.2 从磁盘管理菜单下操作 (21)第五部分怎样选择花样进行刺绣 (22)5.1 选择刺绣花样 (22)5.2 花样变换的设定 (23)5.3 设置自动换色顺序 (25)第六部分怎样设定花样的起绣点 (29)第七部分怎样检查花样的刺绣范围 (30)目录第八部分怎样快速定位到花样的某一针 (31)第九部分有关换色的操作 (33)9.1 手动换色 (33)9.2 设置手动换色手动启动 (33)9.3 设置自动换色手动启动 (33)9.4 设置自动换色自动启动 (34)9.5 设置自动换色顺序 (34)第十部分剪线的操作 (35)10.1 手动剪线(备注:不剪线的控制系统无此功能) (35)10.2 自动剪线 (35)第十一部分升降速度的操作 (36)第十二部分点动回零位(100°) (37)第十三部分有关移动绣框的操作 (38)13.1 手动移框 (38)13.2 移框回停机点 (38)13.3 恢复花样原点 (38)13.4 记忆花样原点 (39)第十四部分怎样对花样开位 (40)14.1 边框刺绣的操作 (40)14.2 绣开位线的操作 (41)第十五部分怎样进行匹绣、贴布绣及循环绣 (42)15.1 匹绣的操作 (42)15.2 贴布绣的操作 (42)15.3 循环绣的操作 (45)第十六部分有关补绣的操作 (46)16.1 拉杆退针 (46)16.2 定位退针 (47)第十七部分花样管理 (48)17.1 选择刺绣花样 (48)17.2 显示内存花样 (49)17.3 磁盘花样输入到内存 (50)17.4 花样复制 (50)目录17.5 花样编辑 (51)17.6 删除花样 (54)17.7 花样分割 (54)17.8 花样合并 (56)17.9 编辑组合花样 (57)17.10 总清花样 (58)第十八部分磁盘管理 (60)18.1 U盘花样输入到内存 (60)18.2内存花样输出到U盘 (61)18.3 U盘花样删除 (61)第十九部分辅助管理 (62)19.1 设定放大、旋转及反复 (62)19.2 定位空走 (62)19.3 花样周边操作 (62)19.4 另外起点设置 (64)19.5 掉电保护恢复 (65)19.6 语言切换 (65)19.7参数管理 (65)19.8生产统计 (70)19.9 设置循环绣开或关 (70)19.10 设置是否所有机头补绣 (70)19.11 移框生成花样 (71)19.12 生成高速花样 (72)19.13 从刺绣参数生成基本花样 (73)19.14 花样滤除小针步 (73)19.15 普通花样产生轮廓花样 (73)19.16 编辑金片花样 (74)19.17 花样平包针补偿 (75)19.18 密码管理 (76)19.19 机器自检 (77)19.20 编码器自检 (77)目录19.21 主轴转速自检 (77)19.22 机器部件测试 (78)19.23 花样增加贴布绣功能 (79)19.24 转动主轴从100度到一定角度 (79)19.25 选择花样显示颜色 (79)19.26 系统时间 (80)19.27 显示或隐藏总针数 (81)19.28 开机界面设定 (82)19.29 系统升级 (82)19.30 版本信息 (83)第二十部分金片绣的操作 (85)20.1 金片绣简介 (85)20.2 金片绣刺绣的绣作步骤 (85)20.3 单针多片金片绣的刺绣 (85)20.4 手动出片测试 (86)第二十一部分缠绕绣、盘带绣、锯齿绣的操作使用 (88)21.1 功能介绍 (88)21.2主要技术指标 (88)21.3 特种绣绣作步骤 (89)21.4 特种绣的一些相关操作 (89)第二十二部分统计数据 (92)22.1 时间统计 (92)22.2 工作统计 (92)22.3 断线统计 (93)22.4 机器故障统计 (94)第二十三部分附录 (96)参数一览表 (96)错误显示及简单排除方法一览表 (100)第一部分 概述第一部分概述欢迎您使用本公司生产的电脑刺绣机控制系统。
维护红宝书:大趋势2008应用程序安装配置说明1.安装模式大趋势2008有两种安装模式:U盘模式(NPC)和无盘模式(NODISK),而无盘模式又可细分为三类:无hqboost模式、hqboost模式和Hostl模式。
下面将对这几种安装模式进行详细的介绍,并一一列出其优缺点。
营业部可以根据自己的要求选择适合的模式。
1.1U盘版模式U盘版分为个人版和营业部版两种。
U盘版介绍详见其它红宝书文档。
优点:缺点:当U盘需要更换时,用户个人数据转到新盘上将会带来不便。
由于U盘无法存储大量的历史数据,所以大趋势2008不开放某些特色的分析。
1.2 无盘模式(NODISK)无盘模式顾名思义,客户端不需要安装硬盘,所有数据将从服务器上读取。
要了解无盘模式的运作首先要了解hqboost这个程序的作用。
1.2.1 hqboost简要介绍1.2.1.1 hqboost的功能1)获取行情并在局域网内广播如果有局域网内运行有这个模块,需要将vip2000客户端设置为从客户端方式2)可自动维护日线数据3)提供管理功能如果打开管理功能(HasHost),通过工具程序可以动态发布营业部自制的资讯,用户分组信息,营业部信息和跑马灯信息和分组用户管理。
4)可以自动下载分析所需数据(比如关联品种,股改数据等),并可以进行解压5)支持自动备份(每周在星期二和星期五收盘后将用户数据备份)6)支持自动同步(如果有多个Hqboost,它们之间可以实现用户数据的即时同步)1.2.1.2 hqboost的使用运行方式:服务器后台方式 ./ hqboost/tdx/hqboost/hqboost daemonhqboost运行将下载全部日线以供分析使用(第一次可能需花几分钟),它将维护的数据放在hqboost.ini中DataPath所指定的位置(hqboost连接的行情主站必须是4.58以上版本才行,否则连接不上主站),以后它将自动更新。
有了hqboost提供的历史日K线数据,客户端将开放所有的特色分析功能,由于日K线数据在本地局域网,所以数据的读取非常快。
ehp2008 称重控制仪说明书使用本仪表钱前认真阅读本说明书a:仪表电源进线必须接触良好,不允许出现:手超生锈,接触不好现象。
b:仪表器、通讯、及速度信号等弱电线缆不可与强电电缆同走一个电缆沟。
c:仪表控制柜接地线必须单独接大地。
d:传感器屏蔽接地线必须单独接大地。
仪表控制柜接地传感器屏蔽线接地和强电电气接地。
不能共用一个接地。
e:变频器控制柜必须接大地。
f:变频器控制的电机必须接大地。
g:仪表供电电源严禁与大功率火气大png频繁的电器共相。
本说明说如另有变动,恕不另行通知表一显示参数一级修改参数Y03给定值<10000KG/分默认值200 K值XXXXX.XXY04预控值1<255默认值100给定值<10000KG/分Y05零点<65535默认值200速度值<30000 Y06 p值<100默认值.20给定AD 0--65536 Y07 I值<255默认值10控制量I<255Y08预控值2<255默认值50 AD值<255Y09上线零点<255默认值5零点<30000总产量XXXXXX.XX吨每米科重<99KG/M速度值2<3000日期及时间二级修改参数E00 K值xxxx.xx默认值500.00E01周期<999秒默认值60E02校零时间<999秒默认值60E03失控停机时间<255秒默认值0E04自动校零时间<255秒默认值0E05停机延迟时间<255秒默认值0E06启动时间<255秒默认值0E07标定时间<999秒默认值60E08启动是否校零0,校零,1不校零默认值1E09称体选择0,1,2,3,分别对应恒速,调速默认值0E10启动选择0,本机;1,远程1;2,远程2默认值0 E11给定选择0,本机;1,远程;2,485默认值0E12程控放大倍数0,1,2分别对应1倍2倍4倍默认值0 E13计量单位选择1,KG;0,吨默认值1E14波特率0,1,2,3,E15停机是否累计0不累计;1累计E16速度零点0-255E17标定砝码重量<10000KGE18日期年,月,日E19时间时,分,秒E20远程给定输入量最大值<10000KG/分默认值500KG E21远程流量输出量最大值<10000KG/分默认值500KG E22远程给定上限10-20mA对应65536默认值12228 E23远程给定下限0—4mA对应0-xxxxx默认值2278。