摄像机跟踪规则
- 格式:doc
- 大小:937.31 KB
- 文档页数:29
BOSCH数字会议DCN-CCU摄像自动跟踪调试步骤------谢勇注意:第1部分是安装完所有摄像头后的硬件操作基本设置。
第2部分以后是全新的进行摄像跟踪的调试。
1、安装软件前,先对多只摄像头进行地址设定:Camera1使用,作为全景拍摄,不能作为联动.联动是从Camera2设置(矩阵后面的摄像机输入和控制输入都从第二口接,第一口接Camera1做全景用,如果没有全景摄像机就不要接第一口).连接完毕通电,即可控制球,此时是球机一起旋转,需要对每个摄像头分配地址码,具体如下:通过键盘将对应的摄像机图象调出,在键盘上按ON、999、ENTER,此时屏幕应该显示一些字符,如ON、XXX、ENTER,跟住屏幕英文提示操作即可(它怎么提示,怎么设即可,不必做任何改动),然后再在控制键盘上切换另一摄像头,再按ON、999、ENTER依次对全部球分配地址。
2、连接笔记本的串口1和DCN_CCU主机的串口1(连线如图2,----9芯直通线)(调完后是矩阵的com1接主机的com2!!!!)。
笔记本的com2连接矩阵切换器的com口。
连接方式如图3。
注意:笔记本的COM1的波特率要改成19200.3、在笔记本中安装光盘中的DCN_NG_DLT软件;(最好默认路径和默认选项进行安装),语言可以选择简体中文。
4、按软件提示执行每一项步骤,(通过串口向CCU主机上传程序)即,在Windows的程序菜单里:a、执行Install CCU SW(等待2两步骤(1of2和2of2)完毕后再进行下一步)b、执行Download Fontc、执行Enter Licensed、执行Download Optical Unit Firmware(可以不管)5、拔掉DCN_CCU主机的串口1的连接线,接到主机的COM2上。
(连线不变)。
6、之后,安装摄像头软件DCN_NG_SACC,可以安装简体中文,并运行它。
如果弹出时间很长,则说明没有连接上。
解释说明ae中跟踪摄像机功能的作用AE中跟踪摄像机功能的作用Adobe After Effects中的跟踪摄像机功能是一项强大的动画工具,它可以制作2D/3D图形,并能够在三维空间中跟踪某个摄像机。
在进行2D/3D动画制作时,使用AE中的跟踪摄像机功能可以获得惊人的视觉效果,可以大大提高动画制作的效率。
AE中的跟踪摄像机功能可以分为以下几个方面:一、跟踪摄像机可以跟踪某个物体通过使用跟踪摄像机,我们可以选择某个物体,比如人物或动物,并将摄像机定位于它的位置上。
这样,可以根据实际的场景在三维空间中跟踪某个物体,而不必进行手动编辑。
二、跟踪摄像机可以实现多景的摄影通过跟踪摄像机,我们可以实现多景的摄影。
在实际的摄影场景中,可以精确控制摄像机运动,包括位置、朝向、速度等参数,这样就可以把场景中的多景拍摄完成,大大提高动画制作效率。
三、跟踪摄像机可以实现多种动画制作跟踪摄像机还可以实现多种动画制作。
从移动微视频,电影、游戏等,都可以利用跟踪摄像机技术来实现精准的跟踪,提高动画制作的效率。
四、跟踪摄像机可以实现便捷的3D动画AE中的跟踪摄像机不仅可以跟踪单个物体运动,还可以实现3D 动画,以及3D场景的摄影。
这样可以大大提高灵活性,可以从多个角度拍摄场景,更快更精准地制作动画,也可以为视觉创意加分。
五、跟踪摄像机的跟踪可以节省时间在AE中使用跟踪摄像机可以节省大量的时间。
因为它能够实时反馈场景的信息,这样可以消除动画制作中的重复性的工作,从而提高动画制作的效率。
总之,AE中的跟踪摄像机功能是一款强大的动画制作工具,具有多种功能,可以帮助艺术家和设计师更快更准确地完成他们的动画作品。
AE中的跟踪摄像机功能能够大大提高动画制作的效率,并允许拍摄精确、复杂的动画场景,可以提供视觉创意,使艺术家和设计师更容易获得惊人的动画视觉效果。

鲁棒的PTZ摄像机目标跟踪算法
梁文锋;项志宇
【期刊名称】《浙江大学学报(工学版)》
【年(卷),期】2011(045)001
【摘要】提出基于可旋转、变焦( PTZ)摄像机的目标实时智能跟踪算法.通过检测图像序列的方差,根据噪声和运动干扰的历史数据,建立相应的空间分布模型,实现有选择性的、高灵敏度的运动检测和云台控制.根据噪声的分布情况调整判决阈值,为不同区域赋予不同的检测灵敏度,提高了系统的噪声容限.自适应地调整方差的序列长度,实现系统灵敏度的大范围调整,以适应噪声、光照的快速变化和不同数量级别的运动幅度.推导长序列方差的快速算法,给出系统实时工作的例子.实验结果表明,算法工作可靠,响应迅速.
【总页数】5页(P59-63)
【作者】梁文锋;项志宇
【作者单位】浙江大学信息与电子工程学系,浙江杭州310027;浙江省综合信息网技术重点实验室,浙江杭州310027;浙江大学信息与电子工程学系,浙江杭州310027;浙江省综合信息网技术重点实验室,浙江杭州310027
【正文语种】中文
【中图分类】TP391.41
【相关文献】
1.基于事件分析的多摄像机鲁棒跟踪算法 [J], 蔡晓东;吴迪;华娜;梁奔香;朱利伟
2.基于鲁棒容积卡尔曼滤波的自适应目标跟踪算法 [J], 彭美康; 郭蕴华; 汪敬东; 牟军敏; 胡义
3.基于反馈判决的鲁棒自适应机动目标跟踪算法 [J], 汪家宝;陈树新;吴昊;何仁珂;郝思冲
4.一种基于多通道孪生网络的鲁棒目标跟踪算法 [J], 邹鹏;范都耀
5.基于孪生网络的鲁棒红外目标跟踪算法 [J], 陈果;滕奇志
因版权原因,仅展示原文概要,查看原文内容请购买。
目标跟踪与追踪:Blender摄像机动画和角色互动编排在Blender软件中,目标跟踪与追踪技术是模拟真实世界中摄像机的功能,通过追踪特定的目标物体,实现摄像机的移动和角度的调整。
这项技术在电影、动画和游戏制作中广泛应用,能够为作品增添动态和逼真感。
首先,我们需要在场景中创建一个摄像机。
在3D视图中,选择"Add"(添加)- "Camera"(摄像机),即可创建一个默认的摄像机对象。
然后,我们需要确保场景中至少有一个目标物体。
我们可以使用3D模型、图片或文字等来充当目标物体。
接下来,我们需要将摄像机设置为跟踪目标物体。
选中摄像机对象,切换到"Constraints"(约束)选项卡,并点击"Add Object Constraint"(添加对象约束)。
在弹出的约束列表中,选择"Track To"(跟踪到)约束。
在"Track To"约束中,我们需要指定目标物体。
首先,在"Target"(目标)栏中选择目标物体,然后在"Track Axis"(跟踪轴向)下拉菜单中选择X、Y或Z轴,确定摄像机跟踪目标时的旋转方向。
最后,在"Up"(上方向)下拉菜单中选择X、Y或Z轴,指定摄像机的上方向。
点击"Animate"(动画)按钮,即可在摄像机和目标物体之间创建一个动画关键帧。
在时间轴中,我们可以调整关键帧的位置和顺序,控制摄像机的移动和角度变化。
除了目标跟踪,我们还可以通过追踪技术实现角色与环境之间的互动。
例如,我们可以使用追踪技术将角色模型与场景中的物体进行交互。
首先,我们需要在场景中创建一个角色模型。
可以使用Blender提供的基础模型,也可以导入自己设计的角色模型。
然后,我们选择一个目标物体,将其添加到角色模型中作为参考物。
BOSCH数字会议DCN-CCU摄像自动跟踪调试步骤注意:第1部分是安装完所有摄像头后的硬件操作基本设置。
第2部分以后是全新的进行摄像跟踪的调试。
1、安装软件前,先对多只摄像头进行地址设定:Camera1使用,作为全景拍摄,不能作为联动.联动是从Camera2设置(矩阵后面的摄像机输入和控制输入都从第二口接,第一口接Camera1做全景用,如果没有全景摄像机就不要接第一口).连接完毕通电,即可控制球,此时是球机一起旋转,需要对每个摄像头分配地址码,具体如下:通过键盘将对应的摄像机图象调出,在键盘上按ON、999、ENTER,此时屏幕应该显示一些字符,如ON、XXX、ENTER,跟住屏幕英文提示操作即可(它怎么提示,怎么设即可,不必做任何改动),然后再在控制键盘上切换另一摄像头,再按ON、999、ENTER依次对全部球分配地址。
2、连接笔记本的串口1和DCN_CCU主机的串口1(连线如图2,----9芯直通线)(调完后是矩阵的com1接主机的com2!!!!)。
笔记本的com2连接矩阵切换器的com口。
连接方式如图3。
注意:笔记本的COM1的波特率要改成19200.3、在笔记本中安装光盘中的DCN_NG_DLT软件;(最好默认路径和默认选项进行安装),语言可以选择简体中文。
4、按软件提示执行每一项步骤,(通过串口向CCU主机上传程序)即,在Windows的程序菜单里:a、执行Install CCU SW(等待2两步骤(1of2和2of2)完毕后再进行下一步)b、执行Download Fontc、执行Enter Licensed、执行Download Optical Unit Firmware(可以不管)5、拔掉DCN_CCU主机的串口1的连接线,接到主机的COM2上。
(连线不变)。
6、之后,安装摄像头软件DCN_NG_SACC,可以安装简体中文,并运行它。
如果弹出时间很长,则说明没有连接上。
如果连接和通讯正常的话,在右下角显示新发现的话筒数量,摄像头也有一个或多个被发现。
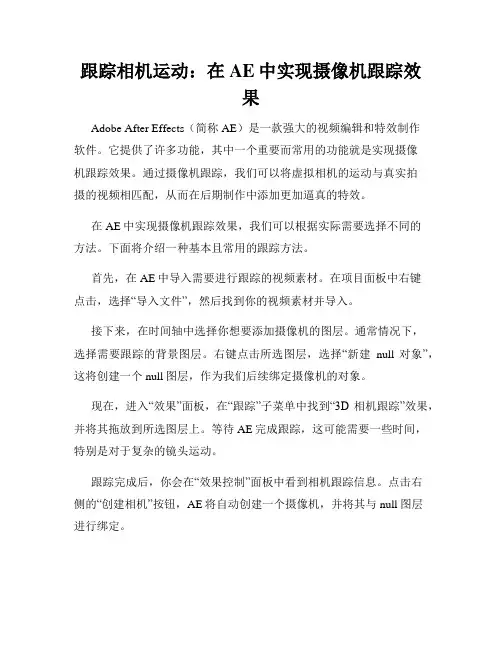
跟踪相机运动:在AE中实现摄像机跟踪效果Adobe After Effects(简称AE)是一款强大的视频编辑和特效制作软件。
它提供了许多功能,其中一个重要而常用的功能就是实现摄像机跟踪效果。
通过摄像机跟踪,我们可以将虚拟相机的运动与真实拍摄的视频相匹配,从而在后期制作中添加更加逼真的特效。
在AE中实现摄像机跟踪效果,我们可以根据实际需要选择不同的方法。
下面将介绍一种基本且常用的跟踪方法。
首先,在AE中导入需要进行跟踪的视频素材。
在项目面板中右键点击,选择“导入文件”,然后找到你的视频素材并导入。
接下来,在时间轴中选择你想要添加摄像机的图层。
通常情况下,选择需要跟踪的背景图层。
右键点击所选图层,选择“新建null对象”,这将创建一个null图层,作为我们后续绑定摄像机的对象。
现在,进入“效果”面板,在“跟踪”子菜单中找到“3D相机跟踪”效果,并将其拖放到所选图层上。
等待AE完成跟踪,这可能需要一些时间,特别是对于复杂的镜头运动。
跟踪完成后,你会在“效果控制”面板中看到相机跟踪信息。
点击右侧的“创建相机”按钮,AE将自动创建一个摄像机,并将其与null图层进行绑定。
现在,你可以通过选择“视图”菜单中的“摄像机”来查看摄像机的视角。
通过调整null图层的位置、旋转和缩放等属性,可以实现虚拟相机与实际拍摄的视频匹配。
此外,你还可以通过应用其他特效来增强跟踪效果。
例如,你可以在跟踪相机的图层上应用“光效”或“景深”等特效,以增加真实感和深度感。
在AE中实现摄像机跟踪效果的关键是准确地跟踪相机的运动。
为了获得更好的跟踪效果,你可以使用高清素材、清晰的纹理和较少的镜头抖动。
此外,确保在拍摄时相机的焦距、快门速度和帧率等设置与后期制作保持一致,这对于跟踪的准确性至关重要。
通过在AE中实现摄像机跟踪效果,你可以为视频添加各种令人惊叹的特效,如虚拟物体的插入、3D场景的构建和身临其境的运动追踪。
熟练掌握AE中的摄像机跟踪技巧,将带给你无限的创作可能性。
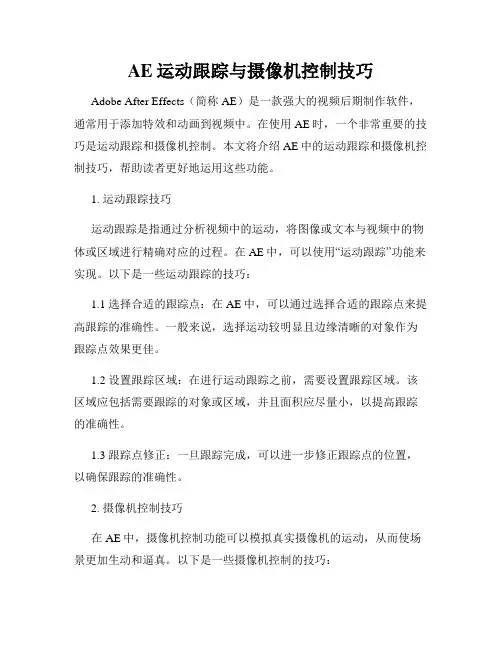
AE运动跟踪与摄像机控制技巧Adobe After Effects(简称AE)是一款强大的视频后期制作软件,通常用于添加特效和动画到视频中。
在使用AE时,一个非常重要的技巧是运动跟踪和摄像机控制。
本文将介绍AE中的运动跟踪和摄像机控制技巧,帮助读者更好地运用这些功能。
1. 运动跟踪技巧运动跟踪是指通过分析视频中的运动,将图像或文本与视频中的物体或区域进行精确对应的过程。
在AE中,可以使用“运动跟踪”功能来实现。
以下是一些运动跟踪的技巧:1.1 选择合适的跟踪点:在AE中,可以通过选择合适的跟踪点来提高跟踪的准确性。
一般来说,选择运动较明显且边缘清晰的对象作为跟踪点效果更佳。
1.2 设置跟踪区域:在进行运动跟踪之前,需要设置跟踪区域。
该区域应包括需要跟踪的对象或区域,并且面积应尽量小,以提高跟踪的准确性。
1.3 跟踪点修正:一旦跟踪完成,可以进一步修正跟踪点的位置,以确保跟踪的准确性。
2. 摄像机控制技巧在AE中,摄像机控制功能可以模拟真实摄像机的运动,从而使场景更加生动和逼真。
以下是一些摄像机控制的技巧:2.1 对象跟随:可以使用摄像机控制功能来实现物体的跟随效果。
通过调整摄像机的位置和方向,使其始终对准物体,从而实现物体的跟随效果。
2.2 运动路径设定:摄像机可以沿指定的运动路径进行移动。
可以通过在AE中创建运动路径,然后将摄像机与路径关联,从而实现摄像机沿路径移动的效果。
2.3 深度感创造:通过调整摄像机的焦距和景深,可以在场景中创造出深度感。
可以尝试使用景深效果,将某些元素模糊处理,以增强真实感。
3. 运动跟踪和摄像机控制的结合运用运动跟踪和摄像机控制是AE中常常结合使用的技术。
通过将运动跟踪应用于摄像机,可以实现更加真实动态的效果。
3.1 虚拟场景增强:通过运动跟踪识别视频中的表面,然后将虚拟场景应用于该表面,可以实现可信度更高的虚拟场景增强效果。
3.2 物体替换:运动跟踪可以用于识别视频中的物体,然后通过摄像机控制将其他物体或图像替换进去,从而实现物体替换的效果。
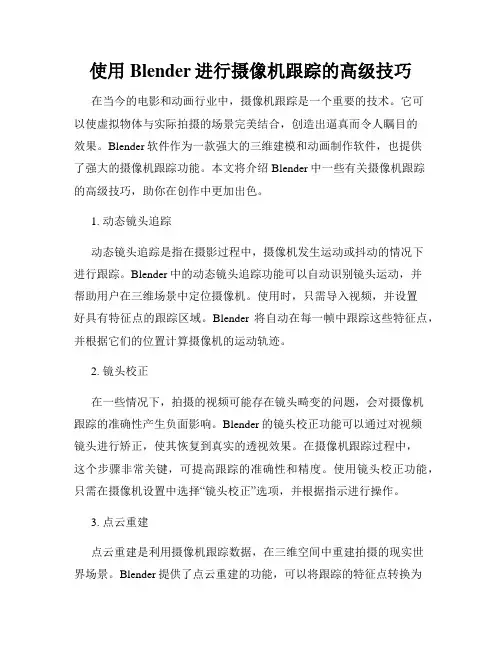
使用Blender进行摄像机跟踪的高级技巧在当今的电影和动画行业中,摄像机跟踪是一个重要的技术。
它可以使虚拟物体与实际拍摄的场景完美结合,创造出逼真而令人瞩目的效果。
Blender软件作为一款强大的三维建模和动画制作软件,也提供了强大的摄像机跟踪功能。
本文将介绍Blender中一些有关摄像机跟踪的高级技巧,助你在创作中更加出色。
1. 动态镜头追踪动态镜头追踪是指在摄影过程中,摄像机发生运动或抖动的情况下进行跟踪。
Blender中的动态镜头追踪功能可以自动识别镜头运动,并帮助用户在三维场景中定位摄像机。
使用时,只需导入视频,并设置好具有特征点的跟踪区域。
Blender将自动在每一帧中跟踪这些特征点,并根据它们的位置计算摄像机的运动轨迹。
2. 镜头校正在一些情况下,拍摄的视频可能存在镜头畸变的问题,会对摄像机跟踪的准确性产生负面影响。
Blender的镜头校正功能可以通过对视频镜头进行矫正,使其恢复到真实的透视效果。
在摄像机跟踪过程中,这个步骤非常关键,可提高跟踪的准确性和精度。
使用镜头校正功能,只需在摄像机设置中选择“镜头校正”选项,并根据指示进行操作。
3. 点云重建点云重建是利用摄像机跟踪数据,在三维空间中重建拍摄的现实世界场景。
Blender提供了点云重建的功能,可以将跟踪的特征点转换为三维点云,并在三维视图中进行可视化。
这样,用户可以更清晰地了解场景的形状和结构,为后续的建模和渲染工作提供重要参考。
4. 跟踪遮挡物在真实的场景中,存在着各种各样的遮挡物,如人物、建筑物等。
在进行摄像机跟踪时,这些遮挡物可能会影响到跟踪的准确性。
Blender提供了遮挡物的处理功能,可以通过手动标记或自动检测的方式进行修复和补充跟踪信息,提高跟踪的鲁棒性和稳定性。
5. 跟踪数据导出完成摄像机跟踪后,接下来需要将跟踪的数据导出到其他软件中进行后续的建模和渲染工作。
Blender支持将跟踪数据导出为常用的数据格式,如FBX、Alembic等。
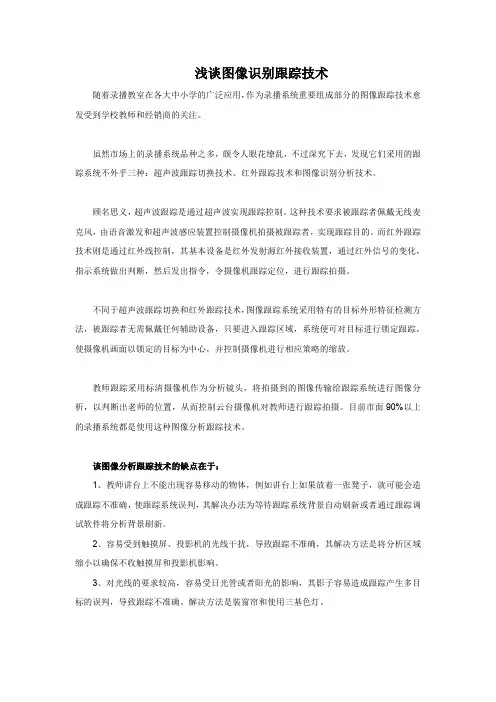
浅谈图像识别跟踪技术随着录播教室在各大中小学的广泛应用,作为录播系统重要组成部分的图像跟踪技术愈发受到学校教师和经销商的关注。
虽然市场上的录播系统品种之多,颇令人眼花缭乱,不过深究下去,发现它们采用的跟踪系统不外乎三种:超声波跟踪切换技术、红外跟踪技术和图像识别分析技术。
顾名思义,超声波跟踪是通过超声波实现跟踪控制。
这种技术要求被跟踪者佩戴无线麦克风,由语音激发和超声波感应装置控制摄像机拍摄被跟踪者,实现跟踪目的。
而红外跟踪技术则是通过红外线控制,其基本设备是红外发射源红外接收装置,通过红外信号的变化,指示系统做出判断,然后发出指令,令摄像机跟踪定位,进行跟踪拍摄。
不同于超声波跟踪切换和红外跟踪技术,图像跟踪系统采用特有的目标外形特征检测方法,被跟踪者无需佩戴任何辅助设备,只要进入跟踪区域,系统便可对目标进行锁定跟踪,使摄像机画面以锁定的目标为中心,并控制摄像机进行相应策略的缩放。
教师跟踪采用标清摄像机作为分析镜头,将拍摄到的图像传输给跟踪系统进行图像分析,以判断出老师的位置,从而控制云台摄像机对教师进行跟踪拍摄。
目前市面90%以上的录播系统都是使用这种图像分析跟踪技术。
该图像分析跟踪技术的缺点在于:1、教师讲台上不能出现容易移动的物体,例如讲台上如果放着一张凳子,就可能会造成跟踪不准确,使跟踪系统误判,其解决办法为等待跟踪系统背景自动刷新或者通过跟踪调试软件将分析背景刷新。
2、容易受到触摸屏、投影机的光线干扰,导致跟踪不准确,其解决方法是将分析区域缩小以确保不收触摸屏和投影机影响。
3、对光线的要求较高,容易受日光管或者阳光的影响,其影子容易造成跟踪产生多目标的误判,导致跟踪不准确。
解决方法是装窗帘和使用三基色灯。
而学生跟踪分为两种,一种是采用一个分析镜头吸顶装,其跟踪分析方式是分析学生起立和坐下的动作和高度差,另外一种是将两个分析镜头分别装在教室两侧,其跟踪分析方式是在两个分析镜头之间有虚拟的高度线,如有学生超过此虚拟线既可跟踪目标。
AE中利用摄像头跟踪移动物体在AE软件中,我们可以利用摄像头来跟踪移动物体。
这项技巧广泛应用于电影制作、广告和特殊效果等领域,可以为我们的作品增添趣味和创造力。
本文将简述如何在AE中利用摄像头进行对象跟踪。
首先,我们需要准备工作。
确保已经安装了AE软件,并连接了一个摄像头。
打开AE软件后,选择“新建合成”创建一个新的合成。
设置合成的尺寸和帧速率以适应你的需求。
接下来,我们需要点击“文件”菜单中的“导入”选项,将要跟踪的移动物体的视频导入到AE中。
将视频拖动到合成中,放置在时间轴上方便我们操作。
在AE的工具栏中,选择“摄像机跟踪器”工具,在视频上点击并拖动一个矩形框,选中并包含你想要跟踪的物体。
这个矩形框将起到一个关键帧的作用,帮助AE识别并跟踪物体。
一旦完成选择,点击“分析”按钮开始分析视频中的移动物体。
AE 会自动为你跟踪物体并在时间轴上生成一个跟踪点。
根据视频的长度和复杂程度,跟踪时间可能会有所不同。
在跟踪过程中,确保视频中的移动物体尽可能保持在矩形框内,并避免遮挡和闪烁。
完成跟踪后,我们可以使用跟踪点来添加特效或修改动画。
选中跟踪点,并选择“效果”菜单中的“稳定器”或“跟踪封套”选项,可以帮助我们减少或消除物体的抖动和摇晃,使图像更加稳定。
我们还可以添加“约束”来增加物体的动态性。
选择跟踪点,并在“层”菜单中选择“新建”-“摄像机”或“光圈”约束。
摄像机约束可以使对象具有类似于摄像机移动的运动,而光圈约束可以模拟光圈的打开和关闭效果。
此外,在AE中还可以使用跟踪数据导出功能。
选择跟踪点,并单击“层”菜单中的“导出”选项,可以将跟踪数据导出为各种格式,如C4D、Nuke、mocha等。
这个功能可以让我们在其他软件中使用AE的跟踪数据,进一步扩展我们的创作。
总结一下,AE中利用摄像头跟踪移动物体可以为我们的作品增加趣味和创意。
通过选择合适的跟踪区域,并进行跟踪分析和修饰,我们可以实现精准的物体追踪和特效添加。
AE摄像机运动与追踪技巧AE(After Effects)是一款强大的视频编辑及特效制作软件,它在后期制作中扮演着重要的角色。
其中一项核心功能是摄像机运动与追踪技巧,它能够为视频添加逼真的运动效果和跟踪图像。
一、摄像机运动效果在AE中,我们可以通过摄像机运动效果实现虚拟摄像机的运动,使画面具有一种逼真的三维感。
具体操作步骤如下:1. 首先,在AE工作区中打开一个合成项,并在时间轴中创建一个空白的图层。
2. 在图层中选择"摄像机工具",然后在场景中拖动鼠标,可以看到一个虚拟的摄像机图标出现。
3. 通过控制摄像机工具来调整视角、缩放、旋转等参数,以达到期望的效果。
4. 如果需要给摄像机参数添加关键帧,可以使用时间轴面板来调整摄像机运动轨迹,实现平滑的过渡效果。
5. 在时间轴中可以对摄像机运动效果进行调整和修改,以获得更加满意的结果。
二、图像追踪技巧图像追踪是指在影片中追踪出一个或多个特定位置的运动轨迹,并将跟踪结果应用于其他元素或特效中。
AE提供了丰富的图像追踪工具和技巧,如下所示:1. 首先,在AE工作区中打开一个合成项,并将需要进行图像追踪的素材导入到项目面板中。
2. 在项目面板中选择需要进行图像追踪的素材,右键点击并选择"新建跟踪点"。
3. 使用鼠标拖动选择一个需要跟踪的参考点,在图像中位置明显且稳定。
4. 点击"分析"按钮,AE会自动分析图像上的运动轨迹,并在时间轴中生成关键帧。
5. 将分析结果应用于其他元素或特效中,例如添加跟踪点或将图像置于其他背景中。
6. 使用时间轴面板对图像追踪效果进行调整和修改,以获得更符合实际需求的效果。
通过合理使用AE提供的摄像机运动与追踪技巧,我们可以为视频添加逼真的运动效果和跟踪图像。
这两项技术在特效制作和后期制作中起着重要作用,可以大大提升作品的视觉效果和观赏性。
在使用过程中,我们需要不断实践和尝试,熟悉AE软件的操作和特效效果,才能更好地应用于实际制作中,创作出优秀的作品。
CONFIDENTIALA.1 GeneralCommunications with the Free-d unit use RS422/RS485 serial data as follows: Baud rate:38.4 kbaudData bits:8 (LSB first)Parity:OddStop bits:1Total bits:11Data is transferred in messages. Each message consists of:Message typeCamera ID numberData (depending on message type)ChecksumMulti-byte data values are sent most-significant-byte first.The checksum is calculated by subtracting (modulo 256) each byte of themessage, including the message type, from 40 (hex).The Camera ID number identifies the camera concerned. If the Camera ID of amessage received by the Free-d unit does not match that of the camera to which theunit is connected, the message is ignored. However, if the Camera ID is set to FF(hex) no comparison is made and the message is always recognised. Messagestransmitted by the Free-d unit carry the ID number of the camera to which it isconnected.A.2 ProtocolsThere are two modes of operation, stream mode and polled mode. In stream mode,the Free-d unit will send position updates continuously at an approximate rate of 30per second. In polled mode, the Free-d unit will send a message only whenspecifically requested - a maximum rate of 100 polls per second is allowed.Switching between the two modes is possible using a command message.The Free-d unit initialises itself to a ‘Radamec-compatible’ stream mode, in which ittransmits messages with the same format as would be returned by a robotic pedestal.Since Radamec-format messages have no provision for a camera ‘roll’ value, in thismode the camera must be mounted on a tripod or other suitable platform. Confidential Page 2A.3 Message structuresA.3.1 Type D0 - Poll / CommandThe D0 message is used to poll the Free-d unit for data, or to send a command to theFree-d unit.The message contains 4 bytes as follows:<D0>Message type<CA>Camera ID<CD>Command<CK>ChecksumCommands presently defined are:00Stop stream mode01Start stream mode02Stop freeze mode03Start freeze modeD1Poll for position update (and stop stream mode)D2Request system statusD3Request system parametersD4Request first marker dataD5Request next marker dataD6Request first image pointD7Request next image pointD8Request next EEPROM dataDA Request camera calibration valuesDB Request diagnostic modeConfidential Page 3A.3.2 Type D1 - Camera Position/Orientation DataThe D1 message is used for transferring the camera position and orientation data from the Free-d unit.The message contains 29 bytes as follows:<D1>Message type<CA>Camera ID<PH><PM><PL> Camera Pan Angle<TH><TM><TL> Camera Tilt Angle<RH><RM><RL> Camera Roll Angle<XH><XM><XL> Camera X-Position<YH><YM><YL> Camera Y-Position<HH><HM><HL> Camera Height (Z-Position)<ZH><ZM><ZL> Camera Zoom<FH><FM><FL> Camera Focus<SH><SL>Spare / User Defined (16 bits)<CK>ChecksumSee Appendix B for details of the content of this message.A.3.3 Type D2 - System StatusThe D2 message is used for transferring the system status from the Free-d unit.The message contains 16 bytes as follows:<D2>Message type<CA>Camera ID<SW>Switch settings<LD>LED indications<FS>System status<CV>CPU firmware version number<PV>PLD firmware version number<DV>DSP software version number<DS>DSP status<MR>Number of markers seen (i.e. detected by hardware)<MC>Number of markers identified (i.e. bar-codes read)<NP>Number of markers used (identified and in database)<EH><EM><EL>RMS error<CK>ChecksumConfidential Page 4A.3.3 Type D2 - System Status (cont.)Bits in the ‘switch settings’ byte are as follows:Bits 0-3:Setting of the hex switch S5 (inverted)Bit 4:0 = S2 left (decrease value / scroll left)Bit 5:0 = S2 right (increase value / scroll right)Bit 6:0 = S4 closed (save settings)Bit 7:0 = S3 left (results mode), 1 = S3 right (entry mode) Bits in the ‘LED indications’ byte are as follows:Bit 0: 1 = video input presentBit 1: 1 = video input OKBit 2: 1 = serial data input presentBit 3: 1 = data ‘freeze’ mode, 0 = normalBit 4: 1 = too few markersBit 5: 1 = RMS error highBit 6: 1 = DSP alert (see DSP status)Bit 7: 1 = fault (see system status)Note that only one ‘video input’ LED (D3) is present in the hardware, which lightswhen both Bit 0 and Bit 1 of the ‘LED indications’ byte are set.The version numbers should be interpreted as BCD, with an implied decimal pointbetween the two digits, e.g. 12 (hexadecimal) refers to version 1.2.The RMS error is expressed in pixels as a 24-bit positive number, where the most-significant bit (bit 23) is always zero, the next 8 bits (bits 22 to 15) are the integer part and the remaining bits (bits 14 to 0) are the fractional part; alternatively, this may bethought of as an unsigned integer value in units of 1/32768 pixels. The range ofvalues is from zero to nearly 256.0 pixels (7FFFFF hex).The ‘DSP alert’ bit is set whenever the DSP status is negative (bit 7 set).The ‘fault' bit is set whenever the system status byte is non-zero.Confidential Page 5A.3.3 Type D2 - System Status (cont.)The system status is an 8-bit number which can take one of the following values:0System normal (no detected errors).1 A processor reset occurred. This code is only presenttransitorily.2Serial communications error. This is most likely to be causedby a message being sent to the Free-d unit before the reply to theprevious message has been received.3Vertical blanking failure. This may indicate a hardware fault,or a problem with the digital video input.4Xilinx failure. The programmable logic devices have notinitialised correctly; if persistent, this indicates a hardwarefault.5I2C bus failure. Communication between the CPU and peripheraldevices has failed, indicating a probable hardware fault.6EEPROM failure. An attempt to save the parameters to non-volatile memory U3 has failed, indicating a probable hardwarefault.7DSP failure (1). The DSP failed to acknowledge a command; ifpersistent, this indicates a hardware fault.8DSP failure (2). The DSP failed to accept data; if persistent,this indicates a hardware fault.9DSP failure (3). The DSP failed to provide data; ifpersistent, this indicates a hardware fault.10DSP failure (4). The DSP is flagging an exception error; ifpersistent, this indicates a hardware or software fault.Confidential Page 6A.3.3 Type D2 - System Status (cont.)91I2C communication failure: No Reply.93I2C communication failure: Bus Error.94I2C communication failure: ACK Error.95I2C communication failure: Undefined State.96I2C communication failure: Overflow.The ‘I2C communication failure’ codes result from a problem with communicationbetween the processor and the I2C peripherals U3 and U17, most likely indicating ahardware fault.The DSP status is a signed 8-bit number which when negative indicates an errorcondition as follows:-1Too few valid markers visible to compute camera position.-2Iteration failed to converge.-3 A DSP reset occurred.-4Internal DSP error.A zero or positive value of DSP status indicates the number of iterations which wererequired to compute the camera's position.A.3.4 Type D3 - Control ParametersThe D3 message is used for transferring the control parameters. It may be sent to the Free-d unit in order to set their values, or requested from the Free-d unit in order tointerrogate the current values. Operation of switch S4 saves the current values toEEPROM, which become the default values following a subsequent processor reset.The message contains 13 bytes as follows:<D3>Message type<CA>Camera ID<SN>Studio ID<SM>Smoothing value<HI>Maximum asymmetry<HO>Half box width<BT>Black video threshold<WT>White video threshold<BC>Black video clip level<WC>White video clip level<MB>Maximum number of >black pixels between boxes<MW>Minimum number of >white pixels in inner box<CK>ChecksumA.3.4 Type D3 - Control Parameters (cont.)Confidential Page 7The ‘studio ID’ is in the range 0 to 255 and determines which database of markerpositions (stored in the on-board EEPROM) is used.The ‘smoothing value’ is in the range 0 to 255, corresponding to settings of smoothing between 0.000 and 0.996.The ‘maximum asymmetry’ is in the range 0 to 255, in units of 1/128 pixels. This setsa limit on the difference between the centre position of a marker as measured by thehardware and its position as estimated as the mid-point between opposite edges.The ‘half box width’ determines the size of the outer box used in marker detection.The maximum value is 41 pixels: if a larger value is set the unit will not operatecorrectly; the box height is calculated to ensure the box is square. A value of zerosignifies ‘automatic’: the Free-d unit sets the box size according to the apparent sizeof the markers in the image.The ‘black video clip level’ and ‘white video clip level’ determine the clipping which is applied before the marker's position is measured. Too little clipping can make theposition measurement over-sensitive to level variation, such as might be caused byuneven illumination. Too much clipping, however, can cause excessive aliasingwhich can impair the measurement accuracy.The ‘maximum number of black pixels’ and ‘minimum number of white pixels’values are used in conjunction with the ‘black video threshold’ and ‘white videothreshold’ to control the marker detection process. A marker is recognised if there are at least the specified minimum number f pixels above the ‘white’ threshold within the inner box, and at most the specified maximum number of pixels above the ‘black’threshold between the inner and outer boxes.The Free-d unit acknowledges receipt of a D3 message by replying with a D3 message containing the new data.A.3.5 Type D4 & D5 - Marker DataThe D4 and D5 messages are used for transferring marker data from the Free-d unit.Each message contains data about a single marker: requesting message D4 causes data for marker zero to be transmitted and requesting message D5 causes data for the next marker in sequence to be transmitted. After data for the last marker has been sent, the next message will contain data for the first marker, with a message type of D4(whether the request was for D4 or D5).Confidential Page 8A.3.5 Type D4 & D5 - Marker Data (cont.)The messages contain 18 bytes as follows:<D4> or <D5> Message type<CA>Camera ID<SN>Studio ID<MH><ML>Marker Number<XH><XM><XL>Marker X-Position<YH><YM><YL>Marker Y-Position<HH><HM><HL>Marker Height (Z-Position)<FH><FM><FL>Marker Flags<CK>ChecksumThe X-Position, Y-Position and Height are sent in the same format as the cameraposition in message D1 (see Appendix B).The MSB of Marker Flags (bit 7 of FH) is set for a valid marker and cleared for aninvalid marker. If the marker is flagged as invalid its position data should be ignored.A.3.6 Type D6 & D7 - Image DataThe D6 and D7 messages are used for transferring image data from the Free-d unit.Each message contains data about a single marker: requesting message D6 causes data for the first marker in the image to be transmitted and requesting message D7 causesdata for the next marker in the image to be transmitted. After data for the last marker has been sent, the next message will contain data for the first marker, with a message type of D6 (whether the request was for D6 or D7).The messages contain 18 bytes as follows:<D6> or <D7>Message type<CA>Camera ID<MI>Marker Index (zero for message D6)<MH><ML>Marker Number<XH><XM><XL> X-Position in image<YH><YM><YL> Y-Position in image<AH><AM><AL> Error in X-Position<BH><BM><BL> Error in Y-Position<CK>ChecksumThe X-Position and Y-Position are positive values in units of 1/256 pixels (i.e. XH,XM is the integer part of the X-Position in pixels and XL is the fractional part). Confidential Page 9A.3.6 Type D6 & D7 - Image Data (cont.)The Error values are signed and in units which depend on the lens calibration. Toobtain values in pixels the X-Error must be divided by X-Scale (see message DA) and multiplied by 512. Similarly the Y-Error must be divided by Y-Scale and multipliedby 512.A.3.7 Type D8 - EEPROM DataThe D8 message is used for transferring EEPROM data from or to the Free-d unit. Ifa D8 message is sent to the Free-d unit the EEPROM is programmed with the datasupplied, and the Free-d unit replies with a D8 message containing the new data.The message contains 21 bytes as follows:<D8>Message type<CA>Camera ID<EH><EL>EEPROM Address<D0>....<DF> 16 bytes of EEPROM data<CK>ChecksumThe EEPROM can only be programmed or read 16-bytes at a time. The EEPROMAddress within the message corresponds to the address of the first byte of datatransferred.A.3.8 Type D9 - Request EEPROM DataThe D9 message is used to request the transfer of EEPROM data from the Free-d unit.The Free-d unit replies with a D8 message containing 16 bytes of EEPROM data.The message contains 5 bytes as follows:<D9>Message type<CA>Camera ID<EH><EL>EEPROM address<CK>ChecksumThe EEPROM Address determines the address of the first data byte to be transferred. Confidential Page 10A.3.9 Type DA - Camera Calibration DataThe DA message is used for transferring Camera Calibration data from the Free-dunit. The data corresponds to the camera currently in use. If a valid camera is notconnected to the Free-d unit, or if the camera has only recently been connected, thedata is invalid.The message contains 30 bytes as follows:<DA>Message type<CA>Camera ID<CH><CM><CL>Lens X-Centre<DH><DM><DL>Lens Y-Centre<SH><SM><SL>Lens X-Scale<TH><TM><TL>Lens Y-Scale<AH><AM><AL>Lens Distortion A (radial, square term)<BH><BM><BL>Lens Distortion B (radial, fourth power)<XH><XM><XL>X-Offset from auxiliary camera to studio camera<YH><YM><YL>Y-Offset from auxiliary camera to studio camera<ZH><ZM><ZL>Z-Offset from auxiliary camera to studio camera<CK>ChecksumA.3.10 Type DB - Diagnostic ModeThe DB message is used to switch the Free-d unit into a diagnostic mode, or to return the diagnostic mode currently set.The message contains 4 bytes as follows:<DB>Message type<CA>Camera ID<DM>Diagnostic mode<CK>ChecksumOnly the two most-significant bits of Diagnostic Mode are defined. The possiblemodes are as follows:00Normal operation40Set video data to 0x5580Set video data to 0xAAC0Set video data to test patternThe Free-d unit acknowledges receipt of a DB message by replying with a DBmessage containing the new mode.A.3.11 Type A4 - Poll / Command (Radamec compatibility mode)Confidential Page 11The A4 message is used to poll the Free-d unit for data, or to send a command to theFree-d unit, in a way compatible with the Radamec RP2VR robotic pedestal.The message contains 4 bytes as follows:<A4>Message type<CA>Camera ID<CD>Command<CK>ChecksumCommands presently defined are:00Stop Radamec-compatible stream mode01Start Radamec-compatible stream mode02Request camera IDFF Poll for Radamec-compatible position updateIn the case of commands 00 and 01 the Free-d unit acts on the message butdoes notreply.In the case of command 02 (request camera ID) the <CA> byte in the message should be set to FF. The Free-d unit replies with an A4 message having the <CA> byte set to the current camera ID and the <CD> byte set to 02.In the case of command FF (poll) the Free-d unit replies with an A2 message.A.3.12 Type A2 - Camera Position/Orientation Data (Radamec compatibility mode)The A2 message is used for transferring the camera position and orientation data from the Free-d unit in a form compatible with Radamec robotic pedestals. Note that there is no provision to send a ‘roll’ value, so the camera must be mounted on a tripod orpedestal.Confidential Page 12A.3.12 Type A2 - Camera Position/Orientation Data (Radamec compatibility mode)The message contains 30 bytes as follows:<A2>Message type<CA>Camera ID<PH><PM><PL> Camera Pan Angle<TH><TM><TL> Camera Tilt Angle<ZH><ZM><ZL> Camera Zoom<FH><FM><FL> Camera Focus<HH><HM><HL> Camera Height (Z-Position)<XFH><XFL> Camera X-Position (fraction)<XIH><XIL> Camera X-Position (integer)<YFH><YFL> Camera Y-Position (fraction)<YIH><YIL> Camera Y-Position (integer)<00><00>Pedestal Orientation (set to zero)<SH><SL>Spare / User Defined (16 bits)<CK>ChecksumThe Pan Angle is expressed as a 24-bit integer in units of 1/900 degrees, where zero is represented by 080000 hex. The range of values is from -180.0 degrees (058730 hex) to +180.0 degrees (0A78D0 hex).The Tilt Angle is expressed as a 24-bit integer in units of 1/900 degrees, where zero is represented by 080000 hex. The range of values is from -90.0 degrees (06C398 hex) to +90.0 degrees (093C68 hex).The Camera Zoom is expressed as a 24-bit positive unsigned number in arbitrary units related to the rotation of the ‘zoom ring’ on the camera lens. It will be necessary forthe host system to convert this to a true zoom value based on the type and particularsample of lens and camera in use.The Camera Focus is expressed as a 24-bit positive unsigned number in arbitrary units related to the rotation of the ‘focus ring’ on the camera lens. It will be necessary forthe host system to convert this to a true focus value based on the type and particularsample of lens and camera in use.The Height is expressed as a 24-bit integer in units of 1/82.2 mm. The range of values is from -102,051.2 mm (800000 hex) to +102,051.2 mm (7FFFFF hex).The X-Position and Y-Position are expressed in units of millimetres as a 16-bit integer part and a 16-bit fractional part. The range of values is from -32,768 mm (integer part 8000 hex, fractional part 0000hex) to almost +32,768 mm (integer part 7FFF hex,fractional part FC00hex).Note that, unlike a Radamec robotic pedestal and camera head, it is not possible topre-load the encoder positions by transmitting an A2 message to the Free-d unit. Appendix B Camera Positioning ParametersConfidential Page 13The following sections describe the parameters used to convey the position, orientation etc. of the studio camera.B.1 Definition of AxesA set of orthogonal right-handed axes (X, Y and Z) is used, fixed with respect to thereference frame of the studio. The X and Y axes lie in the horizontal plane, and the Z axis is vertical. The positive direction of the Z-axis is upwards.B.2 Camera Pan AngleThe Camera Pan Angle is defined as the angle between the Y-axis and the projection of the optical axis of the camera onto the horizontal (XY) plane. A zero valuecorresponds to the camera looking in the positive Y direction and a positive valueindicates a pan to the right (i.e. the camera rotates clockwise when viewed fromabove).The value is expressed in degrees as a 24-bit twos-complement signed number, where the most-significant bit (bit 23) is the sign bit, the next 8 bits (bits 22 to 15) are theinteger part and the remaining bits (bits 14 to 0) are the fractional part; alternatively,this may be thought of as a signed integer value in units of 1/32768 degree. The range of values is from -180.0 degrees (A60000 hex) to +180.0 degrees (5A0000 hex).B.3 Camera Tilt AngleThe Camera Tilt Angle is defined as the angle between the optical axis of the camera and the horizontal (XY) plane. A positive value indicates an upwards tilt. If the panand tilt angles are both zero, the camera is looking in the direction of the positive Yaxis.The value is expressed in degrees as a 24-bit twos-complement signed number, where the most-significant bit (bit 23) is the sign bit, the next 8 bits (bits 22 to 15) are theinteger part and the remaining bits (bits 14 to 0) are the fractional part; alternatively,this may be thought of as a signed integer value in units of 1/32768 degree. The range of values is from -90.0 degrees (D30000 hex) to +90.0 degrees (2D0000 hex).B.4 Camera Roll AngleThe Camera Roll Angle is defined as the angle of rotation of the camera about itsoptical axis. A roll angle of zero corresponds to a ‘scan line’ of the camera sensor (i.e.a horizontal in the image) being parallel to the horizontal (XY) plane. A positivevalue indicates a clockwise roll, when viewed from behind the camera.B.4 Camera Roll Angle (cont.)Confidential Page 14The value is expressed in degrees as a 24-bit twos-complement signed number, where the most-significant bit (bit 23) is the sign bit, the next 8 bits (bits 22 to 15) are theinteger part and the remaining bits (bits 14 to 0) are the fractional part; alternatively,this may be thought of as a signed integer value in units of 1/32768 degree. The range of values is from -180.0 degrees (A60000 hex) to +180.0 degrees (5A0000 hex).B.5 Camera X-PositionThe Camera X-Position is defined as the horizontal displacement of the camera from its reference position in the direction of the X-axis.The value is expressed in millimetres as a 24-bit twos-complement signed number,where the most-significant bit (bit 23) is the sign bit, the next 17 bits (bits 22 to 6) are the integer part and the remaining bits (bits 5 to 0) are the fractional part; alternatively, this may be thought of as a signed integer value in units of 1/64 mm. The range ofvalues is from -131,072.0 mm (800000 hex) to nearly +131,072.0 mm(7FFFFF hex).B.6 Camera Y-PositionThe Camera Y-Position is defined as the horizontal displacement of the camera from its reference position in the direction of the Y-axis.The value is expressed in millimetres as a 24-bit twos-complement signed number,where the most-significant bit (bit 23) is the sign bit, the next 17 bits (bits 22 to 6) are the integer part and the remaining bits (bits 5 to 0) are the fractional part; alternatively, this may be thought of as a signed integer value in units of 1/64 mm. The range ofvalues is from -131,072.0 mm (800000 hex) to nearly +131,072.0 mm(7FFFFF hex).B.7 Camera Height (Z-Position)The Camera Height is defined as the vertical displacement of the camera from itsreference position. A positive value indicates an upwards displacement.The value is expressed in millimetres as a 24-bit twos-complement signed number,where the most-significant bit (bit 23) is the sign bit, the next 17 bits (bits 22 to 6) are the integer part and the remaining bits (bits 5 to 0) are the fractional part; alternatively, this may be thought of as a signed integer value in units of 1/64 mm. The range ofvalues is from -131,072.0 mm (800000 hex) to nearly +131,072.0 mm(7FFFFF hex).Confidential Page 15B.8 Camera ZoomThe Camera Zoom is defined as the vertical angle of view of the camera, i.e. thevertical angle subtended at the camera lens by the top and bottom edges of the activepicture.The value is expressed as a 24-bit positive unsigned number in arbitrary units related to the rotation of the ‘zoom ring’ on the camera lens. It will be necessary for the host system to convert this to a true zoom value based on the type and particular sample of lens and camera in use.B.9 Camera FocusThe Camera Focus is defined as the distance between the camera lens and an object at which the object will be in sharp focus. The value is expressed as a 24-bit positiveunsigned number in arbitrary units related to the rotation of the ‘focus ring’ on thecamera lens. It will be necessary for the host system to convert this to a true focusvalue based on the type and particular sample of lens and camera in use. Confidential Page 16。
摄像机跟踪规则:
计划你的镜头。在你尝试电影序列之前,要能够理解最基本的哪些能够跟踪和哪些不能跟踪。在周围360度的圈里盲目挥舞着相机,并期待SynthEyes能够解决是行不通的。有些事你必须要提前考虑到:
首先,场景内必须要有足够的参照物或容貌特征。所以拍摄一个白色的房间就是不明智的(除非你做了全部标记并打算在后期移除)。需要有深度与角度变化的重要 特点才足以产生良好的摄像机解决方案。要有足够的容貌特征在整个镜头当中,不仅仅是这些;它们还需要被尽可能好地展开在画面内以产生最准确的跟踪。
3D物体如何放置?如果你有良好容貌特征对与SynthEyes围绕此点进行跟踪是极有帮助的。通常在做特效镜头期间,你会遵循在场景中放置一个3D角色,或聚焦在插入的这个物体上。这些区域都需要很好的跟踪以便来获取“locked”跟踪点。所以当你要拍摄你的镜头素材时,要提前构思这个特定镜头里的3D元素是什么。这一点很容易被人们忽视,但三维空间由3轴(X ,Y, Z)构成 ,所以一定要确保你有很好的参考点展开在地平面及垂直的画面上。
Features 特征 什么是特征?一个特征是一个存在您的图像序列中相当长一段时间且始终可以被跟踪的点。你可以选择杆子的顶端,地面上的一片树叶,一辆汽车上的标志,建筑物的角,墙壁上的标记。 由你来计划,尽量挑选小的、可确定的区域,并且与其周围环境具有较高对比度,记住你正在试图通过这个单点标记建造一个能够融入现实场景的3D物体。所以你 不应该选择随着摄像机角度变化其自身会有所改变的特征。例如,视觉上的一个物体与另一个物体的交叉点,玻璃上的高光反射,或者画面中移动的物体(比如摇摆 的树枝)。所有这些实际上并不代表场景中的任何静态锁定属性的特征都会产生标记。对于没有很多明显特征的场境,通常会添加跟踪标记或网球来帮助完成跟踪过 程,当然这些添加物会在后期被roto掉。
Tracking with SynthEyes 利用SynthEyes进行跟踪 打开SynthEyes后,选择导入我在树林中手持拍摄的10秒钟序列帧。它已做出了正确的推测设置(PAL DV, 25fps, progressive, 250 frames)。
你可以在此自定义输入,SynthEyes能够在任何帧速率和分辨率的设置下工作。我接受默认设置。点击控制面板上的播放按钮将镜头缓冲进内存。
SynthEyes的主要工作区包含4个视口,与一个3D应用程序类似。前、左、顶和摄像机视图。你可以用控制面板上的播放按钮或拖动时间栏进行预览。在屏幕顶部可以使用多个功能面板。选择相关按钮左手边便会切换出处于活跃状态的控制面板
SynthEyes有一个有效的'Full Automatic'全自动跟踪模式位于‘summary’ panel简要面板。这对于一些平滑的镜头是十分有益的,轨道/斯坦尼康/摇臂等。SynthEyes将会尝试自动跟踪特征点,然后采取最好的输出一个解决方案。这只是一个点击过程。但是,你往往会发现自动跟踪遇到那些手持拍摄或有轻微运动模糊常常就会削减,你也许就会放弃。少量的跟踪点会偏移画面,然后你的解算就失败了。对于这个教程的目的(SynthEyes非常强大,我不可能面面俱到)我满将重点放在解算一个手动跟踪,手持的定焦DV镜头。理由是手持更难追踪,并且你将由此学到所有的摄像机跟踪与解算的基础。
尽管我们这个教程的重点不是“自动跟踪”,但您可以使用自动跟踪镜头得到一个良好的开端。有两种方法可以做到这一点:打开'Features'特征面板,确保勾选‘Link after blips’复选项,然后点击'Blips all frames'按钮。
SynthEyes处理整个镜头并跟踪数百个特征。
接下来点击'Peel All' 筛选所有按钮。此举会留下所有自动跟踪特征点中最好的部分,并将它们转换为跟踪点以备后用。
不像“Full Automatic”那样它并没有马上试图产生一个解决方案。作为选择,你可以在“summary panel摘要面板”中点击“'Run Auto-tracker'运行自动追踪器”,程序同样也会做出“blipping and peeling标记和筛选”的处理,一键式的。这样有助于预处理,第一时间理解Syntheyes做了什么。如果你已经做好“blipping and peeling标记和筛选”,那么你也就不需要再点击'Run Auto-tracker'运行自动追踪器。
点击工具栏上的'Quad'下拉菜单,从中选择‘Camera’,使摄像机视图展开至整个屏幕。现在切换至'Tracker'跟踪器面板,你将在视图内看到SynthEyes所常用的菱形状自动跟踪点标示。
拖动时间轴查看这些特征是否始终锁定它们正在追踪的对象。虽然SynthEyes保持着最佳跟踪状态,但这并不意味着就准确无误,比如一个特征点可能会错 误的跳跃到另一个与其紧密类似的特征点。在一个地面上布满落叶的快速移动镜头就可能发生这种状况。这正是我们不使用“'Full Automatic'全自动跟踪”显而易见的理由。有的手持镜头甚至一些跟踪点会跳来跳去;如果你以这些跟踪点为解决方案,那么你会等待很长段时间而解算 不出结果。如果有出错的跟踪点,选择、删除之。当你做好所有这些工作,也就做好了解算的准备。在我的这个镜头里,SynthEyes应该放置很多跟踪点在 地面上,但远处没有。目前只有少数在地平面上,这不大可能产生一个好的解算。
现在我要添加一些分布更均匀的跟踪点来帮助SynthEyes产生一个准确的跟踪。反复拖动你的序列来找到一个合适的跟踪点(别忘了前面所描述的规则)。点击跟踪面板上的“'create tracker'创建跟踪器”按钮(像魔杖的那个),然后在视图上点按一下你要跟踪的点。
上述操作之后,你所跟踪的特征点就会显现在跟踪窗口,并且视图内也会出现两个红色的方框。
这里要记住的一件重要事情是你想要在这个点上创建跟踪之前,需要反复拖动时间轴检查这个特征点。这听起来可能很明显,但这是一个常见错误,就是有时需要在 序列中途或镜头开始处创建这个新的跟踪器。如果此参考点只到镜头的第60帧处,那么在这一帧创建它并向前跟踪,如果这个参考点存在于整个镜头,那么在第一 帧或最后帧创建跟踪器,然后向前或向后进行跟踪。
在这个例子中,我跟踪了一块我提前放置在树干上的蓝色胶带。它直到镜头的第125帧处才停止,所以说它应该是个好的参考点。当我在第0帧放置好跟踪器后, 只需点击流播放控制器上的'play'即播放按钮开始进行跟踪,但首先我需要更改跟踪类型为“黑色背景上有个白点”,即下图红色标示内的特征按钮。
这将帮助它更容易地跟踪我的标记。这儿有不同的选项可用,取决于你所跟踪的参考点的类型。有些特征使用'symmetry'均匀模式跟踪效果会更好些。那 么,我继续跟踪我的标记,并且在第35帧跟踪器丢失了。SynthEyes已不再能准确的跟踪了,并且标记也飞离了屏幕。
如果SynthEyes丢失了跟踪的特征,它便会在时间栏里显示这些帧为淡蓝色段;一个特征若被一帧接一帧的准确匹配会显示为深蓝色。
一种方法来阻止这种情况的发生是增加追踪器上的search搜索区域数值。你会注意到追踪器有两个方框。里边的方框是追踪区域;外边的方框是特征点的搜索半径。在追踪手持镜头时,简单的增加搜索框的范围是不足以将特征跟踪的更为准确。
数值的多少很大程度上取决于摄像机的晃动程度,所以我在两个方向上增加2—3倍搜索区域。现在我往回拖动至第30帧,或直到能够在追踪器窗口上再次看到参考点,并点按播放按钮。现在追踪器又从第30帧处向前重新跟踪,它停留在第125帧并锁定我的参考点。 如果增加的搜索区域仍然产生一个不准确的跟踪,你可以试着改变跟踪器类型为其它搜索类型(symmetry instead of spot均匀替换为亮点)。每当你丢失参考点就可能需要放置关键帧。返回丢失的这一帧并再次定位在这个参考点上。在定位追踪器时,务必小心没有击中视图上 的追踪器边缘,从而却又新建了一个追踪(经常发生此类事件)。我发现点击并拖动跟踪器窗口比较有用。这将移动现有的跟踪器,并且你也知道你没有意外的新建 了一个。还有种方法就是你可以点击并移动'Pos'调节模块来移动跟踪器。
由此开始,点按播放再次开始跟踪,当SynthEyes丢失它的时候点按停止重新定位跟踪器。可以看到时间栏上有黑色的关键帧标记。保持必要的重新定位和跟踪。
'Preroll by Key Smooth'是个非常有用的功能。此功能会尝试平滑过渡你新放置的关键帧以得到一个良好的跟踪点,在'track'菜单下找到并选择它,然后在'Key Smooth'框里键入数值3,这意味着SynthEyes会平滑新关键帧前边的3帧。
平滑数值过多可能会产生不准确的跟踪,尤其是手持镜头。如果你准确的放置了追踪器,你可能就不再需要这些特征点了。可是,当你对平滑轨道/摇臂摄影机镜头重新定位丢失的追踪器时,使用特征点来避免一个意外的故障就可能会显得很有益。
现在有一个问题。在125帧之后跟踪器跑到了另一个树的后面,并且特征框丢失了它的参考点,再次在屏幕上飞来飞去。