日光灯使用说明书英文版
- 格式:docx
- 大小:18.98 KB
- 文档页数:2
08/20182Introducing our range of best in class, economical LED luminaires. They’re the ideallike-for-like replacements for all lightingsources – from circulation and meetingareas, to storage facilities and car parks.Simple to install, longer lasting and energysaving, you’ll be friends in no time.345JulieBarry George LED high bay Chloe LED downlightRuby6Meet Barry• D irect replacement for conventional battens in terms of light performance and length • Reliable integrated LED technology, ensuring maintenance-free installation and a long lifetime • Homogeneous illumination • High efficacy of 100 lm/W• Choose between cool white (4000K) and daylight (6500K) to suit application useLight source information• 2400 lm (24 W), 4000 lm (40 W) and 6000 lm (60 W), 100 lm/W• 4000 K cool white LED or 6500 K daylight white LED • 50 000 hour rated life (@L80B50, Ta 25 °C)•C RI 80• Beam angle: 120°• McAdam (initial): 5 stepLED battenIdeal for...2400, 4000 and 6000 lumens, 100 lm/WCorridors 50 000 hourslifetimeSave up to 60% energy compared withfluorescent battens600mm (2400 lm), 1200 mm (4000 lm) and 1500 mm (6000 lm)Warehouses WorkshopsLWH7-303060120–120–9090–601500–150±1802404807209601200DescriptionWt (kg) SAP Code BARRY LED 600 2400 8400.896631215BARRY LED 1200 4000 840 1.696630490BARRY LED 1500 6000 840 2.096630491BARRY LED 1200 4000 865 1.696631439BARRY LED 1500 6000 8652.096631440Material/FinishInstallation/MountingBody: steel, powder coated, white (RAL 9003)Diffuser: PC, IP40, opal white End caps: PC, white• S urface mounting (screws included)• Class I electrical • I P20• IK08SpecificationOrdering guideLighting distributionBarry 4000 lmcd/klm ULOR: 14% DLOR: 86% LOR: 100%100 lm/WL W HBARRY LED 600 2400 840 600 66 69BARRY LED 1200 4000 840 1200 66 69BARRY LED 1500 6000 84015006669ChloeMeet ChloeVersatile and durable,Chloe blends in a widerange of applications•A slim ceiling recessed Tri-Colour LEDdownlight with switchable light colour:choose between warm white (3000K),cool white (4200K) and daylight (5700K)to suit application use• Beam angle 95°• High colour rendering and uniform lightsurface with no shadowing• External electronic: dimmable LED driversuitable with trailing edge and universaldimmers*• Thermally optimised aluminium body• Fitted with flex and plug• Interchangeable trim rings availableseparatelyLight source information•L ifetime 30 000 hours (L70, Ta 25°C)•3000K: 790 lm (10 W), 79 lm/W•4200K: 930 lm (10 W), 93 lm/W•5700K: 850 lm (10 W), 85 lm/W•C RI 80LED downlightIdeal for...790-930lumens, upto 93 lm/WOffices and meeting roomsReception areasCorridorsSchools and universities30 000 hourslifetimeReplacementfor 1 x 18 W CFLDimmableSwitchablelight colourIP44(from below)IP20(from above)*see installation instructions for compatible dimmer list89-303060120–120–9090–60150–150±180150300450DescriptionWt (kg) SAP Code CHLOE TC LED 90 800 830/42/57 DIM WH FP 0.5596631233CHLOE TC TRIM WH FLAT 0.0396631234CHLOE TC TRIM SR REBATED 0.0596631235CHLOE TC TRIM SR FLAT 0.0396631236CHLOE TC TRIM BK REBATED 0.0596631237CHLOE TC TRIM BK FLAT0.0396631238CHLOE LED 90 700 830 DIM WH FP*0.5096629760CHLOE LED 90 800 840 DIM WH FP*0.5096629759Material/FinishInstallation/MountingBody: Aluminium Trim: Metal, white• C hloe LED can be installed into a wide range ofceiling types of 2 – 20 mm thickness• Class II electrical• I P44 (from below), IP20 (from above)• IK02• I nsulation Coverable Luminaire and Driver (IC-4/IC-F)SpecificationOrdering guideLighting distributionChloe 850 lmcd/klm ULOR: 0% DLOR: 100% LOR: 100%85 lm/W10754829096631234included withthe product96631238966312379663123696631235*fix colour temperature, with a flat white trim (not interchangeable)TC = tricolour10GeorgeMeet GeorgeReliable, efficient and bright, George feelscomfortable in high ceilings• George offers a simple, direct and cost-effective one-for-one replacement of traditional HID high bay luminaires • Efficient LEDs (120 lm/W) combined with a lens technology offering a beam angle of 90° to reduce waste light • With a long 50 000-hour lifetime, George eliminates the need for costly and disruptive lamp replacements • The housing is carefully designed to allow air through the luminaire. This prevents the components from overheating andensures optimum performance in industrial environments• Supplied with 3 pin flex & plug (3m length)Light source information• Lifetime 50 000 hours (@L70B50, Ta 25 °C)• 12000 lm (100 W), 18000 lm (150 W), 24000 lm (200 W), 30000 lm (250 W), up to 120 lm/W • C olour temperature: 4000 K •C RI 80• M cAdams (initial): 5 stepLED high bay12 000 –30 000 lumens 50 000 hours lifetime90° beam angleIdeal for...IP65: Dust tight and water resistant IK08 rated impact resistanceSave up to 50% energy compared to HIDWarehousesExhibition Halls Retail outlets11Material/FinishInstallation/MountingBody: Aluminum die-cast, black (RAL9017)Lens: PC• S ingle point suspension (mounting hook supplied with luminaire)• S tirrup for wall/ceiling mounting (available as accessory)Ordering guideSpecification• Class I electrical • IP65• IK08• A mbient operatingtemperature: -30 to +50°CDescriptionWt (kg) SAP Code GEORGE LED 330 12000 840 FP 1 3.4096629086GEORGE LED 330 18000 840 FP 2 3.8096629087GEORGE LED 390 24000 840 FP 3 6.0096629088GEORGE LED 390 30000 840 FP 3 6.0096629089Mounting bracketsSET OF GEORGE STIRRUP S (6pcs)10,37x696629371SET OF GEORGE STIRRUP M (6pcs)20,37x696629372SET OF GEORGE STIRRUP L (6pcs)30,47x696629373Lighting distributionGeorge 12000 lmcd/klm ULOR: 0% DLOR: 100% LOR: 100%120 lm/W-303060120–120–9090–601500–150±18030006000900012000150006913833039076151123The small numbers indicate how to match fittings and mounting brackets.12Meet Julie• High quality, low energy lighting in wet and dusty environments • High quality opal diffuser for uniform lighting • Ideal for replacement and refurbishment projects • 4000 lm (40 W), 6000 lm (60 W), up to 100 lm/W • Colour Temperature 4000 KIP65 LED luminaireIP65:Dust tight and water resistant Save up to 60% energy compared to T8 fluorescentIK08 rated impact resistanceLengths of 1232 mm and 1532 mm 2h emergency version availableIdeal for...50 000 hours lifetimeCar parks Workshops Underpasses Storage facilitiesLight source information• Life time 50 000 hours (@L70B50, Ta 25 °C) • 4000 lm (40 W), 6000 lm (60 W), up to 100 lm/W • Colour temperature 4000 K • CRI 80• McAdams (initial): 4 step13100200300-303060120–120–9090–60150–150±180Ordering guideMaterial/FinishInstallation/MountingCanopy: Polycarbonate Diffuser: Opal polycarbonate Bracket: Stainless steelSuitable for surfacemounting. 4 × 10 mm stainless steel self-tapping screws(not included) can be applied to prevent unauthorised opening of the luminaire.Specification• Class I electrical • IP65• IK08• A mbient operating temperature: - 20 to + 40°C STD, 0 to + 25°C EL2Lighting distributionJulie LED 6000 lmcd/klm ULOR: 8% DLOR: 92% LOR: 100%DescriptionWt (kg) SAP Code JULIE 600 LED IP65 1800 840 1.2396628548JULIE 1200 LED IP65 4000 8401.5096665577JULIE 1200 LED IP65 4000 840 COR MWS 1.6096630234JULIE 1500 LED IP65 6000 840 1.9596665580Emergency versionsJULIE 1200 LED IP65 4000 840 EL2* 1.9096646833Spare partJULIE LED Spare Mount Kit96628409100 lm/WL W HJULIE 600 LED IP65 1800 632 103 78JULIE 1200 LED IP65 4000 1232 103 78JULIE 1500 LED IP65 6000153210378LWH* A S 2293 Emergency Classification C0 = D40, C90 = D252 Hour Maintained, LED Emergency Luminaire14RubyMeet RubySophisticated andcompact, Ruby createsa pleasant atmosphere in communication areas• Elegant and lightweight design with a evenly lit surface • Replaces conventional luminaires with 2 X 18W T8, 4 x 18W T8, 4 x 36W T8 and2 x 36W T8 and offers more than 40% energy saving • Ideal solution for any refurbishment job • Supplied with3 pin flex & plug (1.5m length)• Suitable for recessed, surface and suspended mountingLight source information• 1800lm (18W), 4000K, 100lm/W • 3200lm (32W), 4000K, 100 lm/W • 4500lm (50W), 4000K, 90 lm/W • CRI 80• McAdam (initial): 4 step • Beam angle: 110°Recessed LED panelIdeal for...1800, 3200 and 4500 lumens, up to 100lm/W 50 000 hours lifetime 1200 x 300mm 1200 x 600mm 600 x 300mmand600 x 600mmOffices and meeting rooms Schools and universities Foyers and waiting-roomsSpecification• Class II electrical • IP20• A mbient operating temperature: -20 to +40 °C15100200300-303060120–120–9090–60150–150±180Material/FinishInstallation/MountingBody: Aluminum, white finish (RAL 9003)Diffuser: high uniformity PS diffuserLight guide plate: PMMA• L ay-in installation in T-bar ceiling grids • S uitable for suspension and surface mounting (available as accessories)Ordering guideDescriptionWt (kg) SAP Code RUBY LED 1200x300 3200 840 FP 3.3296628981RUBY LED 1200x600 4500 840 FP 4.7596628982RUBY LED 600x600 3400 840 FP 2.696631071RUBY LED 600x300 2000 840 FP 1.396631070AccessoriesRUBY LED 1200 x 300 Suspension Kit 96629238RUBY LED 1200 x 600 Suspension Kit96629085Lighting distributionRuby 3200 lmcd/klm ULOR: 0% DLOR: 100% LOR: 100%100 lm/W29613730101196596156321196296351003010596152321059639596thorneco thorneco ContactAustraliaNSW - HeadquartersZG Lighting Australia Pty Ltd2/7 Millner AvenueHorsley Park, NSW 2175AustraliaT +61 1300 139 965**************************NSW – Sales officeZG Lighting Australia Pty Ltd38 Oxley StreetCrows Nest, NSW 2065AustraliaT +61 1300 139 965**************************VICZG Lighting Australia Pty Ltd163 Epsom RoadFlemington, VIC 3031AustraliaT +61 1300 139 965**************************QLDZG Lighting Australia Pty LtdLevel 1, 349 Coronation DriveMilton, 4064 QLDAustraliaT +61 1300 139 965**************************WASCOPE LIGHTING PTY. LTD.14 Christable WayLandsdale, WA 6065AustraliaT +61 1300 139 965**************************SALEDA Lighting Solutions PTY. LTD.3 Prescott CourtHallett Cove, SA 5158AustraliaT +61 1300 139 965**************************THORNeco is constantly developing and improving its products.All descriptions, illustrations, drawings and specifications in thispublication present only general particulars and shall not formpart of any contract. The right is reserved to change specifica-tions without prior notification or public announcement. All goodssupplied by the company are supplied subject to the company’sGeneral Conditions of Sale, a copy of which is available on request.All measurements are in millimetres and weights in kilogramsunless otherwise stated.Publication Date: 08/2018TASWestport Agencies PTY. LTD.12 Fleet StreetMoonah, TAS 7009AustraliaT +61 1300 139 965**************************NTGlobal Lighting Solutions PTY. LTD.Cnr Mataram St & Coonawarra RdWinnellie, NT 0820AustraliaT +61 1300 139 965************************** | DE-101-933021 | AT-101-130426。

1. Scope of ApplicationThese specifications apply to chip type LED lamp, CITILED, model CL-270S-WS-SD-TS.Reference 2. Part codeCL-270S-WS-SD-TSSeries270S : Mono-colorUltra small,thin,sidewayslight emission typeLighting colorWS : High brightness whiteLow VF typeDiffusionSD: DiffusedShipping modeNon-coded: BulkTS: Taping (standard)Approved Checked Drawn Symbol CITILEDName CL-270S-WS9. Precautions9-1. Soldering(1) Manual soldering1) Solder of 96.5Sn 3Ag 0.5Cu is recommended.2) Before soldering every time, make baking to units. By manual soldering, it is the possibility of crack due to the moisture absorption in the resin portion.3) Use a soldering iron of 25W or smaller. Adjust the temperature of the soldering iron below 350°C.4) Force or stress must not be applied to the resin portion while soldering. 5) Finish soldering within 3 seconds.6) Handle the devices only after temperature is cooled down.(2) Lead free soldering1) Following soldering paste is recommendedMelting temperature: 216 ~ 220°C. Composition: 96.5Sn 3Ag 0.5Cu2) The temperature profile at the top surface of the parts is recommended as shown below.3) It is requested that products should be handled after their temperature has droppeddown to the normal room temperature.Approved Checked Drawn Symbol CITILEDNameCL-270 Reference140sec160~180°C4°C /sec.MaxT e m p e r a t u r eTime4°C /sec.Max 260°C Max 220°C60~70secCL-270S-WS-SD rankChromaticity coordinatesCondition : IF=5mAwithin the area surrounded by a, b, c and d.Reference。
开学第一课主题班会范本5篇最新开学第一课主题班会范本5篇通过介绍老师,认识伙伴,拉近老师和学生之间的距离,增进伙伴们之间的友谊。
下面是小编为大家整理的最新开学第一课主题班会范本,希望能够帮助到大家!最新开学第一课主题班会范本(篇1)一、教学目标1、充分认识安全工作的重要意义。
2、在学习和生活中注意人身安全,饮食安全,交通安全等。
3、进行预防灾害,防肺结核的教育。
二、教学过程1、导入:列举出生活中的安全事例。
2、安全工作的重要性(1)公路上的交通事故时有发生,是因为安全意识不强。
(2)班级举例学校发生的事故及后果。
(3)国家、政府狠抓安全教育工作。
(4)目前学校抓的几项工作。
三、小学生应注意安全的地方1、学生讨论。
2、集体归纳。
(1)人身安全,在校园内或公路上不追逐打闹,不爬围墙,不爬树,不接近有电等危险地点,劳动时,注意安全,不与社会上不三不四的人交往,特别是吸毒者,课外不玩火,不玩火。
(2)交通安全,在公路上不追逐打闹,自觉遵守交通规则,交叉路口要注意行人车辆,骑自行车宁慢勿快,上、下坡要下车,通过公路要做到一停二看三通过。
(3)财产安全,保管好自己的物品、钱财,如有遗失或遇偷盗、敲诈等应向老师及时反映或报警。
(4)饮食安全,不饮生水,不吃不卫生的食品,不吃有病的鸡肉、猪肉等,饭前便后要洗手,不吃霉变或过期食品。
四、安全教育总结新学期开学以来,为提高二年级全体学生的安全意识和自护自救能力,预防和杜绝各类事故的发生,我积极采取有效措施,认真上好新学期第一堂安全课:在开学第一天对学生进行安全教育。
安全教育内容紧扣学生实际,主要从以下三方面展开教育:1、教育学生时刻注意交通安全,平时外出严格遵守交通规则,不乘坐无安全保障的黑车、病车等。
2、教育学生谨防发生在身边的伤害事故,用血淋淋的事例教育学生平时严格遵守《守则》《规范》,远离学生伤害事故。
3、教育学生做好个人卫生,严防水痘、腮腺炎等春季传染病的发生,若有发烧症状的及时自觉就医等。
200w光束灯16CH英⽂说明书AUDIOStart to audio motivate1. Press “UP” “DOWN” choose other modes.2. Press knob to “test run” to check the audio motivate state which is automatic. “Yes” --audio mode already, “No” --audio mode fail.Set ”ON”, then audio status flicker with music.Reverse.PanPress knob to menu, then “UP”, “DOWN” to reverse pan and save. Reverse TiltPress knob to menu, then “UP”, “DOWN” to reverse tilt and save. ResetReset fixture to standard location, press knob to save Specification Item Technical ParameterPower supply AC 110V/220V, 50-60Hzpower consumption350WFuse 6ALamp Philip MSD Platinum 189WDMX channel 18 ChannelsColor wheel 14 color+white+rainbow effectGobo wheel 17 gobos+blank+rainbow effectStrobe 0-10Hz adjustablePan 540oTilt 270oDisplay LCD screenProtect Intelligent thermal protectionSize 330*405*475mmDMX 18CHChannel Value FunctionCH1 Pan0-255 Pan movement by 450°CH2 Tilt0-255 Tilt movement by 270°0-255 Fine control of Tilt movement by 0-1°CH5 Pan/Tilt speed 0-255 Speed from fast to slowCH6 Dimmer0-255 DimmerCH7 Strobe0 off1--50 on51--240 Strobe from slow to fast241--255 onCH8 Atomization0-255 AtomizationCH9 Color0-7 white8-15 color 116-23 color 224-31 color 332-39 color 440-47 color 548-55 color 656-63 color 764-71 color 872-79 color 980-87 color 1088-95 color 1196-103 color 12104-111 color 13112-127 color 14128-191 Rotating color on anti-clockwise from slow to fast192-255 Rotating color on clockwise from fast to slowCH10 Color fine0-255 Color fine from fast to slowCH11 Gobo0-6 White7-13 Gobo 121-27 Gobo 328-34 Gobo 435-41 Gobo 542-48 Gobo 649-55 Gobo 756-62 Gobo 863-69 Gobo 970-76 Gobo 1077-83 Gobo 1184-90 Gobo 1291-97 Gobo 1398-104 Gobo 14105-111 Gobo 15112-118 Gobo 16119-127 Gobo 17128-191 Rotating gobo on anti-clockwise from slow to fast192-255 Rotating gobo on clockwise from fast to slow CH12 Gobo shake 0 No effect1-191 Gobo shaking from slow to fast192-255 No effectCH13 Prism0-31 No effect32-255 8-facet prismCH14 Prism wheel0-127 Prism angle128-191 Rotating prism on clockwise from fast to slow192-255Rotating prism on anti-clockwise from slow tofastCH15 Prism amplification0--255 Prism from concerntrated to dispersive CH16 Focus0-255 Continuous adjustment from near to far CH17 Lamp on/off100-105 Close delayingly200-205 Open delayingly0-254 No255 ResetLCD Dispaly DOWN UPAP-200DMX Address=001Set DMX addressFor users change the address valu e1. Press the knob to choose “dmx address” from menu, enter and press “UP” “DOWN” to set new addr ess.Other settings1. Parameter. To set control mode and fixture mode.2. Option. X reverse, Y reverse, X/Y reverse.3. Display. Set language, brightness, backlight, logo.4. Manual control. Set from CH1 to CH205. Test operation. Adjust sound mode, auto mode.6. Resume default7. Fixture reset.TestAccess to built-in demo program without controller. The setting will be saved permanently unless you exist the test mode. Press knob to”test”, choose “sound mode”, press again to set.1. Mod.1Press “UP” “DOWN” to other modes,press knob to test under “sound mode”. Press “UP” “DOWN” for exist.产品保修卡WARRANTY CARD[保修服务]Warranty service尊敬的⽤户,⾸先感谢您对本公司产品的信赖,选⽤,阁下如果您在使⽤过程中发现本产品质量有什么问题时,请填好“产品故障”⼀栏,并加盖单位公章⽣效寄回。
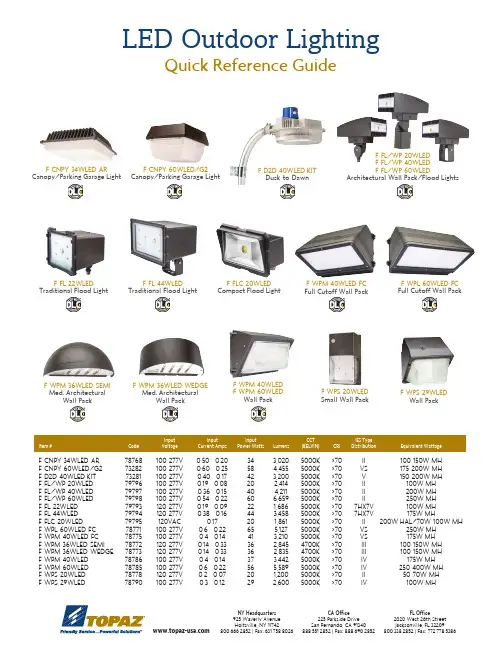
Input Input Input CCT IES Type Item # Code Voltage Current Amps Power Watts Lumens (KELVIN) CRI Distribution Equivalent Wattage
F-CNPY-34WLED-AR 78768 100-277V 0.50 - 0.20 34 3,020 5000K >70 II 100-150W MHF-CNPY-60WLED/G2 73282 100-277V 0.60 - 0.25 58 4,455 5000K >70 VS 175-200W MHF-D2D-40WLED KIT 73281 100-277V 0.40 - 0.17 42 3,200 5000K >70 V 150-200W MHF-FL/WP-20WLED 79796 100-277V 0.19 - 0.08 20 2,414 5000K >70 II 100W MHF-FL/WP-40WLED 79797 100-277V 0.36 - 0.15 40 4,211 5000K >70 II 200W MHF-FL/WP-60WLED 79798 100-277V 0.54 - 0.22 60 6,659 5000K >70 II 250W MHF-FL-22WLED 79793 120-277V 0.19 - 0.09 22 1,686 5000K >70 7HX7V 100W MHF-FL-44WLED 79794 120-277V 0.38 - 0.16 44 3,458 5000K >70 7HX7V 175W MHF-FLC-20WLED 79795 120VAC 0.17 20 1,861 5000K >70 II 200W HAL/70W-100W MHF-WPL-60WLED-FC 78771 100-277V 0.6 - 0.22 65 5,127 5000K >70 VS 250W MHF-WPM-40WLED-FC 78775 100-277V 0.4 - 0.14 41 3,210 5000K >70 VS 175W MHF-WPM-36WLED-SEMI 78772 120-277V 0.14 - 0.33 36 2,845 4700K >70 III 100-150W MHF-WPM-36WLED-WEDGE 78773 120-277V 0.14 - 0.33 36 2,835 4700K >70 III 100-150W MHF-WPM-40WLED 78786 100-277V 0.4 - 0.14 37 3,442 5000K >70 IV 175W MHF-WPM-60WLED 78785 100-277V 0.6 - 0.22 56 5,589 5000K >70 IV 250-400W MHF-WPS-20WLED 78778 120-277V 0.2 - 0.07 20 1,200 5000K >70 II 50-70W MHF-WPS-29WLED 78790 100-277V 0.3 - 0.12 29 2,600 5000K >70 IV 100W MH
灯具说明书常用语英文As a successful content creator, it is essential to be ableto write effective instruction manuals for various products. One such product that requires a well-written manual islighting fixtures. In this article, we will explore the common phrases and terms used in English for lightingfixtures, to help you create a concise and effectiveinstruction manual.1. Basic parts of a lighting fixtureTo start, it is important to include an illustration in your manual that shows the different parts of the lighting fixture. The following are the basic parts that should be mentionedand labeled:- Bulb holder or socket- Bulb or light source- Lampshade or cover- Electrical connections and wiring2. Installation instructionsWhen it comes to installing the lighting fixture, it is important to provide clear and concise instructions to avoid any accidents or damage to the fixture. The following aresome common phrases used in instruction manuals for lighting fixtures:- Position the fixture in the desired location.- Fix the mounting bracket securely to the ceiling or wall. - Connect the wiring according to the manufacturer's instructions.- Test the fixture to ensure it is working properly.3. Maintenance instructionsIt is important to provide maintenance instructions, as proper care and maintenance can prolong the lifespan of the lighting fixture. The following are some common phrases used for maintenance instructions:- Turn off the power before cleaning the fixture.- Use a soft, dry cloth to clean the fixture.- Do not use abrasive cleaners or solvents.- Replace the bulb with a new one of the same wattage.4. Common troubleshooting tipsIn case of any issues with the lighting fixture, it is important to provide troubleshooting tips in the instruction manual. The following are some common phrases used for troubleshooting:- Check the bulb to see if it needs to be replaced.- Check the wiring for any loose connections.- Check the circuit breaker to ensure it hasn't tripped.- Contact a professional electrician if the issue persists.ConclusionIn conclusion, a well-written instruction manual for lighting fixtures should include basic parts, installation instructions, maintenance instructions, and common troubleshooting tips. Using clear and concise language and providing illustrations can help users understand how to properly install and maintain the fixture, as well as troubleshoot any issues that may arise. With these tips, you can create an effective and easy-to-follow instruction manual for lighting fixtures.。
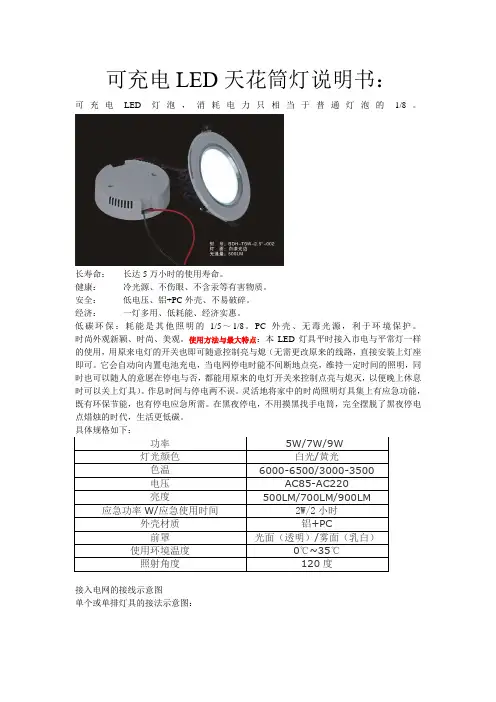
可充电LED天花筒灯说明书:可充电LED灯泡,消耗电力只相当于普通灯泡的1/8。
长寿命:长达5万小时的使用寿命。
健康:冷光源、不伤眼、不含汞等有害物质。
安全:低电压、铝+PC外壳、不易破碎。
经济:一灯多用、低耗能、经济实惠。
低碳环保:耗能是其他照明的1/5~1/8。
PC外壳、无毒光源,利于环境保护。
时尚外观新颖、时尚、美观。
使用方法与最大特点:本LED灯具平时接入市电与平常灯一样的使用,用原来电灯的开关也即可随意控制亮与熄(无需更改原来的线路,直接安装上灯座即可。
它会自动向内置电池充电,当电网停电时能不间断地点亮,维持一定时间的照明,同时也可以随人的意愿在停电与否,都能用原来的电灯开关来控制点亮与熄灭,以便晚上休息时可以关上灯具)。
作息时间与停电两不误。
灵活地将家中的时尚照明灯具集上有应急功能,既有环保节能,也有停电应急所需。
在黑夜停电,不用摸黑找手电筒,完全摆脱了黑夜停电点焟烛的时代,生活更低碳。
具体规格如下:功率5W/7W/9W灯光颜色白光/黄光色温6000-6500/3000-3500电压AC85-AC220亮度500LM/700LM/900LM 应急功率W/应急使用时间2W/2小时外壳材质铝+PC前罩光面(透明)/雾面(乳白)使用环境温度0℃~35℃照射角度120度接入电网的接线示意图单个或单排灯具的接法示意图:两排或多排灯具的接线示意图:Rechargeable LED ceiling lamp specificationRechargeable LED open lanterns, with consumption power is only equivalent to 1/8 of the common bulbLong—life : Up to 50000 hours of service lifeHealthy : with Cold light do not hurt the eye, wihtout containing mercury and other harmful SubstancesSafety: Low voltage ,PC shell ,difficult to breakEconomic One light with multi-purpose, low energy consumption and economic benefits low-carbon green: Energy consumption is 1/5 ~ 1/8 of other lighting . PC shell, non-toxic source, as to protect the environmentFashional : The novel appearance ,fashional, beautifulUse method and the biggest characteristic:This LED lamps and lanterns usually access mains and normal use of the light, use the original light switch also can control light and out (without changing the original line, installed directly on the lamp holder. it will automatically to the built-in battery charging, when power grid can uninterrupted place bright, maintain certain time lighting, and at the same time also can follow the will of the people in power failure or not, can use the original lamp switch to control the light and go out, so that night when resting can close lamps and lanterns) neglect neither work and rest time nor power outages. Agilely will home fashion lighting lamps and lanterns is set on the emergency function, both environmental protection and energy saving, also have power needed for emergency power in the night, need not to late to find a flashlight, completely out of the night candle power point of time, make the life more low carbonspecifications below:power 5W/7W/9WLight color White color /yellow color colour temperature 6000-6500/3000-3500 voltage AC85-AC220brightness 500LM/700LM/900LM service power W/service time 2W/2 hoursLamp Material alumina-bearing material +PC front shroud fog surface (milky white) The use of ambient temperature 0℃~35℃Beam Angle 120degreesLamps and lanterns access network diagramA single or a single row of lamps and lanterns connection diagramSchematic wiring of two or more rows of lamps and lanterns:。

Instructions for LED Emergency Lighting FixtureIMPORTANT:READ AND FOLLOW ALL SAFETY INSTRUCTIONSSAVE THESE INSTRUCTIONSFLEXIBLE CONDUIT ONLYINSTALLATION (J-BOX MOUNTING)INSTALLATION (CONDUIT )WARNING:Let the battery charge up for at least 24 hours.Then normal operation ofthis unit should take effect . To check, press the " TEST " button . TheLED lamps on the unit should turn ON. During an electrical power failure,the led lamps will automatically come on for a minimum of 90 minutes. Inaccordance with NFPA 101, your emergency lighting system must betested monthly for a minimum of 30 seconds and annually for 90 minutes.Refer to your local codes for any additional requirements that may apply. When using electrical equipment, basic safety precautions should always be followed including the following:1. Do not use outdoors.2. Equipment should be mounted in locations and at heights where it will not be subject to tampering by unauthorized personnel.3. Do not mount near gas or electric heaters.4. The use of accessory equipment not recommended by the manufacturer may cause an unsafe condition.5. Do not use this equipment for anything other than its intended use.6. Servicing of this equipment should be performed by qualified personnel.7. Disconnect AC power before servicing.1. Feed fixture leads through the back plate and connect to AC power supply (Fig A). For 120V use black and white wires and for 277V, use red and white wires.2. Attach back plate to J-Box and secure with screws.3. Complete the battery connection. (Fig. B)4. Align snaps and push housing directly onto the back plate (Fig. C). Apply continuous AC power and press "TEST" buttonto check light.1. Secure back plate to wall surface . Route wires through hole in conduit flange and make conduit connection. For 120V,use black and white wires and for 277V, use red and white wires.2. Complete the battery connection (Fig. B).3. Align snaps and push housing directly onto the back plate (Fig. C). Apply continuous AC power and press "TEST" button to check light.Unused wires must be capped using enclosed wire nuts.Fig.A (J-Box)Page 1 of 2OPERATIONWIRING DIAGRAMREGULARREMOTE CAPABLE1. During an electrical power failure, the LED lamps will automatically come on for a minimum of 90 minutes.2. To test, depress the "TEST" switch. The emergency LED lamps will illuminate. When the switch is released, the lamps will go off.READYREADYNote:Use 18-22 AWG stranded wire to connect remote lamp heads.Page 2 of 2SELF‐DIAGNOSTICS TESTING:1)IntroductionOnce the unit is properly installed according to the Installation instruction sheet and AC power is supplied, the EXIT will come ON. The dual‐color LED indicator will also come ON, automatically initiating the self‐diagnostic test function. The LED indicator points out the current unit status. A STEADY GREEN on the LED indicator indicates a normal service; BLINKING GREEN indicates that the unit is in testing mode; GREEN/RED FLASHING indicates that the battery is charging; RED (STEADY and BLINKING) would indicate a fault or a service alert. Refer to section 3 – Fault Indication for more details. The LED indicator would be OFF when the unit is in Emergency mode.2)Self – Diagnostic ServiceThe self‐diagnostic function is factory preset without any field adjustment. The automatic self‐diagnostic feature serves the following tests –a.On‐line real time monitoring of battery and lamps: Identifies battery charging, disconnection and failure along with lampfailure.b.Self‐testing and a 30‐second discharge once every 30 days (conforming to NFPA code requirements), after AC power hasbeen supplied for a minimum of 24 hours.c.Self‐testing and a 30‐minute discharge once every 180 days, after AC power has been supplied for a minimum of 24 hours.d.Self‐testing and a 90‐minute discharge once every 365 days (conforming to NFPA code requirements), after AC power hasbeen supplied for a minimum of 24 hours.3)Fault IndicationFunction LED IndicationUnit is in normal mode STEADY GreenBattery Disconnected STEADY RedBattery Recharge Red and Green (flashing alternatively)Battery Recharge Failure* FLASHING RedBattery Failure** Red BLINKING ‘2’ timesLAMP Failure Red BLINKING ‘4’ timesRemote LAMP Failure Red BLINKING ‘5’ times* A battery recharge failure will come up if the battery is NOT able to recharge within the 24hrs charging time** A battery failure will come up if the battery is NOT able to operate the lamps for the period of a discharge test4)Manual TestingThis unit also provides for manual testing by pushing the test switch in a specific pattern. The different patterns and the resulting tests are listed in the table below.ACTION REACTION AND LED INDICATIONPush test button once (within 2 seconds) 30‐second test; FLASHING GreenPush test button ‘2’ times (within 2 seconds) 30‐minute test; Green BLINKING ‘2’ timesPush test button ‘3’ times (within 2 seconds) 90‐minute test; Green BLINKING ‘3’ timesPush & Hold test button (3‐5 seconds) System InterruptionPush & Hold test button (more than 6 seconds) System Reset5)OperationDuring an electrical power failure, the lamps will automatically come ON for a minimum of 90 minutes. To test this unit, the battery needs to be charged initially for 2 hours before depressing the test switch (to do manual test). On pressing the test switch, the Lamps will illuminate. The Lamps will turn OFF after 30‐sec /30‐min /90‐min depending on the number of times the switch has been pressed.。
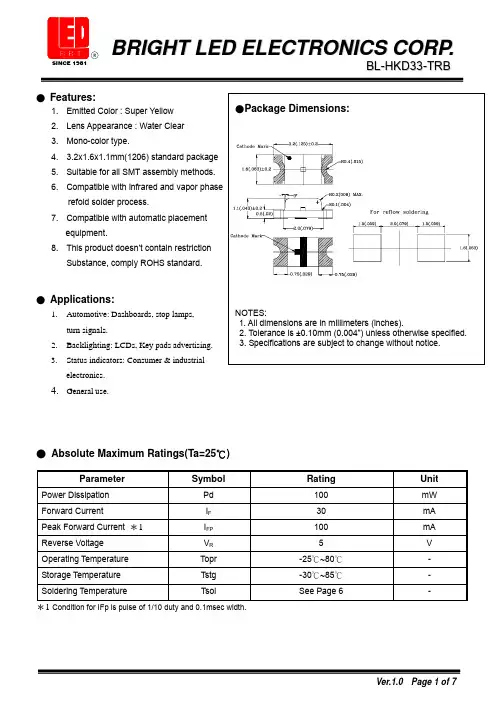
electronics.4.General use.● Absolute Maximum Ratings(Ta=25℃)Parameter Symbol Rating UnitPower Dissipation Pd 100 mWForward Current I F 30 mA Peak Forward Current *1I FP 100 mA Reverse Voltage V R 5 V Operating Temperature Topr -25℃~80℃-Storage Temperature Tstg -30℃~85℃-Soldering Temperature Tsol See Page 6 -*1 Condition for IFp is pulse of 1/10 duty and 0.1msec width.● Typical Electro-Optical Characteristics CurvesFig.2 Forward current derating curveF o r w a r d c u r r e n t (m A )R e l a t i v e l u m i n o u s i n t e n s i t y (@20m A )Forward current (mA)R e l a t i v e r a d i a n t i n t e n s i t yFig.1 Relative intensity vs. wavelengthIntensity Bin Limits (At 20mA)BIN CODE Min. (mcd) Max. (mcd)M28 42N4263P6394Q94140 Tolerance for each Bin limit is ± 15 %.●BIN:xI n t e n s i t y B I N C O D EClassification Test Item Reference Standard Test Conditions ResultOperation Life MIL-STD-750:1026MIL-STD-883:1005JIS-C-7021 :B-1 Connect with a power If=20mATa=Under room temperatureTest time=1,000hrs0/20HighTemperature High Humidity Storage MIL-STD-202:103BJIS-C-7021 :B-11Ta=+65℃±5℃RH=90%-95%Test time=240hrs0/20High Temperature Storage MIL-STD-883:1008JIS-C-7021 :B-10High Ta=+85℃±5℃Test time=1,000hrs 0/20EnduranceTestLowTemperature Storage JIS-C-7021 :B-12Low Ta=-35℃±5℃Test time=1,000hrs 0/20Temperature Cycling MIL-STD-202:107DMIL-STD-750:1051MIL-STD-883:1010JIS-C-7021 :A-4-35℃ ~ +25℃ ~ +85℃ ~ +25℃60min 20min 60min 20minTest Time=5cycle0/20Thermal Shock MIL-STD-202:107DMIL-STD-750:1051MIL-STD-883:1011 -35℃±5℃ ~+85℃±5℃20min 20minTest Time=10cycle0/20EnvironmentalTestSolder Resistance MIL-STD-202:201AMIL-STD-750:2031JIS-C-7021 :A-1Preheating:140℃-160℃,within 2 minutes.Operation heating:260℃(Max.), within 10seconds. (Max.)0/20●Judgment criteria of failure for the reliabilityMeasuring items Symbol Measuring conditions Judgement criteria for failureForward voltage V F ( V) I F=20mA OverUx1.2 Reverse current I R(uA) V R=5V OverUx2 Luminous intensity Iv ( mcd ) I F=20mA BelowSX0.5 Note: 1.U means the upper limit of specified characteristics. S means initial value.2.Measurment shall be taken between 2 hours and after the test pieces have been returned tonormal ambient conditions after completion of each test.The temperature of the iron tip should not be higher than 300℃(572℉) and Soldering within 3 seconds per solder-land is to be observed. 2. Reflow SolderingPreheating : 140℃~160℃±5℃,within 2 minutes.3. Preheating : 120℃~150℃,within 120~180 sec.Operation heating : 245℃±5℃ within 5 sec.260℃ (Max) Gradual Cooling (Avoid quenching).● Handling :Care must be taken not to cause to the epoxy resin portion of BRIGHT LEDs while it is exposed to high temperature.Care must be taken not rub the epoxy resin portion of BRIGHT LEDs with hard or sharp article such as the sand blast and the metal hook .TimeLEDs within the rated figures. Also, caution should be taken not to overload BRIGHT LEDs with instantaneous voltage at the turning ON and OFF of the circuit.When using the pulse drive care must be taken to keep the average current within the rated figures. Also, the circuit should be designed so as be subjected to reverse voltage when turning off the BRIGHT LEDs.● Storage:In order to avoid the absorption of moisture, it is recommended to solder BRIGHT LEDs as soon as possible after unpacking the sealed envelope.If the envelope is still packed, to store it in the environment as following: (1) Temperature : 5℃-30℃(41℉)Humidity : RH 60﹪Max.(2) After this bag is opened, devices that will be applied to infrared refold, vapor-phase refold, orequivalent soldering process must be: a. Completed within 168 hours. b. Stored at less than 30% RH.(3) Devices require baking before mounting, if:(2) a or (2) b is not met.(4) If baking is required, devices must be baked under below conditions:48 hours at 60℃±3℃.● Package and Label of Products:(1) Package: Products are packed in one bag of 3000 pcs (one taping reel) and a label is attachedon each bag. (2) Label:BRIGHT LED LOGOPart No. Quantity BIN. Sealing Datexx xx xx Location。
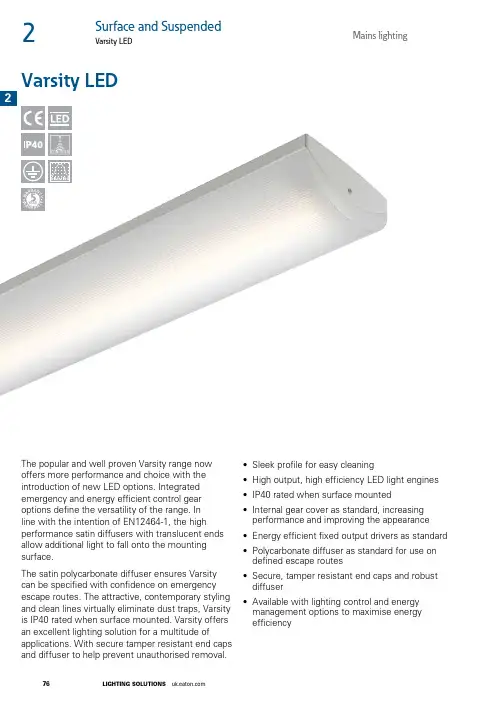
The popular and well proven Varsity range now offers more performance and choice with the introduction of new LED options. Integrated emergency and energy efficient control gear options define the versatility of the range. In line with the intention of EN12464-1, the high performance satin diffusers with translucent ends allow additional light to fall onto the mounting surface.The satin polycarbonate diffuser ensures Varsity can be specified with confidence on emergency escape routes. The attractive, contemporary styling and clean lines virtually eliminate dust traps, Varsity is IP40 rated when surface mounted. Varsity offers an excellent lighting solution for a multitude ofapplications. With secure tamper resistant end caps and diffuser to help prevent unauthorised removal.• Sleek profile for easy cleaning• High output, high efficiency LED light engines • IP40 rated when surface mounted• Internal gear cover as standard, increasing performance and improving the appearance • Energy efficient fixed output drivers as standard • Polycarbonate diffuser as standard for use on defined escape routes• Secure, tamper resistant end caps and robust diffuser• Available with lighting control and energy management options to maximise energy efficiencyVarsity LEDW AR R A NT YWA R R A NT YYEAR762Surface and Suspended2Mains lightingVarsity LEDLamp and Control Gear Options• High efficacy LED linear light engines 4000°K • Fixed output control gear as standard Materials• Body and gear cover - sheet steel, powder coated in RAL9016 white finish• End cap - injection moulded ABS, colour matched finish • Attachment - TPa rated flame retardant UV stabilised satin polycarbonate Options• DALI dimming option• Fully integrated independent emergency option, 3 hour duration • We offer a range of product support contracts to aidcommissioning, reduce your maintenance costs, comply with legislative test requirements and increase the lifespan of your lighting equipment Installation Notes• Suitable for direct fix or conduit mounting • Central BESA cable entry position on rear• Additional fixing brackets available separately to provide 600mm BESA fixing centres• Terminal block with 2 x 2.5mm² cable capacity per termination • Fused as standard• Snap fix positive location of the diffuser allows quick attachment installation/removal• Diffusers are retained by screws for tamper resistanceCatalogue NumbersAccessoriesSpecificationTo specify state: IP40 surface LED luminaire, with flushattachment, retained by screws for tamper resistance, injection moulded end caps and high quality, durable post coat powder paint finish, as Eaton’s Varsity LED range, part no. ________DimensionsPhotometric DataLO: 2991lm ULOR: 0.05DLOR: 0.0.95SHR nom: 1.50SHR max: 1.578Cat. No. VYLP304KZUtilisation factors / TM5 R eflectances Room Index C W F 0.75 1.0 1.25 1.5 2.0 2.5 3.04.05.0 70 50 20 58 66 73 78 85 90 93 98 101 70 30 20 50 58 66 71 79 84 88 93 97 70 10 20 45 53 60 66 74 79 83 89 93 50 50 20 56 63 70 75 81 86 89 93 95 50 30 20 49 57 64 69 76 81 84 89 92 50 10 20 44 52 59 64 71 77 81 86 90 30 50 20 54 61 67 72 78 82 84 88 91 30 30 20 48 55 62 67 73 78 81 85 88 30 10 20 44 51 57 62 69 74 78 83 86 0 0 0 41 48 54 59 65 70 73 77 80 BZ-class 4 5 5 5 5 5 5 5 5Cat NoLumen OutputWattageLlm/cWWeight (kg)Emergency Cat NoWeight (kg)VYLP904KZ 9343103.0090.71 4.10ELVYLP904KZ 4.45VYLP804KZ 831088.8393.54 4.10ELVYLP804KZ 4.45VYLP704KZ 732276.3895.98 4.10ELVYLP704KZ 4.45VYLP504KZ 511358.6087.25 3.65ELVYLP504KZ 3.90VYLP404KZ 400943.3592.47 3.65ELVYLP404KZ 3.90VYLP304KZ299128.91103.473.65ELVYLP304KZ3.90For DALI dimming option, replace part number character Z with DD , e.g. VYLP904KZ becomes VYLP904K DDDescriptionCat NoWeight (kg)Additional BESA Mounting Kit VYBMK 0.25For more information on the installation requirements and product specifications, please visit our website: https:///content/gb/en/products/product-catalog/varsity-led-linear-surface-mount-led-ceiling-lights.htmlSee page 468 for design guide772Surface and Suspended2Mains lightingVarsity LED。
使用说明书产品简介主要技术参数外壳材质:铝合金输入电压:AC 220V最大功耗: 16W防水等级:IP54产品重量:0.42Kg感谢您使用本产品,在安装产品之前请仔细阅读说明书,并保存起来供以后参考。
注:腐蚀性或溶解性的化学药品会使灯具外壳的防护遭到破坏.正常使用环境温度为 -40℃~+50℃,湿度为0-95%。
如果超出此规定范围,将对产品寿命产生不利的影响。
室内使用警告 当产品在包装盒内,请不要接通电源,除非该产品是做为展示用;在安装之前请不要连接高压电源,确保装置完全连接良好;该灯具的外部软缆或软线不可替换:如果导线损坏,该灯具即报废;灯泡不可更换;注意防火、防电和防震。
1.2m日光灯寿命是普通T8荧光管的光 源:240颗3528 白光 LED产品尺寸:¢30mm*1200mm颜 色:白光 6000K独特的散热设计,大方而得体的外观;高效的LED光源、低能耗长寿命;10~30倍;适用于办公室、会议室、候车室、候机室、商场、学校、展厅等。
产品尺寸图(单位mm )产品安装图安装说明:危险: 触电风险在安装,维护,拆卸产品前请断开电源线1196mm1.2m日光灯2.LED日光灯管套用安装在传统日光灯灯架上面即可可使用。
3.但安装时一定要拆掉原日光灯支架灯系统的启辉器和镇流器,或者绕开镇流器接线就可以了。
a.灯架内有电感整流器的,短接或拆除整流器,拔掉启辉器,将灯管装在灯架内,转动LED日光灯管使之发光 b.灯架内有电子整流器的,拆除整流器,将灯管装在灯架内,转动LED日光灯管使之发光并调整好发光方向; 1.LED日光灯的安装尺寸和普通日光灯安装尺寸一样。
并调整好发光方向;电气连接示意图使用注意事项z 请不要用粗糙物品或是清洁剂抹产品,因为会对外壳造成损害,同时,请不要用高压水冲洗产品; z 灯具达到使用寿命后,请认真做好产品的回收,也可与当地相关机构或零售商征求回收建议; z 本灯具须由专业人员安装维修。
KEEP ORIGINAL PACKAGING – ALL RETURNS NEED TO BE IN THE ORIGINAL PACKAGING IN ORDER TO AVOID PRODUCT DAMAGE DURING SHIPPING. ANY DAMAGE TO PRODUCTS NOT IN THEIR ORIGINAL PACKAGING WILL NOT BE COVERED UNDER WARRANTY.SAFETY FIRST!FAILURE TO OBSERVE THE FOLLOWING SAFETY WARNINGS MAY RESULT IN SERIOUS INJURY. IN ADDITION, FAILURE TO OBSERVE THESE SAFETY WARNINGS WILL RESULT IN A WAIVER OF ALL LIABILITIES ON SUNLIGHT SUPPLY ®, INC. AND WILL VOID ALL WARRANTIES.BULB INFORMATION: Proper Bulb Care Always unplug your ballast and allow your lamp to cool before changing out your lamp. Lamps should be changed out about every year of continuous use to maintain maximum lumen output. Running a lamp beyond its expected life is not recommended and can cause lamp failure as well as a shift in the output & color spectrum.REFLECTOR SETUP:1. Insert a DE lamp into a DE reflector. (FIG. 1) Insert each lamp wire of the double-ended lamp into both socket slots. Make sure the wires are straight. Push both ends of lamp firmly down into the metal clips. Slide each socket slider lock over both ends of the lamp to secure the lamp into place.2. S ome reflectors include/accept glass. If the frame is damaged or glass breaks it may be possible to purchased replacement glass or the glass/frame assemblies separately. Typically people use glass to control air movement through the reflector during air cooling. This also protects/contains the environment of your grow area. Glass is not required when using HPS lamps for ETL listing to apply. It is required for MH lamps for this listing to apply. The glass installation process varies by reflector type. It is a simple process for all Sun System ® reflectors and is many times factory installed.3. Use an eye bolt or some other means of securely hanging from the ceiling.4. V-Hangers used to hang the fixture are included with most reflectors (FIG. 2).5. Sun Grip ® Push Button Light Hangers (#710122, #710114, #710116 & #710123),(FIG. 3), Sky Hook™ Light Hangers (#710119) or jack chain (#350205)may be used to adjust the hanging height. DE REFLECTOR SETUPTechnical Information GuideFIG. 3FIG. 2Attach the triangle reflector level into one of the embossed level slots located on the top or side of the reflector as shown.WARNING:• If the exterior of the DE lamp is damaged, replace DE lamp immediately.• Disconnect power before re-lamping.• When re-lamping, make sure lamp has time to cool before touching.• Make sure power cord and lamp cord are connected properly.• DO NOT hang by power cord or lamp cord.• DO NOT make contact with the interior of the double-ended sockets while the power is on.• DO NOT operate the light systems in wet locations.• DO NOT attempt to open, rewire or reconfigure any components of the light system. It will void the warranty and could cause serious injury or death.• These products operate at very high temperatures. Keep away from children.• DO NOT plug or unplug a lamp cord while the ballast is turned on.• Glass bottom lens required in reflectors when using metal halide (MH) DE lamps for ETL listing to apply (fixture must be fully enclosed). Not required with high pressure sodium (HPS) DE lamps.S L I D ET H I SW A YSLIDE SOCKET LOCK ALL THE WAY UNTIL IT STOPS HEREFIG. 1SUN SYSTEM ® REFLECTOR LEVEL Size: 2.25" h x 1.75" wTOP SIDEEMBOSSED LEVEL SLOTDE REFLECTOR MOUNTING HEIGHTSA general guideline for the proper hanging height of a DE lamp would be 36”- 48” depending on wattage and fixture type (see below). Make sure to check for excessive heat at the top of your plants by placing your hand (palm down) over your plants. If the top of your hand is hot, you need to move fixture lamp up higher. If the light source is too close to your plants, you can burn them. Remember that as your plants grow you will need to adjust the height of your lamp.Please keep in mind that the AC-DE air-cooled reflectors allow you to place higher wattage fixtures closer to plants (about 24 inches).When you raise the light up & away from your plants, you need to be aware that the light levels to your plants will be significantly reduced. As light moves away from its source (the lamp) it diminishes as follows: 1/Distance 2. For example: 1 ft. = 1000 FTC, 2 ft. = 250 FTC, 3 ft. = 111 FTC, 4 ft. = 63 FTC, 5 ft. = 40 FTC, and 6 ft. = 28 FTC (FTC = foot candle).COVERAGE AREA:A fluorescent fixture can be placed much closer to plants than an H.I.D. fixture because it produces very little heat. You should place your fluorescent lights as close to the tops of your plants as you can without excluding the outside perimeter of your garden.H.I.D. AVERAGE COVERAGE AREA BY WATTAGE150 watts covers approximately 2’ x 2’ area 250 watts cover approximately 3’ x 3’ area 400 watts covers approximately 4’ x 4’ area 600 watts covers approximately 6.5’ x 6.5’ area 1000 watts covers approximately 8’ x 8’ areaThis is a general guide. Some advanced growers will use a 1000 watt DE fixture over a 5’x5’ area. Proper air cooling & environmental controls will need to be used. Consult an Authorized Dealer for advice on choosing & installing your fixture.WARRANTY SERVICE: Please read warranty information firstIf the light does not work after troubleshooting problems, you should return the light to the dealer where you purchased it. They will be able to evaluate the light, test its various components and quite possibly will be able to identify and/or fix any problems. Often the problem is as simple as a defective lamp. If the dealer is unable to fix the light, they will return it to us for factory repair. Many dealers have loaner fixtures that you may check out until yours is returned (usually not more than 7-10 days).To locate the dealer nearest you, visit our website at and complete the “Dealer Search”. If there are no dealers in your area, you may contact us directly for technical support. If we cannot help you resolve the problem over the phone, we will issue you a RMA # (return merchandise authorization) authorizing you to return the system to us for factory reconditioning (if the unit is under warranty). You will need to provide an email address or fax number so that the Authorization Form may be sent to you. You will need to include this Authorization Form in the packaging when returning your Sun System ® unit. Also please write the RMA # on the outside of the box.Please package the light carefully in its original packaging. If it is damaged in shipment we will not be responsible.Once we receive the light back, we will repair it within 48 hours (business) and return it to you via UPS Ground. If the unit cannot be repaired, a replacement will be sent. If there are no replacements available, a comparable unit will be sent back.Sun System Reflectors = 5 Year Warranty Returning Units: Please contact your retail store for returns.WARRANTY INFORMATION:Sunlight Supply ®, Inc. warrants to the original purchaser of this product against defects in material and workmanship under normal use for 5 years. During the warranty period, Sunlight Supply ®, Inc. will, at our option, and without charge, repair or replace this product if the unit or any of its components fail or malfunction.This warranty is expressly in lieu of all other warranties, expressed or implied, including the warranties of merchantability and fitness for use and of all other obligations or liabilities on the part of the seller. This warranty shall not apply to this product or any part thereof which has been damaged by accident, abuse, misuse, modification, negligence, alteration or misapplication. Sunlight Supply ®, Inc. makes no warranty whatsoever in respect to accessories or parts not supplied by Sunlight Supply ®, Inc. This warranty shall apply only to the United States, including Alaska, Hawaii and territories of the United States.NOTE: Sunlight Supply ®, Inc. is a manufacturer of supplementary lighting systems. All sales offerings to the public are done through a nationwide group of dealers. No sales offerings will be made directly to the general public.051117-B VMinimum 12” - 24”LOW WATT SYSTEMMEDIUM WATT SYSTEMHIGH WATT DE SYSTEM。
DRT8-600 Operation Manual
Warning: For correct installation of these lights, this Operation Manual shall be specifically read and well
preserved after the case is unwrapped.
Ⅰ.The Main Structures and Application Scope of the Lights
1.The light housings are all made of alloyed aluminum, whose surfaces are polished, wiredrawn, and electrostatically oxidation treated, and isothermally cured, so they have the features of strong adhesion, water resistance, dust protection, and new structures.
2.These lights are mainly used for lighting in work places, shopping centers, and public spaces.
Ⅱ. Main Structural Parameters
1.Rated voltage: 100-120V 50/60Hz 220-240V 50/60Hz
2.Rated power
9W☐18W☐
3.Level of electric shock protection : Level 1
4.Level of housing protection: IP68
5.LED quantity: 90
6.Product sizes:
7.Luminous flux: 90LM/W
8.Beam angle: 270°□
9. Service environment: temperature ≥90%; operating temperature: -40℃~+55℃
Ⅲ. Installation Requirements and Maintenance
1.Firstly, sort up all kinds of components and accessories matching with these lights.
2.Power supply must be cut off before installation.
3.In turn, fix the accessory plastic expansion tubes (1) on the surface of the object to be installed, reeve the tapping screws (2) in through the screw holes of the lights in turn according to the sketch, and fix them on the surface of the object to be installed.
4.If you use this product to replace ordinary lights, please carefully check the compliance between the product adapter and old light holder, and never misuse it.
5.Connect the electric line of the light to the power line matching with it.
6.Make sure that this product is fastened to the surface of the object to be installed, then conduct the following operations, finally connect it to the power supply and light it up.
Ⅳ. Precautions
◆Dangers may occur if the operation is against this Manual.
◆Your articles may be damaged, or even your personal security may be harmed, if the operation is against this Manual.
Warranty Commitment
Dear Customers,
Thanks for your choosing and using Qingbo products, and we will provide you with the following services in accordance with the Law of the People's Republic of China on Protecting Consumers' Rights and Interests and relevant regulations of the State Bureau of Technical Supervision as well as this Manual and effective invoice:
A.Free warranty period is two years.
B.In case of failure that can not be eliminated in the process of using, please contact us for maintenance according to the following methods:
◆During warranty period, please contact the after-sale service centers or authorized service spots of our company, and ask for services by carrying this Manual and effective invoices.
◆Out of warranty period, please contact the after-sale service centers or authorized service spots of our company,
and the services will be charged based on relevant regulations.
The following cases shall not be included in the warranty scope:
◆No Manual or invoice can be presented.
◆Damages caused by accidents or misuses.
◆Damages caused by self-repairing without the consent of our company.
◆The product is beyond warranty period, but can still be used after being repaired.。