激光雕刻机说明书讲解
- 格式:doc
- 大小:576.00 KB
- 文档页数:103
![[业务]激光雕刻机激光切割机山东科良激光睿达RDCAM嵌入式软件说明书](https://img.taocdn.com/s1/m/c8513c0f5e0e7cd184254b35eefdc8d376ee1409.png)
第一章概述21.1 激光雕刻切割系统的介绍 (2)1.2 软件对操作系统环境的要求 (2)1.3 软件运行 (2)1.3.1 运行CorelDraw (2)1.3.2 运行AutoCad (3)第二章软件基本操作 (4)2.1 操作主界面 (4)2.2 语言设置与厂家信息 (5)2.3 文件参数设置 (6)2.4 对象的选取 (6)2.5 对象的颜色 (7)2.6 对象的变换 (7)2.7 放置对象 (8)2.8 对象的对齐 (8)2.9 对象查看 (9)2.10 群组和解散群组 (9)2.11 基本图形的创建 (9)2.12 重要的工具 (10)2.12.1 手动排序及切割点、切割方向设置 (10)2.12.2 设置与编辑对象的引入引出线 (14)2.12.3 曲线平滑 (15)2.12.4 闭合检查 (16)2.12.5 删除重线 (17)2.12.6 合并相连线 (17)2.12.7 位图处理 (17)2.12.9 加工预览 (22)第三章系统设置 (24)3.1 输出设置 (24)3.1.1路径优化 (25)3.1.2 行列设置 (25)3.1.3旋转雕刻 (26)3.1.4 送料设置 (27)3.1.5 图形定位位置 (27)3.1.6 输出选中图形 (27)3.2 一般设置 (28)3.2.1 小圆限速 (28)3.2.2 扫描反向间隙 (28)3.3 机器参数 (29)3.3.1切割参数 (29)3.3.2扫描参数 (30)3.3.3复位参数 (31)3.3.4走边框 (31)3.3.5其他参数 (32)3.3.6轴方向镜像 (32)3.3.7激光头位置 (33)3.3.8绝对坐标 (34)3.4 文档操作 (35)3.5 手动 (36)3.6 信息 (36)第四章加工输出 (38)4.1查找设备 (38)4.2走边框、切边框 (38)4.3 开始、暂停、停止、保存为脱机文件、脱机文件输出、下载 .. 394.4 图层设置 (40)4.4.1 公用图层参数设置 (41)4.4.2 激光扫描参数设置 (43)第一章概述1.1 激光雕刻切割系统的介绍激光雕刻切割系统通过计算机实现对激光数控机床的有效控制, 根据用户的不同要求完成加工任务。

User ManualD1.1.2_KD010218000D1.3.5_KD010098000StatementWelcome to use Makeblock products!Before installing and using the product for the first time, please carefully read all the accompanying materials of the product to improve your experience with it. If you fail to use the product according to the instructions and requirements of the Manual, or mis-operate the product due to misunderstanding, etc., Makeblock Co., Ltd. (Shenzhen) will bear no responsibility for any loss resulting therefrom, except for losses due to improper installa-tion or operation by Makeblock professional maintenance personnel.Makeblock Co., Ltd. (Shenzhen) has collated the Manual rigorously and carefully, but we cannot guarantee that the Manual is completely free of error or omission.Makeblock Co., Ltd. (Shenzhen) is committed to continuously improving product functionality and service quality, and therefore reserves the right to change any product or so ware program described in the Manual and the contents of the Manual at any time without prior notice.The Manual is intended to help you use the product correctly and does not include any description of the product hardware and so ware configuration. For product configuration, please refer to the relevant contract (if any) and packing list, or consult your distributor. Pictures in the Manual are for reference only and the actual product may vary.Protected by copyright laws and regulations, the Manual shall not be reproduced or transcribed in any way, or be transmitted on any wired or wireless network in any manner, or be translated into any language without the prior written authorization of Makeblock Co., Ltd. (Shenzhen).ContentsSafety First (Important) 01List of Items 05Meet Your Laserbox 06Quick Operation GuideConnect the smart smoke purifier Start the LaserboxConnect a computer to the Laserbox Start cutting / engraving10Appendix 1: Cutting/Engraving Material Requirements29Appendix 2: Annular Indicator Status Description 3032Product Warranty InformationPause the task Cancel the task Clean chippingsBring sketch to life Image extractionMore Operations23More Features26Note: The above information may be subject to change due to objective factors, and please refer to the latest release of Makeblock. If you use the internet or phone call to get our support, additional fees may apply.Makeblock service informationPlease contact us if you find the actual product is inconsistent with the Manual during operation, or if you want to get the latest informa-tion, or have any questions or suggestions.Technicalsupport:*********************Safety First (Important)1. General safetyRead and get familiar with all safety protocols and procedures before operating the Laserbox. Users shall strictly follow all safety precautions and ensure that the Laserbox is properly assembled and in working order.01Please observe the following operating principles:Be sure to check the Laserbox for damage every time before use. Do not operate any damaged ordefective Laserbox in any way.Please keep the workspace clean and flat. Note that the laser tube is made of glass and is very fragile. If itis broken, the Laserbox will fail to work.Without authorization, please do not disassemble or change the Laserbox structure in any other way; andplease do not modify or decompile the operating system of the Laserbox.Please keep the inside of the Laserbox clean. Residues and chippings accumulated during cutting andengraving are dangerous and may cause fire. Clean the chippings and residues in the honeycomb paneland tray regularly.The working temperature of laser is between 5 °C and 25 °C. It is strictly prohibited to operate below 0 °C.2. Laser safetyUnder normal circumstances, the CO2 laser tube is completely enclosed in a casing during operation. The Laserbox has a safety interlock switch. If thelid is li ed during operation, the Laserbox will stop working to prevent harming people. No special precautions are required to ensure laser safety.The reference standard for laser safety is American National Standard for Safe Use of Lasers (Z136.1-2000), which is provided by the American NationalStandards Institute (ANSI). This reference is the basis for federal regulations and laser system manufacturers, as well as the laser safety guidelines ofOccupational Safety and Health Administration (OSHA). It contains details on the proper installation and use of laser systems.Please observe the following safety guidelines:Never operate the Laserbox with any parts removed, such as tray. Please note that the absence of any part of the Laserbox may expose the lasersystem and increase the risk of equipment damage. Remember that the CO2 laser beam is invisible.Do not engrave or cut any material that contains PVC or vinyl (processed plastics are not recommended). These materials (and other materialscontaining chlorine/chloride) can generate corrosive vapor that is extremely harmful to the human body and can cause damage to the Laserbox.Any damage caused by engraving or cutting any material containing PVC or vinyl is not covered by Makeblock’s warranty.Do not engrave or cut any unknown material. Vaporization/melting of many materials, include, but not limited to, PVC and polycarbonate, will releaseharmful smoke.Laser operation is prohibited when the lid/tray is li ed. Make sure that the Laserbox is closed by the lid/tray during operation and do not tamper withthe safety mechanism of the lid.Do not operate the Laserbox before properly connecting smoke purifier. Most materials produce irritating smoke when being processed.These include, but are not limited to, paints, varnishes, composite boards, and plastics that can produce hazardous compounds during processing.023.Fire safetyA high-density laser beam is used by the Laserbox to irradiate the material to be cut or engraved, so as to heat up the material surface and vaporize the material without burning. But most materials are inherently flammable and may be ignited to form an open flame that can burn down the Laserbox (even if it is made of flame-retardantmaterials) and its surroundings. Experience shows that vector cutting with a laser is most likely to produce an open flame. In particular, acrylic has proven to be extremely flammable in vector cutting.Please read the following warnings and suggestions carefully:Please note that stacked materials (especially organic materials such as paper) may cause flame propagation or increase the risk of material ignition.Never leave the Laserbox unattended during operation. There is a risk of fire if the Laserbox is started due to incorrect settings and le unattended for long periods of time, or if the Laserbox is mechanically or electrically malfunctioning during operation.Clean the Laserbox regularly. Excessive accumulation of residues and chippings from cutting and engraving would increase the risk of fire. Honeycomb panel and tray should be removed and cleaned periodically to ensure that there is no residue or chipping in the Laserbox.Keep the area around the Laserbox clean and free of cluttered flammable materials, explosives or volatile solvents such as acetone, alcohol or gasoline.Provide fire extinguishers, and perform regular maintenance and inspection.03044.Electrical equipment safetyLaser tube of the Laserbox has a silicone rubber casing, which can e ectively shield the internal power cord. If you find the cover is loose and the power cord is exposed, stop operating and contact customer service personnel.Please carefully read and strictly observe the following warnings and suggestions:When the Laserbox is connected to the power supply, do not open any access panel on the Laserbox to avoid harm from accidental contact with the power supply.When the Laserbox is connected to the power supply, do not touch the electronic-related area with your hands or other tools.Power button of the Laserbox is at the rear of it. Pressing (-) to power it on and pressing “o” to power it o .LaserboxButtonAnnular Indicator Power Button Power Interface USB InterfaceEthernet Cable Interface Smoke OutletAviation Interface1234567806User ManualList of Items Laserbox × 1Smoke Exhaust Pipe × 2Pipe Clamp × 3Aviation Connector × 1User Manual × 1Power Cord × 1USB Cable × 1Smart Smoke Purifier × 105Meet Your Laserbox12345678910111213Smart Smoke PurifierHEPA Composite Filter Indicator Aviation Interface Smoke Inlet Smoke Outlet12345Camera Laser Head TrayHoneycomb Panel Laser Tube910111213070812345Quick Operation GuideConnect the smart smoke purifierUse pipe clamps to hold the exhaust pipes:091012341.Connect the purifier with the 2m-exhaust pipe and lay the pipe to the window.Tips: You can also visit the website below to get the video tutorials.2.Connect the Laserbox and purifier with the 1.5m-exhaust pipe.3.Connect the Laserbox and purifier with the aviation connector.4.Connect the power supply.https:///maker-tools/laserbox-videoEthernet Wi-FiUSB Connect a computer to the LaserboxLaserbox so ware is required for the connection of a computer to the Laserbox. Please download and install the so ware at the following website.There are three ways to connect a computer to the Laserbox. Choose the best according to your situation.https:///maker-tools/laserbox11 Start the LaserboxA er pressing the power button, the laser head will automatically reset and calibrate. A er the first startup, the annular indicator will turn solid white. The startup process takes a while, and please be patient.121. Connect a computer to the Laserbox with the USB cable.2. Open the so ware, select “Connect to a new Laserbox” and click “Next”.3. Select “USB” and click “Next” to start the connection.4. Successful connection.Connect with the USB cable14131234Back Next Select your preferred connection mode.Device connectionUSB Wi -FiEthernet Cancel Next Select your preferred connection method.Device connectionConnect to a new Laserbox.Connect to a networked Laserbox.FinishConnected successfully!Go and enjoy the fun of creation!FinishConnected successfully!Go and enjoy the fun of creation!Back NextSelect your preferred connection mode.Device connectionUSB Wi -FiEthernet Cancel Next Select your preferred connection method.Device connectionConnect to a new LaserBox.Connect to a networked LaserBox.1. Connect your computer to the Laserbox with an Ethernet cable.2. Open the so ware, select “Connect to a new Laserbox” and click “Next”.3. Select “Ethernet” and click “Next” to start the connection.4. Successful connection.Connect with an Ethernet cable (not included in the package)11516243Cancel Next Select your preferred connection method.Device connectionConnect to a new LaserBox.Connect to a networked LaserBox.Back NextConnect to the LaserBox via Wi-FiWi-Fi NamePasswordBack NextSelect your preferred connection mode.Device connectionWi -FiEthernetUSB1. Connect a computer to the Laserbox with the USB cable.2. Open the so ware, select “Connect to a new Laserbox” and click “Next”.3. Select “Wi-Fi” and click “Next”.4. Connect to the existing Wi-Fi network.5. A er successful connection, you can disconnect the USB cable and wirelessly control the Laserbox.Wi-Fi wireless connection18171234Place the o icial materials in the Laserbox working area.Note: Cutting/Engraving Material Requirements can be found in the appendix.Start cutting / engraving20119Open the Laserbox so ware and select the sample image. You can also import or draw images yourself.Press the button on the Laserbox to start cutting/engraving.The task is completed when the annular indicator turns solid green.21222Click the “Start” button. TheLaserbox can automatically identify o icial materials and set cutting/en-graving parameters.3Click "Send" to send the image to the Laserbox. A er the transmis-sion is completed, the Laserbox would be ready, and the annular indicator would turn flashing blue.45速度功率雕刻126.3178.4Press and hold the button for 5 seconds.More OperationsPause the taskMethod 1: Click “Pause” in theso ware interface to pause the task.Method 2: Press the button on the Laserbox to pause the task. Press again to continue with the task.Method 3: Open the lid to pause the task. Close the lid and press the button on the Laserbox to continue with the task.Cancel the task1. Open the lid.Note: A er starting cutting/engraving, you can also cancel the task by clicking “Pause -> Cancel” in the Laserbox so ware interface.2324122. Press and hold the button for 5 seconds. A er the task is cancelled successfully, you will hear a beepsound and the annular indicator turns from red to blue.Method 1:Method 2:Method 3:密度MMore FeaturesNote: For optimal cutting / engraving e ect, it is recommended to use the Deli S550oil-based marker, draw the image as far as possible from the ring code and the edge of the material, and place the material in the center of the honeycomb panel. Only with copy paper and o icial materials, you can bring sketch to life. Damages caused by the use of other materials are not covered by Makeblock’s warranty service.Bring sketch to lifeClean chippings2526123Residues and chippingsaccumulated during operation of the Laserbox should be cleaned regularly, otherwise it may cause a fire. Pull out the tray as shown to clean up residues and chippings.Draw on copy paper or o icialmaterials with a black/red oil-based pen. For images drawn with a black oil-based pen, the Laserbox will cut along the contour and the black area will be engraved. Images drawn with a red oil-based pen will be cut directly along the handwriting.1. Draw an image, preferably with a Deli S550 oil-based marker.2. Place the material and close the lid.3. Press the button on the Laserbox to start the task.1. Place the object for image extraction.3. Successful image extraction.2. Start the Laserbox and select “Marquee” to put the image you want to extract in a selection box.The Laserbox has a built-in camera that extracts the surface image for further creation.Image extraction2728123Maximum dimensions for cutting: 500 (length) * 300 (width) * 22 (thickness) mm Materials for cutting/engraving:Materials not recommended:Note: The use of poor quality materials may result in poor cutting/engraving. It is recommended to use Makeblock o icial materials.The use of the materials not recommended above may damage the device, and the resulting damages are not covered by Makeblock’s warranty service.2930Appendix 1: Cutting/Engraving Material RequirementsAppendix 2: Annular Indicator Status DescriptionCardboard Paper Uneven materialHumid materialDirty materialOut-of-gauge materialWood boardAcrylic Leather Cloth Base plate ABS-based color boardPET RubberPlasticCorianWood veneerGlass fiberIndicator status DescriptionFlashing whiteThe system gets started.Waiting to connect.Completion.Abnormal.Sleep mode. It goes into the sleep mode from the standby mode a er 10 minutes idle.Solid whiteSolid blueIt is ready and the image has been sent successfully.Flashing blueSix indicators light up gradually Green breathing indicatorSolid redThe Laserbox firmware is being upgraded.Solid purpleSolid greenIt is in the standby mode and the Laserbox has been connected to the computer.It is in the working status, and the number ofindicators that are ON indicates the current progress.Declaration of conformity Hereby, Makeblock Co., Ltd., declares that this product is in compliance with the essential requirements and other relevant provisions of Directive RED 2014/53/EU and the RoHS directive 2011/65/EU3132Notes and instructions:①The above “warranty period” is from the date of purchase on the receipt, with the invoice date as a reference. Please keep your purchase invoice on record. In the absence of a valid invoice, the warranty period will be counted from the ex-factory date.② Laser tube warranty terms:<1> Makeblock promises to provide warranty service if the laser tube has a crack upon arrival.<2> Within the warranty period, Makeblock promises to provide warranty service if the laser tube has no visible damage on its appearance but it is malfunctioning (for instance, no laser light coming out) during LaserBox operation.<3> Within the warranty period, Makeblock will not provide warranty service, if the laser tube has a crack on its appearance during LaserBox operation, including but not limited to a crack caused by improper carrying or low operating environment temperature.Product Warranty InformationDECLARATION OF CONFORMITYCategoryMain Parts Consumable materials & AccessoriesPCB, motor, camera, laser tube, guide rail and conveyor belt, etc Filter cartridge and wood board, power cord, aviation connector, user manual, package and honeycomb panel etc.Parts NameTwelve(12) monthsNo applicable to this Limited Warranty. Makeblock only provides free replacement for the defective part upon receiving.Warranty Period3334Special NotesProduct informationProduct serial number:This warranty does not apply to Product and parts whose warranty period expires;Normal discoloration, wear, tear and consumption;Malfunction or damage caused by incorrect or improper use, maintenance or storage, such as: improper handling; use for purposes not as properly intended; improper insertion and removal of external equipment; drop or improper external force extrusion; contact or exposure to inappropriate temperature, solvent, acid, alkali, water immersion and other environments; and breaking & cracking, rusting and damage of products or parts (such as casing, components, circuits, etc.) due to insects, rat bites, or any foreign materials;Damage due to installation, repair, alteration or modification by anyone other than an authorized service center or personnel of Makeblock;Product or parts whose original identifying information has been modified, defaced or removed; Absence of a valid receipt or any other documents that can prove the warranty status;Malfunction or damage resulting from uses of so ware that are illegally licensed, non-standard or not available to the public;Malfunction or damage caused by virus infection, hacker attack or other malicious infringements;Malfunction or damage due to force majeure or accidents;Damage occurred on the product's way back to Makeblock for repair;Including but not limited to other non-design, technical, manufacture, quality issue;Products can run without interruption or error.If you run into issues above, please contact relevant parties for solutions, for which Makeblock is not held reliable.Remarks: Makeblock reserves the right, at its sole discretion, to interpret and amend this warranty policy at any time.The packing of the product, free gi s, consumable parts, and accessories do not apply to this Warranty. If you find any damage upon receiving, Makeblock will provide you free replacement. Please check timely the product a er the receipt thereof. Makeblock will charge certain fees if you would add packaging, accessories or require refurbishment service.None of any warranty service made by an authorized distributor is covered by this warranty policy, and Makeblock shall not be held liable. In order to receive any benefits from the distributor’s warranty and/or other policies, please keep any documents obtained during the purchase.In terms of discontinued products or the products which are going to be discontinued, Makeblock will publish relevant announcement and inform authorized distributors to notify customers of the deadline of the Warranty Period. Makeblock and its authorized distributors will terminate the warranty service a er the deadline of the Warranty Period.The Limited Warranty does not apply to products that were resold by unauthorized resellers.To the extent other warranty agreements are made during the purchase, those contracts confirmed by Makeblock shall prevail.。
以下为激光雕刻机的操作规程,一起来看看吧。
一、操作步骤1、接通机床总电源开关。
接通机床控制电源(钥匙开关)。
待系统自检完成,机床各轴回参考点。
2、启动冷水机组,检查水温、水压(正常水压为5bar)。
冷水机组上电3分钟后,压缩机起动,风扇转动,开始制冷降温。
3、启动空压机、冷干机。
4、待冷水机降至设定温度(设定为21度),再打开激光器总电源。
5、当激光器面板出现“HV READY”字样时,上高压。
6、切割前确认材料种类,材料厚度,材料大小。
7、调整板材,使其边缘和机床X轴和Y轴平行,避免切割头在板材范围外工作。
8、将Z轴移动到起割起点,模拟要执行的程序,确保不会出现超出软限位警报,进入编辑方式,根据材料种类和厚度调节功率、速度、打孔时间。
9、待以上各项正常,才能切换到执行状态,进行工件的切割。
10、如切割过程中出现挂渣、返渣或其他异常情况,应立刻暂停,查明原因,问题解决后再继续切割,以免损坏设备。
11、工作完毕,按以下顺序关机:1)断开激光器总电源。
2)关冷水机组。
3)断开机床控制电源(钥匙开关),断开机床总电源开关。
4)关冷干机。
5)关空压机。
二、注意事项1、严格按照操作顺序开机、关机。
2、禁止无资质人员操作和维修机床。
3、机床工作期间,严禁人员和物品进入工作台,确保人机安全;操作人员要专注,遇到危险情况要尽快按下“急停”按钮。
4、调整机床光路、在随动方式下调整切割头,必须按照正确的操作次序进行,确保人机安全。
5、每次开机,要回参考点,检查清理聚焦镜片,校准光束—喷嘴的同轴度,打开切割辅助气体,瓶内压力应不低于1Mpa。
三、维护保养1、冷水机组散热片要定期进行清理,避免灰尘过多影响工作,水箱内的蒸馏水四个月更换一次,不可使用自来水或纯净水。
2、空压机、冷干机过滤器每天早晨必须排水,外光路镜片侧吹风的前一级过滤器必须随时检查,不得有水或油,否则污染镜片。
必须改善气源,使之达标。
3、每周检查一次外光路保护气体、冷路柜、冷却水路、空气压缩机、冷干机,排放过滤器的积水。

激光雕刻&切割机操作手册激光雕刻机和切割机的装置注意事项:激光是一种高功率和无形的光,当人体只对时对人体有害,容易引起可燃事宜。
当机器运转时操作人员不能离开,请仔细阅读此手册以避免不必要的错误和损失。
由于更新或改进内容可能和实际产品有些不一致。
请根据实际需要购买。
此外,若手册的内容进行改进,请原谅没有通知。
提前声明。
内容第一章概要 (2)第二章安全手册 (4)第三章安装与调试 (6)第四章常见问题和调整 (9)第一章概要1.说明激光雕刻切割机是一种新型的激光数据处理设备,主要用于:工艺品,家具,玻璃制品,木制品,聚氯乙烯,灯饰,广告,装饰,造纸,马克板,邮票及印章,腈纶,竹制品,手袋及鞋子,衣服和服装,面料等。
通过对激光参数的调整,机器可以进行多样的雕刻和切割。
这个机器具有多种优点:切口光滑,无接触切割,高速雕刻,雕刻准确、效果好。
构造:激光雕刻切割机是由光学系统、工作平台、控制系统、冷却系统和辅助系统构成。
2、雕刻机有五部分组成:机械系统、光学系统、传动系统、控制系统和辅助系统。
机械平台:由上盖、导轨、底座、反射镜架等机械配件组成。
光学系统:由激光管、激光电源、三个反射镜和一个聚焦镜组成。
传动系统:由三条高精度四均衡进口直线导轨、皮带、2个步进电机和若干个齿轮组成。
控制系统:由高速控制卡、开关电源、步进电机驱动器组成。
辅助系统:有循环冷动水泵、吹气压缩机、抽烟排风机。
3.技术参数技术参数第二章安全手册激光雕刻切割机用于四种激光(强激光射出),激光射出可能引起以下意外事故:1)引燃周围的易燃物2)当机器运行时可能产生有害的气体3)激光直接照射人体将对人体有害。
因此,工作的场所必须有灭火器,严格禁止易燃物靠近机器并且保持通风。
请阅读和遵守安全手册。
1.机器的外壳应与地面接触。
2.禁止非专业的高压供电。
不要打破外壳.需要通风散热。
3.当激光管工作时需用循环的水使过热的激光管的温度降低。
因此机器工作前,请务必要加一些水到冷却水泵里。
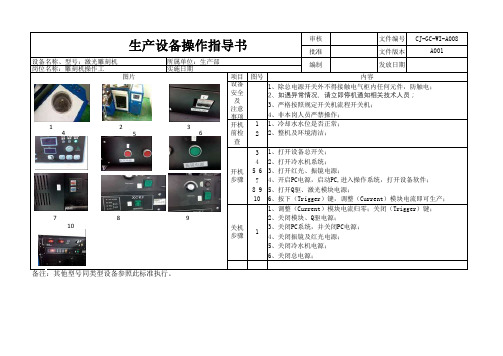
审核文件编号批准文件版本设备名称、型号:激光雕刻机岗位名称:雕刻机操作工
项目图号
12345 678 910
生产设备操作指导书
CJ-GC-WI-A008
A001
所属单位:生产部编制
发放日期
实施日期
图片
内容
设备安全及注意事项1、除总电源开关外不得接触电气柜内任何元件,防触电;2、如遇异常情况,请立即停机通知相关技术人员;3、严格按照规定开关机流程开关机;4、非本岗人员严禁操作;开机前检查
1、冷却水水位是否正常;
2、整机及环境清洁;
开机步骤
1、打开设备总开关;
2、打开冷水机系统;
3、打开红光、振镜电源;
4、开启PC电源,启动PC,进入操作系统,打开设备软件;
5、打开Q驱、激光模块电源;
6、按下(Trigger)键,调整(Current)模块电流即可生产;备注:其他型号同类型设备参照此标准执行。
关机步骤
1
1、调整(Current)模块电流归零;关闭(Trigger)键;
2、关闭模块、Q驱电源;
3、关闭PC系统,并关闭PC电源;
4、关闭振镜及红光电源;
5、关闭冷水机电源;
6、关闭总电源;
1
2
3
4
5
6
7
89
10。

第一章控制系统的安装1.1控制系统的组成控制系统由硬件(控制卡)和软件两部分组成。
硬件包括MPC6515一张;软件包括控制软件和加密狗。
整个控制系统放在一个包装盒中,软件在光盘中。
软件的目录说明:子目录名称目录中数据内容使用说明Install 安装程序Drivers 控制卡驱动程序Doc 用户使用手册Word格式的操作手册Demo Data PLT,BMP等演示文件Read me 版本说明1.2MPC6515控制卡的安装使用MPC6515控制卡必须要安装USB驱动程序,该程序在[Drivers]目录下。
双击SetupMpc6515Drv.exe即可安装。
1.3控制软件的安装请预先在电脑中安装CorelDraw或者AutoCAD软件,目前本系统只能支持CorelDraw11,CorelDraw12,AutoCAD2000以上的版本。
强烈建议用户安装正版的CorelDraw或者AutoCAD软件,否则软件运行有可能出现异常情况。
对此类原因造成的机器损坏以及法律纠纷本公司概不负责。
运行Setup.exe,出现以下对话框:选择需要安装的软件版本,点击【安装】即可。
默认的安装路径是C:\LaserCut50”。
点击可以改变安装路径。
第二章CorelDraw直接输出版控制系统在CorelDraw增加了激光加工菜单,其中包括:激光输出、导入DST文件、导出文件和机器设置。
如下图所示:激光输出导入DST文件导出文件机器设置2.1 激光输出点击此按钮,对话框如下:2.1.1图层参见第五章。
2.1.2手动参见第五章。
2.1.3脱机文件(下载数据)参见第五章。
2.1.4计算。
当图形改变或者加工参数改变后,建议点击本按钮,以将参数保存到加工文件中。
2.1.5布局。
点击该按钮,2.1.5.1 :放大显示图形数据。
点击该按钮,在屏幕上用鼠标点击即可放大图形数据(数据实际大小不会改变)。
2.1.5.2 :缩小显示图形数据。
点击该按钮,在屏幕上用鼠标点击即可缩小图形数据(数据实际大小不会改变)。
激光机操作流程(构架)一、激光雕刻操作知识A.熟悉工作环境,机子操作与保养及注意事项(附:激光雕刻安全操作流程规范)激光雕刻安全操作流程规范1. 每天上下班之前都要清洗激光机镜片及打扫周边卫生。
2. 每个星期一都要打扫卫生并更换激光机所使用的水3. 下班时,理清当天所打的茶盘数量填好“绩效卡”并发送到指定的QQ邮箱里4.激光雕刻产品时要”三问”1)是不是专款产品及根据订单雕刻图案产品?2)打什么图案/LOGO ?3)此产品是否在图纸有标明:LOGO/图案的位置和大小(若图纸上没有明确标明,及时咨询负责人确认后方可雕刻;)操作机子过程中务必做到心中无疑虑。
5.操作激光机雕刻时,操作员务必知道“五清”:1).出水口对了吗2)输出文件对了吗?3).电流对了吗?4)焦距对了吗?5)输出图纸位置对了吗?6.每隔两个小时要去查看一下水桶,务必做到“三点”:1)水是否循环?2)水是否过热?3)水是否到量?7.操作过程中,焦距棒对准避免雕刻出来图案不准确(焦距棒53mm)激光雕刻操作8. 一般情况下应将“激光高压”开关处于“关闭”状态。
9. 根据加工目的及工件性质选取工作速度和激光电流的大小,即选好工艺参数。
10. 发现异常或需更改参数时,按下“暂停/继续”键(键锁定、灯亮)。
11. 激光管的冷却水不可中断,否则必须立即切断激光高压,或按下“紧急开关”,防止激光管炸裂;激光工作过程中,要保持排风通畅。
12. 工件表面加工区域里不得摆放有碍激光刀头运行的物品。
13. 切割或雕刻时,必须盖好防护罩。
14. 在任何情况下,不得将肢体放在光路中,以免灼伤。
15. 禁止在雷电环境下使用本机。
B. 熟悉公司产品及图案/LOGO定位图纸(附:LOGO定位图案)C. 了解激光机操作过程及软件的应用(附:”激光雕刻操作规范标准”“视频教程”<条件允许制作成有声音视频教程> )二、对于新样品激光雕刻的要求:所有新出样品都要通过相关负责人确定后才可雕刻。
目录安装 (1)用电 (3)排风 (5)注意事项 (7)计算机相关 (8)安装激光雕刻机Windows98/2000/XP驱动程序 (9)USB 打印安装 (10)软件设置:(CorelDraw 、AutoCAD 和Photshop ) (12)CorelDraw8(中文版) (12)CorelDRAW9(英文版) (15)AutoCAD 设置 (16)Adobe Photoshop设置 (18)激光机驱动程序说明 (20)激光设置工具栏(Laser Settings) (20)图象雕刻工具栏 (26)3D 雕刻工具栏 (29)查看工具栏 (33)一些概念的说明.............................................................................................................34系统操作........................................................................................................................39工作原理 (39)控制面板 (42)菜单系统 (45)菜单详细介绍 (47)维护保养........................................................................................................................65一些可选配件的简单介绍 (72)旋转辅助器 (72)切割平台 (73)空气助吹器 (73)聚焦透镜 (74)双激光头 (75)一些样品材料的雕刻和切割 (76)安全 (76)材料 (76)激光机驱动程序设置 (76)附...................................................................................................................................99TLONG 故障处理向导....................................................................................................... 99 有关空压机和油水过滤器................................................................................................. 103 国际控制面板.................................................................................................................... 105 附录1........................................................................................................................... 107 附录2 (108)基于DOS 的程序的使用.................................................................................................... 108 附录3 (109)如何获得技术支持............................................................................................................. 109 声明.. (110)激光雕刻机操作手册安装环境最好安装在类似“计算机房”的房间内,无粉尘的环境,避免与机械雕刻机等有可能产生烟尘、碎屑的设备同处一室。
粉尘会导致激光机系统的光学部件快速损坏。
通风良好,以利于机器所产生热量和雕刻时不慎泄露的有毒气体的散发。
温度室温在15-30摄氏度之间,要求必须有空调,过高或过低的温度有可能对机器造成损害,尤其是激光管,对温度很敏感,不适合的温度会导致激光管的报废。
如果从一个极冷或极热的操作环境移至一个适宜的工作环境中,必须使激光机或激光管在新的适宜的工作环境中搁置2小时以上以适应环境温度。
摆放我们建议将激光机放在混凝土地板上,机器下面的地板应是水平并且平整的,以保证每个脚轮在同一水平面上,不平的地面会引起主要部件的弯曲,这会导致运动系统卡死及引起雕刻问题。
如果地板不合乎要求,你可以调整激光机的脚轮使机器水平,但每个脚轮的调整高度应小于5mm 。
位置激光机左侧和后背必须和周围的墙壁距离30公分以上,激光机的右侧(有电源开关和散热风扇出风口的那一侧)必须离墙壁80公分以上,以保证热量散发效果良好,否则也会导致激光机严重损坏。
激光管的安装在连接和使用激光机之前,必须将激光管安装到激光机上。
注意:在安装激光管之前一定要拔掉激光机的电源插头!,待安装好后再恢复。
首先按动后盖上的开关,打开后盖。
这时可以看到两个激光管压槽、一个激光管卡锁和一个激光管对齐装置,以及激光管电源插头。
注意观察激光机身上的对齐装置有两个铁片,一个较短一个较长。
同时观察激光管的上部和下部各有一个V 形槽,最右端则是对齐1激光机使用说明书用的金属板。
如图:按正确的方向拿住激光管(带出射窗口的一端在右手),倾斜大约30度将上部V 形槽挂到激光机身上的两个压槽上,然后保持这个角度调整右边的对齐金属板对齐到激光机身右边的对齐装置上,对齐后,将激光管向下压,直到明显感觉到激光管卡锁锁住了激光管下部的V 形槽上,即是安装成功。
然后插上激光管电源插头,盖上后盖。
安装完毕,请看下图:2激光雕刻机操作手册用电电源电源应符合下列要求方可确保激光机的正常工作:¾ TL-60、TL-70或TL-80系列(25W 、30W )—220VAC 、5A 、50Hz ¾ TL-60、TL-70或TL-80系列(50W )—220VAC ,8A ,50Hz¾ TL-80系列(100W )—220VAC ,15A ,50Hz¾ 不充足或不合适的电源引起的损坏不属于保修范围电压激光机的电压为220V 士%5,既允许电源电压的范围为209V ~231V 。
不稳定的电压或电压尖峰会影响甚至可能破坏激光机的电子部件。
不要将地线插头与火线短接,也不要将机器插进一个不接地的插座。
这是很危险的,假设不是致命的电击,也会导致严重后果,务必保持系统的电源插头3激光机使用说明书与具可靠接地的插座相连。
稳定,电压低或经常断电,则必须配备一个净化稳压电源。
必须源。
注功率一般根据激光机所配激光器的功率而定。
率线般的机电设备(包括计算机)在没有接地的情况下在运行一段时间后或体接触时充当了接但是因为很多原因实际上地线并没有真正和大如果你的工作区电压的不选择质量可靠、性能稳定由专业厂家生产的净化稳压电源。
否则,如果选择一款质量不可靠的稳压电源,有时会对激光机造成更严重的电器损坏,情况适实得其反。
目前市面上的稳压电源有很多种类型,我们要求的类型是AC (交流)稳压电意:不要使用UPS (不间断电源)作为稳压电源来使用,因为一般的UPS 电源没有很好的稳压功能。
我们只推荐一种“精密交流净化稳压电源”,这种稳压电源可以过滤掉市电网中的波峰和波谷电压,使输入到激光机中的电压始终保持一个稳定安全状态。
有一种“中川集团”生产的“上海振华”牌稳压电源“精密交流净化稳压电源”已经被我们的用户使用证明效果良好。
AC 稳压电源的激光机所配激光器的功率 AC 稳压电源的功 <10W >1KVA20W—30W >2kVA30W—50W >3KVA50W—100W >5KVA地一一开始运行时就会在其金属壳体上产生感应静电,这种情形在那些有运转的电机(如机械雕刻机)的设备上表现得尤其突出,这种静电对地的电压有时会高达120V 以上。
这种静电一旦突然有了接地途径时(如:人地导体;一直处于断开状态的接地线突然接通,等等)使静电释放产生强大的电流,这种情况不仅会危及人身安全,还可能对设备的电子元件造成严重的损坏,它还会干扰电脑和设备间的数据传输。
解决这一问题的唯一办法就是让设备的外壳与大地之间有严格、可靠、稳固的连接,这就是地线。
我们的设备的电源线里就有一根是地线,如果电源插座的地线是真实可靠接地的,只要插头和插座之间的连接稳固可靠,那么我们的设备也就可以可靠地接地了。
在有些电源插座上虽然都有地线连接,4激光雕刻机操作手册地相机和计算机上任何插头,如果要拔插插头排风必须为激雕刻机安装一套合适的排风系统以便彻底地将雕刻过程中产生的气体和烟尘排安装排风系统,如下图所示:连,或者没有正常良好的安装,造成地线没有或者没用。
所以,我们要求用户在安装激光机时,必须确保激光机有稳固、可靠的接地。
另外,要特别强调用户,绝对不能带电拔插激光,必须要关闭计算机和激光机的电源(现在计算机的ATX 主板有关机供电的功能,所以必须要将插头拔下才是断电,而不仅仅是关闭计算机)。
光出激光机。
对于TL-60和TL-70系列的机型,你所选的排风系统排风能力不低于400立方米/分,压力不底于800pa 。
对于TL-80系列排风能力不低于600立方米/分,压力不低于800pa 。
必须正确的风机尽量装在室外和管道的高端,在室外可以减小风机工作时对室内产生的噪音,装在高处可以增加排风能力,因为大气有压力,如果风机装在低处风机要克服大气的压力和管道的阻力向上排气,相反,如果装在高处风机要克服大气的压力和管道的阻力相对要小的多,这样它的排气能力就相对要大的多,而大气压自然会将低端的空气压入有负压的管5激光机使用说明书道内。
和激光机相连接的管道应该采用带螺旋钢丝骨架的软管,直径为100mm ,长度为1.5~3米排风量下降,可以拆下排风机,用工具80,可以按下图的方法安装排风管。
,这样便于激光机的移动。
其它的管道应采用PVC 管道。
在寒冷的地区(我国的东北地区)还应该安装有风门的连接头,当风机停止工作时风门自动关闭以阻止室外的冷空气直接进入激光机内对激光机特别是激光管造成损害。
长时间使用后,排风机内部因积聚了许多杂物导致清理扇叶上的灰尘后再重新安上。