安卓手机厨房Kitchen说明
- 格式:docx
- 大小:49.48 KB
- 文档页数:5

Featuresn U L and ULC Approvedn C omplies with NFPA Standard 17A and 96n M eets the requirements of the Building Officials andCode Administrators (BOCA)n M eets the requirements of the International BuildingCode (IBC)n A pproved by the City of New York Material andEquipment Acceptance Division (MEA)n C E M arkedGeneral The KITCHEN KNIGHT II Restaurant Kitchen Fire Suppression System is a pre-engineered solution to appli-ance and ventilating hood and duct grease fires. The system is designed to maximize hazard protection, reliabil-ity, and installation efficiency. Automatic or manual system activation releases a throttle discharge of potassium carbonate solution on the protected area in the form of fine droplets to suppress the fire and help prevent reignition after the discharge is complete.One Stanton Street / Marinette, WI 54143-2542 / +1-715-735-7411 / KITCHEN KNIGHT II Restaurant FireSuppression System 002841PC Flow M ounting M odel A B C D Point Weight Bracket No. in. (cm) in. (cm) in. (cm) in. (cm) Capacity lb (kg) UsedPCL-1608.00 (20) 17.75 (45) 23.50 (60) 15.44 (39) 5 34 (15) MB-15 PCL-3008.00 (20) 25.06 (64) 30.81 (78) 22.75 (58) 10 53 (24) MB-15 PCL-46010.00 (25) 25.06 (64) 30.81 (78) 22.75 (58) 15 83 (38) MB-15 PCL-600 10.00 (25) 35.81 (91) 41.56 (106)33.50 (85) 20 108 (49)MB-1OPTIONAL CYLINDER ENCLOSURETO DISCHARGESystem OperationThe KITCHEN KNIGHT II Restaurant Kitchen FireSuppression System has been designed for protectingkitchen hood, plenum, exhaust duct, grease filters, andcooking appliances (such as fryers, griddles, rangetops,upright broilers, charbroilers and woks) from grease fires.The versatile state-of-the-art wet chemical distribution tech-nique, combined with dual, independent activation capabil-ity – automatic fusible link or manual release – providesefficient, reliable protection the moment a fire is detected.Once initiated, the pressurized wet chemical extinguishingagent cylinder discharges a potassium carbonate solu-tion through a pre-engineered piping network and out thedischarge nozzles. The wet chemical discharge pattern ismaintained for a duration of time to ensure suppressionand inhibit reignition. Expanded capability provides remotemanual actuation, gas equipment shutdown, and electricalsystem shutdown. This optional equipment will enhancethe basic system functions and be applicable when design-ing custom configurations to suit a particular customer’sneeds and/or comply with local codes.The operating temperature range of the PYRO-CHEMKITCHEN KNIGHT II System is 32 °F to 120 °F (0 °C to49 °C).Suggested Architect’s Specifications The fire suppression system shall be of the stored pres-sure, wet chemical pre-engineered fixed nozzle type manu-factured by Tyco Fire Suppression & Building Products. A carbon dioxide cartridge shall be used as the pneumatic releasing device for the system. The cartridge shall be an integral part of the control head assembly. The wet chemi-cal storage cylinder shall be a DOT-rated cylinder for stored pressure of 225 psig (15.5 bar), and a pressure gauge shall be provided on the cylinder valve for visual inspection. The system shall be capable of automatic and manual actua-tion. Automatic actuation shall be provided by an appropri-ate number of fusible link detectors mounted in series on a stainless steel wire input line to the control head. Manual actuation shall be provided by turning a handle on the cylinder control head cover, if available, and/or remotely by a cable operated pull station with a dedicated stain-less steel line connected between the pull station and the control head mechanism.The system shall have been tested to the UL Standard for Fire Extinguishing Systems for Protection of Restaurant Cooking Area, UL300, and Listed by Underwriters Laboratories, Inc. It shall be installed in accordance with the National Fire Protection Association standards, NFPA17A Standard for Wet Chemical Systems, and NFPA 96Standard for Ventilation Control and Fire Protection ofCommercial Cooking Operations, and comply with all localand/or state codes and standards. Refer to PYRO-CHEMKITCHEN KNIGHT II Restaurant Fire Suppression SystemManual, Part No. 551274, for detailed installation and main-tenance instructions.Typical insTallaTion1. C YLINDER CONTROL HEAD – Integral design allowsdirect connection of the actuation pressure cylinderto the control head without the need of high pressure hose or pipe. Separate wire cable activation lines for automatic fusible links and remote pull station provide an added measure of safety. Unique technique forachieving necessary input wire cable tension.2. P IPING – Unbalanced piping network simplifies appli-cation design and installation. Requires no additional piping to connect system pressure cylinder to extin-guishing agent container. Schedule 40 black iron,chrome-plated, or stainless steel pipe can be used.3. C YLINDERS – Contain PYRO-CHEM PotassiumCarbonate wet chemical solution stored at 225 psig(15.5 bar). Includes pressure gauge for visual mainte-nance checks. 1.6, 3.0, 4.6, and 6.0-gallon sizes provide 5, 10, 15, and 20 flow point coverage respectively,offering a broad range of application coverage.4. N OZZLES – Can be fixed or fitted with a swivel adaptorallowing the nozzle to be rotated approximately 30° in all directions.5. R EMOTE MANUAL PULL STATION – Simple operatinginstructions with double action release minimizes acci-dental manual operation of the system. Maxi m um limi-tations of 150 ft (45.7 m) cable run with 1/16 in. cable and 40 cor n er pulleys apply. A dedicated wire cableinput line to the cylin d er con t rol head provides manual operation in addition to automatic operation utilizing fusible link detection.The pull station is compatible with flexible conduit.6. F USIBLE LINK DETECTION EQUIPMENT –Accommodates both series and terminal placement to minimize inventory and simplify ordering. All neces-sary components are included for efficient assembly and installation. Fusible links rated for maximumambient temperature must be ordered separately.Maximum limitations of 20 fusible links on a 150 ft(45.7 m) cable run with 40 corner pulleys providesubstantial hazard coverage.7. A UTOMATIC GAS SHUT-OFF VALVE – Complies withrequirements pertaining to the shut off of fuel asdescribed by NFPA 17A. Can be reset at control head after regular maintenance/service check for conve-nience of service technician. Maximum limitations of 100 ft (45.7 m) cable run with 30 corner pulleys provide mounting flexibility.T he gas shut-off valve is compatible with flexibleconduit.8. C ORNER PULLEYS AND ACCESSORIES – Designedto ensure reliable system function as tested byUnderwriters Laboratories.9. A GENT DISTRIBUTION HOSE (Not Shown) – Kitchenappliances manufactured with or resting on caster(wheels/rollers) include an agent distribution hose as a component of the suppression system. This allows the appliance to be moved for cleaning purposed without disconnecting the appliance fire suppression protec-tion. The hose assembly includes a restraining cablekit to limit the appliance movement within the range(length) of the flexible hose.10. F LEXIBLE CONDUIT (Not Shown) – Flexible conduitallows for quicker installations and the convenience of being able to route the cable over, under and aroundobstacles. Flexible conduit can be used as a substitute for standard EMT conduit or can be used with EMTconduit.F lexible conduit can be used only with the RemoteManual Pull Station and Mechanical Gas Valves.。

厨房单词怎么写
厨房单词是kitchen。
kitchen的发音是[ˈkɪtʃɪn],主要用作名词,作名词时意思是“厨房;炊具;炊事人员”。
复数形式为kitchens。
一、kitchen短语搭配
Magic Kitchen魔幻厨房; 片; 魔幻庖厨; 魔法厨房kitchen princess点心公主; 心公主
itchen unit厨房成套家具; 庖厨全套家庭用具; 厨具; 庖厨成套家具
二、双语例句
1.We should put it in the kitchen.
我们应该把它放在厨房里。
2.hey helped me in the kitchen.
他们在厨房里帮我忙活。
3.Although small, the kitchen is well designed.
厨房虽小,但设计巧妙。
4.You've certainly made an excellent job of the kitchen. 你们把厨房弄得好极了。
5.The kitchen is a good size.
这厨房够大的。
6.This room is twice the length of the kitchen.
这个房间的长度是厨房的两倍。

© Inter IKEA Systems B.V. 2020INSTALLATION GUIDEThis guide provides you with tips and step-by-step instructions on how to install your kitchen on your own.A guide to install a new IKEA kitchenOur broad service offer gives you the freedom to decide how much you want to do yourself and how much you want us to do for you.Below you’ll find all the services that we can offer, and how much each of them costs.ServicesMEASURINGPLANNINGDELIVERYPrecise measurements and an accurate survey of the conditions of your existing kitchen lead to an accurate kitchen plan and ease of installation.We are happy to offer a measuring service that will send an experi -enced professional to your home to assess the conditions and provide accurate measurementsWe don’t want you losing sleep over planning your dream kitchen. Our kitchen planning specialists will help you.We specialise in making the best use of space so you get a kitchen that suits the way you live and in the style that suits you. Book akitchen design appointment at your local IKEA store or IKEA.co.th/kitch-enplannerMost of our products are flatpacked and designed in such a way that they can easily fit in your car.However, if you prefer to have your purchase delivered, we have a range of delivery options for you to choose from when shopping at IKEA.co.th or shopping at your nearest IKEA store.PICKING WITH DELIVERYKITCHEN INSTALLATIONASSEMBLYMost of our products are flatpacked and designed in such a way that they can easily fit in your car. However, if you prefer to have your purchase picked and delivered, you can book a delivery service that can be combined with a picking service.We’ll pick the furniture you want and arrange delivery to your home or workplace. All you need to do is place the order and look forward to the arrival of your goods.We’ll install your new kitchen for you and coordinate the job from start to finish. Before installation begins we do a final check that the order is right and the measure-ments correct.Professional kitchen installers will handle all those time-consuming jobs like fitting sinks, taps, and worktops. Your kitchen will be installed to the highest industry standards.Our products are specifically de -signed to be simple to assemble so that our customers can easily do it themselves. That way, you save the most money.However, if you need a hand, we have a range of assembly options for you to choose from when shop -ping at IKEA.co.th or shopping at your nearest IKEA store.FINANCE LOANWe can help you spread the cost with our 0% Instalment Payment Plan (IPP). Find out more at IKEA.co.th/IPPThe step-by-step guide The tools you’ll needBelow is a summary of the basic tools you’ll need. Inaddition you’ll find what tools to use for each product in their respective assembly instructions. It’s a good idea to wear safety glasses when using power tools.Good to knowPlaster, wood or concrete walls? Because there are many different types of walls, fixing hardware is not supplied with your cabinets. Most hardware or home improvement stores stock appropriate fixing hardware and can help you choose the right sort for your walls.Installing your new IKEA kitchen correctlyThis brochure is your guide to preparing and installing your new kitchen yourself. Inside you’ll find clear steps to follow as well as useful tips and ideas. Use this guide along with your IKEA assembly instructions to make sure your kitchen is installed in the right way.Before you beginGo through this brochure before you begin to see what stages are involved in putting in your new kitchen and to organise what tools you’ll need.To make sure you have everything for your new kitch-en, compare the packages and parts you have at home against the order list and the freight list. You should only dismantle your old kitchen when you have all your new parts and appliances.Your kitchen parts and worktop should be stored in-doors, with normal room temperature and humidity. It’s helpful if you arrange your cabinets in the orderyou will be installing them. Use your packing list andIKEA home planner drawing to help you.Before you remove your old kitchen you need to makesure that your electricity, gas and water is shut off.Use a qualified professional to disconnect and connectyour gas, water and electricity.You can do it yourself but you don´t have toOur kitchens are designed to be as simple as possiblefor you to assemble and install yourself. But we’re hereto help as much as you’d like us to. We can offer youservices ranging from planning and delivery to com-plete kitchen installations. For more details see theback page of this guide, kitchen section of IKEA.co.th/kitchen or contact your local IKEA store.Circular sawSpirit levelTry squarePhillipsFlatPrepare your roomMount the suspension railOnce you have removed your old kitchen prepare your room by making sure your walls and floor are even, and your walls are suitable for supporting your new kitchen. Now is also the time to prime and paint your walls, put in tiles or change your flooring.Marking cabinet positionsDraw a layout of your new kitchen directly on the wall. Check that everything fits with the measurements from your plan and your electricity, water, gas and ventilation connections are where you want them. Also mark where to fasten your new kitchen’s suspen -sion rails.Your new IKEA cabinets can be hung directly onto a suspension rail making them easier to install and adjust. It’s important to make sure your suspension rail is straight and level, and to secure it with the right screw type for your wall.Prepare your space by making sure yourcorners are even and your walls and floor are straight. Use your try square for the corners Fasten your rails, base rail first. Make sure you’ve found suitable points in the wall where the rails can be fastened and that the rails are level before drilling.If your wall is uneven use distances between the rail and the wall to make sure the rail is straight.Check your wall is strong enough to hang your suspension rail and cabinets. Depending on your wall material, it’s best to install your rail Use a spirit level to check that each rail is level.Make sure you note the highest point of the floor and where the corners are not 90 degrees.Install your cabinetsIn most kitchens it’s best to install your wall cabinets first. This way you have room to move without base cabinets in the way. One exception is if you are install -ing a single line kitchen with a high cabinet at one end. In this case install the high cabinet first.Some cabinets have ready-made openings for plumb -ing and utilities, but you can use a jigsaw to create your own openings ifneeded. Do this before fitting the cabinet in place. Be aware where you place openings can affect how you can arrange drawers in a cabinet.Assemble all wall cabinet frames according to the assembly instructions. Wait until later be-fore fitting drawers, doors and internal fittings.Hang your base cabinets starting in the corner. Hang each following cabinet in the sameway. If you’re installing a corner carousel now is the time to do it.Make sure the right base cabinet is aligned with your plumbing.Hang the corner cabinet first and secure by tightening the screws. Hang the remaining cabinets and connect them with the included screws. Wait to tighten the screws until the base cabinets are in place and you can ensure alignment.Check that each cabinet is aligned with the previous cabinet by adjusting the legs.Assemble all base cabinets according to the as-sembly instructions. Make sure to have the legs attached in the order the cabinets will be fitted.Cabinet legs connecting two cabinets can be used to support both cabinets while you’re installing. Remember to use the distance ring included with the legs.If you are using a high cabinet, fit with a cover panel first.Filler piecesFiller pieces are used between your cabinets and walls for a streamlined appearance, and to ensure there is enough room to fully open doors and drawers. They are especially use-ful if your walls are not perfectly straight.If the wall is not level and flat, the filler piece must be cut to fit to the wall’s shape. To do this, you’ll need a filler piece, measuring tape, small block of wood about 1-1 1/3” thick and pencil. Cut the filler piece so it’s the same height as the cabinet. Place the edge of the filler piece against the wall. Hold the block of wood flat against the wall with the pencil against it. Keep them pressed against the wall as you slide them down the length of the filler piece. Now you have traced the shape of the wall onto the filler piece. Cut along your trace line. Check the wall with your spirit level to see if it is straight. If the wall is even, measure between the wall and the cabinet and mark this distance at the top and bottom of the filler piece.To ensure the filler piece stays in place, first fas -ten a support strip to the wall. Drill holes in the cabinet for the screws you’ll use to fasten the cabinet and filler piece together. Put the filler piece into place. Put screws through the holes you have drilled. When all your filler pieces are in, caulk around each one with silicone for an airtight seal.Place the newly cut edge of the filler piece against the wall (it should fit perfectly). Mark the edge of the cabinet on the top and bottom of the filler piece. Draw a straight line from these points and cut.All electrical connections must be made by aqualified electrician.Use a circular saw and G clamps to hold astraight-edge to your pre-cut worktop whenyou cut to customising the size. It’s helpfulto use a pair of sawhorses to help you. Atip is to have a second person holding thepiece to be cut off to avoid the edge fromsplintering.To prevent moisture from penetrating theworktop apply polyurethane silicone acrossthe sawn edges.Install your lighting and appliances. If drill-ing holes, use a piece of wood to meet thedrill as it penetrates the surface to avoid theedges from splintering.Install sink into the worktop according tothe assembly instructions.Proof measure your worktop. if you havea pre-cut worktop now is the time to cutit to the right length. To avoid splinter, cutwith the worktop underside facing up whenusing a buzz or jig saw, but with the top ifusing a handsaw.Mark a spot for the sink by laying the work-top in place. Trace the inside of the basecabinet onto the underside of the worktop.This helps you align your sink. Turn yourworktop over and trace the outline of yoursink onto masking tape.Secure your worktop in place according tothe assembly instructions.Use a jigsaw to cut out space for your sink.It’s helpful to drill a hole on the inside cor-ners of your outline before cutting, so youcan make a cleaner cut.Customise your worktop for your hob inthe same fashion as for your sink. See yourhob’s assembly instructions for help.Install the extractor hood. The extractorhoods at IKEA can be installed in two ways:either ducted to the outside, called extrac-tion, or used in recirculation mode fittedwith a charcoal filter. Each installationoption is described in the assembly instruc-tions that come with the product.Saw the hole either in the back panel or inthe top of the cabinet. See the assemblyinstructions. For safety and functionalityreasons, follow precise measurements inthe instructions for installation that comewith the extractor hood/fan. Install your worktop, sink,lighting and appliances.With your cabinet frames in, it’s time to install yourworktop, sink, lighting and appliances. Check that yourworktop is the correct size before fitting it in place.Now is also the time if you need to customise yourworktop for a sink or hob. Note! Always use your as-sembly instructions for help.Once your worktop is in, you’re ready to get yourwater, gas, lighting and appliances connected. Allwater, gas and electricity connections must be done byqualified professionals according to valid local safetyregulations.the island.You can use either UTBY legs or the METOD assembly kit for kitchen island.The latter is used to connect cabinets back to back, or for attaching a coverpanel to the back of cabinets.Contact your local IKEA store if you need help regarding the assembly.METOD assembly kit for kitchen island.802.984.12 250.-Install your shelves, drawers,doors, knobs and handles.You’re done! Congratulationson your new kitchen!Now your cabinet frames, worktops and appliancesare in, fit your drawer slides into your cabinets. Re-member that the slides for inner drawers and stand-ard drawers are fitted in different ways (see yourassembly instructions for help).Caring for your cabinetsClean the doors, cabinet interiors and wood surfaceswith a soft, damp cloth. Only use cleaning productsintended for these materials. Do not use productsthat contain ammonia, alcohol, bleach or abrasives.Rinse with clean water, then dry with a clean, drycloth. Make sure to clean up spills quickly.Keep your sink sparklingAfter each use, wipe the sink clean with a cloth orsponge damped in water or a non-abrasive deter-gent, if necessary. Rinse the bowl with water andthen wipe the sink with a dry cloth. Avoid scouring-powder, steel wool, or hard objects which can scratchthe stainless steel surface. The damp surface can bediscoloured if substances containing iron, such assteel wool, nails or gravel, are allowed to remain on it.Once the slides are in, fit in your drawers before yourdoors and shelves. Finish up by adding knobs andhandles as well as any other internal solutions (likewire baskets).Note! Always use your assembly instructions for help.Long-lasting worktopsKeep your worktop in top condition by cleaning spillsquickly with water and a mild detergent. Be sure tokeep them as dry as possible after use.Fasten your drawer slides, starting with yourouter drawers. Outer drawer slides shouldbe attached to the outer row of holes in yourcabinet.Attach the hinges for your doors.Once your outer drawer slides are in, fit your in-ner drawer slides. The inner drawers slides arefitted to the inner row of holes in your cabinet.Assemble your drawers with the help of theassembly instructions.Fit your drawers and doors to your cabinets.Align your doors to the correct height and widthby adjusting the screws on the hinge plate.If you’re fitting a plinth now is the time to attachit. Follow the assembly instructions for help.If you are fitting a ventilation grill, place the grillbetween two pieces of plinth.。

厨房电器多功能说明手册在现代家庭中,厨房电器的种类越来越丰富,功能也越来越强大。
它们不仅为我们的烹饪带来了便利,还能帮助我们制作出各种美味佳肴。
为了让您更好地了解和使用厨房电器,本文将为您详细介绍几种常见厨房电器的多功能特点及使用方法。
一、电饭煲电饭煲是厨房中最常用的电器之一,它不仅可以煮饭,还具备多种其他功能。
1、煮饭功能首先,将适量的米洗净放入内胆,根据米的种类和个人口感加入适量的水。
一般来说,普通大米的水位要超过米约一个指节的高度。
选择煮饭模式,等待电饭煲自动煮熟并保温。
2、煮粥功能同样将米和水按照一定比例放入内胆,水要比煮饭时多一些。
选择煮粥模式,注意煮粥过程中可能会有溢出的情况,所以不要加太满的水。
3、煲汤功能准备好食材,如排骨、鸡肉、蔬菜等,切成适当大小。
将食材和水放入电饭煲,选择煲汤模式,煮出的汤浓郁鲜美。
4、蒸煮功能在内胆中加入适量的水,将蒸架放入,把需要蒸的食物,如包子、馒头、鱼等放在蒸架上。
选择蒸煮模式,轻松完成蒸煮操作。
二、微波炉微波炉是一种快速加热食物的电器,使用方便快捷。
1、加热饭菜将饭菜放入微波炉专用的容器中,注意不要使用金属容器。
设定加热时间和功率,一般根据食物的量和种类来决定,通常几分钟就能加热完成。
2、解冻食物把需要解冻的食物放入微波炉,选择解冻模式。
微波炉会根据食物的重量自动计算解冻时间。
3、烹饪简单菜肴例如可以用微波炉做烤鸡翅,将鸡翅用调料腌制好,放入微波炉专用烤盘,选择烧烤模式。
4、制作爆米花购买专门的微波炉爆米花,按照包装上的说明放入微波炉,短短几分钟就能享受到美味的爆米花。
三、电烤箱电烤箱能烤制出各种美味的烘焙食品和烤肉。
1、烘焙面包和蛋糕准备好面粉、鸡蛋、糖等原料,按照配方搅拌成面糊或面团。
将模具放入烤箱,选择合适的温度和时间,烤出香甜的面包和蛋糕。
2、烤制肉类如烤鸡、烤排骨等,将肉类用调料腌制入味。
放入烤箱,设置适当的温度和时间,期间可以翻面,确保烤制均匀。

Installation Guide产品安装使用说明书KOHLER CHINA INVESTMENT CO., LTD NO.158, JIANG CHANG SAN ROAD,JINGAN DISTRICT, SHANGHAI, PRC POST CODE: 200436科勒(中国)投资有限公司 上海市静安区市北工业园区江场三路158号 邮编:200436Kitchen Water Filtration System ALEO Series科勒厨房超滤净饮机利奥系列K-24634T-KT700-01R®FREE SERVICE HOT LINE: 800 820 2628 MOBILE:400 820 2628 (China area only): 800 820 2628 :400 820 26281. PRODUCT FUNCTION (1)2. INTENDED USE (2)3. PRODUCT SPECIFICATION (3)4. INSTALLATION (7)5. OPERATION INSTRUCTIONS (11)6. FILTER CARTRIDGE REPLACEMENT (12)7. TROUBLESHOOTING GUIDE......................................13一、产品功能 (1)二、安装之前 (2)三、产品规格 (3)四、安装步骤 (7)五、产品使用 (11)六、滤芯更换 (12)七、常见问题及解决方法 (13)• Thank you for choosing the Kitchen WaterFiltration System ALEO Series.• Please read this Installation Guide carefully prior to installation and operation of this system.• You can also visit for an electronic copy of the Installation Guide or obtain the latest product information by following the official Kohler WaterFiltration wechat account: kohlerwater.• 感谢您选择科勒厨房超滤净饮机利奥系列。
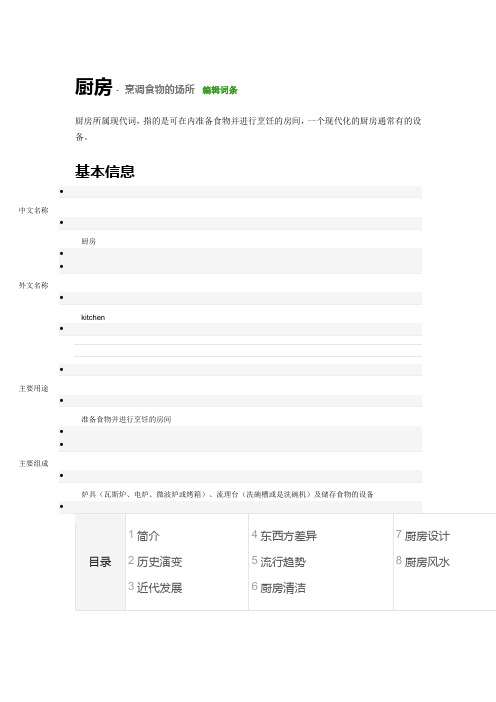
厨房 - 烹调食物的场所 编辑词条 厨房所属现代词,指的是可在内准备食物并进行烹饪的房间,一个现代化的厨房通常有的设备。
基本信息 ∙ 中文名称∙ 厨房 ∙ ∙ 外文名称∙kitchen ∙ ∙ 主要用途∙ 准备食物并进行烹饪的房间 ∙ ∙主要组成∙ 炉具(瓦斯炉、电炉、微波炉或烤箱)、流理台(洗碗槽或是洗碗机)及储存食物的设备∙目录 1简介 2历史演变 3近代发展 4东西方差异 5流行趋势 6厨房清洁 7厨房设计8厨房风水简介编辑本段厨房避免厨房拥挤关键立柜吊柜抽屉厨房,是指可在内准备食物并进行烹饪的房间,一个现代化的厨房通常有的设备包括炉具(瓦斯炉、电炉、微波炉或烤箱)、流理台(洗碗槽或是洗碗机)及储存食物的设备(例如:冰箱)。
拥有一个精心设计、装修合理的厨房会让你变得轻松愉快起来。
厨房装修首先要注重它的功能性。
打造温馨舒适厨房,一要视觉干净清爽;二要有舒适方便的操作中心:橱柜要考虑到科学性和舒适性。
灶台的高度,灶台和水池的距离,冰箱和灶台的距离,择菜、切菜、炒菜、熟菜都有各自的空间,橱柜要设计抽屉;三要有情趣:对于现代家庭来说,厨房不仅是烹饪的地方,更是家人交流的空间,休闲的舞台,工艺画、绿植等装饰品开始走进厨房中,而早餐台、吧台等更加成为打造休闲空间的好点子,做饭时可以交流一天的所见所闻,是晚餐前的一道风景呢。
历史演变编辑本段纵观中国历史上厨房格局的演变,它一方面取决于生产力的发展,另一方面也决定于当地的自然条件和居民的生活习惯。
厨房大致经历了以下几个发展时段,通过不同时期的演变,厨房的功能性逐渐走向合理。
1、首先是古建筑遗址考证。
原始人以天然洞穴为居,居住条件极差,以野菜、野果、野兽肉等生食充饥,过着所谓“茹毛饮血”的生活,不知道熟食的制作。
后来尝到了被雷击而烧死的野兽肉,发现了熟食的美味。
当然,钻木取火的发明才使人类有条件正式开始熟食的习惯,这也是走入人类文明的第一步,如中国北京猿人居住的周口店洞穴石壁上,至今留有焰火薰烤的痕迹和木炭残迹。
My kitchen 我家的厨房
My kitchen is very small. 我家的厨房很小。
There is a table in the middle of the room. 在厨房的中间有一张桌子。
There is a cup on the table. 桌子上有一个杯子。
The cup is clean. 杯子很干净。
There is a bottle on the table ,too. 桌子上还有一个瓶子。
The bottle is behind the cup. 瓶子在杯子的后面。
There is a cupboard in the room. 厨房里有一个橱柜
The cupboard is on the left. 橱柜在左边。
There are some plates in the cupboard. 橱柜里有一些盘子。
There are some spoons and knives in the kitchen0. 橱柜里还有一些勺子和刀子。
There is a fridge in the room. 房间里有一个冰箱。
The fridge is on the right.冰箱在右边。
There is some milk in the fridge. 冰箱里有一些牛奶。
There are some bottles in the fridge. 冰箱里还有一些瓶子。
The bottles are full. 这些瓶子是满的。
This is my kitchen.. 这就是我家的厨房。
Ceramic BakewareUstensile de cuisson au four en céramique Utensilios para hornearde cerámicaINSTRUCTIONSINSTRUCTIONSINSTRUCCIONESWELCOME TO THE WORLD OF KITCHENAID. www.kitchenaid.caWe’re committed to helping you create a lifetime of delicious meals for family and friends. T o help ensure the longevity and performance of your bakeware, keep this guide handy. It will empower you with the best way to use and care for your product. Your satisfaction is our #1 goal. Remember to register your product online at /support.Join us in the kitchen at .Scan with your mobile device for recipes, tips, and more.E n g l i s h3CERAMIC BAKEWARE INSTRUCTIONSPROOF OF PURCHASE & PRODUCT REGISTRATION Model Number_ _______________________________________________________________________Ser_ial Number_ _______________________________________________________________________Date Pur_chased ______________________________________________________________________Stor_e Name _________________________________________________________________________Always keep a copy of the itemized sales receipt showing the date of purchase of your bakeware. Proof of purchase will assure you of in-warranty service. Before you use your bakeware, please register online at /support. This will enable us to contact you in the unlikely event of a product safety notification and assist us in complying with the provisions of the Consumer Product Safety Act. The completion and submission of product registration information is not required to obtain your product warranty. Please complete the following for your personal records:FEATURES ................................................................................................................4USING YOUR BAKEWARE Baking .................................................................................................................5CARING FOR YOUR BAKEWARE Cleaning Bakeware .............................................................................................5WARRANTY (6)TABLE OF CONTENTS45• Before use, wash with hot, soapy water, rinse and dry thoroughly. It is not necessary to season the bakeware before use.• The ceramic bakeware is oven safe to 500°F; however, it is not recommended to place bakeware directly under the broiler.• The ceramic bakeware can be stored in the freezer. The non-porous ceramic bakeware will not absorb odors, flavors, or bacteria from food. • The ceramic bakeware is safe for cooking or reheating in the microwave.• For best results, add a small amount of liquid or sauce in the bottom of the bakeware when cooking with meat.• Baking time can vary when using ceramic bakeware. Monitor and adjust the cooking time as needed.• Use a hot pad or trivet before placing the hot ceramic bakeware on an unprotected surface.• T o avoid possible damage, do not set hot bakeware on a cold or wet surface.• After removal from the oven, ceramic bakeware will retain heat longer than standard bakeware.• The ceramic bakeware is dishwasher safe and can be placed on the top or bottom rack.• T o remove baked-on food, soakbakeware in hot, soapy water for 15 to 20 minutes or as needed before placing it in the dishwasher.• Always dry ceramic bakeware thoroughly before storing.IMPORTANT: Do not use on stovetop or with any other direct heat, such as broiler, grill, toaster oven, or direct flame.the product. If the product is found to be defective upon receiptand examination, KitchenAid brand of Whirlpool Corporationor Whirlpool Canada LP (hereafter “KitchenAid”) will, at its solediscretion, provide product or part replacement with an identicalor similar item. If replaced, your product will be covered by theremaining five year limited warranty of the original product. Thiswarranty is limited to the original consumer upon presentation of aonly when the baking product is used in the country in which it was purchased.WHAT IS NOT COVERED BY THIS WARRANTY1.Damage from ordinary wear and tear such as scratches, dents, stains or discoloration to allsurfaces or other damage that does not impair the function of the bakeware.2.Damage due to improper handling, accident, abuse, misuse, fire, flood, theft, acts of God,neglect, corrosion, modification, exposure to extreme temperatures or failure to follow the manufacturer’s use and care instructions.3.Damage or breakage of bakeware or lids due to dropping or impact.4.Shipping, freight or insurance fees to deliver replacement parts or return defective productsto an Authorized KitchenAid Service Center.e of this product in commercial applications.6.Minor imperfections or blemishes due to variations in paint, enamel, metals, plastic, silicone,ceramic or glass.7.Replacement product or parts when used outside the United States, Canada or Puerto Rico.8.Surfaces damage due to chemical interaction or cleaning agents including but not limited toscouring pads, abrasive cleaners or automatic dishwashers.9.Replacement of bakeware sets, only the defective part or item will be replaced.The cost of r_epair_ or_ r_eplacement under_ these excluded cir_cumstances shall be bor_ne by the customer_.DISCLAIMER OF IMPLIED WARRANTIESIMPLIED WARRANTIES, INCLUDING ANY LIMITED WARRANTY OF MERCHANTABILITY OR LIMITED WARRANTY OF FITNESS FOR A PARTICULAR PURPOSE, ARE LIMITED TO1 YEAR OR THE SHORTEST PERIOD ALLOWED BY LAW. Some states and provinces do notallow limitations on duration of implied warranties of merchantability or fitness, so this limitation may not apply to you. This warranty gives you specific legal rights, and you also may have other rights that vary from state to state or province to province.LIMITATION OF REMEDIES; EXCLUSION OF INCIDENTAL ANDCONSEQUENTIAL DAMAGESYOUR SOLE AND EXCLUSIVE REMEDY UNDER THIS LIMITED WARRANTY SHALLBE PRODUCT OR PART REPLACEMENT AT OUR DISCRETION AS PROVIDED HEREIN.KITCHENAID SHALL NOT BE RESPONSIBLE FOR INCIDENTAL OR CONSEQUENTIAL DAMAGES. Some states and provinces do not allow exclusion or limitation of incidental orconsequential damages, so these limitations may not apply to you. This warranty gives youspecific legal rights, and you also may have other rights that vary from state to state or province to province.Outside the 50 United States and Canada this warranty does not apply. If you need warranty service, contact the KitchenAid Customer eXperience Center at 1-888-801-1707 in the USA or 1-800-661-6721 in Canada.6。
RangehoodRange.Leave your kitchen feeling fresh and clean, all with quiet efficiency.A few decibels can make the difference between harmful, loud and pleasant. Operating at 38dB(A)*, our quietest rangehood means you can have it on whileWall-mounted RangehoodsVenting Cooktops:The best of our cooktopsand rangehoods combined.Our new cooktops with an integrated ventilation module, extract steam and odours at their source, so you can focus on the most important thing: cooking. No matter if you require a recirculation system or ducted system, the compact design offers flexibitility when planning your kitchen.ConveniencePerfectAir sensor .*PerfectAir continuously monitors the air and automatically adapts the extraction rate to the amount of odour present. At the same time, it reduces the noise level because it only activates the lowest extraction rate necessary.Cooktop to Rangehood control.*Control your rangehood via your cooktop with cooktop to rangehood control. When the cooktop is turned on, the hood also switches on and thanks to PerfectAir, automatically extracts at the correct power level. If preferred, the rangehood can be controlled manually.Electronic filter saturation indicator .*For maximum extraction efficiency, an illuminated light indicates when the filter needs cleaning. For hassle-free cleaning, the one-piece filter can be loaded into your Bosch dishwasher.Electronic control .*3 power levels + 2 additional intensive settings, automatic run-on, filtersaturation indicator, automatic powerrevert and SoftLight with dimmer function; control at your fingertips.Electronic button control .*This control provides you with 3 power levels + 1 intensive setting. There’s also a push-button for turning the lights on and off. And to make operation even easier, the buttons are back-lit.PerformanceDishwasher-safe metal filters.For easy cleaning, all Bosch filters can be safely loaded into any Bosch dishwasher for sparkling clean results.Metal grease filter.Metal grease filters are required forducted and recirculating systems to filter grease and other solid particles out of the extracted air. To make sure these filters operate at maximum efficiency, they should be cleaned about twice a month.Stainless steel filter.The stainless steel filter provides an exceptionally high level of grease absorption. It is concealed behind an elegant stainless steel cover with a stainless steel handle.Rim ventilation filter .*With its smooth uninterrupted surface and grease separation of 80–92%,* the rim ventilation filter from Bosch has amulti-patented filter sealing system and flow-optimised filter system with 12-layer filter mats.Extraction rates .*Air extraction is measured using room volume. This is calculated by multiplying Length x Width x Height. Bosch rangehoods offer powerful maximum extraction rates for when you are cooking up a storm in the kitchen. While the variable power settings allow you to navigate just the extraction power you need for each meal.CleaningAutomatic power revert .*When the intensive setting is selected, it can be set to automatically revert to a pre-defined setting after a short period of time.LED lighting .*The new LED lights offer a longer lifetime and use less energy than older stylehalogen lighting. Additional convenience is offered with SoftLight which gently fades lighting in and out with dimmer function.Variable power settings .*All Bosch rangehoods feature variable power settings, which can be set to effectively remove odours, smoke andmoisture caused by cooking. Many models also feature an intensive extractionsetting, which gives an extra boost to the performance when required.Home Connect.*Give yourself some breathing space and conveniently change the settings for your rangehood with Home Connect via the app. You have everything under control – from the blower setting to the sensitivity or the run-on time. Plus, the app lets you know as soon as the grease or activated charcoal filter needs cleaning, changing or regenerating. It also provides practical tips and instructions on how to change the filter with ease.Advanced features and functions for everyday use.*N o s p a c e f o r a ra n g e h o o d ?S ee o ur 2-in -1 c oo kt opw it h in te gr at ed ve nt ila ti onWashing Machine Range.Cooktop Range.Dryer Range.Oven and Compact Dishwasher Range.Floorcare Range.Refrigeration Range.Freestanding Cooker。
kitchen拼读规则摘要:1.介绍厨房的拼读规则2.厨房中元音字母的拼读规则3.厨房中辅音字母的拼读规则4.厨房中字母组合的拼读规则5.总结厨房的拼读规则正文:1.介绍厨房的拼读规则厨房是英语中一个常见的单词,其拼读规则对于英语学习者来说具有一定的参考价值。
在英语中,厨房的拼读为/ktn/,这个单词由三个音节组成,分别是/kt/ 和/-n/。
下面我们来详细了解一下厨房的拼读规则。
2.厨房中元音字母的拼读规则在厨房这个单词中,元音字母有// 和//。
其中,// 位于"kit" 这个音节中,表示短元音//;// 位于"chin" 这个音节中,表示长元音//。
在英语中,元音字母的拼读规则通常遵循“长元音-短元音-双元音”的顺序,因此我们在读"kitchen" 这个单词时,会先读出短元音//,然后读出长元音//。
3.厨房中辅音字母的拼读规则在厨房这个单词中,辅音字母有/k/、/t/、// 和/n/。
其中,/k/ 位于"kitchen" 这个单词的开头,表示辅音/k/;/t/ 位于"kitchen" 这个单词的第二个音节,表示辅音/t/;// 位于"kitchen" 这个单词的第三个音节,表示辅音//;/n/ 位于"kitchen" 这个单词的结尾,表示辅音/n/。
在英语中,辅音字母的拼读规则通常遵循“一声-二声-三声-四声”的顺序,因此我们在读"kitchen" 这个单词时,会先读出一声的辅音/k/,然后依次读出二声的辅音/t/、三声的辅音// 和四声的辅音/n/。
4.厨房中字母组合的拼读规则在厨房这个单词中,有一些字母组合需要特别注意,例如"ch" 和"tch"。
在英语中,字母组合的拼读规则通常是两个字母分别发音,再合并发音结果。
DSIXDA’s ROM Kitchen for HTC Android Devices DSIXDA的HTC安卓ROM(固件)定制工具 2011.2.23 文章作者:Will Verduzco
是否你曾经想制做自己风格的ROM,但是又没有足够的编程经验去真正实现它?非常幸运的是,XDA高级版主Dsixda已经为HTC安卓设备制作了一个非常好的烹制工具,这个工具应该能够实现你所有ROM定制的需求。这个工具只兼容Linux和Mac OS X,所以如果你的电脑正在运行windows系统,你将需要使用Cygwin或是一个虚拟机,比如VirtualBox。想得到一些具体细节和其它的解决方式请参考Kitchen FAQ。
根据开发者提供的信息,这个工具被定位于以下目标人群:************** •哪些想要打造自己品牌的新定制Roms且又想要找一个容易的地方开始的人 •哪些仅仅想将一个发行版的Rom或是其它人制做的ROM修改为自己喜欢的风格的人 •哪些为了制作或是提取ROM而被这些脚本语言和复杂的命令行所困惑的人
到目前为止,以下设备已经被支持: •Buzz / Wildfire •Desire •Desire HD •Desire Z •Dream / G1 •Droid Eris •Evo 4G •Evo Shift 4G •HD2 – using NAND ROM •Hero / G2 Touch •Incredible •Legend •Magic / myTouch 3G •myTouch 4G •Nexus One •Tattoo / Click •所有的已经获得完全root权限的其它一些HTC的Android设备(没有经过测试) •所有的能运行Android系统的其它一些HTC Windows Mobile设备(没有经过测试)
根据其它论坛的会员反馈,一些非HTC设备也被支持: •Huawei U8100/U8110/U8120/U8150 •LG Ally •LG Shine Plus •LG GT540 Optimus •Motorola CLIQ •Samsung Galaxy S-你必需用RMGeren’s SGS版本的kitchen工具 •Sony Xperia X10 / X10 Mini / X10 Mini Pro – 没有boot.img •T-Mobile Pulse
软件的具体说明和下载见下面回贴! =================================================================== HTC Android Kitchen - by dsixda (xda-developers . com) ===================================================================
软件菜单介绍(英汉对照) Main Menu 主菜单
1. Set up working folder from ROM 1.设置ROM的工作目录 2. Add root permissions 2.添加root权限 3. Add BusyBox 3.添加BusyBox 4. Disable boot screen sounds 4.禁止第二屏启动的声音 5. Add wireless tethering 5.添加无线共享 6. Zipalign all *.apk files to optimize RAM usage 6.使用Zipalign压缩所有的apk文件以优化RAM使用 7. Change wipe status of ROM 7.更改ROM的擦除状态 8. Change name of ROM 8.更改ROM的名称 9. Check update-script for errors 9.检查更新脚本错误 10. Show working folder information 10.显示工作目录信息
Advanced Options 高级选项 11 - Deodex files in your ROM 11 - Deodex你ROM中的文件 (译者注:就是把system/app下的APK和ODEX合并为一个apk文件,以便进行更新系统软件) 12 - Add task killer tweak for speed (stock ROM only) 12 - 添加task killer工具来调整运行速度(只适用于官方ROM) 13 - Add /data/app functionality 13 - 添加/data/app功能(译者注:加入自定义可卸载程序存放目录,放在这里面的程序刷机后可以卸载,刷完格式化手机也会丢失) 14 - Add Nano text editor + sysro/sysrw 14 - 添加Nano文本编辑器和sysro/sysrw(系统只读或读写转换) 15 - Add Bash (command shell) 15 - 添加Bash(命令行)(译者注:不知道是什么高级东东) 16 - Add Apps2SD 16-添加Apps2SD 17 - Add /etc/init.d scripts support (busybox run-parts) 17 - 添加/etc/init.d脚本支持 (译者注:可能是可以开机自动运行/etc/init.d目录下的脚本吧,做一些初始化的工作) 18 - Add custom boot animation functionality 18 - 添加定制启动动画功能 19 - Porting tools (experimental) 19 - 移植工具(实验) 20 - Unpack or re-pack a boot image 20 - 解包或打包boot镜像 21 - Unpack data.img 21 - 解包data.img 22 - Sign APK file(s) 22 - 签名APK文件 23 - Convert update-script or updater-script 23 - 转换update-script或 updater-script 24 - Run plugin scripts 24 - 运行插件脚本 99. Build ROM from working folder 99. 从工作目录中生成ROM 00. About/Update kitchen 00. 关于/升级kitchen 0. Exit 0.退出
注意:刷Rom需要一个定制的recovery菜单。(泽者注:一般XX过权限的都有了这个东东。)
KITCHEN工具下载和帮助
警告:在你将要做以下工作之前,请阅读常见问题(FAQ) 安装软件 因为kitchen工具的使用问题而准备在这个贴子里发言来寻求帮助之前 *************软件下载地址见附件文本*************
Release Notes 版本发行记录
版本0.130 (2011.2.22): 改进了de-odexing routine的 'brute-force method',现在应该更快和更可靠了 增加了对Motorola Atrix framework and apps de-odex的支持 修正了单个文件de-odex模式的一个错误,用户试着详细述一个classfile,但是被一个已经定义的脚本所拒绝。 在单个文件de-odex模式中增加了一个选项,用户可以再试一下,如果以前deodex失败 修正了在de-odex routine中的其它一些小错误 修正了错误,语法错误将会被显示出来,如果你遇到一个坏的system.img和data.img 修正了Explore2fs 记录文件有时候会被删除的错误
进行Rom制作,可能需要一些基础的计算机知识,比如Dos命令行操作,目录操作,更多的是需要虚心学习的精神、一点点勇气和空闲时间。 如果你感兴趣,且英语很好,还是请参考原贴作者写的教程。 如果你不想看英语,哪就看我的翻译吧,水平有限,错误难免,还请批评指正。 有时候,某些应用并不太常用,放在ROM里面占空间挺可惜的,不如把它变成一个单独的APK安装包,想用的时候再装来的更方便些。这种时候,就需要把优化成APK文件和Odex文件组成的程序重新合并起来。 需要用到的工具是smali,一个开源的java处理软件
http : //code .google.com/p/smali/downloads/list 下载里面的baksmali和smali的jar文件到工作目录,把ROM里面的core.odex, ext.odex, framework.odex, android.policy.odex, services.odex这5个文件也放在同一目录(也可以放在别的目录,通过设置BOOTCLASSPATH指定,默认就是当前目录)。
我们以teeter为例子,ROM里面拿出来的可能是2个文件,teeter.apk + teeter.odex。 第一步,分解odex文件: java -jar baksmali-1.2.1.jar -x teeter.odex 如果没其他问题,会在工作目录生成一个out的目录,里面是分解出来的一些文件,我们在此不深究这些文件的作用。
第二部,把分解得到的文件变成classes.dex: java -Xmx512M -jar smali-1.2.1.jar out -o classes.dex 这样,我们就得到了一个有用的classes.dex文件,用WinZip或者WinRAR打开teeter.apk文件,把这个classes.dex放进去,最后再用signapk把最新得到的这个包
含classes.dex的apk重新签署一下,就生成一个可以安装的单独APK程序了。
就这么简单。