ADI IMU EV20(30)使用说明(new)
- 格式:pdf
- 大小:1.21 MB
- 文档页数:15

ectrodynamic DesignsOPERATION MANUAL HEDD Type20MK2HEDD Type30MK2Table of Contents2Product OverviewCongratulations on purchasing the HEDD Type20MK2or HEDD Type30MK2.You haveacquired very precise monitors with a rich feature set.The main features are exchangableuse as a Closed or Ported system,as well as the integration of the on-board HEDDLineariser®.Please head to the specific section to find out more.As active speakers,the MK2monitors have an integrated amplifier.You can connect themwith a digital interface or analog pre-amplifier.Please refer to the section Getting Startedor Speaker Setup to find out more.Due to their similar nature,this operation manual equally covers the HEDD Type20MK2and HEDD Type30MK2monitors.This manual uses illustrations of the different variants,which thus might not match your exact version in terms of colour or size.©2021HEDD Audio GmbH|Heinz Electrodynamic Designs|www.hedd.audio4Box ContentsThe complete set includes:•one active monitor Type20MK2or Type30MK2•one power cable compatible with the region from where it was sold •quickstart guide•«CoP»leaflet explaining the proper switch from Ported to Closed Mode •«CoP»screw and plugs to seal the bass reflex portsPlease make sure your box contents match our listing.6Getting StartedMake sure the main power switch is in the "0"position,then connect the power cord to the power socket.Set the power switch to "1".Please note that the LED becomes green immediately but it may take up to 15sec to power up and play music.Warning:High volume may damage your hearing!Consider lowering the volume first.Connect your audio source via the balanced XLR socket,then select the desired input with the ANALOG /AES rotary switch on the back plate (bottom left).For digital AES input,please choose the signal (left,right,mono).As there are quite a number of control knobs on the backplate we recommend to start playing music with all the markers in the "Up"position:ALL "0"and "↑"POSITION =FACTORY SETTINGStatus LEDThe front LED panel of the speaker will indicate its operational status as follows:The monitors automatically jump into stand-by after 30minutes.They wake back up when audio isplayed.Green Lightpower onRed Lightoverload:please decrease the input sensitivityWhite Lightstand-bySpeaker SetupTo achieve the best possible sound and unfold the full potential of the HEDD MK2 monitors,the correct speaker placement is very important.Please follow our guide below.Horizontal SetupPlacing the speaker horizontally is the best way,as they are designed to be placed like this.Always place them on a solid surface or a stand.Vertical SetupIf you like to place the speaker vertically in a stereo or surround setup,make sure that theyare aligned symmetrically:The Tweeters both should face either outwards or inwards. Otherwise,the acoustical image will not be correct.Height PositioningPlace the speaker in a position so that the tweeter matches the height of your ears whenyou are on your listening position.If this is not possible,tilt the speaker so that the tweeteraims at your ears.Try to avoid that the tweeter is placed too low or too high,as this mayresult in a muffled or less definedsound.©2021HEDD Audio GmbH|Heinz Electrodynamic Designs|www.hedd.audioStereo PositioningFor optimizing the stereo listening position,place the two speakers so that they form anequilateral triangle with your listening position.Your listening position should be on animaginary center point between the two speakers.Adjust the distance of the speakers andthe distance of our listening position accordingly to find the best position.Listen to somegood known records while adjusting,until you get an authentic stereo panorama.Surround PositioningFor a surround listening setup,place the speakers in a circle around your listening positionin following angles:Center0°,Front Right30°,Rear Right110°,Rear Left250°and FrontLeft330°.Radius of the circle should be between0.7m-2m.Surrounding walls should beat least40cm away from every speaker to avoid early reflections.It is preferrable to usethe same type of speaker for every channel(except the subwoofer,of course),becauseotherwise negative frequency and/or phase coloration can occur.Refer to the ITUrecommendation BS.2159-4for a detailedexplanation.8«CoP»Closed or PortedThe HEDD Type20MK2and Type30MK2can be used in either closed or in portedmode.These are two fundamentally different systems that are available for the user tocompare and choose.There is no definite better between the two systems.We recommend to compare carefully to find the optimal option for your environment andlistening habits.©2021HEDD Audio GmbH|Heinz Electrodynamic Designs|www.hedd.audioIn closed mode the HEDD MK2speaker functions as an infinite baffle speaker.This resultsin a cleaner sound and increased resolution.However,a6-10dB reduction in maximumsound pressure level(depending on the audio material)for low frequencies is the consequence.©2021HEDD Audio GmbH|Heinz Electrodynamic Designs|www.hedd.audioHEDD Lineariser®Due to the physically given relationship between time and frequency,expressed in thegroundtaking harmonic analysis or Fourier transform,different tones have slightlydifferent travelling times through loudspeakers.This is true for both active or passivespeakers.Broadly speaking,lower frequencies need more time to pass through thanmidrange frequencies,and these are slower than the high tones.Our HEDD Lineariser®offers a complex phase-correction of your HEDD MK2monitors.It solves one of the most challenging problems in loudspeaker designs,e.g.the natural occurance of phase difference during multi-component sound reproduction.With the on-board Lineariser®,our monitors are always“right in time”.The phase-linearisation will improve transients and imaging.To be noted:the correctionnecessarily will introduce a latency of around15ms.To avoid the delay that might affectlive recordings or instrument playing the HEDD Lineariser®can be switched off.12Control SettingsVolumeThe output volume rotary switch changes the reproduction level in a±12dB range.We recommend to fine-tune the volume through the connected source like an interface,control board,mixing board or pre-amp.The output volume allows to match the speakers to the audio chain,e.g.lowering SNR orTHD.The default setting is0dB.©2021HEDD Audio GmbH|Heinz Electrodynamic Designs|www.hedd.audioHEDD Lineariser®By default,the Lineariser rotary switch is turned on.This activates an on-board phase-correction of our HEDD MK2monitors.For more information,please refer to the section HEDD Lineariser®.Closed or PortedCoP switches the internal system layout according to the selected option.Please makesure that the plugs are correctly inserted for closed mode.For more information,please refer to the section Closed or Ported.Shelving FilterLow Shelf:Frequencies between30Hz and~200Hz are increased or reduced in a±4dBrange in steps of1dB.If you have placed your speaker near to a wall or in a corner,youwill typically get a boosted bass response.You can use this control for compensating.Orif you place the speaker in a particularly bright room,use the control to get a morebalanced sound.High Shelf:Frequencies between3kHz and~20kHz are increased or reduced in a±4dBrange in steps of1dB.14Low Frequency RangeIf you choose the extended bass response,the woofer has to deliver muchhigher amplitudes if very low frequencies occur.As a consequence itsmaximum sound pressure level(SPLmax)is reduced for low frequenciesby6-10dB depending on the musical material.The mechanical overload ofthe woofers is looming much earlier.The default low frequency range may be adjusted according to specific needs.When set to extended,the low frequency response is extended by~20%.In the case of Type20 and30MK2the-3dB point goes from32Hz down to26Hz.In case the monitors are used in a Satellite-Subwoofer system together with our BASS series,the switch has to be set to“for SUB”.If a BASS08or bigger HEDD subwoofer is used,it is preferrable to usethe analogue outputs from the sub.The HEDD BASS subwoofers have aLineariser®on board as well,therefore the overall bass signal is delayedby approximately30ms.They are added to the analog output so that anall in all linear phase Satellite-Sub-system is in place.In this very case youmay set the switch to“for SUB”.Should the listening distance vary between subwoofer and MK2monitorwith respect to the listening position,you may compensate on that withthe“Sat.offset”rotary switch by2m in.5m steps.In case the monitors are used in a Satellite-Sub-system together with our BASS series, please use the analog output to the satellites of the BASS08or12unit to get a completely linear phase Satellite-Sub-system.In case you feed the full range signal to both the satellites in parallel to any subwoofer(HEDD or other)set the switch to“for SUB”.202116Input SelectionThis 4-position rotary switch selects which signal to reproduce.“Analog”takes an analog signal from a symmetrical source.The other 3positions refer to an incoming digital AES signal.Left,Right or Mono can be extracted from the data.For multi-channel audio that exceedsstereo,for example 5.1surround sound,the monitors have to be fed throughthe analog XLR input.Input SensitivityThe “Input Sensitivity”rotary switch levels the voltage of the analog input.It can be used to optimize the signal to noise ratio for the A/D converter.In case of weak input signals the gain can beadded for up to +4dB.In case of very loud signals (>2V)either -4or -10dB gain reduction can be applied to avoid an A/D converter overload.The setting has no effect when the signal is received through the digital AES input.Desk FilterMonitors sitting on meter bridges or desks may suffer by early reflections from the desk surface that potentially blur the sound.The “Desk Filter”is a 3-position PEQ (Parametric Equaliser)that minimizes the effect.Please note that we cannot give an exact recommendation because the acoustical environments play a vital role.Please find out in how far these filters may improve the sound.Smallup to 80x 150cm [d x w]Med.up to 100x 180cm [d x w]Large for larger consoles or desktopsSafety InstructionsPlease read the following safety instructions carefully before setting up your system.Keep the instructions for subsequent reference.Please read the warnings and follow the instructions.•To reduce the risk of an electric shock,do not open the loudspeaker yourself.Always refer to qualified service personnel.•This is an active loudspeaker.It must be connected with an IEC60320AC mains power cord like the one supplied with the product.•Please switch off your audio system before connecting or disconnecting any cables to the speaker–also if you intent to clean the surface or single components.Never use flammable or combustible chemicals for cleaning audio components.•HEDD studio monitors are equipped with universal mains,meaning that the speakers work within a voltage range from85–265V.This makes the usual voltage switches unnecessary.•Do not place this unit on an unstable cart,stand or tripod,bracket or table.The unit may fall, causing serious injury and/or serious damage.•This product should never be used outside.Avoid exposing it to rain or any sort of moisture.•Power chords and audio cables connected to this product should never be stepped on.•Please note that defective cables can harm your speakers and/or create humming,crackling, etc.•Always keep electric equipment out of the reach of children.•Always unplug sensitive electronic equipment during lightning storms.•The monitor should be installed near the socket outlet and disconnection of the device should be easily accessible.•To completely disconnect the speaker from the AC mains,physically disconnect the power chord.•Please try to avoid touching the speaker diaphragms.Always keep the woofer’s ventilation ports open.•Don't use the speaker at very high or low temperatures.The speakers’back panel should not be exposed to direct sunlight.Never operate this product in an explosive atmosphere.•High SPL’s can irreparably damage your ears!Please take good care when working the speakers at high levels.•Loudspeaker diaphragms are embedded in strong magnetic fields.Magnetic objects(toys etc.)should not be placed or played around with next to the speakers.•Make sure that the air can circulate behind the speaker as it needs sufficient cooling.•Only mount this product onto dry and non-conducting walls(wood,plaster).For other wall materials an additional isolation panel is required.To prevent injury,this loudspeaker must be securely attached to the wall in accordance with the installation instructions of your wall mount bracket.2021Maintenance and Care•Your HEDD audio studio monitor doesn’t need any internal maintenance like lubricating,mechanical adjusting and so on,so there is no reason to open up thespeaker cabinet.If servicing will be necessary,refer to qualified service personnel.•For cleaning the surface of the cabinet,we recommend to use a microfiber cloth and simply warm water.Don’t use any aggressive detergent,as it will damage thefinish.•For cleaning dust out of the loudspeaker diaphragms,use a very soft brush.•Always switch the speaker off before cleaning!•Make sure that no liquids get inside the cabinet.•Don’t use flammable or acidic chemicals for cleaning.Shipping and PackagingIf you need to send your speakers postal,use the original packaging.It’s the safest wayto get your speakers from A to B.HEDD Audio GmbH cannot be held responsible for any damage due to improperpackaging.Environmental InformationAll our products comply with RoHS and WEEE.If your speaker is seriously broken,please consult your local authorities for furtherinformation on proper disposal.18WarrantyWe promise that our products are free of defects in material and workmanship for the duration of twenty-four(24)months from the date of the original purchase.This warranty can be extended to thirty-six(36)months if the product is registered with us within the first6months after purchase:hedd.link/registrationAccessories and any parts that are subject to wear and tear are covered for six(6) months.The latest updates to our warranty will be accessible online at hedd.audio/warranty/Please always contact your point of sale first:Please check our list of authorized resellers:https://hedd.audio/store-locator/LimitationsPlease note that inappropriate use voids the warranty and any claims.2021Trouble ShootingIf none of these advices solves the problem,the speaker might be faulty.If you needfurther assistance,please contact us directly:***************20Technical Specifications©2021HEDD Audio GmbH|Heinz Electrodynamic Designs|www.hedd.audio©2021||Please visit our website to stay up-to-date on all public news and consider subscribing to our newsletter:https://hedd.audioBe sure to follow us on all major platforms (click for URL hyperlink):Instagram:@heddaudioYouTube:HEDD Audio GmbH Facebook:@HEDDaudioLinkedIn:HEDD |Heinz Electrodynamic Designs Twitter:@HEDDaudioContact us:***************HEDD |Heinz ElectroDynamic Designs is a high-end audio manufacturer founded by Klaus Heinz and Dr.Frederik Knop.Drawing on a rich history in audio creation and reproduction,the German company builds handcrafted professional studio monitors,subwoofers,and headphones in Berlin since 2016.HEDD’s advantage is the in-house developed signature Air Motion Transformer driver.ynamic Designs。
部门采购员职责范文作为部门采购员,主要职责包括以下几个方面:一、采购计划制定:根据公司的战略目标及业务需求,结合市场竞争状况和供应商的能力,制定年度采购计划,确保公司采购需求的及时满足。
二、供应商评估和选择:负责评估和筛选供应商,根据公司的采购标准和需求,综合考虑供应商的价格、质量、交货期和服务等因素,选择合适的供应商,并与供应商建立长期稳定的合作关系。
三、采购合同管理:与供应商进行谈判,制定和签订采购合同,明确双方的权责和约束关系。
并确保供应商履行合同义务,及时交付满足公司质量要求的产品或服务。
四、采购订单执行:根据业务需求,按照采购计划和采购合同的要求,及时编制采购订单,跟踪采购过程,确保采购物资的准时到货,并进行验收,保证物资的质量和数量的准确性。
五、供应商管理:定期对供应商进行绩效评估,了解供应商的发展状况和能力,与供应商进行业务洽谈和沟通,解决采购过程中的问题和纠纷,保证供应商的合理利益。
六、市场调研和采购策略制定:了解市场价格和供应情况,进行市场调研和分析,制定采购策略和采购计划,以确保公司采购的效益和利益最大化。
七、采购成本控制:通过与供应商谈判和比价等方式,降低采购成本,提高采购效益。
同时,对采购过程中的费用进行控制和核算,确保采购成本的合理性和透明度。
八、采购市场监控:关注市场的变化和竞争状况,了解行业最新动态和市场价格的波动,以便及时调整采购策略和采购计划,确保公司在市场竞争中的优势地位。
九、采购风险管理:识别和评估采购过程中可能存在的风险,制定相应的控制和应对措施,降低采购风险对公司业务的不利影响。
十、协助相关部门工作:与公司内部其他相关部门进行沟通和合作,协助实施公司的采购策略和采购计划,支持公司业务目标的实现。
以上职责仅为基本范围,实际工作中可能还会根据公司的具体情况和需求进行调整和补充。
作为部门采购员,应具备良好的沟通能力、分析能力和判断能力,同时要有很强的谈判和协调能力,能够处理好与供应商和其他部门的关系。
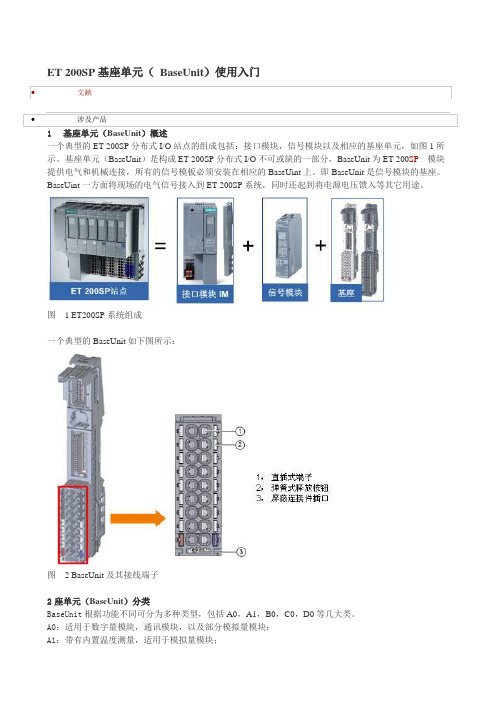
ET 200SP基座单元(BaseUnit)使用入门•文献•涉及产品1 基座单元(BaseUnit)概述一个典型的ET 200SP分布式I/O站点的组成包括:接口模块,信号模块以及相应的基座单元,如图1所示。
基座单元(BaseUnit)是构成ET 200SP分布式I/O不可或缺的一部分,BaseUnit为ET 200SP模块提供电气和机械连接,所有的信号模板必须安装在相应的BaseUint上。
即BaseUnit是信号模块的基座。
BaseUint一方面将现场的电气信号接入到ET 200SP系统,同时还起到将电源电压馈入等其它用途。
图 1 ET200SP系统组成一个典型的BaseUnit如下图所示:图 2 BaseUnit及其接线端子2座单元(BaseUnit)分类BaseUnit根据功能不同可分为多种类型,包括A0,A1,B0,C0,D0等几大类。
A0:适用于数字量模块,通讯模块,以及部分模拟量模块;A1:带有内置温度测量,适用于模拟量模块;BU 类型D0●最高400 V AC●20mm 宽AI Energy Meter ST●6ES7...D0AI Energy Meter ST(6ES7134-6PA00-0BD0)BU20-P12+A0+0B(6ES7193-6BP00-0BD0)* 用于补偿热电偶的基准结温度在A0和A1类BaseUnit中,根据是否用于形成新的电位组,以及是否需要额外AUX(辅助接线端子)或附加供电端子,又可以分为多个类型。
根据订货号的不同,一个BaseUnit也可同时具有以上多个功能,如即可形成新电位组的又带AUX(辅助接线端子)功能。
综上所述,基座单元的分类可以总结如下:图 3 BaseUnit的分类一览BaseUnit各型号说明及特征如下表所示:BU15-P16+A10+2D/T 的短名称(示例)BaseUnit 特性模块宽度BU15宽度为15 mm 的BaseUnit信号连接P16●连接方式:直插式端子● I/O 模块端子数:如16 个连接到AUX 总线A0与AUX 总线无连接10n = AUX 端子数,如10 个电源母线2 2 个直插式端子( L+,接地),用于通过 P1 和P2 供电或引出供电电压(请参见 D 和 B )12● 2 个直插式端子( L+ ,接地),用于通过 P1 和P2 供电或引出供电电压(请参见 D 和 B )●2x5 个直插式附加端子图4通过AUX辅助接线端子实现3线制开关的连接AI 4 x I 2-, 4-wire ST(6ES7 134-6GD00-0BA1)使用了BU15-P16+A0+12D(6ES7193-6BP40-0DA1)作为BaseUnit即可实现如图5所示的供电方式,即4线制仪表的供电可以通过附加供电端子来完成。

仪器Fukuda FRE203使用说明书
1、连接电缆,连接后自动开机。2、打开仪器电源开关,仪器开始工作。3、显示数据,设置时间间 隔,
调整分辨率,校准时间。4、仪器校准完成后开始测量。5、显示测量结果(数值)及测试结果。6、 使用仪器
自带的软件测量结果;如无特别要求可直接在软件上计算所测值的平均值或标准偏差和变异系数。 7、将所测得
数据保存到SD卡里,或者存储在电脑中;如有需要可导出到Excel文件;将测试数据导入。


FMU30超声波液位计仪表调试与测量设置一、FMU30仪表调试在下列阶段调试设备:1、安装检查2、设备上电3、基本标定4、使用包络线进行测量信号检查本章节介绍了使用现场显示的调试步骤。
与使用 FieldCare 调试软件进行调试的步骤相同。
二、仪表上电上电后,仪表首先进行初始化。
随后,显示下列信息,显示时间约 5 s:1、仪表型号2、软件版本号按下 E 键,退出显示。
首次上电时,要求选择文本的显示语言。
提供以下显示语言:? English / 英文? Deutsch / 德文? Fran?ais / 法文? Espa?ol / 西班牙文? Italiano / 意大利文? Nederlands / 挪威文? Japanese / 日文随后,要求选择测量的长度单位。
提供以下长度单位:? m? ft? mm? inch显示测量值。
并非罐体中的物位高度。
首先,执行基本标定。
按下 E 键,切换至功能组选择。
再次按下 E 键,开始基本标定。
三、基本标定“Basic setup / 基本设置” (00) 功能组中列举了标准测量任务和调试仪表所需的所有功能参数。
完成一个功能参数输入后,自动进入下一个功能参数输入页面,直至完成整个标定。
四、测量点设置“tank shape / 罐体形状” (002) 功能参数在此功能参数中选择以下选项之一:A dome ceiling / 拱顶罐B horizontal cyl. / 卧罐C bypass / 旁通管、 stilling well/ultrasonic guide pipe / 导波管 / 超声导波管D no ceiling / 敞口罐,例如:垃圾场、开放液位、渠、堰E sphere / 球罐F flat ceiling / 平顶罐“medium property / 介质属性” (003) 功能参数在此功能参数中设置介质类型。
选项如下:? “unknown / 未知” ( 例如:膏状介质,诸如油脂、乳脂、凝胶等 )? “liquid / 液体”? “solid / 固体”,颗粒大小 < 4 mm, ( 精细 ) ? “solid / 固体”,颗粒大小 > 4 mm, ( 粗糙 )standard liquids / 标准液体calm surface / 平静液面turb. surface / 扰动液面不满足以下各类描述的所有应用。
E+H超声波液位计调试方法E+H超声波液位计FMU30,FMU40的接线方式。
屏蔽电缆接入仪表后,24V电压接在仪表的+,—上面,屏蔽层接到仪表里面的接地端子。
另外,为保持仪表测量的稳定性,仪表外部的接地端子尽量也做一下接地。
E+H超声波液位计FMU30,FMU40的调试方法一般来说,超声波液位计的调试需要修改如下几个选项,002(罐体形状),003(介质属性),004(过程条件),005(空罐标定),006(满罐标定)上电以后,仪表自检,然后变到测量值00。
(1)按E键进入基本设置菜单,首先看到的是002这个选项,显示的是(拱顶罐,水平卧罐,旁通管,,等几个选项),如需更改,按+或者—号键选需要选择的罐型,按E键确定。
更改后+,-号键一起按返回上层菜单。
(2)如不需更改,直接按E键进入下个菜单003。
003代表被测量介质的属性,有如下几个选项(未知,液体,固体直径大于4mm,固体直径小于4mm'''' 等),根据现场情况进行选择。
修改方法同上。
(3)继续按E键进入004菜单,有如下几个选项(标准,平静液面,带搅拌器,,等)一般工况选择标准。
根据实际情况选择。
(4)继续按E键进入005菜单,这个是需要修改的很重要的一个值。
这个值是空罐值。
把池底到超声波探头表面的实际距离输入仪表,按+键进入菜单,选中空罐的值,按E键确认修改,+,—用来修改数值,E键确认。
(5) +,—号一起按返回005的主目录,继续按E键进入006菜单,这个也是需要修改的值,这个值是满罐值,它表示池底到zui高液位的距离,修改方法同空罐值。
基本上,仪表的调试已经完成。
另,如果显示值波动较大,这个在罐子里面的测量可能出现,这个需要做一下回波抑制。
在基本设定中,按E键找到051这个菜单,进入后选择(manual''手动),+,—号—起按返回051菜单,继续按E键进入052菜单,输入抑制的距离,这个距离比空罐值要低一点,如果空罐5M的话,建议输入4.8M。
E+HLiquiphantTFTL20限位开关简明操作指南KA00213F/28/ZH/09.0471122138简明操作指南Liquiphant T FTL20限位开关目录安全指南3设备标识4操作6安装实例8安装10直流(DC)连接(PNP) 14交流(AC)连接 18 AS-i总线连接20测试21清洗22技术参数23 150 °C型外形尺寸24 100 °C型外形尺寸 25附件和备件 26故障排除30补充文档资料31"小心!= 禁止;导致不正确操作或损坏。
Liquiphant T FTL20设计用于液体的限位检测。
使用不当可能会导致应用危险。
仅允许经授权的合格专业人员进行Liquiphant T FTL20的安装、电气连接、调试、操作和维护,必须严格遵守《操作手册》、相关标准、法律要求和证书(取决于实际应用)中的要求。
在设备附近安装易于操作的电源开关。
标识电源开关方便设备通断。
操作握住外壳禁止握住传感器叉体禁止弯曲禁止截短禁止拉伸安装实例Array A:开关点B:开关迟滞性考虑粘度和粘附安装过程连接G ? A 、G ? A 、G 1 A (DIN ISO 228/l)2.)1.)KA00032FG 1KA00219FG ?32 mm32max. 150 °C / 25 bar max. 100 °C / 40 bar (max. 300 °F / 360 psi)(max. 210 °F / 580 psi)32G ?"=>1.)~ 63.9 mm (~ 2.6 in) 2.)~ 38.0 mm (~ 1.5 in)G 1"=>1.)~ 78.0 mm (~ 3.7 in)~ 48.0 mm (~ 1.9 in)2.)NPT ?”、?”Array ANSI B 1.20.1R ?”、?”DIN 2999对准传感器叉体Array注意标记?直流(DC)连接(PNP) Array M12x1插头功能亮起闪烁熄灭直流(DC)连接(PNP) Array 转接头功能交流(AC)连接Array转接头功能。
3.3 基本操作面板(BOP 20)控制电机BOP20(Basic Operator Panel 20)是一个带有背景灯显示和6个按键的基本操作面板。
BOP20可以直接安装在SINAMICS S120的控制单元(CU310 或CU320,固件版本2.4或以上)上进行操作。
3.3.1 BOP 20概述使用BOP20可以在调试的过程中实现对SINAMICS S120实现以下功能:•改变驱动对象,启动或停止驱动轴•实现参数的修改和显示•显示故障信息并复位故障在一个应用简单并使用SINAMICS S120的场合,使用BOP20是一个经济有效的选择。
图3.7 BOP20面板1. BOP20的LED 显示状态如下表所示:表3.2 BOP的LED显示状态2. BOP20的按键信息如下表所示:运行表3.3 BOP的按键信息3. BOP20的功能如下表所示:表3.4 BOP的功能表4. BOP20的相关参数:•对于控制单元➢r0000 BOP20运行显示➢p0003 BOP20访问等级➢p0004 BOP20参数显示过滤➢p0007 BOP20背景灯设置➢p0008 BOP20传动对象选择➢p0009 设备调试,参数过滤➢p0011 BOP20密码输入➢p0012 BOP20密码确认➢r0019 BOP20控制字➢p0977 保存所有参数•对于所有驱动对象➢p0005 BOP20运行显示选择➢p0006 BOP20运行显示模式➢p0013 BOP20用户定义参数➢p0971 保存传动对象参数•对于所有控制单元(如:servo,vector,infeed,TM31)➢p0010 调试参数过滤此外,通过BOP20实现的重要功能有:•工厂复位通过设置控制单元CU上的参数完成工厂复位➢p0009 = 30➢p0976 = 1•Copy RAM to ROM在CU上可以初始化所有参数,并保存在非易失性内存中(CF卡)➢按住P键3秒或➢p0009 = 0➢p0977 = 1•LED识别驱动器对象的主要组成部分(如,电机模块)可以通过参数p0124指数来识别。
ADI IMU EV20(30)评估套件
ADI IMU EV20/30是针对ADI系列微惯性测量单元IMU的评估套件,为广大客户开发和应用ADI系列微惯性测量单元IMU提供帮助。
其中ADI IMU EV20为USB2.0接口的评估套件,ADI IMU EV30为RS232接口的评估套件,针对客户的要求可以选择。
一、引言
微惯性测量单元IMU(Inertial Measurement Unit)以牛顿力学定律为基础,利用微惯性测量元件(MEMS加速度计、MEMS陀螺仪、微磁强计)测量载体相对于惯性空间的运动参数,在给定运动初始条件下,经转换、处理后可输出载体的姿态和航向等信息。
它具有体积小、低成本、低功耗、完全自主、不受干扰、输出信息量大、输出信息实时性强等特点。
广泛应用于航空、航天、航海、机器人、汽车、工业自动化、医疗仪器、人体运动测量等方面。
ADI最新推出系列微惯性测量单元IMU,包括ADIS16350、ADIS16354、ADIS16355、ADIS16364、ADIS16365、ADIS16400以及ADIS16405等,并且得到了业界的广泛关注和好评。
ADIS163XX系列集成了三轴MEMS加速度计、三轴MEMS陀螺仪,并且还输出三轴陀螺仪的温度,以及电气参数。
采用ADI公司顶级iMEMS Motion Signal Processing Technology(运动信号处理)设计的ADIS16405完整惯性检测系统集成了三轴MEMS陀螺仪、三轴MEMS加速计与三轴磁力计。
嵌入式磁力计提供高航向精度,对产品出色的响应与短期稳定性进行了补充。
与集成度较低且需要高度用户校准的许多IMU产品不同, ADI系列微惯性测量单元IMU产品所有必需的
运动检测与校准都是在工厂内完成的,这意味着系统集成时间的大幅缩短,用户使用大大简化,这使得系统设计工程师可以缩短长达一年的系统开发时间,同时节省测试设备成本。
例如,ADIS16405可提供0.05°的速度传感器正交校准精度,不仅改善了系统的整体精度,而且简化了终端系统的设计。
磁力计传感器已经过校准,并与惯性传感器轴进行对准。
扩展的校准与动态补偿使产品可提供低于2.0°/√hr的角度随机游走和40 ppm/℃的温度稳定性。
所有传感器均可通过标准SPI接口进行访问,通过这一接口还可对内部数字滤波进行控制。
二、开发应用
航空航天:无人飞行器或者无人直升机的控制,稳定以及导航;空中摄影设备的稳定。
传感器应用于自动操控。
海洋:远程操作车(ROV)和水下自动设备(AUV)的控制和稳定;稳定单元主要用于诸如声音定位(USBL)、回声等测量设备,也用于水下勘测和绘图。
机器人:机器人的控制和稳定(安全、防御、检查, 服务机器人)。
汽车:汽车和摩托车等车辆的动态性能分析(线加速度, 角速度以及纵倾横滚和方位角)。
工业:如可应用于钻井以及管道检测工具的惯性测量单位(IMU)。
动画:真人全身运动姿态数据的采集并利用计算机生成(CG)动画,应用于电影和游戏产业。
生物力学:作为运动学(三轴加速度计和陀螺仪)和定向(角度)上的测量单元并应用于体育、人体工程学、康复和其它领域的科研工作。
训练和模仿:对全身运动信息的适时采集和事后的检查并应用于运动员、战士、消防员、警察和急救队员的训练
虚拟现实以及增强现实:在虚拟环境中应用于头部跟踪器或者HMD(头盔显示器)的跟踪。
集成惯性传感器和照相机,可应用于电影预报文物维护等需要6自由度的运动跟踪。
三、产品配套
1、ADI IMU EV20/30 评估板 1 块
2、高级屏蔽防干扰USB2.0线 1 条
3、串口调试模块 1 块(仅EV30)
4、标准串口线 1 条(仅EV30)
5、产品配套光盘 1 张(包含详尽的中文使用说明、安装软件、应用例程、相关驱动、以及相关参考资料等)
四、评估板接口说明:
ADI IMU EV20 评估板:
接插件(元件) 引 脚 功 能
1、VCC 5V USB 供电DC+5V
2、DM USB D-
3、DP USB D+
J1(USB-B ) 4、GND 地
U4座 3、SCLK ;4、MISO 5、MOSI ;6、CS
连接ADIS1635X/36X/40X D1(LED )
略 电源指示
ADI IMU EV30 评估板:
接插件(元件) 引脚功能
1、VCC 5V 供电DC+5V
2、RXD RS232接收
3、TXD RS232发送
4、GND 地
J1(RS232)
5、GND 地
U4座3、SCLK;4、MISO
5、MOSI;
6、CS 连接ADIS1635X/36X/40X
JP1 1,2,3 1,2短接—选择ADIS1635x/36x 2,3短接—选择ADIS1640x
D1(LED)略电源指示
五、安装软件
将光盘放入光驱驱动器,运行配套软件文件夹下的setup.exe安装程序,将出现安装界面如下:
程序安装界面
可按照软件界面提示,一步一步进行安装操作,安装完成后,会提示重启计算机,建议重启。
重启后,在桌面出现该软件图标,可以点击运行。
六、硬件及驱动安装
硬件连接步骤如下:
通过USB连接线将ADI IMU EV20评估板连接到主机上;同时ADI IMU EV20评估板红色指示灯亮起。
主机装载ADI IMU EV20 评估板设备驱动程序。
主机会自动检测到ADI IMU EV20评估板,并要求安装驱动。
驱动安装:
七、软件设置与运行之一(ADI IMU EV20)
启动界面
八、软件设置与运行之二(ADI IMU EV30)
ADI IMU EV30运行图
运行配套光盘中“测试软件”中的Ev30Test测试软件,界面如上图所示。
◆ 菜单功能介绍:
1、 File –“Exit”(退出);
2、 Device—“ADIS1640x”和“ADIS1635x”(选择产品系列);
3、 Config—“Com?”和“log”(选择串口和保存数据文件);
◆ 界面:
1、主界面左侧为“Output Registers”,用于显示ADSI16系列IMU的主要寄存器数据(电压、
三轴速率、三轴加速度、三轴磁阻、温度、AUX_ADC等信号数据);
2、主界面右侧为“DATA Plot”数据图表,用直观的图形显示三轴速率、三轴加速度、三轴磁
阻(或温度)等数据;
◆ 操 作:
1、 运行Ev30Test 后,首先选择对应产品,然后设置串口“Com ”;
2、 启动“Start ”按键,进行单步采集、显示;
3
、 连续采集和显示时,首先要选择时间(Loop Delay ),单位是毫秒(ms ),然后选择“Loop ”
(打钩选中),此后就可按下“Start ”按钮启动连续测试了。
4、 如果要保存文件,可以通过菜单Config— “log ”来设置。
附:ADI IMU EV30测试板串口输出格式
1、对应ADSI1640X 系列串口输出数据格式:
具体数据结构见下表: 序号
字节
数 据 结 构
意义
1 1,2
0xAAH , 0x55H 首字节
2 3,4 高字节(H ),低字节(L ) 供电电压(14位)
ωx ωy ωz 3 5~10
H ,L H ,L H ,L
陀螺角速率输出 (14位) a x a y a z 4 11~16
H ,L H ,L H ,L
加表加速度输出 (14位) m x
m y
m z
5 17~22
H ,L H ,L H ,L
磁强输出(14位) 6 23,24
高字节(H ),低字节(L ) 温度传感器输出 (12位) 7 25,26
高字节(H ),低字节(L ) AUX_ADC 输出 (12位) 8 27
字节3~26的按位异或值 校验字节 9 28,29 0x0DH ,0x0AH 尾字节
2、对应ADSI1635X/36X 系列串口输出数据格式:
具体数据结构见下表: 序号
字节
数
据 结 构
意义
1 1,2
0xAAH , 0x55H 首字节
2 3,4 高字节(H ),低字节(L ) 供电电压(14位)
ωx ωy ωz 3 5~10
H ,L H ,L H ,L
陀螺角速率输出 (14位) a x a y a z 4 11~16
H ,L H ,L H ,L
加表加速度输出 (14位) T x
T y
T z
5 17~22
H ,L H ,L H ,L
陀螺温度输出 (14位) 6 23,24
高字节(H ),低字节(L ) AUX_ADC 输出 (12位) 7 25,26
高字节(H ),低字节(L ) 未用(无意义) 8 27
字节3~26的按位异或值 校验字节 9 28,29 0x0DH ,0x0AH 尾字节
3、数据结构和计算:
其中:ND 为数据更新标志位,ND=1表示数据为已更新数据,否则为未更新数据;
EA 为系统出错标志位,EA=1表示出错,否则为正常; 计算的具体细节可参考光盘提供的相关产品技术文档。
4、串口设置和启动方法:
◆ 波特率:115200 起始:1位 数据:8位 停止:1位 校验:无 ◆ 启动串口传输的方法:发送任意一个字节即可启动传输一次。
如有疑问可向我们进一步咨询,谢谢您选购上海思越电子科技有限公司产品!。