Android 五大布局
- 格式:pdf
- 大小:77.98 KB
- 文档页数:1
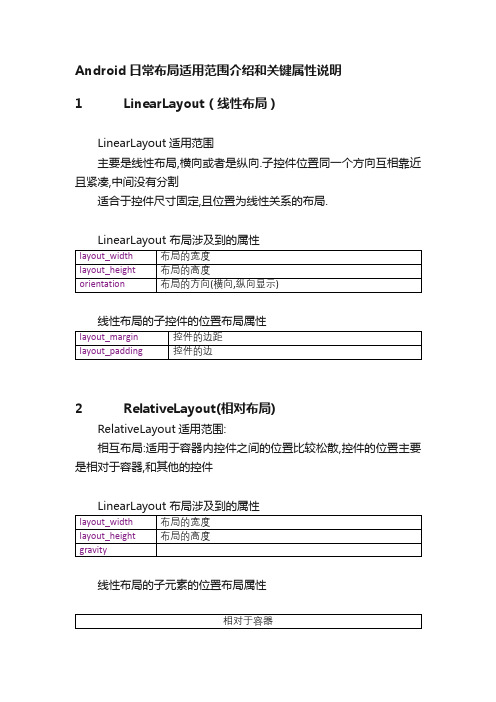
Android日常布局适用范围介绍和关键属性说明1 LinearLayout(线性布局)LinearLayout适用范围主要是线性布局,横向或者是纵向.子控件位置同一个方向互相靠近且紧凑,中间没有分割适合于控件尺寸固定,且位置为线性关系的布局.LinearLayout 布局涉及到的属性线性布局的子控件的位置布局属性2 RelativeLayout(相对布局)RelativeLayout适用范围:相互布局:适用于容器内控件之间的位置比较松散,控件的位置主要是相对于容器,和其他的控件LinearLayout 布局涉及到的属性线性布局的子元素的位置布局属性注:在容器的子控件和其他的控件相对布局时,布局配置文件中,其他控件的定义在当前子控件定义前面。
3 TableLayout (表格布局)TableLayout适用范围:容器里面的内容显示的方式按照Table的形式显示TableLayout 布局涉及到的属性例子:android:text="Table Test" android:gravity="center"/><TableRow><TextViewandroid:layout_column="1" android:text="姓名"android:gravity="center"/><TextViewandroid:text="基本信息" android:gravity="center"/></TableRow><TableRow><TextViewandroid:text=" 1 "android:gravity="center"/><TextViewandroid:text="hoyah" android:gravity="left"/><TextViewandroid:text="Wuhan University" android:gravity="right"/></TableRow><TableRow><TextViewandroid:text=" 2 "android:gravity="center"/><TextViewandroid:text="Google" android:gravity="left"/>。

Android中常用的5大布局方式有以下几种:∙线性布局(LinearLayout):按照垂直或者水平方向布局的组件。
∙帧布局(FrameLayout):组件从屏幕左上方布局组件。
∙表格布局(TableLayout):按照行列方式布局组件。
∙相对布局(RelativeLayout):相对其它组件的布局方式。
∙绝对布局(AbsoluteLayout):按照绝对坐标来布局组件。
1.线性布局按照垂直或者水平方向来布局,属性值有vertical和horizontal两种。
android:orientation:可以设置布局的方向android:gravity:用来控制组件的对齐方式layout_weight:控制各个组件在布局中的相对大小2.帧布局从屏幕的左上角开始布局,多个组件层叠排列,第一个添加的组件放到最底层,最后添加到框架中的视图显示在最上面。
上一层的会覆盖下一层的控件。
3.表格布局以表格显示它的子视图元素,行和列标识一个视图的位置。
android:collapseColumns:隐藏指定的列android:shrinkColumns:收缩指定的列以适合屏幕,不会挤出屏幕android:stretchColumns:尽量把指定的列填充空白部分android:layout_column:控件放在指定的列android:layout_span:该控件所跨越的列数4.相对布局相对布局是按照组件之间的相对位置来布局,比如在某个组件的左边,右边,上面和下面等。
5.绝对布局绝对布局通过指定子组件的确切X,Y坐标来确定组件的位置,在Android2.0API 文档中标明该类已经过期,可以使用FrameLayout或者RelativeLayout来代替。

1、线性布局 LinearLayout :线性布局是所有布局中最常用的类之一,也是RadioGroup, TabWidget, TableLayout, TableRow, ZoomControls 类的父类。
LinearLayout 可以让它的子元素垂直或水平的方式排成一行(不设置方向的时候默认按照垂直方向排列)。
举个例子:java 代码: ?code1 2 3 4 5 6 7 8 9 10 11 12 13 14 15 16 17 18 19 20 21 22 23 <?xml version="1.0" encoding="utf-8"?><LinearLayoutxmlns:android="/apk/res/andro id "android:orientation="vertical"android:layout_width="fill_parent"android:layout_height="wrap_content"><!--android:id —— 为控件指定相应的IDandroid:text —— 指定控件当中显示的文字,需要注意的是,这里尽量使用strings.xml 文件当中的字符串android:grivity —— 指定控件的基本位置,比如说居中,居右等位置android:textSize —— 指定控件当中字体的大小android:background —— 指定该控件所使用的背景色,RGB 命名法android:width —— 指定控件的宽度android:height —— 指定控件的高度android:padding* —— 指定控件的内边距,也就是说控件当中的内容android:layout_weight —— 控件之间的权重比android:sigleLine —— 如果设置为真的话,则将控件的内容在同一行当中进行显示4 25 26 27 28 29 30 31 32 33 34 35 36 37 38 39 40 41 42 43 44 45 --><TextViewandroid:id="@+id/firstText"android:text="第一行一行一行一行一行一行一行一行一行一行"android:gravity="center_vertical"android:textSize="35pt"android:background="#aa0000"android:layout_width="fill_parent"android:layout_height="wrap_content"android:paddingLeft="10dip"android:paddingTop="20dip"android:paddingRight="30dip"android:paddingBottom="40dip"android:layout_weight="1"android:singleLine="true"/><TextViewandroid:id="@+id/secondText"android:text="第二行"android:gravity="center_vertical"android:textSize="15pt"android:background="#0000aa"android:layout_width="fill_parent"6 47 48 495515253545556575859661626364656667android:layout_height="wrap_content"android:layout_weight="1"/></LinearLayout>6869771727374757677787988182832、相对布局 RelativeLayout相对布局 RelativeLayout 允许子元素指定它们相对于其父元素或兄弟元素的位置,这是实际布局中最常用的布局方式之一。

android五种布局模式Android布局是应⽤界⾯开发的重要⼀环,在Android中,共有五种布局⽅式,分别是:LinearLayout (线性布局),FrameLayout(框架布局),AbsoluteLayout(绝对布局),RelativeLayout(相对布局),TableLayout(表格布局)。
在windows下有预览功能,可以在xml中查看布局的样式,在linux中⽆。
⼀、LinearLayout线性布局,这个东西,从外框上可以理解为⼀个div,他⾸先是⼀个⼀个从上往下罗列在屏幕上。
每⼀个LinearLayout⾥⾯⼜可分为垂直布局(android:orientation="vertical")和⽔平布局(android:orientation="horizontal" )。
当垂直布局时,每⼀⾏就只有⼀个元素,多个元素依次垂直往下;⽔平布局时,只有⼀⾏,每⼀个元素依次向右排列。
linearLayout中有⼀个重要的属性 android:layout_weight="1",这个weight在垂直布局时,代表⾏距;⽔平的时候代表列宽;weight值越⼤就越⼤。
线形布局中预览和真机中完全⼀样。
TextView占⼀定的空间,没有赋值也有⼀定的宽⾼,要特别注意。
⼆、FrameLayoutFrameLayout是最简单的⼀个布局对象。
它被定制为你屏幕上的⼀个空⽩备⽤区域,之后你可以在其中填充⼀个单⼀对象 — ⽐如,⼀张你要发布的图⽚。
所有的⼦元素将会固定在屏幕的左上⾓;你不能为FrameLayout中的⼀个⼦元素指定⼀个位置。
后⼀个⼦元素将会直接在前⼀个⼦元素之上进⾏覆盖填充,把它们部份或全部挡住(除⾮后⼀个⼦元素是透明的)。
三、AbsoluteLayout AbsoluteLayout 这个布局⽅式很简单,主要属性就两个 layout_x 和 layout_y 分别定义这个组件的绝对位置。

Android之四⼤组件、六⼤布局、五⼤存储总结Android之四⼤组件、六⼤布局、五⼤存储⼀.四⼤组件:四⼤组件分别为activity、service、content provider、broadcast receiver。
⼀、android四⼤组件详解1、activity(1)⼀个Activity通常就是⼀个单独的屏幕(窗⼝)。
(2)Activity之间通过Intent进⾏通信。
(3)android应⽤中每⼀个Activity都必须要在AndroidManifest.xml配置⽂件中声明,否则系统将不识别也不执⾏该Activity。
2、service(1)service⽤于在后台完成⽤户指定的操作。
service分为两种:(a)started(启动):当应⽤程序组件(如activity)调⽤startService()⽅法启动服务时,服务处于started状态。
(b)bound(绑定):当应⽤程序组件调⽤bindService()⽅法绑定到服务时,服务处于bound状态。
(2)startService()与bindService()区别:(a)started service(启动服务)是由其他组件调⽤startService()⽅法启动的,这导致服务的onStartCommand()⽅法被调⽤。
当服务是started 状态时,其⽣命周期与启动它的组件⽆关,并且可以在后台⽆限期运⾏,即使启动服务的组件已经被销毁。
因此,服务需要在完成任务后调⽤stopSelf()⽅法停⽌,或者由其他组件调⽤stopService()⽅法停⽌。
(b)使⽤bindService()⽅法启⽤服务,调⽤者与服务绑定在了⼀起,调⽤者⼀旦退出,服务也就终⽌,⼤有“不求同时⽣,必须同时死”的特点。
(3)开发⼈员需要在应⽤程序配置⽂件中声明全部的service,使⽤<service></service>标签。
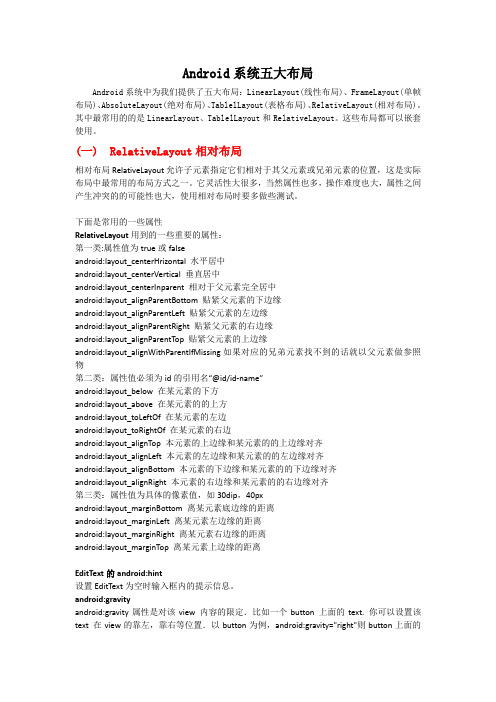
Android系统五大布局Android系统中为我们提供了五大布局:LinearLayout(线性布局)、FrameLayout(单帧布局)、AbsoluteLayout(绝对布局)、TablelLayout(表格布局)、RelativeLayout(相对布局)。
其中最常用的的是LinearLayout、TablelLayout和RelativeLayout。
这些布局都可以嵌套使用。
(一)RelativeLayout相对布局相对布局 RelativeLayout 允许子元素指定它们相对于其父元素或兄弟元素的位置,这是实际布局中最常用的布局方式之一。
它灵活性大很多,当然属性也多,操作难度也大,属性之间产生冲突的的可能性也大,使用相对布局时要多做些测试。
下面是常用的一些属性RelativeLayout用到的一些重要的属性:第一类:属性值为true或falseandroid:layout_centerHrizontal水平居中android:layout_centerVertical垂直居中android:layout_centerInparent相对于父元素完全居中android:layout_alignParentBottom贴紧父元素的下边缘android:layout_alignParentLeft贴紧父元素的左边缘android:layout_alignParentRight贴紧父元素的右边缘android:layout_alignParentTop贴紧父元素的上边缘android:layout_alignWithParentIfMissing 如果对应的兄弟元素找不到的话就以父元素做参照物第二类:属性值必须为id的引用名“@id/id-name”android:layout_below在某元素的下方android:layout_above在某元素的的上方android:layout_toLeftOf在某元素的左边android:layout_toRightOf在某元素的右边android:layout_alignTop本元素的上边缘和某元素的的上边缘对齐android:layout_alignLeft本元素的左边缘和某元素的的左边缘对齐android:layout_alignBottom本元素的下边缘和某元素的的下边缘对齐android:layout_alignRight本元素的右边缘和某元素的的右边缘对齐第三类:属性值为具体的像素值,如30dip,40pxandroid:layout_marginBottom离某元素底边缘的距离android:layout_marginLeft离某元素左边缘的距离android:layout_marginRight离某元素右边缘的距离android:layout_marginTop离某元素上边缘的距离EditText的android:hint设置EditText为空时输入框内的提示信息。
Android 布局详解【图文】Android 布局是开发中非常重要的一个知识部分,它的布局分为以下几种:Linear Layout:线性布局Relative Layout:相对布局Table Layout:表格布局FrameLayoutAbsoluteLayoutGrid View:网格布局Tab Layout:选项卡布局List View:列表布局一、Linear Layout简单来说,直着排,横着排都可以,还可以嵌套,此布局运用的非常多。
下面直接上示例代码及截图:接下来,看一下布局XML文件:<!--l version="<?xml version="1.0" encoding="utf-8"?><LinearLayout xmlns:android="/apk/res/android" android:orientation="vertical" android:layout_width="fill_parent" android:layout_height="fill_parent"><LinearLayout android:orientation="horizontal"android:layout_width="fill_parent" android:layout_height="fill_parent" android:layout_weight="1"><TextView android:text="red" android:gravity="center_horizontal" android:background="#aa0000" android:layout_width="wrap_content" android:layout_height="fill_parent" android:layout_weight="1" /><TextView android:text="green" android:gravity="center_horizontal" android:background="#00aa00" android:layout_width="wrap_content" android:layout_height="fill_parent" android:layout_weight="1" /><TextView android:text="blue" android:gravity="center_horizontal"android:background="#0000aa" android:layout_width="wrap_content" android:layout_height="fill_parent" android:layout_weight="1" /><TextView android:text="yellow" android:gravity="center_horizontal" android:background="#aaaa00" android:layout_width="wrap_content" android:layout_height="fill_parent" android:layout_weight="1" /></LinearLayout><LinearLayout android:orientation="vertical"android:layout_width="fill_parent" android:layout_height="fill_parent" android:layout_weight="1"><TextView android:text="row one" android:textSize="15pt"android:layout_width="fill_parent" android:layout_height="wrap_content" android:layout_weight="1" /><TextView android:text="row two" android:textSize="15pt"android:layout_width="fill_parent" android:layout_height="wrap_content" android:layout_weight="1" /><TextView android:text="row three" android:textSize="15pt"android:layout_width="fill_parent" android:layout_height="wrap_content" android:layout_weight="1" /><TextView android:text="row four" android:textSize="15pt"android:layout_width="fill_parent" android:layout_height="wrap_content" android:layout_weight="1" /></LinearLayout></LinearLayout>下面详细详解这些配置的含义:LinearLayout 标签的常用属性设置线性布局为水平方向android:orientation="horizontal"设置线性布局为垂直方向android:orientation="vertical"设置正比例分配控件范围android:layout_weight="1"设置控件显示位置,这里为水平居中android:gravity="center_horizontal"android:orientation="horizontal":定义方向水平或垂直(horizontal/vertical)android:layout_width="fill_parent" :宽度填充满父控件的宽度android:layout_height="fill_parent":宽度填充满父控件的高度android:layout_weight="1":重量?可解释为权重,这是个什么意思呢,请看下图我将这里的配置变了一下,<LinearLayout android:orientation="horizontal"android:layout_width="fill_parent" android:layout_height="fill_parent" android:layout_weight="1"><TextView android:text="red" android:gravity="center_horizontal"android:background="#aa0000" android:layout_width="wrap_content" android:layout_height="fill_parent" android:layout_weight="1" /> <TextView android:text="green" android:gravity="center_horizontal"android:background="#00aa00" android:layout_width="wrap_content"android:layout_height="fill_parent" android:layout_weight="2" /><TextView android:text="blue" android:gravity="center_horizontal"android:background="#0000aa" android:layout_width="wrap_content"android:layout_height="fill_parent" android:layout_weight="3" /><TextView android:text="yellow" android:gravity="center_horizontal"android:background="#aaaa00" android:layout_width="wrap_content"android:layout_height="fill_parent" android:layout_weight="4" /></LinearLayout>可以看到我设置成了1,2,3,4,这四TextView显示的宽度不一样了,具体是怎么算的,这个我们就不追究了,意思清楚就行,都设置为1则平分,否则数给的越大,占的位置就越多。
Android开发的六种常⽤布局本⼈是Android⼩⽩,刚刚学习Android开发,通过观看教学视屏和书籍学习,总结下Android开发的⼩知识,⼤神勿喷!第⼀种:LinearLayout:线性布局 线性布局是按照处置或者⽔平进⾏排布的,默认是⽔平 属性:orientation:⽤来指定当前的线性布局的排布⽅向。
wrap_content:包裹内容 match_parent:匹配⽗类 margin:外边距 padding:内边距 gravity:便是控件的内部内容针对控件本⾝的对其⽅式 layout_gravity:表⽰该控件⾃⾝在⽗类布局中的对齐⽅式 注:如果线性布局排布⽅式为⽔平,那么layout_gravity在⽔平的⽅向上就不起作⽤,只能在垂直的⽅向上起作⽤ layout_weight:表⽰权重的概念,即该百分⽐的形式进⾏对齐⽅式 如果控件划分的区域为wrap_content,那么权重值越⼤,所占⽐例就会越⼤ 如果控件划分的区域为match_parent,那么权重值越⼤,所占⽐例就会越⼩思考:在⼀个页⾯中,有⼀个权重的控件和⼀个⽆权重的控件,系统会先给谁分配空间尼? 答:系统肯定先给⽆权重的控件分配空间,才会得到需要百分⽐的空间⼤来进⾏百分⽐的划分。
1<?xml version="1.0" encoding="utf-8"?>2<LinearLayout xmlns:android="/apk/res/android"3 xmlns:tools="/tools"4 android:layout_width="match_parent"5 android:layout_height="match_parent"6 android:orientation="vertical"7>89<Button10android:layout_width="match_parent"11 android:layout_height="wrap_content"12 android:paddingTop="20dp"13 android:paddingBottom="20dp"14 android:layout_marginTop="20dp"15 android:layout_marginBottom="20dp"16 android:text="Button1"/>1718<Button19android:layout_width="wrap_content"20 android:layout_height="wrap_content"21 android:paddingTop="20dp"22 android:paddingBottom="20dp"23 android:paddingLeft="30dp"24 android:paddingRight="30dp"25 android:layout_gravity="center"26 android:text="Button2"/>2728</LinearLayout>第⼆种:RelativeLayout:绝对布局按照空间之间的相对位置进⾏排布,存在⼀个参照物的概念。
Android培训之五大布局讲解Android的界面是有布局和组件协同完成的,布局好比是建筑里的框架,而组件则相当于建筑里的砖瓦。
组件按照布局的要求依次排列,就组成了用户所看见的界面。
Android的五大布局分别是LinearLayout(线性布局)、FrameLayout(单帧布局)、RelativeLayout(相对布局)、AbsoluteLayout(绝对布局)和TableLayout(表格布局)。
LinearLayout:LinearLayout按照垂直或者水平的顺序依次排列子元素,每一个子元素都位于前一个元素之后。
如果是垂直排列,那么将是一个N行单列的结构,每一行只会有一个元素,而不论这个元素的宽度为多少;如果是水平排列,那么将是一个单行N列的结构。
如果搭建两行两列的结构,通常的方式是先垂直排列两个元素,每一个元素里再包含一个LinearLayout进行水平排列。
LinearLayout中的子元素属性android:layout_weight生效,它用于描述该子元素在剩余空间中占有的大小比例。
加入一行只有一个文本框,那么它的默认值就为0,如果一行中有两个等长的文本框,那么他们的android:layout_weight值可以是同为1。
如果一行中有两个不等长的文本框,那么他们的android:layout_weight值分别为1和2,那么第一个文本框将占据剩余空间的三分之二,第二个文本框将占据剩余空间中的三分之一。
FrameLayout:FrameLayout是五大布局中最简单的一个布局,在这个布局中,整个界面被当成一块空白备用区域,所有的子元素都不能被指定放置的位置,它们统统放于这块区域的左上角,并且后面的子元素直接覆盖在前面的子元素之上,将前面的子元素部分和全部遮挡。
显示效果如下,第一个TextView被第二个TextView完全遮挡,第三个TextView遮挡了第二个TextView的部分位置。
Android 五大布局Android对用五大布局对象,它们分别是FrameLayout(框架布局),LinearLayout (线性布局),AbsoluteLayout(绝对布局),RelativeLayout(相对布局),TableLayout(表格布局).FrameLayout:FrameLayout是最简单的一个布局对象。
它被定制为你屏幕上的一个空白备用区域,之后你可以在其中填充一个单一对象 —比如,一张你要发布的图片。
所有的子元素将会固定在屏幕的左上角;你不能为FrameLayout中的一个子元素指定一个位置。
后一个子元素将会直接在前一个子元素之上进行覆盖填充,把它们部份或全部挡住(除非后一个子元素是透明的)。
我们看一下效果图:其中Main.xml 代码如下:Java代码1.<?xmlversion="1.0"encoding="utf-8"?>2.<FrameLayoutxmlns:android="/apk/res/android"3.android:layout_width="fill_parent"4.android:layout_height="fill_parent"5.>6.7.<!--我们在这里加了一个Button按钮-->8.<Button9.android:text="button"10.android:layout_width="fill_parent"11.android:layout_height="wrap_content"12./>13.<TextView14.android:text="textview"15.android:textColor="#0000ff"16.android:layout_width="wrap_content"17.android:layout_height="wrap_content"18./>19.</FrameLayout>LinearLayout:LinearLayout以你为它设置的垂直或水平的属性值,来排列所有的子元素。
所有的子元素都被堆放在其它元素之后,因此一个垂直列表的每一行只会有一个元素,而不管他们有多宽,而一个水平列表将会只有一个行高(高度为最高子元素的高度加上边框高度)。
LinearLayout保持子元素之间的间隔以及互相对齐(相对一个元素的右对齐、中间对齐或者左对齐)。
LinearLayout还支持为单独的子元素指定weight 。
好处就是允许子元素可以填充屏幕上的剩余空间。
这也避免了在一个大屏幕中,一串小对象挤成一堆的情况,而是允许他们放大填充空白。
子元素指定一个weight 值,剩余的空间就会按这些子元素指定的weight 比例分配给这些子元素。
默认的 weight 值为0。
例如,如果有三个文本框,其中两个指定了weight 值为1,那么,这两个文本框将等比例地放大,并填满剩余的空间,而第三个文本框不会放大。
我们看一下效果图:其中Main.xm l代码如下:Java代码1.<?xmlversion="1.0"encoding="utf-8"?>2.<LinearLayoutxmlns:android="/apk/res/android"3.android:orientation="vertical"4.android:layout_width="fill_parent"5.android:layout_height="fill_parent">6.<LinearLayout7.android:orientation="vertical"8.android:layout_width="fill_parent"9.android:layout_height="fill_parent"10.android:layout_weight="2">11.<TextView12.android:text="WelcometoMrWei'sblog"13.android:textSize="15pt"14.android:layout_width="fill_parent"15.android:layout_height="wrap_content"16./>17.</LinearLayout>18.<LinearLayout19.android:orientation="horizontal"20.android:layout_width="fill_parent"21.android:layout_height="fill_parent"22.android:layout_weight="1">23.24.<TextView25.android:text="red"26.27.android:gravity="center_horizontal"//这里字水平居中28.android:background="#aa0000"29.android:layout_width="wrap_content"30.android:layout_height="fill_parent"31.android:layout_weight="1"/>32.<TextView33.android:text="green"34.android:gravity="center_horizontal"35.android:background="#00aa00"36.android:layout_width="wrap_content"37.android:layout_height="fill_parent"38.android:layout_weight="1"/>39.</LinearLayout>40.</LinearLayout>RelativeLayout:RelativeLayout 允许子元素指定他们相对于其它元素或父元素的位置(通过ID 指定)。
因此,你可以以右对齐,或上下,或置于屏幕中央的形式来排列两个元素。
元素按顺序排列,因此如果第一个元素在屏幕的中央,那么相对于这个元素的其它元素将以屏幕中央的相对位置来排列。
如果使用XML 来指定这个layout ,在你定义它之前,被关联的元素必须定义。
让我们看一下效果图:其中Main.xml 代码如下:Java代码1.<?xmlversion="1.0"encoding="utf-8"?>2.<RelativeLayoutxmlns:android="/apk/res/android"3.android:layout_width="fill_parent"4.android:layout_height="fill_parent">5.<TextView6.android:id="@+id/label"7.android:layout_width="fill_parent"8.android:layout_height="wrap_content"9.android:text="WelcometoMrWei'sblog:"/>10.<EditText11.android:id="@+id/entry"12.android:layout_width="fill_parent"13.android:layout_height="wrap_content"14.android:layout_below="@id/label"/>15.<Button16.android:id="@+id/ok"17.android:layout_width="wrap_content"18.android:layout_height="wrap_content"19.android:layout_below="@id/entry"20.android:layout_alignParentRight="true"21.android:layout_marginLeft="10dip"22.android:text="OK"/>23.<Button24.android:layout_width="wrap_content"25.android:layout_height="wrap_content"26.android:layout_toLeftOf="@id/ok"27.android:layout_alignTop="@id/ok"28.android:text="Cancel"/>29.</RelativeLayout>TableLayout:TableLayout 将子元素的位置分配到行或列中。
一个TableLayout 由许多的TableRow 组成,每个TableRow 都会定义一个row (事实上,你可以定义其它的子对象,这在下面会解释到)。