华为apdnagn升级到fap及web网管配置操作指南v
- 格式:docx
- 大小:74.53 KB
- 文档页数:15


Quick Start GuideHUAWEI TECHNOLOGIES CO., LTD.Huawei Technologies Co., Ltd.Address: Administration Building,Huawei Technologies Co.,Ltd.,Bantian,Longgang District,Shenzhen,People’s Republic of China Postcode: 518129Website: Email:******************Copyright © Huawei Technologies Co., Ltd. 2012. All rights reserved.No part of this document may be reproduced or transmitted in any form or by any means without prior written consent of Huawei Technologies Co., Ltd.Trademarks and Permissionsand other Huawei trademarks are trademarks of Huawei Technologies Co., Ltd.All other trademarks and trade names mentioned in this document are the property of their respective holders.NoticeThe purchased products, services and features are stipulated by the contract made between Huawei and the customer. All orpart of the products, services and features described in this document may not be within the purchase scope or the usagescope. Unless otherwise specified in the contract, all statements, information, and recommendations in this document are provided "AS IS" without warranties, guarantees or representations of any kind, either express or implied.The information in this document is subject to change without notice. Every effort has been made in the preparationof this document to ensure accuracy of the contents, but all statements, information, and recommendations in this document do not constitute the warranty of any kind, express or implied.Symbol ConventionsThe symbols that may be found in this document are defined as follows.Change HistoryChanges between document issues are cumulative. Therefore,the latest document issue contains all theChanges in previous issues.Change in Issue 01 (2012-05-30)Initial commercial release.Installation tools:Phillips screwdriver Hammer Combination pliers MakerFlat-head screwdriver Diagonal pliersAdjustablewrench Utility knifeESDgloves COAX crimping tool Measuring tapeWire stripper Cable cutter RJ45 Crimping tool Multimeter Level Vacuum cleaner Networkcable testerInstallationsuiteExpansion boltM4X12 hexagonsocket head cap HoopHammer drill Hex keyDevice OverviewPacking ListUnpack the equipment. Ensure that all items listed in the package list are included in the shipment. If any item is missing,Ports and indicators 5G antenna port 672.4G antenna portConnected to the feeder Connected to the feederItemDescriptionSN12345ItemDescriptionSN66776mm drill bitInstalling an AP● Select an appropriate installation position and leave space above and around the device for cooling air circulation.● Outdoors APs are used for hotspot coverage and often installed against walls or poles. The pole diameter is 30 to 114 mm.AP6510DN dimensions (unit: mm) without a backplane supportRecommended AP6510DN installation space (unit: mm)●Installing the AP6510DN against a Wall:Hexagon socket head cap screw1. Fix the wall-mounting bracket to the wall, adjust theinstallation position, and use the marker, level, and measuring tape to mark the drilling positions where expansion bolts are installed.2. Use #8 drill bit to drill 35–40 mm deep holes in the drilling positions and install expansion bolts. Screw the nut into the expansion tube, hammer the expansion bolt into a hole until the flat washer is flattened against the wall, and remove the nuts, spring washer, and flat washer in order.Flat washerSpring washerNuts3. Use four M4*14 hexagon socket head cap screws to fasten the wall-mounting bracket to the AP.4. Pinch the wall-mounting bracket on the expansion bolts, and fasten the Flat washer, spring washer, and nuts in order.5. Slide the AP into the wall-mounting bracket to complete installation.64mm37m m● Installing the AP6510DN against a vertical pole:NOTELock holeSecurity lock1. Determine the AP installation position, slide the hoopthrough the hole of the wall-mounting bracket and attach it to the pole, And use the screwdriver to secure screws on the hoop.2. Slide the AP that has the connector fastened into the wall- mounting bracket.● The procedure for installing the AP6510DN against a horizontal pole is similar to the procedure for installing the AP6510DN against a vertical pole.● Installing the Security LockTo prevent unauthorized personnel from moving the AP, lock the AP. The preceding figure shows the security lock. The carrier should purchase the security lock and determine the position for installing the security lock.● AP6510DN external cable arrangement drawing3. Put the network cable through the hole on the waterproof PG connector.4. Connect the RJ45 connector to the AP and secure the waterproof PG connector, as shown in figures b, c, and d.abcdEnsure that the RJ45 connector is correctly connected to the AP. Otherwise, the network cable may be damaged. Before removing the network cable, remove the waterproof PG connector, and then remove the RJ45 connector from the AP.● Connecting network cables1. Use a shield straight-through cable. Cut the cable of proper length based on the distance between the AP and the PSE device, peel the insulation on both ends of the network cable, and crimp the wires to RJ45 connectors.2. Make a network cable onsite according to the following pin assignment. Otherwise, the communication quality is affected even if devices can be connected.X1 Pin 12345678X2 Pin 12345678Wire Color White and orange OrangeWhite and greenBlue White and blueGreen White and brown BrownFeed lineGround cableNetwork cableFeed lineFeed lineFeed line● Connecting the feed line1. The outdoor AP's antenna ports already have 5 KA surge protection capability. Generally, no surge protection devices need to be installed; therefore, the antenna cables are directly connected to the AP's antenna ports.2. If higher surge protection capability is required, the customer can purchase a surge protection device. When installing thesurge protection device, ensure that it is connected to a ground cable.Waterproof adhesive tapeGround cableNOTESurgeprotection devicebWaterproof adhesive tapeFeed lineFeed linePVC black insulation tape.● Stretch the waterproof adhesive tape evenly and ensure that the upper layer of the tap overlaps 1/2 of the lower layer. Each layer should be attached tightly.● Wrap the three-layer waterproof adhesive tape from bottom to up, from up to bottom, and from bottom to up in order.Connecting the groundbar● Connecting the ground cable● Cut the cable of proper length, and select 6-M4 OT terminal for the AP and 6-M6 OT terminal for the ground bar.Keep the screw properly and install it again after pressing the Reset button.● Pressing the Reset ButtonThe Reset button on an outdoor AP is protected by a waterproof screw. Before pressing the Reset button, remove the waterproof screw.● Requirements for Laying Out Cables● Requirements for laying out power cables1. The power cable must be separated from ground cables and signal cables.2. If multiple power cables are installed, you must bind the power cables.3. The routing of power cables must meet engineering design drawing requirements.4. If the power cable length is insufficient, replace the power cable. The power cable must be complete and cannothave splices or welding points.● Requirements for laying out ground cables1. All ground cables must be connected to a ground bar.2. The ground cable cannot be led in aerially, but buried in the earth or arranged indoor.3. Both ends of the external conductor of the coaxial cable and those of the insulation of the shielded cable shouldhave good electric contact with the metal shell of the equipment they connect to.4. Ground cables must be separated from signal cables to reduce interference between them.5. Do not add any switch or fuse on the ground cable.6. Do not use another device for an electrical connection with the ground cable.7. All metal components in the shell must be securely connected to the ground cable.● Requirements for laying out optical fibers1. Do not press optical fibers forcibly or crush optical fibers with force. Leave sharp objects away from optical fibersto prevent damage to optical fibers.2. Coil up redundant optical fibers round specialize devices such as the splice tray.3. Coil optical fibers gently and do not break them.4. Cover optical fiber connectors with protective caps.Power-onTechnical SpecificationsPower on the AP6510DN and check the indicator status to determine the systemrunning status.NOTELogging In to the RouterAfter an AP is powered on, you can log in to the AP using the following methods.1. Logging In to the AP Using TelnetThis section describes how to log in to the AP using Telnet. After logging in to the AP, you can configure the AP using commands.1. Logging In to the AP Using TelnetThis section describes how to log in to the AP using Telnet. After logging in to the AP, you can configure the AP usingCommands.ProcedureStep 1Connect a PC to the uplink port of the AP with a network cable. Figure 1-1 shows the location of the AP's uplink port.Figure 1-1Location of the AP's uplink port1 Array Step2 Configure a static IP address for the PC. The IP address must be on the network segment 192.168.0.1/24 (The IP address should not be same as the AP's default IP address 192.168.0.1.) and the subnet mask is 255.255.255.0.After the configuration is complete, run the ping 192.168.0.1 command on the PC to check whether the PC can be pinged. If the ping operation succeeds, the connection is set up successfully. If the ping operation fails, The connection fails to be set up. Check whether the network cable works properly.Step 3 Access the command line window on the PC. For example, if the PC runs Windows XP, choose Start > Run And enter cmd in the displayed dialog box.Step 4 Run the telnet 192.168.0.1 command to log in to the AP.Step 5 Enter the default user name and password admin. If the user view is displayed, you have logged inSuccessfully.When you log in for the first time, the following page is displayed:Username: superPassword:Enterprise AP:----EndWLAN services parameters of an AP are configured on the AC that is connected To the AP, and then delivered to the AP. The following parameters are configured on the AP through Telnet.1. Configuring the AP Access ModeThis section describes how to configure the mode in which an AP goes online.2. Configuring VLANs on Wired Interfaces of an APThis section describes how to configure VLANs on wired interfaces of an AP.3. Configuring WDSThis section describes how to configure WDS parameters on an AP.1 Configuring the AP Access ModeThis section describes how to configure the mode in which an AP goes online.●AP Access ModesAfter an AP starts, going online management module determines the mode in which the AP goes online. Users areunaware of the AP access mode. In the AP startup phase, the AP obtains the its IP address, the gateway IP address, and the AC IP address based on the access mode. After obtaining all the information, the AP sets up a Control And Provisioning of Wireless Access Point (CAPWAP) link with the AC. The process is as follows:1. The AP reads the configuration file and determines the mode to go online.2. If the DHCP mode is used, the AP starts the DHCP process.3. If the static mode is used, the AP starts the AC discovery process based on the static configuration, andestablishes a control tunnel with the discovered AC.4. If the PPPoE mode is used, the AP initiates the PPPoE dial-up process. After obtaining the management IPaddress and gateway address, the AP uses the statically configured AC IP address to discover the AC, andestablishes a control tunnel with the AC.By default, AP's go online in DHCP mode.●Configuring the Mode for an AP to Go Online● Configuring the AP to go online in DHCP mode1. Use Telnet to log in to the AP from a PC.login: adminPassword: //The default password is admin.~ #2. Configure the AP to go online in DHCP mode.~ # cliEnterprise AP# configure interface ethernet // Enter the AP interface view.Enter Ethernet configuration commands, one per line.Enterprise AP (if-ethernet) # ip mode dhcp // Set the mode in which the AP goes online.Please reboot the AP, configuration will take effectEnterprise AP (if-ethernet) #3. Restart the AP to make the configuration take effect.~ # reboot●Configuring the AP to go online using a static IP address1. Use Telnet to log in to the AP from a PC.login: adminPassword: //The default password is admin.~ #2. Configure the AP to go online using a static IP address. The configuration items are the IP address of an AC that is connected to the AP, the AP's IP address (mandatory), the mask address (mandatory), and the gatewayaddress (not required when in Layer 2 networking).~ # cliEnterprise AP# configure interface ethernet // Enter the AP interface view.Enter Ethernet configuration commands, one per line.Enterprise AP (if-ethernet) # ip mode static // Set the mode in which the AP goes online.Enterprise AP (if-ethernet) # ac iplist 1.1.1.1 // Configure the IP address of an AC that is connected to the AP.Enterprise AP (if-ethernet) # ip address 192.168.60.2 255.255.255.0 192.168.60.1 // Configure the IPaddress of the AP.Please reboot the AP, configuration will take effectEnterprise AP (if-ethernet) #3. Restart the AP to make the configuration take effect.~ # reboot● Configuring the AP to go online in PPPoE mode 1. Use Telnet to log in to the AP from a PC. login: adminPassword: // The default password is admin. ~ #2. Configure the AP to go online in PPPoE mode. ~ # cliEnterprise AP# configure interface ethernet // Enter the AP interface view. Enter Ethernet configuration commands, one per line.Enterprise AP (if-ethernet) # ip mode pppoe // Set the mode in which the AP goes online. Please reboot the AP, configuration will take effect Enterprise AP (if-ethernet) #3. Configure a user name and password for going online in PPPoE mode. By default, the user name and password are both wlan@huawei and the password type is simple.Enterprise AP(if-ethernet) # user admin password simple admin //Set the user name and password to admin. 4. Restart the AP to make the configuration take effect. ~ # reboot● After the configuration is complete, run the reboot command to restart the AP.● After the configuration is complete, run the show sysinfo command to check the configuration. Enterprise AP(if-ethernet) # show sysinfo ap_ipmode=pppoe ap_ipaddr= ap_ipversion=4 ap_netmask= ap_gateway= ac_ip1= ac_ip2= ac_ip3= ac_ip4=pppoe_username=wlan@huawei pppoe_pwd_type=simple pppoe_password=wlan@huawei1. Use Telnet to log in to the AP from a PC. login: adminPassword: //The default password is admin. ~ #2. Configure VLANs and PVID on the wired interface. ~ # cliEnterprise AP# configure interface ethernet // Enter the AP interface view. Enter Ethernet configuration commands, one per line.Enterprise AP (if-ethernet) # ether-port 0 [1-4095] [tag/untag] // Configure the VLANs allowed by the wired interface.Enterprise AP (if-ethernet) # ether-port 0 pvid [1-4095] //Configure the PVID of the wired interface.NOTE2. Configuring VLANs on Wired Interfaces of an APThis section describes how to configure VLANs on wired interfaces of an AP.● Introduction to the Wired InterfacesA wired interface on an AP is connected to an AC or a switch. When the AP assigns service VLANs to packets, you can configure VLANs on wired interfaces of the AP. ●Configuring VLANs on a Wired Interface● Enabling/Disabling the radio indicator that indicates the signal strength of the last hop bridge.By default, the radio indicator is enabled on an AP6510DN.1. Use Telnet to log in to the AP from a PC. login: adminPassword: // The default password is admin. ~ #2. Enabling/Disabling the AP's radio indicatorEnterprise AP (config) # configure interface wireless 0 (1) // Enter the 2.4G 5G interface view. Enter Wireless configuration commands, one per line.Enterprise AP (if-wireless 0(1)) # wds led flag 0 (1) // Enable/Disable the AP's radio indicator. Please reboot the AP, configuration will take effect 3. Restart the AP to make the configuration take effect. ~ # reboot3. Configuring WDSThis section describes how to configure WDS parameters on an AP.● Introduction to WDSWDS enables multiple AP6510DNs to establish wireless links to connect two or more wired or wireless LANs. WDS-enabled AP6510DNs can switch data packets between the LANs. WDS facilitates network deployment, and device installation, and allows flexible networking.● Configuring WDSMost WDS parameters are configured on the AC. For details, see the AC configuration guides. On an AP, you can enable or disable the radio indicator that indicates the signal strength of the last hop bridge, and configure the WDS keys.After the configuration is complete, run the reboot command to restart the AP.● Configure the WDS key.1. Use Telnet to log in to the AP from a PC.login: adminPassword: // The default password is admin. ~ #2. Configure the WDS key.Enterprise AP (config) # configure interface wireless 0 // Enter the 2.4G 5G interface view. Enter Wireless configuration commands, one per line.Enterprise AP (if-wireless 0(1)) # wds psk 0 (1) 111111 // Set the key type to hex (parse) and the key to 111111.3. Restart the AP to make the configuration take effect. ~ # rebootBy default, the radio indicator is enabled on an AP6510DN.O: Indicates that the concentration of the hazardous substance contained in all the homogeneous materials of this part is below the limit requirement of the SJ/T 11363-2006 standard.X: Indicates that the Concentration of the hazardous substance contained in all the homogeneous materials of this part is above the limit requirement.Declaration on Hazardous Substances in Electronic Information ProductsQUALIFICATION CARDWarranty CardPreserve well. No reissues Seal: Limited Warranty“Products”) to be free from defects in materials and workmanship under normal consumer usage for one ,a Huawei authorized ,Huawei shall charge for the Your NameAddress/Postal Code Telephone Product TypeProduct Serial Number Purchase Date Invoice Number Dealer NameDealer´s Address/TelephoneHuawei Industrial Base, Bantian, Longgang,Shenzhen 518129, People's Republic of ChinaHuawei Technologies Co., Ltd.HUAWEI TECHNOLOGIES CO., LTD.Huawei Industrial BaseBantian, LonggangShenzhen 518129People's Republic of ChinaPart Number: 31505366 Issue: 01。

华为ap的设置方法
华为AP的设置方法如下:
1. 首先,将华为AP连接到电源,并使用网线将其连接到电脑或路由器。
2. 打开电脑或手机上的浏览器,输入华为AP的管理界面地址,通常是192.168.1.1或192.168.0.1,并按下回车键。
3. 输入AP的用户名和密码,通常默认情况下用户名为admin,密码为空或为admin。
如果忘记了密码,可以重置AP到出厂设置。
4. 登录成功后,您将进入华为AP的管理页面。
在这里,您可以进行各种设置,如网络设置、无线设置、安全设置等。
5. 在网络设置中,您可以设置AP的IP地址、子网掩码、网关等。
6. 在无线设置中,您可以设置AP的无线网络名称(SSID)、加密方式、密码等。
7. 在安全设置中,您可以设置AP的管理密码、访问控制等,以保护您的网络安全。
8. 在其他设置中,您还可以进行更高级的设置,如端口转发、静态路由等。
9. 设置完成后,记得点击保存或应用按钮,以使设置生效。
请注意,具体的设置界面和选项可能因不同型号的华为AP而有所不同。
以上是一般的设置方法,您可以根据自己的具体情况进行相应的设置。
另外,如果您对AP的设置还不太了解,建议参考华为AP的用户手册或咨询华为技术支持。

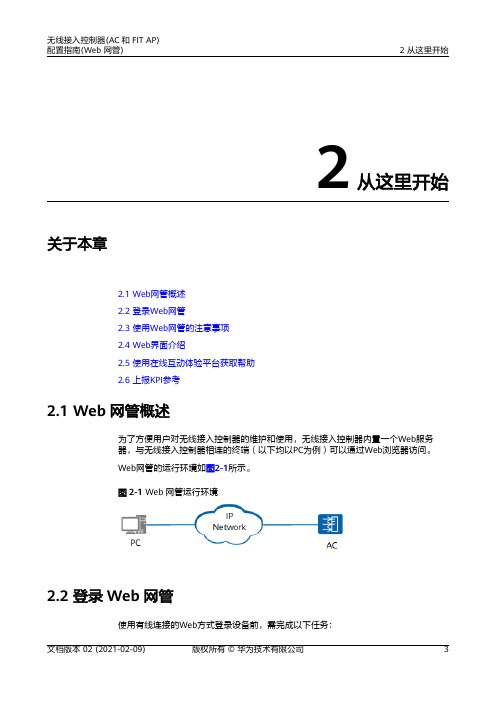
2从这里开始关于本章2.1 Web网管概述2.2 登录Web网管2.3 使用Web网管的注意事项2.4 Web界面介绍2.5 使用在线互动体验平台获取帮助2.6 上报KPI参考2.1 Web网管概述为了方便用户对无线接入控制器的维护和使用,无线接入控制器内置一个Web服务器,与无线接入控制器相连的终端(以下均以PC为例)可以通过Web浏览器访问。
Web网管的运行环境如图2-1所示。
图2-1 Web网管运行环境2.2 登录Web网管使用有线连接的Web方式登录设备前,需完成以下任务:●设备的接入端口已配置IP地址。
●PC终端和设备网络互通。
●设备正常运行,HTTP服务和HTTPS服务已正确配置。
●PC终端已安装浏览器软件。
说明●AirEngine 9700-M、AC6605和AC6805出厂时在接口MEth0/0/1上配置了IP地址169.254.1.1。
●AC6005、AC6003、AC6800V、AC6508、AC6507S和AirEngine 9700S-S出厂时在接口VLANIF 1上配置了IP地址169.254.1.1。
AC6005、AC6003、AC6508、AC6507S和AirEngine 9700S-S的所有GE接口缺省已加入VLAN 1,AC6800V的所有GE和XGE接口缺省已加入VLAN 1。
●设备在出厂时已经配置了STelnet服务,STelnet服务端口为22。
●设备在出厂时已经配置了HTTP服务和HTTPS服务,HTTP缺省服务端口号为80,HTTPS缺省服务端口号为443。
●云模式下,HTTP和HTTPS服务的源接口默认为Eth0/0/47,默认只能通过iMaster NCE-Campus登录Web网管。
如需通过登录MEth0/0/1或VLANIF 1的IP地址的方式登录Web网管,需要在系统视图下执行命令http secure-server server-source-i all。

升级环境组网图AP支持FTP或TFTP或SFTP方式进行形态切换,选择其中一种方法进行操作即可,本文以FTP方式进行Fit/Fat切换举例指导,颜色标注字段根据实际情况输入。
Fit AP切换为Fat AP操作步骤:1. 事先配置好ftp服务器,服务器用户名和密码仅使用英文字母和数字。
按照上图连接AP和PC,保证AP和PC间网络能够互相ping通。
2. 使用串口线将AP的串口和PC的串口相连,使用“超级终端”等软件,进入命令行界面,并记录操作日志。
3. 用户视图执行display version命令查看当前AP版本。
(如果AP为AP8X30XN FAT,跳至步骤6继续)<Huawei>display versionHuawei Versatile Routing Platform SoftwareVRP (R) software, Version 5.130 (AP5130DN FIT V200R005C00)Copyright (C) 2011-2013 HUAWEI TECH CO., LTDHuawei AP5130DN Router uptime is 0 week, 0 day, 0 hour, 16 minutesMPU 0(Master) : uptime is 0 week, 0 day, 0 hour, 16 minutesSDRAM Memory Size : 256 M bytesFlash Memory Size : 32 M bytesMPU version information :1. PCB Version : H85D2TT1D300 VER.A2. MAB Version : 03. Board Type : AP5130DN4. BootROM Version : 624. 系统视图执行ap-mode-switch prepare命令准备形态切换。
精心整理
操作步骤
1,依次单击“向导>WLAN 配置向导”,进入“WLAN 配置向导”界面(这一步不用修改默认即可)
2配置虚拟接口在“虚拟接口列表”中,单击虚拟接口表项右侧的“
”修改完后
需要重新修改电脑IPip 地址,利用用新IP 登录AP 继续下一步3,
本例
注意
配置3DHCP如内网中有DHCP服务器可忽略此步,(一般路由器都会有这个功能),如需添加点击新建自己添加
4配置AP(默认即可不用修改)
5配置射频(默认配置为1,此时应选择0,不然手机会搜不到信号)
6
配置认证服务器(默认即可不用)
7配置无线业务(单击“新建”,依次输入或选择各项参数)
名称自
点些按钮如下
名称自
8配置确认
9修改安全设置,修改密码(点配置--右侧WLAN业务--服务集--安全模板)
组合方式自己修改。
命令行方式升级华为AP5030DN至FAT系统:
材料准备:
1、超级终端或类似软件,这里使用的是CRT软件
2、console线一根,rj45网线一根,电源适配器一个
3、PC、AP
4、tftp软件,这里使用的是3CDeamon
开始升级:
步骤1:安装3CDaemon,打开tftp服务器
步骤2:设置tftp服务器
步骤3:使用CRT或类似终端登录ap,默认用户名密码,查看ap管理地址,并在pc上配置同网段地址且互通
步骤4:检查ap是否支持fit转fat,
ap-mode-switch prepare ap-mode-switch check
步骤5:导入fat系统文件
ap-mode-switch tftp 文件名 tftp服务器地址
步骤6:询问是否升级, yes 回车,期间ap会导入两次fat系统文件,并进行重启
步骤7:重启完成,输入系统默认密码进入,dis version查看系统信息,可以发现变为fat
步骤8:AP5030DN-C的FAT系统是支持web登录的,这里登录测试一下,第一次登录会要求更改密码(web登录密码,命令行登录时依旧是默认密码登录,因为未做修改),修改后会重新登录web界面
到这里,fit转fat就完成了
注:如果在升级过程中AP只从tftp服务器或去一次系统文件,那么这次升级就是失败的。
华为AP3010DN-AGN升级到FAT AP和Web网管配置操作指南二〇一五年四月文档修订记录目录1FAT AP升级操作1.1升级前准备准备一台安装了Windows的PC 如果是WIN7操作系统,需要安装“超级终端”超级终端安装(推荐SecureCRT) Hypertrm或SecureCRT软件安装,安装其中一个即可AP3010DN-AGN 华为无线接入点一根网线平常用的双绞线即可串行接口:USB to RS-232 USB转RS-232串口线串行接口:RS-232 to RJ45 RS-232串口转RJ45水晶头线准备升级所需的文件FIT AP切换到FAT AP需使用:FAT AP切换到FIT AP需使用:升级uboot文件:(版本:UBoot V200R003 version-084)文件位置:以本文档同目录下下载软件文件传送软件1.2搭建升级环境1.2.1通过Uboot方式升级的环境注:本文档将使用些方式升级在uboot视图下,只能通过TFTP协议下载系统软件。
升级环境的基本组网图如1所示。
搭建通过Uboot方式升级的环境时,基本要求如下:在uboot视图下升级时必须通过串口登录设备。
PC作为服务器,PC的网口必须与AP网口直连,并且保证服务器和设备之间能够正常通信。
服务器上已经存储了设备升级时使用的升级文件。
组网中必须连接网线和串口线。
图1-1 升级环境组网图1.3检查设备运行状态执行命令display device查看设备工作状态。
如果显示状态是Normal,表示系统处于正常状态,可以进行升级操作<huawei> display deviceAP6010DN's Device status: Slot Sub Type Online Power Register AlarmPrimary- - - - - - - - - - - - - - - - - - - - - - - - - - - - - - - - - - - - -- -0 - AP6010DN Present PowerOn Registered NormalMaster1.4备份重要数据设备中的重要配置文件一定要在升级之前备份,用户可以通过FTP或TFTP方式将需要备份的文件下载到PC上。
在版本升级完成后可以将备份的文件重新加载到设备中。
备份的具体过程请参见具体升级步骤。
重要数据类型备份文件描述配置文件配置文件1.5FIT AP切换到FAT AP指导必须使用PC作为FTP服务器、TFTP服务器或SFTP服务器,并且PC的网口必须与AP 网口直连。
FIT AP切换到FAT AP时需要保证内存中有足够的连续存储空间存放FAT AP系统软件包,建议用户升级前重启AP,以保证内存中有足够的连续存储空间。
1.5.1V200R003 FIT AP切换到V200R003 FAT AP方法1.5.1.1Uboot下用TFTP的方法升级AP如果AP中的两个固件文件都损坏,可以从Uboot用TFTP的方法升级固件。
必须使用PC作为FTP服务器、TFTP服务器或SFTP服务器,并且PC的网口必须与AP 网口直连。
请事先配置好tftp工具,指向升级文件所在目录;保证在AP上能ping通PC。
1.使用串口线将AP的串口和PC的串口相连,使用“超级终端”等软件,进入命令行界面。
超级终端设置如下:Baud:9600Data bits:8Stop bits:1Parity: noneFlow Control: none2.执行命令reboot,重新启动AP。
在出现以下信息后3秒内按下F键,进入uboot命令行视图。
Press f or F to stop Auto-Boot in 3 seconds: 3Password for uboot cmd line :ar7240>3.配置AP和tftp服务器的IP地址,保证AP能够从tftp服务器获取升级文件。
ar7240> saveenvSaving Environment to Flash...Erasing Flash...Writing to Flash... done4.在命令行中键入update boot,在下面的显示信息中作相应的配置:a.升级uboot:ar7240> update boot #存放在TFTP目录下dup 1 speed 1000......Copy to Flash... doner7240> reset #以新加载的uboot启动升级uboot时不能断电,否则AP无法启动。
b.重新启动AP。
在出现以下信息后3秒内按下F键,进入uboot命令行视图。
Press f or F to stop Auto-Boot in 3 seconds: 3Password for uboot cmd line :ar7240>c.加载需要升级的 FAT AP系统软件:ar7240> update system #存放在TFTP目录下dup 1 speed 1000......Upgrade Firmware to A Successful5.配置完成后,在命令行中键入reset,AP就会使用指定的网络启动固件文件启动了。
用这种方式启动后,固件被读入AP的flash。
ar7240> resetResetting...6.升级完成后,可执行命令display version查看当前版本是否升级成功。
<Huawei> display versionHuawei Versatile Routing Platform SoftwareVRP (R) software, Version (AP6010DN FAT V200R003C00SPC500)Copyright (C) 2011-2013 HUAWEI TECH CO., LTDHuawei AP6010DN Router uptime is 0 week, 0 day, 0 hour, 16minutesMPU 0(Master) : uptime is 0 week, 0 day, 0 hour, 16 minutesSDRAM Memory Size : 128 M bytesFlash Memory Size : 32 M bytesMPU version information :1. PCB Version : H86D2TD1D2002. MAB Version : 03. Board Type : AP6010DN4. BootROM Version : 621.6版本回退版本回退的方法与升级方式一致1.7操作截图及描述PC本地软件配置下载软件,并打开下载SecureCRT(终端)软件,并打开配置通过串口连接华为AP3010DN-AGN(无线接入点设备)回车后,就显示这个视图了。
输入用户名及密码:查看当前版本这版本显示不是我们组网应用时需要的,因此需要从FIT升级到FAT,在这里执行:reboot命令输入密码:可以看到这个uboot的版本为V200R003,符合FIT切换FAT条件,所以不需要升级uboot,直接进入下一步配置AP和TFTP服务器的IP地址,保证AP能从TFTP服务器获取升级文件ar7240> saveenvSaving Environment to Flash...Erasing Flash...Writing to Flash... done升级到FAT AP,执行命令:update system回车,如下图,表示已经升级成功重启AP,执行reset命令AP启动完成后,需要为AP Console口配置一个密码查看版本信息,再次确认FAT AP是否升级成功!升级成功!2华为无线接入点Web网管配置指南2.1登录web网管2.1.1前提条件a.设备的接入端口已配置IP地址(使用默认的);b.PC终端和设备网络互通;c.设备正常运行,HTTP服务和HTTPS服务已正确配置;d.PC终端已安装浏览器软件;注:2.1.2登录2.2配置WLAN向导打开:配置向导>配置向导2.2.1配置以太网接口缺省VLAN:缺省VLAN必须是在设备上已经创建好的,我接下来通过超级终端来创建VLAN。
步骤1 执行命令system-view,进入系统视图。
步骤2 执行命令vlan vlan-id,创建VLAN并进入VLAN视图。
步骤3 执行命令quit,返回系统视图。
步骤4 执行命令interface vlanif vlanif-id,创建VLANIF并进入VLANIF视图。
步骤5 执行命令ip address ip-address{ mask| mask-length} [ sub],配置管理IP地址。
2.2.2配置虚拟接口你可以修改或者选择直接下一步添加选择,直接下一步2.2.4配置AP2.2.5配置射频添加射频模板2.2.6配置无线业务最后2.2.8结果2.3WLAN业务2.3.1新建服务集新建一个BSS接口新建服务集2.3.2新建无线网络3附件3.1组网应用AP3010DN-AGN可以为中小型企业提供基本的无线网络,该类型设备可根据不同环境灵活实施分布放装。
AP3010DN-AGN支持Fat AP和Fit AP两种工作模式,根据网络规划的需要,可以灵活地在Fat AP和Fit AP两种工作模式中切换。
当客户的无线网络初始规模较小时,客户只需采购AP设备,并设置其工作模式为Fat AP模式。
随着客户网络规模的不断扩容,当网络中应用的AP设备达到几十甚至上百台时,为降低网络管理的复杂度,建议客户采购无线控制器设备,便于集中管理网络中的所有的AP设备,此时需要将其AP工作模式切换到Fit AP模式。
Fit AP典型组网图(接入点模式):在上述组网中,AP3010DN-AGN作为Fit AP只承载桥接转发功能,用户接入、AP上线、认证、路由、AP管理、安全协议、QoS等功能需要同AC配合完成。
Fit AP WDS典型组网图(网桥模式-点对点):Fit AP WDS典型组网图(网桥模式-点对多点):在上述组网中,设备通过无线链路连接两个或者多个独立的有线局域网或者无线局域网,组建一个互通的网络实现数据访问。
WDS模式下可支持点对点、点对多点的组网方式。
通过5G和双射频,AP可实现无线桥接及接入等业务应用。
Fit AP Mesh典型组网图:在上述组网中,作为Mesh节点MP(Mesh Point)的AP通过网状互联形成自配置、自愈合的无线Mesh网络WMN(wireless mesh network)主干,通过作为Mesh Portal节点MPP(Mesh Portal Point)的带网关功能的AP提供到Internet的连接。