07-VLAN配置命令
- 格式:pdf
- 大小:325.75 KB
- 文档页数:12
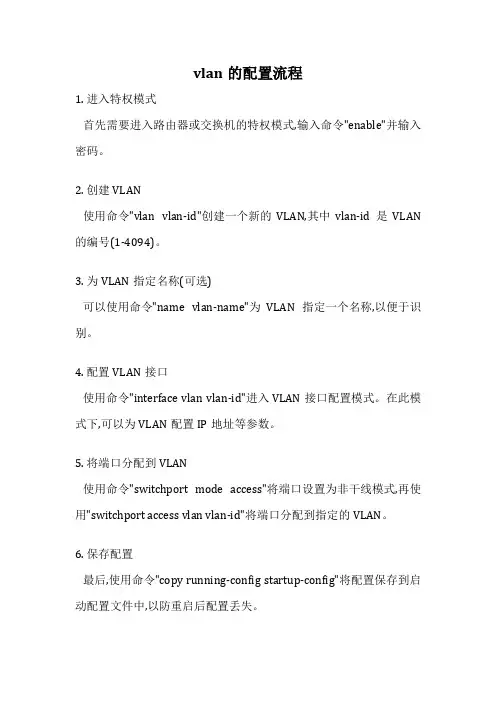
vlan的配置流程
1. 进入特权模式
首先需要进入路由器或交换机的特权模式,输入命令"enable"并输入密码。
2. 创建VLAN
使用命令"vlan vlan-id"创建一个新的VLAN,其中vlan-id是VLAN 的编号(1-4094)。
3. 为VLAN指定名称(可选)
可以使用命令"name vlan-name"为VLAN指定一个名称,以便于识别。
4. 配置VLAN接口
使用命令"interface vlan vlan-id"进入VLAN接口配置模式。
在此模式下,可以为VLAN配置IP地址等参数。
5. 将端口分配到VLAN
使用命令"switchport mode access"将端口设置为非干线模式,再使用"switchport access vlan vlan-id"将端口分配到指定的VLAN。
6. 保存配置
最后,使用命令"copy running-config startup-config"将配置保存到启动配置文件中,以防重启后配置丢失。
VLAN的配置过程包括创建VLAN、配置VLAN接口、将端口分配到VLAN等步骤。
正确配置VLAN有助于网络的合理划分和安全管理。

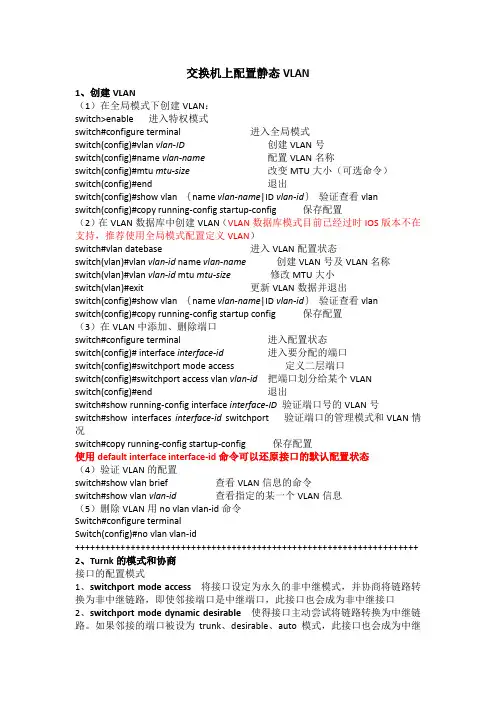
交换机上配置静态VLAN1、创建VLAN(1)在全局模式下创建VLAN:switch>enable 进入特权模式switch#configure terminal 进入全局模式switch(config)#vlan vlan-ID创建VLAN号switch(config)#name vlan-name配置VLAN名称switch(config)#mtu mtu-size改变MTU大小(可选命令)switch(config)#end 退出switch(config)#show vlan {name vlan-name|ID vlan-id}验证查看vlanswitch(config)#copy running-config startup-config 保存配置(2)在VLAN数据库中创建VLAN(VLAN数据库模式目前已经过时IOS版本不在支持,推荐使用全局模式配置定义VLAN)switch#vlan datebase 进入VLAN配置状态switch(vlan)#vlan vlan-id name vlan-name创建VLAN号及VLAN名称switch(vlan)#vlan vlan-id mtu mtu-size 修改MTU大小switch(vlan)#exit 更新VLAN数据并退出switch(config)#show vlan {name vlan-name|ID vlan-id}验证查看vlanswitch(config)#copy running-config startup config 保存配置(3)在VLAN中添加、删除端口switch#configure terminal 进入配置状态switch(config)# interface interface-id 进入要分配的端口switch(config)#switchport mode access 定义二层端口switch(config)#switchport access vlan vlan-id把端口划分给某个VLANswitch(config)#end 退出switch#show running-config interface interface-ID验证端口号的VLAN号switch#show interfaces interface-id switchport 验证端口的管理模式和VLAN情况switch#copy running-config startup-config 保存配置使用default interface interface-id命令可以还原接口的默认配置状态(4)验证VLAN的配置switch#show vlan brief 查看VLAN信息的命令switch#show vlan vlan-id查看指定的某一个VLAN信息(5)删除VLAN用no vlan vlan-id命令Switch#configure terminalSwitch(config)#no vlan vlan-id++++++++++++++++++++++++++++++++++++++++++++++++++++++++++++++++++++ 2、Turnk的模式和协商接口的配置模式1、switchport mode access将接口设定为永久的非中继模式,并协商将链路转换为非中继链路,即使邻接端口是中继端口,此接口也会成为非中继接口2、switchport mode dynamic desirable 使得接口主动尝试将链路转换为中继链路。

Voice VLAN 目录目录第1章 Voice VLAN配置命令..................................................................................................1-11.1 Voice VLAN配置命令.........................................................................................................1-11.1.1 display voice vlan error-info....................................................................................1-11.1.2 display voice vlan oui..............................................................................................1-11.1.3 display voice vlan status.........................................................................................1-21.1.4 display vlan..............................................................................................................1-31.1.5 voice vlan................................................................................................................1-41.1.6 voice vlan aging.......................................................................................................1-51.1.7 voice vlan enable....................................................................................................1-51.1.8 voice vlan mac-address..........................................................................................1-61.1.9 voice vlan mode......................................................................................................1-71.1.10 voice vlan security enable.....................................................................................1-8第1章 Voice VLAN配置命令1.1 Voice VLAN配置命令1.1.1 display voice vlan error-info【命令】display voice vlan error-info【视图】任意视图【参数】无【描述】display voice vlan error-info命令用来显示使能Voice VLAN特性失败的端口。
vlan的配置方法VLAN(Virtual Local Area Network,虚拟局域网)是一种将一个物理网络划分成多个逻辑上的虚拟网络的技术,它可以提供更好的网络性能、安全性和管理灵活性。
在进行VLAN的配置时,需要按照一定的步骤进行操作,下面将详细介绍VLAN的配置方法。
1. 确定VLAN的划分方案在配置VLAN之前,需要先确定VLAN的划分方案。
可以根据不同的需求和网络拓扑结构,将网络划分为不同的VLAN,如按照部门、功能或地理位置等进行划分。
确定划分方案后,可以开始进行VLAN的配置。
2. 创建VLAN在交换机上创建VLAN是配置VLAN的第一步。
可以通过以下命令在交换机上创建VLAN:```Switch(config)# vlan vlan_id```其中,vlan_id为VLAN的标识符,可以根据实际需求进行设置。
创建VLAN后,可以通过以下命令查看已创建的VLAN列表:```Switch# show vlan```3. 配置接口创建VLAN后,需要将交换机的接口与相应的VLAN进行关联。
可以通过以下命令将接口划分到指定的VLAN:```Switch(config)# interface interface_idSwitch(config-if)# switchport mode accessSwitch(config-if)# switchport access vlan vlan_id```其中,interface_id为接口的标识符,可以是物理接口、端口通道或VLAN接口。
vlan_id为要划分到的VLAN的标识符。
配置完成后,可以通过以下命令查看接口的VLAN配置情况:```Switch# show interfaces interface_id switchport```4. 配置Trunk接口如果需要在不同的交换机之间传输多个VLAN的数据,就需要配置Trunk接口。
vlan配置命令VLAN(Virtual Local Area Network)是一种虚拟局域网技术,它可以将一个物理的局域网分成多个虚拟局域网,这些虚拟局域网之间互相隔离,不会干扰彼此。
VLAN的配置需要通过网络设备(如路由器、交换机等)进行操作,下面将介绍一些常用的VLAN配置命令及其解释。
1. 创建VLAN在交换机上创建一个VLAN,需要使用如下命令:```Switch(config)# vlan vlan_id```这里vlan_id是一个1-4094之间的数值,用来标识这个VLAN。
例如,要创建一个编号为10的VLAN,可以输入:2. 将接口加入VLAN创建好一个VLAN之后,需要将它所在的接口加入该VLAN。
例如,将交换机的端口1接口加入到编号为10的VLAN中,可以使用如下命令:```Switch(config)# interface gigabitethernet1/0/1Switch(config-if)#switchport access vlan 10```这里的gigabitethernet1/0/1是交换机的物理接口,switchport access vlan 10表示将该接口加入到编号为10的VLAN中。
3. 显示VLAN信息使用该命令可以查看VLAN的编号、名称、包含的接口等信息。
例如,要删除编号为10的VLAN,可以输入:5. 将VLAN打上tag当一个VLAN中的流量需要通过其他VLAN经过交换机时,需要将该流量打上VLAN tag。
可以使用如下命令来配置一个接口的VLAN tag:这里的switchport mode trunk表示将该接口配置为trunk模式,可以允许多个VLAN 通过该接口,所有流量都会被打上VLAN tag。
6. 配置VLAN间路由如果需要让不同VLAN之间的主机进行通信,就需要对交换机进行路由配置。
可以使用如下命令来配置路由:这里的ip_address和subnet_mask分别表示该VLAN的IP地址和子网掩码。
vlan的划分方法及配置VLAN(虚拟局域网)的划分方法和配置如下:1. 静态VLAN划分方法:静态VLAN是管理员手动定义和配置的VLAN。
划分步骤如下:a. 确定需要划分的子网数量;b. 为每个子网分配一个唯一的VLAN ID;c. 将不同VLAN ID对应的端口划分到不同的VLAN中;d. 配置交换机或路由器上的端口,将其与正确的VLAN关联。
配置示例:(config)# interface gigabitethernet 1/0/1(config-if)# switchport mode access(config-if)# switchport access vlan <VLAN_ID>2. 动态VLAN划分方法:动态VLAN是根据网络上主机的MAC地址、IP地址或者其他特征自动划分的VLAN。
划分步骤如下:a. 配置交换机支持动态VLAN划分(如VTP、GVRP等);b. 激活动态VLAN功能,使交换机能够自动学习和划分VLAN;c. 配置主机的特征,如MAC绑定、802.1X认证等,以便交换机可以识别并将其分配到对应的VLAN上。
3. VLAN间的通信方法配置:a. 为VLAN之间的通信选择一种方式,如路由器或三层交换机;b. 配置设备上的虚拟接口(SVI),将其与相应的VLAN关联;c. 配置VLAN间的路由或三层交换,使得不同VLAN的主机可以进行互通。
配置示例:(config)# interface vlan <VLAN_ID>(config-if)# ip address <IP_ADDRESS> <SUBNET_MASK>需要注意的是,具体的配置方法可能会因厂商和设备型号的不同而有所差异。
请根据实际情况和设备的用户手册进行配置。
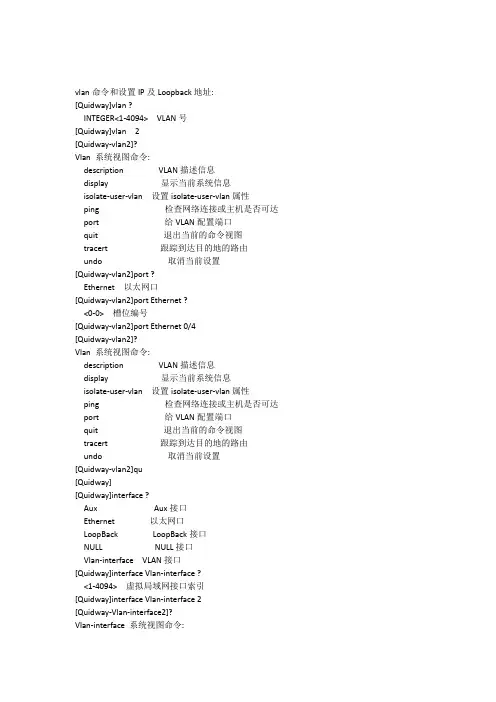
vlan命令和设置IP及Loopback地址:[Quidway]vlan ?INTEGER<1-4094> VLAN号[Quidway]vlan 2[Quidway-vlan2]?Vlan 系统视图命令:description VLAN描述信息display 显示当前系统信息isolate-user-vlan 设置isolate-user-vlan属性ping 检查网络连接或主机是否可达port 给VLAN配置端口quit 退出当前的命令视图tracert 跟踪到达目的地的路由undo 取消当前设置[Quidway-vlan2]port ?Ethernet 以太网口[Quidway-vlan2]port Ethernet ?<0-0>槽位编号[Quidway-vlan2]port Ethernet 0/4[Quidway-vlan2]?Vlan 系统视图命令:description VLAN描述信息display 显示当前系统信息isolate-user-vlan 设置isolate-user-vlan属性ping 检查网络连接或主机是否可达port 给VLAN配置端口quit 退出当前的命令视图tracert 跟踪到达目的地的路由undo 取消当前设置[Quidway-vlan2]qu[Quidway][Quidway]interface ?Aux Aux接口Ethernet 以太网口LoopBack LoopBack接口NULL NULL接口Vlan-interface VLAN接口[Quidway]interface Vlan-interface ?<1-4094>虚拟局域网接口索引[Quidway]interface Vlan-interface 2[Quidway-Vlan-interface2]?Vlan-interface 系统视图命令:address-check 地址匹配检查arp 指定ARP配置信息description 设置接口描述信息dhcp-server 指定DHCP中继配置信息display 显示当前系统信息enable 使能功能igmp 配置IGMP的接口参数ip 接口IP协议配置命令ntp-service 指定NTP(网络时间协议)配置信息ospf 配置OSPF的接口参数pim 配置PIM的接口参数ping 检查网络连接或主机是否可达quit 退出当前的命令视图rip 配置RIP的接口特性shutdown 禁止接口tracert 跟踪到达目的地的路由undo 取消当前设置vrrp 指定VRRP的配置信息[Quidway-Vlan-interface2]ip ?address 设置接口的IP地址[Quidway-Vlan-interface2]ip address ?X.X.X.X IP地址[Quidway-Vlan-interface2]ip address 192.168.0.2 255.255.255.0 [Quidway-Vlan-interface2][Quidway-Vlan-interface2]qu[Quidway]interface ?Aux Aux接口Ethernet 以太网口LoopBack LoopBack接口NULL NULL接口Vlan-interface VLAN接口[Quidway]interface LoopBack ?<0-1023> LoopBack 接口索引[Quidway]interface LoopBack 2[Quidway-LoopBack2]?Loopback 接口视图命令:description 设置接口描述信息display 显示当前系统信息igmp 配置IGMP的接口参数ip 接口IP协议配置命令ntp-service 指定NTP(网络时间协议)配置信息ospf 配置OSPF的接口参数pim 配置PIM的接口参数ping 检查网络连接或主机是否可达quit 退出当前的命令视图rip 配置RIP的接口特性tracert 跟踪到达目的地的路由undo 取消当前设置[Quidway-LoopBack2]ip ?address 设置接口的IP地址binding 将一个VPN-Instance与一个接口或子接口关联[Quidway-LoopBack2]ip address ?X.X.X.X IP地址[Quidway-LoopBack2]ip address 1.1.1.1 255.255.255.255 [Quidway-LoopBack2][Quidway-LoopBack2]qu[Quidway][Quidway]设置端口属性:[Quidway]interface ?Aux Aux接口Ethernet 以太网口LoopBack LoopBack接口NULL NULL接口Vlan-interface VLAN接口[Quidway]interface Ethernet ?<0-0>槽位编号[Quidway]interface Ethernet 0/2[Quidway-Ethernet0/2]?Ethernet 接口视图命令:am 访问管理broadcast-suppression 设置广播风暴抑制description 对接口进行描述display 显示当前系统信息dot1x 指定802.1x配置信息duplex 双工状态enable 使能功能flow-control 流量控制命令garp 通用属性注册协议gmrp GARP 多播组注册协议gvrp GARP VLAN注册协议hgmpport 设置HGMP端口属性igmp IGMP命令loopback 设置接口环回测试方式loopback-detection 检测端口是否存在自环mac-address 设置mac地址方面的配置mdi 设置网线类型ndp 邻居发现协议ntdp 指定NTDP配置信息ping 检查网络连接或主机是否可达port 设置端口属性priority 设置优先级queue-scheduler 设置队列调度模式和参数quit 退出当前的命令视图rmon 配置RMONshutdown 禁止接口speed 设置接口速率stp 生成树协议tracert 跟踪到达目的地的路由undo 取消当前设置[Quidway-Ethernet0/2]port ?access 指定当前用户接入端口的属性hybrid 指定当前混杂端口的属性link-type 指定端口模式trunk 设置当前端口的trunking参数[Quidway-Ethernet0/2]port link-type ?access 用户接入模式hybrid 混杂模式trunk VLAN trunk模式[Quidway-Ethernet0/2]port link-type trunk ?<cr>[Quidway-Ethernet0/2]port link-type trunk[Quidway-Ethernet0/2][Quidway-Ethernet0/2]speed ?10 设置接口速率为10Mb/s100 设置接口速率为100Mb/sauto 使能端口速率自协商[Quidway-Ethernet0/2]speed 100[Quidway-Ethernet0/2][Quidway-Ethernet0/2]port trunk ?permit 指定trunk端口允许通过的VLANpvid 设置trunking端口的tag参数[Quidway-Ethernet0/2]port trunk permit ?vlan 指定trunk端口允许通过的VLAN[Quidway-Ethernet0/2]port trunk permit vlan ?INTEGER<2-4094> VLAN号all 所有的VLAN[Quidway-Ethernet0/2]port trunk permit vlan 2 3 4请等待...: 完成.[Quidway-Ethernet0/2][Quidway-Ethernet0/2]port trunk ?permit 指定trunk端口允许通过的VLANpvid 设置trunking端口的tag参数[Quidway-Ethernet0/2]port trunk pvid ?vlan 指定当前trunk端口的本地VLAN号[Quidway-Ethernet0/2]port trunk pvid vlan ? INTEGER<1-4094>当前trunk端口的本地VLAN号[Quidway-Ethernet0/2]port trunk pvid vlan 3 [Quidway-Ethernet0/2][Quidway-Ethernet0/2]qu[Quidway]新建telnet帐户命令:[Quidway]local [Quidway]local-?local-server local-user[Quidway]local-user ?STRING<1-32>本地用户名multicast 指定组播配置信息password-display-mode 设置密码显示方式[Quidway]local-user 1234创建了一个新的本地用户[Quidway-luser-1234]?Luser 系统视图命令:attribute 设定本地用户属性display 显示当前系统信息multicast 指定组播配置信息password 设定本地用户密码ping 检查网络连接或主机是否可达quit 退出当前的命令视图service-type 设定本地用户类型state 指定本地用户状态tracert 跟踪到达目的地的路由undo 恢复缺省值或禁止某一项功能[Quidway-luser-1234]password ?cipher 密文显示密码simple 明文显示密码[Quidway-luser-1234]password simple ?STRING<1-16>/<24>明文/密文密码字符串[Quidway-luser-1234]password simple 1234 [Quidway-luser-1234]service-type ?ftp 本地用户类型FTPlan-access 本地用户类型接入用户telnet 本地用户类型TELNET [Quidway-luser-1234]service-type telnet ?level 设定TELNET用户优先级<cr>[Quidway-luser-1234]service-type telnet level ?INTEGER<0-3> TELNET用户优先级[Quidway-luser-1234]service-type telnet level 1 [Quidway-luser-1234]qu[Quidway]user[Quidway]user-interface ?INTEGER<0-5>欲配置的第一个用户终端接口aux 辅助用户终端接口vty 虚拟用户终端接口[Quidway]user-interface vty ?INTEGER<0-4>欲配置的第一个用户终端接口[Quidway]user-interface vty 0 4[Quidway-ui-vty0-4]?User-interface 系统视图命令:acl 基于acl过滤的连接authentication-mode 配置用户终端接口的认证方式auto-execute 自动执行功能databits 设置用户终端的数据位display 显示当前系统信息flow-control 设置用户终端的流控方式history-command 记录历史命令idle-timeout 设置终端用户超时modem 设置modem 开关parity 设置用户终端的校验方式ping 检查网络连接或主机是否可达protocol 设置用户终端协议quit 退出当前的命令视图screen-length 设置屏幕显示的行数set 配置用户终端接口的参数shell 启动终端用户任务speed 设置用户终端的发送和接收速率stopbits 设置异步用户终端的停止位tracert 跟踪到达目的地的路由undo 取消当前设置user 指定登录用户的参数[Quidway-ui-vty0-4]user ?privilege 设置用户终端的优先级[Quidway-ui-vty0-4]user privilege ?level 配置用户终端的登录优先级[Quidway-ui-vty0-4]user privilege level 3[Quidway-ui-vty0-4][Quidway-ui-vty0-4]authentication-mode ?none 无需认证直接登录password 利用用户终端接口的口令认证scheme 利用RADIUS方案进行认证[Quidway-ui-vty0-4]authentication-mode scheme ?<cr>[Quidway-ui-vty0-4]authentication-mode scheme注意: 必须添加Telnet or SSH用户,否则操作员无法登录系统![Quidway-ui-vty0-4][Quidway-ui-vty0-4]qu[Quidway]super ?password 设置密码[Quidway]super password ?cipher 密文显示密码level 设置指定优先级的进入密码simple 明文显示密码[Quidway]super password leve ?INTEGER<1-3>优先级级别[Quidway]super password level 3 ?cipher 密文显示密码simple 明文显示密码[Quidway]super password level 3 simple ?STRING<1-16>明文密码字符串[Quidway]super password level 3 simple 12345[Quidway]。
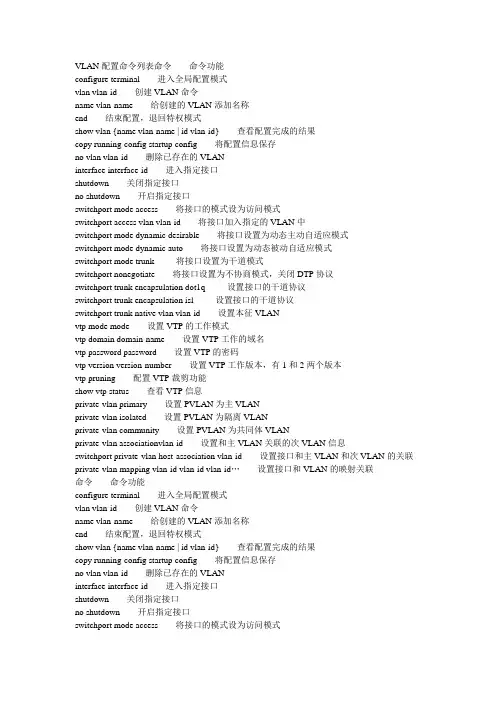
VLAN配置命令列表命令命令功能configure terminal 进入全局配置模式vlan vlan-id 创建VLAN命令name vlan-name 给创建的VLAN添加名称end 结束配置,退回特权模式show vlan {name vlan-name | id vlan-id} 查看配置完成的结果copy running-config startup config 将配置信息保存no vlan vlan-id 删除已存在的VLANinterface interface-id 进入指定接口shutdown 关闭指定接口no shutdown 开启指定接口switchport mode access 将接口的模式设为访问模式switchport access vlan vlan-id 将接口加入指定的VLAN中switchport mode dynamic desirable 将接口设置为动态主动自适应模式switchport mode dynamic auto 将接口设置为动态被动自适应模式switchport mode trunk 将接口设置为干道模式switchport nonegotiate 将接口设置为不协商模式,关闭DTP协议switchport trunk encapsulation dot1q 设置接口的干道协议switchport trunk encapsulation isl 设置接口的干道协议switchport trunk native vlan vlan-id 设置本征VLANvtp mode mode 设置VTP的工作模式vtp domain domain-name 设置VTP工作的域名vtp password password 设置VTP的密码vtp version version-number 设置VTP工作版本,有1和2两个版本vtp pruning 配置VTP裁剪功能show vtp status 查看VTP信息private-vlan primary 设置PVLAN为主VLANprivate-vlan isolated 设置PVLAN为隔离VLANprivate-vlan community 设置PVLAN为共同体VLANprivate-vlan associationvlan-id 设置和主VLAN关联的次VLAN信息switchport private-vlan host-association vlan-id 设置接口和主VLAN和次VLAN的关联private-vlan mapping vlan-id vlan-id vlan-id…设置接口和VLAN的映射关联命令命令功能configure terminal 进入全局配置模式vlan vlan-id 创建VLAN命令name vlan-name 给创建的VLAN添加名称end 结束配置,退回特权模式show vlan {name vlan-name | id vlan-id} 查看配置完成的结果copy running-config startup config 将配置信息保存no vlan vlan-id 删除已存在的VLANinterface interface-id 进入指定接口shutdown 关闭指定接口no shutdown 开启指定接口switchport mode access 将接口的模式设为访问模式switchport access vlan vlan-id 将接口加入指定的VLAN中switchport mode dynamic desirable 将接口设置为动态主动自适应模式switchport mode dynamic auto 将接口设置为动态被动自适应模式switchport mode trunk 将接口设置为干道模式switchport nonegotiate 将接口设置为不协商模式,关闭DTP协议switchport trunk encapsulation dot1q 设置接口的干道协议switchport trunk encapsulation isl 设置接口的干道协议switchport trunk native vlan vlan-id 设置本征VLANvtp mode mode 设置VTP的工作模式vtp domain domain-name 设置VTP工作的域名vtp password password 设置VTP的密码vtp version version-number 设置VTP工作版本,有1和2两个版本vtp pruning 配置VTP裁剪功能show vtp status 查看VTP信息private-vlan primary 设置PVLAN为主VLANprivate-vlan isolated 设置PVLAN为隔离VLANprivate-vlan community 设置PVLAN为共同体VLANprivate-vlan associationvlan-id 设置和主VLAN关联的次VLAN信息switchport private-vlan host-association vlan-id 设置接口和主VLAN和次VLAN的关联private-vlan mapping vlan-id vlan-id vlan-id…设置接口和VLAN的映射关联。
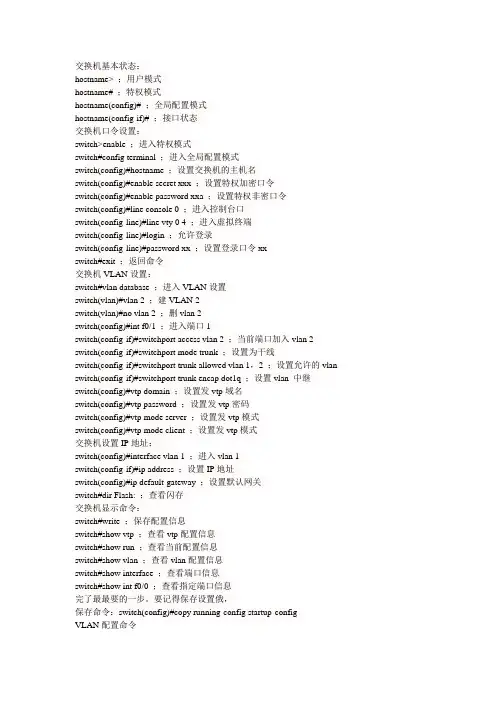
交换机基本状态:hostname> ;用户模式hostname# ;特权模式hostname(config)# ;全局配置模式hostname(config-if)# ;接口状态交换机口令设置:switch>enable ;进入特权模式switch#config terminal ;进入全局配置模式switch(config)#hostname ;设置交换机的主机名switch(config)#enable secret xxx ;设置特权加密口令switch(config)#enable password xxa ;设置特权非密口令switch(config)#line console 0 ;进入控制台口switch(config-line)#line vty 0 4 ;进入虚拟终端switch(config-line)#login ;允许登录switch(config-line)#password xx ;设置登录口令xxswitch#exit ;返回命令交换机VLAN设置:switch#vlan database ;进入VLAN设置switch(vlan)#vlan 2 ;建VLAN 2switch(vlan)#no vlan 2 ;删vlan 2switch(config)#int f0/1 ;进入端口1switch(config-if)#switchport access vlan 2 ;当前端口加入vlan 2 switch(config-if)#switchport mode trunk ;设置为干线switch(config-if)#switchport trunk allowed vlan 1,2 ;设置允许的vlan switch(config-if)#switchport trunk encap dot1q ;设置vlan 中继switch(config)#vtp domain ;设置发vtp域名switch(config)#vtp password ;设置发vtp密码switch(config)#vtp mode server ;设置发vtp模式switch(config)#vtp mode client ;设置发vtp模式交换机设置IP地址:switch(config)#interface vlan 1 ;进入vlan 1switch(config-if)#ip address ;设置IP地址switch(config)#ip default-gateway ;设置默认网关switch#dir Flash: ;查看闪存交换机显示命令:switch#write ;保存配置信息switch#show vtp ;查看vtp配置信息switch#show run ;查看当前配置信息switch#show vlan ;查看vlan配置信息switch#show interface ;查看端口信息switch#show int f0/0 ;查看指定端口信息完了最最要的一步。

VLAN配置命令目录第1章 VLAN配置命令 (1)1.1 VLAN配置命令 (1)1.1.1 vlan (1)1.1.2 name (2)1.1.3 switchport pvid (2)1.1.4 switchport mode (3)1.1.5 switchport trunk (4)1.1.6 double-tagging (5)1.1.7 show vlan (6)第1章 VLAN配置命令1.1 VLAN配置命令VLAN配置命令有:vlannameswitchport pvidswitchport modeswitchport trunkshow vlandouble-tagging1.1.1 vlan[no] vlan vlan-id添加或删除VLAN。
参数参数参数说明vlan-id 定义VLAN的ID。
取值范围:1 – 4094。
缺省无命令模式全局配置模式使用说明使用本命令后,可以进入到VLAN配置模式,进入该模式后可以更改该VLAN的一些属性。
示例下面的命令将添加ID为200的VLAN。
Switch_config#Switch_config#vlan 2Switch_config_vlan_2#1.1.2 name[no] name str给VLAN命名。
参数参数参数说明str 定义VLAN的名称。
取值范围:长度为1–32的字符串缺省default的VLAN的名称为‘Default’,其它VLAN的名称为VLANxxxx(xxxx为VLAN的4位对齐的ID)命令模式VLAN配置模式使用说明本命令可以根据特殊需求更改VLAN的名称以标志特殊的VLAN。
示例下面的命令将vlan200的名称改为main405。
Switch_config#Switch_config#Switch_config#vlan 200Switch_config_vlan_200#name ?WORD The ascii name of VLAN(32bytes)Switch_config_vlan_200#name main4051.1.3 switchport pvidswitchport pvid vlan-idno switchport pvid配置访问模式端口所属的VLAN。
vlan的配置方法VLAN(Virtual Local Area Network)是一种虚拟的局域网技术,可以将一个物理局域网划分为多个逻辑上的子网。
通过VLAN的配置,可以实现网络资源的合理分配和安全隔离。
本文将介绍VLAN 的配置方法。
一、VLAN的基本概念VLAN是一种逻辑上的划分,将一个物理局域网划分为多个虚拟的子网,每个子网相互隔离,互不干扰。
VLAN可以根据不同的需求进行划分,比如按部门、按功能等。
VLAN的划分可以基于端口、MAC地址或者子网等方式进行。
二、VLAN的配置方法1. 创建VLAN首先需要创建VLAN,可以通过交换机的管理界面或者命令行进行配置。
在交换机的管理界面中,找到VLAN配置的选项,点击创建新VLAN。
输入VLAN的ID和名称,点击确认即可创建。
2. 配置端口创建VLAN后,需要将端口划分到相应的VLAN中。
在交换机的管理界面中,找到端口配置的选项,选择要配置的端口,将其绑定到相应的VLAN中。
可以选择将端口设置为访问模式或者特定VLAN 模式。
3. 配置端口模式端口模式分为访问模式和特定VLAN模式。
访问模式下,端口只能属于一个VLAN,数据包只能在该VLAN中传输。
特定VLAN模式下,端口可以属于多个VLAN,数据包可以在多个VLAN之间传输。
根据需求选择相应的端口模式。
4. 配置VLAN间的互通不同VLAN之间默认是隔离的,无法直接通信。
如果需要实现不同VLAN之间的互通,可以通过三层交换机或者路由器进行配置。
在交换机或者路由器上配置虚拟接口,将不同VLAN的虚拟接口进行绑定,即可实现VLAN间的互通。
5. 配置VLAN间的安全为了增强网络的安全性,可以配置VLAN间的访问控制列表(ACL)或者端口安全。
ACL可以限制不同VLAN之间的通信,只允许特定的IP地址或者端口进行通信。
端口安全可以限制端口上的设备数量,防止未授权设备接入。
6. 配置VLAN的管理在配置VLAN时,还需要考虑VLAN的管理。
vlan基本命令配置trunk链路配置<a target="_blank" href="///wpa/qunwpa?idkey=8a8ad9b8f03685df6bde84370578b288f2a615862defa4f1313567ee78a10858"><img border="0"src="///wpa/images/group.png" alt="IT资料群" title="IT资料群"></a>1 案例1:vlan基本命令1.1 问题1)在交换机上创建vlan10,修改名称为web并查看vlan配置2)删除vlan10,查看vlan配置3)创建vlan20,将端⼝f0/1加⼊此vlan,查看vlan配置4)将f0/1从vlan20中删除,查看vlan配置1.2 步骤实现此案例需要按照如下步骤进⾏步骤⼀:在交换机上创建vlan10,修改名称为web并查看vlan配置1. Switch>enable2. Switch#configure terminal3. Switch(config)#vlan 104. Switch(config-vlan)#name web5. Switch(config-vlan)#end6. Switch#show vlan brief步骤⼆:删除vlan10,查看vlan配置1. Switch#configure terminal2. Switch(config)#no vlan 103. Switch(config)#end4. Switch#show vlan brief步骤三:创建vlan20,将f0/1端⼝加⼊此vlan,查看vlan配置1. Switch#configure terminal2. Switch(config)#vlan 203. Switch(config-vlan)#exit4. Switch(config)#interface fastethernet 0/15. Switch(config-if)#switchport access vlan 206. Switch(config)#end7. Switch#show vlan brief步骤四:将f0/1端⼝从vlan20中删除,查看vlan配置1. Switch#configure terminal2. Switch(config)#interface fastethernet 0/13. Switch(config-if)#no switchport access vlan 204. Switch(config)#end5. Switch#show vlan brief2 2 案例2:vlan基本配置2.1 问题在交换机上创建以下vlan,按照拓扑图-1将端⼝加⼊到指定的vlan并配置服务器IP地址,实现通vlan主机的通信图-12.2 步骤1. Switch>enable2. Switch#configure terminal3. Switch(config)#vlan 24. Switch(config-vlan)#vlan 35. Switch(config-vlan)#exit6. Switch(config)#interface range fastEthernet 0/3-47. Switch(config-if-range)#switchport access vlan 28. Switch(config-vlan)#exit9. Switch(config)#interface range fastEthernet 0/5-610. Switch(config-if-range)#switchport access vlan 311. Switch#show vlan brief3 3 案例3:跨交换机同vlan通信3.1 问题通过配置交换机实现图-2中的vlan主机互通图-23.2 步骤S1配置1. Switch#configure terminal2. Switch(config)#interface fastethernet 0/73. Switch(config-if)#switchport access vlan 3S2配置1. Switch>enable2. Switch#configure terminal3. Switch(config)#vlan 34. Switch(config-vlan)#exit5. Switch(config)#interface range fastEthernet 0/5-76. Switch(config-if-range)#switchport access vlan 34 4 案例4:trunk链路配置4.1 问题如图-3所⽰1)配置s1的f0/1端⼝为trunk模式,分别查看两台交换机f0/1端⼝的状态2)恢复s1的f0/1端⼝为默认模式,分别查看两台交换机f0/1端⼝的状态图-34.2 步骤配置s1的f0/1⼝为trunk模式,分别查看两台交换机f0/1端⼝状态1. Switch>enable2. Switch#configure terminal3. Switch(config)#interface fastEthernet 0/14. Switch(config-if)#switchport mode trunk5. Switch(config-if)#end6. Switch#show interfaces fastEthernet 0/1 switchport恢复s1的f0/1⼝为默认模式,分别查看两台交换机f0/1端⼝状态1. Switch#configure terminal2. Switch(config)#interface fastEthernet 0/13. Switch(config-if)#no switchport mode trunk4. Switch#show interfaces fastEthernet 0/1 switchport5 5 案例5:多vlan跨交换机通信5.1 问题通过配置实现跨交换机的同vlan通信,如图-4所⽰图-45.2 步骤注:以下配置需要在练习3的基础上完成S1配置1. Switch>enable2. Switch#configure terminal3. Switch(config)#interface fastEthernet 0/74. Switch(config-if)#switchport mode trunkS2配置1. Switch>enable2. Switch#configure terminal3. Switch(config)#vlan 24. Switch(config-vlan)#exit5. Switch(config)#interface range fastEthernet 0/3-46. Switch(config-if-range)#switchport access vlan 27. Switch(config-if-range)#exit8. Switch(config)#interface fastEthernet 0/79. Switch(config-if)#switchport mode trunk6 6 案例6:以太⽹通道6.1 问题参照图-5将交换机的f0/7-f0/9端⼝配置为以太⽹通道图-56.2 步骤S1配置1. Switch>enable2. Switch#configure terminal3. Switch(config)#interface range fastEthernet 0/7-94. Switch(config-if-range)#channel-group 1 mode on5. Switch(config-if-range)#end6. Switch#show etherchannel summaryS2配置1. Switch>enable2. Switch#configure terminal3. Switch(config)#interface range fastEthernet 0/7-94. Switch(config-if-range)#channel-group 1 mode on5. Switch(config-if-range)#end6. Switch#show etherchannel summary。
VLAN配置命令vlan 配置思路(access 、Trunk)(1)创建Vlan在基于IOS的交换机上配置静态VLAN:switch# vlan databaseswitch(vlan)# vlan vlan-num name vlan-nameswitch(vlan)# exitswitch# configure teriminalswitch(config)# interface interface module/numberswitch(config-if)# switchport mode access // 设置端口模式为access模式switch(config-if)# switchport access vlan vlan-num // 设置端口所属的VLANswitch(config-if)# end核验配置:show vlan(2)配置干道链路干道是在两台catalyst交换机端口或catalyst交换机与路由器间的一条点对点链路。
干道链路可以承载多个vlan。
在基于IOS的交换机上配置干道链路switch(config)# interface interface mod/portswitch(config-if)# switchport mode trunk // 设置端口模式为trunk模式switch(config-if)# switchport trunk encapsulation {isl|dotlq} // 设置trunk所封装的帧switch(config-if)# switchport trunk allowed vlan remove vlan-list // 允许那些VLAN通过干路no switchportno switchport // 把物理端口变成三层口,即把三层口当成路由器上的口,当将一个端口配置成三层端口之后,就可以在此端口上分配IP地址了,当然还是可以连接PC机的,。
vlan配置命令(1)激活vlan路由Switch1#config tSwitch1(config)#ip routing(2)创建三个VLANSwitch1#Switch1#vlan databaseSwitch1(vlan)#vlan 2Switch1(vlan)#vlan 3Switch1(vlan)#vlan 10Switch1(vlan)#exit(3)给VLAN分配IPSwitch1#config tSwitch1(config)#config vlan2Switch1(config-if)#ip address 192.168.2.1 255.255.255.0 Switch1(config-if)#no shutdownSwitch1#config tSwitch1(config)#config vlan3Switch1(config-if)#ip address 192.168.3.1 255.255.255.0 Switch1(config-if)#no shutdownSwitch1#config tSwitch1(config)#config vlan10Switch1(config-if)#ip address 192.168.10.1 255.255.255.0 Switch1(config-if)#no shutdown(4)配VTPSwitch1#Switch1#config tSwitch1(config)#vtp domain china_mobileSwitch1(config)#vtp mode serverSwitch1(config)#end(5)配TrunkSwitch1#Switch1#config tSwitch1(config)#interface gigabitethernet0/1Switch1(config-if)#switchport trunk encapsulation isl Switch1(config-if)#switchport mode trunkSwitch1(config-if)#end(6)给中心交换机通往路由器的接口配IPSwitch1#Switch1#config tSwitch1(config)#interface fastethernet0/1Switch1(config-if)#no switchportSwitch1(config-if)#ip address 200.1.1.1 255.255.255.0 Switch1(config-if)#no shutdown(7)给中心交换机配置缺省路由Switch1#Switch1#config tSwitch(config)#ip route 0.0.0.0 0.0.0.0 200.1.1.2(8)把VLAN号分配给IP接口Switch1#Switch1#config tSwitch1(config)#interface fastethernet0/2Switch1(config-if)#switchport mode accessSwitch1(config-if)#switchport access vlan2Switch1(config-if)#spanning-tree portfast… …Switch1#Switch1#config tSwitch1(config)#interface fastethernet0/13Switch1(config-if)#switchport mode accessSwitch1(config-if)#switchport access vlan3Switch1(config-if)#spanning-tree portfast(其它同)(9)存配置Switch1#copy running-config startup-config二.在接入层交换机Swith2上VLAN的配置(1)配TRUNKSwitch2#Swtich2#config tSwitch2(config)#interface gigabitethernet0/1Switch2(config-if)#switchport trunk encapsulation isl Switch2(config-if)#switchport mode trunkSwitch2(config-if)#endSwitch2#Swtich2#config tSwitch2(config)#interface gigabitethernet0/2 Switch2(config-if)#switchport trunk encapsulation isl Switch2(config-if)#switchport mode trunkSwitch2(config-if)#end(2)配VTPSwitch2#Switch2#config tSwitch2(config)#vtp mode clientSwitch2(config)#vtp domain china_mobileSwitch2(config)#end(3)给接口分配VLAN号Switch2#Switch2#config tSwitch2(config)#interface fastethernet0/1Switch2(config-if)#switchport mode accessSwitch2(config-if)#switchport access vlan2Switch2(config-if)#spanning-tree portfast… …(其它端口配置同)(4)存配置Switch2#copy running-config startup-config(其它交换机同)。
配置vlan的方法配置VLAN(Virtual Local Area Network)的方法是将网络设备按照功能或者部门划分为不同的虚拟网络,从而提高网络性能和安全性。
下面是一些配置VLAN的基本方法。
1. 网络规划和设计:在配置VLAN之前,必须进行网络规划和设计。
这包括确定需要划分的VLAN 数量,每个VLAN所涵盖的网络设备范围,以及设备之间的互联方式。
此外,还需要考虑IP地址分配和子网掩码设置,以确保VLAN之间的互联和通信。
2. VTP(VLAN Trunking Protocol)设置:VTP是一种用于自动配置和管理VLAN的协议。
它包括服务器模式、客户端模式和透明模式。
配置VTP服务器模式的交换机可以管理和分发VLAN信息,而VTP客户端模式的交换机则接收和配置来自VTP服务器模式的信息。
配置VTP 透明模式的交换机不会传递VLAN信息,而只会接收和配置自己的VLAN。
3. VLAN的创建和配置:在交换机上创建和配置VLAN是非常重要的一步。
可以使用命令行界面(CLI)或者图形用户界面(GUI)来进行配置。
在命令行界面下,可以使用"vlan database"命令进入VLAN数据库模式,然后使用"vlan"命令来创建和配置VLAN。
在图形用户界面下,可以通过交换机的管理界面找到VLAN设置并进行配置。
4. VLAN端口配置:一旦VLAN创建和配置完成,还需要将交换机的端口分配给相应的VLAN。
这可以通过命令行界面或者图形用户界面来实现。
在命令行界面下,可以使用"switchport access vlan"命令将端口配置为特定的VLAN。
在图形用户界面下,可以选择相应的端口并将其分配给目标VLAN。
5. VLAN间的通信设置:默认情况下,不同VLAN之间的通信是被禁止的,因此需要进行相应的设置来实现VLAN间的通信。
可以使用三层交换机或者路由器来实现VLAN间的互联。
VLAN配置命令8.2.2.1vlan命令:vlan[vlan-id]no vlan[vlan-id]功能:创建vlan并且进入vlan配置模式,在vlan模式中,用户可以配置vlan名称和为该vlan分配交换机端口;本命令的no操作为删除指定的vlan。
参数:[vlan-id]为要创建/删除的vlan的vid,取值范围为1~4094。
命令模式:全局配置模式缺省情况:交换机缺省只有vlan1。
使用指南:vlan1为交换机的缺省vlan,用户不能配置和删除vlan1。
允许配置vlan的总共数量为4094个。
另需要提醒的是不能使用本命令删除通过gvrp学习到的动态vlan。
举例:创建vlan100,并且进入vlan100的配置模式。
switch(config)#vlan100switch(config-vlan100)#8.2.2.2name命令:name[vlan-name]no name功能:为vlan指定名称,vlan的名称是对该vlan一个描述性字符串;本命令的no操作为删除vlan的名称。
参数:[vlan-name]为指定的vlan名称字符串。
命令模式:vlan配置模式缺省情况:vlan缺省名称为vlanxxx,其中xxx为vid。
使用指南:交换机提供为不同的vlan指定名称的功能,有助于用户记忆vlan,方便管理。
举例:为vlan100指定名称为testvlan。
switch(config-vlan100)#name testvlan8.2.2.3switchport access vlan命令:switchport access vlan[vlan-id]no switchport access vlan功能:将当前access端口加入到指定vlan;本命令no操作为将当前端口从vlan里删除。
参数:[vlan-id]为当前端口要加入的vlan vid,取值范围为1~4094。
命令模式:接口配置模式缺省情况:所有端口默认属于vlan1。