PR100接收机操作说明
- 格式:ppt
- 大小:24.40 MB
- 文档页数:34
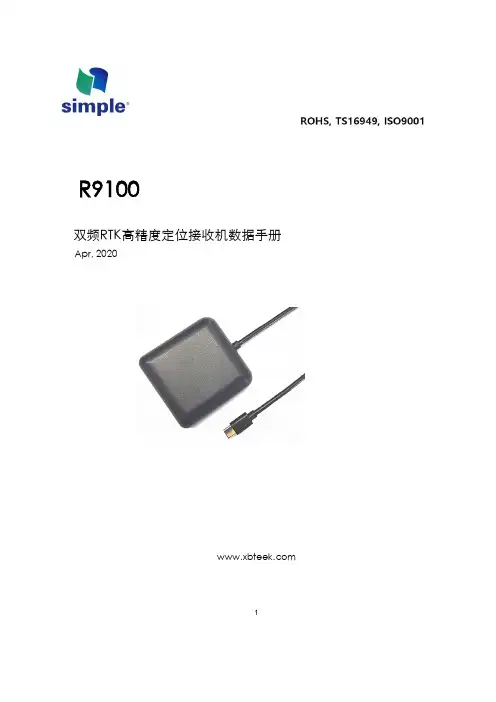
1R9100双频RTK 高精度定位接收机数据手册Apr, 2020修订记录免责声明本文档提供有关深圳市西博电子有限公司产品的信息。
本文档并未以暗示、禁止反言或其他形式转让本公司或任何第三方的专利、商标、版权或所有权或其下的任何权利或许可。
除西博在其产品的销售条款和条件中声明的责任之外,本公司概不承担任何其它责任,并且,西博对其产品的销售和/或使用不作任何明示或暗示的担保,包括对产品的特定用途适用性、适销性或对任何专利权、版权或其它知识产权的侵权责任等,均不作担保。
若不按手册要求连接或操作产生的问题,本公司免责。
西博可能随时对产品规格及产品描述作出修改,恕不另行通知。
对于本公司产品可能包含某些设计缺陷或错误,一经发现将收入勘误表,并因此可能导致产品与已出版的规格有所差异。
如客户索取,可提供最新的勘误表。
2目录1产品介绍 (4)1.1 概述 (4)1.2 关键指标 (5)2.电气特性 (6)2.1电气极大值 (6)2.2运行条件 (6)3产品功能 (7)3.1 多模卫星星座 (7)3.2 增强系统 (7)3.3 快速在线标定 (8)3.4 自由安装 (9)3.5 导航数据率 (9)3.6 MEMS传感器原始数据输出 (9)4.外形尺寸 (10)5. 传输及接口 (9)6. 订购信息 (10)31产品介绍1.1 概述R9100多模双频高精度GNSS/MEMS 组合导航接收机,是深圳市西博电子有限公司推出的基于六自由度MEMS 传感器与双频RTK 卫星导航紧密结合的组合导航系统,RTK算法与组合导航算法高效运行于片上处理器,是一款低功耗、小体积、高精度、无需接入里程计辅助、具备城市峡谷和长时间隧道,100%导航可用性的厘米级组合导航产品。
R9100采用先进的MEMS 惯性传感器与载波差分(RTK)卫星导航组合导航技术,充分利用了卫星导航的载波相位信息与惯性器件(三轴陀螺与三轴加速度计)的相对角运动与线运动测量功能,使用多维扩展卡尔曼滤波技术及其它特定算法实现了在微小器件上的三维高精度导航测姿功能。

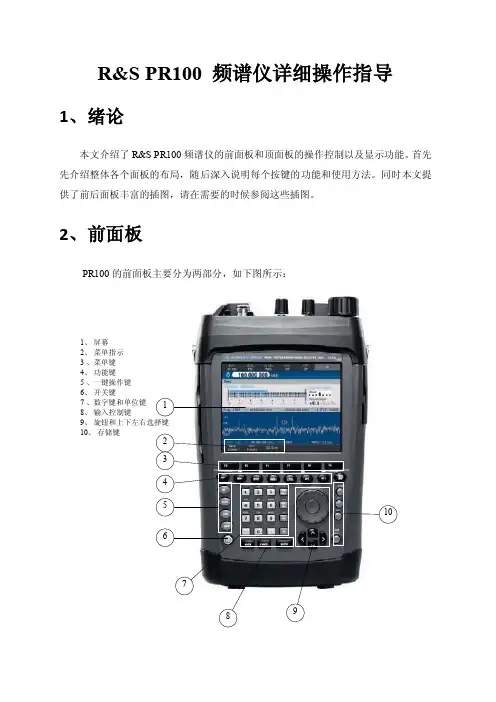
R&S PR100 频谱仪详细操作指导1、绪论本文介绍了R&S PR100频谱仪的前面板和顶面板的操作控制以及显示功能。
首先先介绍整体各个面板的布局,随后深入说明每个按键的功能和使用方法。
同时本文提供了前后面板丰富的插图,请在需要的时候参阅这些插图。
2、前面板PR100的前面板主要分为两部分,如下图所示:1、 屏幕2、 菜单指示3 、菜单键4、 功能键5 、一键操作键6、 开关键7 、数字键和单位键8、 输入控制键9、 旋钮和上下左右选择键10、 存储键上部分是显示屏,显示的是实时频谱图、瀑布图等:在图形头部显示的是解调时的参数,如带宽BW、解调模式MOD、检波方式LEVEL、自动频率控制AFC、天线增益A TT、手动增益控制MGC;在图形底部是功能键的子菜单,如DISP显示键的子菜单有:显示模式选择Display Mode、显示参数设置Range、峰值Peak、调节中频带宽Zoom、标记频点Maker、全屏显示Full Screen、差分模式显示Diff Mode。
下半部分是各种控制键:紧跟屏幕下方的是菜单键F1、F2、F3、F4、F5和F6,每一个菜单键对应于屏幕底部一个子菜单,要设置某一个子菜单可以按下相对应的按键;在功能操作键下面的就是一键操作键,可以直接控制解调时的参数,带宽选择键BW-和BW+,模式选择键MOD-和MOD+,检波方式选择键LEVEL,自动频率控制键AFC,天线增益ATT,频率输入及存储FREQ/MEM;在一键操作键下面分为三部分,左边是基本操作键,RX、SCAN、DISP和CONF;中间部分是数字键和单位选择键以及旋钮和上下左右选择键;右边是存储键区。
最下面一排是输入控制键3、顶面板PR100的顶面板上的按键可以方便用户对频谱仪进行简单操作,该面板从左至右有以下按键和旋钮:射频输入接口,耳机接口,外部信号辅助接口,BW、MOD以及USR的简便选择键,音量控制旋钮,参数设置指示灯,锁定键LOCK,音调调节旋钮,频率调节旋钮。
台式全目录第一章面板介绍 3 第二章连接及安装9 第三章频率设置9 第四章接收功能10 第五章记忆信道12 第六章扫描16 第七章定时关机功能20 第八章模式设置【SET MODE】20 第九章连接器信息22 第十章控制命令22 第十一章维护22 第十二章附选件安装22 第十三章故障介绍23 第十四章指标23 第十五章附选件介绍24前言使用机器前请详细阅读本说明书,并保管好本说明书。
注意事项:只能在室内用!不能将220V交流电直接接在IC-R8500接收机上,必须用AC电源转换或接13.8V直流电源。
不能用不合规定的保险。
金属片、导线等小物品不能碰到接收机内部元件和后部接口。
避免在低于-10℃高于+50℃的环境里使用或放置接收机。
避免将接收机放置于阳光直射或尘土过多的地方。
编译水平有限,有不详尽处请参见英文使用说明书。
第一章面板介绍一、前面板1.电源开关【POWER】2.定时关机/设置开关【SLEEP/SET】设定关机时间* 可选择30、60、90、120分钟或OFF* “SLEEP”显示在功能显示屏上,表示已设定关机时间按此键1秒,进入快速设定状态* 使用【M-CH】旋钮和主旋钮分别来选择设定项目和内容3.录音遥控插座【REC REMOTE】:连接录音机上的遥控口,用予遥控录音。
4.录音机插口【REC OUT】:输出音频信号,接到录音机输入端。
5.耳机插口【PHONES】:阻抗为4—16Ω插入耳机后,喇叭无输出可用立体声耳机,但只有单声道6.接收方式键【WFW】/【FM】/【AM】/【SSB/CW】按下选择操作接收方式* 有下列几种方式:【FM】---FM ,窄FM【AM】---AM,窄AM,宽AM【SSB/CW】-USB,LSB,CW,任意的窄CW选SSB/CW接收方式,按【SSB/CW】键1秒,调拍频振荡器(BFO)频率。
7.消噪/ AFC开关【NB/ AFC】触发消噪或自动频率控制功能。

KMC100KMCMEDIA CENTEROwner’s Manual2Owner’s ManualMedia CenterMulti-Media Receiver w/ USB, Bluetooth and SiriusXM-Ready™Thank you for purchasing the KMC100 Media Center. We recommendreading through the entire manual for detailed instructions on how to installand operate the unit. For support please call: 1-800-844-2774Purchase Date:Serial Number:SiriusXM Radio ID:(SiriusXM® Connect Tuner sold separately)ITEMS INCLUDED:(1) KMC100 (1) Trim Ring (1) Wiring Harness (1) UV Cover(1) Mounting Gasket (1) Owner’s ManualFCC Compliance StatementThis equipment has been tested and found to comply with the limits for a Class B digital device, pursuant to part 15 of the FCC Rules. These limits are designed to provide more reasonable protection against harmful interference in a residential installation.Operation is subjected to the following two conditions: (1) This device maynot cause harmful interference, and (2) the device must accept any interference re-ceived, including interference that may cause undesired operation.This equipment generates, uses, and can radiate radio frequency energy and, if not installed and used in accordance with the instructions, may causeharmful interference to radio communications. However, there is no guarantee that interference will not occur in a particular installation. If this equipment does cause harmful interference to radio or television reception, which can be determined by turn-ing the equipment off and on, you are encouraged to try to correct the interference by one of the following measures:• Reorient or relocate the receiving antenna.• Increase the separation between the equipment and receiver.• Connect the equipment into an outlet on a circuit different from that to which the receiver is connected.• Consult the dealer or an experienced radio/TV technician for helpChanges or modifications not expressly approved by the party responsible for compli -ance could void the user’s authority to operate the equipment.The equipment should be installed and operated with minimum distance 20cm between the radiator & your body.CEOperation temperature: (-25°C~55°C )Bluetooth: 2402-2480MHzBluetooth transmitter power: 4.33dBmHereby declares that this equipment is in compliance with essential requirements and other relevant provisions of Directive 2014/53/EU.All radio frequencies can be used in all EU member safe without restrictions.3Installation Overview1- RGB Black +12v 2- RGB Red GND 3- RGB Green GND 4- RGB Blue GND1. Main Harness 13. Front RCA Output 14. Rear RCA Output15. Subwoofer RCA Output 16. Zone 2 RCA Output5.5”4The button layout below will give you a quick overview of the button functionality.BUTTONS:1 - Source 2 - Favorites 3 - Menu4 - Back/Return5 - Seek/Tune Down6 - Play/Pause7 - Seek/Tune Up8 - Volume KnobFunction: How To:Power On Hold the Source (1) button for 2 seconds.Power Off Hold the Source (1) button for 2 seconds.Volume Up Turn the knob (8) clockwise.Volume Down Turn the knob (8) counter-clockwise.Seek Up Press Seek Up (7) once.Seek Down Press Seek Down (5) once.Tune Up Hold down Seek Up (7).Tune Down Hold down Seek Down (5).Enter/Select Press the Knob (8) inward once.Pause/Play Press Play/Pause (6) once.Mute Press Play/Pause (6) once.Back Press Back (4) once.12384567DISPLAYKMC100 Settings MENUTo enter the Settings Menu : Hold the MENU (3) button for 2 seconds.Rotate the knob to scroll between menu items and press enter on knob to select.Available Settings are:Day/Night:The Day/Night feature allows you to change the color scheme from Day Mode to Night Mode. The unit is defaulted to auto switch when your lights are turned on. In order for the unit to automatically switch between day and night modes, the orange illumination wire must be connected. You can also set the unit to stay in either Day mode or Night mode by rotating the knob and selecting the desired setting.Dimmer:The Dimmer allows you to adjust the brightness of the screen, and buttons. You can adjust the brightness from 0 to +12.Low Battery Alert:The Low Battery Alert setting allows you to turn ON /OFF the Low Battery Alert. When set to ON, if the unit drops below 10.5V , the unit will display a visual and audible alert warning that your batteries need charged.Tuner:Allows you to change the region for the tuner.Your available options: USA , EUROPE5KMC100 Settings MENU Cont.Zone 2:The Zone 2 feature gives you the ability to have a secondary volume control. Within Zone 2 there are 4 additional settings:High Pass Crossover:Adjusts the high-pass crossover for internal channels and Front, Rear, Zone 2 RCA outputs.Your available options: OFF , 50Hz, 80Hz, 120Hz.Loudness:Turns the loudness setting ON/OFF .Voltmeter:Turns the voltmeter display ON /OFF .ON/OFF:Allows you to turn the 2nd Zone volume control ON and OFF .NAMING:Allows you to change the Zone 2 name.Your available options: Zone 2, Tower, Transom, Cockpit, Interior.Control:Allows you to select which connection is controlled by the Zone 2 volume.a. Internal Power- Zone 2 internal channels are controlled by Zone 2 volume. Zone 2 RCA is controlled by Zone 1 volume.b. Preamp- Zone 2 RCA is controlled by the Zone 2 volume. Zone 2 internal channels are controlled by Zone 1 volume.c. Both- Zone 2 internal channels and Zone 2 RCA are controlled by Zone 2 volume.Absolute/Relative:The Absolute and Relative setting for Zone 2 change the behavior of the Zone 2 volume control with regard to the main zone volume.a. Relative- When the main zone volume is increased or decreased, Zone 2 volume will adjust up or down accordingly.b. Absolute- When the main zone volume is increased or decreased, Zone 2 volume will remain at the same level until adjusted independently.SourcesTo change any of the sources, press the Source button on the KMC100. Rotating the knob left or right will scroll through the available sources and pressing enter will select the source.FM Source:AM Source:Weatherband (WX) Source:USB Source:Function: How To: Seek Up: Press the Seek Up (7) button once. Seek Down: Press the Seek Down (5) button once. Tune Up: Hold the Tune Up (7) button for 2 seconds. Then press (7) once. Tune Down: Hold the Tune Down (5) button for 2 seconds. Then press (5) once. Mute: Press the Play/Pause button.Function: How To: Seek Up: Press the Seek Up (7) button once. Seek Down: Press the Seek Down (5) button once. Tune Up: Hold the Tune Up (7) button for 2 seconds. Then press (7) once. Tune Down: Hold the Tune Down (5) button for 2 seconds. Then press (5) once. Mute: Press the Play/Pause button.Function: How To: Seek Up: Press the Seek Up (7) button once. Seek Down: Press the Seek Down (5) button once. Tune Up: Hold the Tune Up (7) button for 2 seconds. Then press (7) once. Tune Down: Hold the Tune Down (5) button for 2 seconds. Then press (5) once. Mute: Press the Play/Pause button.Function: How To: Next Track: Press the Seek Up (7) button once. Previous Track: Press the Seek Down (5) button once. Fast Forward: Hold the Tune Up (7) button. Rewind: Hold the Tune Down (5) button. Pause: Press the Play/Pause button.AUX Input Source:Function: How To: Mute: Press the Play/Pause button. Bluetooth Source:Function: How To: Next Track: Press the Seek Up (7) button once. Previous Track: Press the Seek Down (5) button once. Pause: Press the Play/Pause button. Bluetooth Device Name: Media Center. There is no password required.SiriusXM Source:Function: How To: Channel Up: Press the Seek Up (7) button once. Channel Down: Press the Seek Down (5) button once. Fast Browse Up: Hold the Tune Up (7) button. Fast Browse Down: Hold the Tune Down (5) button. Mute: Press the Play/Pause button.The SiriusXM source allows you to access SiriusXM satellite radio. SiriusXM Connect Tuner and subscription required and sold separately.67FAVORITESCamera/Video InputThe Favorites button will allow you to view and set your favorite station from the following sources: FM - AM - WX - SXM 16 favorites can be set.This feature allows you to connect an external camera or video source and view it though the KMC100. A reverse trigger is provided to activate the camera when putting the vehicle in reverse or you may select the video input manually. The reverse trigger is a +12v trigger.Setting a Favorite1. Select the station you wish to add to the favorites list.2. Press the Favorites button and select the Favorites preset you wish to set.3. Press and Hold the knob (8) button for 2 seconds to set.Entering Video Input Manually1. Press and Hold the Favorites button to display the connected device on the screen.2. Press and Hold the Favorites button to exit the video input mode.Audio SettingsAudio Settings Cont.Audio Menu: Press the knob for 2 seconds from any source screen to enter the Audio Settings Menu. Rotating the knob left and right will scroll between the available settings. Pressing the knob will select highlighted setting.Equalizer: When the EQ is ON, Bass, Mid & Treble controls are not accessible. The KMC100 has the following preset options for the EQ:OFF - ROCK - POP - JAZZ - CUSTOM. Rotating the knob left and right to scroll between the options and press knob (8) to select. To en-able Bass, Mid & Treble controls, EQ must be set to OFF .Bass: Rotate the knob left and right to adjust the Bass. Pressing enter will confirm setting. Adjustment is from -6 to +6.Mid: Rotate the knob left and right to adjust the Midrange. Pressing enter will confirm setting. Adjustment is from -6 to +6.Treble: Rotate the knob left and right to adjust the Treble. Pressing enter will confirm setting. Adjustment is from -6 to +6.Balance: Rotate the knob left and right to adjust the Balance. Pressing enter will confirm setting. Adjustment is from Left 6 to Right 6.Fader: Rotate the knob left and right to adjust the Fader. Pressing knob (8) will confirm setting. Adjustment is from Front 6 to Rear 6.Sub: Rotate the knob left and right to adjust the Subwoofer level. Pressing enter will confirm setting. Adjustment is from 0 to +12.When using the CUSTOM EQ you can adjust the following frequencies:50Hz - 125Hz - 250Hz - 500Hz - 1kHz - 3kHz - 8kHzIn each of these frequencies you can adjust the values from -6 to 6.Source Specific Menus Source Specific Menus Cont.Press and release the Menu button while in the following sources will bring up Source Specific Menu items: WX - USB - BT - AUX - SiriusXM. Rotate the knob to adjust the settings and press enter to confirm.WX Menu:Auto-Alert On and OFF - this feature will automatically interrupt any source and tune to Weatherband for an alert message.USB Menu:BROWSE: Displays all files/folders available for playback. Rotate the knob to scroll through the items and press knob (8) to begin playback of selected track.REPEAT: Allows you to select Repeat for Current Playlist or Repeat Off. SHUFFLE: Allows you to turn Shuffle tracks for Current Playlist,All Tracks or Off.DME: Digital Music Enhancer. This feature will enhance the sound quality of compressed music files. Setting is ON/OFF.BLUETOOTH Menu:ENTER PAIRING MODE: Places the device in to pairing mode.Device Name: Media CenterIn order to pair your phone to the Media Center you must:1. Make sure the Bluetooth is turned “ON”, on your device.2. Search for “Media Center”.3. Connect/ Trust the device to begin streaming music.(No password required)Select Device: Allows you to view all paired devices and select the device you wish to use for playback.Disconnect Current Device: Disconnects the current paired device and connects to the next device on the list.Delete Device: Allows you to view all paired devices and select the device you wish to delete.Delete All Devices: Deletes all stored Bluetooth® devices from memory and puts the unit into pairing mode.8SiriusXM® Radio OperationOnly SiriusXM® brings you more of what you love to listen to, all in one place. Get over140 channels, including commercial-free music plus the best sports, news, talk, comedy and entertainment. Welcome to the world of satellite radio. A SiriusXM Connect Tuner and Subscription are required. For more information, visit Activating your SiriusXM SubscriptionAfter installing your SiriusXM Connect Tuner and antenna, power on your KMC100 and select SiriusXM mode. You should be able to hear the SiriusXM preview channel on Channel 1. If you cannot hear the preview channels, please check the installation instructions to make sure your SiriusXM Connect Tuner is properly installed.After you can hear the Preview channel, tune to Channel 0 to find the Radio ID of your tuner. In addition, the Radio ID is located on the bottom of the SiriusXM Connect Tuner. You will need this number to activate your subscription. Write the number down for reference.Note: the SiriusXM Radio ID does not include the letters I, O, S or F.In the USA, you can activate online or by calling SiriusXM Listener care:• Visit /activatenow• Call SiriusXM Listener Care at 1-866-635-2349For Canadian Subscriptions, please contact:• Visit www.siriusxm.ca/activatexm• Call XM customer Care at 1-877-438-9677When your radio detects that the tuner has received the activation message, your radio will display: “Subscription Updated”. Once subscribed, you can tune to channels in your subscription plan. Note, the activation process usually takes 10 to 15 minutes, but may take up to an hour. Your radio will need to be powered on and receiving the SiriusXM signal to receive the activation message.910SiriusXM Radio Operation Cont.Alternate tuning options and settingsPress MENU and rotate the knob to select an alternate tuning method or system setting below:Channel Browse: Allows users to browse SiriusXM channels before selec-tion. Rotating the knob left and right will scroll through the channel lineup. Pressing enter will select highlighted channel and begin playback.Category Browse: Allows users to browse SiriusXM categories. Rotating the knob left and right will scroll through the different categories. Pressing the knob (8) on the highlighted category will show a list of available channels within that category. Pressing the knob (8) again will select the highlighted channel and begin playback.DIRECT TUNING: Allows you to manually enter in the channel number you wish to tune to. Rotate the volume knob to adjust the digit, then press the knob (8) to select the next digit. Once the channel number has been entered, the unit will tune to that channel and begin playback.RESET: Allows you to Reset the KMC100 to the SiriusXM factory defaults. Parental Controls will be disabled and lock code restored to the default.PARENTAL CONTROLS: Allows you to limit access to SiriusXM channels with mature content. When enabled, the Parental Control feature requires you to enter a passcode to tune to the locked RMATION: Displays SiriusXM Radio ID.SiriusXM Parental Controls Cont.ENABLE PARENTAL CONTROLS: After choosing to enable the parental controls, you will be prompted to enter a 4-Digit passcode: Default Pass-code is 0000. Rotate the volume knob to adjust the digit, then press the knob (8) to select the next digit.MANAGE PASSWORD: With the password set, you will also be given the option to MANAGE your password, which allows you to change/reset the current passcode.DISABLE PARENTAL CONTROLS: Select Disable Parental Controls, to remove all mature channel restrictions.SiriusXM Connect Tuner and Subscription sold Sirius, XM and all related marks and logos are trademarks of Sirius XM Radio Inc. All rights reserved.The following checklist will help you remedy problems you may encounter with your unit. Before going through the checklist below, checkthe connection and operating procedures. If the problem is not solved, please contact your local KICKER retailer or call 1-800-844-2774.GeneralNo power is being supplied to the unit- Check to ensure 12V is being supplied to the red wire and the black wire has a good ground.-Press the Source button.No Sound- Check to ensure amplifiers (if applicable) are on.- Check to ensure fader is in the middle (0) position.The buttons will not function- Perform Master Reset by holding the Play/Pause button down for 10 seconds.Radio ReceptionStations cannot be received- Check Antenna for proper connection.- The broadcast signal is too weak.- Ensure Tuner in Settings Menu is setto proper region.RDSRDS Information is not displayed- The current station is not an RDS station.- RDS data has not been received.USB playbackYou cannot play back items via a USB hub.- This unit cannot recognize USB devices via a USB hub.A USB device takes longer to play back.- The USB device contains files with a complicated tree structure or contains a large amount of files.The sound is intermittent.- The sound may be intermittent at a high-bit-rate of more than 320 kbps.11For SiriusXM Radio operation:Check Antenna- The radio has detected a fault with the SiriusXM antenna. The antenna cable may be either disconnected or damaged.- Verify that the antenna cable is connected to the SiriusXM Connect Tuner.- Inspect the antenna cable for damage and kinks. Replace the antenna if the cable is damaged. SiriusXM products are available at your local retailer or online at Check Tuner- The radio is having difficulty communicating with the SiriusXM Connect Tuner.- The tuner may be disconnected or damaged.- Verify that the SiriusXM Connect Tuner cable is securely connected to the radio.No Signal- The SiriusXM Connect Tuner is having difficulty receiving the SiriusXM satellite signal.- Verify that your vehicle is outdoors with a clear view of the sky.- Verify that the SiriusXM antenna is mounted on the outside of the vehicle.- Move the SiriusXM antenna away from any obstructions.- Inspect the antenna cable for damage and kinks.- Consult the SiriusXM Connect Tuner installation manual for more information on antenna installation. Replace the antenna if the cable is damaged. SiriusXM products are available at your local retailer or online at Subscription Updated- The radio has detected a change in your SiriusXM subscription status. Press the knob (8) to clear the message. Visit www. or call 866-635-2349 if you have questions about your subscription.Channel Not Available- The channel you have requested is not a valid SiriusXM channel or the channel that you were listening to is no longer available. You may also see this message briefly when first connecting a new SiriusXM Connect Tuner.- Visit for more information about the SiriusXM channel lineup.Channel Not Subscribed- The channel that you have requested is not included in your SiriusXM subscription package or the channel that you were listeningto is no longer included in your SiriusXM subscription package.- Visit or call 866-635-2349 if you have questions about your subscription package or would like to subscribe to this channel.Channel Locked- The channel that you have requested is Locked by the radio Parental Control feature. See page 10 for more information on the Parental Con-trol feature and how to access locked channels. Default Passcode is 0000.12WARRANTYElectronics Limited Warranty (including KICKER Accessories)When purchased from an Authorized KICKER Dealer, CPS warrants this product to be free from defects in material and workmanship under normal use fora period of ONE (1) YEAR from date of original purchase with receipt. If this product is identified as “Refurbished” or “B Goods”, the warranty is limited toa period of THREE (3) MONTHS from the date of original purchase. In all cases you must have the original receipt. Should service be necessary under this warranty for any reason due to manufacturing defect or malfunction during the warranty period, CPS will repair or replace (at its discretion) the defective merchandise with equivalent merchandise. Warranty replacements may have cosmetic scratches and blemishes. Discontinued products may be replacedwith more current equivalent products. Warranty is valid only for the original purchaser and is not extended to owners of the product subsequent to theoriginal purchaser. Any applicable implied warranties are limited in duration to a period of the express warranty as provided herein beginning with the date ofthe original purchase at retail, and no warranties, whether express or implied, shall apply to this product thereafter.© 2019 CPS Distributors, Inc.6024 Parretta Dr. Kansas City, MO 64120800-844-2774131415。
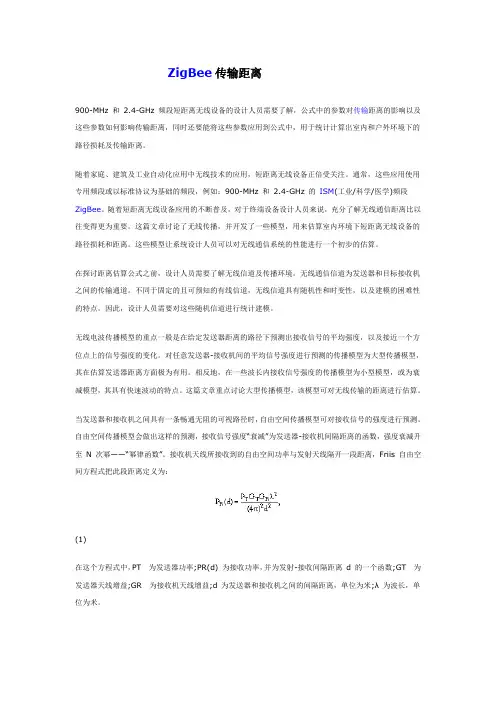
ZigBee传输距离900-MHz 和2.4-GHz 频段短距离无线设备的设计人员需要了解,公式中的参数对传输距离的影响以及这些参数如何影响传输距离,同时还要能将这些参数应用到公式中,用于统计计算出室内和户外环境下的路径损耗及传输距离。
随着家庭、建筑及工业自动化应用中无线技术的应用,短距离无线设备正倍受关注。
通常,这些应用使用专用频段或以标准协议为基础的频段,例如:900-MHz 和 2.4-GHz 的ISM(工业/科学/医学)频段ZigBee。
随着短距离无线设备应用的不断普及,对于终端设备设计人员来说,充分了解无线通信距离比以往变得更为重要。
这篇文章讨论了无线传播,并开发了一些模型,用来估算室内环境下短距离无线设备的路径损耗和距离。
这些模型让系统设计人员可以对无线通信系统的性能进行一个初步的估算。
在探讨距离估算公式之前,设计人员需要了解无线信道及传播环境。
无线通信信道为发送器和目标接收机之间的传输通道。
不同于固定的且可预知的有线信道,无线信道具有随机性和时变性,以及建模的困难性的特点。
因此,设计人员需要对这些随机信道进行统计建模。
无线电波传播模型的重点一般是在给定发送器距离的路径下预测出接收信号的平均强度,以及接近一个方位点上的信号强度的变化。
对任意发送器-接收机间的平均信号强度进行预测的传播模型为大型传播模型,其在估算发送器距离方面极为有用。
相反地,在一些波长内接收信号强度的传播模型为小型模型,或为衰减模型,其具有快速波动的特点。
这篇文章重点讨论大型传播模型,该模型可对无线传输的距离进行估算。
当发送器和接收机之间具有一条畅通无阻的可视路径时,自由空间传播模型可对接收信号的强度进行预测。
自由空间传播模型会做出这样的预测,接收信号强度“衰减”为发送器-接收机间隔距离的函数,强度衰减升至N 次幂——“幂律函数”。
接收机天线所接收到的自由空间功率与发射天线隔开一段距离,Friis 自由空间方程式把此段距离定义为:(1)在这个方程式中,PT为发送器功率;PR(d) 为接收功率,并为发射-接收间隔距离d 的一个函数;GT为发送器天线增益;GR为接收机天线增益;d 为发送器和接收机之间的间隔距离,单位为米;λ 为波长,单位为米。


R&S®PR100 便携式接收机从9 kHz 到7.5 GHz进行现场无线电监测无线电监测与测向数据手册| 01.0R&S®PR100顶视图:紧凑设备的方便操作配有R&S®HE300有源方向性天线的R&S®PR100:天线具有三个模块,覆盖从20 MHz 到7.5 GHz 的频率范围(使用HF 选件模块后可扩展到9 kHz )。
前置放大器置于天线手柄内R&S®PR100便携式接收机概述R&S®PR100便携式接收机专门为现场无线电监测应用而设计。
接收机功能及控制理念全部根据监测任务而进行优化。
此外,R&S®PR100 还适用于很多其他应用。
R&S®PR100可工作于9 kHz 到7.5 GHz 的宽频率范围内。
不管是用于监测发射、探测干扰还是定位微型发射机,都能以最方便的操作提供高度的可移动性。
R&S®PR100可与R&S®HE300有源方向性天线组成一个紧凑的接收系统。
也可与其他天线共同使用,例如宽带全向天线。
虽然R&S®PR100外观设计十分紧凑,却能提供通常需要更高价格的设备才具有的多种功能。
此接收机具有良好的性价比,对于所有要求高度移动性和低成本的无线电监测作业是必不可少的。
R&S®PR100小巧轻便,非常适合用于车辆无法到达的地区。
其功耗极低,仅用一块电池即可持续使用四个小时。
更换锂电池只需几秒钟,无需其他工具。
关机时,当前设置将自动写入内存中。
从9 kHz 到7.5 GHz 整个频率范围的快速全景扫描150 Hz 到500 kHz 带宽的解调和10 MHz 中频频谱6.5" 彩色屏幕显示频谱和瀑布图测量数据存储于接收机内的SD 卡LAN 接口,用于远程控制和数据输出人体工程学设计,坚固耐用,适合便携使用重量仅为3.5 kg (含电池)通过R&S®HE300有源方向性天线进行发射定位J J J J J J JJR&S®PR100便携式接收机应用和关键特点应用干扰检测以及专业无线电网络中的定位对诸如故障电子设备造成的无线电干扰的可靠检测快速有效的消除干扰源,例如在机场的干扰监测用户专用的无线电服务通过不同的扫描模式监测各种无线电服务在指定频段内监测合法机构的发射紧急信号的跟踪通过R&S®HE300有源方向性天线定位紧急呼叫源复杂地形内定位的单音功能简易爆炸装置(IED )的定位对待机状态的简易爆炸装置(IED )的检测使用R&S®HE300有源方向性天线定位简易爆炸装置 (IED)微型发射机的移动跟踪窃听器的探测,例如用于会议室中通过R&S®HE300有源方向性天线进行窃听器的跟踪定位J J J J J J J J J J 关键特点面向未来的投资接收机极宽的频率范围和出色的性能使其投资必将在未来证明物有所值R&S®PR100能够对当前和未来的无线电服务信号进行接收和处理高接收灵敏度,高信号分辨率R&S®PR100使用最先进的数字信号处理技术,能够以高灵敏度接收信号,并且能够检测极弱的信号而不降低处理速度与传统模拟接收机相比,在灵敏度和信号分辨率方面拥有更加优越的性能通过解调进行信息检索模拟调制信号可以在接收机内进行直接解调,并通过耳机或内置扬声器进行监听数字调制信号通过I/Q 解调转换为基带信号,存储在接收机中或通过局域网(LAN )输出可对数字调制信号进行离线分析,例如使用罗德与施瓦茨的R&S®GX430软件脉冲信号和雷达发射的检测R&S®PR100能够捕获窄脉宽脉冲,例如雷达发射接收机的宽中频特性使其能够显示用于分析短脉冲信号的中频频谱集监测接收机和移动数据存储于一身收集到的信息写入接收机的内置SD 卡,无需其他设备监测期间记录的数据可以随后进行离线分析通过远程控制高效操作R&S®PR100可以通过LAN 接口(SCPI 命令到IEEE488.2)完全远程控制实现对接收机高效的远程操作,例如在无人职守的监测站中直观方便的操作直观的菜单结构和极方便的操作使用户可以迅速熟悉设备在6.5"彩色显示屏上显示接收的信号,并可以方便地进行分析针对移动应用的电池重量仅为3.5 kg (含电池)仅用一块电池即可连续工作四个小时J J J J J J J J J J J J J J J J J干扰检测及专业无线电网络中的定位R&S®PR100的紧凑设计和广泛的专业功能使其成为追踪各种无线电干扰的理想选择对诸如故障电子设备造成的无线电干扰的可靠检测R&S®PR100配备了专门的功能来完成此类任务,例如可选择的测量时间以及连续或周期的电平输出。
数字卫星接收机说明书本说明书适用于V1.2版本的OVT/DVB-TSS-2000数字卫星接收机。
一、概述OVT/DVB-TSS-2000数字卫星接收机是一款专业的数字卫星接收机,应用于数字卫星信号的接收和转发,且带有DVB标准ASI接口输出TS流,可广泛应用于各种模拟或数字CATV 前端系统中。
二、功能特点●完全符合DVB和MPEG-2标准●支持专业的视频/音频输出接口,且带有标准ASI串行的TS流输出接口●支持DiSEqc1.2多语言功能●支持多种可编程的卫星和转发器信息●频道记忆●前面板按键和红外线遥控用户界面●操作菜单可锁定保护●多种编辑功能(包括电视或无线电广播,组,频道名称,PID参数,卫星名称和类型) ●提供屏幕频道信息的电子节目指南●多个卫星的频道记忆功能●256色的图形用户界面三、基本原理OVT/DVB-TSS-2000数字卫星接收机基本原理如下面框图所示:其大致工作原理为:卫星接收机将接收的卫星信号接行解调,然后由解码单元进行解码,再经过一些接口电路得到可以播放的模拟视频/音频信号,同时将解调后的信号经过数字逻辑处理单元进行处理打包,再进行专业的数字接口转换电路,得到ASI接口的TS流输出。
四、产品说明1.1前面板1.电源按键打开或关闭接收机。
2.显示(4位7段数码管)4个数码管显示频道信息。
在休眠模式,显示当地时间。
3.遥控传感器检测遥控器发出的红外信号。
4.CH-/CH+按键在不进入菜单模式时,用于改变频道。
1.2后面板1.TS流输出(ASI OUT)DVB标准ASI接口TS流输出2.高频头输入(LNB IN 13/18V 最大500mA)卫星信号输入口,用同轴电缆连接高频头(LNB)。
3.高频头输出(LNB OUT)卫星信号环出口,可连接其它的卫星信号接收设备。
4.音频输出音频插座提供立体声输出。
5.视频输出视频插座提供一个复合的视频输出。
6.没有使用对于本版本接收机,此接口没有使用。
ZigBee传输距离900-MHz 和2.4-GHz 频段短距离无线设备的设计人员需要了解,公式中的参数对传输距离的影响以及这些参数如何影响传输距离,同时还要能将这些参数应用到公式中,用于统计计算出室内和户外环境下的路径损耗及传输距离。
随着家庭、建筑及工业自动化应用中无线技术的应用,短距离无线设备正倍受关注。
通常,这些应用使用专用频段或以标准协议为基础的频段,例如:900-MHz 和 2.4-GHz 的ISM(工业/科学/医学)频段ZigBee。
随着短距离无线设备应用的不断普及,对于终端设备设计人员来说,充分了解无线通信距离比以往变得更为重要。
这篇文章讨论了无线传播,并开发了一些模型,用来估算室内环境下短距离无线设备的路径损耗和距离。
这些模型让系统设计人员可以对无线通信系统的性能进行一个初步的估算。
在探讨距离估算公式之前,设计人员需要了解无线信道及传播环境。
无线通信信道为发送器和目标接收机之间的传输通道。
不同于固定的且可预知的有线信道,无线信道具有随机性和时变性,以及建模的困难性的特点。
因此,设计人员需要对这些随机信道进行统计建模。
无线电波传播模型的重点一般是在给定发送器距离的路径下预测出接收信号的平均强度,以及接近一个方位点上的信号强度的变化。
对任意发送器-接收机间的平均信号强度进行预测的传播模型为大型传播模型,其在估算发送器距离方面极为有用。
相反地,在一些波长内接收信号强度的传播模型为小型模型,或为衰减模型,其具有快速波动的特点。
这篇文章重点讨论大型传播模型,该模型可对无线传输的距离进行估算。
当发送器和接收机之间具有一条畅通无阻的可视路径时,自由空间传播模型可对接收信号的强度进行预测。
自由空间传播模型会做出这样的预测,接收信号强度“衰减”为发送器-接收机间隔距离的函数,强度衰减升至N 次幂——“幂律函数”。
接收机天线所接收到的自由空间功率与发射天线隔开一段距离,Friis 自由空间方程式把此段距离定义为:(1)在这个方程式中,PT为发送器功率;PR(d) 为接收功率,并为发射-接收间隔距离d 的一个函数;GT为发送器天线增益;GR为接收机天线增益;d 为发送器和接收机之间的间隔距离,单位为米;λ 为波长,单位为米。
监测检测浅析无线电便携式P R100接收机的远程控制技术文丨国家无线电监测中心陕西监测站潘琳董亚文赵延安摘耍:P R100接收机足II丨徳丨R&S公司生产的-款便携式无线电接收机,该设济提供/基于 C/C++语言的A P I接U,以供幵发人员对M进行二次幵发。
本义洋细叙述r P R100接收机:次幵发 的通信协议、指令格忒和数拋流特征,同时测试了 P R100接收机多个重要参数之M的>5系,为实现 PR100设备的远杩挖制提供j T技术指导和数据支搾。
关键词:P R100接收机二次幵发TCP/I P协议UDP/I P协议数据流0引言P R100接收机设计紧凑,重量轻,支持电池运行。
该设备配备H E400手持定向天线,将移动性和操作的便利性结合在一起,形成一个紧凑的接收系统,便于无线电技术人员外出携带n_21。
同时,R&S公司提供了该接收机的A P I接口,工程人员可通过T C P/I P协议和U D P/I P 协议对P R100设备进行远程控制|31。
P R100接收机根据 T C P/I P协议读取控制命令帧,解析设备参数,自动调整 界面显示内容。
同时,利用U D P/I P协议向工控机输出全 景频谱数据流、中频数据流或指定频点频谱数据流等数据,开发人员可利用这些数据流开展信号检测、识别和定位等 工作。
本文详述P R100设备的二次开发过程,为技术人 员开发P R100接收机提供技术方案。
图1P R10U接收机发送的数据帧格式图数据点数、输出带宽与频率分辨率有关。
故幵发人员将 P R100设备可设置的所有分辨率一一进行测试,记录每 一个分辨率值以及对应的帧数据点数和输出带宽(见表 1)。
表1测试数据表明,随着分辨率值变小,数据点数 会增加。
P R100接收机二次开发时,技术人员可参考表1综合考虑时效性和精确性,选择合适的分辨率值。
1 P S C A N模式工控机通过T C P/I P协议向P R100接收机发送全景 频谱数据流(P S C A N)的控制命令,具体指令参见文献 [3]。
This quick start guide will introduce you to the basics of the JBL Legend CP100 smartphone receiver. Please refer to your owner’s manual for amore in-depth look at installation and functions.8. Using Bluetooth for hands-free callingQuick Start GuideJBL Legend CP100To pair your phone and receiver using Bluetooth, tap the “Phone” button and press “Yes”. Then pull up the pairing screen on your phone and select the CP100. You can now receive calls, and make calls by using the onscreen dialer or selecting a contact.Bluetooth is not available whenusing Apple CarPlay or Android Auto.Quick Start GuideJBL Legend CP1009. Playing music via USBTo play digital music stored on a USB thumb drive, plug the drive into the USB port, and tap the “Media” button. You can thenbrowse your music by artist, album, genre, and playlist.Quick Start GuideJBL Legend CP10010. AM/FM radioFrom the home screen, tap FM or AM. You can then find stations by direct tune, auto scan, or manual search. Press the double arrow key once to tune manually; hold the double arrow key to engage seek tuning. You can save up to 10 presets. To set one, press and hold 1. Installation Wiring connection guideQuick Start GuideTo install the Legend CP100, you’ll need to buy or fabricate a vehicle-specific mounting bracket.Function Wire color Function Wire colorACC power Red Front left speaker +White Constant power Yellow Front left speaker –White/black Ground Black Front right speaker + Gray12v outY ellow/black Front right speaker –Gray/black Rear left speaker +Dark green Parking brake Light green Rear left speaker –Green/black Reverse signal Violet/white Rear right speaker +VioletOptional rear camera Yellow RCA Rear right speaker –Violet/blackQuick Start GuideBluetooth ® microphone control adapter inputinput(iPhone, Android, andextension cables sold separately)Front and rear preamp outputs for optional external amplifier(s)2. Rear panel connectionsQuick Start GuideJBL Legend CP100The home screen is your base of operations. From it, you can tap the screen to select:Phone to make and receive hands-free phone calls Media to play MP3 files from USB, or engage Apple CarPlay or Android Auto from your compatible phone FM to listen to FM radio broadcastsAMto listen to AM radio broadcasts Settings to adjust system settings5. Home screenQuick Start GuideQuick Start GuideJBL Legend CP100JBL Legend CP100After installation, or if you’ve discon-nected and recon-nected your car’s battery, you’ll first need to program the date and time by tapping the arrows on the screen.Tap “Settings” on the home screen to change languages,activate day/night mode, change the date/time, adjust audio settings, and connect to your Bluetooth devices.4. Setting upQuick Start GuideJBL Legend CP1006. Using Apple CarPlay To engage Apple CarPlay, you simply need to plug your compatible iPhone 5 or iPhone 6 into the USB input and tap the Apple CarPlay button that appears on the home screen. From there, you can use the touchscreen or your voice to control select Apple apps.Tap the JBL icon to return to the home screen.To engage Android Auto, you just plug your compatibleAndroid Phone into the USB input and tap the Android Auto button that appears on the home screen. You can then use the touchscreen or your voice to control select apps. This feature might require you to download Android Auto from the Google Play™ store.7. Using Android Auto Display Size: 6.75"LCD type: TFT active matrixPixels : 1,152,000 [800 x 480 x 3 (RGB)]Illumination: LEDPowerGeneral Power Requirement: 14.4V DC (11–16V allowable)Operating Temperature: -20°C to 85°C (-4°F to 185°F)Power Output: 20W RMS x4 (Primary amplifier ratings per CEA-2006 standardPower output measured at 4 Ohms and < 1 % THD+N)S/N ratio: 107 dBa (reference: 1W into 4 ohms)AM TunerTuning: 530 – 1,170 kHz Sensitivity: 25 uV/20 dB USBUSB Standard: USB 1.1/2.0Max Current Supply: 1.0 A USB Class: MSC (Mass Storage Class)File System: FAT 16/32, NTFS File Playback: MP3BluetoothVersion: Bluetooth 4.0Output Power: +4 dBm Max. (Power class 2)Rear View Camera: Composite video Quick Start Guide JBL Legend CP100SpecificationsQuick Start GuideJBL Legend CP1001. Power button turns the receiver on and off2. Volume button paises and lowers the volume level3. P ush-to-talk button lets you engage Android Auto™ and Apple CarPlay ® voice control functions3. Front-panel buttons123This quick start guide will introduce you to the basics of the JBL Legend CP100 smartphone receiver. Please refer to your owner’s manual for amore in-depth look at installation and functions.8. Using Bluetooth for hands-free callingQuick Start GuideJBL Legend CP100To pair your phoneand receiver using Bluetooth, tap the “Phone” button and press “Yes”. Then pull up the pairing screen on your phone and select the CP100. You can now receive calls, and make calls by using the onscreen dialer or selecting a contact.Bluetooth is not available whenusing Apple CarPlay or Android Auto.Quick Start GuideJBL Legend CP1009. Playing music via USBTo play digital music stored on a USB thumb drive, plug the drive into the USB port, and tap the “Media” button. You can thenbrowse your music by artist, album, genre, and playlist.Quick Start GuideJBL Legend CP10010. AM/FM radioFrom the home screen, tap FM or AM. You can then find stations by direct tune, auto scan, or manual search. Press the double arrow key once to tune manually; hold the double arrow key to engage seek tuning. You can save up to 10 presets. To set one, press and hold 1. Installation Wiring connection guideGuide de demarrage rapideGuide de demarrage rapideGuide de demarrage rapideGuide de demarrage rapideGuide de demarrage rapideGuide de demarrage rapideGuide de demarrage rapideGuide de demarrage rapideTo install the Legend CP100, you’ll need to buy or fabricate a vehicle-specific mounting bracket.Function Wire color Function Wire colorACC power Red Front left speaker +White Constant power Yellow Front left speaker –White/black Ground Black Front right speaker + Gray12v outY ellow/black Front right speaker –Gray/black Rear left speaker +Dark green Parking brake Light green Rear left speaker –Green/black Reverse signal Violet/white Rear right speaker +VioletOptional rear camera Yellow RCA Rear right speaker –Violet/blackBluetooth ® microphone control adapter inputinput(iPhone, Android, andextension cables sold separately)Front and rear preamp outputs for optional external amplifier(s)2. Rear panel connectionsJBL Legend CP100The home screen is your base of operations. From it, you can tap the screen to select:Phone to make and receive hands-free phone calls Media to play MP3 files from USB, or engage Apple CarPlay or Android Auto from your compatible phoneFM to listen to FM radio broadcasts AM to listen to AM radio broadcasts Settings to adjust system settings5. Home screenJBL Legend CP100After installation, or if you’ve discon-nected and recon-nected your car’s battery, you’ll first need to program the date and time by tapping the arrows on the screen.Tap “Settings” on the home screen to changelanguages, activate day/night mode, change the date/time, adjust audio settings, and connect to your Bluetooth devices.4. Setting upJBL Legend CP1006. Using Apple CarPlay To engage Apple CarPlay, you simply need to plug your compatible iPhone 5 or iPhone 6 into the USB input and tap the Apple CarPlay button that appears on the home screen. From there, you can use the touchscreen or your voice to control select Apple apps.Tap the JBL icon to return to the home screen.JBL Legend CP100To engage Android Auto, you just plug your compatibleAndroid Phone into the USB input and tap the Android Auto button that appears on the home screen. You can then use the touchscreen or your voice to control select apps. This feature might require you to download Android Auto from the Google Play™ store.7. Using Android Auto Display Size: 6.75"LCD type: TFT active matrixPixels : 1,152,000 [800 x 480 x 3 (RGB)]Illumination: LEDPowerGeneral Power Requirement: 14.4V DC (11–16V allowable)Operating Temperature: -20°C to 85°C (-4°F to 185°F)Power Output: 20W RMS x4 (Primary amplifier ratings per CEA-2006 standardPower output measured at 4 Ohms and < 1 % THD+N)S/N ratio: 107 dBa (reference: 1W into 4 ohms)AM TunerTuning: 530 – 1,170 kHz Sensitivity: 25 uV/20 dB USBUSB Standard: USB 1.1/2.0Max Current Supply: 1.0 A USB Class: MSC (Mass Storage Class)File System: FAT 16/32, NTFS File Playback: MP3BluetoothVersion: Bluetooth 4.0Output Power: +4 dBm Max. (Power class 2)Rear View Camera: Composite video Quick Start Guide JBL Legend CP100SpecificationsJBL Legend CP1001. Power button turns the receiver on and off2. Volume button paises and lowers the volume level3. P ush-to-talk button lets you engage Android Auto™ and Apple CarPlay ® voice control functions3. Front-panel buttons123。
各种卫星电视接收机的操作指南1.通过自动搜索功能自动搜索节目以航天珠江WTD-198型卫星接收机为例,其具体操作步骤如下:(1)按遥控器“菜单”键进入“菜单”目录。
(2)在“菜单”目录中选择“系统设置”,按“确认”键。
(3)在“系统设置”目录中选择“恢复出厂设置”,按遥控器“右(?)”键移动到“是”的位置。
(4)出现密码菜单后,按遥控器“上()、下(?)、左(?)、右(?)”(或数字)键,输入“8888”。
(5)按“菜单”键返回主菜单。
(6)在“主菜单”中选择“节目设置”并进入,选择“自动搜索”,再按“确认”键,开始“自动搜台”。
(7)搜台完毕后,按遥控器的“菜单”键退出。
2.通过RS—232串行接口遥控操作3.通过卫星接收机面板(或遥控器)的按键手动操作以科海、亚视达、同州、九州、如意、航天、东仕和长虹公司生产的卫星接收机为例说明此类机型的具体操作步骤。
“科海”卫星接收机具体操作步骤如下:(1)正确调整好卫星天线的方位角、仰角、极化角,并连接好所有设备。
(2)打开卫星接收机电源,按“菜单”键选择“修改本振频率”,再按“确认”键,输入新的本振频率(对于C波段节目为5150MHz; 对于Ku波段节目为11300MHz),按“确认”键确认。
(3)在“菜单”中选择“扩展菜单?节目编辑?增加节目”项。
(4)正确输入节目的“下行频率”、“符号率”和“FEC”参数(其它参数不考虑)。
(5)在“极化方式”选项中,如该节目是“水平极化”就选择“水平极化”,是“垂直极化”就选择“垂直极化”(“H”代表水平极化、“V”代表垂直极化)。
(6)此时,“信号强度”和“信号质量”有百分比显示,并显示“有卫星信号”,或者在接收机面板上,“信号锁定指示灯”为绿色,表示锁定。
(7)按“确认”键,进行节目搜索,系统提示“节目搜索中,请稍候”。
(8)当系统搜到节目并自动存储后,按“菜单”键退出,节目存储完毕。
(9)预搜索新的节目,则按步骤(3)—(8)重复操作即可,需要改变的只是“下行频率”、“符号率”的参数和“极化方式”的选项,直至所有节目搜索完毕。