hem7071血压计说明书
- 格式:pdf
- 大小:4.23 MB
- 文档页数:22
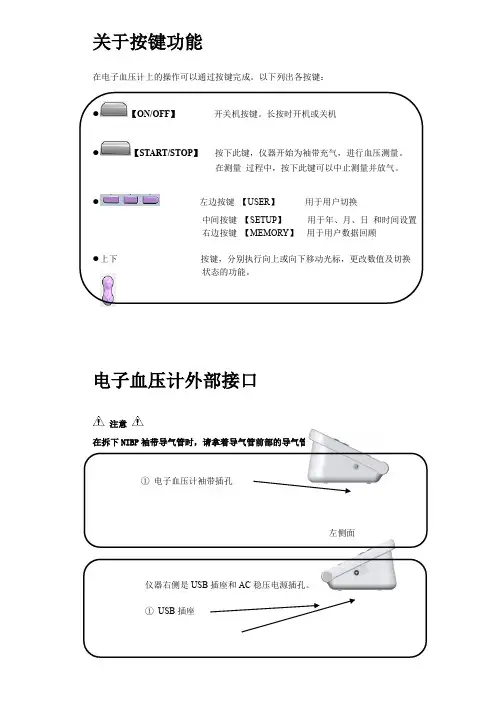
关于按键功能在电子血压计上的操作可以通过按键完成。
以下列出各按键:●【ON/OFF】开关机按键。
长按时开机或关机●【START/STOP】按下此键,仪器开始为袖带充气,进行血压测量。
在测量过程中,按下此键可以中止测量并放气。
●左边按键【USER】用于用户切换中间按键【SETUP】用于年、月、日和时间设置右边按键【MEMORY】用于用户数据回顾●上下按键,分别执行向上或向下移动光标,更改数值及切换状态的功能。
电子血压计外部接口注意在拆下NIBP袖带导气管时,请拿着导气管前部的导气管插头拔出。
①电子血压计袖带插孔左侧面仪器右侧是USB插座和AC稳压电源插孔。
①USB插座②AC稳压电源插孔右侧面装入干电池/AC 稳压电源的使用方法 本产品既可以使用干电池又可以使用AC 稳压电源①② 装入干电池 ③① 将电池盒盖沿箭头方向卸下② 将5号干电池按极装入③ 将电池盒盖滑动关上图标 “”:表示电池电量即将耗尽。
请同时更换4节新电池(相同种类)。
更换电池时请关闭本体电源。
使用后的电池的废弃方法请参照城市有关环境保护规定进行处理AC 稳压电源的使用方法① 连接血压计与AC 稳压电源请将AC 稳压电源的插头插入血压计本体右侧面的AC 稳压电源插孔② 请将AC 稳压电源的电源插头插入AC220V 插座注意 切断电源时,先切断电源插座与稳压电源,再切断稳压电源与血压计请务必使用专用AC 稳压电源(型号: )注意当稳压电源与干电池同时使用时,不消耗干电池电量● 稳压电源与干电池切换时请在关机状态下进行,否则会使仪器因断电关机设定日期和时间接通电源按开机键开机后,需设置日期和时间本血压计可自动存储测量结果及日期和时间干电池能量耗尽,或卸下电池等时,计时停止。
此时,请重新设定日期和时间本血压计可自动记忆3位用户,每位用户99组测量值,并能将测量的结果通过USB传到PC机软件,进行数据回放处理等。
对日期和时间进行正确的设定,则会存储正确的测量日期和时间。
血压计操作规程一、引言血压计是一种常用的医疗设备,用于测量人体的血压值,对于诊断和监测高血压等心血管疾病具有重要意义。
为了确保测量的准确性和可靠性,制定本操作规程,以指导使用者正确操作血压计。
二、适用范围本操作规程适用于医院、诊所、家庭等各类场所使用的血压计。
三、术语定义1. 收缩压:心脏收缩时血液对动脉壁的压力。
2. 舒张压:心脏舒张时血液对动脉壁的压力。
3. 脉压差:收缩压与舒张压之间的差值。
4. 平均动脉压:每个心脏收缩周期内,血液对动脉壁的平均压力。
四、操作步骤1. 准备工作a. 确保血压计处于正常工作状态,检查电源、显示屏、气袋等是否正常。
b. 选择适当大小的气袋,根据被测者的臂围选择合适的气袋尺寸。
c. 被测者应保持安静,避免剧烈运动、吸烟、喝咖啡等刺激性活动。
d. 被测者应坐于椅子上,双脚平放在地上,背部挺直,手臂放松自然垂直于身体。
2. 开始测量a. 将气袋正确安装在被测者的上臂上,气袋的下缘应与肘关节的上缘对齐。
b. 确保气袋与被测者的皮肤紧密贴合,没有松动或皱褶。
c. 按下血压计的开关按钮,启动测量程序。
d. 血压计会自动充气,被测者可能感到一些压迫感,但不应感到疼痛。
e. 当血压计检测到脉搏时,会开始逐渐放气,同时显示出血压数值。
f. 当血压计完成测量后,显示屏上会显示出收缩压、舒张压和脉搏数值。
3. 结束测量a. 关闭血压计的电源开关,将气袋从被测者的上臂上取下。
b. 清洁血压计的气袋和其他接触被测者的部分,使用酒精棉擦拭,确保卫生。
c. 将血压计放置在干燥通风的地方,避免阳光直射和潮湿环境。
五、注意事项1. 在测量前应静坐5-10分钟,以确保身体放松。
2. 测量时应保持安静,避免说话或移动手臂。
3. 使用时应按照说明书的要求正确操作,避免误操作导致不准确的测量结果。
4. 定期校准血压计,确保测量结果的准确性。
5. 长期不使用时,应将血压计存放在干燥通风的地方,避免受潮或受热。
侧面/底面扬声器5. 缠绕袖带· 请正确缠绕袖带。
· 以下步骤适用于将袖带缠绕在左臂上测量血压。
在右臂上进行测量时,请遵循本小节末尾“右臂测量血压时”中提到的右臂袖带使用说明。
· 右臂和左臂的血压可能不同,并且测得的血压读数亦可能不同。
欧姆龙建议始终使用同一手臂进行测量。
如果两个手臂之间的读数相差较大,请咨询您的医生,以确定使用哪只手臂进行测量。
· 请勿在袖带缠绕上手臂之前开始加压。
· 请将袖带紧贴皮肤或薄内衣等进行测量。
· 穿着厚衣服时,勿卷起衣袖,请脱去厚衣服后再进行测量。
错误测量姿势袖带缠绕太松向前倾的姿势卷起袖子测量过程中移动身体或说话穿着较厚的衣服测量过程中移动身体或触碰袖带注意:· 袖带正确缠绕在手臂时,“ ”图标亮起。
· 袖带缠绕过松时,“ ”图标亮起。
语音提示「袖带缠绕过松,建议您重新绑定袖带后再次测量」。
请按下开始/停止按钮关闭血压计,正确缠绕袖带后重新测量。
· 测量过程中移动身体时,“ ”图标亮起。
语音提示「本次测量中有移动身体或说话现象,建议您重新测量」。
可能导致不能正确测量。
请重新测量一次。
· 如果“ ”图标和“ ”图标同时亮起,语音提示「本次测量中有移动身体或说话及袖带缠绕过松的现象同时出现,建议您重新测量」。
请正确缠绕袖带后保持安静,重新测量一次。
· 测量过程中脉波的间隔不规则时,在测量结果中将会显示“ ”图标,并在下方显示不规则脉波出现的次数。
语音提示「本次测量中有2次不规则脉波现象,建议您定期观察」或「本次测量中有3次不规则脉波现象,如反复出现多次,建议您前往医院检查」。
显示该图标时,可能会导致无法正确测量。
请保持安静,重新测量一次。
如果经常显示不规则脉波图标,请咨询医生。
· 如果“ ”图标和“ ”图标同时亮起,语音提示「本次测量中有2次不规则脉波和袖带缠绕过松的现象同时出现,建议您重新测量」或「本次测量中有3次不规则脉波和袖带缠绕过松的现象同时出现,建议您重新测量」。
血压计操作规程一、引言血压计是一种用于测量人体血压的医疗设备,广泛应用于临床医学、家庭健康监测等领域。
为了确保测量结果的准确性和可靠性,以及保障使用者的安全,制定本操作规程,规范血压计的正确使用方法。
二、适合范围本操作规程适合于所有使用血压计进行血压测量的医务人员和个人用户。
三、术语和定义1. 血压计:指用于测量人体血压的设备,包括传统的手动血压计和电子血压计等。
2. 收缩压:指心脏收缩时血液对血管壁的压力。
3. 舒张压:指心脏舒张时血液对血管壁的压力。
4. 脉搏:指心脏搏动时血液通过动脉产生的脉动。
四、操作步骤1. 准备工作a. 确保血压计处于正常工作状态,检查电池电量或者气压是否充足。
b. 选择合适的测量环境,确保肃静、舒适,避免干扰因素。
c. 让被测者坐在舒适的椅子上,保持放松状态,双脚平放在地上,胳膊伸直并放在桌面上。
2. 安装血压计a. 将血压计袖带绑在被测者的上臂上,袖带应紧贴皮肤但无非紧。
b. 确保袖带位置与心脏水平,袖带中心点应位于肘关节内侧动脉搏动处。
3. 开始测量a. 按下血压计的开关按钮,开始自动充气。
b. 血压计充气时,袖带会逐渐紧缩,直至彻底封闭动脉血流。
c. 血压计开始自动放气,同时开始测量被测者的血压。
d. 在测量过程中,被测者应保持肃静,不要说话或者挪移。
4. 记录测量结果a. 当血压计完成测量后,屏幕上会显示收缩压、舒张压和脉搏等数据。
b. 将测量结果记录在相关的测量表格或者健康档案中,包括测量时间、日期和测量位置等信息。
五、注意事项1. 在测量前,被测者应避免饮食、饮酒、吸烟、剧烈运动等会影响血压的因素。
2. 袖带应正确安装,过紧或者过松都会影响测量结果的准确性。
3. 在测量过程中,被测者应放松身体,不要说话或者挪移,以免干扰测量结果。
4. 每次测量前应清洁和消毒血压计的袖带,避免交叉感染的发生。
5. 定期校准血压计,确保测量结果的准确性和可靠性。
6. 如有异常情况或者不适,应及时就医或者咨询专业人士。
OPERATING THE DEVICEpressure. Self-diagnosis and treatment using measured results may be dangerous. Follow the instructions of your physician or licensed healthcare provider.clean water. Contact a physician immediately.literature in the box before operating the unit.pulse rate in the adult population. Do not use this device on infants or persons who cannot express their intentions.To ensure a reliable reading follow these recommendations:1. Avoid eating, drinking alcohol, smoking, exercising, and bathing for 30 minutes before taking a measurement. Rest for at least 15 minutes before taking the measurement.2. Stress raises blood pressure. Avoid taking measurements during stressful times.3. Measurements should be taken in a quiet place.4. Remove tight-fitting clothing from your arm.5. Sit on a chair with your feet flat on the floor. Rest your arm ona table so that the cuff is at the same level as your heart.6. Remain still and do not talk during the measurement.7. Keep a record of your blood pressure and pulse readings for your physician. A single measurement does not provide an accurate indication of your true blood pressure. You need to take and record several readings over a period of time. Try to measure your blood pressure at about the same time each day for consistency.8. Wait 2-3 minutes between measurements. The wait time allows the arteries to return to the condition prior to taking the blood pressure measurement. You may need to increase the wait time depending on your individual physiological characteristics.Main Unit:Components:Air TubeArm CuffStorage CaseMemory SymbolIRREGULAR HEARTBEAT SYMBOL ()When the monitor detects an irregular rhythm two or more times during the measurement, the Irregular Heartbeat Symbol ()will appear on the display with the measurement values.An irregular heartbeat rhythm is definedas a rhythm that is more than 25% sloweror 25% faster than the average rhythmdetected while the monitor is measuringthe systolic blood pressure and thediastolic blood pressure.If the irregular heartbeat symbol ()displays with your measurement results,we recommend you consult your physician. Follow the directions of your doctor.MOVEMENT ERROR SYMBOL ()The Movement Error Symbol () is displayed if you move your body during the measurement. Please remove the arm cuff, wait 2-3 minutes,reapply the arm cuff, then take another measurement.A VERAGE V ALUE SYMBOL ()The Average Value Symbol () is displayed when you press the MEMORY button. The most recent average reading appears on thedisplay screen.Set the monitor to the current date and time before taking a measurement for the first time. If the date and time are not set correctly, the measurement values stored in the memory and the average values may not be correct.The Blood Pressure Monitor automatically stores up to 60 individual measurement values with the dates and times.The monitor can also calculate an average reading based on the three most recent measurements taken within 10 minutes of the last reading. NOTES:• If only two readings are stored in the memory for the 10-1.TO START THE SETTINGPress and hold the Date/Timeand time.The year flashes on the display.3.SETTING THE MONTHThe day flashes on the display.The hour flashes on the display.5.SETTING THE HOURThe time is set using AM or PM.Press the Date/Time Setting button to setthe current hour.The minute flashes on the display.6.SETTING THE MINUTEPress the MEMORY button to advance by increments of one minute. Press the Date/Time Setting button to set the minute setting.7.TO TURN THE MONITOR OFFPress the START/STOP button.NOTE:The monitor will automatically turn off after the minute hasbeen set after battery replacement.Your HEM-711AC IntelliSense®Automatic Blood Pressure Monitor, excluding the arm cuff, is warranted to be free from defects in materials and workmanship appearing within 5 years from the date of purchase, when used in accordance with the instructions provided with the monitor. The arm cuff is warranted to be free from defects in materials and workmanship appearing within one year from the date of purchase when the monitor is used in accordance with the instructions provided with the monitor. The above warranties extend only to theoriginal retail purchaser.We will, at our option, repair or replace without charge any monitor or arm cuff covered by the above warranties. Repair or replacement is our only responsibility and your only remedy under the above warranties.To obtain warranty service contact Omron Healthcare for the addressof the repair location. Shipping instructions and repair information is available by calling 1-800-634-4350or visit our website at . Enclose the Proof of Purchase. Include $5.00 for the return shipping and handling.Include a letter, with your name, address, phone number, and description of the specific problem. Pack the product carefully to prevent damage in transit. Because of possible loss in transit, we recommend insuring the product with return receipt requested.ALL IMPLIED W ARRANTIES,INCLUDING BUT NOT LIMITED TO THE IMPLIED W ARRANTIES OF MERCHANTABILITY AND FITNESS FOR P ARTICULAR PURPOSE,ARE LIMITED TO THE DURATION OF THE APPLICABLE WRITTEN W ARRANTY ABOVE.Some states do not allow limitations on how long an implied warranty lasts, so the above limitation may not apply to you.OMRON SHALL NOT BE LIABLE FOR LOSS OF USE OR ANY OTHER INCIDENTAL,CONSEQUENTIAL OR INDIRECT COSTS,EXPENSES OR DAMAGES.Some states do not allow the exclusion or limitation of incidental or consequential damages, so the above exclusions may not apply to you.This warranty gives you specific legal rights, and you may also have other rights which may vary from state to state.FOR CUSTOMER SERVICEVisit our web site at: Call toll free:1-800-634-4350Model:HEM-711ACDisplay:LCD Digital DisplayMeasurement Range:Pressure: 0 to 299 mmHg, Pulse: 40 to 180/min. Accuracy/Calibration:Pressure: ±3mmHg or 2% of readingPulse:±5% of readingInflation:Automatic by electric pumpDeflation: Automatic pressure release valveRapid Air Release:Automatic exhaust valvePressure Detection:Capacitive pressure sensorMeasurement Method:Oscillometric methodPulse Wave Detection:Capacitance type pressure sensorPower Source:120V 60Hz AC adapter or 4 “AA” batteriesBattery Life:Approx. 1500 uses when used 2 times a daywith 4 new alkaline batteriesOperating Temperature50ºF to 104ºF (10ºC to 40ºC) /30 to 85% RH/Humidity:Storage Temperature-4ºF to 140ºF (-20ºC to 60ºC) /10 to 95% RH/Humidity/Air Pressure:/700 - 1060 hPaMain Unit Weight:Approximately 12 1/2 oz. (355 g)not including batteriesMain Unit Dimensions:Approx. 6 3/32" (l) × 5 5/32" (w) ×3 5/16" (h)(155 mm ×131 mm ×84 mm)Cuff Size:Approx. 5 3/4" (w) ×17 1/2" (l) (146 mm ×446 mm)Cuff tube 23 5/8" (l) (600 mm)Cuff Circumference:Fits arm circumferences 9" to 13" (220 mm to 320 mm) Memory:Up to 60 readingsContents:Main Unit, Arm Cuff, AC Adapter, Instruction Manual,Storage Case and Warranty CardUPC Code:************NOTE:These specifications are subject to change without notice.Manufactured by OMRON HEALTHCARE Made in ChinaDistributed by:OMRON HEALTHCARE,INC.1200 Lakeside DriveBannockburn, Illinois 60015。
本文部分内容来自网络整理,本司不为其真实性负责,如有异议或侵权请及时联系,本司将立即删除!== 本文为word格式,下载后可方便编辑和修改! ==欧姆龙hem906,操作说明篇一:电子血压计校准方法欧姆龙福禄克校验方法检测类型:全自动电子血压计:9020/9021血压计,曲线设定值-10%,203血压计,曲线设定值-4%。
半自动电子血压计:907/1300/7071血压计,曲线设定值-4%。
1.检测器材:9020/9021血压计、907/1300/7071血压计、袖套、电源线、福禄克检测仪、三通管(三根直流管、一个三通)、检测模块(5个拼装模块)。
2.检测目的:检测血压计的稳定性和准确度。
3.9020/9021/203血压计检测方法:动态测量法:1.将检测模块(一般为四个组合模块)放入袖筒里面;2.用三通管将9020/9021/203血压计(接口处于本体背面盖,扭开螺丝, 9020/9021连接300气孔)与福禄克检测仪连接;3.接通福禄克和血压计电源,福禄克按到NIBP检测模式,调整到常规检测血压值(180/120、120/80、90/60毫米汞柱,对应心率大概为80/分、70/分、60/分)进行测定,曲线设定值为-10%(203血压计曲线设定值为0%),然后血压计按开始键开始检测。
静态测量法:1. 将检测模块放入袖筒里面;2. 用三通管将9020/9021/203血压计(接口处于本体背面盖,扭开螺丝,9020/9021连接300气孔)与福禄克检测仪连接;3. 9020/9021本体背面的模式开关设定在“2”的刻度位置(正常设定“4”的刻度);4.按住模式开关的同时打开电源开关ON(203血压计同时按住模式和停止键),此时HBP-9020/9021显示屏显示的代码为tES_1,203血压计显示屏显示的代码为t_0,此为检测模式;5.在检测模式下,HBP-9020选择[tES_13]、HBP-9021选择[tES_14],按上、下按钮加减数值(203血压计不用调整数值),再按下开始/停止按钮,自动卷紧模拟手臂,等待几秒后,舒张压和收缩压均为0,然后开始测量。
血压计操作规程一、引言血压计是一种用于测量人体血压的仪器,广泛应用于医疗机构、家庭和健康管理等领域。
为了确保血压计的正确操作和准确测量结果,制定本操作规程。
二、适用范围本操作规程适用于所有使用血压计进行血压测量的人员,包括医疗机构的医护人员、家庭用户以及健康管理机构的工作人员。
三、术语定义1. 收缩压:心脏收缩时血液对血管壁施加的压力。
2. 舒张压:心脏舒张时血液对血管壁施加的压力。
3. 脉压差:收缩压与舒张压之间的差值。
4. 平均动脉压:心脏收缩和舒张期之间的平均压力。
四、操作步骤1. 准备工作a. 检查血压计的完整性和准确性,确保其正常工作。
b. 选择合适的血压计袖带尺寸,一般应该覆盖被测者上臂的2/3。
c. 确保被测者处于安静、放松的状态,不要进行剧烈运动、吸烟或饮咖啡等刺激性活动。
d. 记录被测者的基本信息,如姓名、年龄、性别等。
2. 安装袖带a. 将袖带固定在被测者的上臂上,袖带应与被测者心脏水平。
b. 袖带应紧密贴合被测者的皮肤,但不要过紧,以免影响血流。
3. 开始测量a. 打开血压计,并确保其处于正常工作状态。
b. 被测者应坐于椅子上,保持直立姿势,双脚平放在地面上。
c. 被测者的上臂应放置在桌面上,与心脏处于同一水平线上。
d. 被测者的手臂应放松,不要用力支撑或移动。
4. 进行测量a. 按下血压计上的启动按钮,开始自动充气。
b. 血压计会逐渐增加袖带的压力,直到达到最大压力。
c. 在袖带缓慢放气时,血压计会自动测量收缩压、舒张压和脉压差。
d. 测量结果会显示在血压计的屏幕上,同时可以发出声音提示。
5. 记录和分析结果a. 将测量结果记录在测量表格或健康管理系统中。
b. 分析测量结果,判断被测者的血压是否正常。
c. 如果测量结果异常或不确定,可以重新进行测量,或者请专业人员进行进一步评估。
五、注意事项1. 使用血压计前,应仔细阅读和理解血压计的使用说明书。
2. 操作血压计时,应保持安静、放松的环境,避免干扰因素对测量结果的影响。
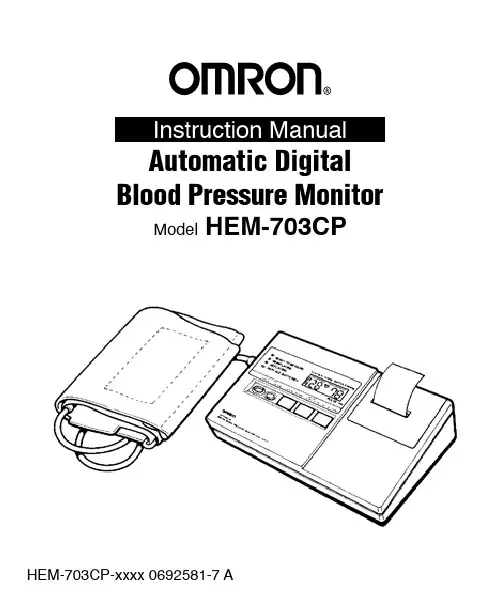
Automatic Digital Blood Pressure Monitor Model HEM-703CPImportantCONTENTSImportant . . . . . . . . . . . . . . . . . . . . . . . . . . 1Name and Function of Each Part . . . . . . . . 2Preparations for Use . . . . . . . . . . . . . . . . . 3Instructions for Use . . . . . . . . . . . . . . . . . . 8When Error Indication Symbols Appear . . 10Specifications . . . . . . . . . . . . . . . . . . . . . . 11Thank you for purchasing our Digital Blood Pressure & Pulse Monitoring Kit . Please care-fully read this instruction manual before use and keep it with your portion of the enclosed warranty card .PLEASE NOTE:1 . Allow 3 to 5 minutes between blood pres-sure readings on same arm . Repeated mea-surement results in inaccurate readings .2 . Keep in mind only a physician can ac-curately determine safe or unsafe limits of blood pressure . This instrument should be used by non-professional persons only to determine measurement of blood pres-sure, not to make any medical judgement . Remember, blood pressure varies during the day .3 . This unit is a precision instrument − avoidrough handling, direct sunlight, high tem-perature/humidity and magnetic field . Fold-ing or bending cuff may result in damage to cuff .4 . Do not inflate cuff above 280 mmHg .5 . Do not take unit apart . You cannotcalibrate unit . If you have any difficulties or problems with unit, contact our Service Center . 1-800-634-4350 .Name and Function of Each PartAir JackSystolic Bood Pressure DisplayDiastolic Blood Pressure and Pulse DisplayPrinting PaperPaper CutterSPHYG/CLOCK ButtonSTART ButtonPRINT / PAPER FEED ButtonSET ButtonTabAir PlugMODE Selector Button Main UnitCuff1 How to insert the batteriesBattery Cover1 . Take off the battery cover at the back ofthe main unit by sliding it in the direction indicated by the arrow symbol .Replacement• the “Replace Batteries” symbol ( ) flashes during measurement, replace the batteries with the new ones .• When the batteries have run down, random numbers may be displayed .Points to be careful about whan using the batteries• When replacing the batteries please replace all four batteries at once .• Use the same kind of batteries .• Take out weak batteries quickly so as to avoid causing damage to the machine .• Remove the batteries when the unit is not used for extended periods .2 . Install 4 “AA” size batteries attached sothat the + and - polarities on the batteries correctly match the polarities in the battery compartment .3 . Replace the cover .2 How to Set Time and Date3 Plug in and Turn on1 . When batteries are installed, the display shows PM 12:00 .1 . Insert the air plug into the air jack on the left side of the main unit correctly .2 . When the SPHYG/CLOCK button is changed to the sphygmomanometer mode, all the LCD symbols are momentarily displayed . This happens because the unit is running a check on the display and this state lasts for approximately one second .3 . Once the LCD symbols vanish, the air release indication symbol ( ↓ ) starts flashing . Please wait until the ( ↓ ) symbol goes out .4 . When the preparations necessary before measurement have been completed, the unit emits a series of beeps and finally the “Ready to Measure” symbol ( ♥ ) will be displayed .2 . When the MODE button is pressed down, the “month” sign displayed . When the SET button is pressed down, the “month” .3 . When the MODE button is pressed the “day” sign is displayed . Adjust the “day” in the same way as the “month” .4 . In the same manner select the “hour” and “min .” with the MODE and set each value with the SET button . AM and the “hour” adjsutment .5 . Press the MODE button for the last time min .) display .Initial Display“Ready to Measure”DisplayAir releaseindication symbol4 How to Set the Printing PaperPlease be sure not to print without inserting printing paper as it will shorten the life span of the printer head .1 . Slide the plastic printer cover in the direction indicated by the arrow symbol and remove it from the main unit .4 . Insert the printing paper in the installation section, and then attach the cover back to the main unit in such a way that the edge of the paper protrudes from the cover .5 . When the PRINT/PAPER FEED button is pressed while the results of the measurement are shown on the digital display, these results, together with the date and time of measurement are printed out .6 . When purchasing printing paper, ask at the shop where you purchased the main unit for further supply . Other brands of paper may be used providing the dimensions are smaller than 38mm wide and 20mm in di-ameter . However the printing quality may differ a little .2 . Peel off the glued edge of the prontlng paper included with the unit, and cut it off to about 2 inches with a pair of scissors, and then shape and cut the edge for easy insertion to the printer as shown in the figure .3 . Press the PRINT/PAPER FEED button while inserting the edge of the printing paper to the paper feeding slit . When the edge of the paper protrudes sufficiently, release the button and stop feeding .Inserting DirectionReverseFront5 Changing the Printer InkThough not originally equipped with an ink roller, the HEM-703CP digital blood pressure monitor contains enough printer ink to last about two years when used once a day at normal room temperature .When the ink on the print out becomes light and hard to read, purchase a replacement ink roller from your retailer and install as fol-lows .1 . Remove the printer cover .3 . Insert the supplement ink roller into the allotted space next to the printer .4 . Replace the printer cover .NOTE: The supplement ink roller should last about two years, however, if youneed to replace the supplement inkroller, simply grasp the top of the inkroller and turn itslightlycounterc1ock-wise before lifting the roller from theprinter .Supplement ink roller2 . Removethe ink, which came with the unit when you bought it, from the allotted space .about 1 inchArteryno space6 Attach the CuffThis cuff has eliminated the need for a microphone thereby lessening possible interference from vibrations and noise . Fitting also has been made much easier through the widening of the artery oscillation detection area .1 . Place the cuff on the left arm so that the air tube lies across the center of the arm .3 . Place your arm on a table or a support with the palm facing upward so that the cuff is placed at the same level as the heart .2 . Wrap the cuff pulling in a diagonal angle securely so that the cuff tab is positioned about one inch above the elbow joint of the inner your left upper arm . (Over the brachi-al artery) .There should be no space between the cuff and your arm .NOTE: If you have any difficulties wrap-pingcuff by yourself, we recom-mend that you ask someone to wrap the cuff for you .7 Apply Pressure to the Cuff1 . When you press the start button, the pump operates and pressure is applied . When the pressure reaches 170mmHg, the pump stops automatically .2 . When the appropriate pressure has been reached, the air is automatically released and the value on the display window starts to decrease . After a while when the artery oscillations are detected, the ( ♥ ) symbol starts flashing and the unit emits a beep-ing sound simultaneously . The value shown on the display will continue to fall .* During measurement, do not shake the cuff or the air tube .Depress the START button continuously untill the cuff is inflated up to the targeted pressure .After the cuff has been inflated, release the START button .Notes:* If your systolic blood pressure is higher than 140mmHg, the pump starts again and the cuff will be inflated up to 210mmHg .* If your systolic blood pressure is higher than 180mmHg, sufficient inflation will not be applied to the cuff by automatic reinflation . In this case, inflate up to 30mmHg higher than your expected systolic blood pressure by pressing the start button continuously . While press-ing the start button, the cuff can be in-flated continuously, and when the start button is released, the pump stops and the cuff is no longer inflated . When the pressure reaches 300mmHg, the cuff deflates rapidly .* When you want to stop measurememt, press SPHYG/CLOCK button . The pres-sure will stop and the air is deflated rapidly .Pressure being appliedTargetted Blood Pressure ReachedIndicated Value DropsMeasuringMeasurement CompletedAlternate DisplayBlood Pressure Reading Display (for approx . 3 seconds)Pulse Reading Display(for approx . 1 .5 seconds)*P: Stands for PULSE .8 Blood Pressure and Pulse are displayedWhen the deflation symbol begins to flash, the residual pressure in the cuff is then rapidly released .1 . When the unit has continued to deflate to a point when the artery oscillations are no longer detected, the unit will display the systolic and diastolic blood pressure values, along with a long beep, and causes the deflation indication symbol ( ) to start flashing . After this, blood pressure and the pulse readings are displayed alter-nately .* When you wish to stop measuring during operation, press the SPHYGICLOCK button . The pump will stop and all the cuff pressure will be released rapidly .* When the PRINT button is pressed while the results of the measurement are shown on the digital display, the results will be printed .3 . Measurement of the blood pressure is now complete . The results will remain displayed even after the cuff is taken off . If you wish to carry out repeated measurements, repeat the operation from Step 6 .* The arm gradually becomes congested when measurements are repeatedly taken . If you wish to take consecutive measurements, take off the cuff and wait at least 3 to 5 minutes between measurements .4 . When measurement is completed press the SPHYG/CLOCK button to return to the time display . If you should forget to press this button, the display will return to time display mode automatically after about 5 minutes .2 . Upon total cuff deflation, a series of beeps are emitted and the ( ♥ ) symbol is displayed .When Error Indication Symbols Appear The following special error symbols will appear in the display if the unit is being used incorrectly:ERROR SYMBOL CAUSE CORRECTION 1 . Cuff underinflated 1) Release air pressure in cuff 2)Wait 10 minutes before taking another reading .3)Repeat “Instructions for Use” steps except inflate cuff 30 mmHg higher than previous inflation value .2 . Movement during measurement Residual air pressure in cuff .1) Release air pressure in cuff 2) Wait 10 minutes before taking another reading .3) Repeat “Instructions for Use” stepsCuff overinflated (more than 300 mmHg) .No pulse or blood pressure reading due to:1) Motion 2) Very weak artery oscillationSpecificationsPower Source:Battery (four type “AA” dry cell batteries) 6V 4W Measurement Method:Oscillometric MethodDisplay:Liquid Crystal Digital Display Measurement Range:Pressure: 0 ~ 280mmHgPulse: 40 ~ 200/minuteAccuracy:Pressure: within ± 3 mmHgPulse: within ± 5% readingPressure Detection:Capacitive Pressure SensorInflation:Automatic Pressure Application by a Pump Deflation and Rapid Air Release:Automatic pressure release valve Automatic-shut-off System When the internal pressure in the unit continuesat less than 20mmHg for about 5 ~ 8 minutes, themode changes automatically to clock . Printer:Serial static impact printerOperating/Temperature, Humidity:+500F to +104°F (+100C to +40 0C) 30-85% RH StorageiTemperature, Humidity:-4°F to 140°F (-20°C to + 600C) 10-95% RH Dimensions (Approx .):Main Unit: 82/4” (w) X 51/8” (d) x 23/5” (h) (215x 130x 66 mm)Cuff: 51/2 “(w) x 184/5”(1) (140x 480 mm)Cuff Range:For arms 9” to 13” in circumference Weight:Main Unit: approx . 201/2 oz (580 g)includingbatteriesCuff: approx . 42/5 oz (125 g) Accessories:Cuff, instruction manual,Printing paper: 2 rollsOptional parts: AC Adaptor Specifications subject to change without notice .This equipment generates and used radio frequency energy and if not installed and used properly, that is, in strict accordance with the manufacturer’s instructions, may cause interference to radio and television reception . It has been type tested and found to comply with the limits for a Class B computing device in accordance with the specifications in Subpart J of Part 15 of FCC Rules, which are designed to provide reasonable protection against such interference in a residential installation . However, there is no guarantee that interference will not occur in a particular installation . If this equipment does cause interference to radio or television reception, which can be determined by turning the equipment off and on, the user is encouraged to try to correct the interference by one or more of the following measures:- reorient the receiving antenna- relocate the computer with respect to the receiver- move the computer away from the receiver- plug the computer into a different outlet so that computer and receiver are on different branch circuits .If necessary, the user should consult the dealer or an experienced radio/television technician for additional suggestions . The user may find the following booklet prepared by the Fedral Communications Commision helpful:“How to Identify and Resolve Radio-TV Interference Problems” . This booklet is available from the US Government Printing Office, Washington, D .C ., 20402, Stock No . 004-000-00345-4 .LICENSED UNDER U . S . PAT .4829419 .4942516 .4896260 .4531132 .4825364,4686622 .4121284 4396976 .4371923 .4471385 .4120583 .4435732,4672457 .4739396CUSTOMER SERVICE TOLL FREE: 1-800-634-4350Limited One Year WarrantyYOUR OMRON MODEL HEM-713C Digital Blood Pressure Monitor is warranted to be free from manufacturing defects for a period of one year under normal use . This warranty extends only to the original retail purchaser .Should repair be needed, within the warranty period, ship the unit and receipt as proof of purchase prepaid to OMRON HEALTHCARE, INC ., 300 Lakeview Parkway, Vernon Hills, Illinois 60061, together with $5 .00 for return shipping and insurance .We will either repair or at our option replace free of charge any parts necessary to correct defects in material or workmanship . The above warranty is complete ad exclusive . The warrantor expressly disclaims liability for incidental, special or consequential damages of any nature . (Some status do not allow the exclusion or limitation of incidental or consequential damages so the above limitation or exclusion may not apply to you .)Any implied warranties arising by operation of law shall be limited in duration to the term of this warranty . (Some states do not allow limitations on how long an implied warranty lasts, so the above limitation may not apply to you .)This warranty gives you specific legal rights, and you may have other rights which vary from state to state . As condition to operation of your warranty, the enclosed registration card must be completed and sent to us within 10 days from the date of purchase .Caution Changes or modifications not expressively approved by OMRON HEALTH CARE, INC . could void the user’s authority to operate this product .Note Potential For RadiofTelevision Interference (for U .S .A . only)This product has been tested and found to comply with the limits for a Class B digital device, pursuant to part 15 of the FCC rules .These limits are designed to provide reasonable protection against harmful interference in a residential installation . The product generates, uses and can radiate radio frequency energy and, if not installed and used in accordance with the instructions, may cause harmful interference to radio communications . However . there is no guarantee that interierence will not occur in a particular installation . If the product does cause harmful interference to radio or television reception, which can be determined by turning the product off and on, the user is encouraged to try to correct the interference by one or more of the following measures:• Reorient or relocate the receiving antenna .• Increase the separation between the product and receiver .• Connect the product into an outlet on a circuit different from that to which the receiver is connected .• Consult the dealer or an experienced radiofTV technician for help .Potential For RadiofTelevision Interference (for Canada only)This digital apparatus does not exceed the Class B limits for radio noise emissions from digital apparatus as set out in the interferencEH:ausing equipment standard entitled “Digital Apparatus”, ICES’{)03 of the Canadian Department of Communications .Cet appareil numerique respecte les limites de bruits radioelectriques applicables aux appareils numeriques de Classe B prescrites dans la norme sur Ie materiel brouilleur . “Appareils Numeriques”, NMB .{J03 ildictee par Ie ministre des communications .OMRON uses recycled paper to help preserve our natural recources .Distributed by OMRON HEALTHCARE,INC.300 Lakeview Parkway Vernon Hills, Illinois 600610692581-7 A。
瑞安康血压计说明书瑞安康血压计使用说明书一、产品概述瑞安康血压计是一款智能便携式血压测量仪器,采用非侵入式测量方法,可精确测量用户的血压值和脉搏频率。
该产品适用于高血压、低血压和心脑血管疾病患者的家庭日常血压监测,方便用户进行血压自测,提供重要参考依据。
二、产品结构瑞安康血压计由主机、臂带、显示屏、按钮和电池盒等组成。
1. 主机:负责控制仪器的各项功能和显示测量结果;2. 臂带:使用柔软的材料制成,缠绕在用户的上臂上,具有可调节尺寸的功能,以适应不同用户的臂围;3. 显示屏:用于显示血压和脉搏等数据以及其他重要信息;4. 按钮:用于用户选择菜单、设置和确认操作;5. 电池盒:用于存放电池,以供血压计正常工作。
三、使用方法1. 将电池装入电池盒,注意正负极的正确安装方向;2. 将臂带套入主机,并将臂带固定在用户的上臂上,保证臂带固定牢固且舒适;3. 打开电源开关,显示屏上将出现欢迎界面以及相应的操作提示;4. 如显示选项提示,请根据需要选择适当的选项;5. 如果是第一次使用,需要设置用户的个人信息,如姓名、性别、年龄等;6. 按下“开始”按钮,仪器开始充气,同时显示血压和脉搏等数据;7. 仪器充气至一定压力后,自动检测用户的血压和脉搏频率,并在显示屏上显示相应数值;8. 测量结束后,显示血压和脉搏数据,并提供相应的健康建议;9. 关闭电源开关,拆卸臂带,将血压计放置在干燥通风的地方。
四、注意事项1. 请在测量前保证用户身体处于放松状态,避免测量结果受到身体运动和情绪等因素的影响;2. 严格按照说明书操作,避免操作错误导致的不准确测量结果;3. 使用过程中请注意观察身体反应,如出现异常情况应及时停止使用并咨询医生;4. 定期检查电池的电量,确保血压计正常使用;5. 定期进行校准,以保证测量结果的准确性;6. 请注意血压计的清洁和维护,避免测量结果受到污垢和灰尘等因素的影响。
五、常见问答Q: 使用血压计是不是可以替代医院测量?A: 血压计的测量结果可以作为参考,但不能完全替代医院的测量结果,建议用户适时到医院进行专业测量。
血压计的使用操作流程及保养下载温馨提示:该文档是我店铺精心编制而成,希望大家下载以后,能够帮助大家解决实际的问题。
文档下载后可定制随意修改,请根据实际需要进行相应的调整和使用,谢谢!并且,本店铺为大家提供各种各样类型的实用资料,如教育随笔、日记赏析、句子摘抄、古诗大全、经典美文、话题作文、工作总结、词语解析、文案摘录、其他资料等等,如想了解不同资料格式和写法,敬请关注!Download tips: This document is carefully compiled by theeditor. I hope that after you download them,they can help yousolve practical problems. The document can be customized andmodified after downloading,please adjust and use it according toactual needs, thank you!In addition, our shop provides you with various types ofpractical materials,such as educational essays, diaryappreciation,sentence excerpts,ancient poems,classic articles,topic composition,work summary,word parsing,copy excerpts,other materials and so on,want to know different data formats andwriting methods,please pay attention!血压计的使用操作流程。
1. 检查设备,取出血压计,检查仪器和袖带是否完好无损,确保仪器正常工作。
臂式全自动电子血压计使用说明书●感谢您购买本公司产品。
●使用之前请您务必仔细阅读本使用说明书。
●请您务必妥善保管本使用说明书。
目录(一) 规格(二) 安全注意事项(三) 各部名称(四) 使用方法(五) 测量(六) 其它(七) 异常状态之检定(八) 注意事项(一) 规 格品 名臂式全自动电子血压计 型 号FT-A11-2 显 示 方 式数字式液晶显示 测 量 方 式示波法检测方式 测 量 范 围压 力:(20mmHg ~300mmHg) 脉搏数:(30~160)次/分 准 确 度压 力:(±5mmHg) 脉搏数:±5%以内 电 源DC6V (2A)4节 正常工作环境温 度 5℃~40℃ 湿 度 ≤80%RH 贮存运输环境温 度 -20℃~55℃ 湿 度 10%RH ~93%RH 可测量的手臂周长约200mm ~195mm 重 量355克(含臂带,电池除外) 外形尺寸(主机)长135mm ×高93mm ×厚60mm 安全分类内部电源B 型 加压方式振动片式泵的加压调整方式 快速排气方式急速排气阀开放方式 压力检测半导体压力传感器 脉博检测 半导体压力传感器 ※ 本型号电子血压计不可用于幼儿。
(二) 安全注意事项※使用之前,请仔细阅读本“安全注意事项”,以便正确使用。
注 意一、自己判断测量结果而进行治疗十分危险。
1.请将测量结果交给了解您健康状况的医生并接受诊断。
2.如果服用药剂请遵医嘱。
3.对于那些因某些疾病引起的末梢循环障碍者,在手腕和上臂部测量的血压值可能会出现较大差异。
二、请勿用于血压测量以外的用途。
否则,将有可能引起事故或发生故障。
三、请勿私自进行拆卸、修理和改造。
否则将有可能发生事故和故障。
禁 止(三) 各 部 名 称(四) 使 用 方 法一、装入电池※请务必使用碱性电池1将主机翻过来,按箭头所指方向卸下电池盖。
2确认电池的极后,装入(AAA)号碱性电池4节。
无创自动测量电子血压计计量检定分析及探讨作者:***来源:《品牌与标准化》2024年第01期【摘要】文章依据JJG 692—2010《无创自动测量血压计检定规程》并结合工作经验,分析了电子血压计的外观、静态压力、示值重复性等检定项目,重点讨论了静态压力的测量方法,并对其结果进行了不确定度评定。
【关键词】电子血压计;静态压力;不确定评定【DOI编码】10.3969/j.issn.1674-4977.2024.01.069Analysis and Discussion on Metrological Verification Items of Non-invasive Automatic Measurement Electronic SphygmomanometerCHEN Shurong(Beijing Xicheng Institute of Metrology, Beijing 100055, China)Abstract: Based on JJG 692—2010 Non-invasive Automated Sphygmomanometers and daily work experience, the article analyzes the verification items of electronic blood pressure meters,such as appearance, static pressure, and repeatability of indication. The focus is on discussing the measurement method of static pressure, and evaluating the uncertainty of the results.Keywords: digital electronic sphygmomanometer; static pressur; uncertainty evaluation目前,用于醫疗卫生的电子血压计已经被列入《实施强制管理的计量器具目录》中。
电子行业电子血压计使用说明书1. 产品概述本产品是一款电子血压计设备,用于测量人体的血压值。
它采用了先进的电子技术,具有精确、便捷、易于使用等优点。
本说明书将介绍该电子血压计的功能特点、使用方法、注意事项等内容,以帮助用户正确、安全地使用该设备。
2. 功能特点•高精度测量:本电子血压计采用先进的传感技术,能够测量出准确的血压值。
•易于操作:设备配备了直观的操作界面和简单的按键,用户可以轻松完成血压测量。
•多项测量参数:除了血压值外,该血压计还能测量心率、脉搏波等相关参数。
•数据存储与分享:该设备内置存储功能,可以存储测量数据。
用户还可以将数据通过无线方式传输到手机或电脑,并与医生或亲友分享。
3. 使用方法3.1 准备工作在使用电子血压计之前,需要先进行以下准备工作:1.打开设备开关:将电源开关打开,确保设备处于工作状态。
2.绑定测量袖带:将血压计的测量袖带绑在待测测量部位,确保袖带紧贴皮肤且不松动。
3.2 开始测量1.坐姿测量:坐在椅子上,保持身体放松,将袖带绑在上臂处。
2.手腕测量:将袖带绑在手腕处,手臂自然放松。
3.按下测量键:按下设备上的测量键,等待血压计完成测量。
4.完成测量:设备在测量完成后会显示测量结果,包括血压值、心率等相关参数。
4. 注意事项•在测量前,确保血压计和测量袖带处于正常工作状态。
•使用本设备时,请根据实际需要选择坐姿或手腕测量方式。
•在测量过程中,保持身体放松,避免用力或移动手臂。
•测量完成后,注意将袖带和设备进行清洁和消毒,以保证卫生安全。
•请定期校准本设备,以确保测量结果的准确性。
5. 故障排除以下是一些可能出现的故障及解决方法:故障现象可能原因解决方法设备无法开电池电更换电池机量不足测量结果不准确袖带位置不正确重新调整袖带的位置,保证紧贴皮肤设备无法连接到手机或电脑无线连接异常检查无线连接设置,确认设备与手机或电脑在同一网络环境下如有其他故障或疑问,请咨询本产品的售后服务中心。